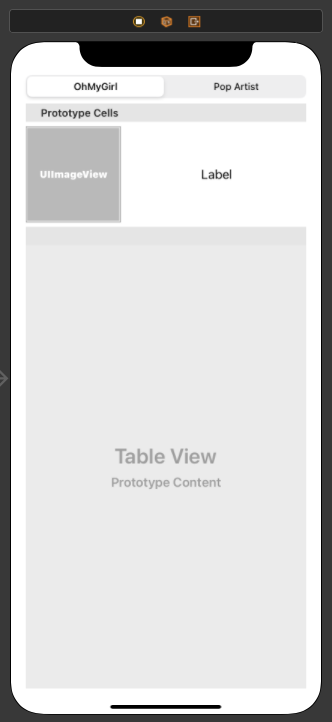
목표는 SegmentedControl의 선택에 따라 하나의 TableView에서 다른 데이터를 보여주는 것입니다. 먼저 아래처럼 SegmentedControl과 TableView를 추가하고 layout을 설정한 상태입니다. TableView 구현과 관련한 글을 보시고 싶으시다면 이미지 아래에 링크를 통해 확인하실 수 있습니다.
UITableView with Storyboard Practice
https://velog.io/@panther222128/UITableView
UITableView with XIB Practice
https://velog.io/@panther222128/UITableView-with-XIB-Practice
UITableView Programmatically Practice
https://velog.io/@panther222128/UITableView-Programmatically-Practice
아래처럼 새로운 파일을 만들어 CustomTableView를 만들어줬지만, 특별하게 수정할 내용은 없어 코드는 비어있습니다. TableView가 이 클래스를 따르게 했습니다. 뒤에 나오는 ViewController에서 확인이 가능합니다.
class CustomTable View: UITableView {
}
그리고 TableViewCell을 만듭니다. ImageView와 Label을 하나씩 갖고 있습니다. configure 메소드는 ViewController에서 불러와 값을 넣어주는 메소드입니다.
class CustomTableViewCell: UITableViewCell {

    @IBOutlet weak var customImageView: UIImageView!
    @IBOutlet weak var customLabel: UILabel!

    func configure(name: String, imageName: String) {
        customLabel.text = name
        customImageView.image = UIImage(named: imageName)
    }

}
예시로 활용할 데이터입니다.
struct OhMyGirl {

    let name: String
    let imageFileName: String

}

struct OhMyGirlData {

    var member: [OhMyGirl]

    init() {
        self.member = []
        memberInit()
    }

    private mutating func memberInit() {
        member.append(OhMyGirl(name: "효정", imageFileName: "효정.jpg"))
        member.append(OhMyGirl(name: "미미", imageFileName: "미미.jpg"))
        member.append(OhMyGirl(name: "유아", imageFileName: "유아.jpg"))
        member.append(OhMyGirl(name: "승희", imageFileName: "승희.jpg"))
        member.append(OhMyGirl(name: "지호", imageFileName: "지호.jpg"))
        member.append(OhMyGirl(name: "비니", imageFileName: "비니.jpg"))
        member.append(OhMyGirl(name: "아린", imageFileName: "아린.jpg"))
    }

}
struct Artist {
let name: String
}
struct ArtistData {
var member: [Artist]
init() {
self.member = []
memberInit()
}
private mutating func memberInit() {
member.append(Artist(name: "Eric Clapton"))
member.append(Artist(name: "Mac Miller"))
member.append(Artist(name: "Simon"))
member.append(Artist(name: "Garfunkel"))
member.append(Artist(name: "Datf Punk"))
member.append(Artist(name: "a-ha"))
member.append(Artist(name: "Fleetwood Mac"))
member.append(Artist(name: "Billie Eilish"))
member.append(Artist(name: "Musiq Soulchild"))
member.append(Artist(name: "Keane"))
member.append(Artist(name: "Amy Winehouse"))
member.append(Artist(name: "Childish Gambino"))
member.append(Artist(name: "Mac DeMarco"))
member.append(Artist(name: "Lana Del Rey"))
}
}ViewController의 코드입니다. segmentedControl을 갖고 있고 CustomTableView 타입을 따르는 customTableView도 갖고 있습니다. segmentedControlSelected를 살펴보면 segmentedControl의 첫 번째가 입력되었을 때와 두 번째가 입력되었을 때 모두 customTableView.reloadData()를 실행합니다.
func tableView(_ tableView: UITableView, numberOfRowsInSection section: Int) -> Int를 살펴보면 segmentedControl의 입력마다 TableView가 보여주려는 row의 개수를 바꿔주고 있습니다.
func tableView(_ tableView: UITableView, cellForRowAt indexPath: IndexPath) -> UITableViewCell는 보여주려는 데이터를 바꿔줍니다.
class ViewController: UIViewController {
@IBOutlet weak var segmentedControl: UISegmentedControl!
@IBOutlet weak var customTableView: CustomTableView!
private let ohMyGirlData = OhMyGirlData()
private let artistData = ArtistData()
override func viewDidLoad() {
super.viewDidLoad()
tableViewDelegate()
}
private func tableViewDelegate() {
customTableView.delegate = self
customTableView.dataSource = self
}
@IBAction func segmentedControlSelected(sender: AnyObject) {
switch(segmentedControl.selectedSegmentIndex) {
case 0:
customTableView.reloadData()
break
case 1:
customTableView.reloadData()
break
default:
break
}
}
}
extension ViewController: UITableViewDelegate, UITableViewDataSource {
func tableView(_ tableView: UITableView, numberOfRowsInSection section: Int) -> Int {
switch segmentedControl.selectedSegmentIndex {
case 0:
return ohMyGirlData.member.count
case 1:
return artistData.member.count
default: break
}
return 0
}
func tableView(_ tableView: UITableView, cellForRowAt indexPath: IndexPath) -> UITableViewCell {
guard let ohMyGirlCell = tableView.dequeueReusableCell(withIdentifier: "CustomCell") as? CustomTableViewCell else { return UITableViewCell() }
guard let artistCell = tableView.dequeueReusableCell(withIdentifier: "CustomCell") as? CustomTableViewCell else { return UITableViewCell() }
switch segmentedControl.selectedSegmentIndex {
case 0:
ohMyGirlCell.configure(name: ohMyGirlData.member[indexPath.row].name, imageName: ohMyGirlData.member[indexPath.row].imageFileName)
return ohMyGirlCell
case 1:
artistCell.configure(name: artistData.member[indexPath.row].name, imageName: "")
return artistCell
default: break
}
return ohMyGirlCell
}
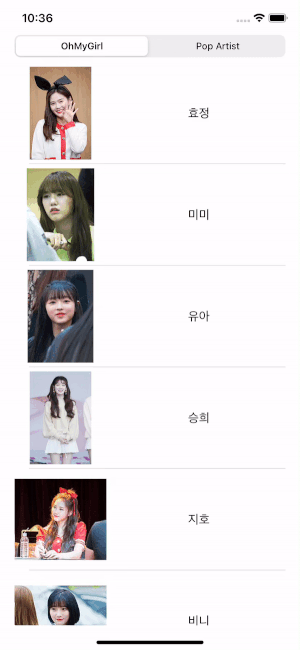
}실행 결과는 아래와 같습니다.