이 글은 Peter Shirley의 Ray Tracing in One Weekend를 번역한 것입니다.
Ray Tracing in One Weekend를 공부하면서 다시 한번 복습하는 느낌으로 번역을 해보려고 합니다. 영어가 서툴러 번역이 잘못되었을 수도 있으므로 잘못된 부분을 발견하신다면 지적해 주시면 감사하겠습니다.
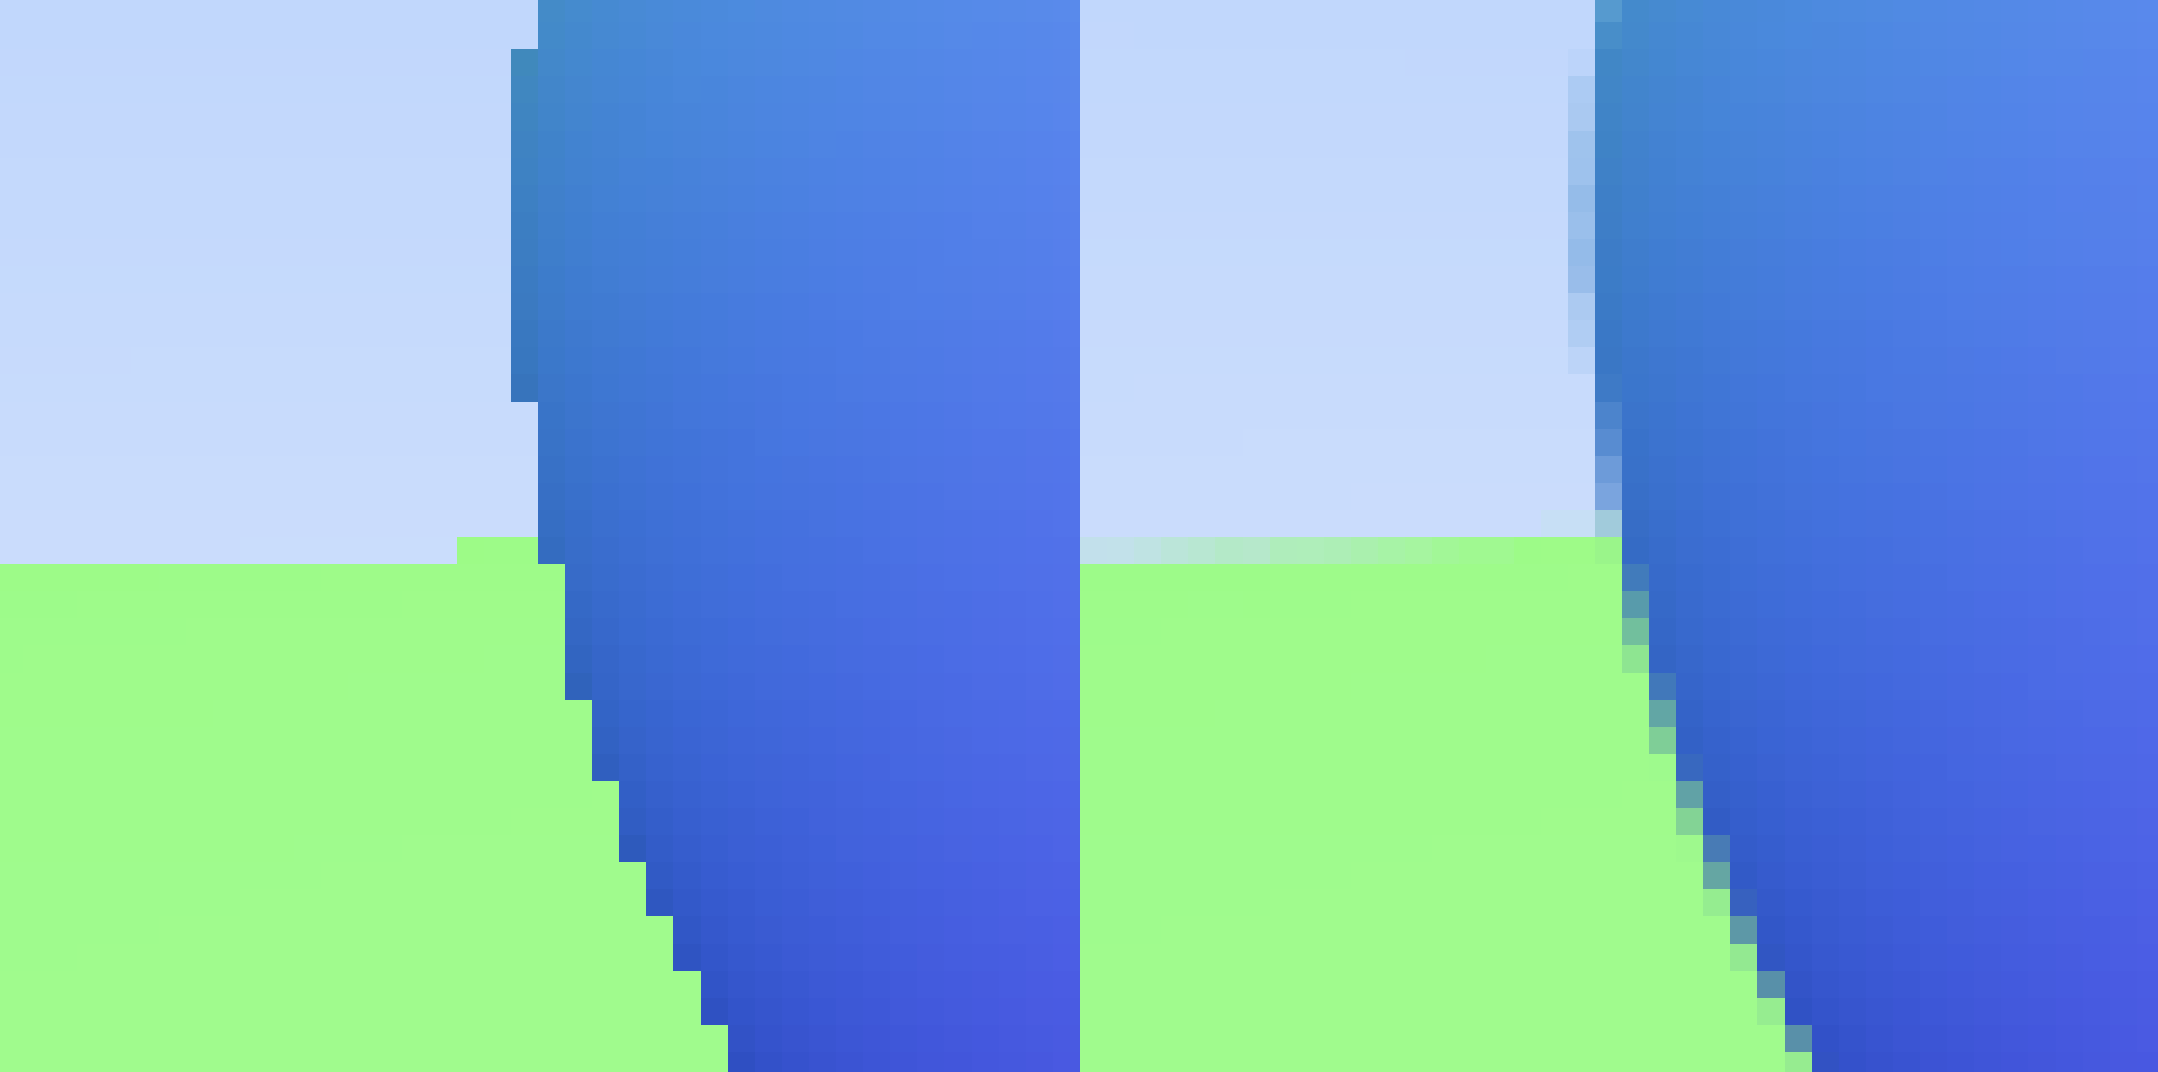
실제 카메라로 사진을 찍으면 가장자리에서 계단현상(jaggies)이 대개 발생하지 않습니다. 가장자리 픽셀에서 앞쪽과 뒤쪽의 색상이 혼합되기 때문입니다. 각 픽셀 내부의 샘플들의 평균을 활용하여 같은 효과를 구현할 수 있습니다. 계층화(stratification)는 신경 쓰지 않을 것입니다. 이것은 논란의 여지가 있지만 우리의 프로그램에서는 일반적입니다. 일부 레이 트레이서에서는 매우 중요하지만, 우리가 만드는 일반적인 레이 트레이서에서는 그다지 이점이 없으며 코드가 더 나빠집니다. 카메라 클래스를 약간 추상화할 것입니다. 그러면 나중에 더 멋진 카메라를 만들 수 있습니다.
7.1 Some Random Number Utilities
필요한 한 가지는 실수 난수(real random numbers)를 리턴하는 난수발생기(random number generator)입니다. 컨벤션에 따른 0 ≤ 𝑟 < 1 범위의 실수 난수인 표준 난수(canonical random number)를 리턴하는 함수가 필요합니다. 범위에서 1이 포함되지 않음(𝑟 < 1)은 때때로 유용하게 활용할 수 있으므로 중요합니다.
간단한 방법은 <cstdlib>에 있는 rand() 함수를 사용하는 것입니다. rand() 함수는 0부터 RAND_MAX 사이 범위의 랜덤 정수를 리턴하는 함수입니다. 그러므로 rtweekend.h에 추가된 다음의 코드 스니펫을 사용하여 원하는 실수 난수를 얻을 수 있습니다.
#include <cstdlib>
...

inline double random_double() {
  // Returns a random real in [0, 1).
  return rand() / (RAND_MAX + 1.0);
}

inline double random_double(double min, double max) {
  // Returns a random real in [min, max).
  return min + (max - min) * random_double();
}
Listing 25: [rtweekend.h] random_double() functions
C++에는 전통적으로 표준 난수발생기가 없었습니다. 하지만 새로운 C++ 버전에서는 헤더로 이 문제를 해결(일부 전문가에 따르면 불완전하게)했습니다. 만약 이 방식을 원하신다면, 다음 조건으로 난수를 얻을 수 있습니다.
#include <random>

inline double random_double() {
  static std::uniform_real_distribution<double> distribution(0.0, 1.0);
  static std::mt19937 generator;
  return distribution(generator);
}
Listing 26: [rtweekend.h] random_double(), alternate implementation
7.2 Generating Pixels with Multiple Samples
주어진 픽셀 안에서 몇 개의 샘플을 얻을 수 있고, 광선이 각 샘플들을 통과하도록 보냅니다. 그다음 이 광선들의 색상 평균을 구합니다.
![]()
Figure 7: Pixel samples
이제 가상 카메라와 장면 샘플링 관련 작업을 관리하는 camera 클래스를 만들기 적절한 때가 되었습니다. 다음 클래스는 기존의 축 정렬 카메라를 사용하는 간단한 카메라를 구현합니다.
#ifndef CAMERA_H
#define CAMERA_H

#include "rtweekend.h"

class camera {
public:
  camera() {
    auto aspect_ratio = 16.0 / 9.0;
    auto viewport_height = 2.0;
    auto viewport_width = aspect_ratio * viewport_height;
    auto focal_length = 1.0;

    origin = point3(0, 0, 0);
    horizontal = vec3(viewport_width, 0.0, 0.0);
    vertical = vec3(0.0, viewport_height, 0.0);
    lower_left_corner = origin - horizontal / 2 - vertical /2
      - vec3(0, 0, focal_length);
  }

  ray get_ray(double u, double v) const {
    return ray(origin, lower_left_corner + u * horizontal + v * vertical
        - origin);
  }

private:
  point3 origin;
  point3 lower_left_corner;
  vec3 horizontal;
  vec3 vertical;
};

#endif
Listing 27: [camera.h] The camera class
멀티 샘플링된 색상을 계산하기 위해서, write_color() 함수를 업데이트할 것입니다. Rather than adding in a fractional contribution each time we accumulate more light to the color, just add the full color each iteration, and then perform a single divide at the end (by the number of samples) when writing out the color. 편리한 유틸리티 함수인 clamp(x, min, max) 함수를 rtweekend.h 유틸리티 헤더에 추가합니다: 값 x를 [min, max] 범위에 고정시키는 clamp(x, min, max) 함수
inline double clamp(double x, double min, double max) {
  if (x < min) return min;
  if (x > max) return max;
  return x;
}
Listing 28: [rtweekend.h] The clamp() utility function
void write_color(std::ostream &out, color pixel_color, int samples_per_pixel) {
  auto r = pixel_color.x();
  auto g = pixel_color.y();
  auto b = pixel_color.z();

  // Divide the color by the number of samples.
  auto scale = 1.0 / samples_per_pixel;
  r *= scale;
  g *= scale;
  b *= scale;

// Write the translated [0, 255] value of each color component.
out << static_cast<int>(256 * clamp(r, 0.0, 0.999)) << ' '
  << static_cast<int>(256 * clamp(g, 0.0, 0.999)) << ' '
  << static_cast<int>(256 * clamp(b, 0.0, 0.999)) << '\n';
}
Listing 29: [color.h] The multi-sample write_color() function
main도 다음과 같이 변경됩니다:
/* ************* 추가 ************ */
#include "camera.h"
/* ******************************* */

...

int main() {

  // Image
  const auto aspect_ratio = 16.0 / 9.0;
  const int image_width = 400;
  const int image_height = static_cast<int>(image_width / aspect_ratio);
/* ************* 추가 ************ */
  const int samples_per_pixel = 100;
/* ******************************* */

  // World
  hittable_list world;
  world.add(make_shared<sphere>(point3(0, 0, -1), 0.5));
  world.add(make_shared<sphere>(point3(0, -100.5, -1), 100));

  // Camera
/* ************* 수정 ************ */
  camera cam;
/* ******************************* */

  // Render

  std::cout << "P3\n" << image_width << ' ' << image_height << "\n255\n";

  for (int j = image_height - 1; j >= 0; --j) {
    std::cerr << "\rScanlines remaining: " << j << ' ' << std::flush;
    for (int i = 0; i < image_width; ++i) {
/* ************* 수정 ************ */
      color pixel_color(0, 0, 0);
      for (int s = 0; s < samples_per_pixel; ++s) {
        auto u = (i + random_double()) / (image_width - 1);
        auto v = (j + random_double()) / (image_height - 1);
        ray r = cam.get_ray(u, v);
        pixel_color += ray_color(r, world);
      }
      write_color(std::cout, pixel_color, samples_per_pixel);
/* ******************************* */
    }
  }

  std::cerr << "\nDone.\n";
}
Listing 30: [main.cc] Rendering with multi-sampled pixels
생성된 이미지를 확대해보면, 가장자리 픽셀에서 차이를 확인할 수 있습니다.

Image 6: Before and after antialiasing
출처
Ray Tracing in One Weekend - Peter Shirley
https://raytracing.github.io/books/RayTracingInOneWeekend.html#antialiasing