[Ray Tracing in One Weekend 번역] 6. Surface Normals and Multiple Objects
Ray Tracing in One Weekend 번역
이 글은 Peter Shirley의 Ray Tracing in One Weekend를 번역한 것입니다.
Ray Tracing in One Weekend를 공부하면서 다시 한번 복습하는 느낌으로 번역을 해보려고 합니다. 영어가 서툴러 번역이 잘못되었을 수도 있으므로 잘못된 부분을 발견하신다면 지적해 주시면 감사하겠습니다.
6.1 Shading with Surface Normals
먼저 음영 표현을 위해 표면 법선 벡터를 계산합니다. 이 벡터는 교차점에서 구의 표면에 대하여 수직인 벡터입니다. 법선 벡터를 만들기 위한 두 가지 설계 결정사항이 있습니다. 한 가지는 법선 벡터의 크기가 단위 길이인지 여부입니다. 법선 벡터의 크기가 단위 길이라면 음영을 처리하기에 편리합니다. 그러므로 저는 법선 벡터의 크기를 단위 길이로 하겠습니다. 하지만 반드시 저와 같이 하실 필요는 없습니다.
이렇게 하면 약간의 버그가 발생할 수 있지만, 이것은 대부분의 설계 결정사항들과 마찬가지로 개인적인 선호도 차이임을 인지하시기 바랍니다. 구의 바깥으로 향하는 법선 벡터는 교차점에서 구의 중점을 뺀 벡터의 방향과 같습니다:

Figure 5: Sphere surface-normal geometry
지구를 예로 들면, 지구 중심에서 여러분까지의 벡터는 여러분 위치에서 정확히 위쪽 방향을 가리킨다는 것을 의미합니다. 이제 코드로 작성하여 음영을 표현해봅시다. 아직 조명이나 어떤 것도 존재하지 않습니다. 그러므로 컬러 매핑을 활용하여 법선 벡터를 시각화하겠습니다. 법선 벡터를 시각화하는 일반적인 트릭은 법선 벡터의 각 성분을 0에서 1의 범위로 매핑한 다음, 매핑된 법선 벡터의 성분 x/y/z를 r/g/b로 다시 매핑하는 것입니다. (n(법선 벡터)이 단위 길이 벡터라고 가정하는 것이 쉽고 직관적이기 때문입니다. 그러므로 단위 길이 법선 벡터의 각 성분은 -1 ~ 1사이의 값입니다.) 법선 벡터를 구하기 위해서는 단지 교차하는지가 아닌 교차점이 필요합니다. 가장 가까운 교차점을 구해봅시다(가장 작은 𝑡). 다음과 같이 코드를 수정하면 𝐧(법선 벡터)를 계산하고 시각화할 수 있습니다.
/* ************* 수정 ************ */
double hit_sphere(const point3& center, double radius, const ray& r) {
/* ******************************* */
  vec3 oc = r.origin() - center;
  auto a = dot(r.direction(), r.direction());
  auto b = 2.0 * dot(oc, r.direction());
  auto c = dot(oc, oc) - radius * radius;
  auto discriminant = b * b - 4 * a * c;
/* ************* 수정 ************ */
  if (discriminant < 0) {
    return -1.0;
  } else {
    return (-b - sqrt(discriminant)) / (2.0 * a);
  }
/* ******************************* */
}

color ray_color(const ray& r) {
/* ************* 수정 ************ */
  auto t = hit_sphere(point3(0, 0, -1), 0.5, r);
  if (t > 0.0) {
    // 법선 벡터 N을 단위 길이 벡터로 생성
    vec3 N = unit_vector(r.at(t) - vec3(0, 0, -1));
    // 법선 벡터 N의 각 구성요소들을 -1 ~ 1 범위에서 0 ~ 1 범위로 매핑
    return 0.5 * color(N.x() + 1, N.y() + 1, N.z() + 1);
  }
/* ******************************* */
  vec3 unit_direction = unit_vector(r.direction());
/* ************* 수정 ************ */
  t = 0.5 * (unit_direction.y() + 1.0);
/* ******************************* */
  return (1.0 - t) * color(1.0, 1.0, 1.0) + t * color(0.5, 0.7, 1.0);
}
Listing 11: [main.cc] Rendering surface normals on a sphere
다음과 같은 결과를 얻을 수 있습니다.

Image 4: A sphere colored according to its normal vectors
6.2 Simplifying the Ray-Sphere Intersection Code
광선-구 방정식을 다시 한 번 봅시다.
double hit_sphere(const point3& center, double radius, const ray& r) {
  vec3 oc = r.origin() - center;
  auto a = dot(r.direction(), r.direction());
  auto b = 2.0 * dot(oc, r.direction());
  auto c = dot(oc, oc) - radius * radius;
  auto discriminant = b * b - 4 * a * c;
  if (discriminant < 0) {
    return -1.0;
  } else {
    return (-b - sqrt(discriminant)) / (2.0 * a);
  }
}
Listing 12: [main.cc] Ray-sphere intersection code(before)
첫째, 동일한 두 벡터끼리의 내적은 해당 벡터 크기의 제곱과 같다는 것을 알고 있습니다.
둘째, 방정식의 b가 짝수인지에 대해 주목합니다. 만약 b = 2h라면 이차방정식이 어떻게 변하는지 생각해봅시다:

이 성질을 이용하여 구-교차 코드를 다음과 같이 간단하게 작성할 수 있습니다.
double hit_sphere(const point3& center, double radius, const ray& r) {
  vec3 oc = r.origin() - center;
/* ************* 수정 ************ */
  auto a = r.direction().length_squared();
  auto half_b = dot(oc, r.direction());
  auto c = oc.length_squared() - radius * radius;
  auto discriminant = half_b * half_b - a * c;
/* ******************************* */

  if (discriminant < 0) {
    return -1.0;
  } else {
/* ************* 수정 ************ */
    return (-half_b - sqrt(discriminant)) / a;
/* ******************************* */
  }
}
Listing 13: [main.cc] Ray-sphere intersection code(after)
6.3 An Abstraction for Hittable Objects
이제, 여러 개의 구를 다루어볼까요? 구의 배열을 만들고 싶은 유혹이 생기지만, 정말 깔끔한 해답은 광선이 교차할 수 있는 모든 것에 대한 "추상 클래스(abstract class)"를 만드는 것입니다. 그리고 광선이 구와 구의 리스트를 교차할 수 있도록 만듭니다. 이 클래스의 이름을 짓는 일은 난감한 작업입니다 - "객체지향(object oriented)"프로그래밍이 아니라면 클래스 이름을 "object"라고 하는 것이 좋습니다. "Surface"는 클래스 이름으로 자주 사용되지만 부피를 나타내고 싶을 경우에는 적절한 클래스 이름이 아닙니다. "hittable"라는 클래스 이름은 클래스의 멤버 함수를 강조합니다. 저는 이 클래스 이름 중 어떤 것도 마음에 들지 않지만, 클래스 이름으로 "hittable"을 사용하겠습니다.
hittable 추상 클래스는 광선을 매개변수로 받는 hit 멤버 함수를 가집니다. 대부분의 레이 트레이서는 t𝑚𝑖𝑛에서 t𝑚𝑎𝑥까지의 교차 유효 범위를 설정하는 것이 편리하다는 것을 발견했고, 그래서 t𝑚𝑖𝑛 < t < t𝑚𝑎𝑥 범위에서만 교차를 "계산"합니다. 처음 광선은 양수 t이지만, 보다시피 t𝑚𝑖𝑛에서 t𝑚𝑎𝑥의 범위는 설정하는 것은 코드 상의 세부적인 부분에 도움이 됩니다. 한 가지 설계적 문제는 광선이 어떤 것과 교차할 때, 법선 벡터를 계산할지 여부입니다. 더 가까운 점에서 교차할 것입니다. 그러므로 가장 가까운 점의 법선 벡터만 필요합니다. 여기서는 데이터들을 덩어리로 묶어 처리하는 방식인 구조체를 사용하여 계산할 것입니다. 아래에 추상화 클래스가 있습니다:
❗광선이 구에 교차할 때, 광선이 구를 관통하여 교차점이 두 개라면 광선의 원점에 더 가까운 교차점을 우선적으로 처리하여 법선 벡터를 구한다는 내용인 것 같습니다.
#ifndef HITTABLE_H
#define HITTABLE_H

#include "ray.h"

struct hit_record {
  point3 p;
  vec3 normal;
  double t;
};

class hittable {
public:
  virtual bool hit(
    const ray& r, double t_min, double t_max, hit_record& rec) const = 0;
};

#endif
Listing 14: [hittable.h] The hittable class
구에 대한 코드입니다.
#ifndef SPHERE_H
#define SPHERE_H

#include "hittable.h"
#include "vec3.h"

class sphere : public hittable {
public:
  sphere() {}
  sphere(point3 cen, double r) : center(cen), radius(r) {};

  virtual bool hit(
    const ray& r, double tmin, double tmax, hit_record& rec) const override;

public:
  point3 center;
  double radius;
};

bool sphere::hit(const ray& r, double t_min, double t_max, hit_record& rec) const {
  vec3 oc = r.origin() - center;
  auto a = r.direction().length_squared();
  auto half_b = dot(oc, r.direction());
  auto c = oc.length_squared() - radius * radius;

  auto discriminant = half_b * half_b - a * c;
  if (discriminant < 0) return false;
  auto sqrtd = sqrt(discriminant);

  // Find the nearest root that lies in the acceptable range.
  auto root = (-half_b - sqrtd) / a;
  if (root < t_min || t_max < root) {
    root = (-half_b + sqrtd) / a;
    if (root < t_min || t_max < root)
      return false;
  }

  rec.t = root;
  rec.p = r.at(rec.t);
  rec.normal = (rec.p - center) / radius;

  return true;
}

#endif
Listing 15: [sphere.h] The sphere class
6.4 Front Faces Versus Back Faces
법선 벡터에 대한 두 번째 설계 결정사항은 법선 벡터가 항상 구의 바깥 방향을 가리키는지입니다. 현재까지 살펴본 법선 벡터는 항상 구의 중심에서 교차점으로 향하는 바깥 방향의 법선 벡터입니다. 광선이 구의 바깥에서 안으로 들어오면서 교차하는 경우, 법선 벡터(바깥 방향)는 광선의 방향과 반대입니다. 광선이 구의 안에서 밖으로 나가면서 교차하는 경우, 법선 벡터(바깥 방향)는 광선의 방향과 같은 방향입니다. 아니면 다른 관점으로, 법선 벡터는 항상 광선의 반대 방향을 가리킨다고 생각할 수도 있습니다. 광선이 구의 바깥에서 안으로 들어오면서 교차한다면 법선 벡터는 바깥 방향을 가리킵니다. 하지만 만약 광선이 구 안에서 밖으로 나가면서 교차한다면 법선 벡터는 안쪽 방향을 가리킵니다.

Figure 6: Possible directions for sphere surface-normal geometry
결국 광선이 구 표면의 어느 방향에서 오는지 판별해야 하기 때문에 위의 설계 결정사항 중 한 가지를 선택할 필요가 있습니다. 이것은 양면 종이의 텍스트처럼 각 면에 다르게 렌더링 되는 물체 또는 유리 공처럼 안쪽과 바깥쪽이 모두 존재하는 물체에 중요합니다.
법선 벡터가 항상 바깥을 가리키도록 결정했다면, 색을 칠하기 위해 광선이 어느 쪽에 있는지 판별해야 합니다. 이것은 광선과 법선 벡터의 비교를 통해 알아낼 수 있습니다. 광선과 법선 벡터가 같은 방향이라면 광선은 물체 안쪽에 있습니다. 만약 광선과 법선 벡터가 반대 방향이라면 광선은 물체 바깥쪽에 있습니다. 이것은 두 벡터의 내적을 통해 구할 수 있습니다. 두 벡터의 내적이 양수라면 광선은 구의 안쪽에 있습니다.
if (dot(ray_direction, outward_normal) > 0.0) {
  // 광선이 구의 안쪽에 있습니다.
  ...
} else {
  // 광선이 구의 바깥쪽에 있습니다.
  ...
}
Listing 16: Comparing the ray and the normal
법선 벡터가 항상 광선의 반대 방향을 가리키도록 한다면, 내적 연산으로 광선이 어느 방향에서 오는지 판별할 수 없습니다. 대신, 다음 정보를 저장해야합니다.
if (dot(ray_direction, outward_normal) > 0.0) {
  // 광선이 구의 안쪽에 있습니다.
  normal = -outward_normal;
  front_face = false;
} else {
  // 광선이 구의 바깥쪽에 있습니다.
  normal = outward_normal;
  front_face = true;
}
Listing 17: Remembering the side of the surface
법선 벡터는 항상 표면의 바깥쪽을 향하거나 항상 광선의 반대 방향을 향하도록 설정할 수 있습니다. 지오메트리 교차나 색상을 칠할 시에 표면의 안팎을 정할지에 따라 결정됩니다. 이 책에서는 지오메트리(geometry) 타입보다 더 많은 메테리얼(material) 타입을 가지고 있습니다. 그래서 적은 작업을 하고 지오메트리 작업 시점에서 결정을 할 것입니다. 이것은 단순히 선호도의 문제입니다. 두 가지 구현을 모두 발견할 수 있습니다.
hit_record 구조체에 bool형 front_face 변수를 추가합니다. 또한 표면의 안팎과 법선 벡터를 계산하는 함수도 추가합니다.
struct hit_record {
  point3 p;
  vec3 normal;
  double t;
/* ************* 추가 ************ */
  bool front_face;

  inline void set_face_normal(const ray& r, const vec3& outward_normal) {
    front_face = dot(r.direction(), outward_normal) < 0;
    normal = front_face ? outward_normal : -outward_normal;
  }
/* ******************************* */
};
Listing 18: [hittable.h] Adding front-face tracking to hit_record
그 다음, 표면의 안팎을 판별하는 기능을 클래스에 추가합니다.
bool sphere::hit(const ray& r, double t_min, double t_max, hit_record& rec) const {
  ...

  rec.t = root;
  rec.p = r.at(rec.t);
/* ************* 추가 ************ */
  vec3 outward_normal = (rec.p - center) / radius;
  rec.set_face_normal(r, outward_normal);
/* ******************************* */

  return true;
}
Listing 19: [sphere.h] The sphere class with normal determination
6.5 A List of Hittable Objects
광선이 교차할 수 있는 일반적인 객체인 hittable를 가지고 있습니다. 이제 hittable의 리스트를 저장하는 클래스를 추가할 것입니다.
#ifndef HITTABLE_LIST_H
#define HITTABLE_LIST_H

#include "hittable.h"

#include <memory>
#include <vector>

using std::shared_ptr;
using std::make_shared;

class hittable_list : public hittable {
public:
  hittable_list() {}
  hittable_list(share_ptr<hittable> object) { add(object); }

  void clear() { objects.clear(); }
  void add(shared_ptr<hittable> object) { objects.push_back(object); }

  virtual bool hit(
    const ray& r, double tmin, double tmax, hit_record& rec) const override;

public:
  std::vector<shared_ptr<hittable>> objects;
};

bool hittable_list::hit(const ray& r, double t_min, double t_max, hit_record& rec) const {
  hit_record temp_rec;
  bool hit_anything = false;
  auto closest_so_far = t_max;

  for (const auto& object : objects) {
    if (object->hit(r, t_min, closest_so_far, temp_rec)) {
      hit_anything = true;
      closest_so_far = temp_rec.t;
      rec = temp_rec;
    }
  }

  return hit_anything;
}

#endif
Listing 20: [hittable_list.h] The hittable_list class
6.6 Some New C++ Features
hittable_list 클래스 코드는 C++ 프로그래머가 아니라면 실수할 수 있는 두 가지 C++ 기능을 사용합니다: vector와 shared_ptr.
shared_ptr<type>은 참조 개수(reference count)를 활용하여 할당된 특정 type을 가리키는 포인터입니다. 이 포인터를 다른 shared pointer에 할당(대개 단순 할당)할 때마다 참조 개수가 증가합니다. shared pointer가 스코프 범위 밖(블록이나 함수의 끝)에 있으면 참조 개수가 감소합니다. 참조 개수가 0이 되면 포인터가 참조했던 객체가 해제됩니다.
다음과 같이 일반적으로, shared pointer는 새롭게 할당되는 객체와 함께 초기화됩니다.
shared_ptr<double> double_ptr = make_shared<double>(0.37);
shared_ptr<vec3>   vec3_ptr   = make_shared<vec3>(1.414214, 2.718281, 1.618034);
shared_ptr<sphere> sphere_ptr = make_shared<sphere>(point3(0, 0, 0), 1.0);
Listing 21: An example allocation using shared_ptr
make_shared<thing>(thing의 생성자 매개변수 ...)는 생성자 매개변수를 사용하여 thing 타입의 새로운 인스턴스를 할당합니다. 이
함수를 실행하면 shared_ptr<thing>가 리턴됩니다.
자동으로 타입이 make_shared<type>(...)의 리턴 타입으로 추론되므로 위의 코드는 C++의 auto 타입 지정자를 사용하여 더 간단히 표현할 수 있습니다.
auto double_ptr = make_shared<double>(0.37);
auto vec3_ptr   = make_shared<vec3>(1.414214, 2.718281, 1.618034);
auto sphere_ptr = make_shared<sphere>(point3(0, 0, 0), 1.0);
Listing 22: An example allocation using shared_ptr with auto type
다수의 도형(예를 들어, 동일한 텍스처 맵 메테리얼을 사용하는 여러 개의 구)이 공통 인스턴스를 공유할 수 있고, 메모리 관리를 자동으로 할 수 있고, 더 쉽기 때문에 코드에서 shared pointer를 사용할 것입니다.
std::shared_ptr은 <memory> 헤더에 포함되어 있습니다.
익숙하지 않은 두 번째 C++ 기능은 std::vector입니다. 이것은 임의 타입을 요소로 가지는 일반적인 배열입니다. 위에서, hittable을 참조하는 포인터의 배열을 사용했습니다. std::vector는 새 값을 추가할 경우 자동으로 배열의 길이가 증가합니다: objects.push_back(object)는 std::vector 멤버 변수 objects의 끝에 값을 추가합니다.
std::vector은 <vector> 헤더에 포함되어 있습니다.
마지막으로, listing 20에서 using 선언은 std 라이브러리의 shared_ptr과 make_shared을 사용한다고 컴파일러에게 알려줍니다. 그래서 참조할 때마다 앞에 std::를 붙일 필요가 없습니다.
6.7 Common Constants and Utility Functions
헤더 파일에 편리하게 정의하는 수학 상수들이 필요합니다. 여기서는 무한(infinity)만 필요합니다. 하지만 나중에 필요하게 될 파이(pi) 또한 정의할 것입니다. pi에 대한 포팅 가능한 표준 정의가 없으므로 상수를 정의합니다. 유용한 상수와 나중에 필요한 유틸리티 함수들을 rtweekend.h에 정의합니다.
#ifndef RTWEEKEND_H
#define RTWEEKEND_H

#include <cmath>
#include <limits>
#include <memory>

// Usings
using std::shared_ptr;
using std::make_shared;
using std::sqrt;

// Constants
const double infinity = std::numeric_limits<double>::infinity();
const double pi = 3.1415926535897932385;

// Utility Functions
inline double degrees_to_radians(double degrees) {
  return degrees * pi / 180.0;
}

// Common Headers
#include "ray.h"
#include "vec3.h"

#endif
Listing 23: [rtweekend.h] The rtweekend.h common header
새로운 main입니다:
/* ************* 추가 ************ */
#include "rtweekend.h"

#include "color.h"
#include "hittable_list.h"
#include "sphere.h"
/* ******************************* */

#include <iostream>

/* ************* 수정 ************ */
color ray_color(const ray& r, const hittable& world) {
  hit_record rec;
  if (world.hit(r, 0, infinity, rec)) {
    return 0.5 * (rec.normal + color(1, 1, 1));
  }
/* ******************************* */
  vec3 unit_direction = unit_vector(r.direction());
/* ************* 수정 ************ */
  auto t = 0.5 * (unit_direction.y() + 1.0);
/* ******************************* */
  return (1.0 - t) * color(1.0, 1.0, 1.0) + t * color(0.5, 0.7, 1.0);
}

int main() {

  // Image
  const auto aspect_ratio = 16.0 / 9.0;
  const int image_width = 400;
  const int image_height = static_cast<int>(image_width / aspect_ratio);

  // World
/* ************* 추가 ************ */
  hittable_list world;
  world.add(make_shared<sphere>(point3(0, 0, -1), 0.5));
  world.add(make_shared<sphere>(point3(0, -100.5, -1), 100));
/* ******************************* */

  // Camera
  auto viewport_height = 2.0;
  auto viewport_width = aspect_ratio * viewport_height;
  auto focal_length = 1.0;

  auto origin = point3(0, 0, 0);
  auto horizontal = vec3(viewport_width, 0, 0);
  auto vertical = vec3(0, viewport_height, 0);
  auto lower_left_corner = origin - horizontal / 2 - vertical / 2 - vec3(0, 0, focal_length);

  // Render

  std::cout << "P3\n" << image_width << ' ' << image_height << "\n255\n";

  for (int j = image_height - 1; j >= 0; --j) {
    std::cerr << "\rScanlines remaining: " << j << ' ' << std::flush;
    for (int i = 0; i < image_width; ++i) {
      auto u = double(i) / (image_width - 1);
      auto v = double(j) / (image_height - 1);
      ray r(origin, lower_left_corner + u * horizontal + v * vertical - origin);
      color pixel_color = ray_color(r, world);
      write_color(std::cout, pixel_color);
    }
  }

  std::cerr << "\nDone.\n";
}
Listing 24: [main.cc] The new main with hittables
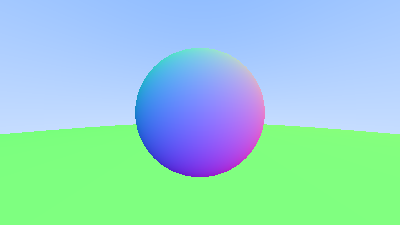
구의 표면 법선 벡터를 시각화한 이미지를 얻을 수 있습니다. 이 방법은 종종 모델의 결함이나 특징을 확인하는데 매우 좋은 방법입니다.

Image 5: Resulting render of normals-colored sphere with ground
출처
Ray Tracing in One Weekend - Peter Shirley
https://raytracing.github.io/books/RayTracingInOneWeekend.html#surfacenormalsandmultipleobjects
