[졸업 프로젝트-1] Korean Receipt 문자 인식을 위한 OCR 모델 개발, 그리고 predict API 만들기
(0) 텐센트 클라우드 연결
--> OCR 모델을 개발하기 위해서
💡 중요한 것은 그냥 ssh원격 접속을 해서 저장을 하게 되면 permission없다는 에러 메세지가 뜨게 된다는 것이다. 그렇게 때문에 무조건 가상 머신의 서버 내에서 편집이나 파일 추가 등을 하기 위해 root로 지정되어 있는 소유자를 chown명령으로 바꾸어 주어야 한다. 우리의 경우 ssh 계정이 ubuntu이기 때문에 `sudo chown -R ubuntu *` 로 권한을 받는다.Tencent Cloud 사용과 가상머신에 대하여
-
원래 처음에는 이메일 주소를 사용해서 로그인을 하라고 했지만 지금은 개인 사용자로서 가입을 하는게 아니기 때문에 CAM User login을 한다. 학교에서 알려준 Root account id - ID - PW 순서대로 입력을 하면 된다. 로그인이 되고 원래 비밀번호에서 변경을 하라고 해서 Asdf1234!로 변경을 하였다.
-
https://console.tencentcloud.com/cvm/instance/index?rid=18 왼쪽의 링크에 접속을 하면
Tencent Cloud>Console>Cloud Virtual Machine>Instances로 들어가서 <스타트 3팀>의 클라우드 가상 머신 인스턴스를 확인 할 수 있다. 이를 running mode로 바꾸어 주면 된다 -
Private IPv4: 10.103.103.5
Public IPv4: 43.155.167.170
→ Public IPv4에 해당하는 ip 주소를 연결 해야 새로운 우분투 원격 접속이 가능 하다.
나 같은 경우에는
vscode에서의ssh원격 접속을 위한 확장 프로그램을 사용하기 떄문에 비교적 사용이 어렵지만은 않았던 것 같다.-
ssh 서버 연결
ssh ubuntu@[public ip address]비밀번호는 그냥 학교에서 설정해 준 대로
Qwer1234!을 입력해주면 된다. -
root 권한으로 접속한 뒤에 필요하다면 업데이트를 하준다. (근데 이건 처음에 vscode에서 시작할때만 해도 될것 같다.)
sudo su -apt-get update -
Linux용 아나콘다를 설치
wget https://repo.anaconda.com/archive/Anaconda3-2021.11-Linux-x86_64.sh이렇게 설치가 된 뒤에
bash Anaconda3-2021.11-Linux-x86_64.sh를 입력하면 Anaconda 설명 및 계약서 비슷한게 나오고 마지막에 yes를 입력하면 된다.
Anaconda will noe be installed into this location: /root/anaconda3 이라고 뜬다. 경로를 기억해둘 필요가 있을 것 같다. (별로 복잡한건 아니지만)
이렇게 또 경로 확정을 지으면
Unpacking payload라는 말이 나오면서 아나콘다를 깔 때에 필요한 모든 파일들을 -
Nvidia Toolkit 설치
wget [https://developer.download.nvidia.com/compute/cuda/11.7.1/local_installers/cuda_11.7.1_515.65.01_linux.run](https://developer.download.nvidia.com/compute/cuda/11.7.1/local_installers/cuda_11.7.1_515.65.01_linux.run)nvidia-smi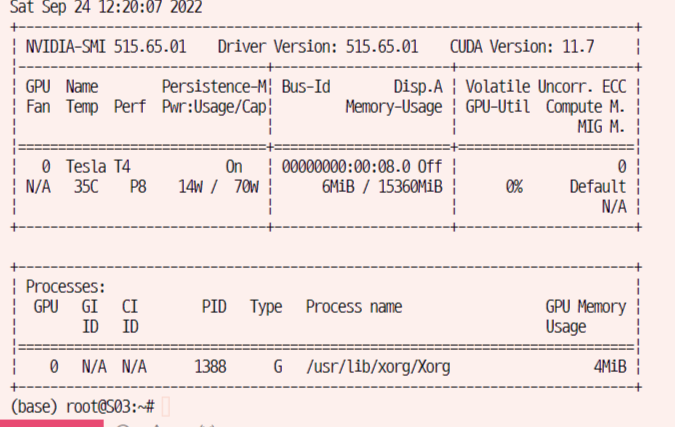
-
가상환경 생성
- 우선 나는 딥러닝 모델을 학습시켜야 했으며,
python=3.8인 버전에서pytorch등의 라이브러리만을 설치해서 사용하게 될것이기 때문에 가상환경을 만들었다. 가상환경 이름은pytorch로 지정했으며,conda create -n pytorch python=3.8로 만들었다. - 생성한 가성환경에서 모델을 돌리고 작업을 하기위해서는 당연하게도 가상환경을 활성화 시켜야 한다.
conda activate pytorch - 만약에 들어간 가상환경에서 나가고 싶으면 한줄로 충분하다 →
conda deactivate
- 우선 나는 딥러닝 모델을 학습시켜야 했으며,
-
Pytorch설치conda install pytorch torchvision torchaudio cudatoolkit=11.6 -c pytorch -c conda-forge- 현재 가상 머신의 환경이 Ubuntu Server 20.04 LTS 6bit인데
-
jupyter notebook 설치
conda install jupyter
jupyter notebook --generate_config ## jupyter_notebook_config.py 파일 생성
ipython ## jupyter notebook 실행
PW: penguin1109
⇒argon2:v=19ui6vDnqvdx7REyJWJlsDCA$YslXYFzgbva4hdxqqI+10A
위의 비밀번호를 기억해 두고 있어야 하는데, 그 이유는 jupyter notebook의 server을 가상 머신 환경으로 연결해야 하기 때문이다.
- 우선 jupyter notebook이 연결이 되게 하기 위해서는 다시 Tencent Cloud의 instance console창으로 들어가야 한다. 그리고 security group를 추가해 주어야 하는데, 이것을 원하는 IP 주소와 Port 번호는 IP의 경우 모든 IPv4 traffic을 허락하기 위해서 ‘0.0.0.0/0’으로 설정해 주어야 하고 Port 번호는 ‘tcp:8.8.8.8’로 지정해 주어야 한다.
jupyter notebook --allow-root(← 이 command 명령이 기억이 안나면 그냥jupyter notebook라고 입력하면 어떻게 terminal run을 할수 있는지를 알려준다.)이후 jupyter notebook을 실행하고 싶으면 43.155.167.170:8888 로 접속을 하면 된다.
⇒ 원래는 colab을 주로 사용했었기 떄문에 jupyter notebook은 어떻게 사용하는 것인지 잘 몰랐었다. 이번 기회에 개인적으로 조금은 이해할 수 있었다.
-
Git Repo Clone 받아서 작업을 위한 초기 단계를 시도해보자
- 우선 vscode로 ssh 원격연결을 하는 것은 당연하고 처음에는 터미널 창에서 그냥
ubuntu@S03:~$이런식으로만 되어 있었고cuda명령같은 것이 먹히지 않았다. 근데 이건 당연했고,sudo su -명령을 사용해서 root 권한으로 접속해야만 했다. root>ubuntu>users>jihye.lee폴더를 만들어서 각각의 사용자마다 다르게 git clone을 받던 jupyter을 쓰던 하면 된다.- 그리고 위의 경로에서
jupyter notebook --allow-root를 입력해서 jupyter 노트북 서버로 접속해서 kernel을 사용할수 있게 된다.
(1) 초기 brainstorming 과정
OCR Pipeline
생각의 흐름..
-
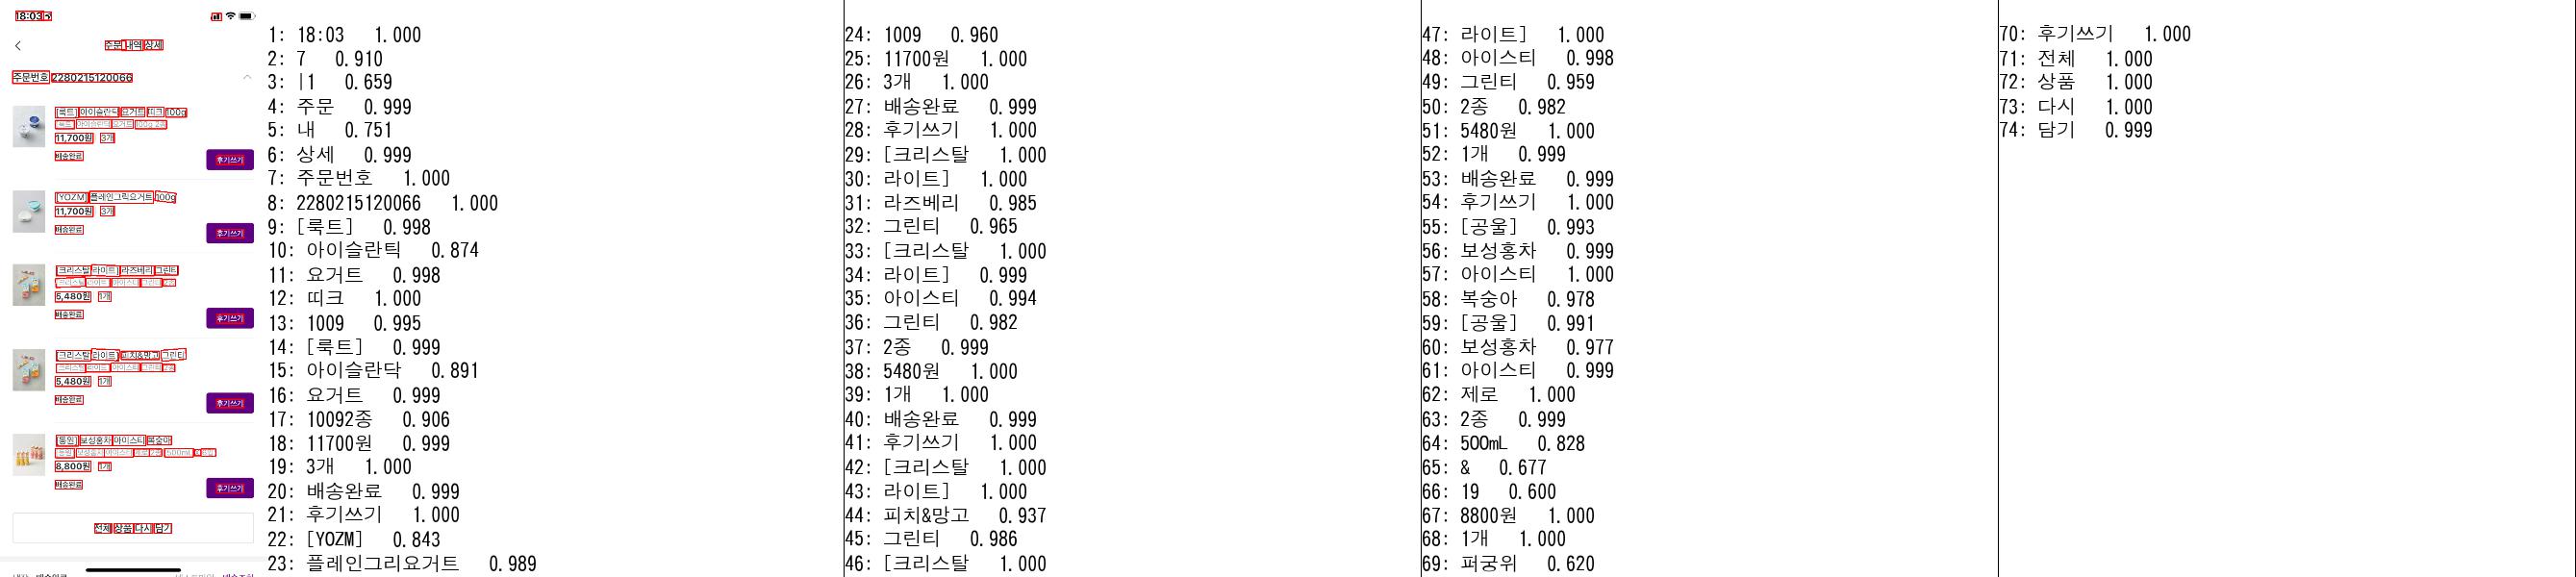
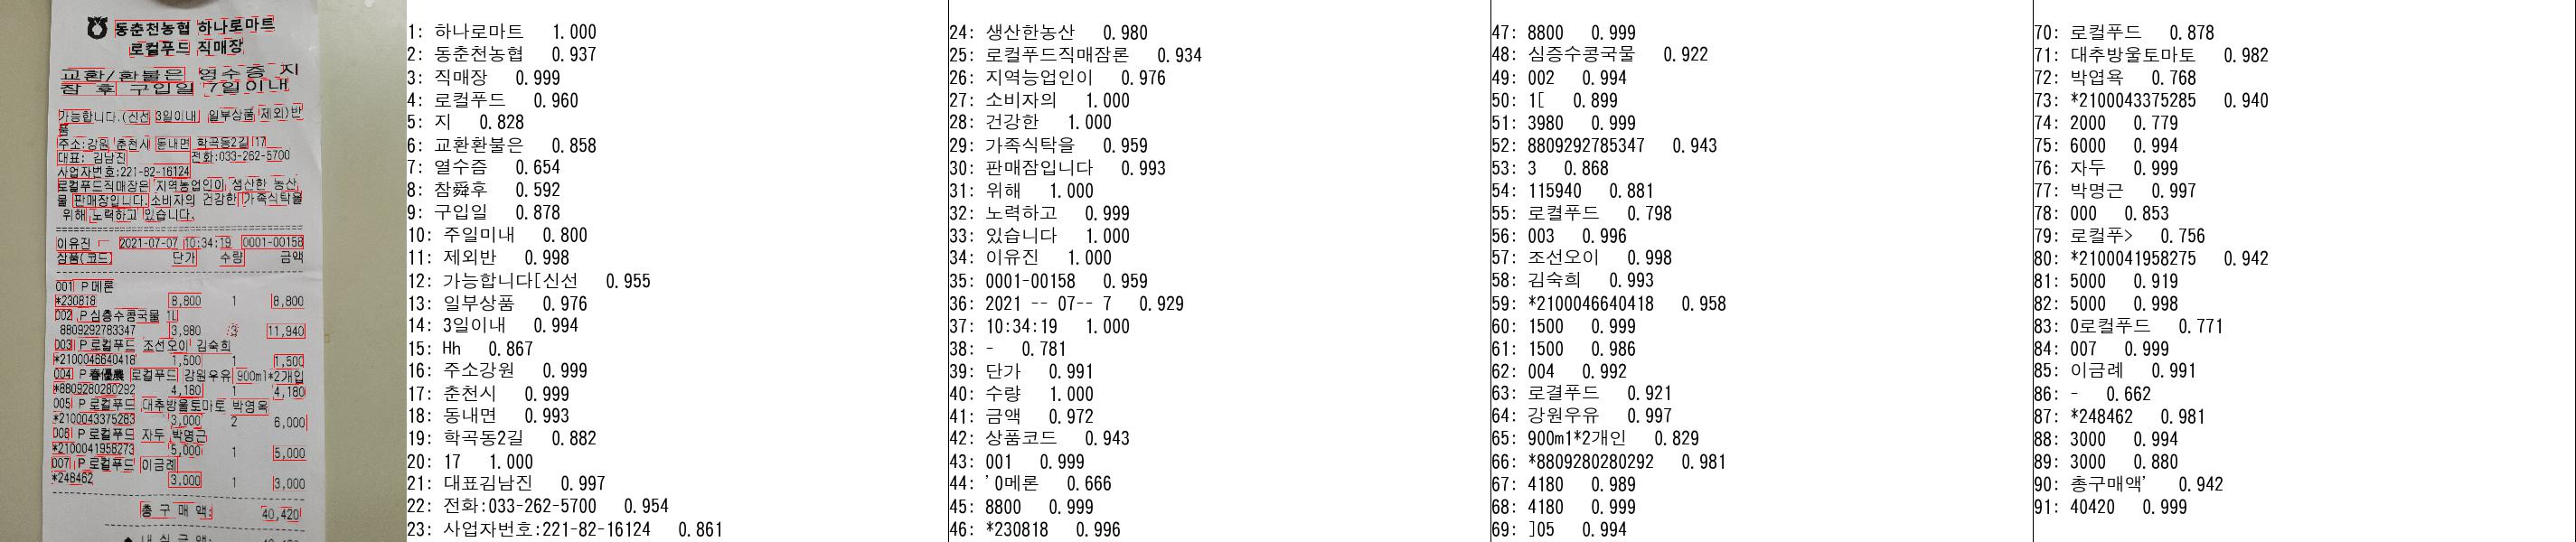
우선 영수증에 대해서 text detection을 하는 것이 더 어렵지 배달 내역을 캡쳐했을때는 image transformation이라던지 회전, 빛 번짐 등의 현상이 전혀 없기 때문에 + 글씨체도 매우 균일하기 때문에 OCR을 사용해서 인식하는데는 문제가 없을 것이다. 다만 각각의 정보를 구분을 해서 <식품명> <가격> <수량> 등으로 classification하는 것이 이 과제에서 제일 중요할 것으로 예상 된다.
# pts1 = np.float32([topLeft, topRight, bottomRight, bottomLeft])
pts1 = np.float32([polys[0][0], polys[0][1], polys[0][2], polys[0][-1]])
pts2 = np.float32(np.array([[0,0], [400, 0], [400,300], [0, 300]]))
width = 450
height = 350
# 변환 행렬 계산
mtrx = cv2.getPerspectiveTransform(pts1, pts2)
# 원근 변환 적용
result = cv2.warpPerspective(img, mtrx, (width, height))
간단하게 검색해서 얻은 이미지들을 사용해서 ppocr을 적용하고 그 결과를 확인해 보자.
- 오른쪽의 그림에서도 충분히 확인을 할수가 있지만 어쨌든 실제로 영수증을 촬영하게 되면 글자가 흐릿한 경우도 있고 다양하다.
- 또, paddle paddle ocr의 문제를 파악해 보니 text recognition을 위해서 사용된 character dict에 일본어도 포함이 되어 있다는 것이었기 때문에 이 부분을 보완해서 한글과 숫자, 그리고 영어만으로 재학습을 시킬 예정이다.
- MLFlow를 training에서의 model tracking도구로 사용할 예정이고, 그냥 argument parameter이 많이 필요할것 같지는 않아서 argparser을 사용하려 한다. (병렬처리는 GPU의 개수가 1개밖에 없으니까 의미가 없을 것이고, 따라서 hydra는 필요가 없을 것이다.)
'korean': {
                    'url':
                    'https://paddleocr.bj.bcebos.com/PP-OCRv3/multilingual/korean_PP-OCRv3_rec_infer.tar',
                    'dict_path': './ppocr/utils/dict/korean_dict.txt'
                },
PPOCR의 원리를 공부해 보자.
- 기본적으로 제공하는 한국어로 사전 학습이던 모델을 보게 된다면 적어도 text detection에 한해서는 결과가 잘 나오는 것을 확인 할 수 있다. 사실 bounding box만 제대로 찾을 수 있다면 recognition의 정확도가 월등히 오르게 될수 밖에 없을 것이다. 실제로 ppocr에서 제공하는 text detection model의 경우에는 DB 라는 모델인데, 역사나 segmentation based model이다. 그래서 segmentation map을 구하고, 이를 binarized map으로 바꾸게 된다.
Text Detection
Text Detection은 크게 두개의 갈래로 나누어서 생각해 볼 수 있다. 회귀 기반과 segmentation 기반이 바로 그것인데, 회귀 기반의 장점은 일반적인 글자 모양에 더 적합하다는 것이다. EAST, CRAFT같은 모델들이 거기에 해당한다.
Text Detection이 결국에는 bounding box를 찾는 것일테고, 바라는 것처럼 깔끔하게 문자 주변으로 하나의 bbox를 만들기는 어렵기 때문에 post-processing의 과정이 필요할 것이다. 이 과정이 대부분의 text detection 모델에서 Non-Max Suppression으로 수행이 된다. FCN → NMS
- EAST를 github repository에서 클론 받아서 사용해보려 하는데, python==3.6의 환경에서 min-max suppression 하는 라이브러리가 작동을 해야 하는데 그 환경이 아니기 때문에 colab에서 실행을 시키려니 python3.6의 ctype 조건이 맞지않는 듯 했다.(분명공식 레포에서는 3.7.1 버전을 다운 받아서 하라고 했었는데 그게 안먹혀서 바꿨었던 것이다.)
- 근데 또 해보니까 text detection의 성능 자체로만 봤을 때는 CTPN 모델이 성능이 좋은 것으로 확인이 되었다.
Text Recognition
Text Recognition은 보통 text detection 단계에서 이어서, text 부분만을 자른 이미지를 입력으로 받고 실제 문자를 출력으로 제공한다.
이것도 역시 detection과 마찬가지로 irregular text 와 normal text 두개로 나누어서 사용할만한 모델을 선택한다.
- 그럼에도 불구하고 한글 데이터의 경우에는 class imbalance 문제가 심각하기 떄문에
Hangul Net이라는 것을 사용하기로 한다.
kakao OCR system 구성과 모델
Text Detection Model (글자 탐지 모델)
EAST모델을 사용하기로 했었다.- 그런데 현재 SOTA모델은
Text Fuse Net이기도 하고, 실제로 character level로 글자를 검출할 수 있으면 좋겠다 싶었기 때문에EAST와Text Fuse Net의 성능을 비교해 보기로 했다.- 물론
EAST모델도 글자 단위로 탐지를 할 수 있지만 영어의 경우에도, 혹은 다른 언어에서도 그런 경우는 없기 때문에 별로 추천하는 방법은 아니다.
- 물론
Image Preprocessing
1단계. 이미지 읽기
## Step1: Read image in Gray scale
def step1(img_path):
  img = cv2.imread(img_path)
  gray_img = cv2.cvtColor(img, cv2.COLOR_BGR2GRAY)
  return img, gray_img
2단계. binary 이미지로 변환
아래 있는 sobel() 함수를 사용하면 x축, y축으로의 픽셀값의 gradient를 구해서 각각 가로방향, 세로방향의 이미지에서의 edge를 검출할 수 있다. 이전에 gaussianBlur() 함수를 사용해서 low level feature, 즉 잡음을 지워주는데, 그 이유는 edge 검출을 할때 noise와 같은 미세한 잡음이 갑자기 튀는 값이라 gradient가 크게 잘못 인식 될 수 있기 때문이다.
## Step2: Calculate the threshold for each image
def step2(gray_img):
  blurred = cv2.GaussianBlur(gray_img, ksize = (9, 9), sigmaX = 0)
  ## gradient (to get the gradient, we must remove the noise first)
  gradX = cv2.Sobel(blurred,  ddepth=cv2.CV_32F, dx=1, dy=0)
  gradY = cv2.Sobel(blurred, ddepth = cv2.CV_32F, dx = 0, dy = 1)
  gradient = cv2.subtract(gradX, gradY)
  gradient = cv2.convertScaleAbs(gradient)
  # thresh_and_blur
  blurred = cv2.GaussianBlur(gradient, (9, 9), 0)
  (_, thresh) = cv2.threshold(blurred, 80, 255, cv2.THRESH_BINARY)
  return thresh
3단계. binary image의 형태학적 연산
## Step3: Need to set the ellipse size at first and do morphological thing.
def step3(thresh):
    kernel = cv2.getStructuringElement(cv2.MORPH_RECT,# cv2.MORPH_ELLIPSE,
                                       (int(thresh.shape[1]/40), int(thresh.shape[0]/18)))
    morpho_image = cv2.morphologyEx(thresh, cv2.MORPH_CLOSE, kernel)
    ## Opening 과정을 통해서 작은 객체나 돌기 제거 등을 한다.
    morpho_image = cv2.erode(morpho_image, None, iterations=1)
    morpho_image = cv2.dilate(morpho_image, None, iterations=1)

    return morpho_image
4단계.receipt 영역 검출 및 배경 제거
## Step4: Based on the morpho_image, get the bounding box of the recipe part
def step4(morpho_image, original_image):
  H, W, C = original_image.shape
  contours, hierarchy = cv2.findContours(morpho_image.copy(),
                                    cv2.RETR_LIST,
                                    cv2.CHAIN_APPROX_SIMPLE)
  c = sorted(contours, key=cv2.contourArea, reverse=True)[0]
  area = cv2.minAreaRect(c) ## ((x1, y1), (x2, y2), angle)
  box = cv2.boxPoints(area) ## 왼쪽 아래 좌표에서부터 시계방향으로 8box point를 반환
  box = np.int0(box)
  ## 그냥 그리면 원본 이미지에 그려지니까 반드시 copy를 해서 그려야 한다.
  draw_box = cv2.drawContours(original_image.copy(), [box], 0, (0, 0, 255), 2)
  # x1, y1, x2, y2, x3, y3, x4, y4 = box[0][0], box[0][1], box[1][0], box[1][1], box[2][0], box[2][1], box[3][0], box[3][1]
  X = [p[0] for p in box]
  Y = [p[1] for p in box]
  x1 = max(min(X), 0);x2 = min(max(X), W)
  y1 = max(min(Y), 0);y2 = min(max(Y), H)
  height = y2-y1
  width = x2-x1
  croped = original_image[y1:y1+height, x1:x1+width]

  return croped, x1, y1, draw_box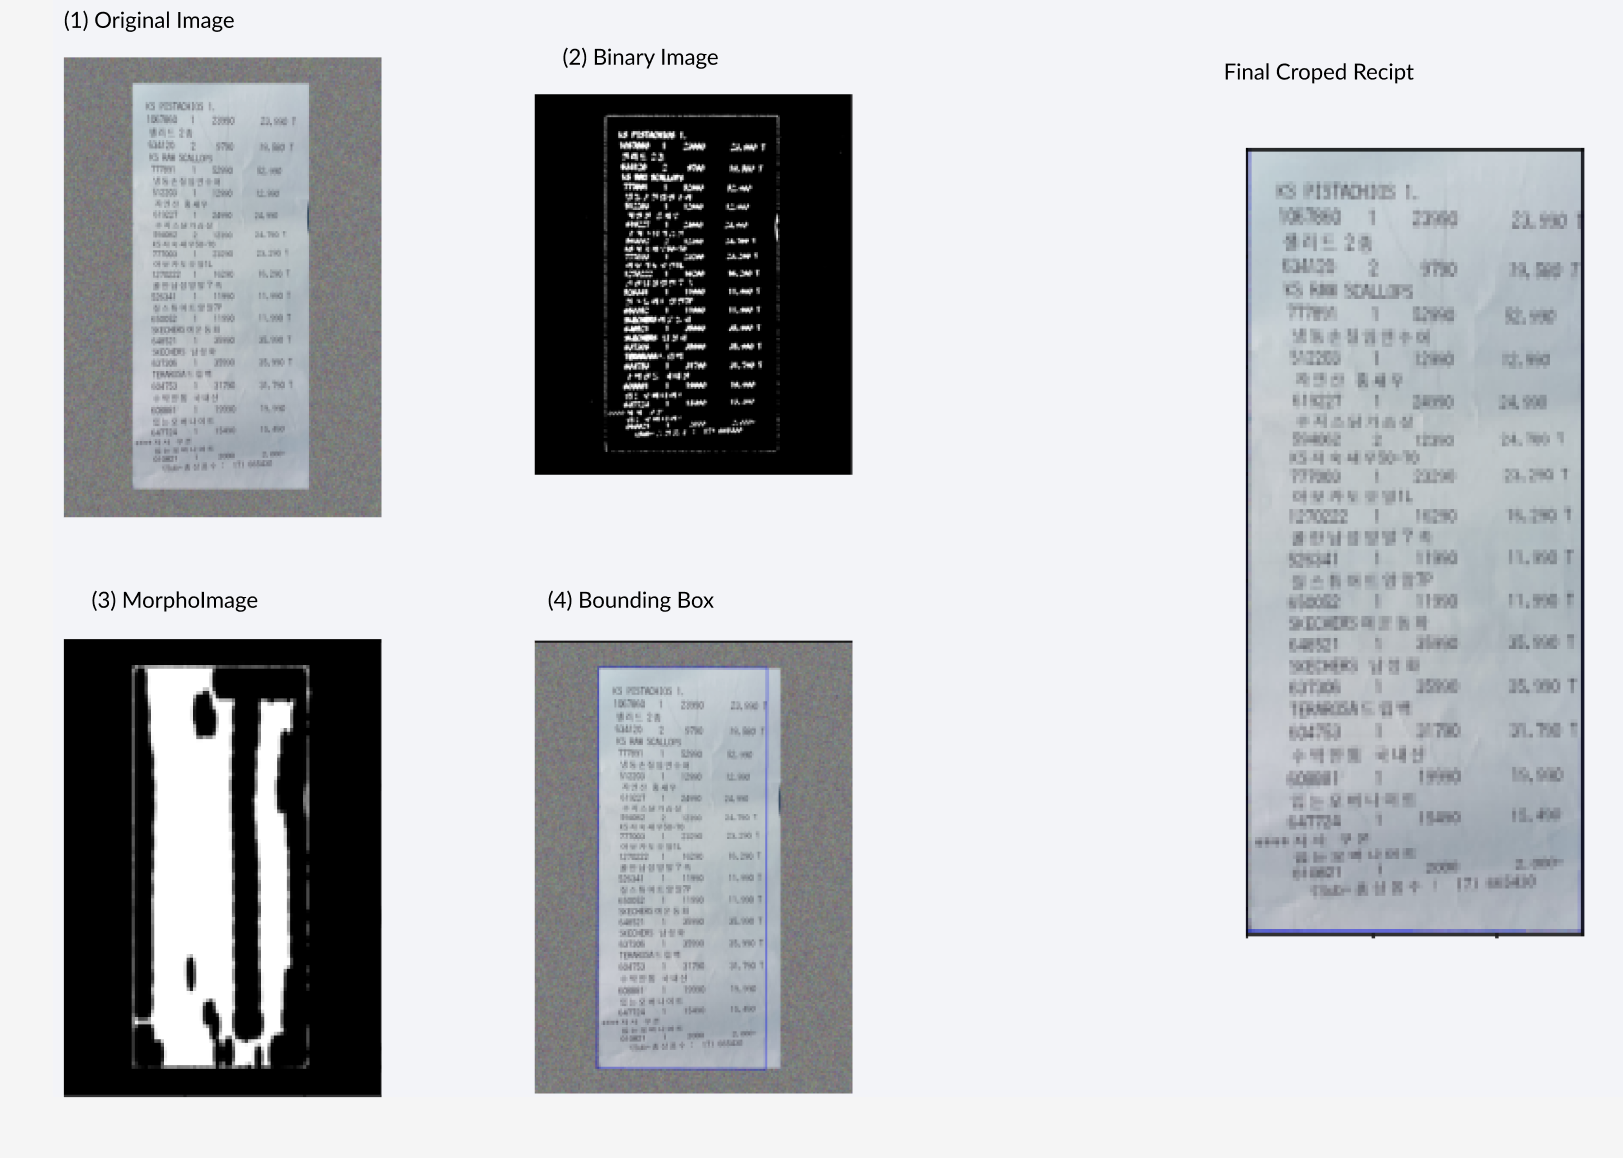
Text Detection: CTPN
Text Recognition Model Benchmarking
TPS - ResNet - BiLSTM - Attn모델을 사용하고자 한다.- 더불어서
Hangul Net을 사용하고자 한다. 아래 설명과 같이 초성 + 중성 + 종성으로 한국어 글자를 분리하여 학습을 하기 떄문이다. - 기존의 korean text recognition 모델의 경우에는 초성 + 중성 + 종성의 3개의 조합이 너무 많다는 단점으로 인하여 그렇게 우수한 결과가 나오지 않았었다.
- 그래서 이 부분을 보완하기 위해서 새로운 자음+모음 embedding layer을 추가할 수 있도록 하였다.
글자 인식 모델은 글자 이미지를 입력값으로 받아서 글자를 예측한다.
IMAGE —> [maxpool - layernorm - conv2d - layernorm - conv2d] — RESHAPE —> [softmax - LSTM - LSTM] —> OUTPUT TEXT
class CTPN(nn.Module):
    def __init__(self, **kwargs):
        super(CTPN, self).__init__()
        try:
            vgg = models.vgg16(weights = models.VGG16_Weights.IMAGENET1K_V1)
        except:
            vgg = models.vgg16(pretrained = True)

        self.base_layers = nn.Sequential(*list(vgg.features)[:-1])
        self.rpn = BasicConv(512,512, kernel_size = 3, stride = 1, bn = False) ## Conv - ReLU
        self.brnn = nn.GRU(512, 128, bidirectional = True, batch_first = True) ## bidirectional=True로 했기 때문에 D=2라서 output shape가 2 * H_out이다.
        self.lstm_fc = BasicConv(256, 512, kernel_size = 1, stride = 1, relu = True, bn = False)

        self.rpn_class = BasicConv(512, 10 * 2, kernel_size = 1, stride = 1, relu = False, bn = False)
        self.rpn_regress = BasicConv(512, 10 * 2, kernel_size = 1, stride = 1, relu = False, bn = False)
        #self.vertical_cord = BasicConv(512, 10 * 4, kernel_size = 1, stride = 1, relu = False, bn = False)
        #self.score = BasicConv(512, 10 * 2, kernel_size = 1, stride = 1, relu = False, bn = False)
        #self.side_refinement = BasicConv(512, 10, kernel_size = 1, stride = 1, relu = False, bn = False)

    def forward(self, x):
        ## (B, C, H, W)
        x = self.base_layers(x)
        x = self.rpn(x) ## (B, 512, H', W') -> 이렇게 vgg16의 feature 추출 layer에서의 output을 사용한다.

        x1 = x.permute(0, 2, 3, 1).contiguous() ## (B, C, H, W) -> (B, H, W, C)
        B, H, W, C = x1.size()
        x1 = x1.view(B * H, W, C) ## (B*H, W, C) (sequence size, batch size, input size)
        x2, _ = self.brnn(x1) ## (B*H, W, 128 * 2)
        x3 = x2.view(x.size(0), x.size(2), x.size(3), 256) ## (B, H', W', 256)

        x3 = x3.permute(0, 3, 1, 2).contiguous() ## (B, 256, H', W')
        x3 = self.lstm_fc(x3) ## (B, 512, H', W')
        x = x3

        cls = self.rpn_class(x) ## (B, 20, H', W')
        regression = self.rpn_regress(x) ## (B, 20, H', W')
        cls = cls.permute(0, 2, 3, 1).contiguous() ## (B, H', W', 20)
        regression = regression.permute(0, 2, 3, 1).contiguous() ## (B, H', W', 20)

        cls = cls.view(cls.size(0), cls.size(1) * cls.size(2) * 10, 2)
        regression = regression.view(regression.size(0), regression.size(1) * regression.size(2) * 10, 2)
        """
        - score: text/nontext score
        - vertical_pred: vertical coordinates
        - side_refinement: side-refinement offset
        """
return cls, regression- CNN layer은 글자 예측에 필요한 feature을 추출하는 역할을 한다.
Text Recognition: Hangul Net
1. Position Encoding
"""Postitional Encoding (L, C)
- The positional encoding module outputs the input feature map tensor added pixel wise with the position encoded vector
- In the paper, the max_length is set to the 75. (Not written on the paper, but is told by the author of the paper)
- In the paper, the embedding dimension is not written.
"""

class PositionEncoding(nn.Module):
  def __init__(self,
              max_length=75,
              embedding_dim=512,
              dropout_rate=0.1,
              device=torch.device('cuda')):
    super(PositionEncoding, self).__init__()
    """sin, cos encoding 구현
    max_length: 전체 단어 / 문장의 최대 길이 (단, Hangul Net에서는 3 X 단어의 수이다.)
    embedding_dim: Dimension of the model
    """
    self.dropout = nn.Dropout(dropout_rate)
    self.encoding = torch.zeros(max_length, embedding_dim, device = device)
    self.encoding.requires_grad = False
    pos = torch.arange(0, max_length, device = device)
    pos = pos.float().unsqueeze(dim = 1)
    _2i = torch.arange(0, embedding_dim, step = 2, device = device).float()

    self.encoding[:, ::2] = torch.sin(pos / (1000 ** (_2i / embedding_dim)))
    self.encoding[:, 1::2] = torch.cos(pos / (1000 ** (_2i / embedding_dim)))
    self.encoding = self.encoding.unsqueeze(0).transpose(0, 1)


  def forward(self, x):
    """ Args
    별건 아니고 1,2,3.. 순서대로 알아서 위치 정보에 대한 embedded vector을 입력 sequence에 더해 주면 결과를 모델이 알아서 학습을 하게 될 것이다.
    x: (sequence_length, batch_size, embedding_dimension)
    out: (sequence_length, batch_size, embedding_dimension)
    """
    seq_len, batch_size, embed_dim = x.shape
    x = x + self.encoding[:seq_len, :]

    return self.dropout(x)
2. Multi Head Attention
#### Multi Head Attention for the same Key, Query, Value ####
class MultiHeadAttention(nn.Module):
  def __init__(self,
               embed_dim,
               head_num,
               dropout_rate=0.0):
    super(MultiHeadAttention, self).__init__()
    """ Args
    embed_dim: total dimension of the model
    head_n: number of parallel attention heads
    dropout_rate: Dropout rate on the Dropout Layer to prevent overfitting
    """
    self.embed_dim = embed_dim
    self.head_num = head_num
    self.head_dim = self.embed_dim // self.head_num
    assert self.head_dim * self.head_num == self.embed_dim, "The Embedding Dimension Should be divisable by number of heads"


    self.in_proj_weight = nn.Parameter(torch.empty(3 * self.embed_dim, self.embed_dim))
    self.register_parameter('q_proj_weight', None)
    self.register_parameter('k_proj_weight', None)
    self.register_parameter('v_proj_weight', None)

    self.in_proj_bias = nn.Parameter(torch.empty(3 * self.embed_dim)) ## 거의 아무 의미 없는 값들로 parameter을 채워주기 때문에
    self.out_proj = nn.Linear(self.embed_dim, self.embed_dim, bias=True)

    self.bias_k = nn.Parameter(torch.empty(1, 1, self.embed_dim))
    self.bias_v = nn.Parameter(torch.empty(1, 1, self.embed_dim))


  def forward(self, query, key, value):
    """ Args (근데 이 경우에는 target sequence length == source sequence length이다.)
    query: (L, N, E) = (target_sequence_length, batch_size, embed_dim)
    key: (S, N, E) = (source_sequence_length, batch_size, embed_dim)
    value: (S, N, E) = (source_sequence_length, batch_size, embed_dim)

    Outputs
    attention_output: (L, N, E) = (target_sequence_length, batch_size, embed_dim)
    attention_weight: (N, L, S) = (batch_size, target_sequence_length, source_sequence_length)
    """
    target_seq_length, batch_size, embed_dim = query.shape
    scaling = float(self.head_dim) ** -0.5
    out = F.linear(query, self.in_proj_weight, self.in_proj_bias)
    q, k, v = torch.tensor_split(out,3,dim = -1)
    q *= scaling
    k = torch.cat([k, self.bias_k.repeat(1, batch_size, 1)])
    v = torch.cat([v, self.bias_v.repeat(1, batch_size, 1)])
    q = q.contiguous().view(target_seq_length, -1, self.head_dim).transpose(0, 1)

    k = k.contiguous().view(-1, batch_size * self.head_num, self.head_dim).transpose(0, 1)
    v = v.contiguous().view(-1, batch_size * self.head_num, self.head_dim).transpose(0, 1)

    attention_weight = torch.bmm(q, k.transpose(1, 2))
    attention_weight = F.softmax(attention_weight, dim = -1)

    attention_output = torch.bmm(attention_weight, v).transpose(0, 1).contiguous().view(-1, batch_size, embed_dim)
    attention_output = self.out_proj(attention_output)

    return attention_output, attention_weight.sum(dim = 1)/self.head_num