1. Redux Slice 및 Store 생성하기
리덕스 설치
npm install @reduxjs/toolkit react-redux redux —save
폴더 구조 생성
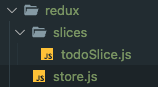
todoSlice.js 파일 만들기
import { createSlice } from "@reduxjs/toolkit";

const todoSlice = createSlice({
  name: "todo",
  initialState: {
    currentId: 4,
    todos: [],
  },
  reducers: {},
});

export default todoSlice.reducer;
store.js 만들기
import { configureStore } from "@reduxjs/toolkit";
import todoReducer from "./slices/todoSlice";

export const store = configureStore({
  reducer: {
    todo: todoReducer,
  },
});
리듀서 작성
todoSlice.js에서 3가지 액션의 리듀서를 작성해준다.
import { createSlice } from "@reduxjs/toolkit";

const todoSlice = createSlice({
  name: "todo",
  initialState: {
    currentId: 4,
    todos: [],
  },
  reducers: {
    addTodo: (state, action) => {
      state.todos.push({
        id: state.currentId++,
        text: action.payload.trim(),
        state: "todo",
      });
    },
    updateTodo: (state, action) => {
      const item = state.todos.findIndex((item) => item.id === action.payload);
      state.todos[item].state =
        state.todos[item].state === "todo" ? "done" : "todo";
      state.todos.push(state.todos.splice(item, 1)[0]);
    },
    deleteTodo: (state, action) => {
      const item = state.todos.findIndex((item) => item.id === action.payload);
      if (item > -1) {
        state.todos.splice(item, 1);
      }
    },
  },
});

export default todoSlice.reducer;
export const { addTodo, updateTodo, deleteTodo } = todoSlice.actions;
-
splice(item, 1) : item 인덱스 하나만 삭제
-
state.todos.push(state.todos.splice(item, 1)[0]): state.todos.splice(item, 1)를 하면 item의 인덱스만 남게되는데, 여기서 0번째니까 해당하는 것을 다시 맨 뒤로 넣어준다는 뜻임.
-
findIndex(item) : 해당하는 item의 index를 찾음. 없으면 -1이 됨
if (item > -1) 이라는 조건은 무조건 아이템이 있다는 것을 나타냄 -
export const { addTodo, updateTodo, deleteTodo } = todoSlice.actions; : 만든 명령을 다른 곳에서 사용할 수 있게 export 해줌
2. todo item 생성하기
input value state 생성
useState를 사용해 textinput의 value값을 저장해준다
InputForm.js
import { useState } from "react"; //상단에 useState 임포트

const [currentValue, setCurrentValue] = useState(""); //useState 사용


<TextInput
        style={styles.inputField}
        placeholder="할 일을 작성해주세요"
        value={currentValue} // textinput에 value값 지정
      />
input에 value 입력 시 텍스트 변경
<TextInput
        style={styles.inputField}
        placeholder="할 일을 작성해주세요"
        onChangeText={setCurrentValue} //onchangetext 지정
        value={currentValue}
      />
button 클릭 시 todo 생성
버튼에 onPress 함수를 달아준다
<Pressable style={styles.addButton} onPress={handleSubmit}>상단에 dispatch와 addtodo 명령 입력 후, 값을 보낸다
import { useDispatch } from "react-redux";
import { addTodo } from "../redux/slices/todoSlice.js";

const InputForm = () => {
  const [currentValue, setCurrentValue] = useState("");
  const dispatch = useDispatch();

  const handleSubmit = () => {
    if (currentValue !== "") { //빈칸이면 입력되지 않아야 하므로 빈칸이 아니라면 조건문 입력
      dispatch(addTodo(currentValue));
      setCurrentValue("");
    }
  };
엔터키를 눌러도 todo가 입력되게 하기
input에 onSubmitEditing 키를 넣어주고 값으로 위에 만든 submit 함수를 입력한다.
<TextInput
        style={styles.inputField}
        placeholder="할 일을 작성해주세요"
        onChangeText={setCurrentValue}
        value={currentValue}
        onSubmitEditing={handleSubmit}
      />
3. todo List 나열하기
app.js에 store를 provider 하기
store에 있는 데이터를 해당 컴포넌트에 provider 해주기
import MainScreen from "./screens/MainScreen";
import { Provider } from "react-redux";
import { store } from "./redux/store";

export default function App() {
  return (
    <Provider store={store}>
      <MainScreen />
    </Provider>
  );
}
useSelector 이용해 redux 데이터 가져오기
//MainScreen.js
import { useSelector } from "react-redux"; //useSelector 임포트

const todo = useSelector((state) => state.todo.todos);
const todoTasks = todo.filter((item) => item.state === 'todo');
const completedTasks = todo.filter((item) => item.state === 'done');
FlatList 컴포넌트 이용해 렌더링해주기
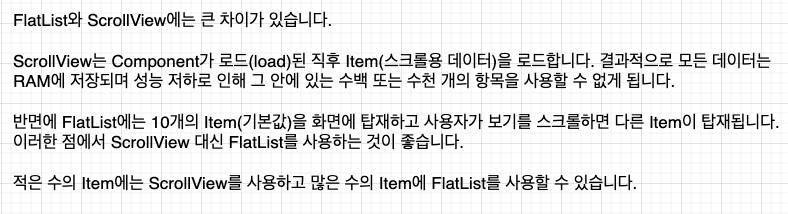
ScrollView VS FlatList
-date : 리스트를 위한 데이터를 넣어준다 (배열로)
-renderItem : 렌더링할 부분을 넣어준다
-keyExtractor : 고유 키. 렌더링에 사용
mainscreen.js에 위에서 가져온 데이터 넣어주기
//할일
{todoTasks.length !== 0 ? (
          <FlatList
            data={todoTasks}
            renderItem={({ item }) => <TodoItem {...item} />} //TodoItem 컴포넌트에 item을 props로 보낸 것임.
            keyExtractor={(item) => item.id}
          />
        ) : (
          <Text style={styles.emptyListText}>할 일이 없습니다.</Text>
        )}

//완료된 일
{completedTasks.length !== 0 ? (
          <FlatList
            data={completedTasks}
            renderItem={({ item }) => <TodoItem {...item} />}
            keyExtractor={(item) => item.id}
          />
        ) : (
          <Text style={styles.emptyListText}>완료된 일이 없습니다.</Text>
        )}
+) import 할 때 중괄호 넣는 것과 안 넣는것의 차이
중괄호를 넣는 것은 export default를 안했을 때, 각각 export 했을 때 중괄호를 넣고
export default를 했으면 중괄호를 안넣어도 된다
+) 로드 에러가 났을 때 해결하고 rr을 누르면 자동 리로드된다.
아이콘 분기 처리 및 실제 텍스트 넣어주기
TodoItem.js 파일 수정
import { Pressable, StyleSheet, Text, View } from "react-native";
import React from "react";
import { useDispatch } from "react-redux";
import UncheckedIcon from "../assets/unchecked.svg";
import CheckedIcon from "../assets/checked.svg";
import CancleIcon from "../assets/cancle.svg";
import { deleteTodo, updateTodo } from "../redux/slices/todoSlice";

const TodoItem = (props) => { //item을 부모에서 보내줬으므로 props로 받을 수 있음
  const dispatch = useDispatch();

  return (
    <View style={styles.itemContainer}>
      <Pressable
        style={styles.itemCheckbox}
        hitSlop={10}
        onPress={() => dispatch(updateTodo(props.id))} //눌렀을 때 id 보내기
      >
        {props.state === "todo" ? (
          <UncheckedIcon />
        ) : (
          <CheckedIcon style={styles.itemCheckboxCheckedIcon} />
        )}
      </Pressable>
      <Text
        style={[
          styles.itemText,
          props.state === "done" && styles.itemTextChecked,
        ]}
      >
        {props.text}
      </Text>
      <Pressable
        style={[
          styles.deleteButton,
          props.state === "done" && styles.deleteButtonDone,
        ]}
        hitSlop={10}
        onPress={() => dispatch(deleteTodo(props.id))} //눌렀을 때 id 보내기
      >
        <CancleIcon />
      </Pressable>
    </View>
  );
};

export default TodoItem;

const styles = StyleSheet.create({
  itemContainer: {
    flexDirection: "row",
    alignItems: "center",
    paddingTop: 10,
    paddingBottom: 15,
    paddingHorizontal: 15,
    backgroundColor: "#f7f8fa",
  },
  itemCheckbox: {
    justifyContent: "center",
    alignItems: "center",
    width: 20,
    height: 20,
    borderRadius: 6,
    marginRight: 13,
  },
  itemCheckboxCheckedIcon: {
    shadowColor: "#000000",
    shadowOpacity: 0.14,
    shadowRadius: 8,
    shadowOffset: {
      width: 0,
      height: 4,
    },
  },
  deleteText: {
    marginRight: "auto",
    paddingRight: 25,
    fontSize: 15,
    lineHeight: 20,
    color: "#737373",
  },
  itemTextChecked: {
    opacity: 0.3,
    textDecorationLine: "line-through",
  },
  deleteButton: {
    opacity: 0.8,
  },
  deleteButtonDone: {
    opacity: 0.3,
  },
});