Sequelize란 ORM(Object-Relational Mapping)의 한 종류로서
node.js에서 JS코드로 mysql을 쉽게 다룰 수 있도록 도와주는 라이브러리다.
ORM이란 간단하게 말하면 객체와 관계형 데이터 베이스 간의 관계를 매핑해주는 도구라 생각하면 된다.
sequlize-cli란 마이그레이션을 할 수 있도록 돕는 툴로, CLI에서 모델을 생성해주거나 스키마 적용을 할 수 있도록 도와준다. (마이그레이션은 스키마 변경에 따른 데이터 이주(migration)을 의미한다.
설치방법(mysql, sequilize)
//sequelize, sequelize cli 설치방법
$ npm install --save sequelize
$npm install --save-dev sequelize-cli
//mysql 설치방법 (Ubuntu)
$ sudo apt-get update
$ sudo apt-get install mysql-server
$ sudo systemctl start mysql // 설치후 시작코드
npx sequelize-cli init // bootstraping(프로젝트 초기단계를 자동으로 설정) 해준다
모델정의하기
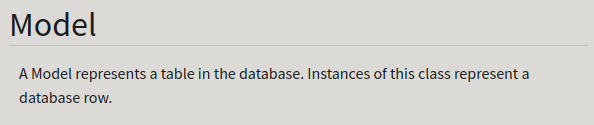
sequelize 공식문서에서 가져온 정의다.
아래 테이블,로우에 대한 내용들, 예시와 같이보면 이해가 좀더 수월한것같다.
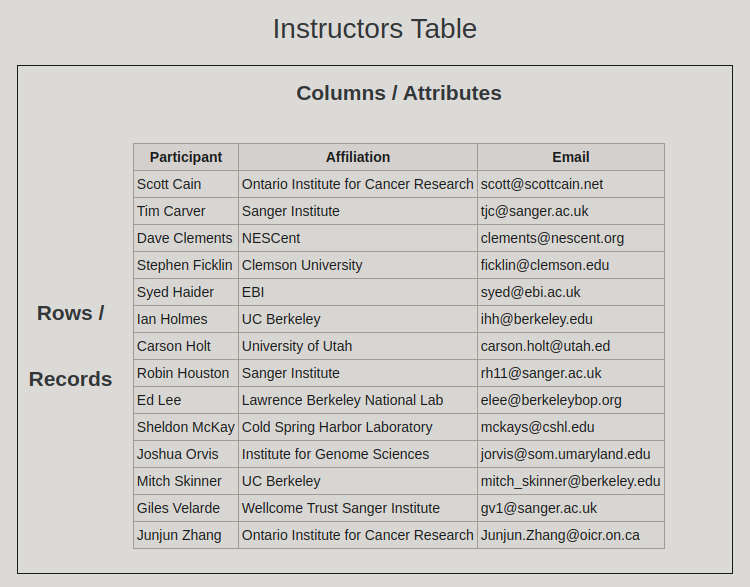
Tables
A database table is just that, a table with rows and columns. Different tables contain information about different types of things.
Rows
Each row in a database table represents one instance of the type of object described in that table. A row is also called a record.
Columns
The columns in a table are the set of facts that we keep track of about that type of object. A column is also called an attribute.
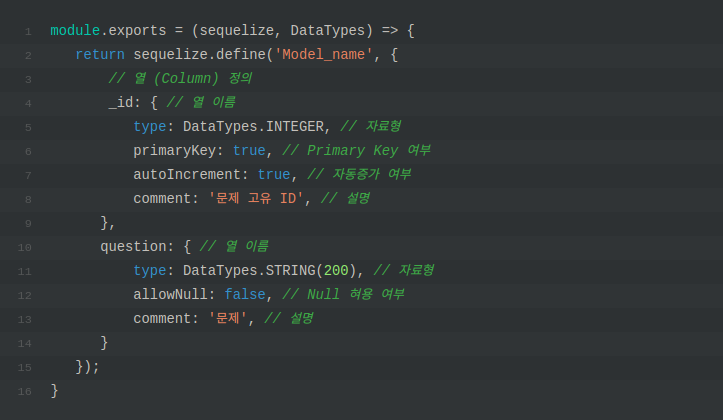
모델을 정의하는 방법으로는 node.js에서 하는법과 sequelize-cli를 이용하는방법이 있다.
첫번째방법
npx sequelize-cli model:generate --name User --attributes firstName:string,lastName:string,email:string // , 사이에 스페이스 들어가지않게 조심두번째방법
-
type
자료형 INTEGER, FLOAT, STRING 등 자주 사용되는 자료형을 거의 대부분 사용할 수 있다 -
allowNull
Null 값을 혀용할지 여부이다. 만약 false로 지정하면 값이 Null인 경우 값을 DB에 저장하지 않는다. 기본값은 true -
autoIncrement
자동 증가열로 지정할지 여부이다. 만약 true로 지정하면 자동 증가를 설정합니다. 기본값은 false -
defaultValue
기본값을 지정 -
timestamps
createdAt열과 updatedAt열을 추가할지 여부이다. 이 옵션이 활성화되면 자동으로 createdAt열과 updatedAt열을 생성하고 데이터가 생성되었을 때와 수정되었을 때에 자동으로 갱신한다. 만약 false로 지정하면 이 열을 생성하지 않는다. 기본값은 true
모델의 인스턴스(데이터베이스의 row생성하기) 생성,제거
생성
- Users.create
const jane = await User.create({ name: "Jane" });
// Jane exists in the database now!
console.log(jane instanceof User); // true
console.log(jane.name); // "Jane"
//Built instances will automatically get default values:
console.log(jane.favoriteColor); // "green"- Users.findOrCreate
module.exports = {
  post: (req, res) => {
    // TODO : 유저가 회원가입을 했을 때, 회원정보를 데이터베이스에 저장하도록 구현하세요.
    const { email, password, username } = req.body;
    users
      .findOrCreate({
        where: {
          email: email
        },
        defaults: {
          password: password,
          username: username
        }
      })
      .then(async ([user, created]) => {
        if (!created) {
          return res.status(409).send('Already exists user');
        }
        const data = await user.get({ plain: true });
        res.status(200).json(data);
      });
  }
};
제거
Task.create({ title: 'a task' }).then(task => {
  return task.destroy();
}).then(() => {
  console.log('row removed')
})

// 만약 model이 paranoid이고, 아예 제거하고 싶다면
task.destroy({ force: true })
인스턴스 수정하기
단순수정
const jane = await User.create({ name: "Jane" });
console.log(jane.name); // "Jane"
jane.name = "Ada";
// the name is still "Jane" in the database
await jane.save(); // save 해줘야됨 !
// Now the name was updated to "Ada" in the database!

//update 이용하기
human.update({
  age: 23
}).then(() => {})
숫자값 증가/감소 시키기
const jane = await User.create({ name: "Jane", age: 100 });
const incrementResult = await jane.increment('age', { by: 2 });
// Note: to increment by 1 you can omit the `by` option and just do `user.increment('age')`
인스턴스 조회하기
테이블 가져오기 findAll(전체), findOne(하나)
// Find all users
const users = await User.findAll();
console.log(users.every(user => user instanceof User)); // true
console.log("All users:", JSON.stringify(users, null, 2));

//전체테이블에서 특정 속성만 가져오기
Model.findAll({
  attributes: ['foo', ['bar', 'baz'], 'qux']
});
SELECT foo, bar AS baz, qux FROM ...

//조건걸어주기 where
Post.findAll({
  where: {
    authorId: 2
  }
});
// SELECT * FROM post WHERE authorId = 2
인스턴스 안에 있는 value값들만 불러오기
Instance의 value들만 출력하고 싶은 경우이 .get과 함께 argument로 { plain: true }를 추가해주면 된다.
Human.create({
  name: 'snow',
  job: 'photographer',
  age: 35
}).then(snow => {
  console.log(snow.get({
    plain: true
  }))
})

// console.log을 통해 출력되는 정보:

// { name: 'snow',
//   job: 'photographer',
//   age: 35
//   createdAt: Mon, 06 Jan 2020 10:12:16 GMT,
//   updatedAt: Mon, 06 Jan 2020 10:12:16 GMT
// }
추가로 공부해봐야할 사항들
hooks
boforeCreate
beforeFind
afterValidate
catch (err)
참고:
https://sequelize.org/master/manual/migrations.html
https://medium.com/humanscape-tech/sequelize-%EC%A0%95%EC%9D%98%ED%95%9C-model%EC%9D%98-instance-%EB%8B%A4%EB%A3%A8%EA%B8%B0-31fbc078d10c