패스트캠퍼스 한 번에 끝내는 프론트엔드 개발(Online) 강의 정리
Ch.3 Creating React Project

1. Creating React App (CRA)
npx create-react-app tic-tac-toe
(npx : npm 5.2.0 이상부터 함께 설치된 CLI)
package.json에서 구성 확인
{
	"name" : "tic-tac-toe",
	"version" : "0.1.0",
	"private" : true,
	"dependencies" : {
		"@testing-library/jest-dom" : "^5.12.0", // test용 라이브러리
		"@testing-library/react" : "^11.2.6", // test용 라이브러리
		"@testing-library/user-event" : "^12.8.3"m, // test용 라이브러리
		"react" : "^17.0.2", // 핵심모듈 라이브러리
		"react-dom" : "^17.0.2", // 핵심모듈 라이브러리
		"react-scripts" : "4.0.3", // CRA의 라이브러리
		"web-vitals" : "^1.1.2" // 구글 사이트경험 향상 측정/개선 라이브러리
	},
	"scripts" : {
		"start" : "react-scripts start",
		"build" : "react-scripts build",
		"test" : "react-scripts test",
		"eject" : "react-scripts eject"
	}
}
CRA 기본 스크립트 명령어 4가지
1) npm start
- react-scripts start
- Starting the development server...
2) npm run build
- react-scripts build
- Creating an optimized production build...
3) npm test
- react-scripts test
- Jest를 통해 test code를 실행합니다.
4) npm run eject
- react-script eject
- 해당 프로젝트에 걸려서 숨겨져있는 모든 설정을 밖으로 추출
(한번 실행하면 되돌릴 수 없고, CRA에 종속된 많은 설정들이 나타남) - eject 에러 시 node나 react 버전 체크
- 보통 CRA 내에서 해결이 안되는 설정을 추가해야 할 때 사용
- Jest, Babel, ESLint 설정이 추가됨
- 각종 설정 파일이 config 폴더에 생성됨
2. ESLint
- JavaScript, JSX의 정적 분석 도구로 오픈 소스 프로젝트
- 코드를 분석해 문법적인 오류나 안티 패턴을 찾아주고 일관된 코드 스타일로 작성하도록 도와줌
- https://eslint.org/
.eslintrc.js
module.exports = {
	env: {
		browser: true,
		es2021: true,
	},
	extends: "eslint:recommneded",
	parserOptions: {
		ecmaVersion: 12,
	},
	rules: { // 프로젝트에 대한 규칙 생성 가능
		semi: {"error", "always"} // 세미콜론 안 찍으면 항상 에러로 체크하도록
	},
};
package.json
{
	"eslintConfig" : {
		"extends" : [
			"react-app", // 앞에 "eslint-config"가 생략된 것
			"react-app/jest"
		]
	}
}
node_modules/eslint-config-react-app에서도 변경 가능
참고자료
https://tech.kakao.com/2019/12/05/make-better-use-of-eslint/
3. Prettier
- 코드 배열/가독성 향상 https://prettier.io/
- Prettier에서 불필요하거나, Prettier와 충돌할 수 있는 모든 규칙을 끔
(이 구성은 규칙을 끄기만 하기 때문에 다른 설정과 함께 사용하는 것이 좋음)
.prettierrc.json
  {
      "singleQuote" : true
  }
4. husky
- Git hooks 쉽게 사용하게 도와줌
- commit이 되기 직전 모든 코드나 설정 점검 (팀에서 사용한다면 유용)
- https://github.com/typicode/husky
packages.json
{
	"scripts" : {
		"prepare" : "husky install",
		"test": "echo \"Error: no test specified\" && exit 1"
	},
	"devDependencies" : {
		"husky" : "^6.0.0"
	}
}
husky/pre_commit
#!\bin\sh
. "$(dirname "$0")/_/husky.sh"

npm test
참고자료
https://www.huskyhoochu.com/npm-husky-the-git-hook-manager/
https://library.gabia.com/contents/8492/
5. lint-staged
- git에 staged 된 파일만 lint 해줌
package.json
{
  "scripts": {
    "precommit": "lint-staged"
  },
  "lint-staged" {
    "*.js": [
      "eslint --fix",
      "git add"
    ]
  }
}
{
"*.js": "eslint",
"**/*.js": "eslint",
"src/*.js": "eslint",
"src/**/*.js": "eslint",
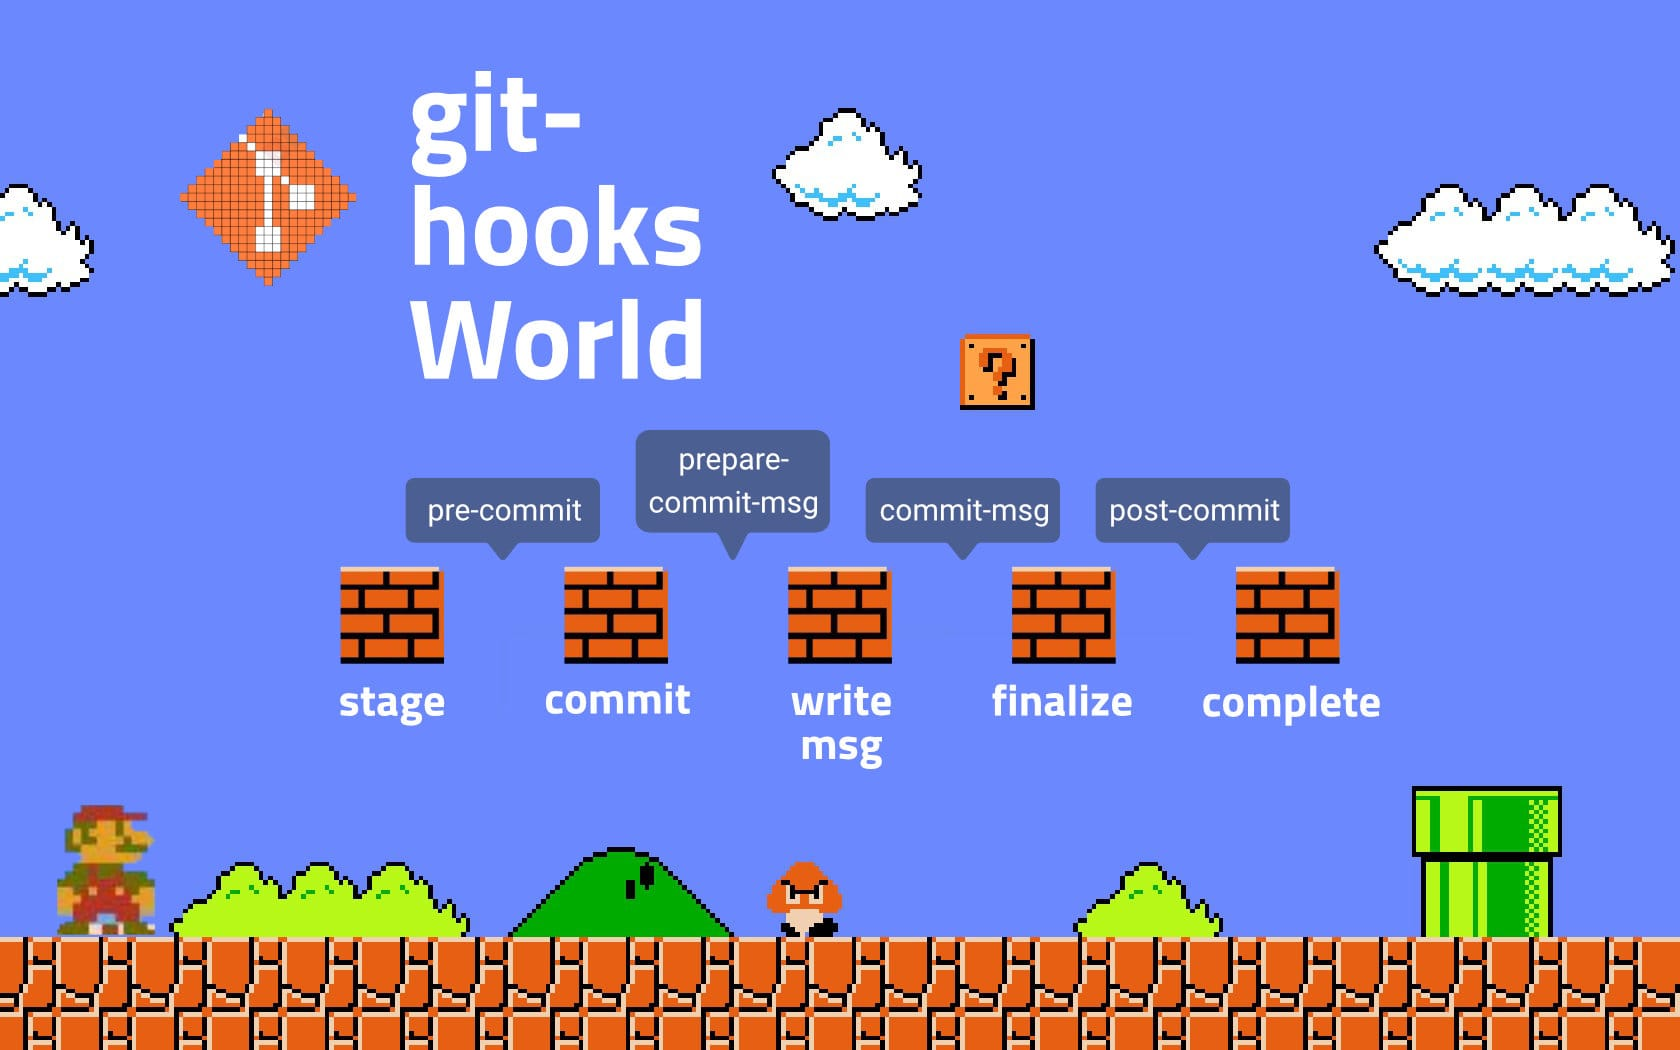
}git hook 이해하기
커밋 워크플로우 훅을 사용하면 커밋을 할 때마다
반복적으로 해야 하는 일들을 손쉽게 자동화할 수 있습니다.
commit workflow hook
- pre-commit 커밋 메시지를 작성하기 전에 호출됨
- prepare-commit-msg 커밋 메시지 생성 후 편집기 실행 전에 호출됨
- commit-msg 커밋 메시지와 관련된 명령을 넣을 때 호출됨
- post-commit 커밋이 완료되면 호출됨
https://www.huskyhoochu.com/how-to-use-lint-staged/
6. Create React App 시작 코드 이해하기
src/index.js
import React from 'react';
import ReactDOM from 'react-dom';
import './index.css';
import App from './App';
import reportWebVitals from './reportWebVitals';

// main
ReactDOM.render(
	<React.StrictMode>
		<App />
	</React.StrictMode>
	document.getElementById('root')
);

reportWebVitals();
src/App.js
import logo from "./logo.svg";
import "./App.css";

function App() {
	return(
		<div className="App">
			<header className="App-header">
				<img src={logo} className="App-logo" alt="logo" />
				<p>
					Edit <code>src/App.js</code> and save to reload.
				</p>
				<a className="App-link" href="https://reactjs.org" target="_blank" rel="noopener noreferrer">Learn React</a>
			</header>
		</div>
	);
}
7. Debugging
React Developer Tools를 사용하게 되면, 크롬 웹에서 개발자 모드로 컴포넌트(Components) 구조를 볼 수 있고 변경하면서 테스트하기 용이하다.
참고
https://byul91oh.tistory.com/424
정리
리액트에서 렌더링을 이해하는 것이 매우 중요
렌더링 : 리액트 엘리먼트를 html 형태로 변환하여 화면에 그려지는 것
(데이터를 화면에 그려주는 것)
왜 렌더링을 이해해야 할까?
1,000개의 데이터를 나열하는 컴포넌트와
100개의 데이터를 나열하는 컴포넌트가 있다고 가정해봅시다.
만약 100개의 데이터에 101개로 추가되어 다시 그려진다고 했을 때
1,000개의 데이터를 나열하는 컴포넌트는 변화가 없기 때문에
다시 렌더링할 필요가 없습니다.
만약 같이 렌더링이 된다면 낭비가 발생합니다.
이러한 이유 때문에 우리는 렌더링이 언제 일어나는지 반드시 알아야 하고
원하는 컴포넌트만 렌더링할 수 있도록 만들어야 합니다.
https://m.blog.naver.com/pjt3591oo/221907792621
렌더링 시점 = 업데이트 할 때 (Update)
- props가 바뀔 때
- state가 바뀔 때
- 부모 컴포넌트가 리렌더링 될 때
- this.forceUpdate로 강제로 렌더링을 트리거할 때 (forceUpdate()가 호출될 때)
(이전 ch의 컴포넌트의 라이프사이클 중 업데이트 개념 참조)
디버깅 툴을 통해 리액트의 데이터흐름을 볼 수 있는데, 이를 통해 우리가 리액트를 사용하여
스크립트로 작성한 컴포넌트의 구조 확인해 변경하면서 테스트하기 용이해짐

