서론
- 인앱결제.. 끝이 안보이던 것도 결국 하게 되네요
- IOS에 이어서 Android도 포스팅 시작합니다~!~!
인앱 상품 유형 및 카탈로그 고려사항 이해
인앱 상품 유형
| 구분1 | 구분2 | 설명 |
|---|---|---|
| 일회성제품 | - | 사용자가 결제 수단으로 단일 요금 지급하여 구매 |
| "" | 소비성 제품 | 사용자가 인앱 콘텐츠를 받기 위해 소비하는 제품 / 두 번 이상 구매할 수 있음 |
| "" | 비소비성 제품 | 한 번 구매하면 영구적인 혜택 제공, 사용자가 구매한 제품은 사용자의 Google 계정과 영구적으로 연결됨 |
| 정기결제제품 | - | 사용자가 지정된 기간 동안 액세스할 수 있는 일련의 혜택 의미 |
고려사항
- 각 앱의 기본 인앱 상품 한도는 1,000개이며 상품 유형에 따라 추가 고려 사항이 있습니다.
- 삭제된 제품의 제품 ID를 재사용할 수 없지만 1,000개 한도에 포함 X
- 그외.. +a로 본격적으로 도입할 때 참고하시면 좋을 것 같습니다!
인앱결제 서버 구현을 위한 설정 준비하기
1. Google Play 개발자 계정 설정
저는 설정 다 된 후에 바로 백엔드 개발에 투입되어 아래 개발자 계정 설정 방법은 잘 모르나 각 단계별로 상세히 나와있는 것 같습니다. 각 단계별로 구글링 해보시면 좋을 것 같아요.
2. Google Play Developer API 구성
- 이 API는 구매를 안전하게 인증하고 사용자에게 환불을 처리해 주는 등 Google Play 결제 라이브러리에서는 사용할 수 없는 기능을 제공합니다.
- Google Play Console을 통해 Google Play Developer API 액세스를 구성해야 합니다.
Google Play Developer API 시작하기
- Google Play Developer API 시작하기
- API 호출을 시작하기 전에 먼저 Google Play 개발자 계정에 대한 API 액세스를 설정해야 합니다
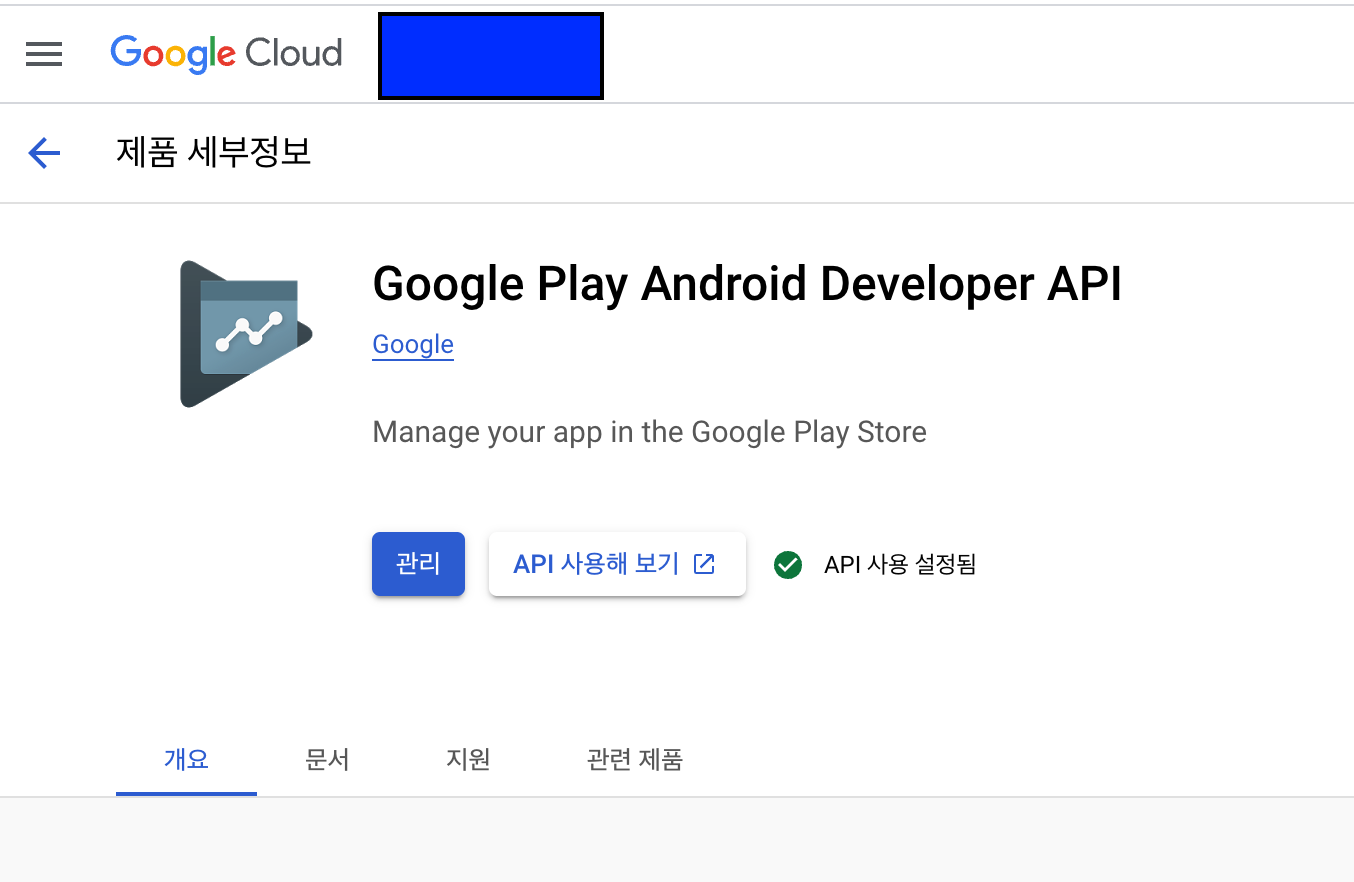
- Google Cloud Console의
API 및 서비스> 라이브러리에서Android Developer API를 검색한 후 활성화(Enable) 버튼을 클릭합니다.
- Google Cloud Console의
- Google Play Developer API 시작하는데 필요한 단계
(1, 2번은 상단Play Console 시작하기링크에서 바로 설정할 수 있는 링크로 이동할 수 있어 생략합니다.)
-
Google Cloud 프로젝트 만들기
- 이미 있다면 건너띄기 가능
-
Google Cloud 프로젝트에 API 사용 설정
- 사용 설정
-
Google Play Developer API에 액세스할 수 있는 관련 Google Play Console 권한을 가진 서비스 계정설정
-
OAuth client나서비스 계정을 사용하여 Google Play Developer API 액세스 구성해야 함서비스 계정 OAuth Client 계정 보안 소프트웨어 서비스가 API에 액세스 사용자가 API에 액세스 SW(Server)가 API 호출할 때 사용 웹사이트에서 사용자를 대신하여 API에 액세스 해야 하면 서비스 계정이 아닌 Google 계정인 클리아언트 계정 인증(서비스 계정의 사용자 인증 정보를 노출하지 않고 사용자를 대신하여 API 호출 가능) -
API 사용 권한이 없는 사람에게 서비스 계정의 사용자 인증 정보가 공개되지 않도록 안전하게 관리 필수
- github 저장소 저장 금지!
-
서비스 계정 사용
-
Google Cloud 콘솔에서 서비스 계정 생성
- 프로젝트 선택
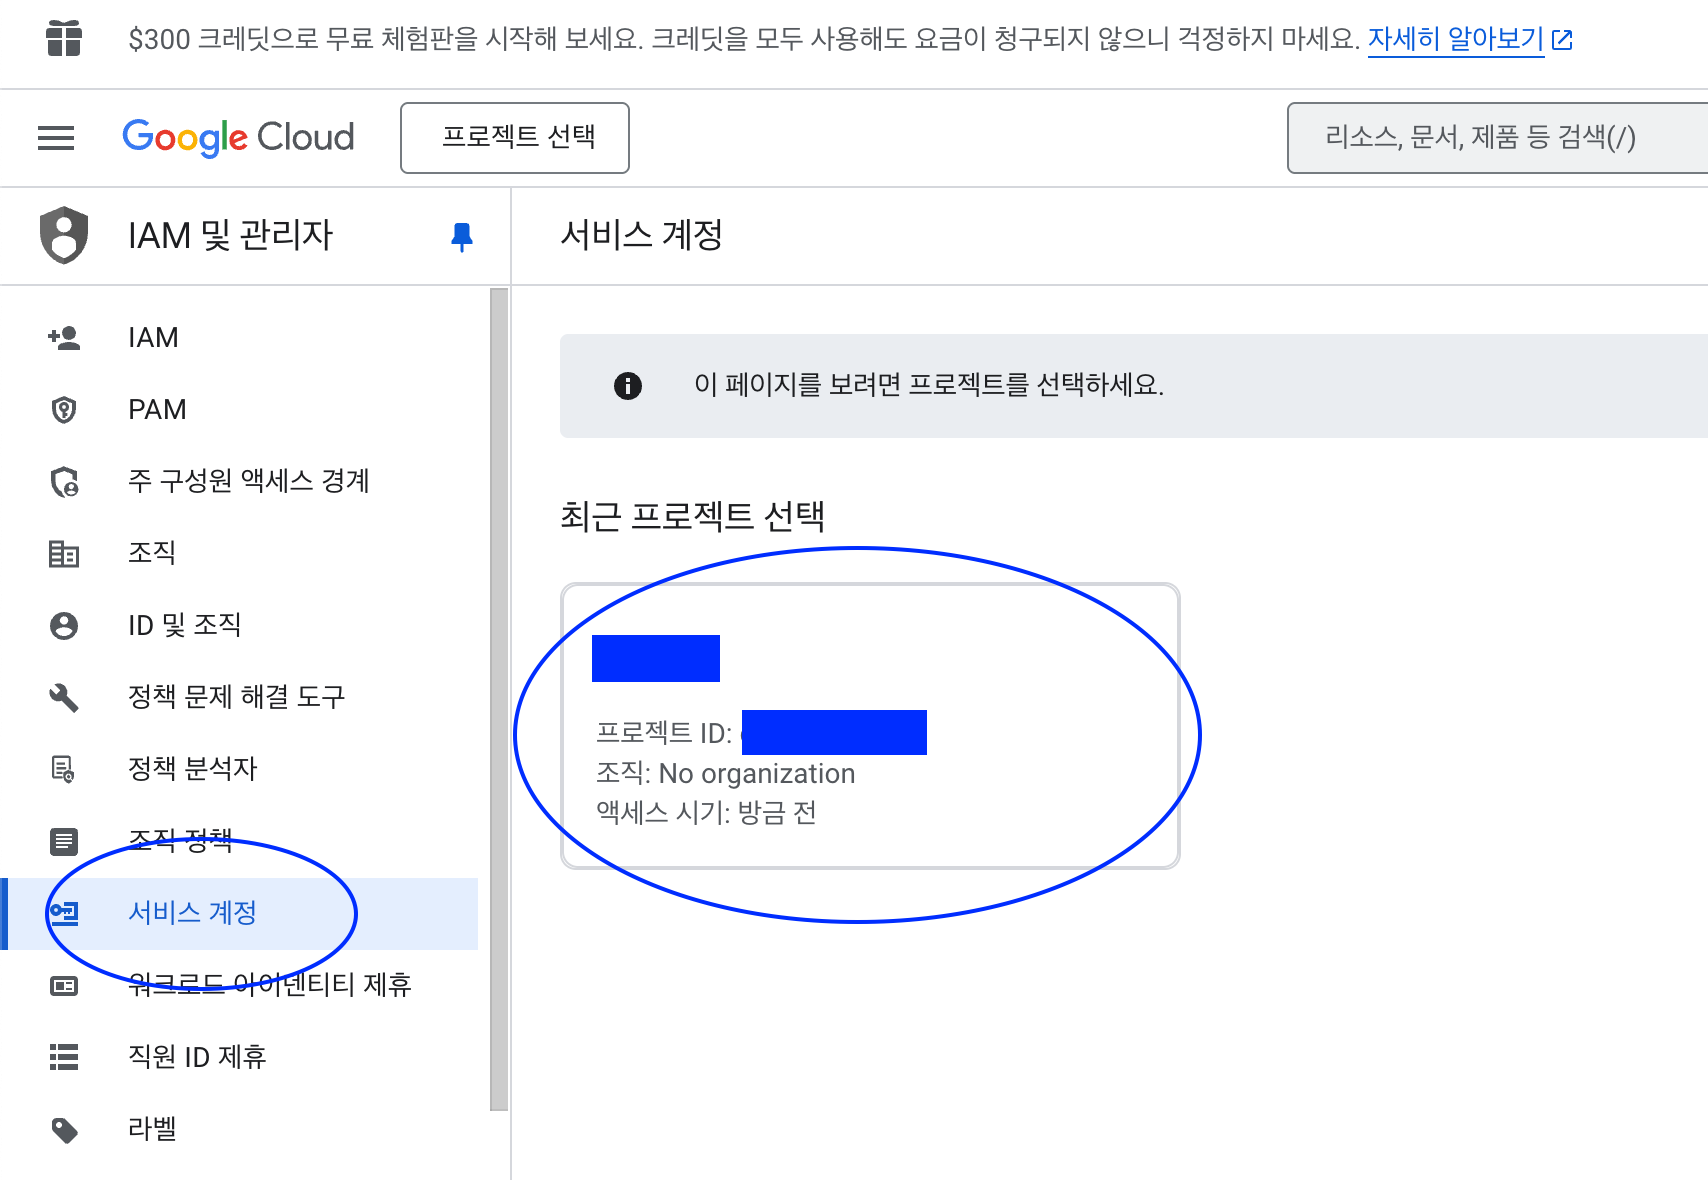
- 프로젝트 선택
-
서비스 계정 만들기 단계 따르기 (생략)
- 권한에 프로젝트 결제 관리자는 꼭 주지 않아도 됩니다. (선택사항이라 적혀있음)
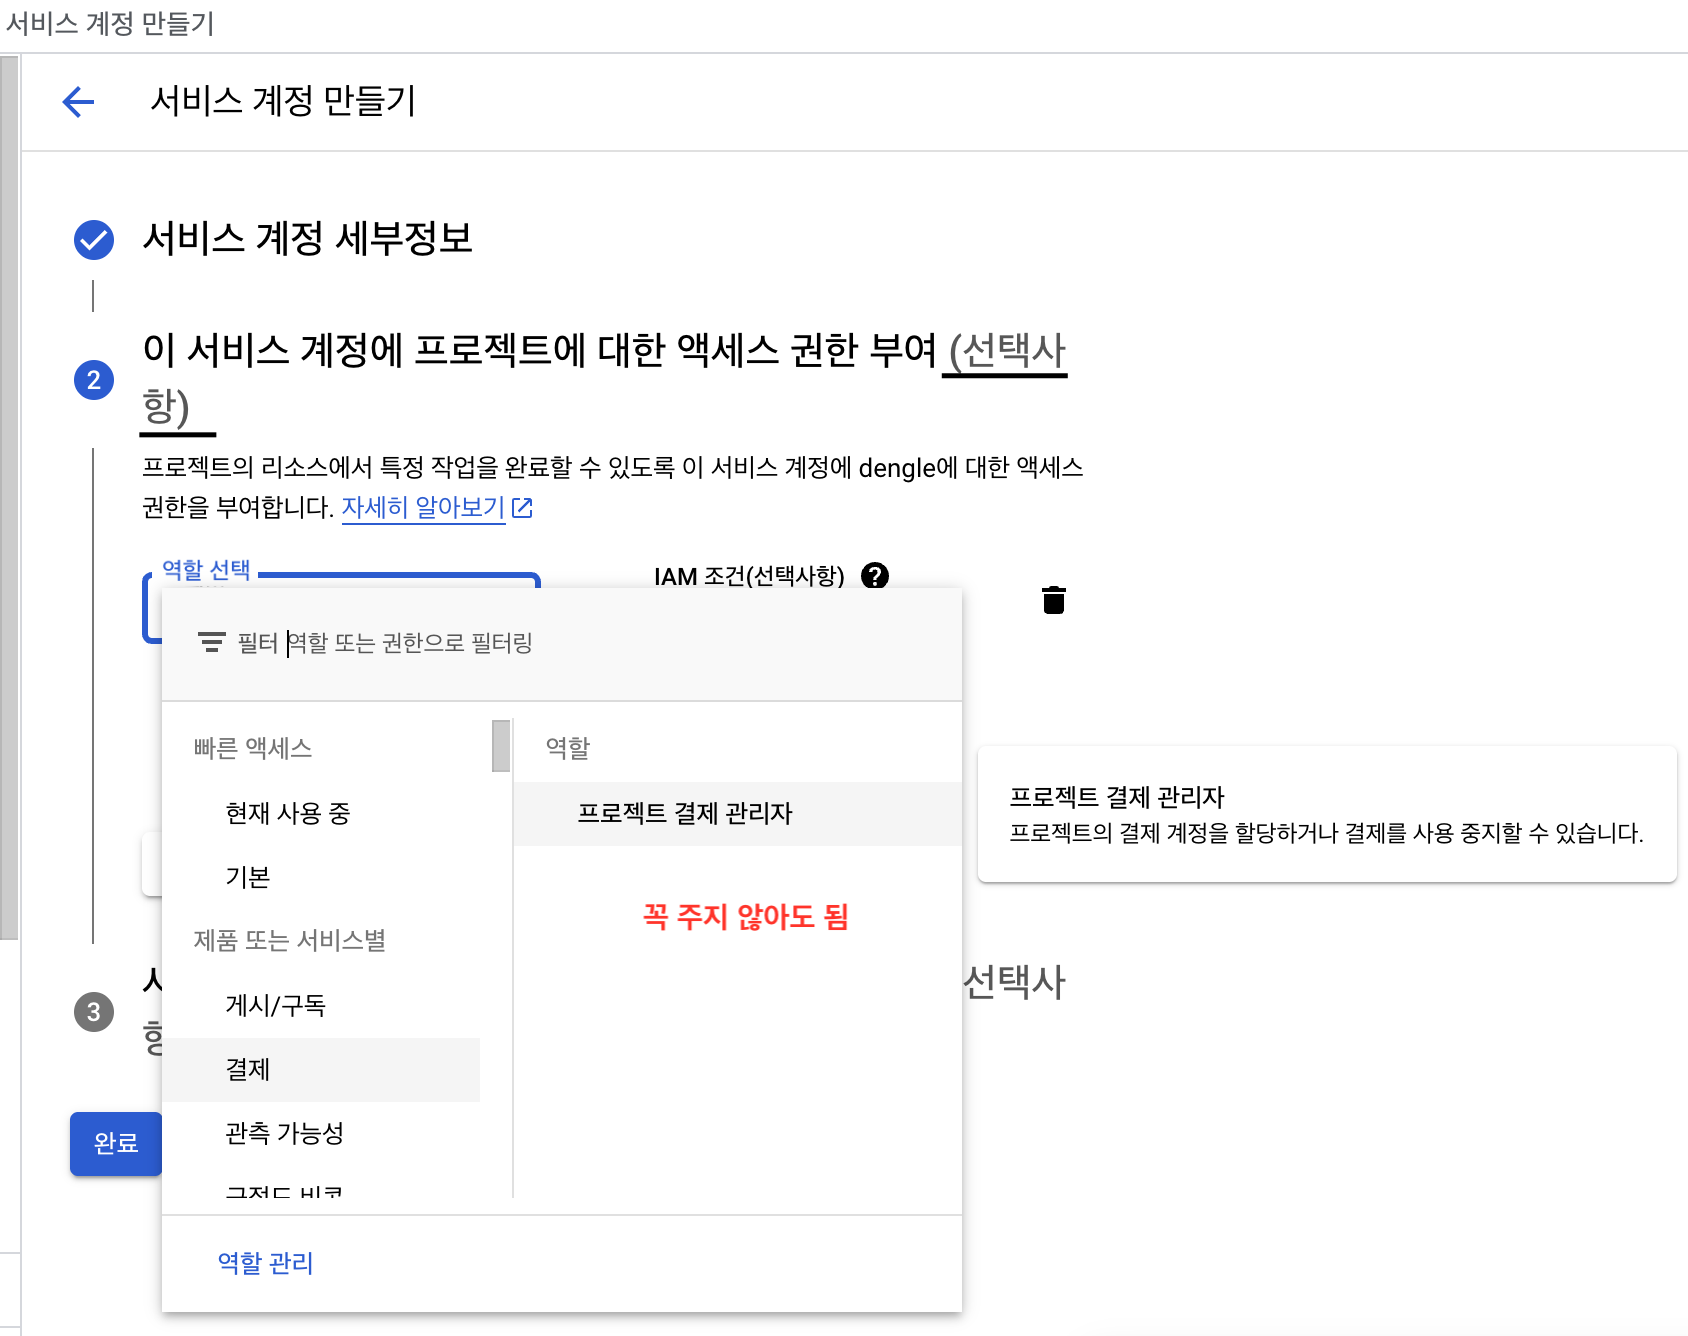
- 권한에 프로젝트 결제 관리자는 꼭 주지 않아도 됩니다. (선택사항이라 적혀있음)
-
Google Play Console에서 신규 사용자 초대
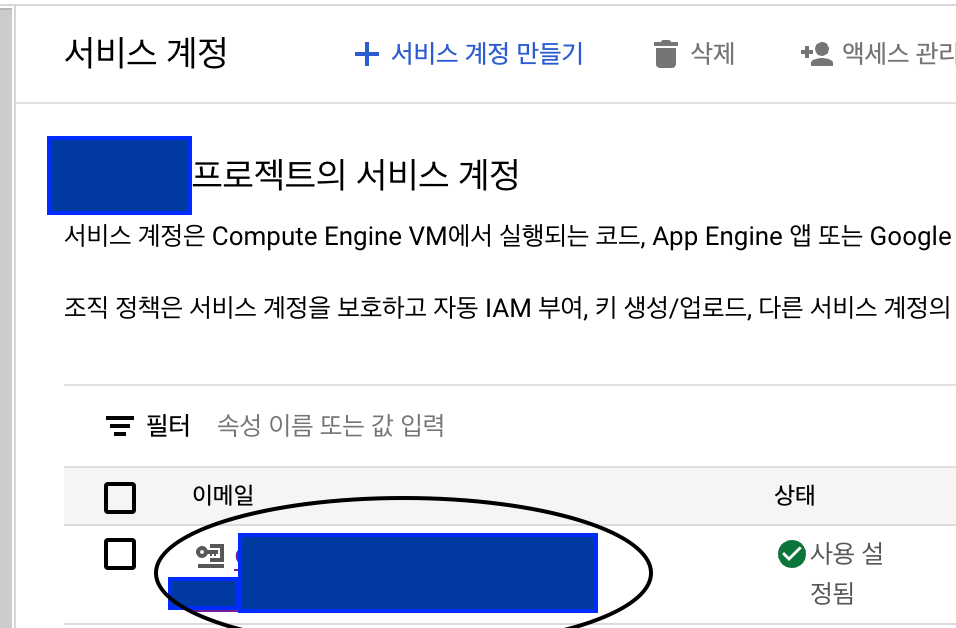
- Service 계정의 이메일 클릭
재무데이터, 주문, 취소 설문조사 응답보기+주문 및 정기 결제 관리 권한필수- 그냥.. 저는 관리자로 줘버렸습니다
-
이제 서비스 계정과 앱을 연결시키는 설정을 완료하였습니다.
- 서비스 계정을 통해 Google Play Developer API에 액세스 가능해짐
서버 간 애플리케이션 OAuth 2.0 사용(웹에서 할 수 있는 설정만)
- Google OAuth 2.0 시스템은
웹 애플리케이션과Google 서비스 간 상호작용과 같은 서버 간 상호작용 지원- 개별 최종 사용자가 아닌 애플리케이션에 속한 계정인 서비스 계정 필요
- 일부 Google API에서는 OAuth 2.0을 사용하는 대신 서명된 JWT를 사용하여 승인된 API 호출을 실행
- 밑에서 나오겠지만 인앱결제 검증에 사용되는 API는 JWT를 사용합니다!
3. 서비스 계정(키) 만들기
-
서비스 계정 만들기는 위에서 작성했기에 Pass~
-
서비스 계정 키 만들기
- 서비스 계정 클릭
- 키 -> 키 생성 클릭
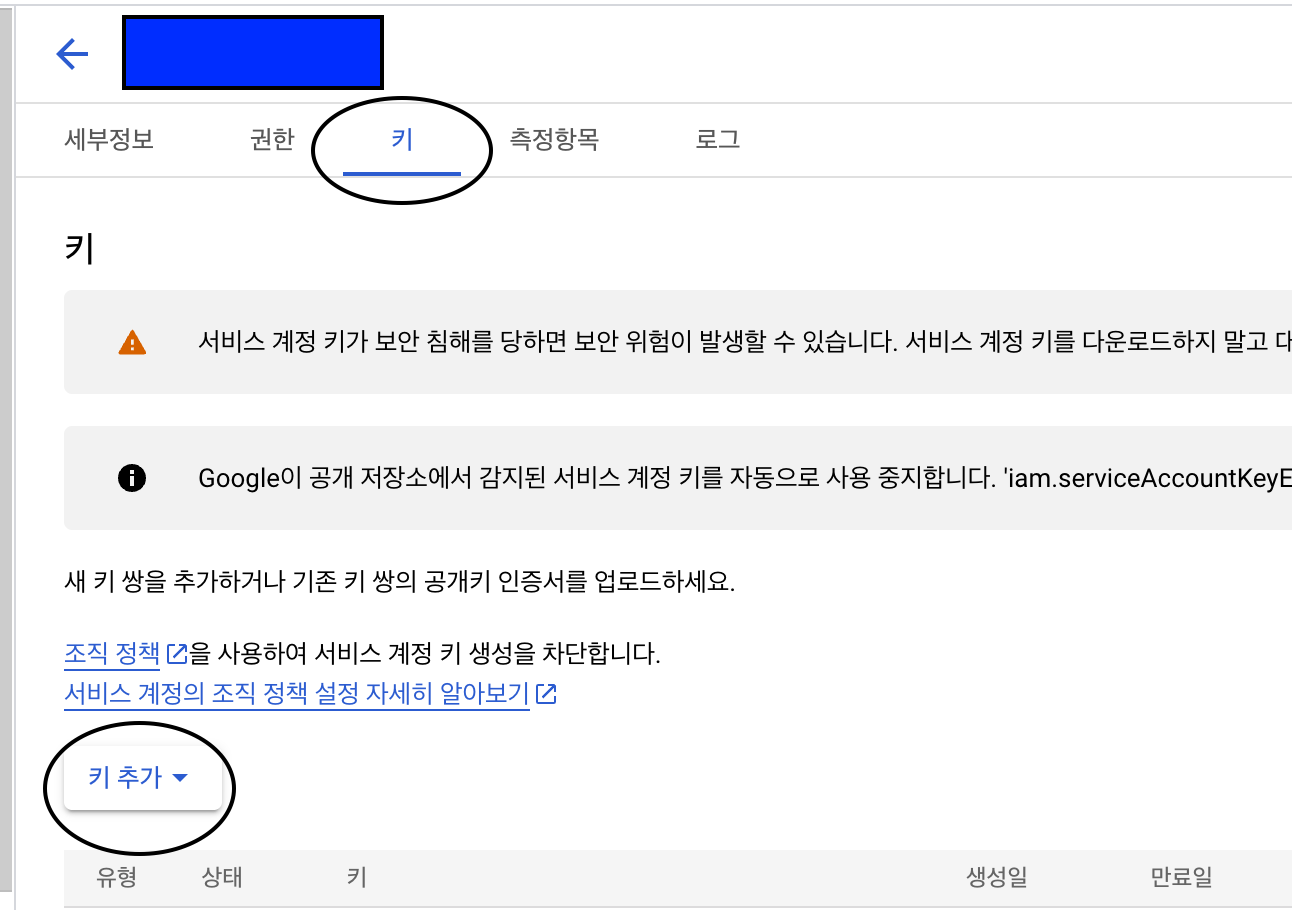
- 서비스 계정 클릭
-
서비스 계정 키를 만들면 아래와 같은 json 파일이 다운로드 됩니다!
{
  "type": "service_account",
  "project_id": "xxx",
  "private_key_id": "xxx",
  "private_key": "-----BEGIN PRIVATE KEY-----ㅌㅌㅌㅌㅌ\n-----END PRIVATE KEY-----\n",
  "client_email": "xxxxxx@xxxxxxx-xxxxx.iam.gserviceaccount.com",
  "client_id": "xxxx",
  "auth_uri": "xxxx",
  "token_uri": "xxxx",
  "auth_provider_x509_cert_url": "xxxx",
  "client_x509_cert_url": "xxxx",
  "universe_domain": "xxxx"
}
위 파일을 Spring Boot 패키지에 넣되, Github에는 올리지마세요!!
이로써 웹에서 설정해야 할 것들은 끝났습니다~!~!
이제 프로젝트에서 환경 설정을 해봅시다.
Google Play Android Developer API
Google Play Android Developer API
- Android 애플리케이션 개발자가 Google Play 계정에 액세스할 수 있도록 허용합니다.
- 이 서비스를 호출하려면 Google에서 제공하는 클라이언트 라이브러리를 사용하는 것이 좋습니다.
클라이언트 라이브러리
- 클라이언트 라이브러리를 사용하면 Google Cloud API에 액세스할 때 작성할 코드 양을 크게 줄여 주는 간소화 기능 제공
Google API 클라이언트 라이브러리
- Google API 클라이언트 라이브러리라 부르는 이전 스타일의 클라이언트 라이브러리 사용 가능
- Cloud 클라이언트 라이브러리가 npm, pip 처럼 되어있어서 Java는 없나? 싶어서 하단 내용을 찾아 적용했습니다.
- Google API Client Libraries 페이지 -> Java 클릭
- 상단 샘플 메뉴
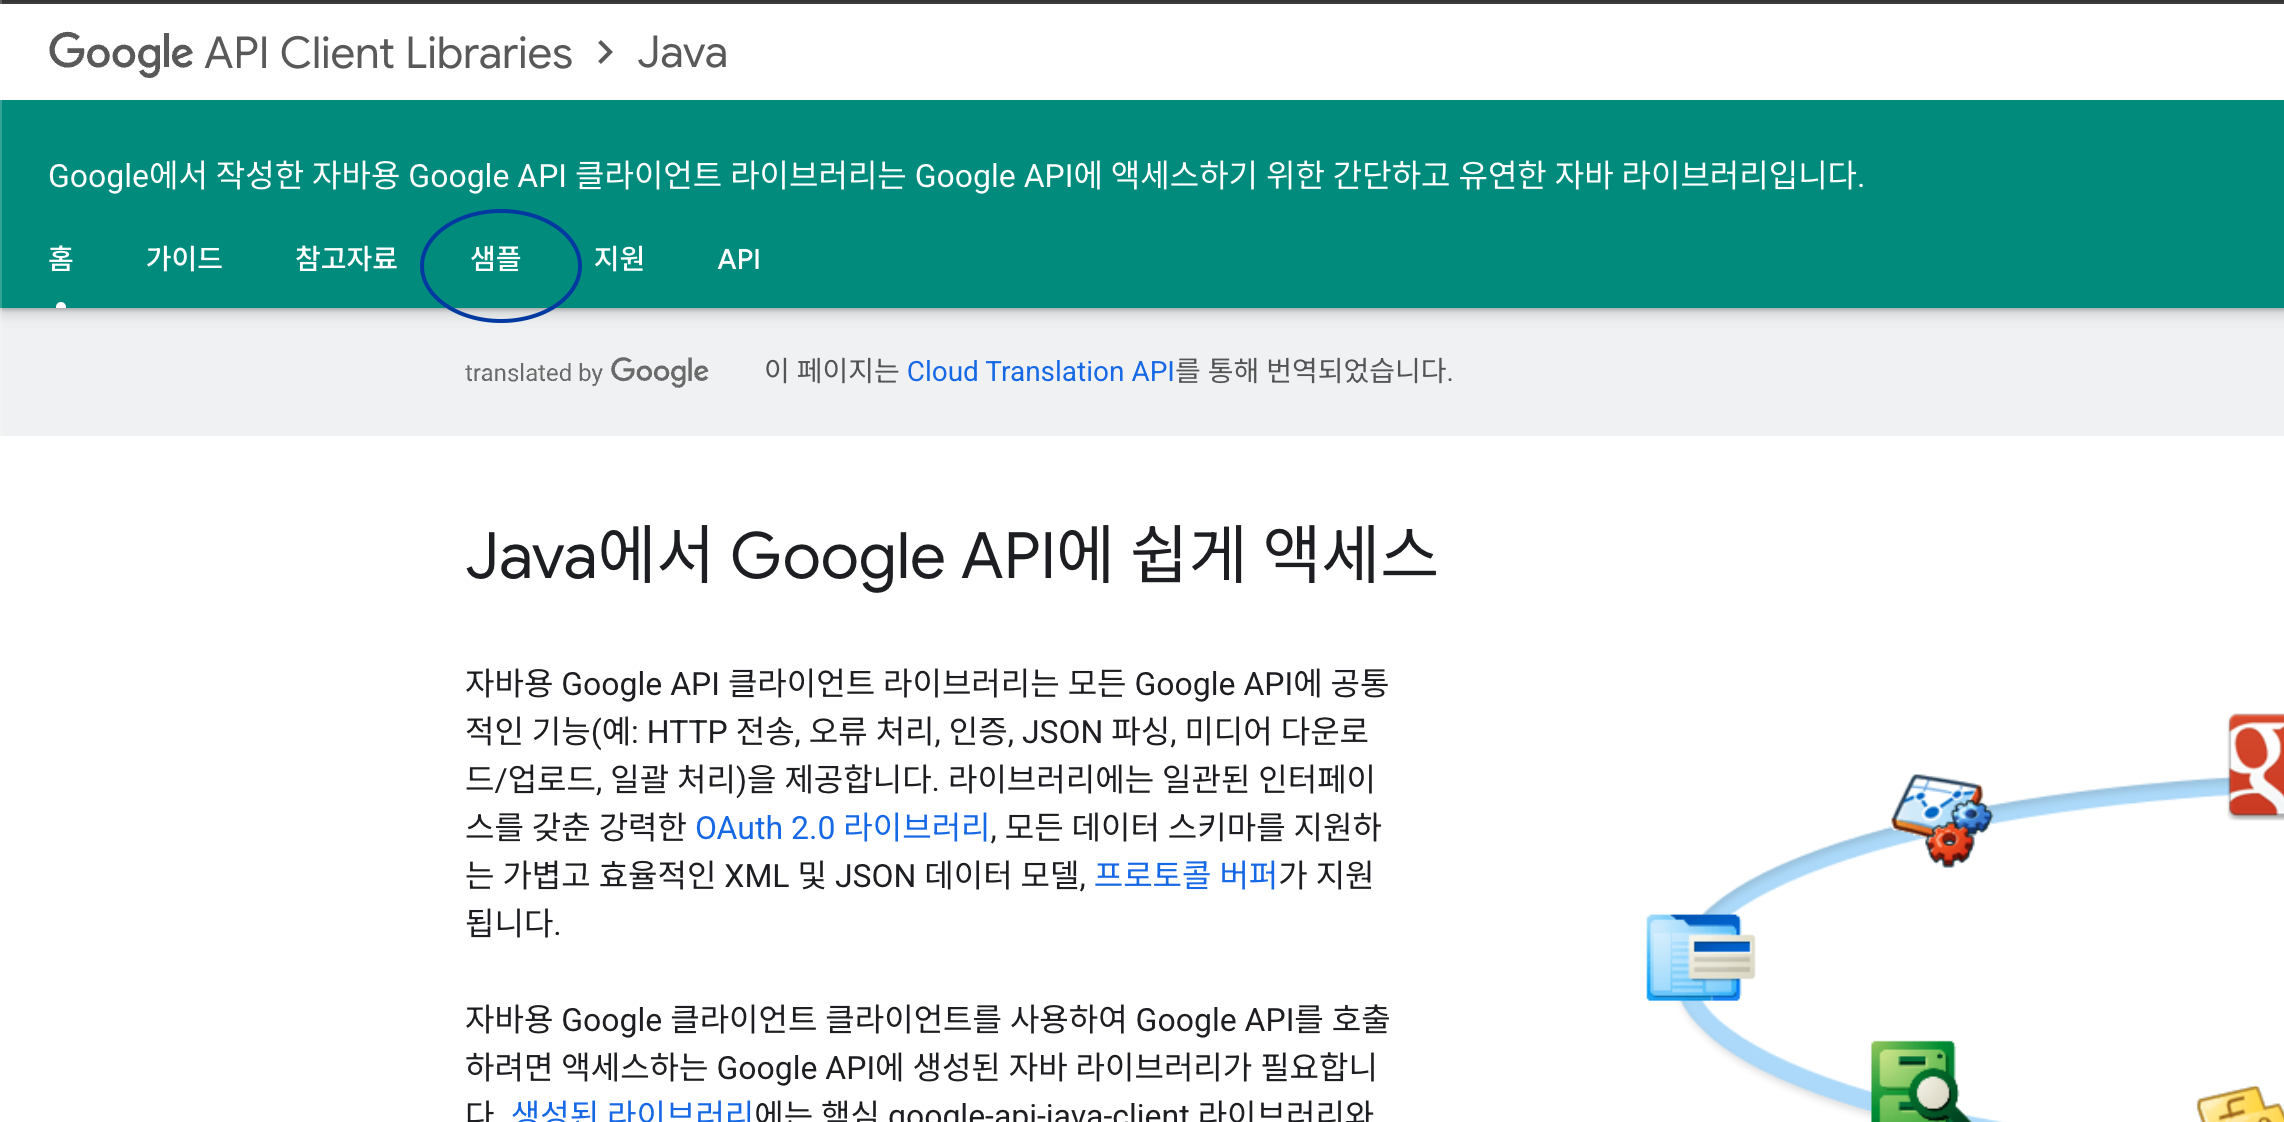
- 깃허브 샘플 둘러보기

클라이언트 라이브러리 샘플 페이지(Github)
- readme에서 Google Play 안드로이드 개발자 API 찾기
- 크롬 번역 기능을 켰는데 껐다면 Android 로 찾아 보시면 됩니다!
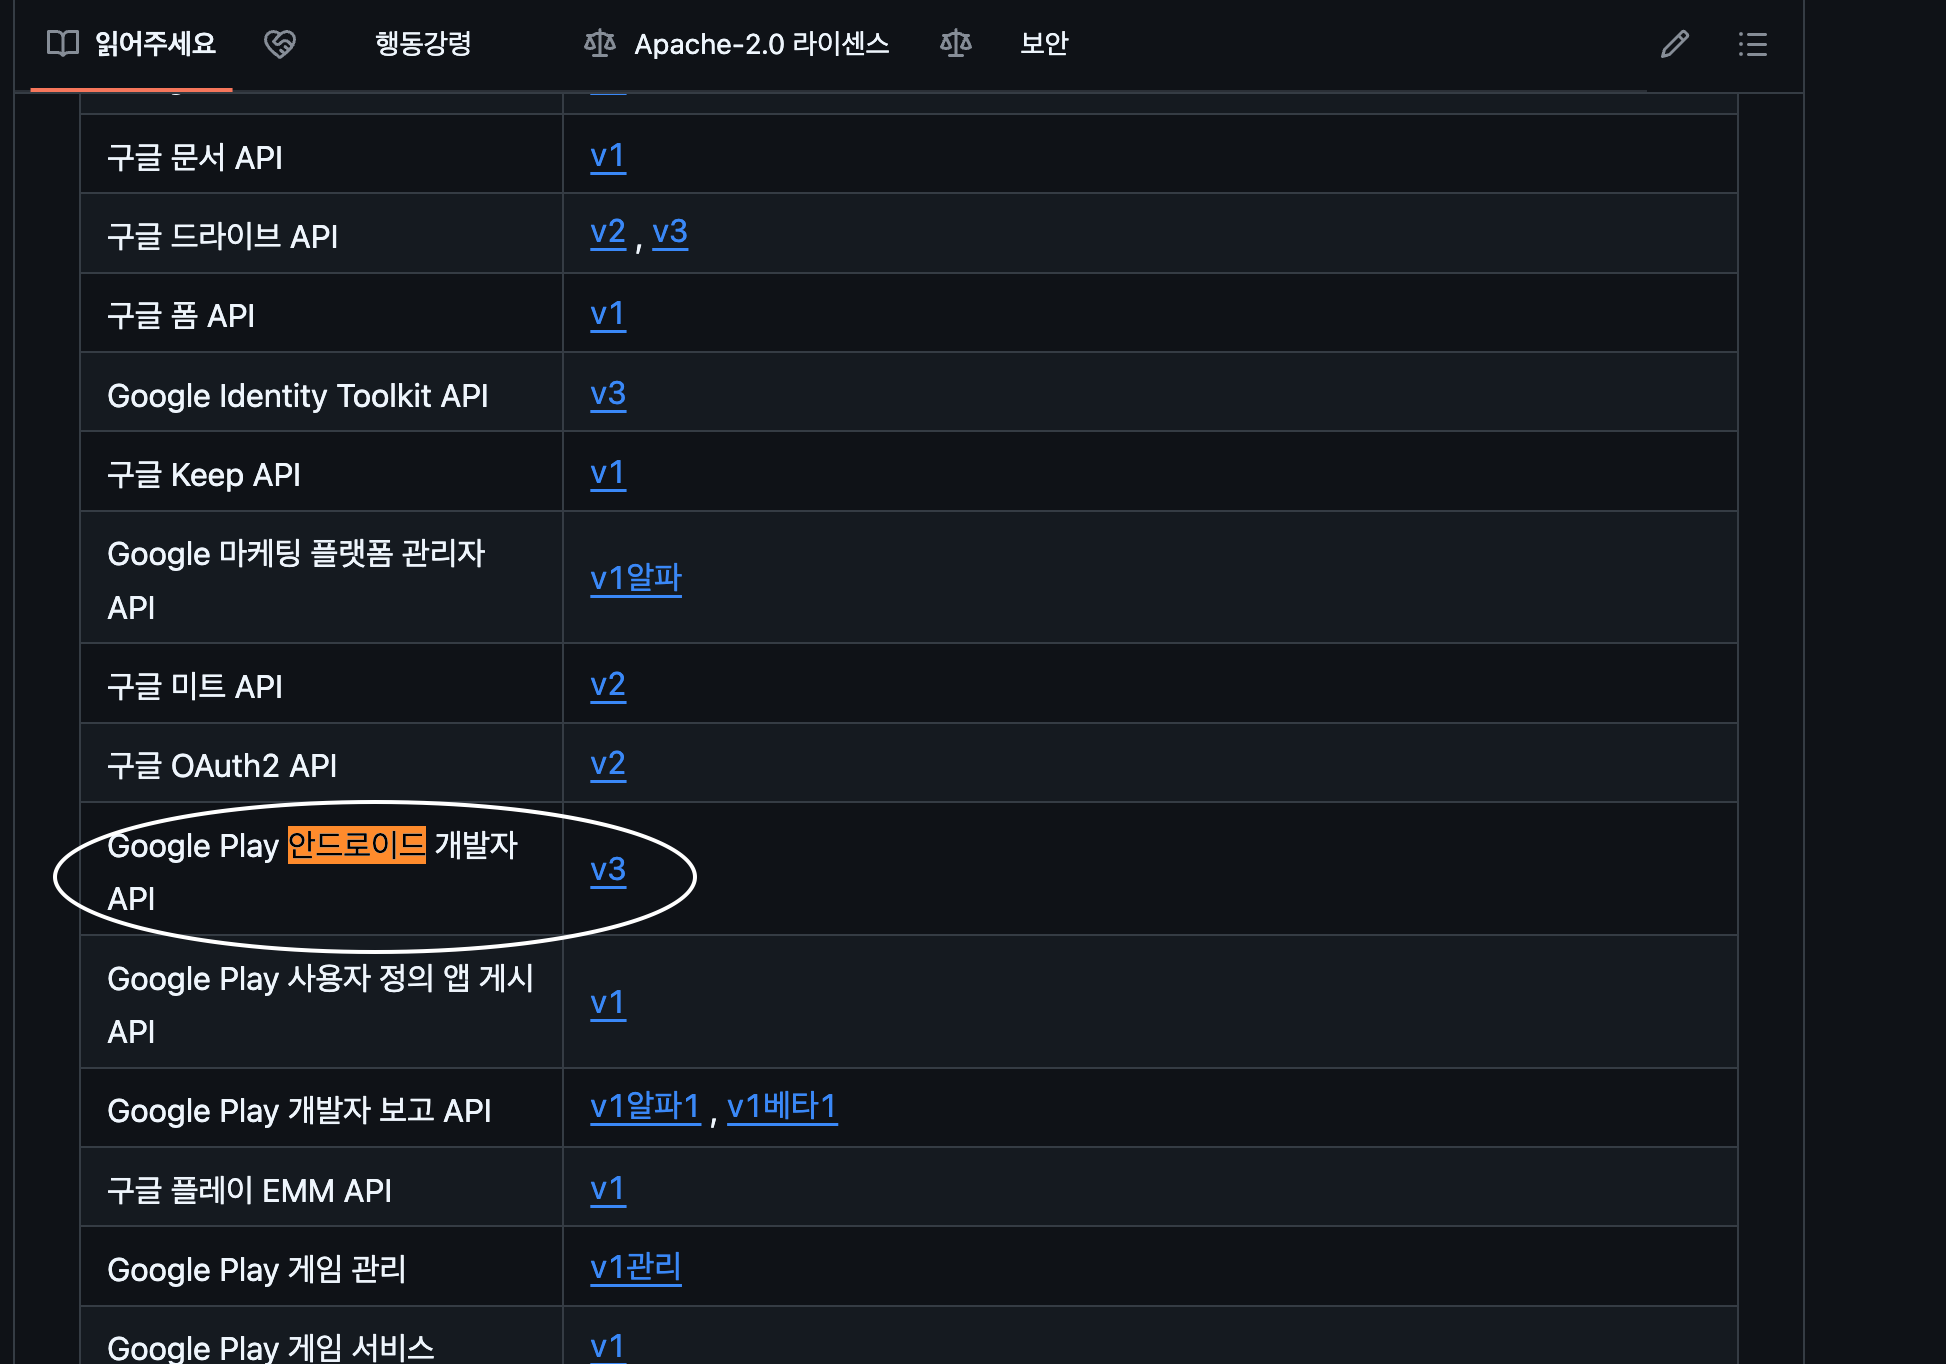
- 크롬 번역 기능을 켰는데 껐다면 Android 로 찾아 보시면 됩니다!
androidpublisher
Java용 Google Play Android 개발자 API 클라이언트 라이브러리
- Android 애플리케이션 개발자가 Google Play 계정에 액세스할 수 있도록 합니다.
의존성 추가
repositories {
  mavenCentral()
}
dependencies {
  implementation 'com.google.apis:google-api-services-androidpublisher:v3-rev20250227-2.0.0'
}
서버 간 애플리케이션에 OAuth 2.0 사용(프로젝트에서 하는 설정 추가)
위임된 API 호출 준비
-
API Console에서 클라이언트 이메일 주소와 비공개 키를 가져온 후 Java용 Google API 클라이언트 라이브러리를 사용하여 서비스 계정의 사용자 인증 정보와 애플리케이션에 액세스해야 하는 범위에서 GoogleCredential 객체를 만듭니다.
- 클라이언트 이메일 주소와 비공개 키 => 시크릿 키 생성하면 생성되는 json 파일 내부에 있음
-
도메인 전체 권한 위임은 제공하지 않겠습니다.
- 위 홈페이지에 서비스 계정에 도메인 전체 권한 위임 부분 읽어보시면 Calendar API 등 사용자 대신 액세스합니다. 도메인의 사용자 대신 데이터에 액세스하도록 서비스 계정을 승인하는 것 이라 나와있습니다.
- 저는 서비스 계정을 결제 검증에만 사용하기 때문에 주지 않았습니다.
Java용 Google Api 클라이언트 라이브러리
- 위를 사용해서
GoogleCredential객체를 만들어야 합니다.
Github에서 의존성 확인
- 의존성 추가
repositories {
    mavenCentral()
    google()
}
dependencies {
    compile 'com.google.api-client:google-api-client:1.33.0'
}- GoogleCredential 객체 생성 코드 확인
HttpTransport httpTransport = GoogleNetHttpTransport.newTrustedTransport();
JsonFactory jsonFactory = GsonFactory.getDefaultInstance();

//Build service account credential
GoogleCredentials googleCredentials = GoogleCredentials.
        fromStream(new FileInputStream("/path/to/file"));
HttpRequestInitializer requestInitializer = new HttpCredentialsAdapter(googleCredentials);

Storage storage = new Storage.Builder(httpTransport, jsonFactory, requestInitializer)
        .setApplicationName("MyProject-1234")
        .build();
호출해야 하는 API를 확인해봅시다.
Library 사용해서 API 호출하는 방법 확인
Google API 호출
Cloud SQL 인스턴스를 나열하는 API 호출 예제
GoogleCredential객체를 사용하여 API를 호출합니다.GoogleCredential객체를 사용하여 호출하려는 API의 서비스 객체를 만듭니다.
SQLAdmin sqladmin = new SQLAdmin.Builder(httpTransport, JSON_FACTORY, credential).build();- API 서비스에 요청
SQLAdmin.Instances.List instances =
  sqladmin.instances().list("exciting-example-123").execute();
Android 인앱결제 검증 API 호출
- 위 예시는 다른 API 호출의 예시지만 Android 인앱결제 검증에도 동일한 원칙으로 아래 순서가 적용됩니다.
GoogleCredential객체를 사용하여 호출하려는 API의 서비스 객체인 AndroidPublisher를 생성합니다.- 생성한 AndroidPublisher 객체를 통해 API 서비스에 요청합니다.
Android 인앱결제 검증 API 호출을 위한 설정 최종 적용
의존성 추가
	implementation 'com.google.apis:google-api-services-androidpublisher:v3-rev20250102-2.0.0' // `GoogleCredential` 객체를 사용하여 호출하려는 API의 서비스 객체 AndroidPublisher 생성용

	implementation 'com.google.auth:google-auth-library-oauth2-http:1.6.0' // 서비스 계정 인증 및 `GoogleCredential` 객체를 만들기 위한 의존성
Java 코드
@Service
@Slf4j
@RequiredArgsConstructor
public class AndroidPurchaseService {

    private String secretFilePath = "android/secret.json" // 시크릿키 json 파일 경로

	// 호출하려는 서비스의 AndroidPublisher 객체 저장
    private AndroidPublisher publisher;
    // TODO : 실제 앱의 패키지명으로 변경
    private String packageName = "com.example.app";

    @PostConstruct
    public void init() {
        try {
            // resources 디렉토리에 있는 파일은 클래스패스를 통해 접근
            InputStream inputStream = getClass().getClassLoader().getResourceAsStream(secretFilePath);

            if (inputStream == null) {
                throw new FileNotFoundException("secret 파일이 없어용~!");
            }

            // JSON 키 파일을 읽어 서비스 계정 자격증명을 생성
            GoogleCredentials credentials = GoogleCredentials.fromStream(inputStream)
                    .createScoped(Collections.singleton("https://www.googleapis.com/auth/androidpublisher"));

            // AndroidPublisher 객체 생성
            publisher = new AndroidPublisher.Builder(
                    GoogleNetHttpTransport.newTrustedTransport(),
                    GsonFactory.getDefaultInstance(),
                    new HttpCredentialsAdapter(credentials))
                    .setApplicationName("example") // TODO : 실제 앱 이름으로 변경
                    .build();

            log.info("AndroidPurchaseService 초기화 완료");
        } catch (Exception e) {
            throw new RuntimeException("AndroidPurchaseService 초기화에 실패했습니다.", e);
        }
}- AndroidPurchaseService 객체를 인앱결제 검증이 필요할 때 바로 사용하도록 빈으로 등록했습니다.
- @PostConstruct 를 통해서 빈 등록하면서 관련 설정정보들을 미리 세팅해두고 바로 사용하도록 의도합니다.
호출해야 하는 API - Google Play Android Developer API
Google Play Android Developer API
- 위 링크에서 API 정보를 알면, 라이브러리를 통해 메서드로 비교적 간편하게 호출할 수 있음
필요 API정보 1 - Rest 리소스 : v3.purchses.products
| 메서드 | 본문 |
|---|---|
| acknowledge | 인앱 상품의 구매를 확인합니다. |
| consume | 인앱 상품 구매를 소비합니다. |
| get | 인앱 상품의 구매 및 소비 상태를 확인합니다. |
리소스 : ProductPurchase
-
사용자의 인앱 상품 구매 상태를 나타냅니다.
-
검증에 사용된 속성 (딱 결제 검증, DB 정보 저장에 필요한 것만 확인했는데 추가로 더 필요하시면 문서에 나와있는 다른 속성 활용하시면 좋을 것 같습니다!)
필드 설명 사용처 purchaseState 주문의 구매 상태/ 0 : 구매함, 1: 취소됨, 2:대기 중 구매함 상태의 구매 토큰일 경우만 검증하는 로직 consumptionState 인앱 상품의 소비 상태/ 0: 아직 소비되지 않음, 1: 소비함 소비되지 않은 경우의 구매 토큰인 경우 백엔드에서 소비 처리용 orderId 인앱 상품 구매와 연결된 주문 ID 유일한 구매 Id로 환불 Notification 받았을 때 처리 + 중복 구매 처리 막기 위함 purchaseType 인앱결제 상품 구매 유형, 0:테스트, 1:프로모션, 2:리워드 테스트 환경에서 결제는 처리하지 않도록 하기 위함 acknowledgementState 인앱 상품의 확인 상태입니다./ 0(아직 확인되지 않음). 확인됨 비소비성 제품 구매 처리 여부 검사
Method: purchases.products.get
-
인앱 상품의 구매 및 소비 상태를 확인합니다.
-
HTTP 요청
-
GET
https://androidpublisher.googleapis.com/androidpublisher/v3/applications/**{packageName}**/purchases/products/**{productId}**/tokens/**{token}**매개변수 내용 pacakgeName 인앱 상품이 판매된 애플리케이션의 패키지 이름 productId 인앱상품 Id token 인앱 상품 구매 토큰
-
-
응답으로
ProductPurchase인스턴스 포함
Method: purchases.products.consume
-
인앱 상품 구매를 소비합니다.
-
HTTP 요청
-
POST
https://androidpublisher.googleapis.com/androidpublisher/v3/applications/**{packageName}**/purchases/products/**{productId}**/tokens/**{token}**:consume매개변수 내용 pacakgeName 인앱 상품이 판매된 애플리케이션의 패키지 이름 productId 인앱상품 Id token 인앱 상품 구매 토큰
-
-
응답 본문 비어 있음.
Method: purchases.products.acknowledge
-
인앱 상품 구매를 확인합니다.
- 비소비성 제품, 정기결제 필요한 작업이나 구현한 로직은 소비성 제품만 고려하여서 실제 사용하지 않음
- 아래 예시 코드 첨부(feat GPT)
-
HTTP 요청
-
POST
https://androidpublisher.googleapis.com/androidpublisher/v3/applications/**{packageName}**/purchases/products/**{productId}**/tokens/**{token}**:acknowledge매개변수 내용 pacakgeName 인앱 상품이 판매된 애플리케이션의 패키지 이름 productId 인앱 상품 Id token 구매 토큰 -
요청 본문
{ "developerPayload": "string" }- developerPayload : 구매에 연결할 페이로드
- 필수 아니야? 했지만 GPT 말로는 선택적
- developerPayload 필드는 선택적(optional)입니다. 이 필드를 사용하면 개발자가 추가적인 정보를(예: 사용자 식별자, 결제와 관련된 메타데이터 등) 전달할 수 있습니다.
- 본문에서는 필요에 따라 developerPayload를 제공할 수 있습니다. 만약 추가 정보가 필요하지 않다면 빈 문자열이나 생략해도 됩니다.
-
-
예시 코드
ProductPurchasesAcknowledgeRequest requestBody = new
// 또는 추가 정보가 필요 없다면 생략할 수 있습니다.
ProductPurchasesAcknowledgeRequest();
requestBody.setDeveloperPayload("추가 정보를 전달하고 싶다면 여기에 입력");


AndroidPublisher.Purchases.Products.Acknowledge request =
    publisher.purchases().products().acknowledge(packageName, productId, purchaseToken, requestBody);
request.execute();
필요 API정보 2 - REST Resource: inappproducts
리소스: InAppProduct
-
인앱 상품입니다. InappproductsService의 리소스입니다.
-
검증에 사용된 속성 (딱 결제 검증, DB 정보 저장에 필요한 것만 확인했는데 추가로 더 필요하시면 문서에 나와있는 다른 속성 활용하시면 좋을 것 같습니다!)
필드 설명 사용처 defaultPrice 기본가격 / 무료인 경우 없어 0원일 수 없음 구매 토큰 검증 시 결제 금액 확인할 수 없어 인앱 상품 가격 확인 -
인앱 상품 구매토큰 검증 시 결제 금액이 없기 때문에 인앱상품 금액을 꺼내서 DB 상에 결제금액으로 넣어버립니다.
Method: inappproducts.get
-
하나의 인앱 상품을 가져옵니다.
-
HTTP 요청
-
GET
https://androidpublisher.googleapis.com/androidpublisher/v3/applications/**{packageName}**/inappproducts/**{sku}**매개변수 내용 pacakgeName 인앱 상품이 판매된 애플리케이션의 패키지 이름 sku 인앱상품 Id
-
-
응답 본문에
InAppProduct인스턴스가 포함됨
영수증 결제 구현 전반적 플로우
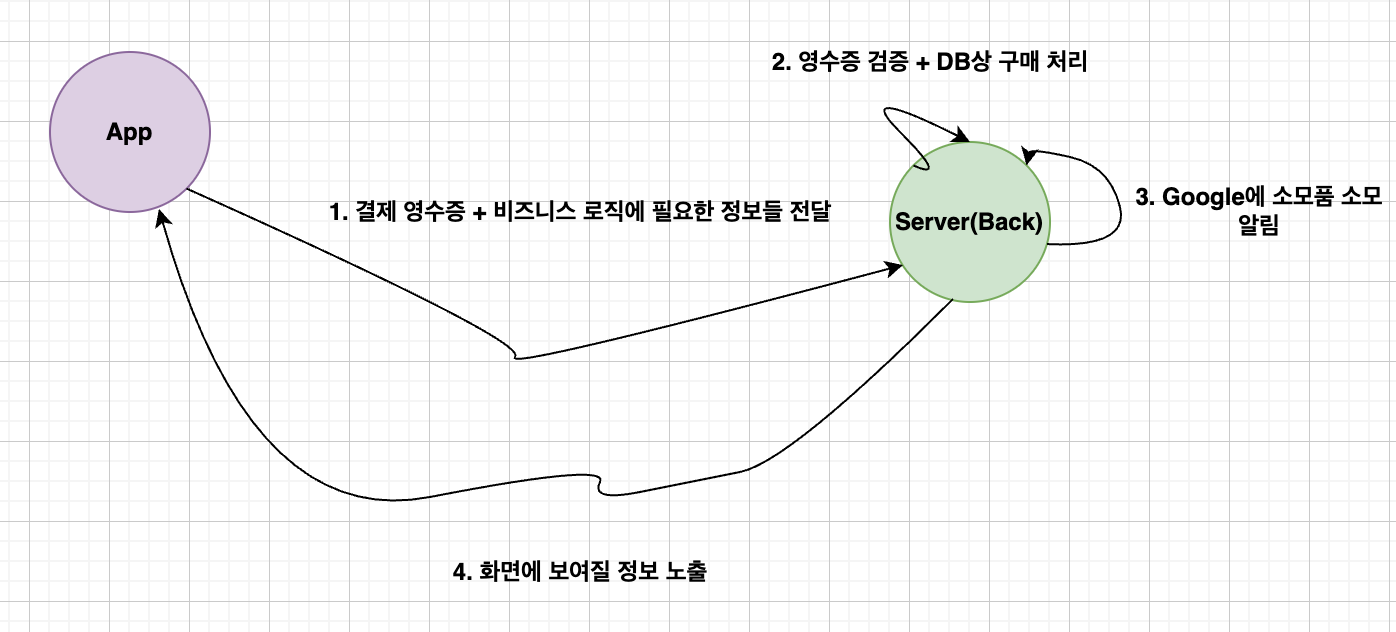
- 앱에서 구매 과정은 앱개발의 영역인 것 같아 자세히 다루지 않겠습니다.
영수증 검증 코드(Controller)
- controller : 앱으로 부터 구매 토큰을 받을 API
    @PostMapping("/verify/android/receipts")
    public ResponseEntity<ResultDto> verifyReceiptForAndroid(@RequestBody Request request) throws Exception {
        log.info("request: {}", request);
        // 구매 토큰으로 ProductPurchase 정보 추출
        ProductPurchase productPurchase = androidPurchaseService.verifyProductPurchase(request.productId(), request.purchaseToken());
        // ProductPurchase 여기에 실제 결제 금액 없으므로 인앱상품의 금액 추출
        Long productPrice = androidPurchaseService.getProductPrice(request.productId());
        // requst 내부에 있던 비즈니스 로직 정보 + 구매 정보 + 인앱상품 금액 => 비즈니스로직 (DB상 구매 처리)
        ResultDto appResultDto = examService.registerForAndroidAppPurchase(request, productPurchase, productPrice);
        // 소비 호출 => 구매 처리되었음을 알려야함 (안하면 3일 이내 자동 환불 처리됨)
        androidPurchaseService.consumeProductPurchase(request.productId(), request.purchaseToken(), productPurchase);
        return ResponseEntity.ok(appResultForLevelTestDto);
    }
잠깐 웬 소비 호출 부분이 추가됐나 싶죠?
구매 감지 및 처리
앱에서 새 구매 또는 완료된 구매를 감지하면 다음을 실행해야 합니다.
- 구매를 인증합니다.
- 완료된 구매에 대해 사용자에게 콘텐츠를 부여합니다.
- 사용자에게 알립니다.
- 앱에서 완료된 구매를 처리했음을 Google에 알립니다.
이러한 단계는 다음 섹션에서 자세히 설명한 후 모든 단계를 요약하는 섹션이 이어집니다.
Google에 구매가 처리되었다고 알림
앱에서 사용자에게 사용 권한을 부여하고 거래가 완료되었음을 알린 후, 앱에서 구매가 처리되었음을 Google에 알리기 위해 구매를 확인합니다.
- 이후 Google에 구매가 처리되었다고 알려 3일 이내에 구매가 자동으로 환불되고 사용 권한이 취소되지 않도록 처리해야 합니다.
- 다양한 유형의 구매를 확인하는 프로세스는 다음 섹션에 설명되어 있습니다.
위와 같은 문구가 또 숨어있었답니다..하하 (약간의 문장을 가독성 좋게 수정함)
(일회성제품) 소비성 제품
- 소비성 제품의 경우 보안 백엔드가 있으면
Purchases.products:consume을 사용하여 안정적으로 구매를 소비하는 것이 좋습니다.
consumptionState를 확인하여 구매가 아직 소비되지 않았는지 확인- 이러한 방법을 사용하면 앱에서 입력 구매 토큰에 해당하는 일회성 제품을 재구매할 수 있습니다.
- 소비 요청이 때로 실패할 수 있으므로 보안 백엔드 서버를 확인하여 각 구매 토큰이 사용되지 않았는지 확인해야 합니다. 그래야 앱이 동일한 구매에 대해 여러 번 자격을 부여하지 않습니다.
- 또는 자격을 부여하기 전에 앱이 Google Play에서 성공적인 소비 응답을 받을 때까지 기다릴 수 있습니다.
- 보안 백엔드로서 구현하고 있기 때문에 권장하는 대로 백엔드에서 소비 처리 코드를 추가했습니다.
- 그렇다면 소비성 제품의 경우만 소비 처리가 필요할까요?
- 그럴리가 없쥬~
(일회성제품) 비소비성 제품
- 비소비성 구매를 확인하려면 앱에 보안 백엔드가 있는 경우
Purchases.products:acknowledge를 사용하여 구매를 안정적으로 확인하는 것이 좋습니다.
acknowledgementState를 확인하여 이전에 구매를 확인하지 않았는지 확인합니다.- 확인하지 않은 경우에만
Purchases.products:acknowledge호출
- 실제 구현은 소비성 제품만 구현했기에 이는 생략하겠습니다. if문으로 응답객체 까서 보고 호출만 해주면 될꺼같아요 사실
(정기 결제)
- 정기 결제 구매는 비소비성 구매와 유사하게 처리됩니다.
- 가능하면 Google Play Developer API의
Purchases.subscriptions.acknowledge를 사용하여 보안 백엔드에서 구매를 안정적으로 확인하세요.Purchases.subscriptions:get의 구매 리소스에서 acknowledgementState를 확인하여 구매가 이전에 확인되지 않았는지 점검합니다.
- 정기 결제도 구현하지 않았기에 이는 생략하겠습니다.
(추가) 그렇다면 여기서 드는 의문?
- 그러면 API를 호출할때 이 인앱상품이 일회성 제품의 소비성인지 비소비성인지 아니면 정기결제인지 아는 방법이 따로 있나?
- 는 없는것으로 파악했습니다. 구현하고자 하는 Service에서 인앱상품 등록 전에 Server상에다가 상품의 종류를 미리 저장해두고 그거에 맞게 구매 소비 처리를 해주셔야 합니다!
- 저는 무조건 소비성 제품으로 구현했었기에 무관하게 코드를 구현했습니다.
- 사실상 아마 끝까지 보신다면 어떻게 분기처리해서 API 호출할지 감이 오실 겁니다.
- 모르신다면 gpt o3 minu high 물어보면 잘 알려 줄 것 같습니다~!~!
영수증 검증 코드(Service)
구매 토큰에서 정보 추출(Purchases.Products.Get) API
    // 구매 토큰에서 정보 추출하는 메서드 - 외부 네트워크 통신이라 실패할 수 있으므로 3번까지 재시도
    @Retryable(
            value = {APIException.class, IOException.class, VerificationException.class},
            maxAttempts = 3,
            backoff = @Backoff(delay = 1000)
    )
    public ProductPurchase verifyProductPurchase(String productId, String purchaseToken) throws Exception {
        AndroidPublisher.Purchases.Products.Get request =
                publisher.purchases().products().get(packageName, productId, purchaseToken);
        return request.execute();
}- @Retryable의 경우 예외 발생하면 재시도 해주는 것인데 한번 찾아보시면 되고, 인앱결제와 무관하니 상세 설명은 패스하겠습니다.
- 외부 통신이다보니 네트워크 문제나 어떤 이유로 처리가 안될경우 재시도 하도록 붙여놨습니다.
Purchases.Products.Get이 형태는 위에서 API로 인앱 상품의 구매 및 소비 상태를 확인하는 API였고 그 객체로 만들어서execute()하는 형태로 라이브러리를 사용합니다.
구매 토큰에서 상품 정보 추출(Inappproducts.Get)
    // 인앱상품 정보 추출하는 메서드 - 외부 네트워크 통신이라 실패할 수 있으므로 3번까지 재시도
    // Android의 경우 결제 금액을 구매 토큰 내부에 저장하지 않아서 상품 정보에서 정가 부분으로 결제 금액 저장하기 위함
    @Retryable(
            value = {APIException.class, IOException.class, VerificationException.class},
            maxAttempts = 3,
            backoff = @Backoff(delay = 1000)
    )
    public Long getProductPrice(String productId) throws Exception {
        AndroidPublisher.Inappproducts.Get request = publisher.inappproducts().get(packageName, productId);
        InAppProduct product = request.execute();
        String defaultPrice = product.getDefaultPrice().getPriceMicros();
        long price = Long.parseLong(defaultPrice);
        // 100만 나눈것이 정가라고 공식문서에 나와있음
        return price / 1_000_000;
}Inappproducts.GetAPI는 위에서 하나의 인앱 상품을 가져오는 API라고 작성했습니다.- Inappproducts 리소스의 Price 정의를 보면
Price- priceMicros : 통화 기본 단위의 백만분의 1, 문자열 표기
- 한국 : "원" => 100만으로 나눠야 실제 상품의 가격 추출 가능
- priceMicros : 통화 기본 단위의 백만분의 1, 문자열 표기
- 한국만 이용한다는 가정하에 서비스 개발했기에 소수점 고려를 안했습니다.
소비 호출
- 소비 상태가 라이브러리에 Enum으로 정의되지 않아 추가의 Enum으로 정의함
@AllArgsConstructor
@Getter
public enum ConsumptionStatusAndroid {
    NOT_CONSUMED(0), // 소비하지 않음
    CONSUMED(1); // 소비함

    private Integer value;
}
// productId와 purchaseToken을 받아 소비 요청을 실행 (소모품) - 외부 네트워크 통신이라 실패할 수 있으므로 3번까지 재시도
@Retryable(
value = {APIException.class, IOException.class, VerificationException.class},
maxAttempts = 3,
backoff = @Backoff(delay = 1000)
)
public void consumeProductPurchase(String productId, String purchaseToken, ProductPurchase productPurchase) throws Exception {
if (productPurchase.getConsumptionState() == null || productPurchase.getConsumptionState().equals(ConsumptionStatusAndroid.NOT_CONSUMED.getValue())) {
AndroidPublisher.Purchases.Products.Consume request =
publisher.purchases().products().consume(packageName, productId, purchaseToken);
request.execute();
}
}purchases.products.consume는 위에서 인앱상품 소비하는 API라고 작성했습니다.(소모성 제품)- 꼭 소비 해줘야 합니다!
- 구매 처리 끝!! 하지만 환불도 남았쥬~!
환불 알림 수신
- 인앱결제의 경우 PG사를 통해 환불처리 하듯이 관리자나 서버에서 명시적으로 환불 처리를 할 수 없습니다.
- Apple의 경우 CONSUMPTION_REQUEST 알림을 수신해서 CONSUMPTION_INFO로 개발자의 의도를 최종 결정에 참고할 수 있도록 전달하지만, Android는 그런거 없이 그냥 환불 처리 결과를 통보받습니다.
- 그렇다면 뭐다? 알림 수신하고 환불 건이면 처리만 하면 된다~!
실시간 개발자 알림 구성
- 실시간 개발자 알림(RTDN)은 앱 내에서 사용자의 자격이 변경될 때마다 Google의 알림을 수신하는 메커니즘입니다.
- RTDN은 Google Cloud Pub/Sub를 활용합니다.
- 이를 통해 설정된 URL로 푸시되거나 클라이언트 라이브러리를 사용하여 폴링되는 데이터를 수신할 수 있습니다.
Cloud Pub/Sub 설정
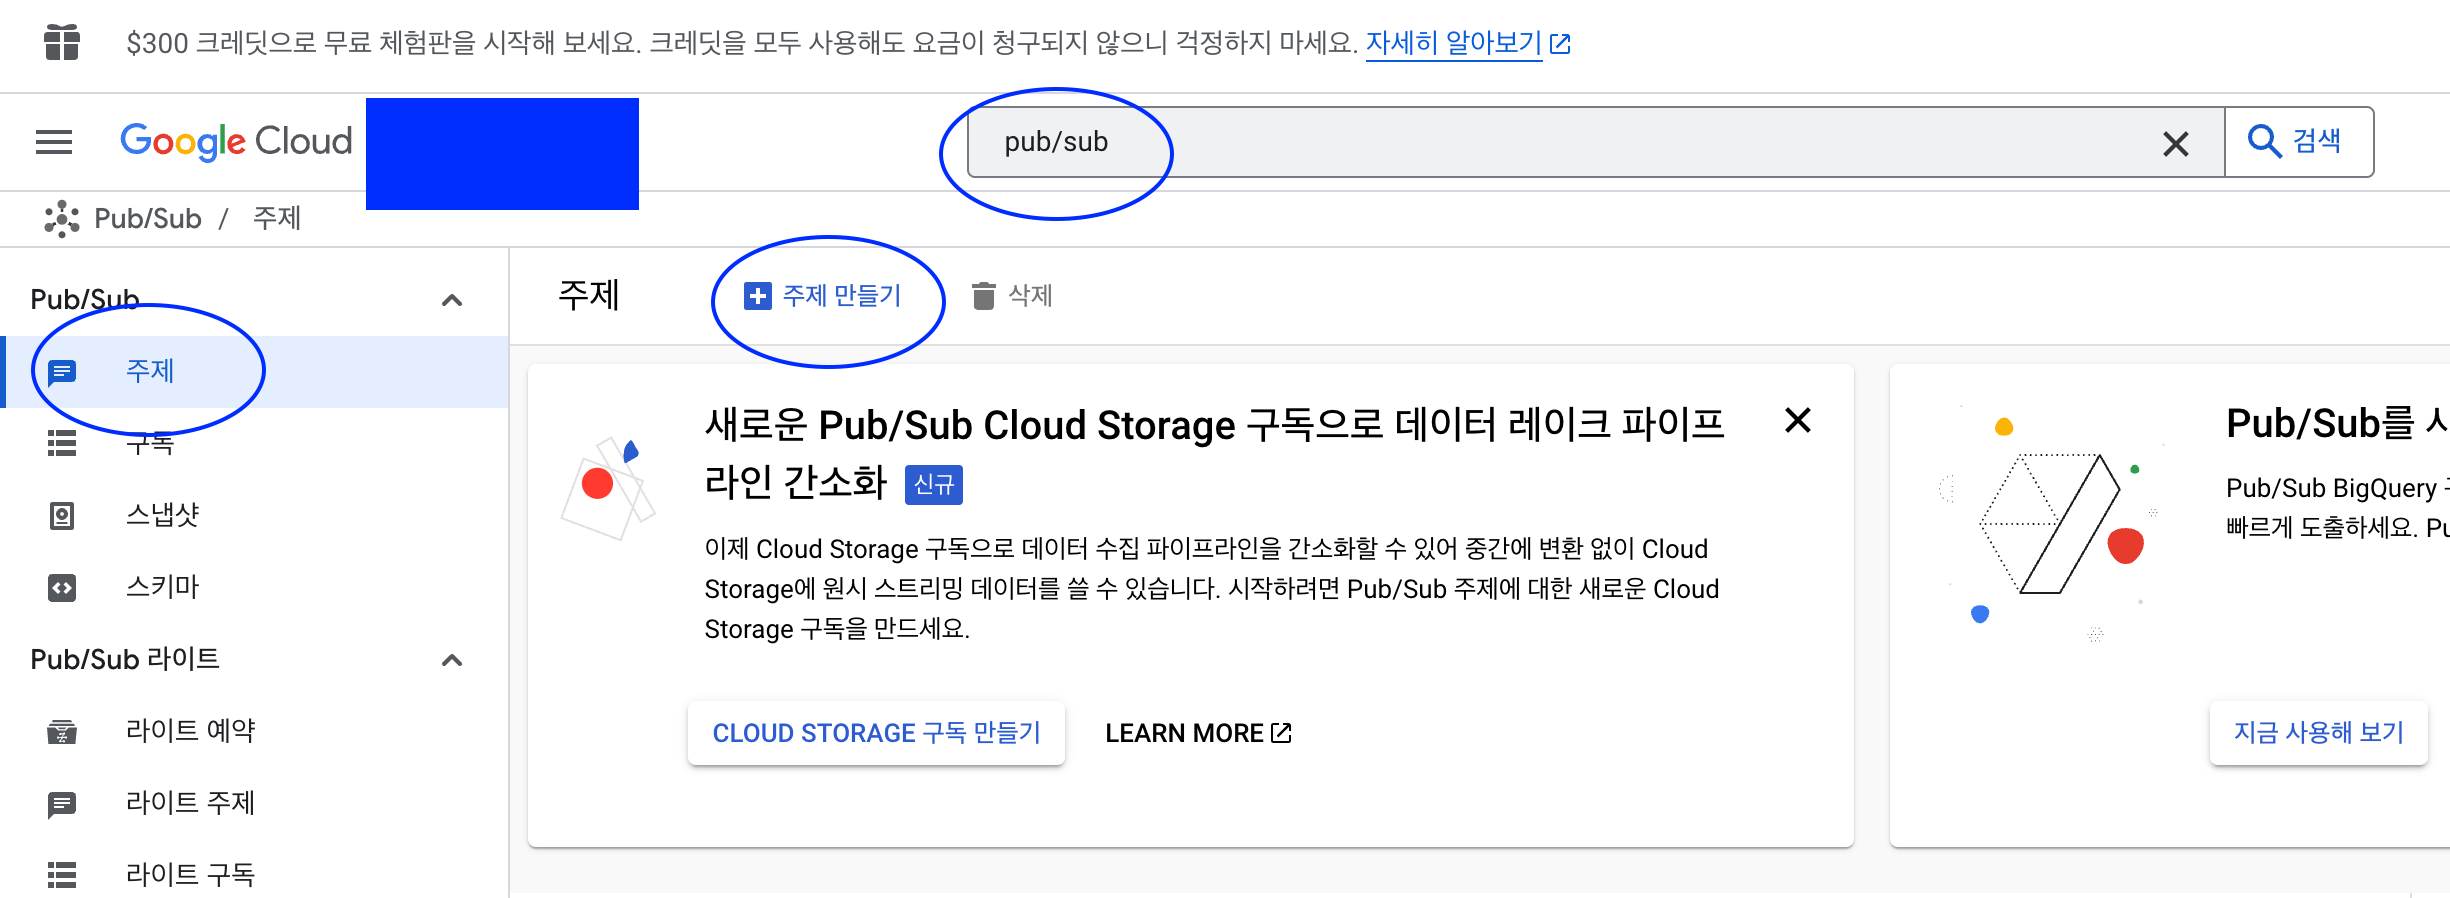
- 실시간 개발자 알림을 사용 설정하려면 먼저 자체 Google Cloud Platform(GCP) 프로젝트를 사용하여 Cloud Pub/Sub를 설정한 후 앱의 알림을 사용 설정해야 합니다.![]
Pub/Sub 설정하기
주제 만들기
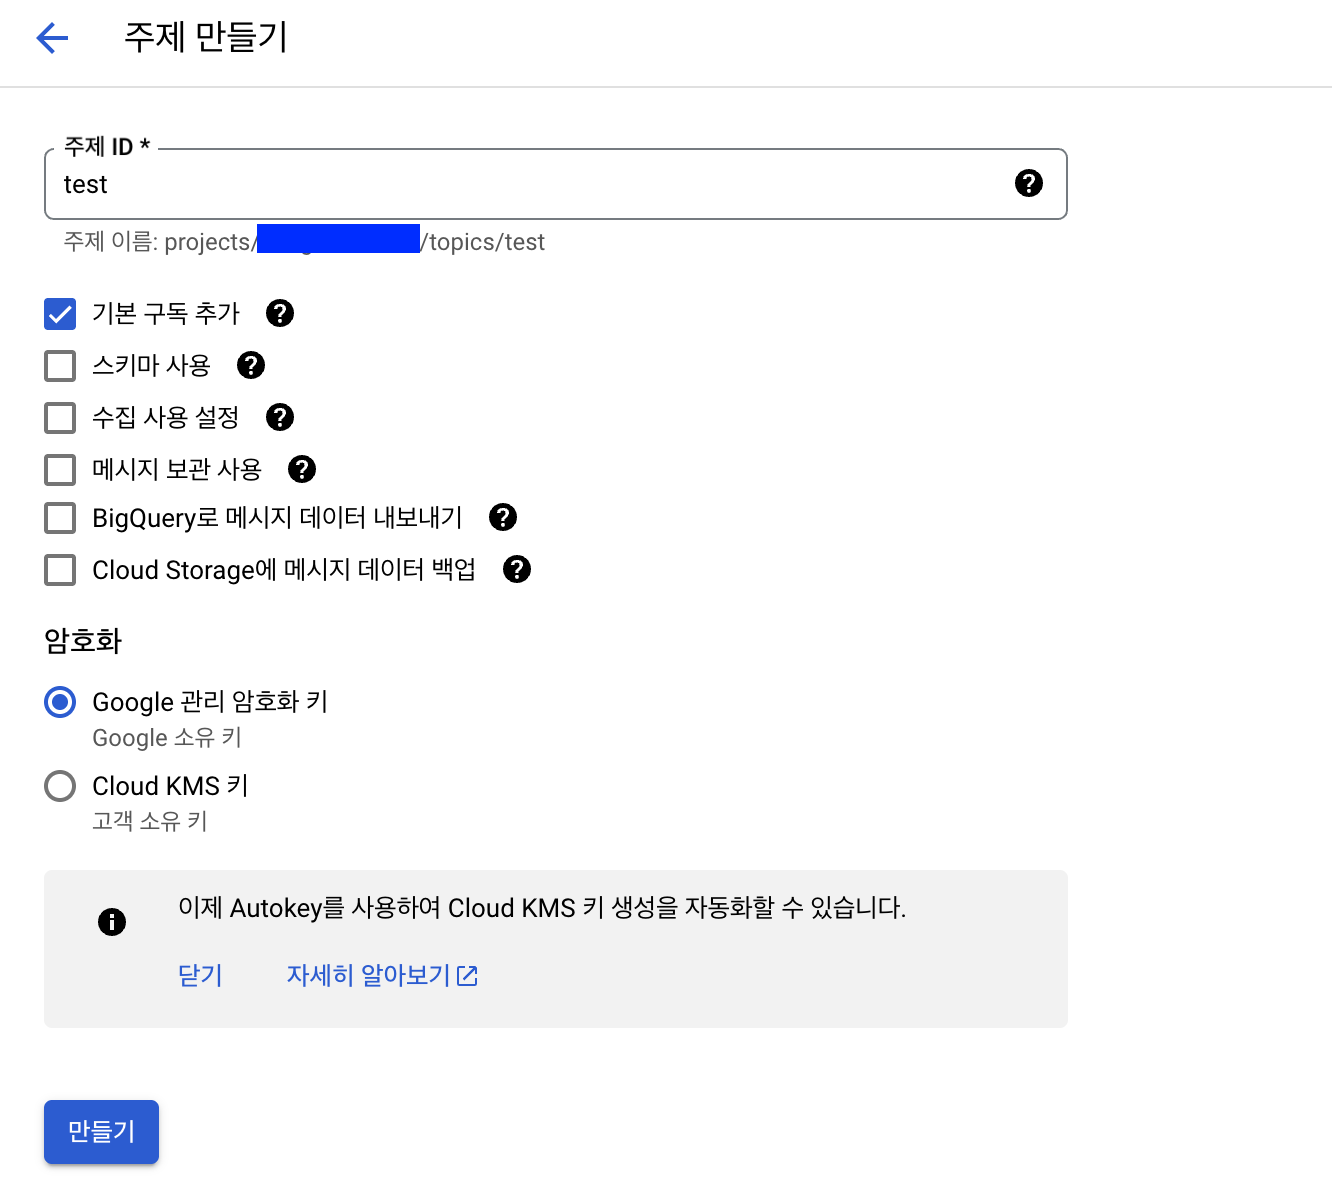

-
만료기간 : 만료되지 않음
-
재시도 정책 : 지수 백오프 지연 후 재시도
- 즉시 재시도로 하면 200 응답 받을때까지 계속 보내기에 요청 너무 과부화 될 수도 있을 것 같아 지수 백오프로 했습니다.
-
출처 : Google Play 인앱 구독 상품, 실시간 상태 추적 시스템 구축. RTDN (Real-Time Develop Notification)
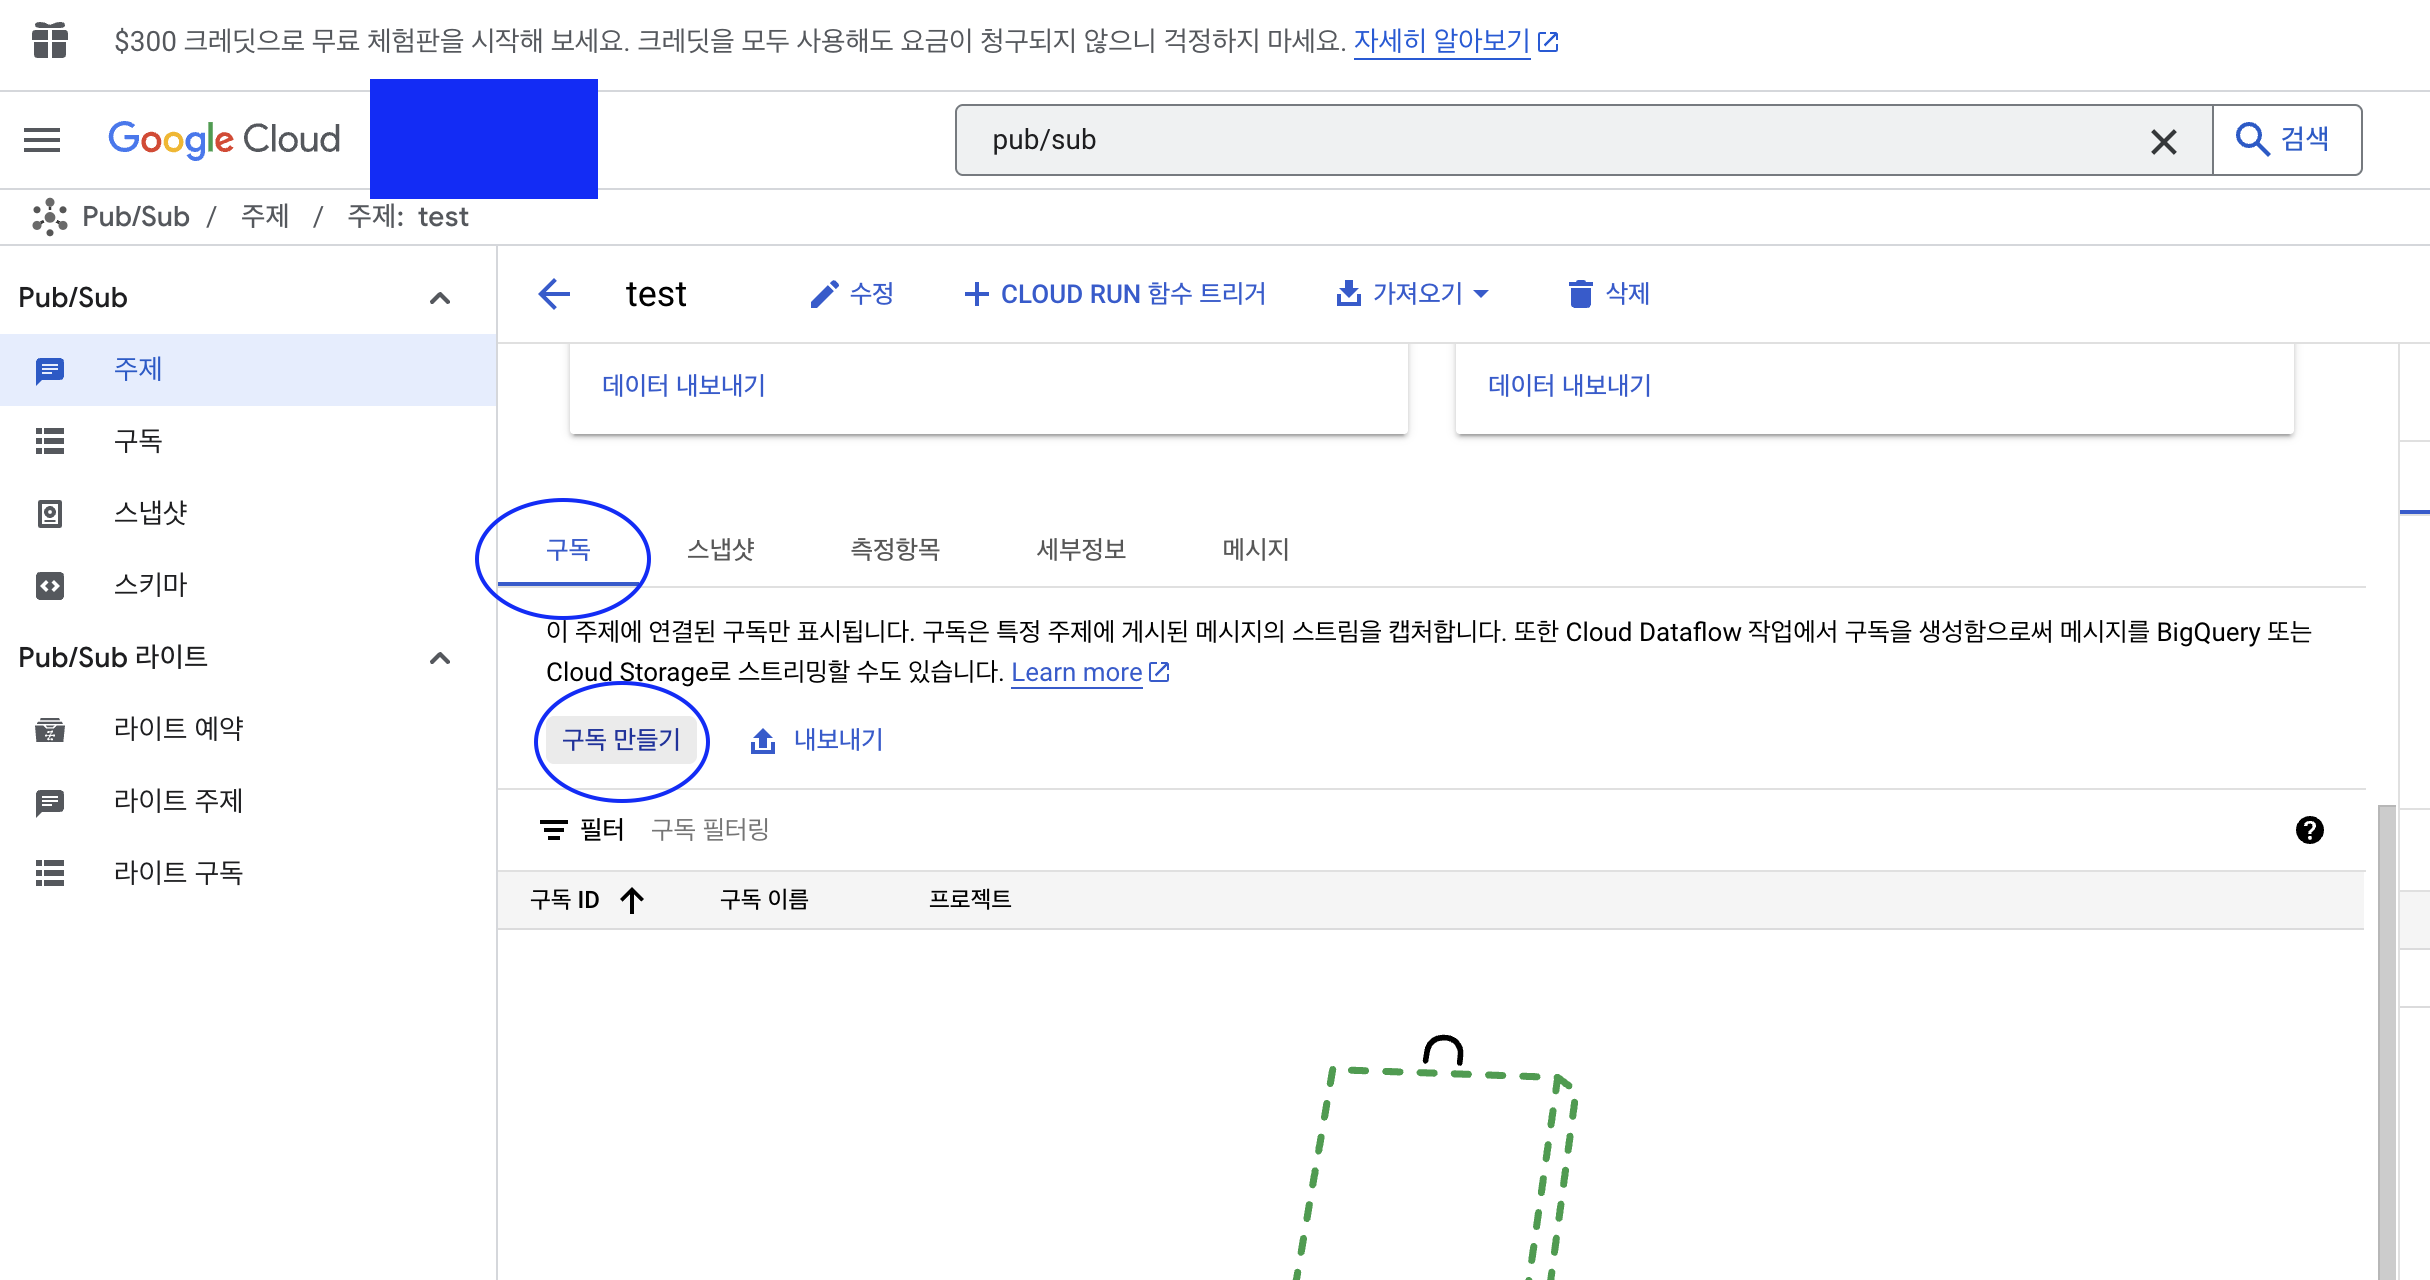
주제에 게시 권한 부여
-
주제에 권한
google-play-developer-notifications@system.gserviceaccount.com계정 추가
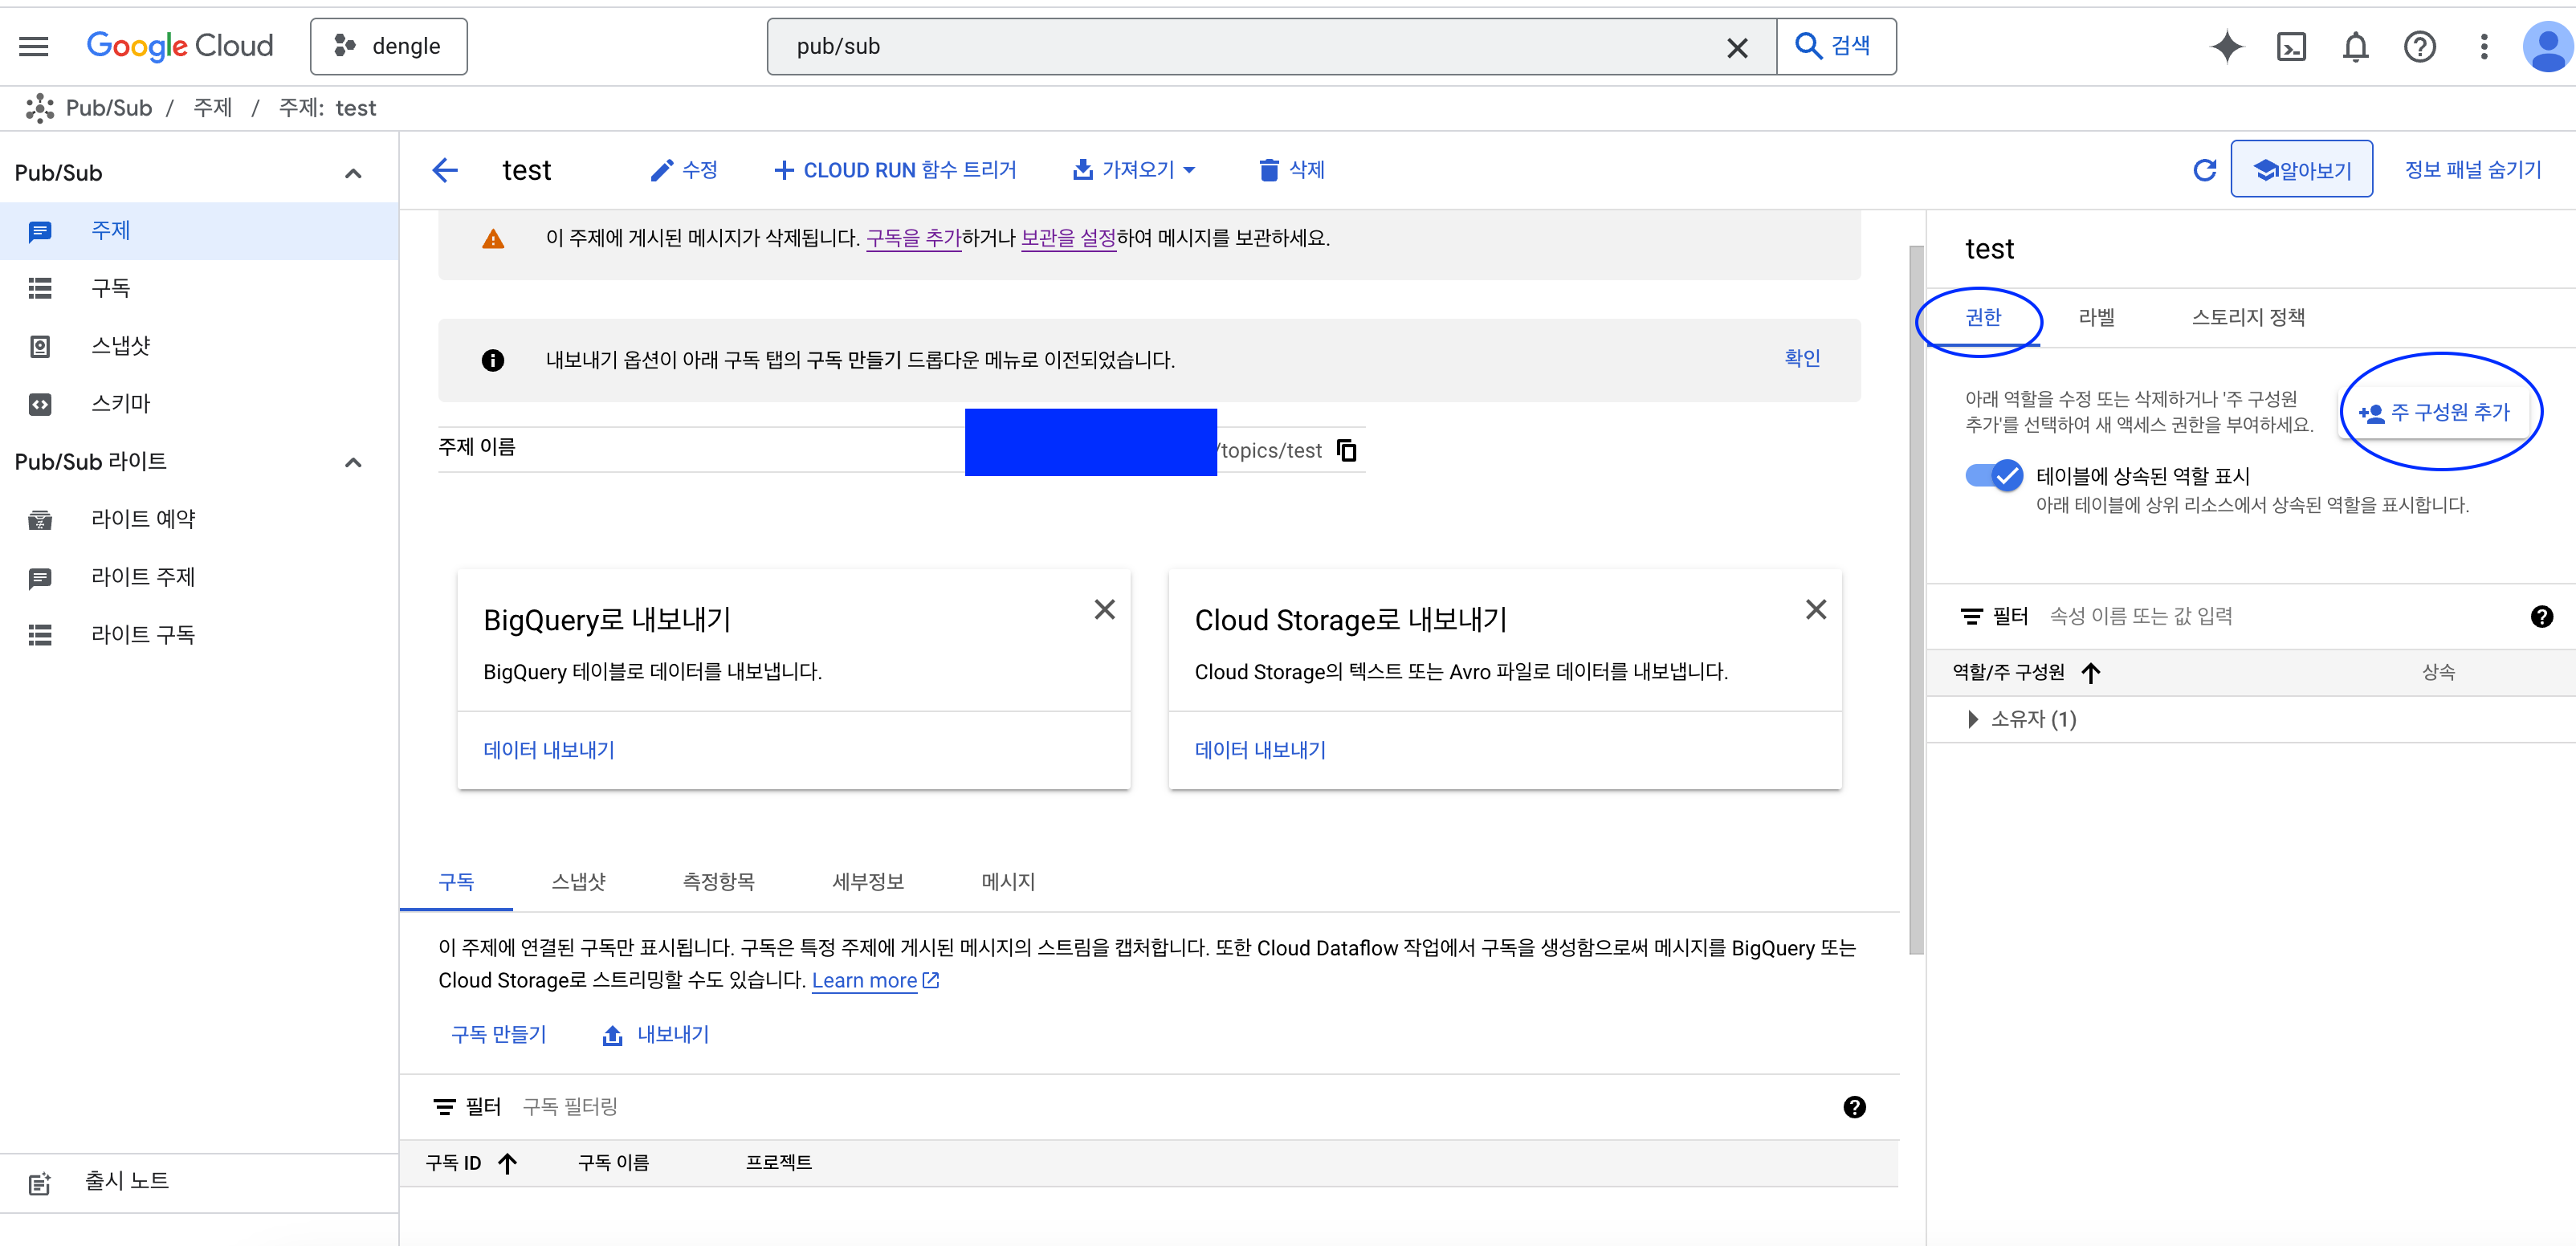
-
pub/sub 게시자 역할 부여
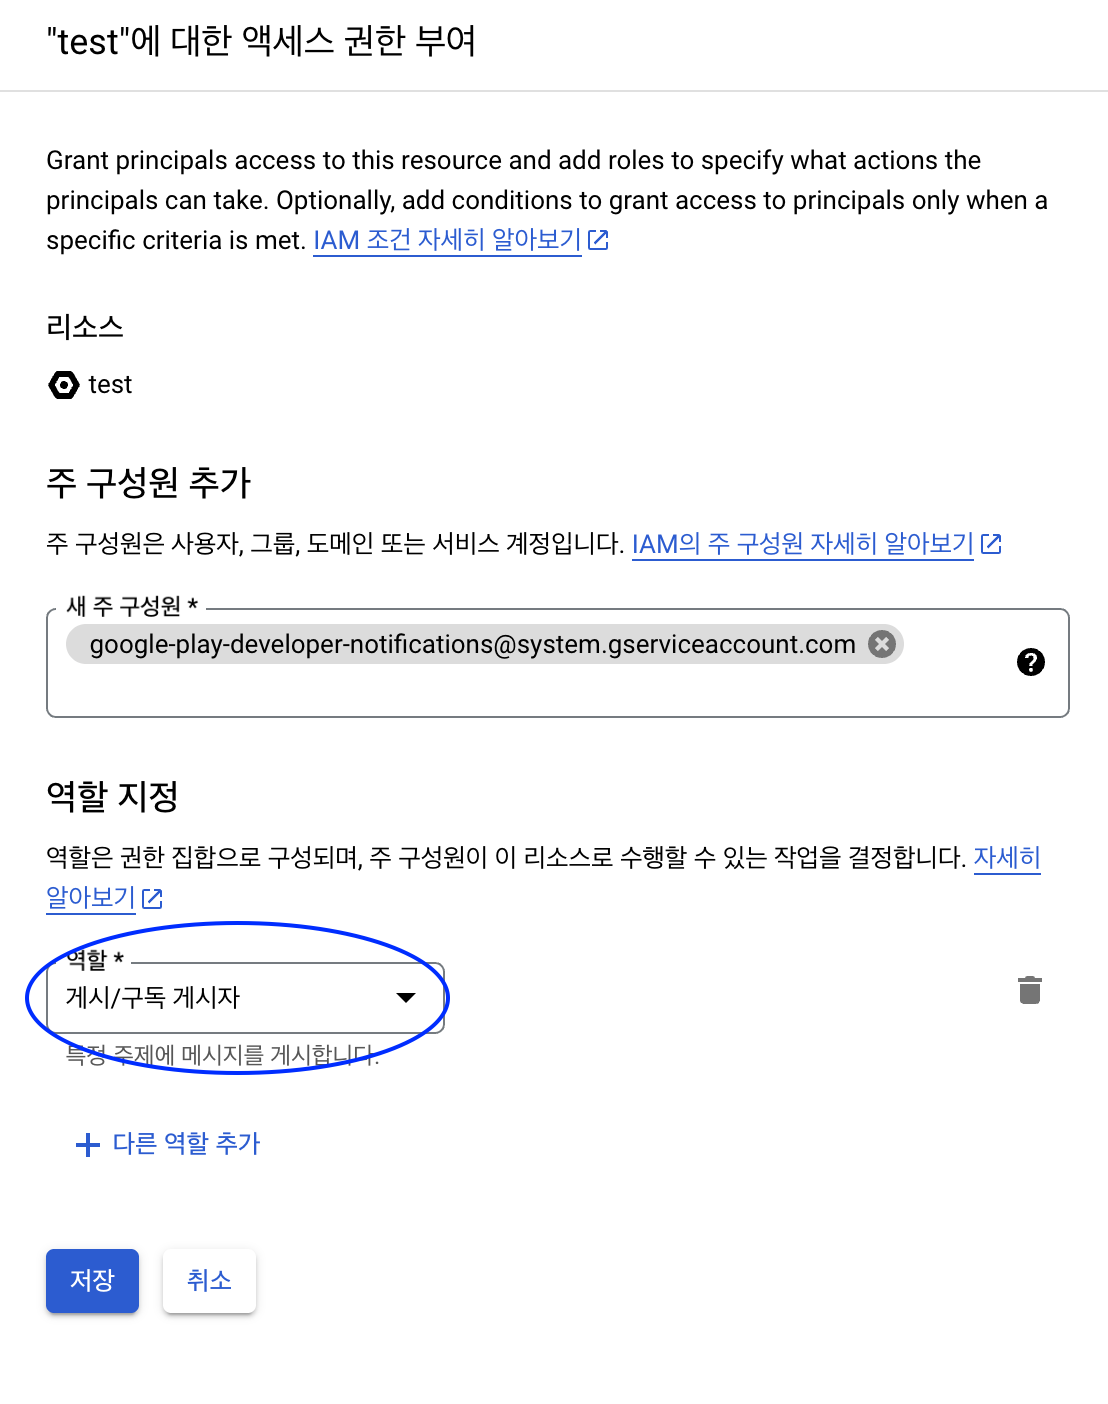
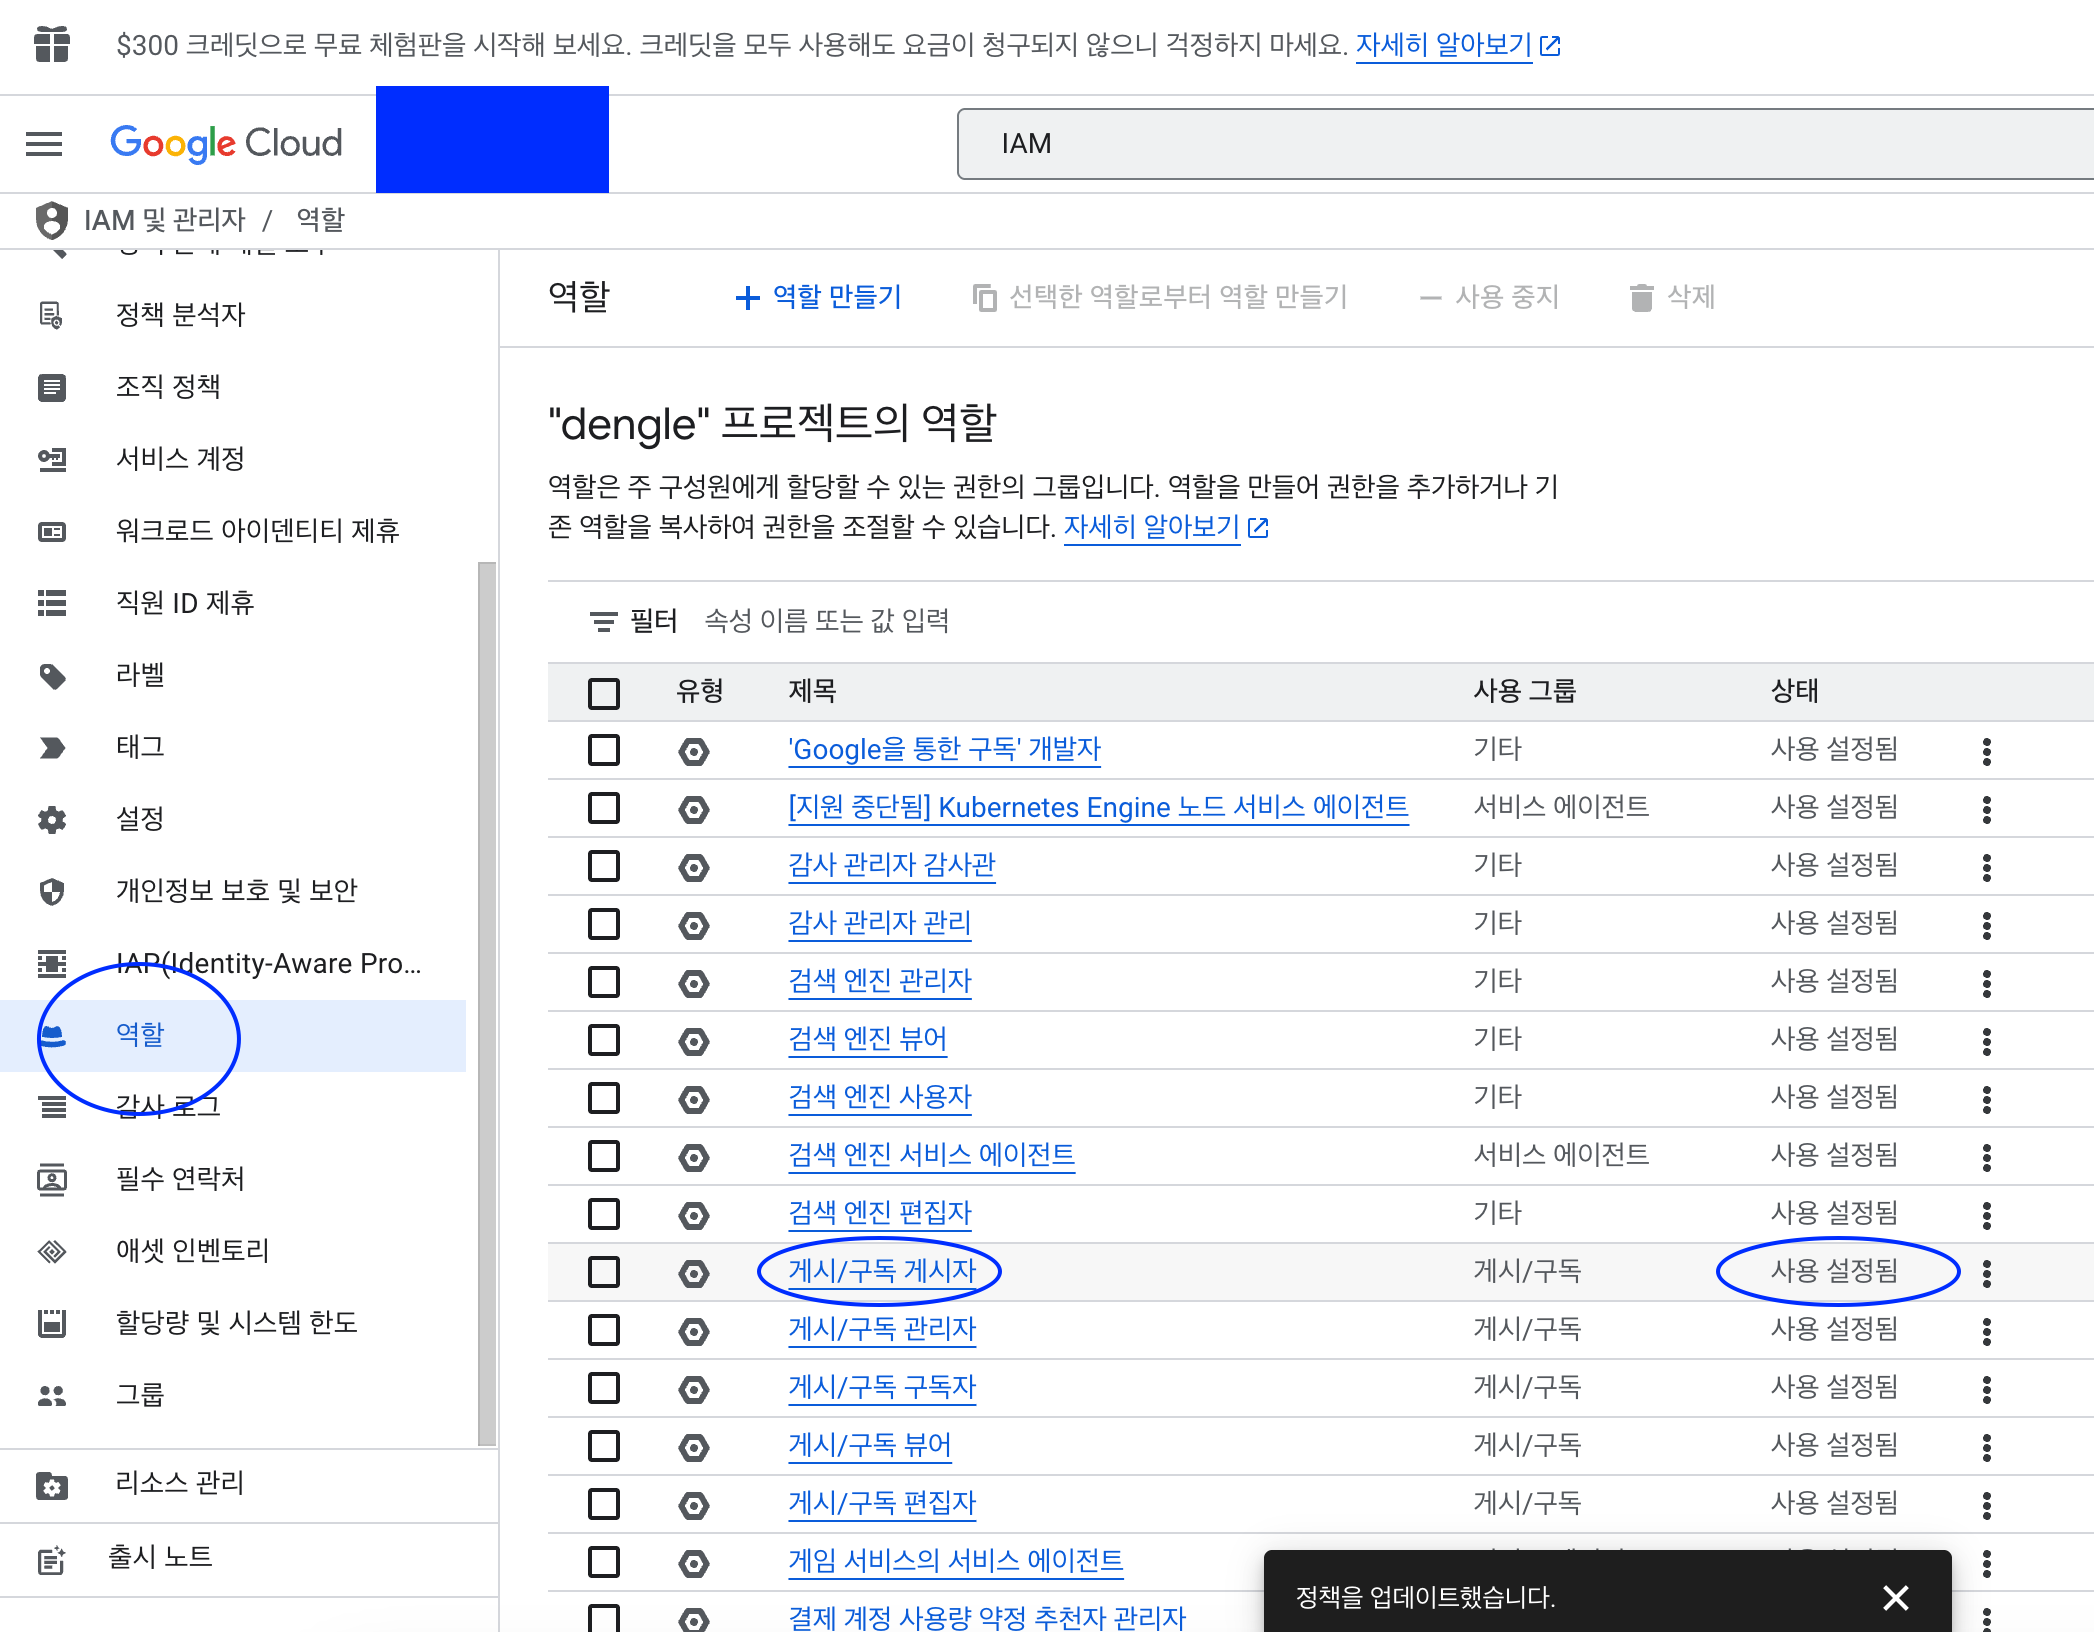
만약 pub/sub 게시자 역할이 없다면?
- IAM 관리자 메뉴에서 역할 확인 후 주제 게시 권한 다시 설정하기
앱에 실시간 개발자 알림 사용 설정

- Google Play Console 접속
- 좌측 Play를 통한 수익 창출 -> 수익 창출 설정 -> Google Play 결제에서 실시간 알림 사용 설정, 주제 이름 설정
- 더미 경로이니 꼭 Google Cloud Console에서 확인!
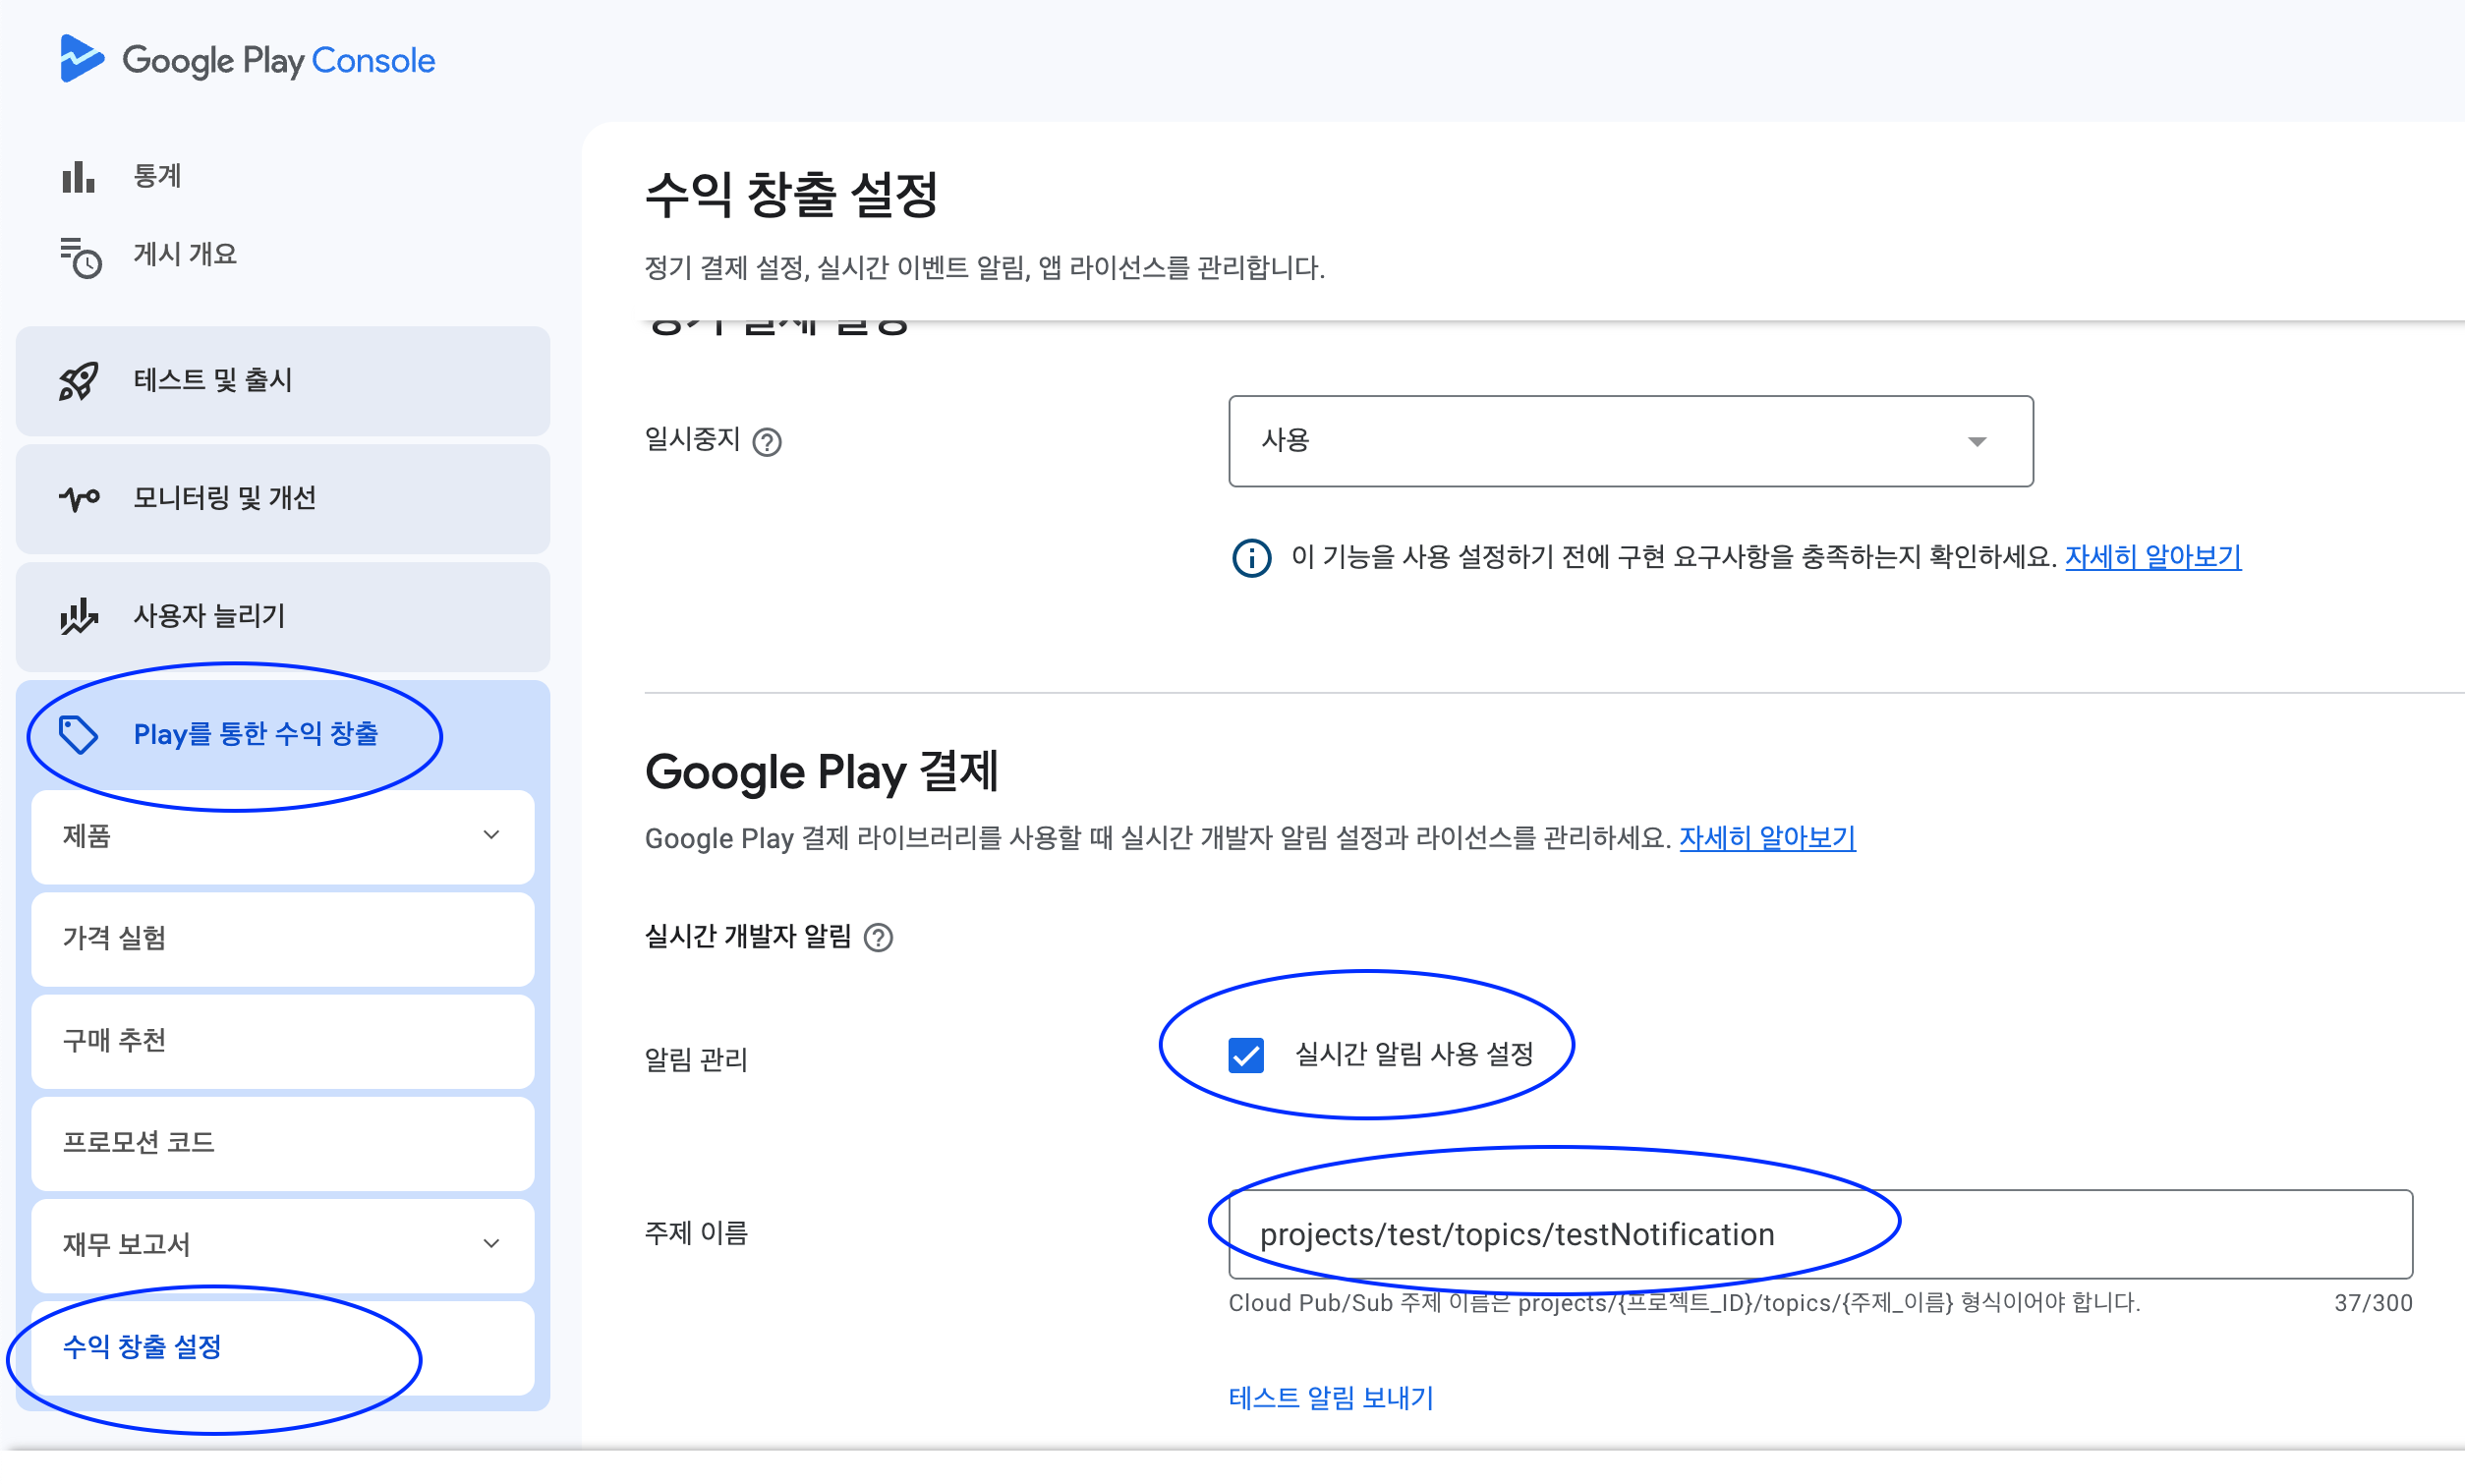
- 더미 경로이니 꼭 Google Cloud Console에서 확인!
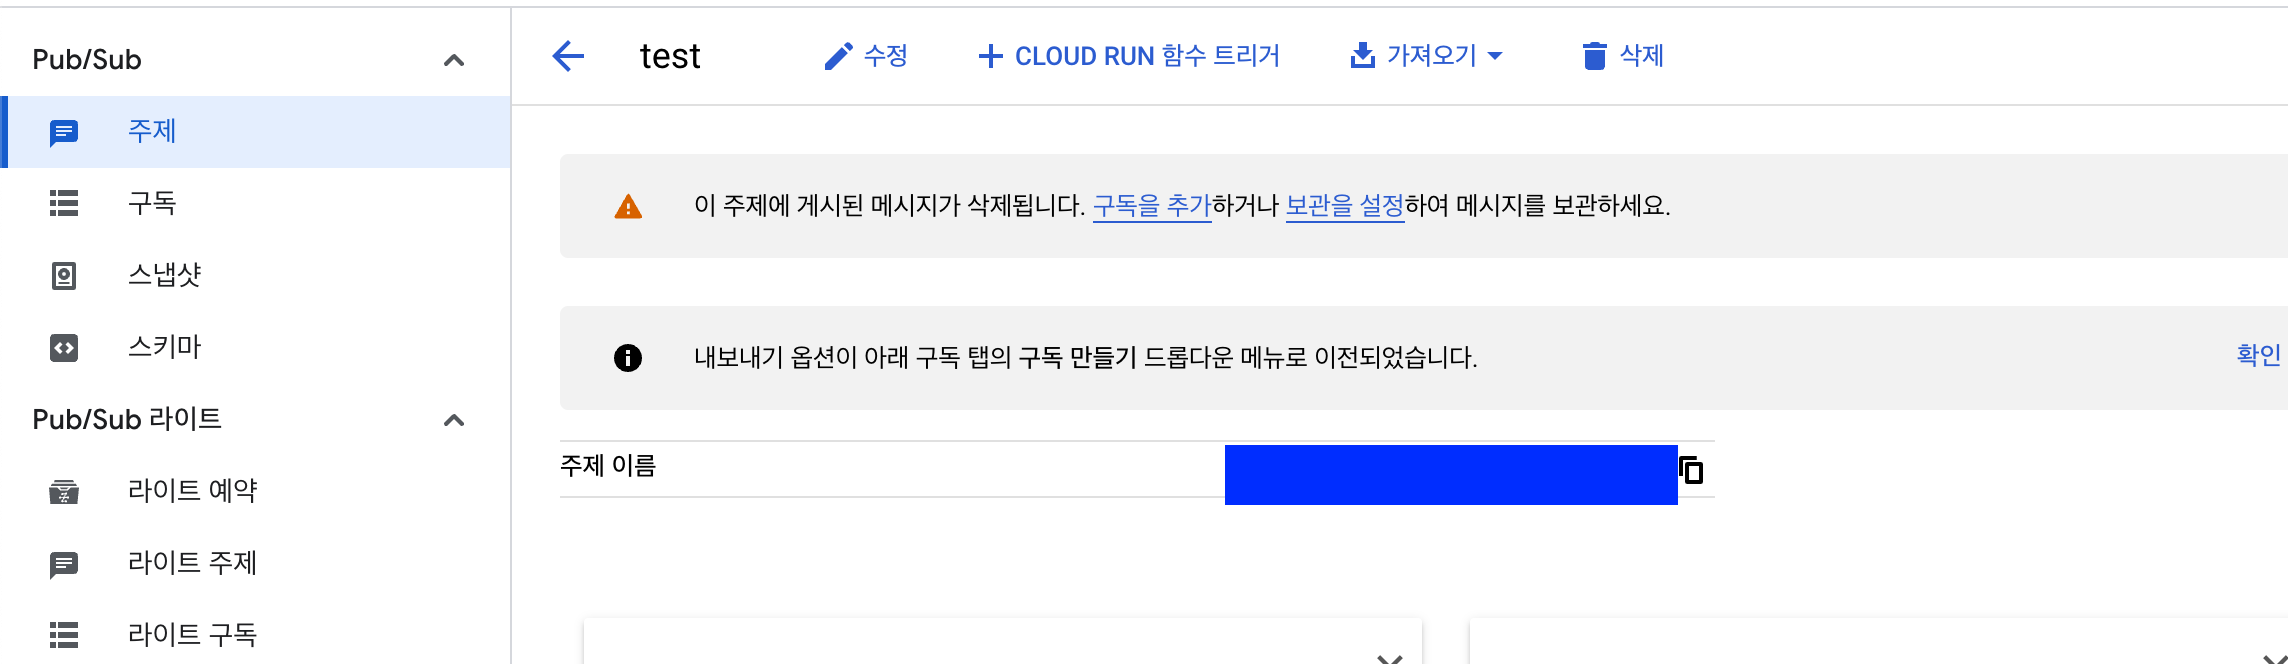
주제이름 경로
-
파란색 부분 복사
-
테스트 알림 보내기 하면 수신 될겁니다!
알림콘텐츠 설정
- 정기 결제 및 모든 무효화된 구매에 관한 알림 받기
- 정기 결제 및 무효화된 구매와 관련된 실시간 개발자 알림을 받습니다.
- 일회성 제품 구매에 대한 알림은 전송되지 않습니다.
- 정기 결제 및 일회성 제품에 관한 모든 알림 받기: 모든 정기 결제 및 무효화된 구매 이벤트에 관한 알림을 받습니다.
- ONE_TIME_PRODUCT_PURCHASED 및 ONE_TIME_PRODUCT_CANCELED와 같은 일회성 제품 구매 이벤트도 수신됩니다.
- 이러한 구매 이벤트에 대해 자세히 알아보려면 일회성 구매 수명 주기를 참고하세요.
- 일회성 제품 구매는 앱으로부터 구매 토큰을 받아서 처리할 꺼기 때문에 환불(무효화된 거래)에 대한 알림만 활성화 하기 위해 저는
정기 결제 및 모든 무효화된 구매에 관한 알림 받기옵션으로 설정했습니다.
그렇다면 이제 리얼 코드로 구현해봅시다.
1. 알림 요청은 어떻게 오는지 확인하기
문서에 나오는 요청 형식
- 각 게시에는 하나의 base64로 인코딩된 데이터 필드가 포함
{
"message": {
"attributes": {
"key": "value"
},
"data": "eyAidmVyc2lvbiI6IHN0cmluZywgInBhY2thZ2VOYW1lIjogc3RyaW5nLCAiZXZlbnRUaW1lTWlsbGlzIjogbG9uZywgIm9uZVRpbWVQcm9kdWN0Tm90aWZpY2F0aW9uIjogT25lVGltZVByb2R1Y3ROb3RpZmljYXRpb24sICJzdWJzY3JpcHRpb25Ob3RpZmljYXRpb24iOiBTdWJzY3JpcHRpb25Ob3RpZmljYXRpb24sICJ0ZXN0Tm90aWZpY2F0aW9uIjogVGVzdE5vdGlmaWNhdGlvbiB9",
"messageId": "136969346945"
},
"subscription": "projects/myproject/subscriptions/mysubscription"
}base64 인코딩된 필드 디코딩하면 DeveloperNotification 조회
{
"version": string,
"packageName": string,
"eventTimeMillis": long,
"oneTimeProductNotification": OneTimeProductNotification,
"subscriptionNotification": SubscriptionNotification,
"voidedPurchaseNotification": VoidedPurchaseNotification,
"testNotification": TestNotification
}| 속성 이름 | 값 | 설명 | 실제 사용 사례 |
|---|---|---|---|
| version | 문자열 | 알림의 버전 | x |
| packageName | 문자열 | 알림과 관련된 애플리케이션 패키지 이름 | x |
| eventTimeMillis | long | 이벤트가 발생한 타임스탬프(밀리초) | 환불 시간 저장 |
| subscriptionNotification | SubscriptionNotification | 정기결제관련 | 사용x |
| oneTimeProductNotification | OneTimeProductNotification | 일회성 구매 관련 정보 | 사용x |
| voidedPurchaseNotification | VoidedPurchaseNotification | 무효화된 구매와 관련 | 무효화 정보 추출 사용o |
| testNotification | TestNotification | 테스트 알림이라 | ok 바로 보냄 |
oneTimeProductNotification, subscriptionNotification, voidedPurchaseNotification, testNotification 은 서로 상호 배타적
(즉 하나만 존재함)
voidedPurchaseNotification
{
"version":"1.0",
"packageName":"com.some.app",
"eventTimeMillis":"1503349566168",
"voidedPurchaseNotification":
{
"purchaseToken":"PURCHASE_TOKEN",
"orderId":"GS.0000-0000-0000",
"productType":1
"refundType":1
}
}| 속성 이름 | 값 | 설명 | 사용 |
|---|---|---|---|
| purchaseToken | String | 무효ㅕ화된 구매와 관련된 토큰 | 사용x |
| orderId | String | 무효화 거래 고유 주문 Id | 일회성 구매는 유일한 주문 Id라 그대로 사용(토큰에서 추출x) |
| productType | int | 무효화된 구매의 productType : PRODUCT_TYPE_SUBSCRIPTION(정기결제) or PRODUCT_TYPE_ONE_TIME (일회성) | 일회성 상품만 사용하기에 따로 사용 안함 |
| refundType | int | 무효화된 구매 REFUND_TYPE_FULL_REFUND(완전 무효) or REFUND_TYPE_QUANTITY_BASED_PARTIAL_REFUND(부분적으로 무효화) | 다중 수량 구매 막았기 때문에 REFUND_TYPE_FULL_REFUND 얘만 오기에 사용하지 않음 |
그렇다면 알림을 받기 위한 Dto 정의
public record AndroidNotificationDto(
AndroidNotificationMessage message,
String subscription
) {
}public record AndroidNotificationMessage(
String data,
String message_id,
LocalDateTime publishTime,
LocalDateTime publish_time
) {
}2. 요청 받는 Controller 정의하기
@PostMapping("/android/server-notification")
public ResponseEntity<Void> verifyServerNotification(@RequestBody AndroidNotificationDto dto) {
log.info("verifyServerNotificationForAndroid");
VoidedPurchaseNotification voidedPurchaseNotification = androidPurchaseService.processRtdnMessage(dto.message().data());
// 환불일때만 환불 처리
if (voidedPurchaseNotification != null) {
androidPurchaseService.handleRefund(voidedPurchaseNotification);
}
return ResponseEntity.ok().build();
}- 요청은 Post로 옵니다!
androidPurchaseService.processRtdnMessage메서드의 경우 환불에 대한 알림인지 검증합니다. 이는 위에서 oneTimeProductNotification, subscriptionNotification, voidedPurchaseNotification, testNotification 은 서로 상호 배타적 이라고 했기에 voidedPurchaseNotification 일때만 반환하고 나머지는 Null로 반환합니다.- null이면 다른 요청이기 때문에 그냥 알림 수신했다고만 응답합니다.
3-1. Service 로직 처리하기 (voidedPurchaseNotification 인지 확인하기)
/**
* subscriptionNotification, oneTimeProductNotification, voidedPurchaseNotification 은 상호 베타적인 관계
* 환불에 대한 알림일때만 객체 반환하고 나머지 알림은 모두 null 반환
*/
@Retryable(
value = {APIException.class, IOException.class, VerificationException.class},
maxAttempts = 3,
backoff = @Backoff(delay = 200)
)
public VoidedPurchaseNotification processRtdnMessage(String base64Data) {
byte[] decodedBytes = Base64.getDecoder().decode(base64Data);
String jsonStr = new String(decodedBytes);
JsonObject jsonObject = JsonParser.parseString(jsonStr).getAsJsonObject();
// 알림 수신 시간 없으면 현재 시간으로 초기화
String refundTimeMillis = jsonObject.has("eventTimeMillis") ? jsonObject.get("eventTimeMillis").getAsString() : null;
if (!StringUtils.hasText(refundTimeMillis)) {
refundTimeMillis = String.valueOf(System.currentTimeMillis());
}
// voidedPurchaseNotification 객체화 시킨 결과 저장
JsonObject notification = jsonObject.getAsJsonObject("voidedPurchaseNotification");
// 객체 없으면 환불에 대한 알림이 아니니깐 Null로 반환
if (notification == null) {
return null;
}
// 환불 알림에 대한 객체로 생성해서 반환
return VoidedPurchaseNotification.of(notification, refundTimeMillis);
}- 주석으로 상세 설명 대체하겠습니다.
3-2. Service 로직 처리하기 (voidedPurchaseNotification 인지 확인하기)
@Retryable(
value = {APIException.class, IOException.class, VerificationException.class},
maxAttempts = 3,
backoff = @Backoff(delay = 200)
)
@Transactional
public void handleRefund(VoidedPurchaseNotification voidedPurchaseNotification) {
log.info("1 - 환불 처리된 Android In App Purchase orderId 추출");
String orderId = voidedPurchaseNotification.orderId();
LocalDateTime nowDateTime = LocalDateTime.now();
Exam exam1 = null;
try {
log.info("2 - 해당 transactionId에 해당하는 거래건 추출");
exam1 = levelTestService.findByAndroidOrderId(orderId);
if (levelTestApply != null) {
log.info("3-case1 - levelTest 인앱결제 환불 처리");
examService.refundForAndroidPurchase(exam1, nowDateTime);
}
} catch (Exception e) {
log.info("환불처리 DB 저장 실패 orderId = {} 확인 후 거래 내역 명시적 환불 처리 요망", orderId);
throw new RuntimeException("Server Error Please Recall");
}
}- 시간을 now로 추출했는데 객체에서 꺼냈었어야 했네요 하하
- DB 비즈니스 로직 예시 하나 첨부드렸습니다! 아무래도 이것도 결국 환불 알림을 수신한 거기 때문에 엥간하면 한번에 성공시키고 싶어서 @Retryable을 붙였습니다.
그러면 이제 진짜 끝!
마무리하며
요약
구매 검증 과정
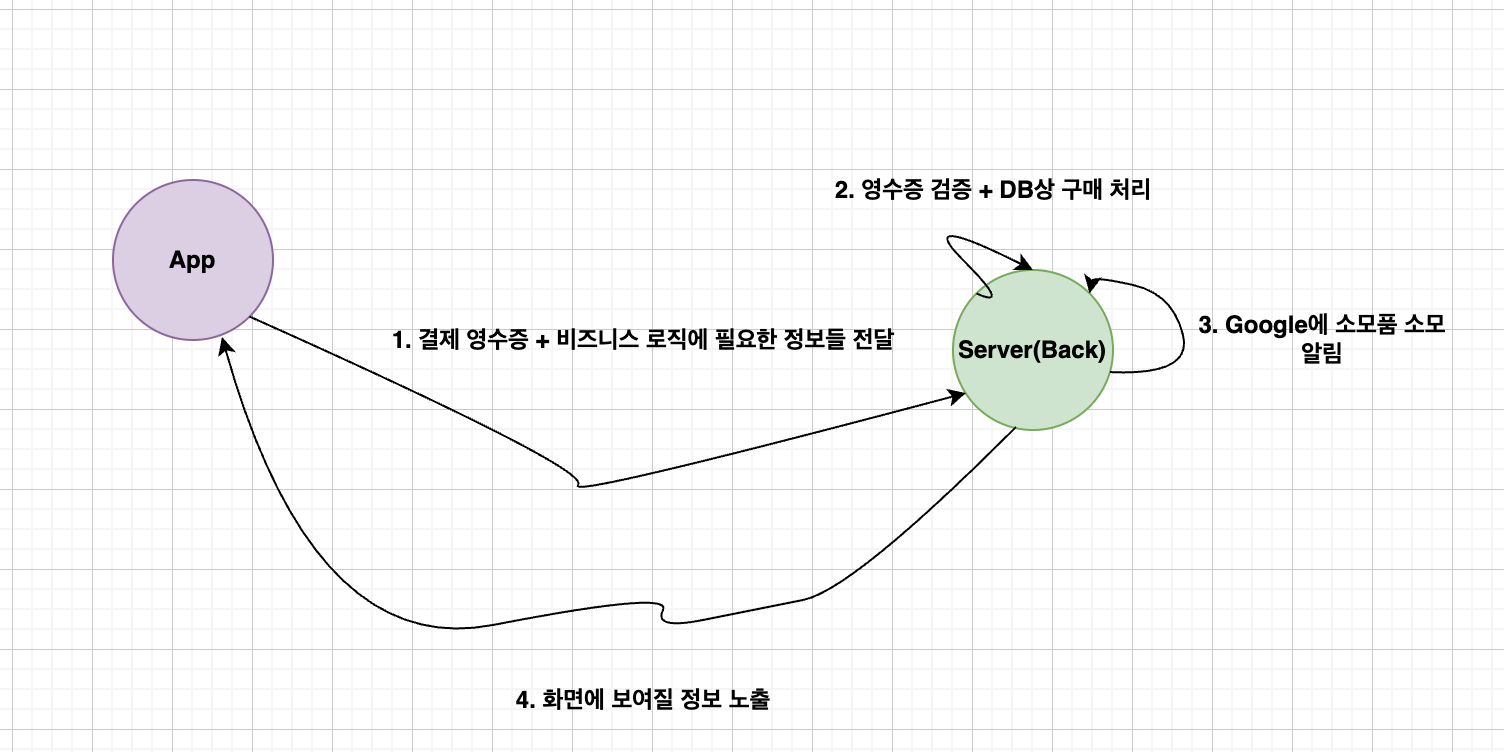
- 구매 토큰을 Server로 전송 => 토큰 검증 및 결제 처리
- Google에 소모품 소모 알림, 각각 호출 API 다르니 확인 필수
- 일회성 제품 (소비)
- 일회성 제품 (비소비) + 정기 결제 제품
환불 처리 과정

- 환불에 대한 Notification 처리
- 본 게시글에서는 일회성 제품(소비성), 단발 구매만 허용한 사례만 다뤘습니다.
- 여러건 구매, 정기 구매는 약간 변형하거나 감이 안오신다면 gpt o3 mini high 이용하세요
최종 코드
Controller
@RestController
@Slf4j
@RequiredArgsConstructor
public class AndroidPurchaseController {
private final AndroidPurchaseService androidPurchaseService;
private final ExamService examService;
@PostMapping("/verify/android/receipts/level-test")
public ResponseEntity<AppResultForLevelTestDto> verifyReceiptForAndroid(@RequestBody AndroidAppPurchaseRequest request) throws Exception {
log.info("verifyReceiptForAndroid request: {}", request);
ProductPurchase productPurchase = androidPurchaseService.verifyProductPurchase(request.productId(), request.purchaseToken());
Long productPrice = androidPurchaseService.getProductPrice(request.productId());
AppPurchaseResult appResultForLevelTestDto = examService.resisterForAndroidAppPurchase(request, productPurchase, productPrice);
// 소비 호출
androidPurchaseService.consumeProductPurchase(request.productId(), request.purchaseToken(), productPurchase);
return ResponseEntity.ok(appResultForLevelTestDto);
}
@PostMapping("/android/server-notification")
public ResponseEntity<Void> verifyServerNotification(@RequestBody AndroidNotificationDto dto) {
log.info("verifyServerNotificationForAndroid");
VoidedPurchaseNotification voidedPurchaseNotification = androidPurchaseService.processRtdnMessage(dto.message().data());
// 환불일때만 환불 처리
if (voidedPurchaseNotification != null) {
androidPurchaseService.handleRefund(voidedPurchaseNotification);
}
return ResponseEntity.ok().build();
}
}Service
@Service
@Slf4j
@RequiredArgsConstructor
public class AndroidPurchaseService {
private String secretFilePath = "android/secret.json" // 시크릿키 json 파일 경로
// 호출하려는 서비스의 AndroidPublisher 객체 저장
private AndroidPublisher publisher;
// TODO : 실제 앱의 패키지명으로 변경
private String packageName = "com.example.app";
@PostConstruct
public void init() {
try {
// resources 디렉토리에 있는 파일은 클래스패스를 통해 접근
InputStream inputStream = getClass().getClassLoader().getResourceAsStream(secretFilePath);
if (inputStream == null) {
throw new FileNotFoundException("secret 파일이 없어용~!");
}
// JSON 키 파일을 읽어 서비스 계정 자격증명을 생성
GoogleCredentials credentials = GoogleCredentials.fromStream(inputStream)
.createScoped(Collections.singleton("https://www.googleapis.com/auth/androidpublisher"));
// AndroidPublisher 객체 생성
publisher = new AndroidPublisher.Builder(
GoogleNetHttpTransport.newTrustedTransport(),
GsonFactory.getDefaultInstance(),
new HttpCredentialsAdapter(credentials))
.setApplicationName("example") // TODO : 실제 앱 이름으로 변경
.build();
log.info("AndroidPurchaseService 초기화 완료");
} catch (Exception e) {
throw new RuntimeException("AndroidPurchaseService 초기화에 실패했습니다.", e);
}
}
// 구매 토큰에서 정보 추출하는 메서드 - 외부 네트워크 통신이라 실패할 수 있으므로 3번까지 재시도
@Retryable(
value = {APIException.class, IOException.class, VerificationException.class},
maxAttempts = 3,
backoff = @Backoff(delay = 1000)
)
public ProductPurchase verifyProductPurchase(String productId, String purchaseToken) throws Exception {
AndroidPublisher.Purchases.Products.Get request =
publisher.purchases().products().get(packageName, productId, purchaseToken);
return request.execute();
}
// 인앱상품 정보 추출하는 메서드 - 외부 네트워크 통신이라 실패할 수 있으므로 3번까지 재시도
// Android의 경우 결제 금액을 구매 토큰 내부에 저장하지 않아서 상품 정보에서 정가 부분으로 결제 금액 저장하기 위함
@Retryable(
value = {APIException.class, IOException.class, VerificationException.class},
maxAttempts = 3,
backoff = @Backoff(delay = 1000)
)
public Long getProductPrice(String productId) throws Exception {
AndroidPublisher.Inappproducts.Get request = publisher.inappproducts().get(packageName, productId);
InAppProduct product = request.execute();
String defaultPrice = product.getDefaultPrice().getPriceMicros();
long price = Long.parseLong(defaultPrice);
// 100만 나눈것이 정가라고 공식문서에 나와있음
return price / 1_000_000;
}
    // productId와 purchaseToken을 받아 소비 요청을 실행 (소모품) - 외부 네트워크 통신이라 실패할 수 있으므로 3번까지 재시도
    @Retryable(
            value = {APIException.class, IOException.class, VerificationException.class},
            maxAttempts = 3,
            backoff = @Backoff(delay = 1000)
    )
    public void consumeProductPurchase(String productId, String purchaseToken, ProductPurchase productPurchase) throws Exception {
        if (productPurchase.getConsumptionState() == null || productPurchase.getConsumptionState().equals(ConsumptionStatusAndroid.NOT_CONSUMED.getValue())) {
            AndroidPublisher.Purchases.Products.Consume request =
                    publisher.purchases().products().consume(packageName, productId, purchaseToken);
            request.execute();
        }
    }
    /**
     * subscriptionNotification, oneTimeProductNotification, voidedPurchaseNotification 은 상호 베타적인 관계
     * 환불에 대한 알림일때만 객체 반환하고 나머지 알림은 모두 null 반환
     */
    @Retryable(
            value = {APIException.class, IOException.class, VerificationException.class},
            maxAttempts = 3,
            backoff = @Backoff(delay = 200)
    )
    public VoidedPurchaseNotification processRtdnMessage(String base64Data) {
        byte[] decodedBytes = Base64.getDecoder().decode(base64Data);
        String jsonStr = new String(decodedBytes);
        JsonObject jsonObject = JsonParser.parseString(jsonStr).getAsJsonObject();

        // 알림 수신 시간 없으면 현재 시간으로 초기화
        String refundTimeMillis = jsonObject.has("eventTimeMillis") ? jsonObject.get("eventTimeMillis").getAsString() : null;
        if (!StringUtils.hasText(refundTimeMillis)) {
            refundTimeMillis = String.valueOf(System.currentTimeMillis());
        }

        // voidedPurchaseNotification 객체화 시킨 결과 저장
        JsonObject notification = jsonObject.getAsJsonObject("voidedPurchaseNotification");

        // 객체 없으면 환불에 대한 알림이 아니니깐 Null로 반환
        if (notification == null) {
            return null;
        }

        // 환불 알림에 대한 객체로 생성해서 반환
        return VoidedPurchaseNotification.of(notification, refundTimeMillis);
    }
@Retryable(
            value = {APIException.class, IOException.class, VerificationException.class},
            maxAttempts = 3,
            backoff = @Backoff(delay = 200)
    )
    @Transactional
    public void handleRefund(VoidedPurchaseNotification voidedPurchaseNotification) {
        log.info("1 - 환불 처리된 Android In App Purchase orderId 추출");
        String orderId = voidedPurchaseNotification.orderId();

        LocalDateTime nowDateTime = LocalDateTime.now();

        Exam exam1 = null;

        try {
            log.info("2 - 해당 transactionId에 해당하는 거래건 추출");
            exam1 = levelTestService.findByAndroidOrderId(orderId);

            if (levelTestApply != null) {
                log.info("3-case1 - levelTest 인앱결제 환불 처리");
                examService.refundForAndroidPurchase(exam1, nowDateTime);
            }
        } catch (Exception e) {
            log.info("환불처리 DB 저장 실패 orderId = {} 확인 후 거래 내역 명시적 환불 처리 요망", orderId);
            throw new RuntimeException("Server Error Please Recall");
        }
    }
}- 정말.. 보물찾기 오지게 하느라 고생하셨습니다
- 이걸 보시는 분들은 시간 아끼시길 바랍니다..!
- GPT 결제는.. API 문서 보셔야 한다면 무조건 필수입니다!! GPT야 고마워~!
- 실제 테스트 구매 토큰을 통해 테스트를 해보지 못해서 일부 잘못된 내용이 있을 수 있는데, 피드백 주시면 감사하겠습니다!