⭐ UI 만들기
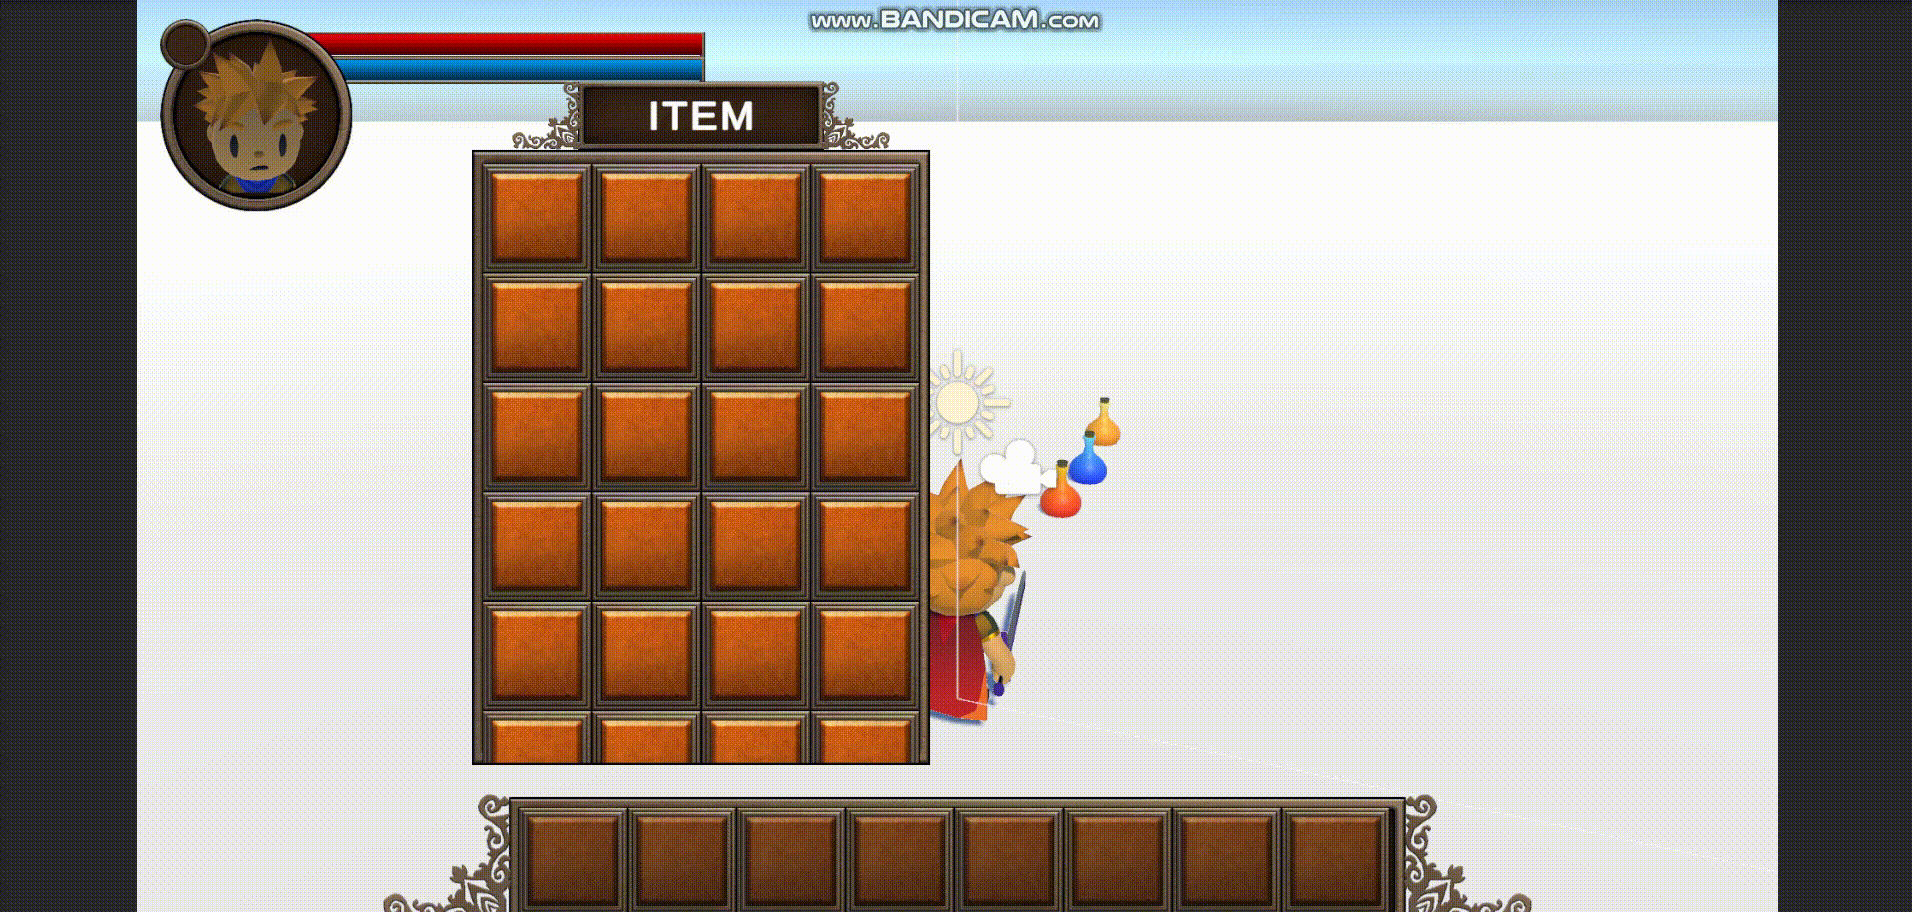
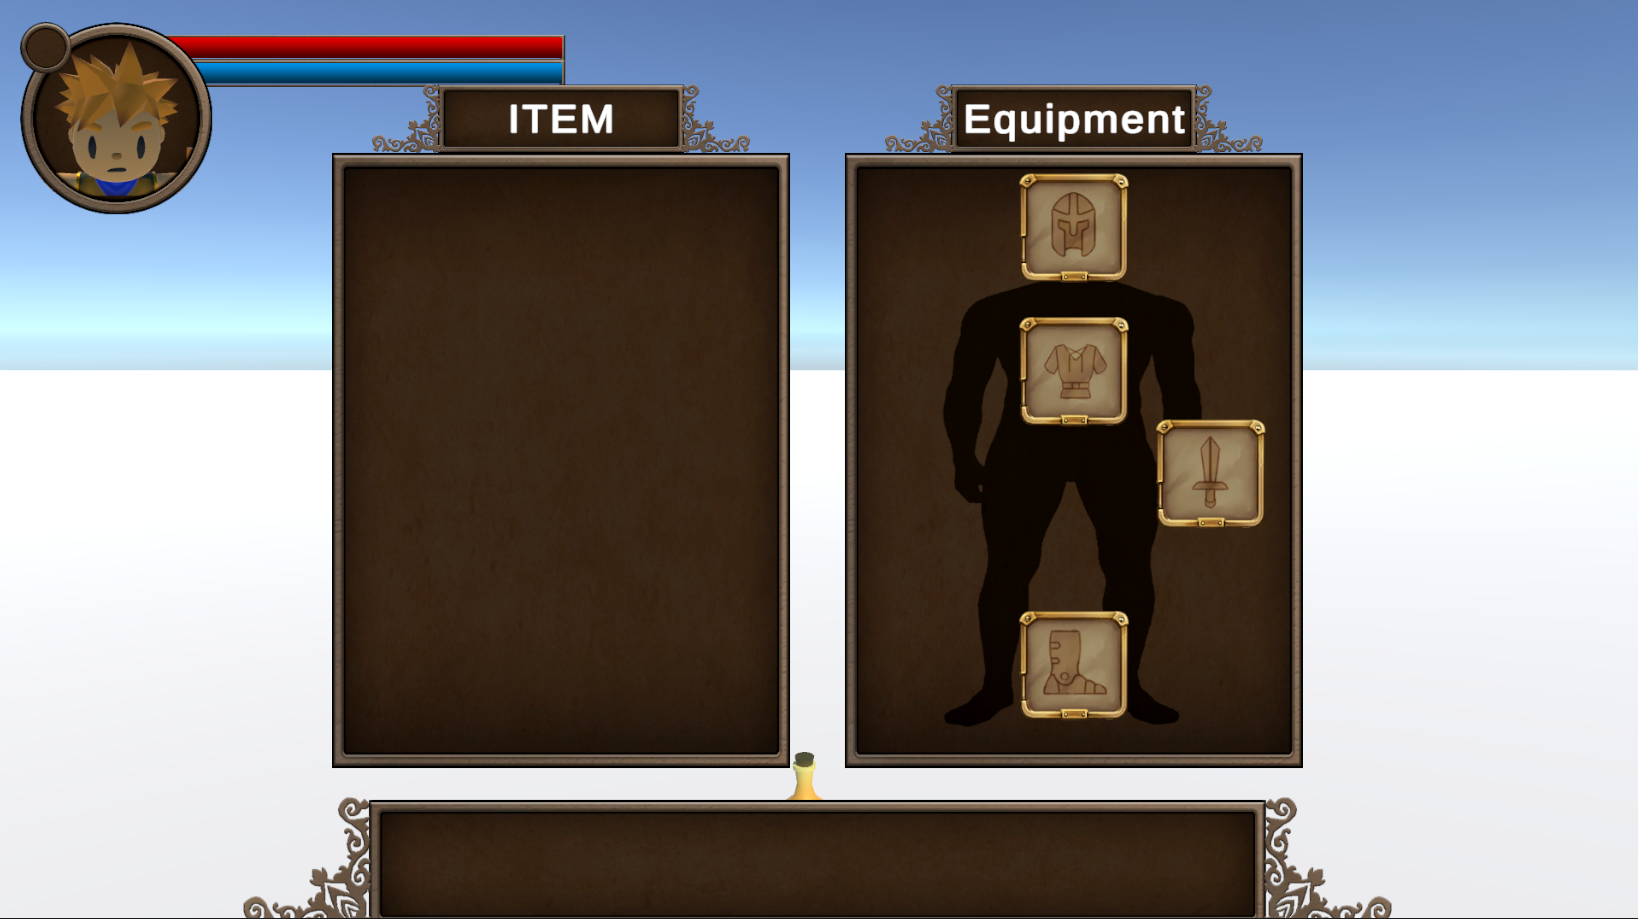
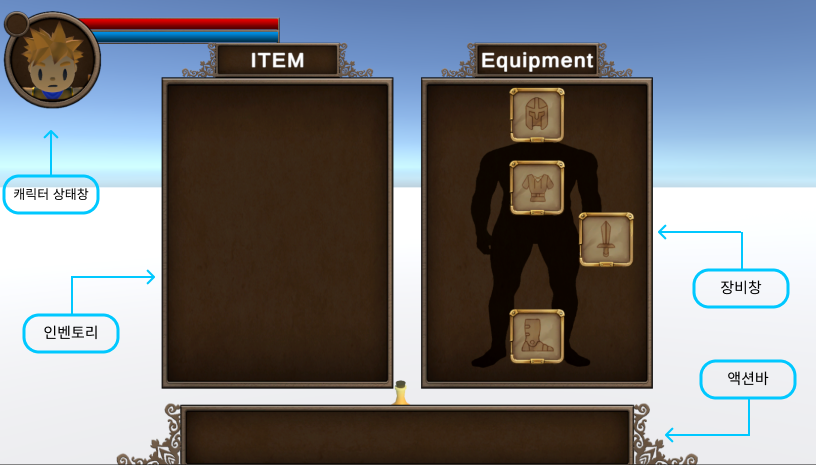
이번에는 Player UI를 만들어 보겠습니다. UI는 아래와 같이 [캐릭터 상태창, 액션바, 아이템창, 장비창] 이렇게 4가지 구성으로 설계해보았습니다. 이번 포스팅에서는 Inventory(아이템 창)만 다루겠습니다! 🙂
🎒 Inventory
🔧 설계
- 아이템의 종류는 크게
장비,소비,기타3가지로 나눈다.- 소비, 기타 아이템은 종류마다
InventorySlot 하나만 할당된다. (개수 표시 O) - 장비 아이템은
Inventory Slot을 공유하지 않는다. (개수 표시 X)
- 소비, 기타 아이템은 종류마다
- 소비 아이템은 하단의
ActionBar에 넣어서 사용할 수 있다. (DragAndDrop)ActionBar에 할당되어있는 KeyCode의 입력에 따라 사용된다.- 사용 시, 아이템 소지 수를 갱신한다.
- 아이템 소지 수가 0이면 아이템 아이콘을 삭제한다.
🔎 주요 요소
ItemData (Scriptable Object)
- Sciptable Object를 통해 효율적인 자원관리
- 특히 소비아이템(Consumable)의 경우 Action Bar와 Inventory 상의 오브젝트가 같은 참조를 가지므로 관리가 매우 편합니다.
Code
- ItemData [부모 클래스]
public enum ItemType
{
    Equipment,
    Consumable,
    ETC
}

[CreateAssetMenu(fileName = "Item Data", menuName = "Scriptable Object/Item Data")]
public abstract class ItemData : ScriptableObject
{
    public string itemName;
    public string description;
    public Sprite icon;
    public ItemType itemType;
    public abstract void Use();
}- 자식 클래스
-
Consumable [자식 클래스]
using System; using TMPro; using UnityEngine; using UnityEngine.Events; public enum ConsumableType { HP, MP, SpeedUp } [CreateAssetMenu(fileName = "Consumable", menuName = "Items/Consumable")] public class Consumable : ItemData { public ConsumableType subType; public bool isPresetting { get; set; } private int consumableCount; public event Action OnConsumableUsed; //소비아이템 사용/획득 콜백. private void OnEnable() { itemType = ItemType.Consumable; consumableCount = 1; isPresetting = false; //ActionBar에 해당 아이템이 존재하는지 유무 } public int GetConsumableCount() { return consumableCount; } public override void Use() { if(consumableCount <= 0) { return; } switch (subType) { case ConsumableType.HP: Debug.Log("HP 포션 사용!"); break; case ConsumableType.MP: Debug.Log("MP 포션 사용!"); break; case ConsumableType.SpeedUp: Debug.Log("SpeedUp 포션 사용!"); break; } consumableCount--; OnConsumableUsed?.Invoke(); } public void GetThisItem() { consumableCount++; OnConsumableUsed?.Invoke(); } public void ThrowThisItem() { consumableCount = 0; OnConsumableUsed?.Invoke(); } } -
Equipment [자식 클래스]
using System.Collections; using System.Collections.Generic; using UnityEngine; public enum EquipmentType { Head, Weapon, Cloth, Foot } [CreateAssetMenu(fileName = "Equipment", menuName = "Items/Equipment")] public class Equipment : ItemData { public EquipmentType subType; public float value; private void OnEnable() { itemType = ItemType.Equipment; } public override void Use(){ GameObject playerState; switch (subType) { case EquipmentType.Head: Debug.Log("헤드 장착"); break; case EquipmentType.Weapon: Debug.Log("무기 장착"); break; case EquipmentType.Cloth: Debug.Log("옷 장착"); break; case EquipmentType.Foot: Debug.Log("신발 장착"); break; } } } -
ETC [자식 클래스]
[CreateAssetMenu(fileName = "ETC", menuName = "Items/ETC")]
public class ETC : ItemData
{
    public override void Use(){ }
}
-
ItemDataSC
실질적으로 아이템 아이콘 렌더링 기능을 수행합니다.
Itemdata ItemSC 아이템 데이터 및 사용 관리 아이템 데이터를 UI에 렌더링
public abstract class ItemDataSC : MonoBehaviour
{
    public abstract ItemData GetItem { get; }
}- 자식 클래스
-
ConsumableItemSC
public class ConsumableItemSC : ItemDataSC { [SerializeField] private Consumable consumableItem; public override ItemData GetItem => consumableItem; private Image iconImg; public TextMeshProUGUI consumableCountText; private void Start() { iconImg = GetComponent<Image>(); consumableCountText = transform.GetChild(0).GetComponent<TextMeshProUGUI>(); UpdateCountCallback(); if (consumableItem != null) { consumableItem.OnConsumableUsed += UpdateCountCallback; } } public void SetItem(Consumable itemData) { if (consumableItem != null) { consumableItem.OnConsumableUsed -= UpdateCountCallback; } consumableItem = itemData; if (consumableItem != null) { consumableItem.OnConsumableUsed += UpdateCountCallback; } MapImage(); } private void MapImage() { if (iconImg == null) iconImg = GetComponent<Image>(); if (consumableItem != null && iconImg != null) { iconImg.sprite = consumableItem.icon; // 아이콘 설정 } } //아이템 획득/사용시 콜백. private void UpdateCountCallback() { if (consumableItem == null) Destroy(gameObject); int consumableCount = consumableItem.GetConsumableCount(); if (consumableCount <= 0) { Destroy(gameObject); } else { consumableCountText.text = consumableCount.ToString(); } } } -
EquipmentItemSC
public class EquipmentItemSC : ItemDataSC
{
    [SerializeField]
    private Equipment equipmentItem;

    public override ItemData GetItem => equipmentItem;

    private Image iconImg;

    private void Start()
    {
        iconImg = GetComponent<Image>();
    }

    public void SetItem(Equipment itemData)
    {
        equipmentItem = itemData;

        MapImage();
    }

    private void MapImage()
    {
        if (iconImg == null)
            iconImg = GetComponent<Image>();

        if (equipmentItem != null && iconImg != null)
        {
            iconImg.sprite = equipmentItem.icon;           // 아이콘 설정
        }
    }
-
🎒 Inventory
Singleton
public static Inventory myInventory { get; private set; }

private void Awake()
{
    if (myInventory == null)
    {
        myInventory = this;
        DontDestroyOnLoad(gameObject);
    }
    else
    {
        Destroy(gameObject);
    }
}
Inventory UI가 활성화 상태 상관 없이 먹은 아이템에 대한 데이터를 저장할 필요가 있습니다.
(+) Player는 오직 하나의 Inventory만 참조하기 때문에 Singletone은 매우 적합한 모델!
Inventory Slot
private GameObject currentItem; //슬롯에 할당되어있는 아이템 참조. public void OnDrop(PointerEventData eventData)
{
GameObject droppedItem = eventData.pointerDrag; //드래그 Drop된 item 참조.
if (droppedItem != null && droppedItem.GetComponent<ItemContoller>() != null)
{
droppedItem.transform.SetParent(transform);
droppedItem.GetComponent<RectTransform>().anchoredPosition = Vector2.zero;
AssignItem(droppedItem);
}
}- Drop Event를 통해 Drag 상태인 아이템을 슬롯에 할당합니다.
OnDrop | [Drag → Drop]시 발생하는 Callback |
|---|---|
eventData.pointerDrag | Drag 상태인 item |
Total Code
using Gentleland.Utils.SteampunkUI;
using System.Collections;
using System.Collections.Generic;
using UnityEngine;
using UnityEngine.EventSystems;

public class InventorySlot : MonoBehaviour, IDropHandler
{
    private GameObject currentItem;

    void Update()
    {
        if (transform.childCount == 0)
        {
            currentItem = null;
        }
    }

    public void AssignItem(GameObject item)
    {
        currentItem = item;
    }

    public void OnDrop(PointerEventData eventData)
    {
        GameObject droppedItem = eventData.pointerDrag;       //드래그 상태인 item 참조

        if (droppedItem != null && droppedItem.GetComponent<ItemContoller>() != null)
        {
            droppedItem.transform.SetParent(transform);
            //가운데 정렬
            droppedItem.GetComponent<RectTransform>().anchoredPosition = Vector2.zero;
            AssignItem(droppedItem);
        }
    }

    public GameObject GetCurrentItem() { return currentItem; }
}
Inventory 세부 기능 구현.
1️⃣ Inventory상의 아이템 존재 여부 확인
이제 이 부분이 가장 중요하고 구현하기 가장 어려웠던 것 같습니다.
Enum으로 구현하여 중복 여부를 줄이고 가독성을 높이는 방법을 선택했습니다. 처음 부모 클래스는 ItemType을 가지고, 자식 클래스인 Consumable, Equipment는 각각 ConsumableType, EquipmentType이라는 Enum을 가지고 있습니다. 하지만 이후에 추가할 ETC는 어떠한 Enum도 가지지 않습니다. 그럼 구분할 때 무엇을 메서드에 실어 보내야 할까요?
물론 간단하게 Tag나 Name을 통해서도 할 수 있지만, 이는 아이템 종류가 늘어날 때마다 새로운 SriptableObject를 만들고 태그 설정을하고 코드를 중간 중간마다 다 수정해주어야하는 번거로움이 있습니다.
그래서 생각한 형태가 바로 Generic입니다.
public bool SearchItemByType<T>(ItemType itemType, T? subType = null) where T : struct
{ ... }
이처럼 제네릭으로 하위 타입(ConusmableType, EquipmentType)을 기반으로 itemType을 보내고, subType이 존재 여부에 따라 ETC와 다른 타입의 아이템을 구분할 수 있습니다.
T? subType = null
타입 매개변수를 따로 보내지 않았다면 일반 itemType으로 간주하여 처리한다.
이렇게 Generic을 통해 조금은 복잡하지만, 모든 item의 처리를 하나의 코드로 구현할 수 있습니다.
//슬롯에 할당된 아이템
ItemData slotItemData = slot.GetCurrentItem().GetComponent<ItemDataSC>().GetItem;

if (itemType == ItemType.Consumable && slotItemData is Consumable consumable) {}
위처럼 GetItem()을 통해 오버라이드한 클래스 객체가 ItemData의 자식 클래스이므로 (Consumable) 아래와같이 itemType을 조건문으로 사용하여, Consumable에 대한 ItemData를 사용할 수 있게 됩니다.
Total Code
public bool SearchItemByType<T>(ItemType itemType, T? subType = null) where T : struct
{
    foreach (InventorySlot slot in slots)
    {
        if (slot.GetCurrentItem() == null) continue;

        ItemData slotItemData = slot.GetCurrentItem().GetComponent<ItemDataSC>().GetItem;

        if (slot.GetCurrentItem() != null && slotItemData.itemType == itemType)
        {
            if (subType == null) return true;
            if (itemType == ItemType.Consumable && slotItemData is Consumable consumable)
            {
                if (EqualityComparer<T>.Default.Equals((T)(object)consumable.subType, subType.Value))
                    return true;
            }
            else if (itemType == ItemType.Equipment && slotItemData is Equipment equipment)
            {
                if (EqualityComparer<T>.Default.Equals((T)(object)equipment.subType, subType.Value))
                    return true;
            }
        }
    }
    return false;
}
2️⃣ 필드에 떨어진 아이템을 Inventory에 넣기
필드에 떨어진 아이템을 Icon화하여 데이터를 Inventory에 넣어봅시다.
먼저 필드에 떨어진 아이템의 itemType을 구분할 수 있는 스크립트가 필요합니다.
public class Consumable_DroppedItemSC : ItemDataSC
{
    [SerializeField]
    private Consumable consumableItem;

    public override ItemData GetItem => consumableItem;
}
ItemDataSC를 상속받는 SC로 각각의 아이템에 맞는 Type을 설정해주면 됩니다.
만약 장비 아이템이라면 Equipment_DroppedItemSC가 되겠죠?
이제 이 SC를 떨어져 있는 아이템에 할당하고 Prefab화 하여 바닥에 놓아 보겠습니다.
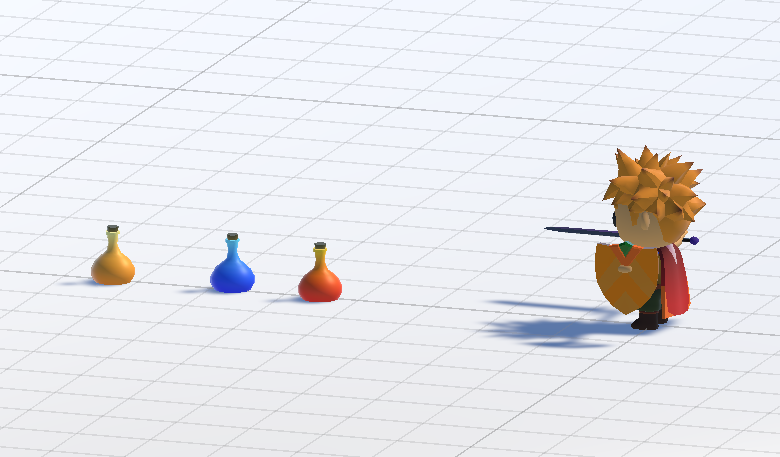
이렇게 순서대로 빨강, 파랑, 노랑 포션이 있습니다.
Potion Object : [***Collider-Trigger]***
InventoryItemIconManager
아이템을 먹었으면 Inventory에 아이콘을 생성하거나, 소지 개수를 갱신해야합니다.
	public void CreateItemIcon(ItemData newItemData, InventorySlot emptySlot)
	{
	    StartCoroutine(CreateItemIconCoroutine(newItemData, emptySlot));
	}

	IEnumerator CreateItemIconCoroutine(ItemData newItemData, InventorySlot emptySlot)
  	{
      	while (!Inventory.myInventory.CheckSlotSize())
        {
            yield return null;
        }
  	}
코루틴을 통해 icon 생성 기능을 수행해 줍시다!
(⇒ Inventory 기능이 Player캐릭터의 다른 행동에 영향을 주어서는 안됩니다.)
☝🏻주의
코루틴(Coroutin) 상의 While문의 용도는?
에디터 사용자는 UI의 렌더링 순서를 직접 설정할 수 없습니다. 그렇기 때문에 나중에 아이템을 게임을 이어하기를 수행할 때, 아이템 icon이 있어야 할 slot이 비어있으면 NullException이 발생합니다. 따라서 코루틴에서 먼저 Inventory에서 Slot을 모두 생성될 때까지 대기하고, icon을 생성할 수 있도록 해줍시다.
	if (itemData.itemType == ItemType.Consumable)
    	item.AddComponent<ConsumableItemSC>();
	else if(itemData.itemType == ItemType.Equipment)
	    item.AddComponent<EquipmentItemSC>();
IconBasPrefab을 itemType에 상관없이 하나로 통일하여 사용하기 때문에 Script를 동적으로 할당하는 방식을 사용했습니다.
**하지만 만약 itemType**별로 다른 Prefab을 사용하면 해당 메서드는 필요 없습니다.
Total Code
public class InventoryItemIconManager : MonoBehaviour
{
    [SerializeField]
    private List<Consumable> consumableItemList;

    [SerializeField]
    public GameObject iconBasePrefab;

    public Transform scrollContent;

    public void CreateItemIcon(ItemData newItemData, InventorySlot emptySlot)
    {
        StartCoroutine(CreateItemIconCoroutine(newItemData, emptySlot));
    }

    IEnumerator CreateItemIconCoroutine(ItemData newItemData, InventorySlot emptySlot)
    {
        while (!Inventory.myInventory.CheckSlotSize())
        {
            yield return null;
        }

        var newItemIcon = AssignItemData(newItemData, emptySlot);
        newItemIcon.gameObject.GetComponent<RectTransform>().anchoredPosition = Vector2.zero;

        newItemIcon.gameObject.transform.SetParent(emptySlot.gameObject.transform);
        newItemIcon.GetComponent<RectTransform>().localScale = Vector2.one;

        Inventory.myInventory.UpdateInventorySlots();
        yield return null;
    }

    public ItemDataSC AssignItemData(ItemData itemData, InventorySlot emptySlot)
    {
        if (itemData == null) return null;

        GameObject item = Instantiate(iconBasePrefab);

        if (itemData.itemType == ItemType.Consumable)
        {
            item.AddComponent<ConsumableItemSC>();
        }else if(itemData.itemType == ItemType.Equipment)
        {
            item.AddComponent<EquipmentItemSC>();
        }

        ItemDataSC itemDataSC = item.GetComponent<ItemDataSC>();
        if (itemDataSC != null)
        {
            if (itemData.itemType == ItemType.Consumable && itemData is Consumable consumable)
            {
                ((ConsumableItemSC)itemDataSC).SetItem(consumable);
            }
            else if (itemData.itemType == ItemType.Equipment && itemData is Equipment equipment)
            {
                Destroy(item.transform.GetChild(0).gameObject);     //Text 삭제.
                ((EquipmentItemSC)itemDataSC).SetItem(equipment);
            }
            else
            {
                Debug.LogError("알 수 없는 아이템 타입입니다.");
            }
        }
        return itemDataSC;
    }
}
Player 상의 코드
  private void OnTriggerEnter(Collider other)
  {
      if (other.gameObject.tag == "Item")
      {
          Destroy(other.gameObject);
          Inventory.myInventory.GetItem(other.gameObject);
      }
  }
item을 먼저 삭제하지 않으면 해당 메서드가 계속 호출되기 때문입니다!
이미 데이터는 매개변수를 통해 넘어왔으므로 Destroy를 통해 오브젝트를 제거해도 GetItem을 호출하는데 문제가 없습니다.
그럼 이번에는 Inventory의 코드를 확인해봅시다.
💥 주의
이렇게 아이템을 줍고 icon을 생성/소멸하는 기능을 만들었는데 과연 원하는 대로 수행이 될까요?
🙅🏻 No!
여기까지 코드들은 Inventory가 활성화된 상태에서만 정상적으로 작동합니다. 그럼 비활성화된 상태에서는 아이템 처리 기능이 누락되게 됩니다.
게임을 할 때, 인벤토리를 항상 열어둘 수는 없죠…
해결
- Inventory의 UI 렌더링 기능과 아이템 데이터 관리 기능 분리
- 즉, 아이템을 먹으면 Inventory에서 따로 먹은 아이템 정보를 저장해둔 다음, Inventory가 활성화 되었을 때, 저장해둔 아이템들을 UI에 렌더링하는 방식을 채용합니다. ⇒ 이 기능을 구현하는데 다양한 방법들이 있지만 저는 Queue를 사용하겠습니다. 아이템을 먹고, 먹은 순서대로 UI에 그려내는 것이 중요합니다. 따라서 Queue의 FIFO(선행선출) 특징이 가장 적합하다고 생각하여 Queue를 채용한 기능 분리를 구현해보겠습니다.
Inventory
 	private Queue<ItemData> itemQueue;              //먹은 아이템에 대한 순서가 보장되어야하기 때문...

 	public void GetItem(GameObject item)
	{
	    ItemDataSC itemDataSC = item.GetComponent<ItemDataSC>();            //DroppedItemSC를 참조한다...
	    ItemData itemData = itemDataSC.GetItem;

	    if (gameObject.activeSelf)
	    {
	        itemQueue.Enqueue(itemData);
	        SyncUIData();
	    }
	    else
	    {
	        itemQueue.Enqueue(itemData);
	    }
	}

	//아이템 창이 활성화되었을 때, 동기화 수행
	public void SyncUIData()
	{
	    while (itemQueue.Count >= 0)
	    {
	        ItemData newitemData = itemQueue.Dequeue();

	        if (newitemData != null)
	        {
	            if (newitemData != null)
	            {
	                if (newitemData is Consumable consumable)
	                {
	                    if (SearchItemByType<ConsumableType>(newitemData.itemType, consumable.subType))
	                    {
	                        consumable.GetThisItem();
	                    }
	                    else
	                    {
	                        GetNewItem(newitemData);
	                    }
	                }
	                else if (newitemData is Equipment equipment)
	                {
	                    GetNewItem(newitemData);
	                }
	            }
	            else
	            {
	                Debug.Log("ItemData is Null...");
	            }
	        }
	    }
}| GetItem | SyncUIData |
|---|---|
| item 획득 시, Queue에 저장 | Inventory가 활성화 될 시, Queue의 모든 데이터를 순서대로 UI에 렌더링 |
⇒ Inventory는 Singletone으로 구현되어있고, static형태로 유지되어 있기 때문에 Queue는 Inventory의 활성화 여부 상관없이 계속 유지됩니다.