istio를 구성하는 방법은 여러 가지가 있지만 이번 과정에서는 직접 helm 차트를 구성해서 배포합니다.
helm 차트를 쉽게 배포하기 위해 argocd를 먼저 설치하고, istio를 구성해 보도록 하겠습니다.
사전 준비
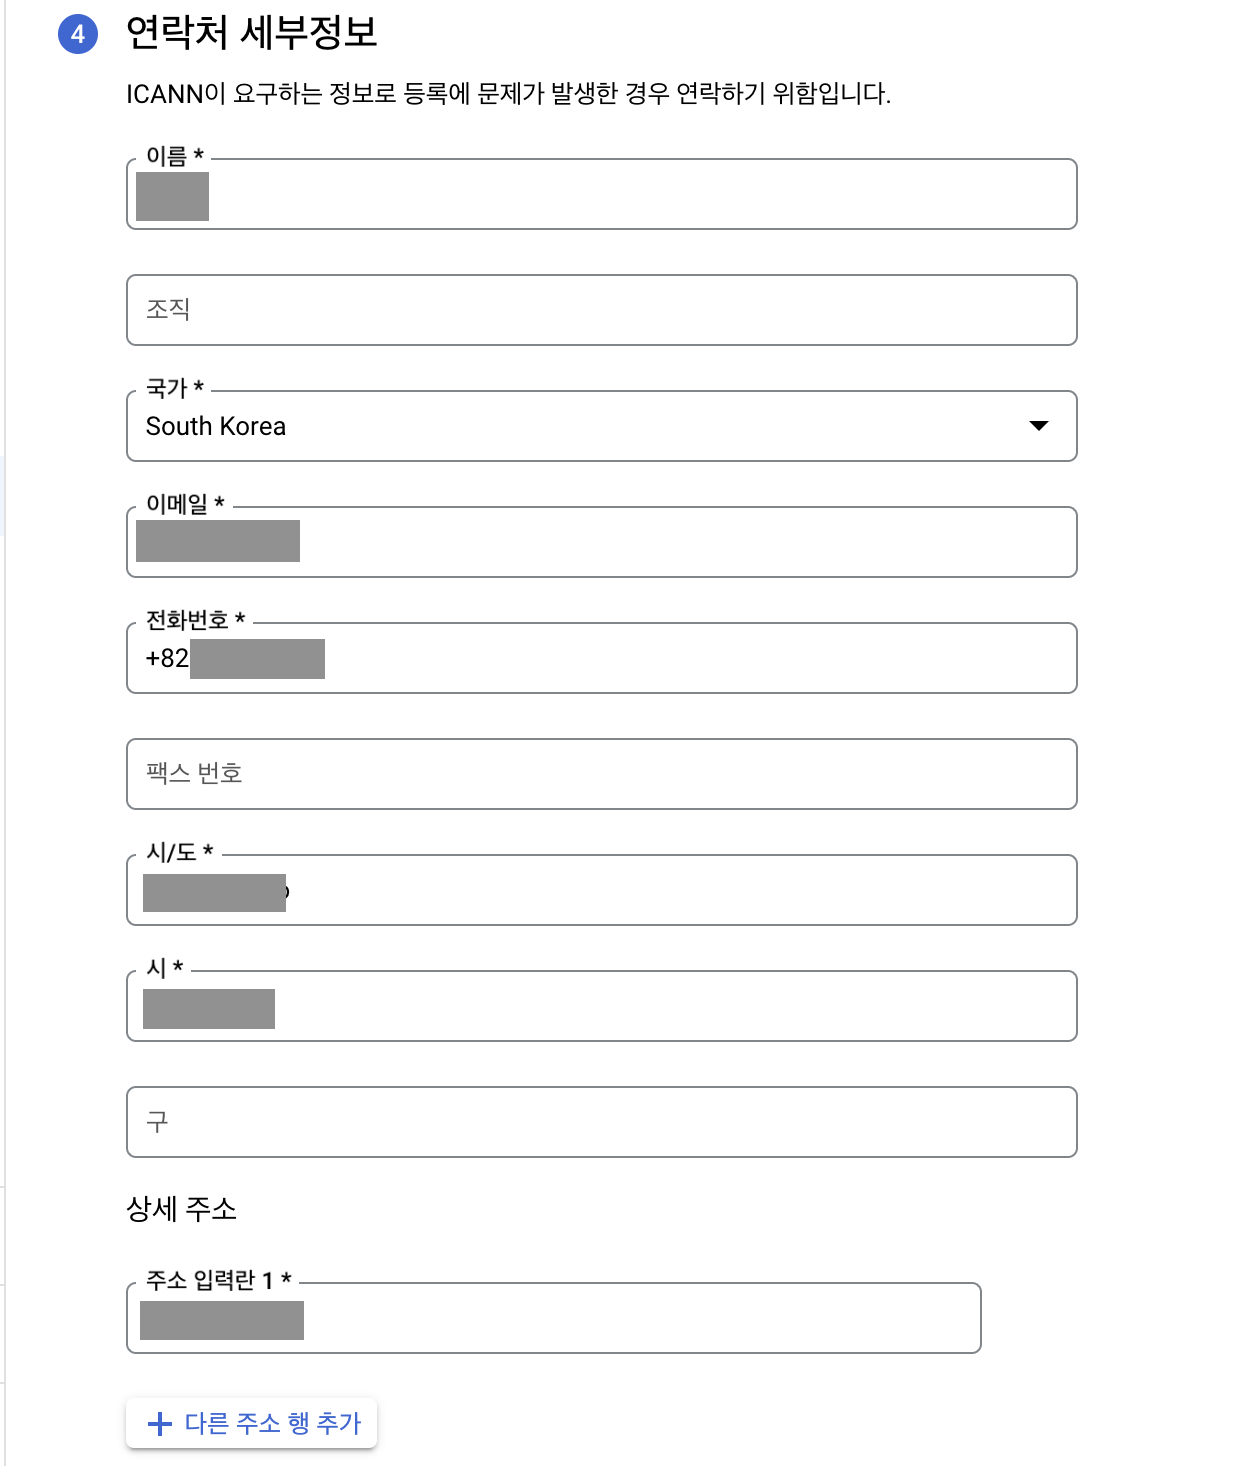
Cloud Domain 발급
cloud domain을 발급받아서 사용하도록 하겠습니다.
goDaddy나 freenom과 같은 무료 도메인 발급 서비스를 이용해도 좋지만, google cloud에는 무료 크레딧이 있으므로 이를 활용하여 도메인을 발급받도록 하겠습니다.
1년이 지나면 연장되면서 과금될 수 있으므로 추후 도메인은 삭제하도록 합니다.
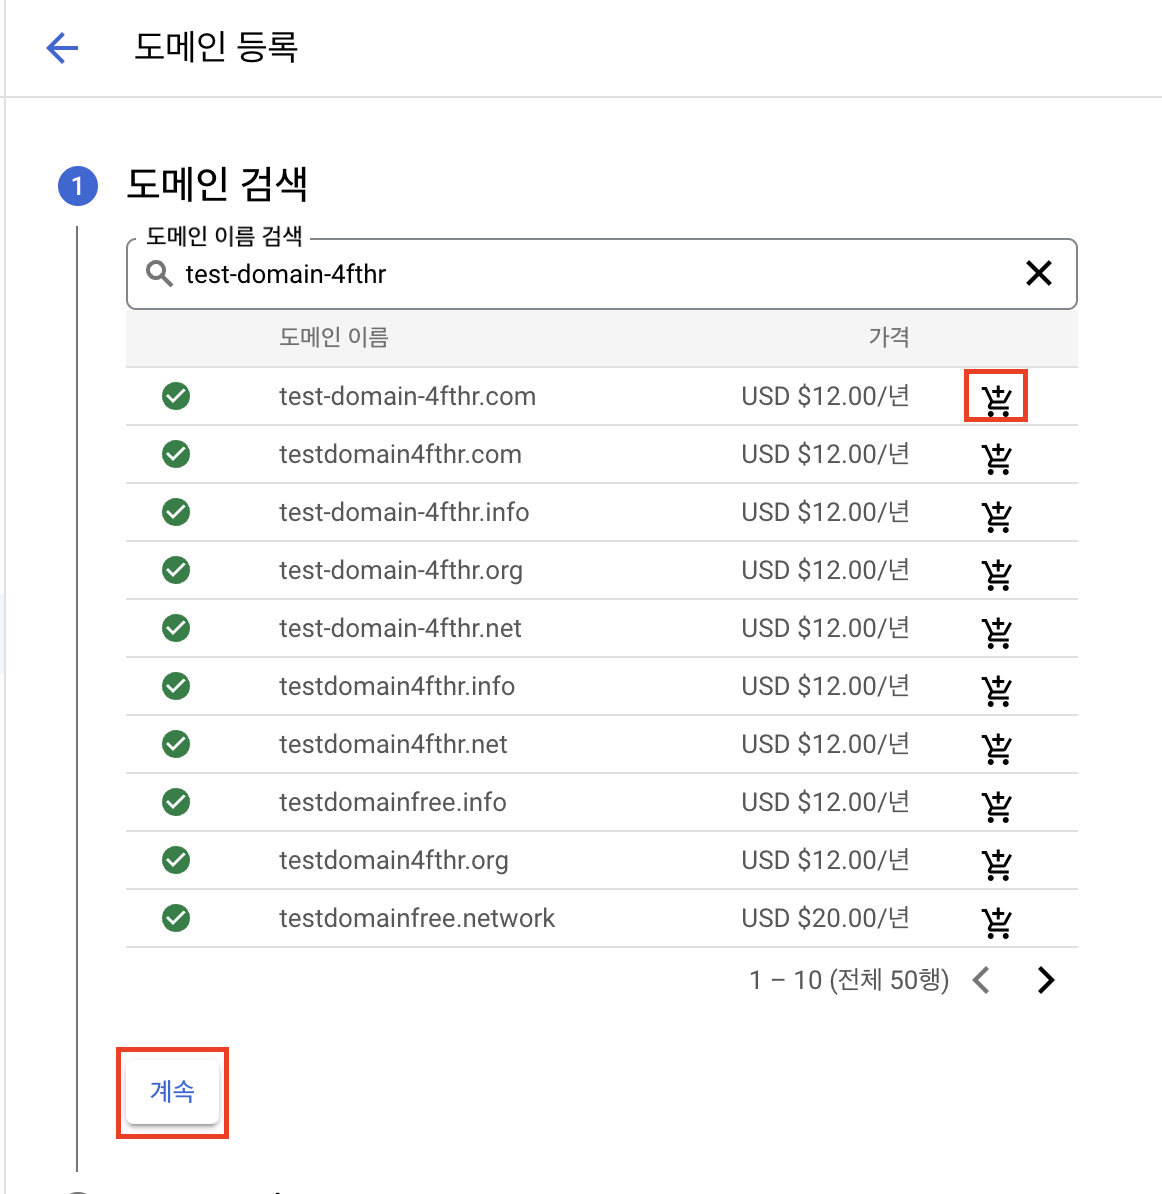
cloud domain > 도메인 등록을 클릭합니다.

도메인 이름은 중복되지 않고 비용이 너무 비싸지 않은 것으로 고르면 됩니다.
주소를 정확히 입력합니다. 서울시 주소의 경우 적합하지 않은 입력이라는 오류 메시지가 나올 수 있습니다.
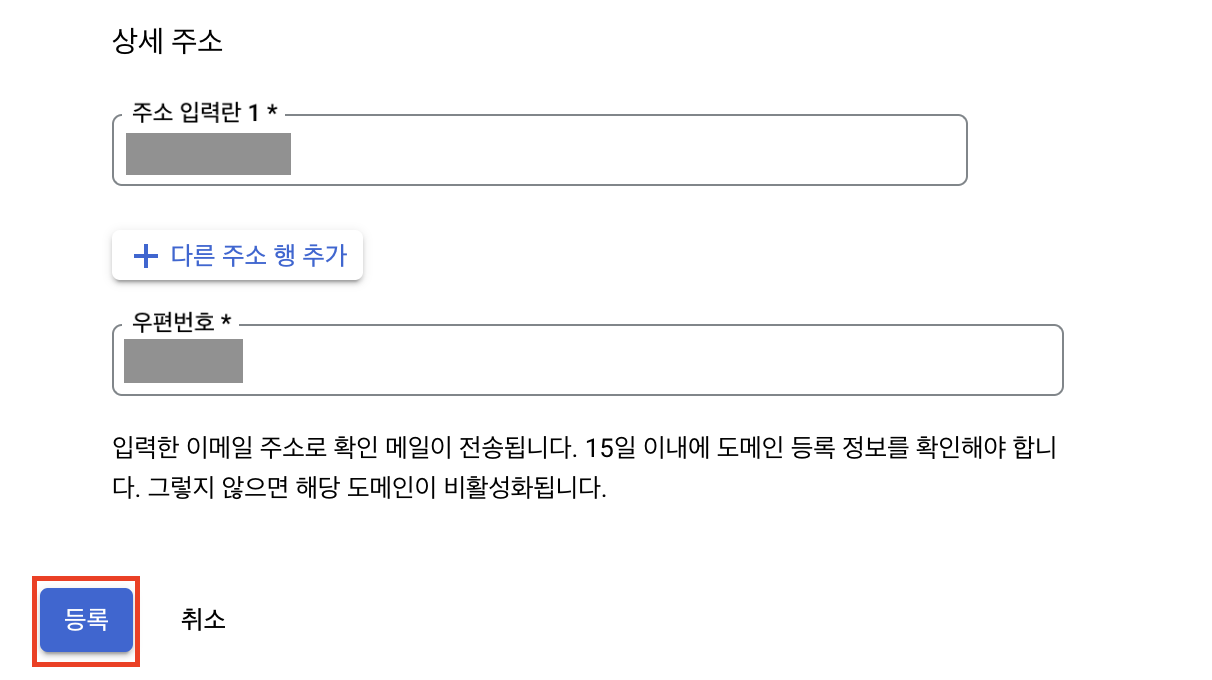
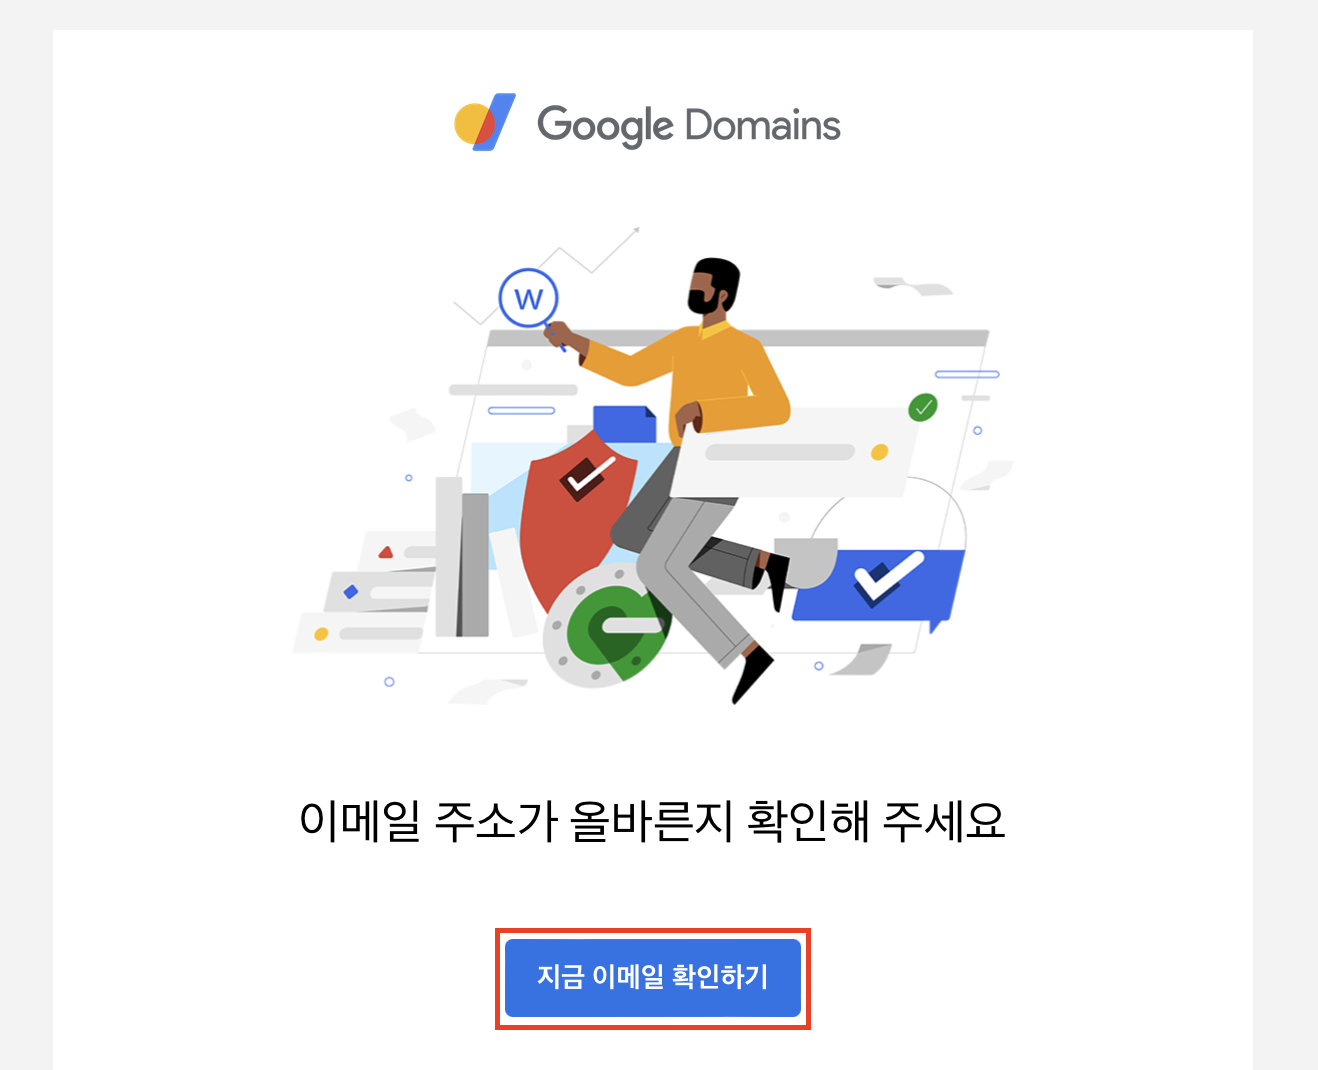
메일을 수신하면 지금 이메일 확인하기를 클릭하여 인증을 합니다.
GitOps용 repository 생성
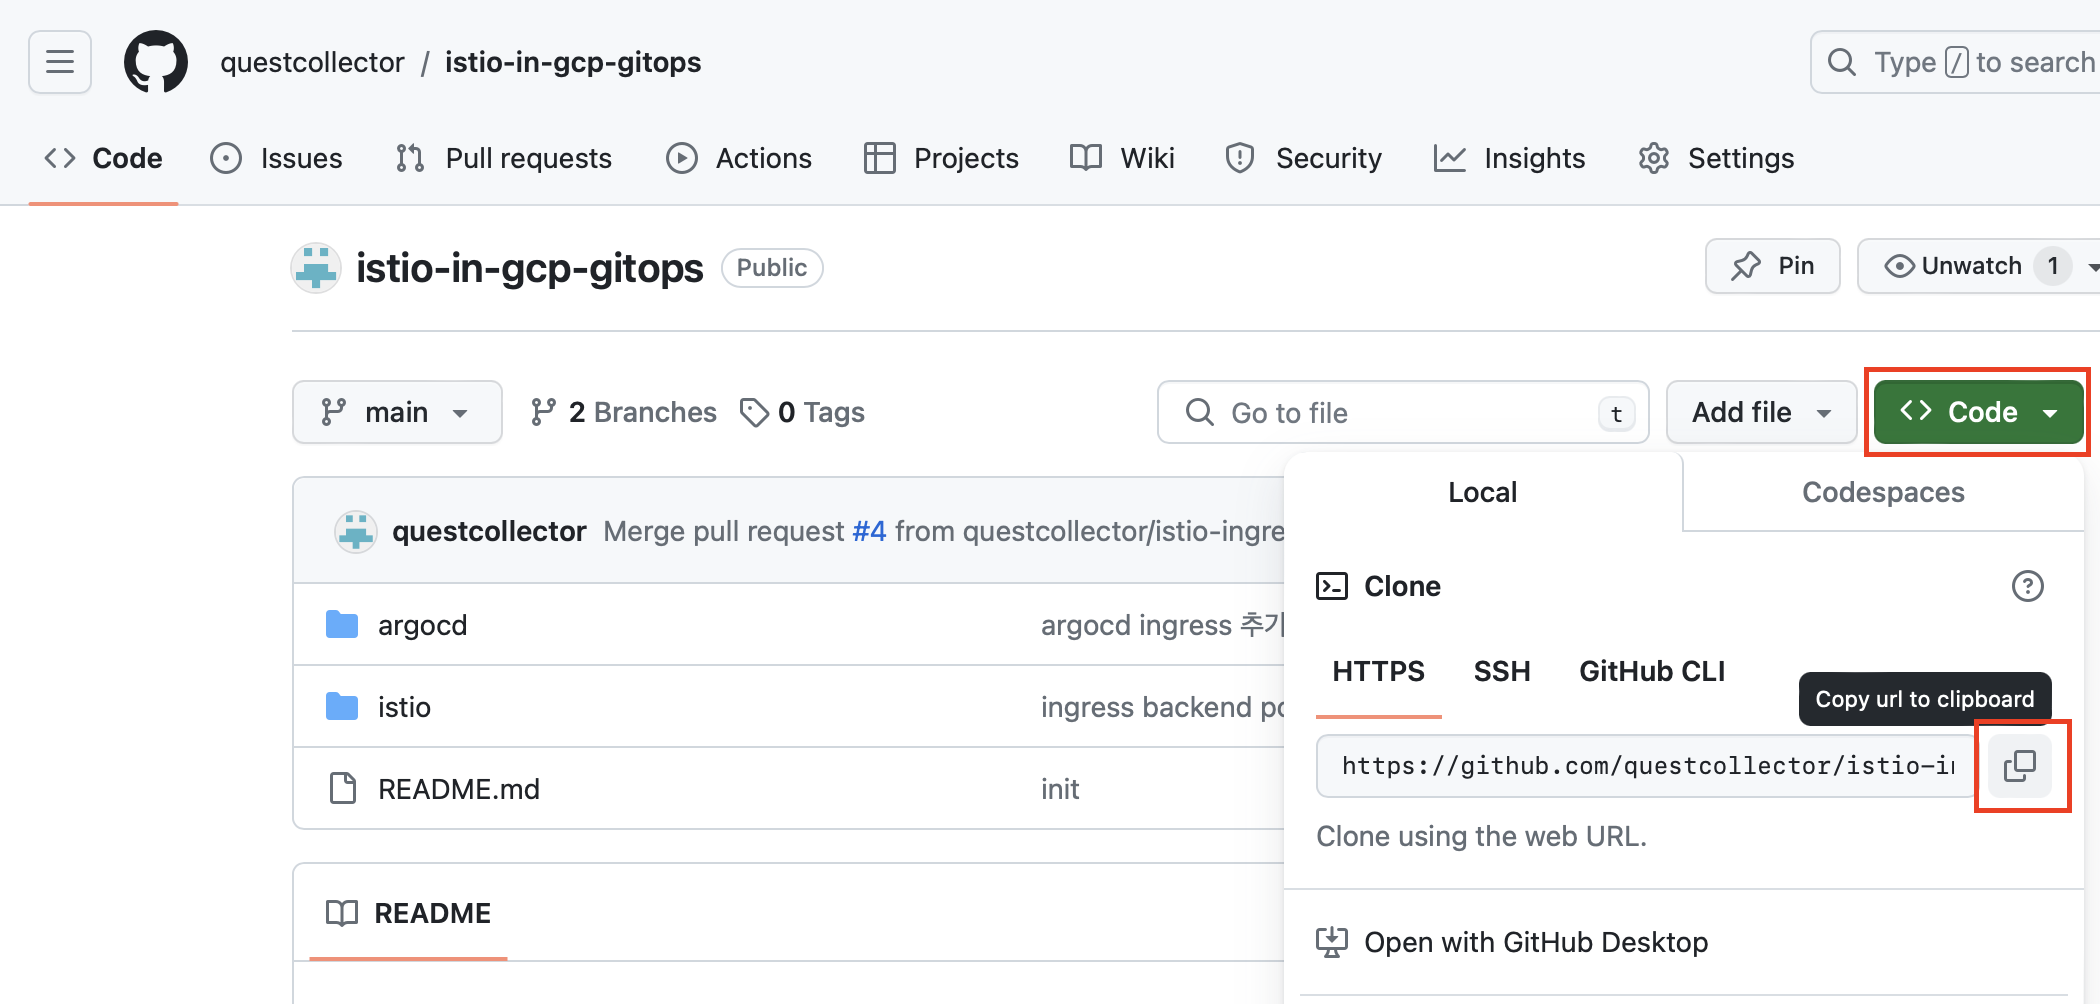
github에서 argocd의 manifest 파일, istio와 다양한 애플리케이션의 helm 차트를 저장할 istio-in-gcp-gitops 레포지토리를 생성합니다.
레포지토리의 HTTPS URL을 복사합니다.
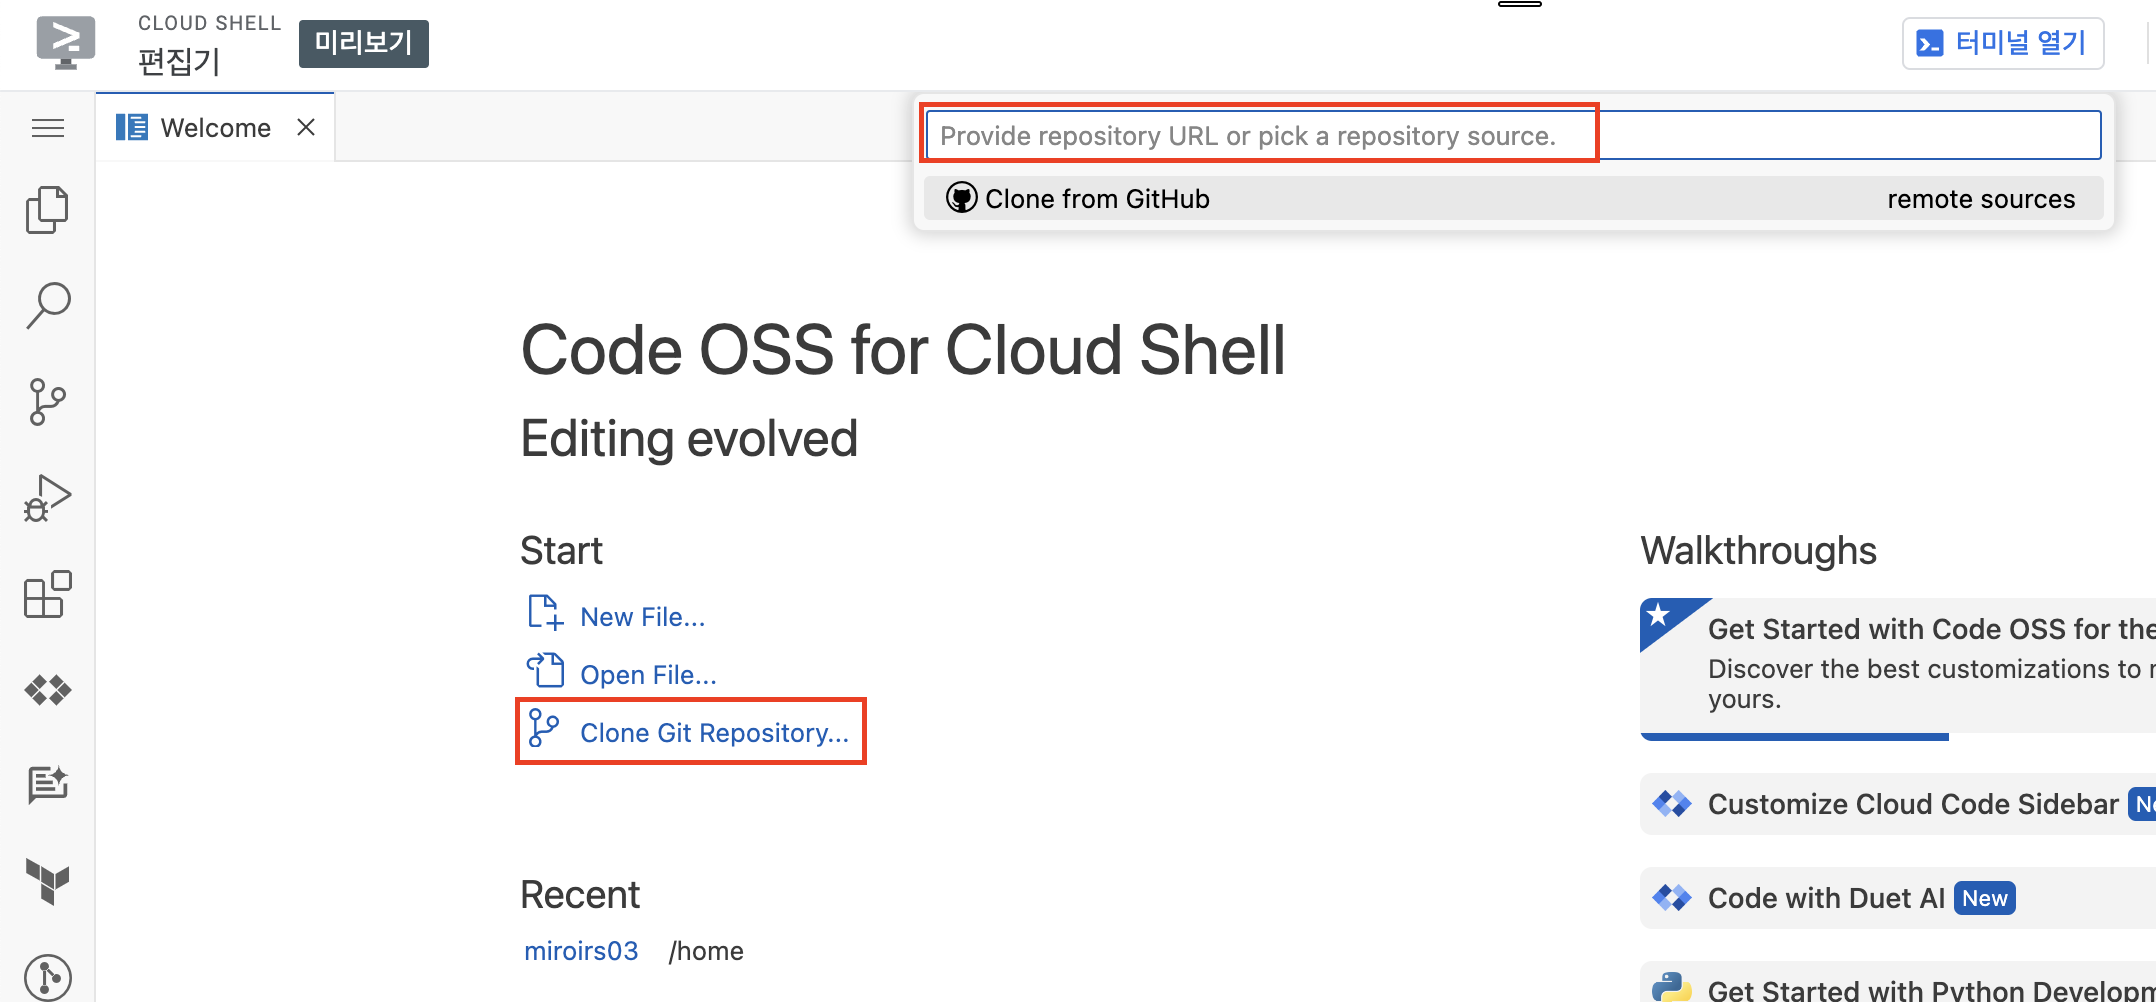
그리고 google cloud shell에 레포지토리를 clone합니다.
google cloud console에서 google cloud shell을 활성화합니다.

편집기 열기 버튼을 클릭하여 편집기 모드로 실행합니다.

Clone Git Repository...를 클릭한 다음 앞서 복사했던 레포지토리의 URL을 입력하여 clone을 합니다.
argocd setting
argocd의 설치는 공식 문서를 참조합니다.
🔗 https://argo-cd.readthedocs.io/en/stable/getting_started/
우선 argocd의 manifest를 저장할 argocd 디렉토리를 생성합니다.
mkdir argocd && cd argocd그리고 manifest 파일을 저장합니다.
curl -LO https://raw.githubusercontent.com/argoproj/argo-cd/stable/manifests/install.yaml그리고 추후 ingress 추가를 위해 argocd-server의 명령어 파라미터를 넣을 수 있는 argocd-cmd-params-cm에 data를 추가하도록 합니다.
대략 20718번 라인의 data.server.insecure에 "true" 값을 추가합니다.
argocd/install.yaml
...
---
apiVersion: v1
kind: ConfigMap
metadata:
  labels:
    app.kubernetes.io/name: argocd-cmd-params-cm
    app.kubernetes.io/part-of: argocd
  name: argocd-cmd-params-cm
data:
  server.insecure: "true"
---
...
argocd ingress 자원 정의하기
argocd-server 서비스를 외부에 노출하기 위해서 ingress를 추가하도록 하겠습니다.
🔗 https://argo-cd.readthedocs.io/en/stable/operator-manual/ingress/#google-cloud-load-balancers-with-kubernetes-ingress
5가지 자원을 새로 정의합니다.
1. argocd-server-external Service
2. BackendConfig
3. FrontendConfig
4. ManagedCertificate
5. Ingress
그 전에 ingress에서 사용할 고정 IP를 생성합니다.
static ip
gcloud compute addresses create argocd-ingress-ip --global --ip-version IPV4argocd 디렉토리에 argocd-ingress.yaml 파일을 새로 생성하고 5가지 자원들을 정의한 yaml contents를 입력합니다.
ManagedCertificate에서 spec.domains[0]의 값과 Ingress에서 spec.rules[0].host의 값에는 argocd의 도메인 주소로 사용될 값을 입력합니다.
예를 들어 example.com 도메인을 발급받았다면 argocd.example.com으로 입력합니다.
argocd-ingress.yaml
apiVersion: v1
kind: Service
metadata:
  name: argocd-server-external
  annotations:
    cloud.google.com/neg: '{"ingress": true}'
    cloud.google.com/backend-config: '{"ports": {"http":"argocd-backend-config"}}'
spec:
  type: ClusterIP
  ports:
  - name: http
    port: 80
    protocol: TCP
    targetPort: 8080
  selector:
    app.kubernetes.io/name: argocd-server

---

apiVersion: cloud.google.com/v1
kind: BackendConfig
metadata:
  name: argocd-backend-config
spec:
  healthCheck:
    checkIntervalSec: 30
    timeoutSec: 5
    healthyThreshold: 1
    unhealthyThreshold: 2
    type: HTTP
    requestPath: /healthz
    port: 8080

---

apiVersion: networking.gke.io/v1beta1
kind: FrontendConfig
metadata:
  name: argocd-frontend-config
spec:
  redirectToHttps:
    enabled: true

---

apiVersion: networking.gke.io/v1
kind: ManagedCertificate
metadata:
  name: argocd-managed-cert
spec:
  domains:
    - argocd.<<domain>> # cloud domain으로 생성한 도메인 추가(ex: example.com)

---

apiVersion: networking.k8s.io/v1
kind: Ingress
metadata:
  name: argocd
  annotations:
    kubernetes.io/ingress.global-static-ip-name: argocd-ingress-ip
    networking.gke.io/managed-certificates: argocd-managed-cert
    networking.gke.io/v1beta1.FrontendConfig: argocd-frontend-config
spec:
  rules:
    - host: argocd.<<domain>> # cloud domain으로 생성한 도메인 추가(ex: example.com)
      http:
        paths:
          - path: /
            pathType: Prefix
            backend:
              service:
                name: argocd-server-external
                port:
                  number: 80
argocd 배포
먼저 argocd 네임스페이스를 생성하고 manifest 파일들을 배포합니다.
kubectl create namespace argocd
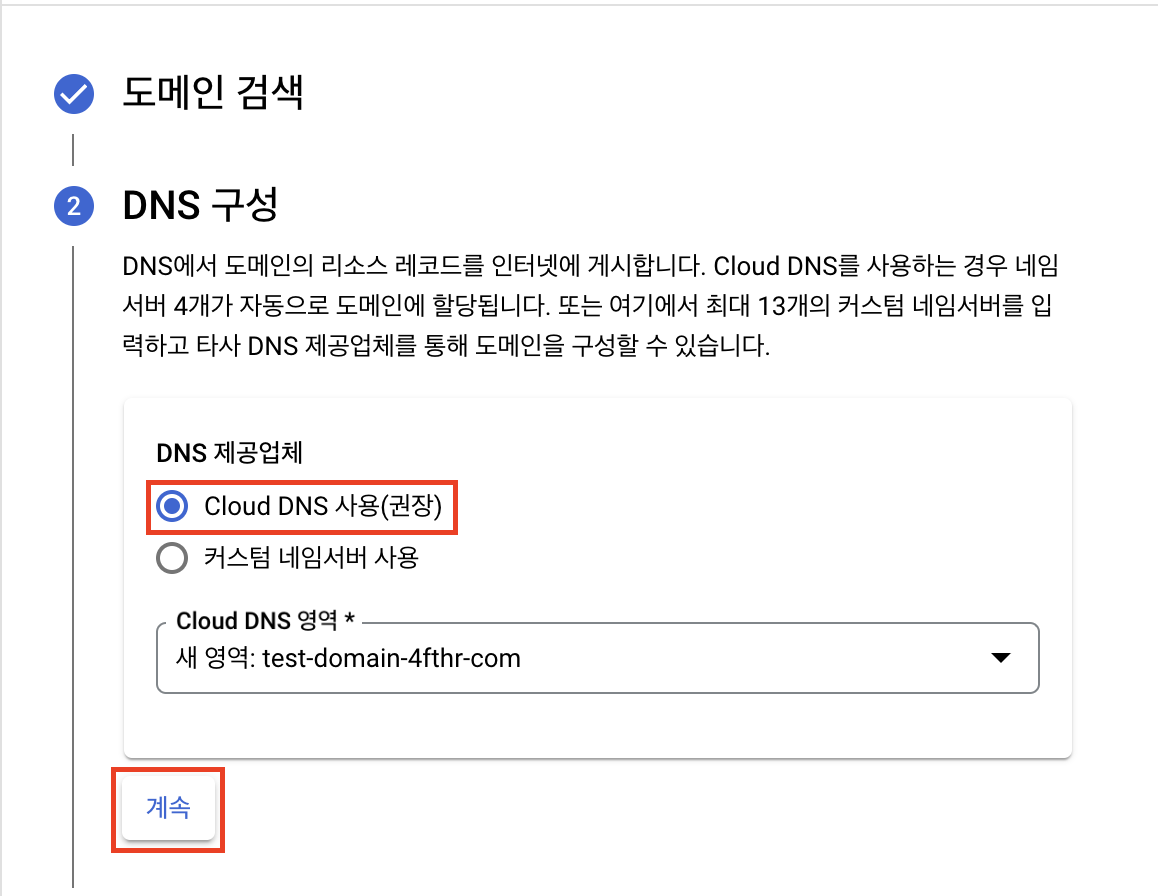
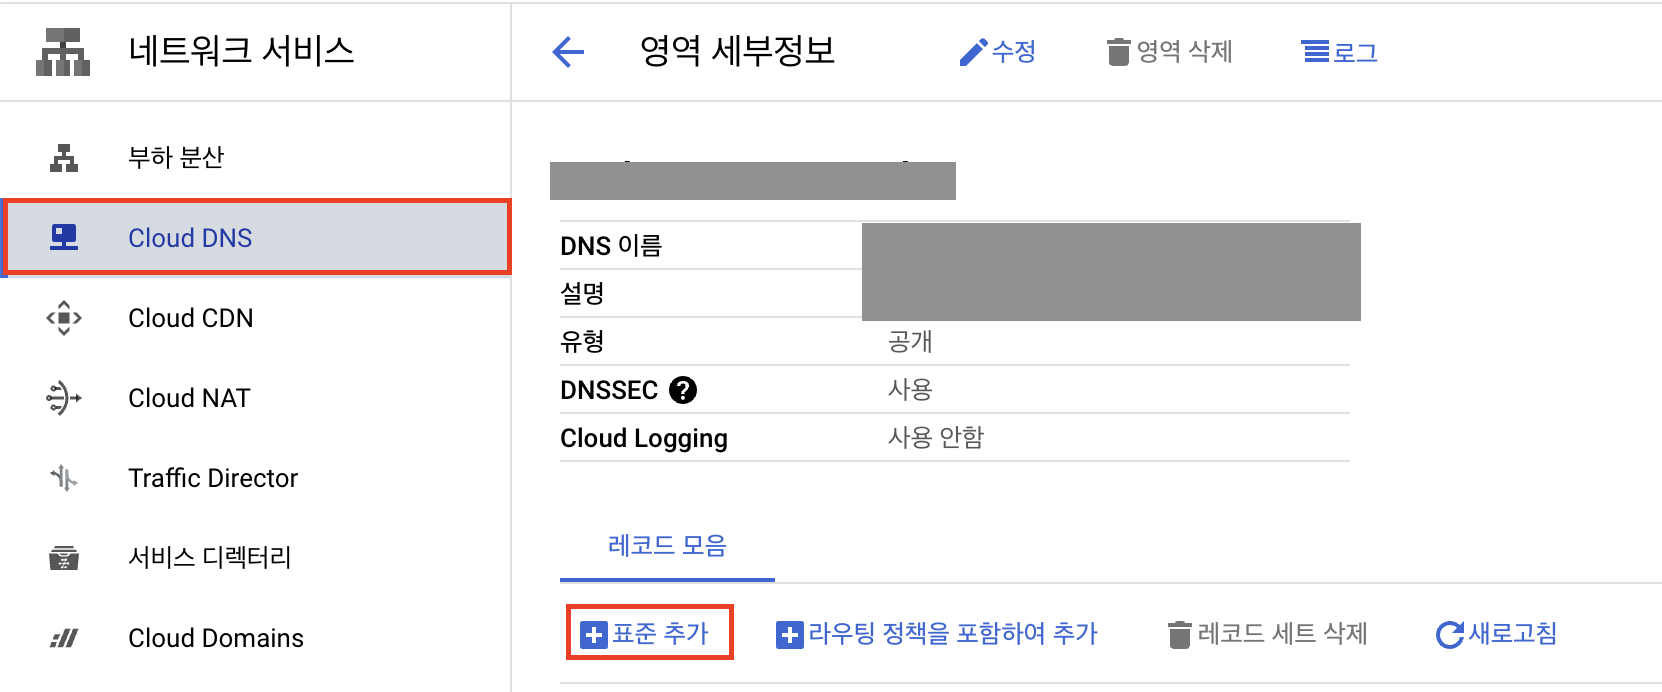
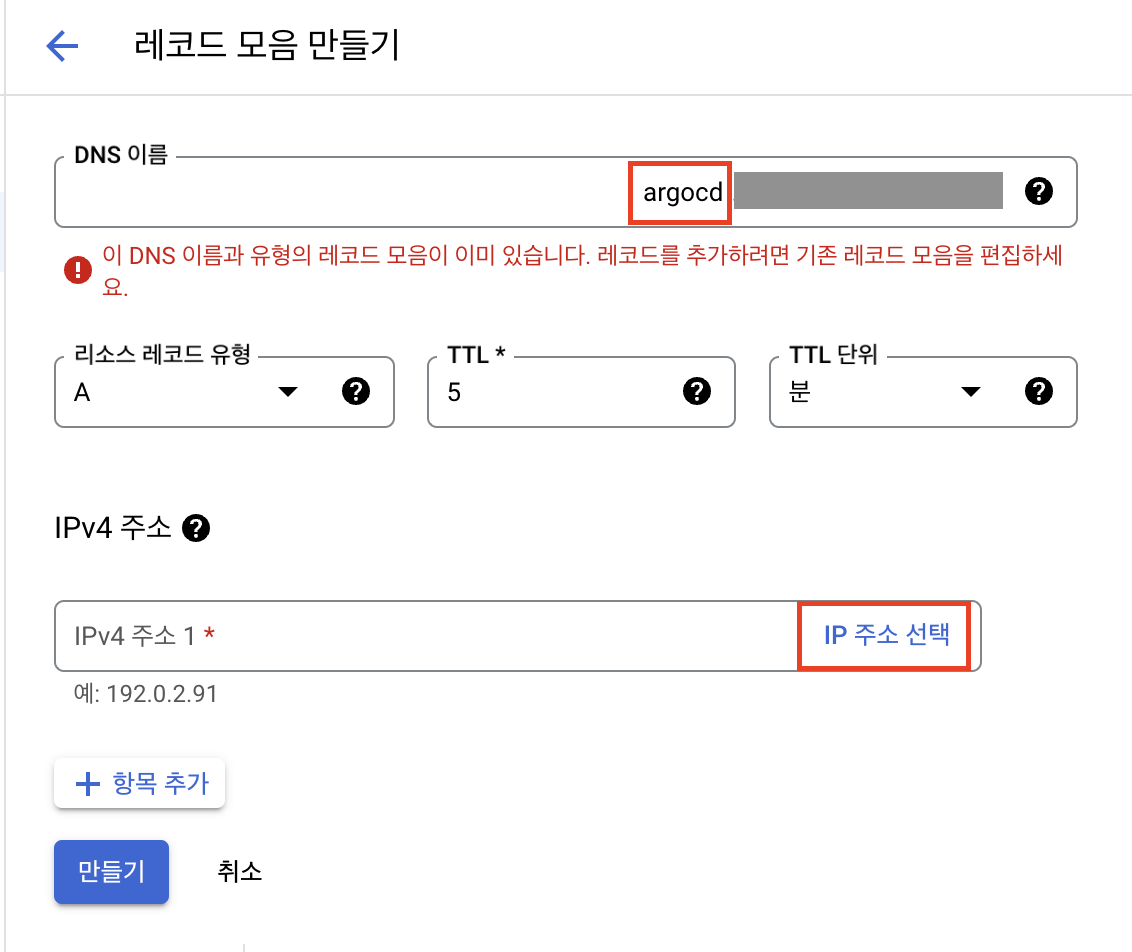
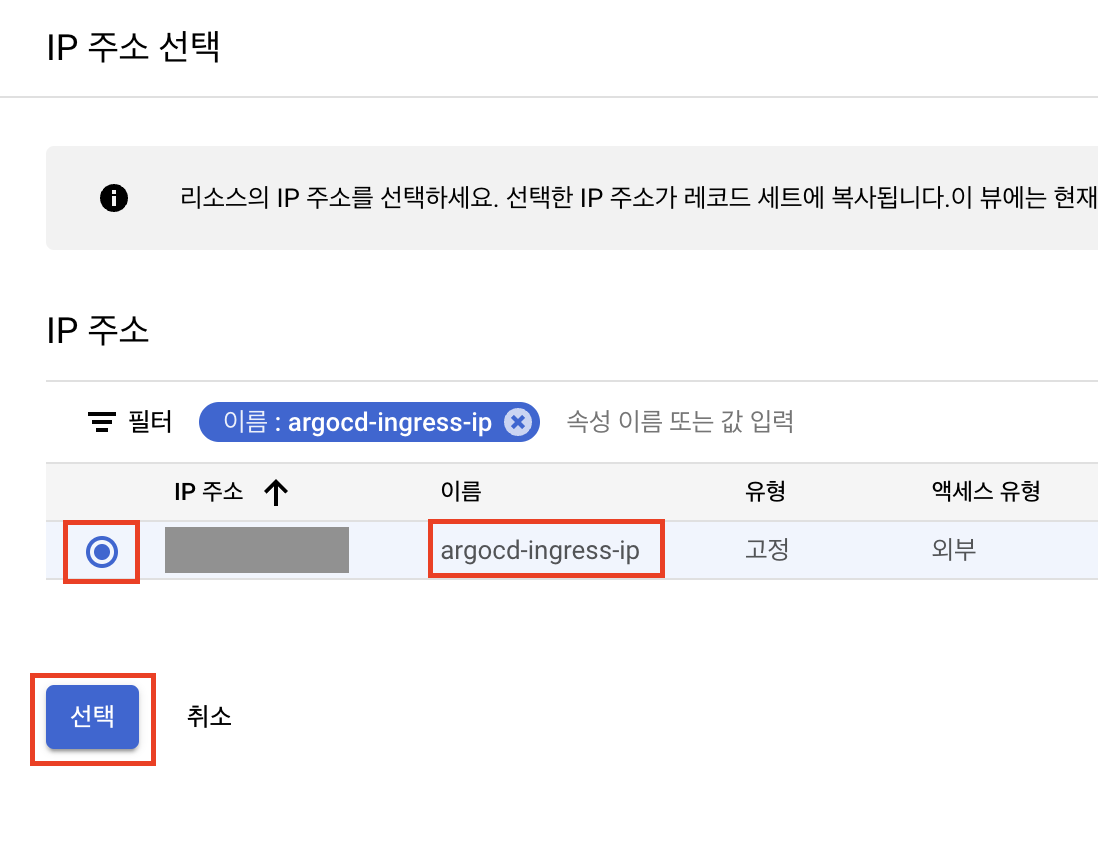
kubectl apply -n argocd -f .그리고 Cloud DNS에서 argocd 레코드를 생성한 다음 argocd-ingress-ip로 생성된 아이피를 등록합니다.
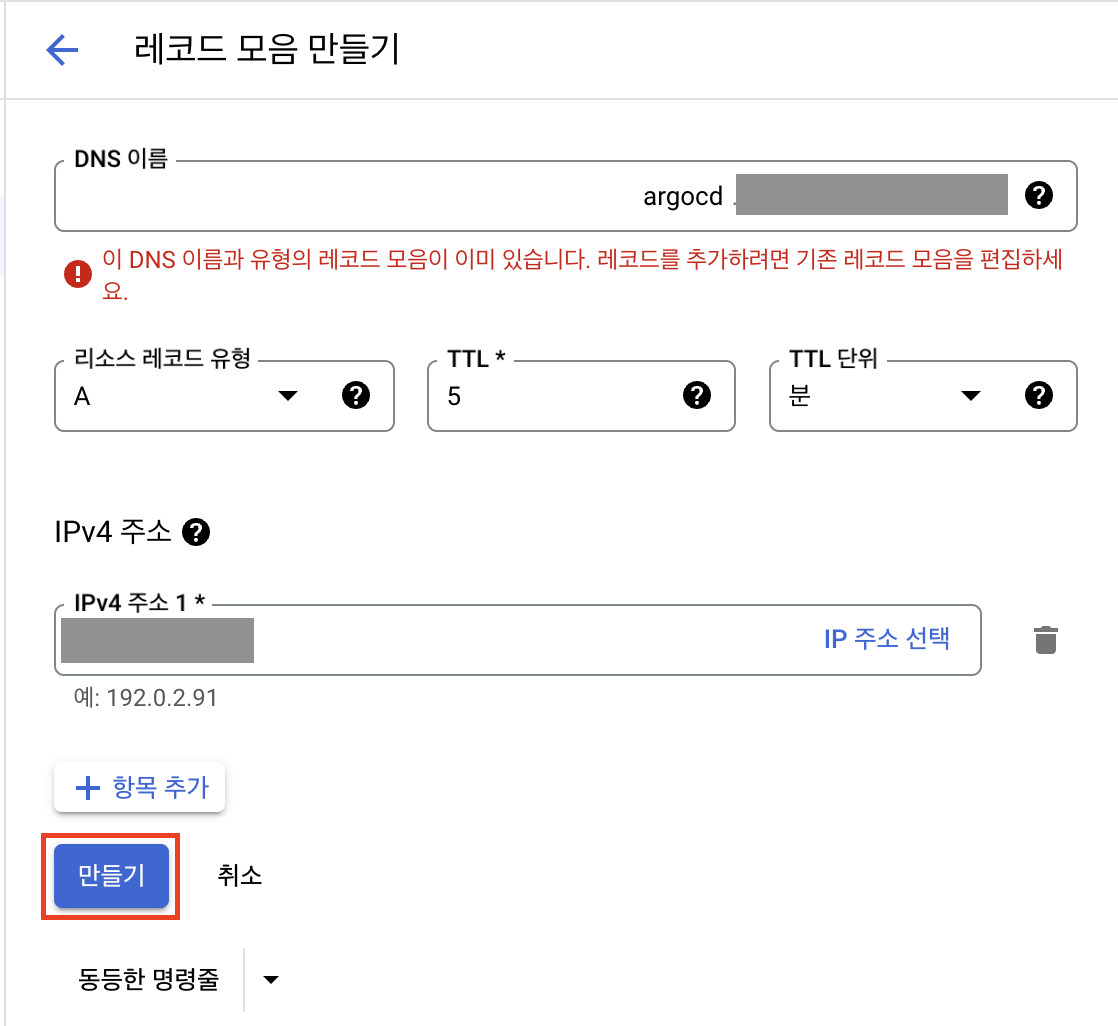
생성한 이후 수 십분 정도 지나서 인증서가 active상태가 되면 도메인으로 등록했던 주소로 접속할 수 있습니다.

초기 비밀번호 확인 및 변경
argocd CLI로 초기 비밀번호를 확인하고 비밀번호를 변경합니다.
먼저 argocd CLI를 설치합니다.
🔗 https://argo-cd.readthedocs.io/en/stable/cli_installation/
curl -sSL -o argocd-linux-amd64 https://github.com/argoproj/argo-cd/releases/latest/download/argocd-linux-amd64
sudo install -m 555 argocd-linux-amd64 /usr/local/bin/argocd
rm argocd-linux-amd64
argocd CLI 명령어로 초기 비밀번호를 확인합니다.
argocd admin initial-password -n argocdkubectl 명령어로 secret 오브젝트에서 직접 확인할 수도 있습니다.
kubectl get secret argocd-initial-admin-secret -n argocd -o jsonpath='{$.data.password}' | base64 -d && echoargocd CLI 명령어로 로그인 후 비밀번호를 변경할 수 있습니다.
로그인
argocd login <<argocd_domain_url>> --grpc-webUsername: admin
Password:
'admin:login' logged in successfully
Context '<<argocd_domain_url>>' updated비밀번호 변경
argocd account update-password*** Enter password of currently logged in user (admin):
*** Enter new password for user admin:
*** Confirm new password for user admin:
Password updated
Context '<<argocd_domain_url>>' updatedistio helm 차트 구성
istio를 설치하는 방법은 여러 가지가 있습니다. istioctl을 활용할 수도 있고, istio helm repository를 이용하여 배포할 수도 있습니다.
GKE(Google Kubernetes Engine)의 경우 istio addon이 있어서 클러스터를 생성할 때 같이 구성하거나 이후에 추가적으로 구성할 수 있습니다.
이번 과정에서는 직접 helm 차트를 구성해야 해서 복잡한 편이지만 잡다한 구성을 미리 정의할 수 있어서 배포에는 간편한 helm 차트를 이용해 보도록 하겠습니다.
helm 설치 & istio repo 추가
Helm을 설치하도록 합니다.
🔗 https://github.com/helm/helm/releases
운영체제와 아키텍쳐에 맞는 바이너리 파일을 다운로드 받아서 바이너리의 위치를 PATH 변수에 추가하도록 합니다.
다음으로 istio의 helm 차트들을 담고 있는 repository를 추가하도록 합니다.
helm repo add istio https://istio-release.storage.googleapis.com/charts
helm repo update
istio 레포가 추가되었고 그 내부에 base, cni, gateway, istiod 등의 차트가 들어 있는 것을 확인할 수 있습니다.
helm search repo istioNAME CHART VERSION APP VERSION DESCRIPTION
istio/istiod 1.20.2 1.20.2 Helm chart for istio control plane
istio/base 1.20.2 1.20.2 Helm chart for deploying Istio cluster resource...
istio/cni 1.20.2 1.20.2 Helm chart for istio-cni components
istio/gateway 1.20.2 1.20.2 Helm chart for deploying Istio gateways
istio/ztunnel 1.20.2 1.20.2 Helm chart for istio ztunnel components 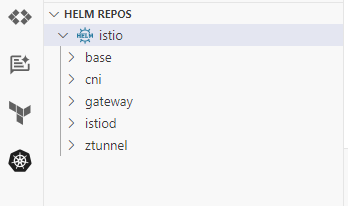
istio 차트 구성
istio의 차트 중 istiod, base, gateway 차트를 포함하는 부모 istio 차트를 생성합니다.
우선 helm create 명령어로 초기 차트 구성을 생성합니다.
cd ~/istio-in-gcp-gitopshelm create istioistio/charts 디렉토리로 변경하고 helm pull [charts] --untar 명령어를 이용해서 istio의 서브차트를 추가하도록 합니다.
cd istio/chartshelm pull istio/base istio/gateway istio/istiod --untar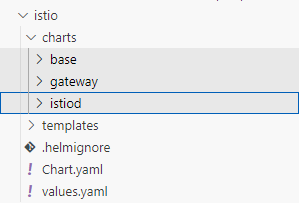
그리고 argocd에서 ingress를 만들었던 것과 같이 istio를 위한 ingress 오브젝트들을 생성합니다.
우선 istio용 ingress에 사용할 고정 IP를 생성합니다.
istio static ip
gcloud compute addresses create istio-ingress-ip --global --ip-version IPV4그리고 values.yaml 파일에 gateway용 변수와 ingress용 변수를 정의합니다.
원래 values.yaml에 있었던 contents는 모두 삭제합니다.
ingress.domain에는 istio ingressgateway로 접속하기 위한 레코드 주소를 입력합니다.
예를 들면 example.com의 도메인을 발급받았고 www.example.com으로 istio ingressgateway에 접속하고자 한다면 www.example.com으로 입력합니다.
istio/values.yaml
ingress:
  domain: "www.<<domain>>" # cloud domain에서 발급받은 도메인으로 수정
  staticIpName: "istio-ingress-ip"
  annotations:
    "helm.sh/hook": post-install
    "helm.sh/hook-weight": "5"

gateway:
  name: "istio-ingressgateway"
  annotations:
    "helm.sh/hook": post-install
    "helm.sh/hook-weight": "1"
  service:
    type: ClusterIP
    annotations:
      "cloud.google.com/neg": '{"ingress": true}'
      "cloud.google.com/backend-config": '{"default": "istio-backend-config"}'
helm hook을 자원들의 annotation에 추가하면 배포 순서를 결정할 수 있습니다.
helm.sh/hook annotation으로는 배포의 시점을 결정할 수 있고 post-install로 지정하여 다른 자원들이 모두 생성된 다음에 만들어지도록 설정합니다.
gateway의 deployment는 istiod가 생성된 후에 배포되어야 hook에 의해서 pod의 컨테이너 이미지가 결정되는데, 그래서 다른 서브차트들보다 나중에 생성되도록 조정하였습니다.
helm.sh/hook-weight를 "1", "5" 값으로 지정했는데 오름차순으로 자원들이 생성됩니다. 여기서는 gateway 자원들이 생성된 다음 ingress 자원들이 생성되도록 조정하기 위해 지정하였습니다.
istio parent chart에서 templates에 있는 _helpers.tpl파일을 제외한 모든 파일들을 제거하고,
BackendConfig, FrontendConfig, ManagedCertificate, Ingress 오브젝트를 정의하는 파일들을 각각 생성합니다.
istio/templates/backend.yaml
apiVersion: cloud.google.com/v1
kind: BackendConfig
metadata:
  name: {{ include "istio.name" .}}-backend-config
  namespace: {{ .Release.Namespace }}
  annotations:
    {{ .Values.ingress.annotations | toYaml | nindent 4 }}
spec:
  healthCheck:
    type: HTTP
    requestPath: /healthz/ready
    port: 15021
istio/templates/frontend.yaml
apiVersion: networking.gke.io/v1beta1
kind: FrontendConfig
metadata:
  name: {{ include "istio.name" .}}-frontend-config
  namespace: {{ .Release.Namespace }}
  annotations:
    {{ .Values.ingress.annotations | toYaml | nindent 4 }}
spec:
  redirectToHttps:
    enabled: true
istio/templates/managed-certificate.yaml
apiVersion: networking.gke.io/v1
kind: ManagedCertificate
metadata:
  name: {{ include "istio.name" .}}-managed-cert
  namespace: {{ .Release.Namespace }}
  annotations:
    {{ .Values.ingress.annotations | toYaml | nindent 4 }}
spec:
  domains:
    - {{ .Values.ingress.domain }}
istio/templates/ingress.yaml
apiVersion: networking.k8s.io/v1
kind: Ingress
metadata:
  name: {{ include "istio.name" .}}
  namespace: {{ .Release.Namespace }}
  annotations:
    {{ .Values.ingress.annotations | toYaml | nindent 4 }}
    kubernetes.io/ingress.global-static-ip-name: {{ .Values.ingress.staticIpName }}
    networking.gke.io/managed-certificates: {{ include "istio.name" .}}-managed-cert
    networking.gke.io/v1beta1.FrontendConfig: {{ include "istio.name" .}}-frontend-config
    kubernetes.io/ingress.class: "gce"
spec:
  rules:
    - host: {{ .Values.ingress.domain }}
      http:
        paths:
          - path: /
            pathType: Prefix
            backend:
              service:
                name: {{ .Values.gateway.name }}
                port:
                  number: 80
여기까지 작업이 완료되었다면 github repository에 현재 상태의 소스를 반영합니다.
istio 배포
argocd에서 istio-in-gcp-gitops repository를 등록합니다.
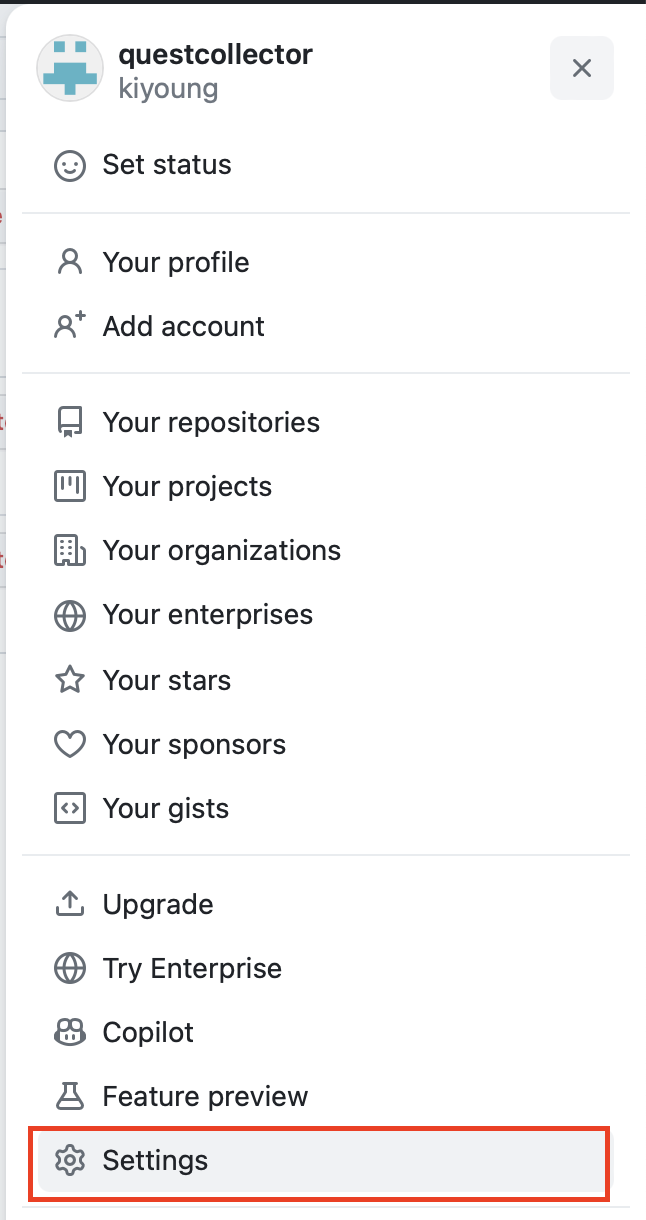
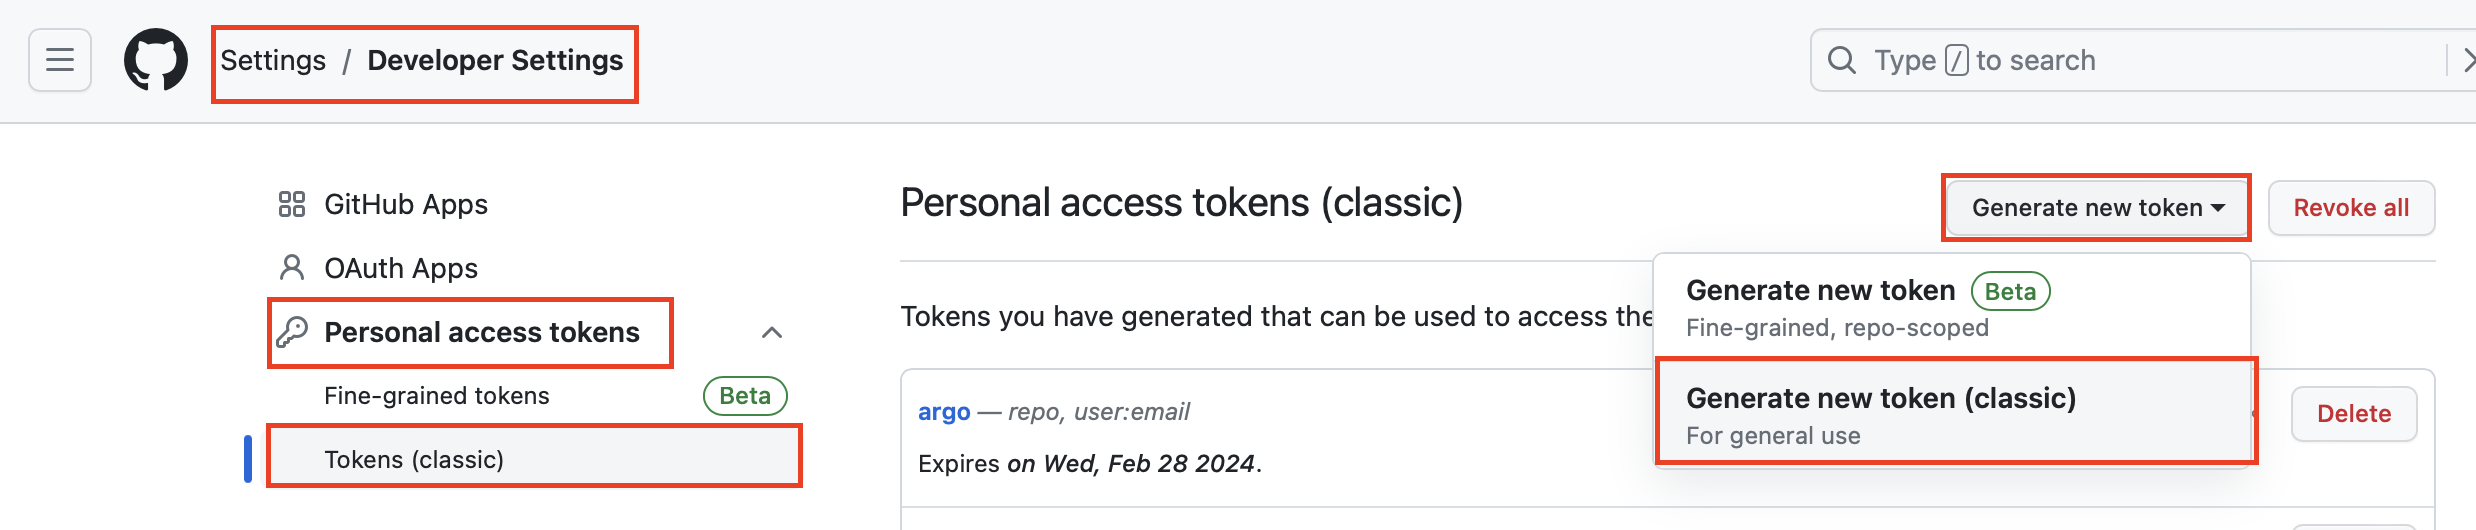
우선 github에서 인증에 사용할 토큰을 발급받습니다.(private repository일 경우 필수)
Settings > Developer Settings > Personal Access Token > Tokens (classic)에서
Generate New Token > Generate New Token (classic)을 클릭합니다.
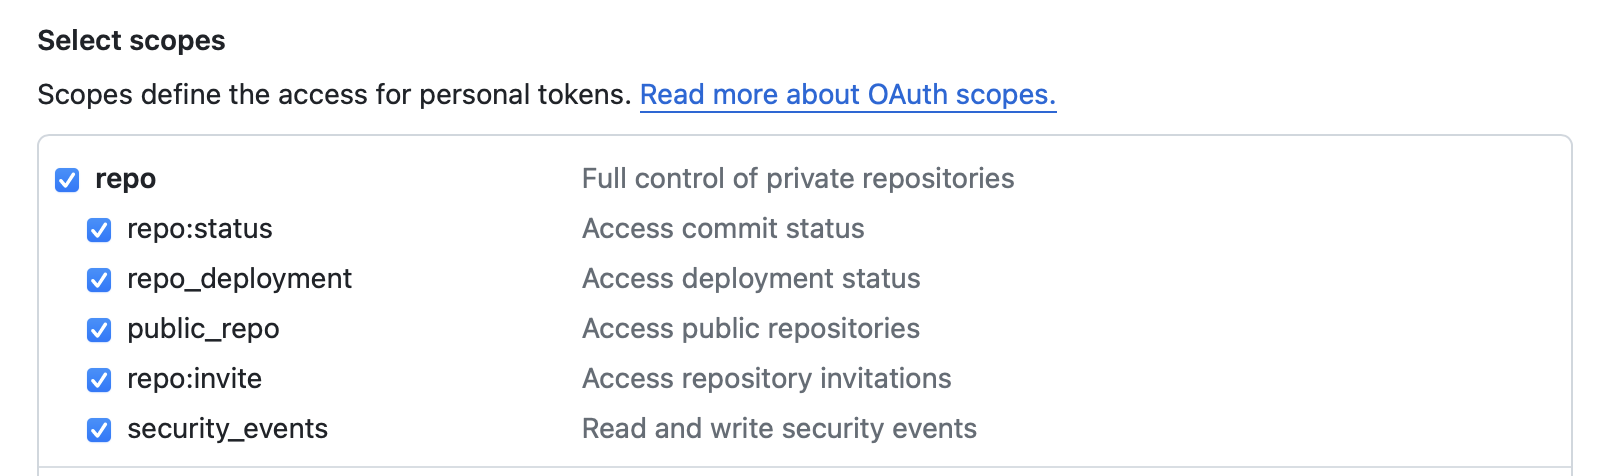
repo 스코프는 전부 체크하고, user:email 스코프도 체크합니다.
| key | value |
|---|---|
| Note | argocd |
repo | ✅ |
user:email | ✅ |

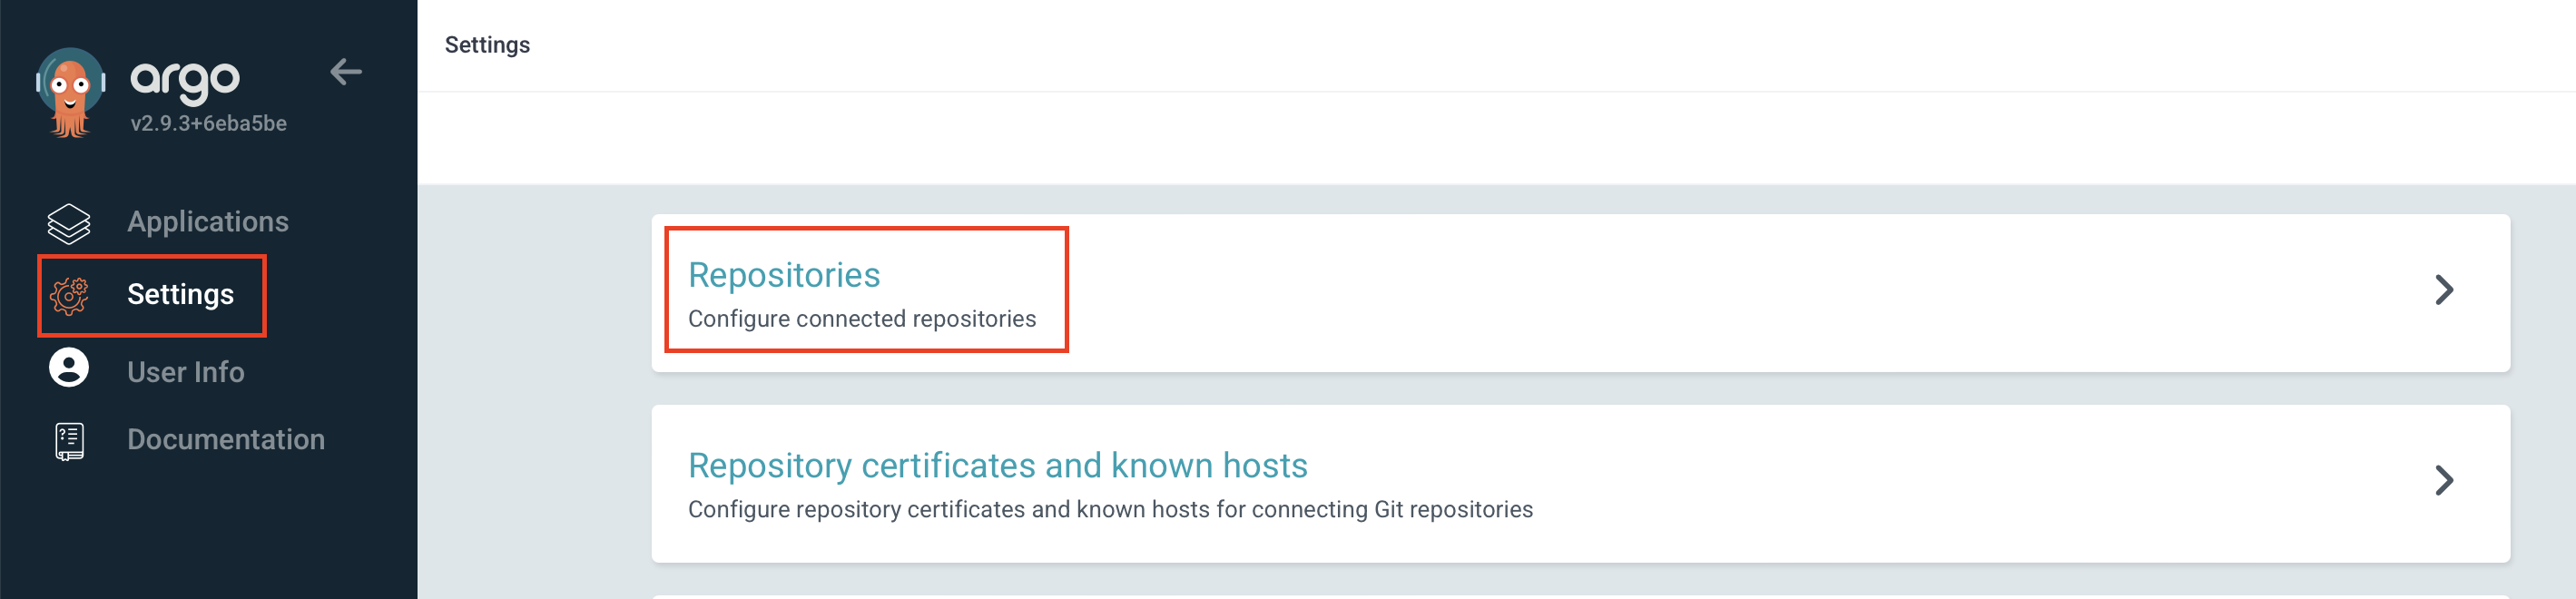
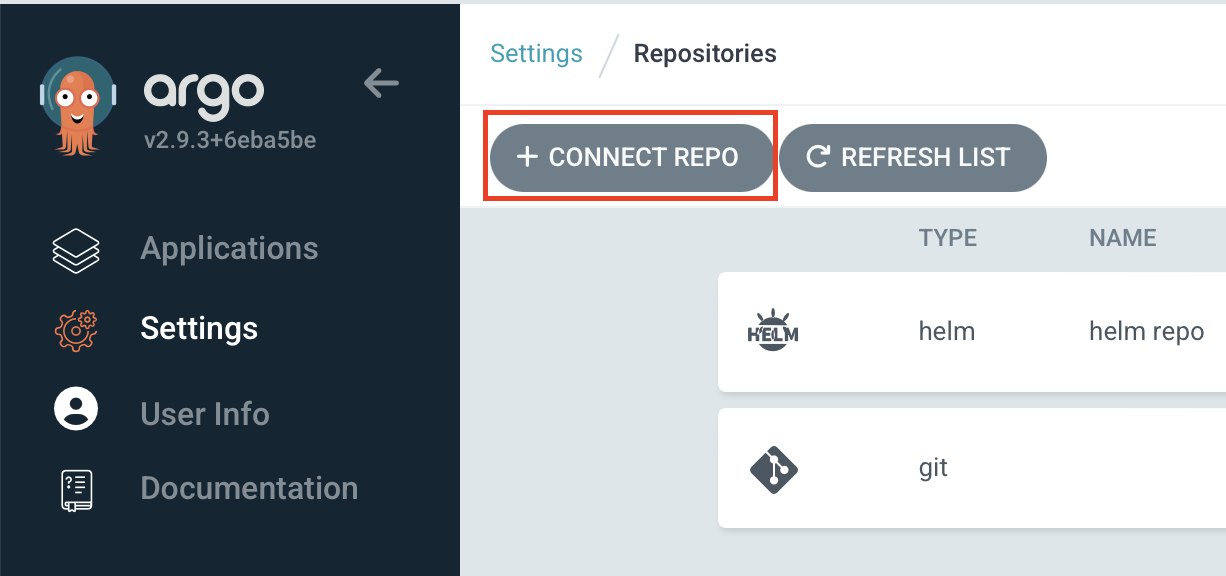
그리고 argocd 서비스에 접속하여 Settings > Repositories에서
CONNECT REPO를 클릭하고 github repository 정보를 입력합니다.
| key | value |
|---|---|
| Choose your connection method | VIA HTTPS |
| Type | git |
| Project | default |
| Repository URL | istio-in-gcp-gitops 주소 |
| Username | 계정 |
| Password | Github Token |
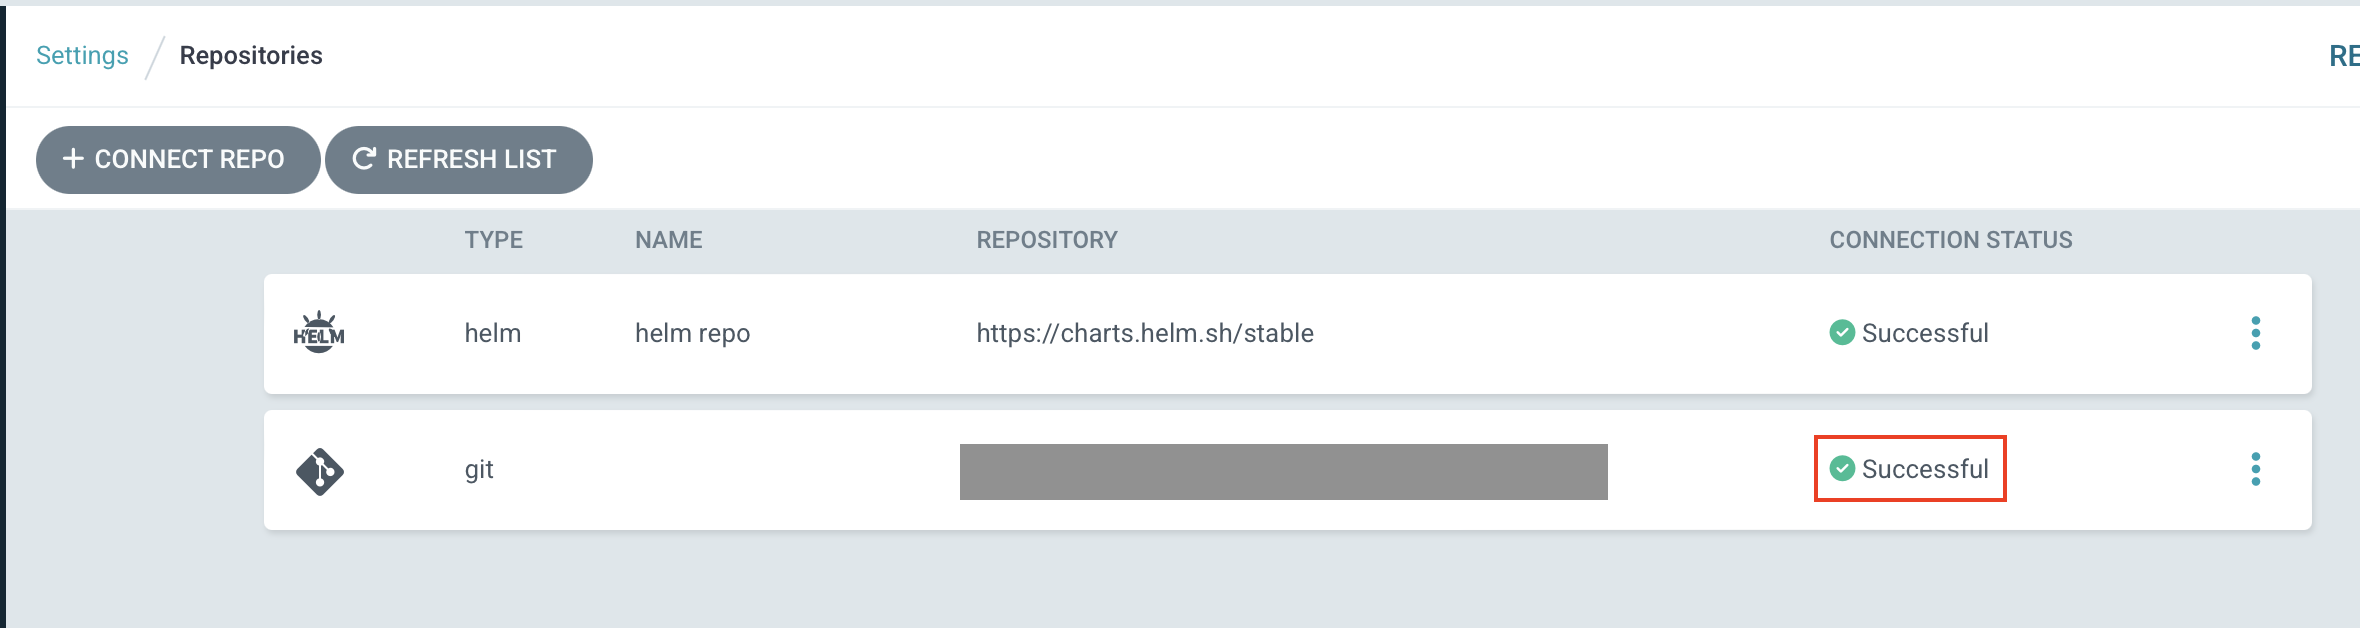
CONNECT 버튼을 클릭하고 CONNECTION STATUS가 Successful인지 확인합니다.
istio를 배포하기 전 istio가 cluster-admin 권한을 이용할 수 있도록 clusterrolebinding을 생성합니다.
🔗 https://istio.io/latest/docs/setup/platform-setup/gke/
kubectl create clusterrolebinding cluster-admin-binding \
    --clusterrole=cluster-admin \
    --user=$(gcloud config get-value core/account)
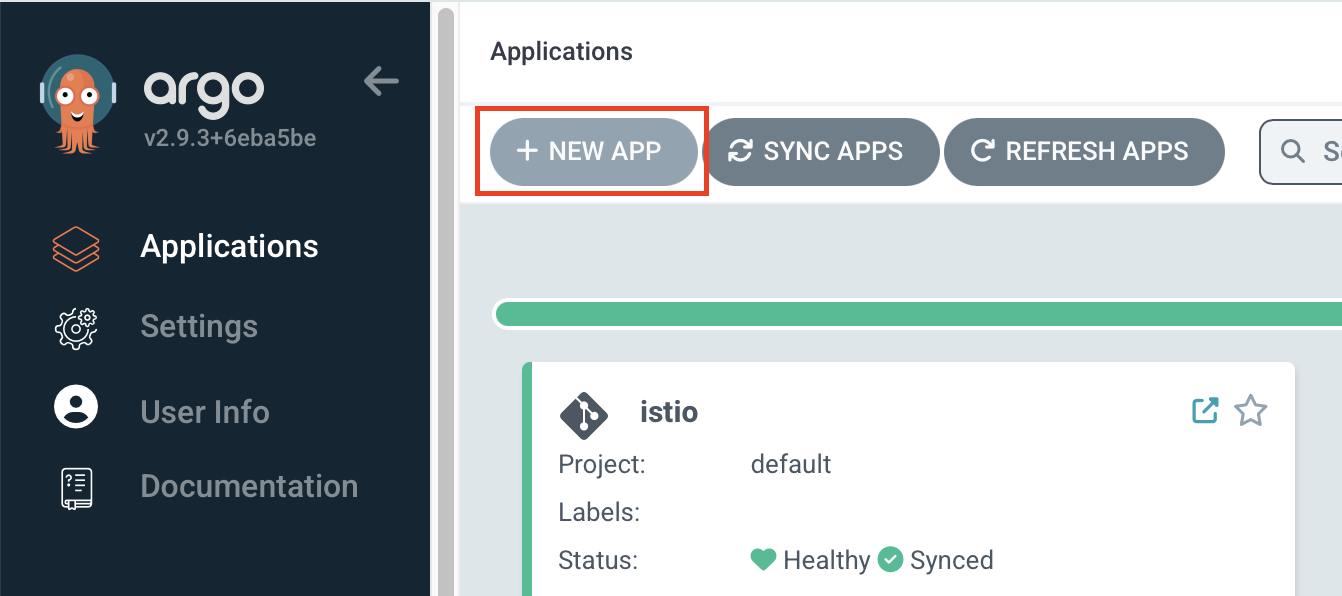
argocd에서 Applications > NEW APP을 클릭하여 istio를 배포합니다.
| key | value |
|---|---|
| Application Name | istio |
| Project Name | default |
| Sync Policy | Manual |
| AUTO-CREATE NAMESPACE | ✅ |
| Repository URL | istio-in-gcp-gitops 주소 |
| Revision | HEAD 또는 원하는 브랜치 입력 |
| Path | istio |
| Cluster URL | https://kubernetes.default.svc (in-cluster) |
| Namespace | istio-system |
| HELM | ✅ |
| VALUE FILES | values.yaml (선택 안해도 기본값으로 인식) |
value 값들이 의도된 대로 잘 들어 있는지 잘 확인합니다.
생성하기 전 오른쪽 위 EDIT AS YAML 버튼을 클릭하여 마지막에 spec 하위에 다음 내용을 추가합니다.
...
spec:
  ...
  ignoreDifferences:
    - group: admissionregistration.k8s.io
      kind: ValidatingWebhookConfiguration
      jsonPointers:
        - /webhooks/0/failurePolicy
istiod의 ValidatingWebhookConfiguration 오브젝트의 webhooks[0].failurePolicy 값이 레포지토리에 정의되었던 값과 달라도 차이점을 argocd에서 무시하기 위해서 추가합니다.
차트에는 Ignore로 값이 등록되지만, webhook 엔드포인트가 활성화되면 validation webhook 컨트롤러에서 이 값을 Fail로 변경시킵니다. 따라서 istio가 배포된 이후에는 항상 차트와 값이 달라지게 됩니다.
앱을 등록하고 나서 argocd에서 sync를 클릭하면 자원들이 생성되면서 istio가 배포됩니다.
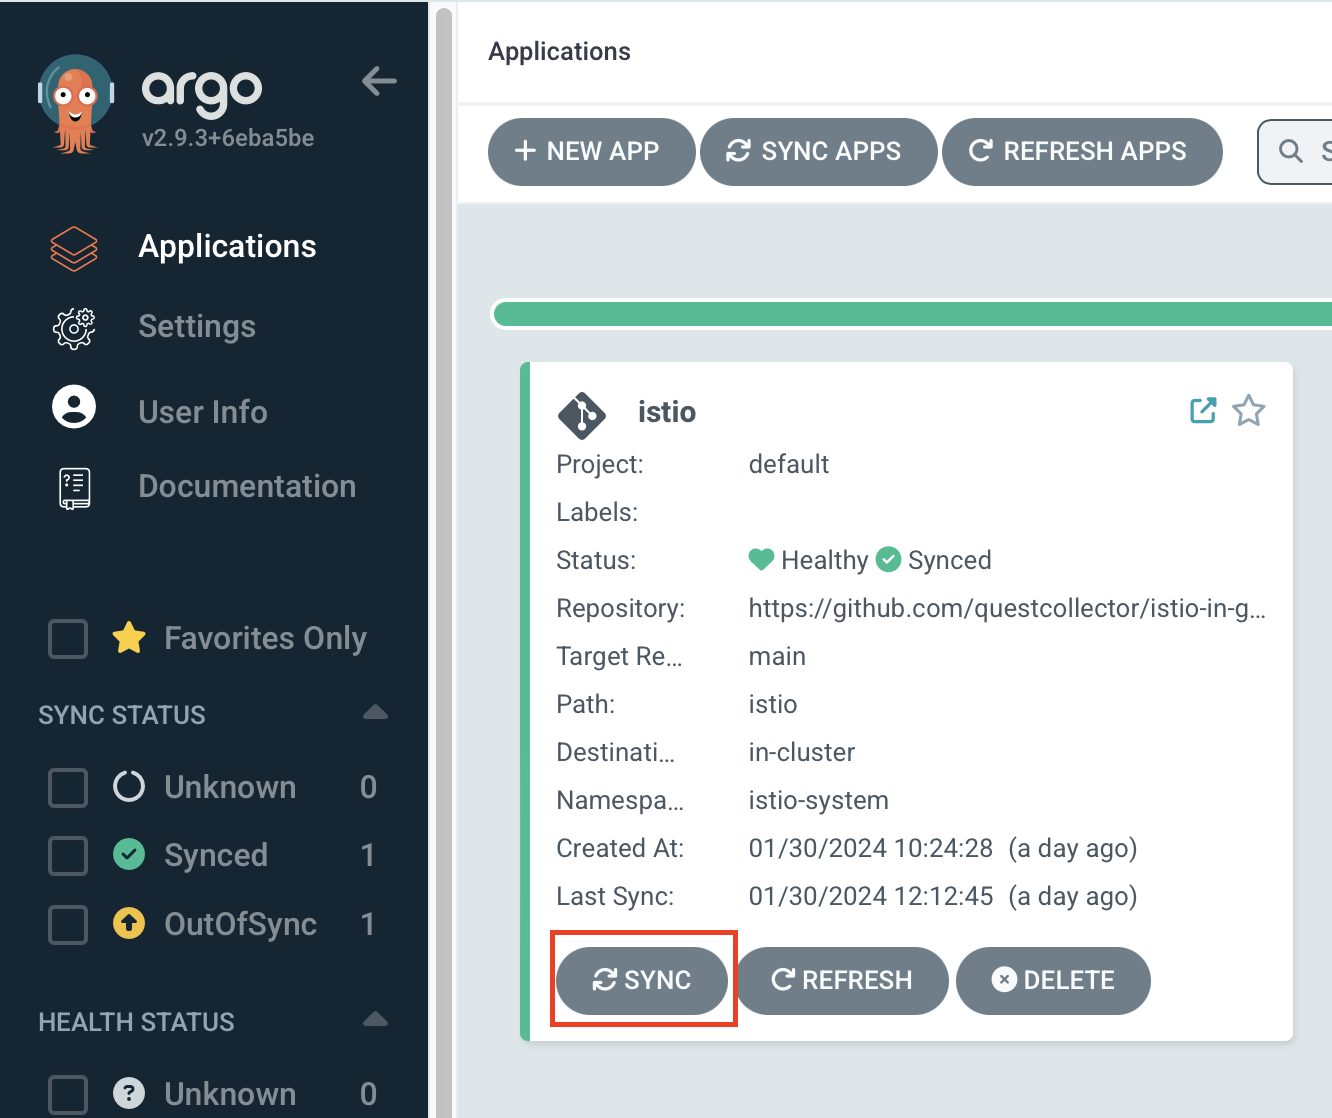
argocd와 마찬가지로 ingress에서 사용할 인증서가 활성화되기까지 수 십분정도 기다리면 앱이 Heathy 상태가 됩니다.
istio ingress 오브젝트에서 ingress.kubernetes.io/backends 애노테이션에 백엔드 구성이 잘 되었는지 확인할 수 있습니다.
kubectl get ingress istio -n istio-system -o yaml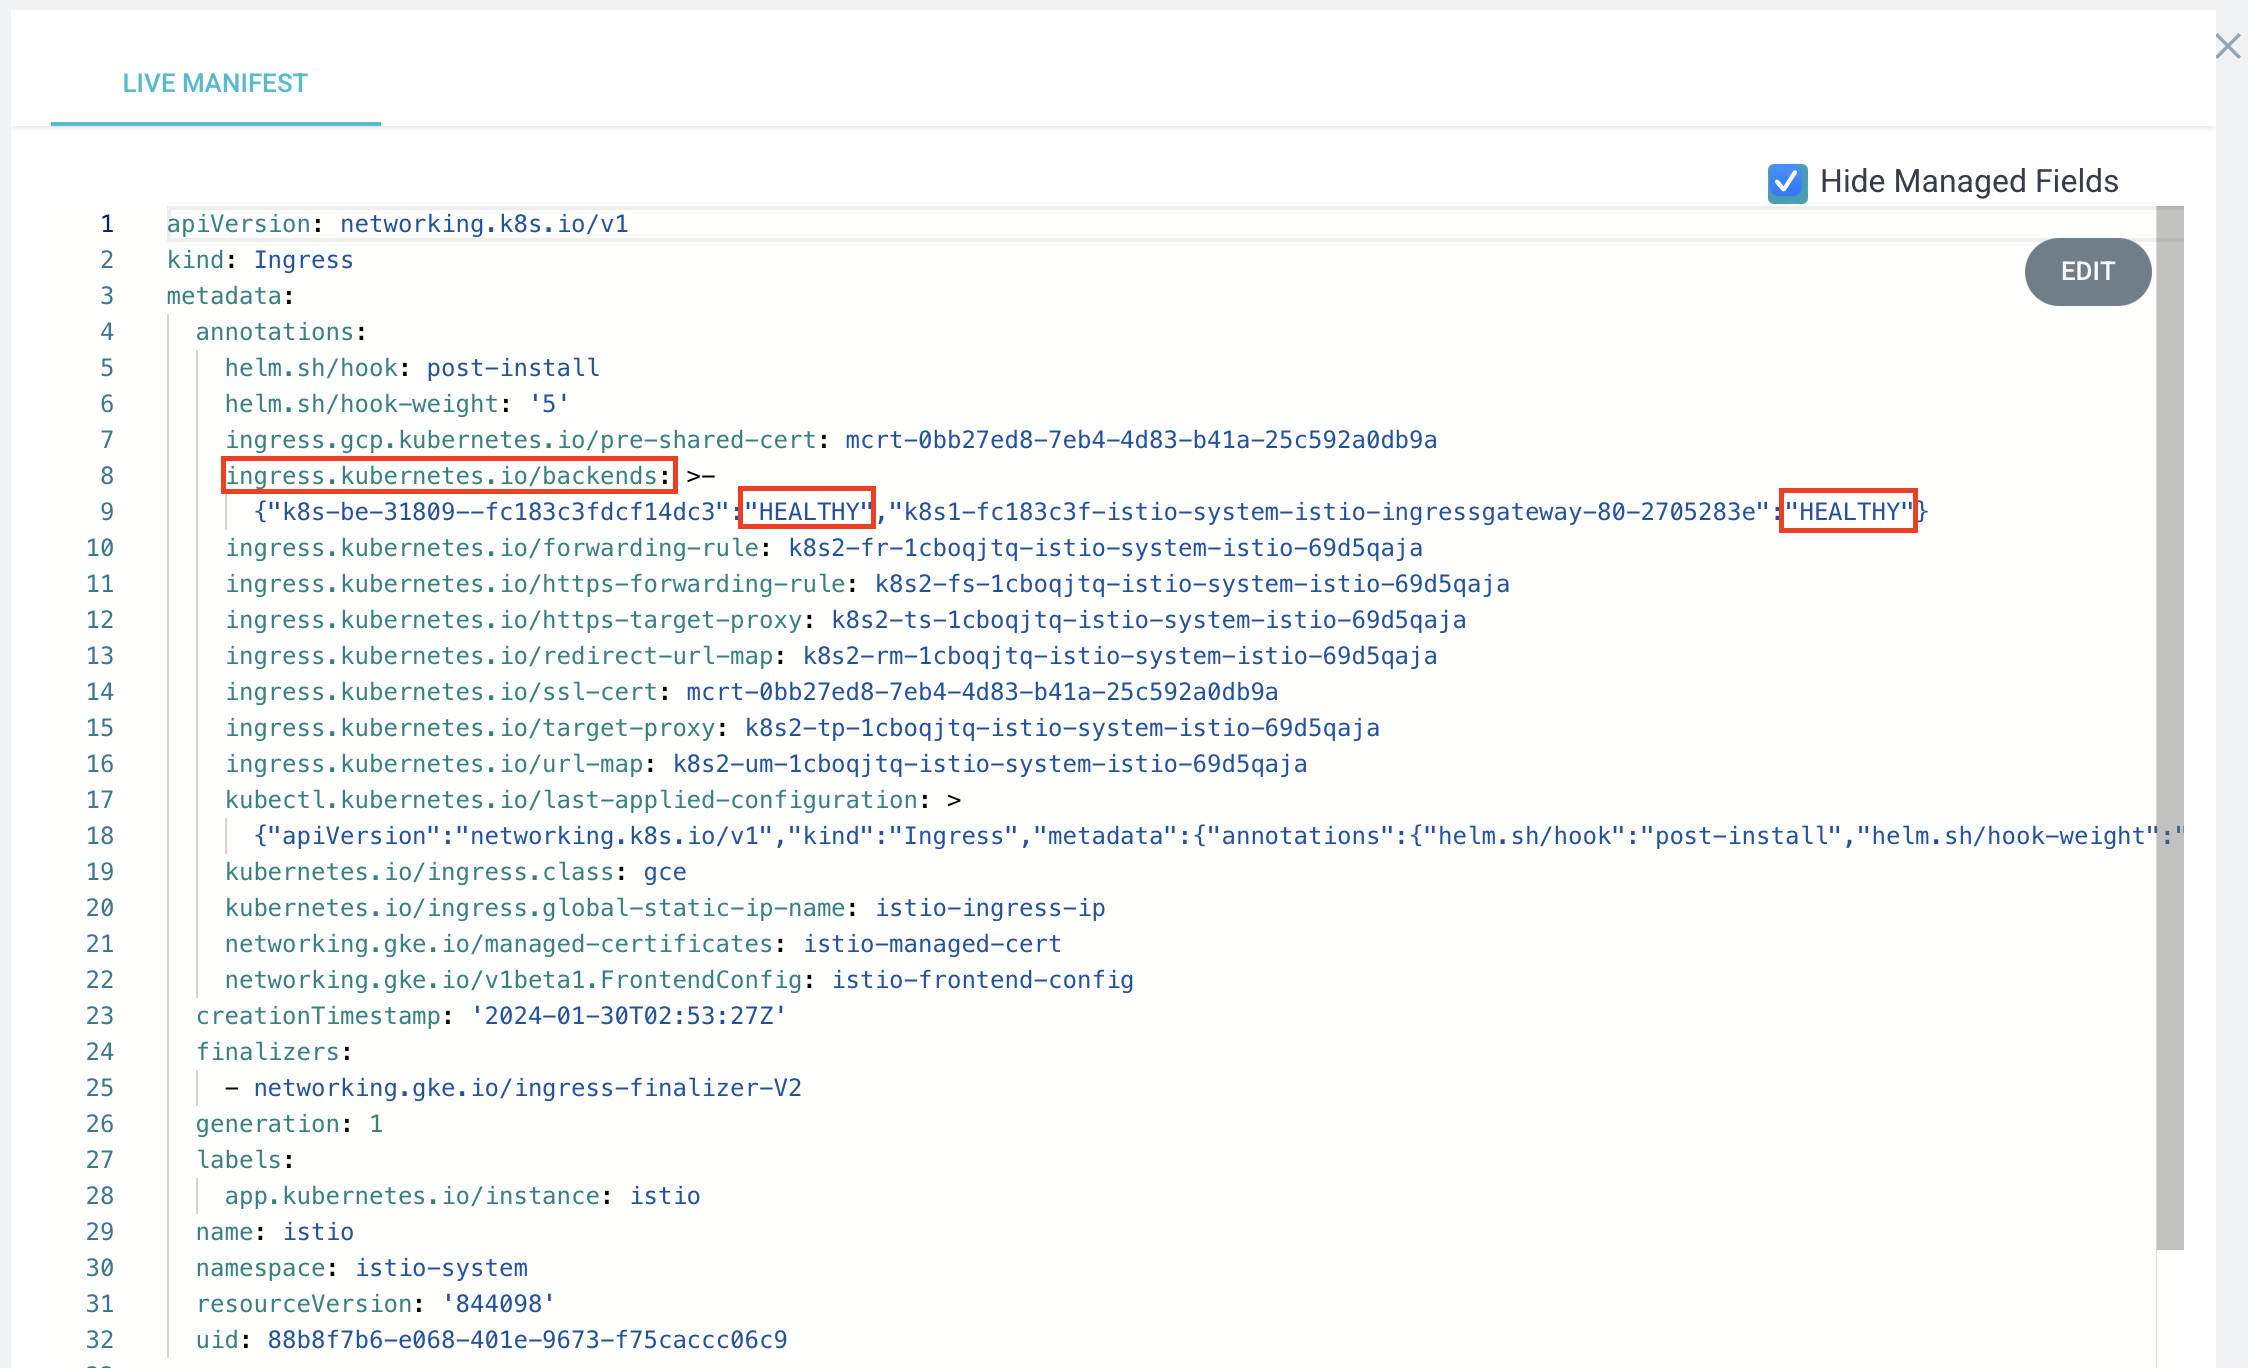
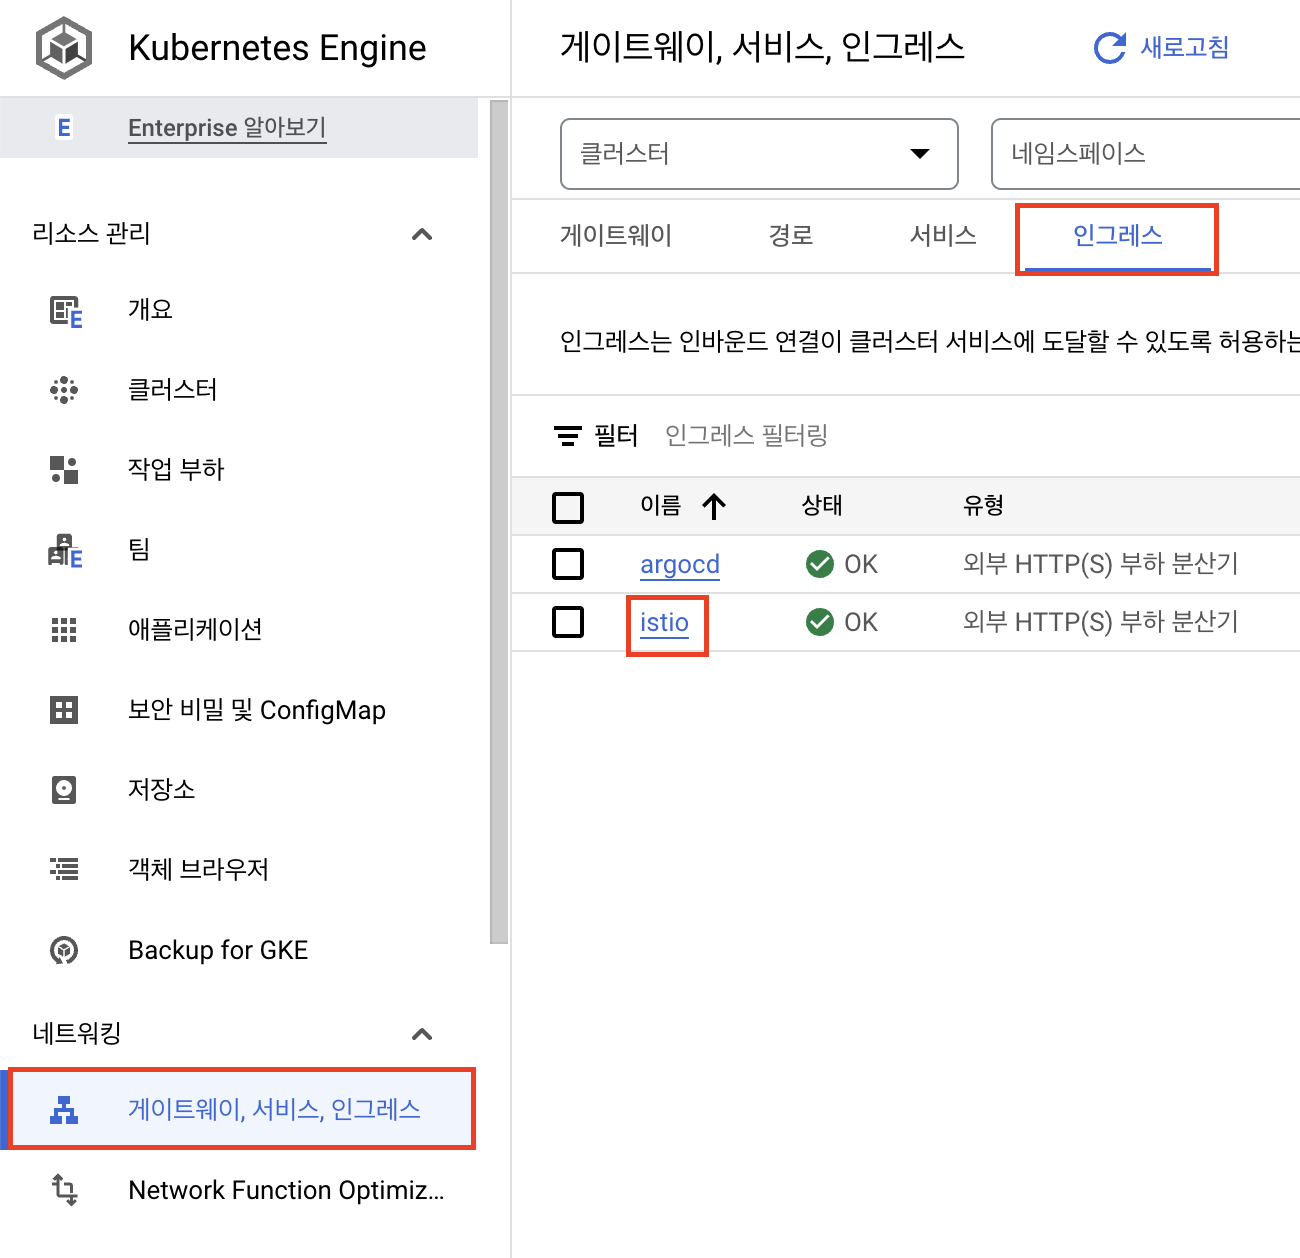
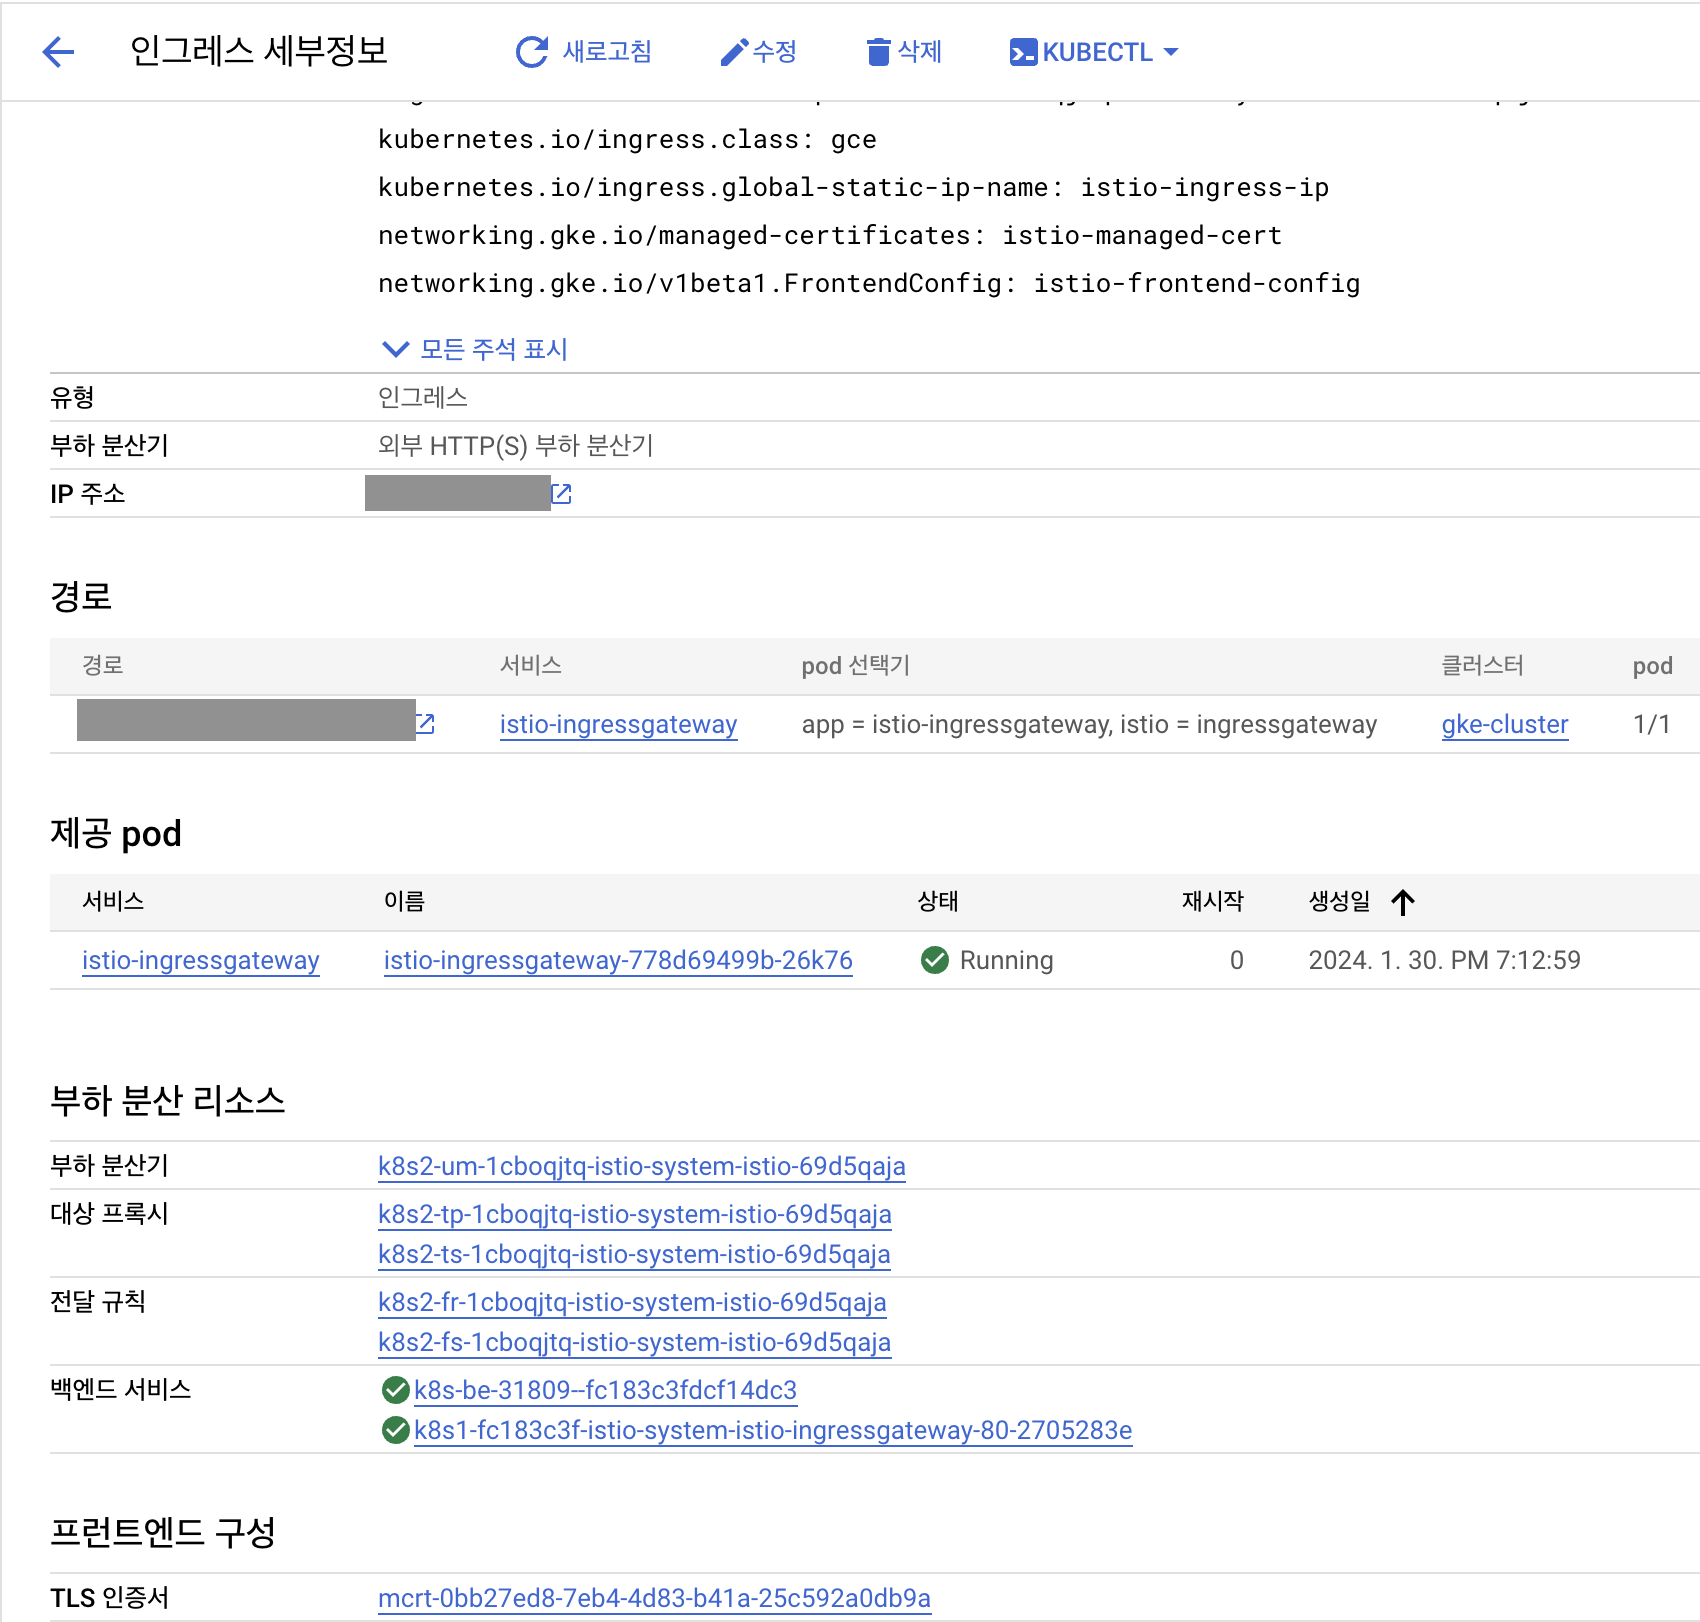
그리고 google cloud console의 kubernetes engine에서 네트워킹 - 게이트웨이, 서비스, 인그레스 항목에서도 인그레스 - istio를 확인해 보면 세부 정보와 인증서 등을 확인할 수 있습니다.
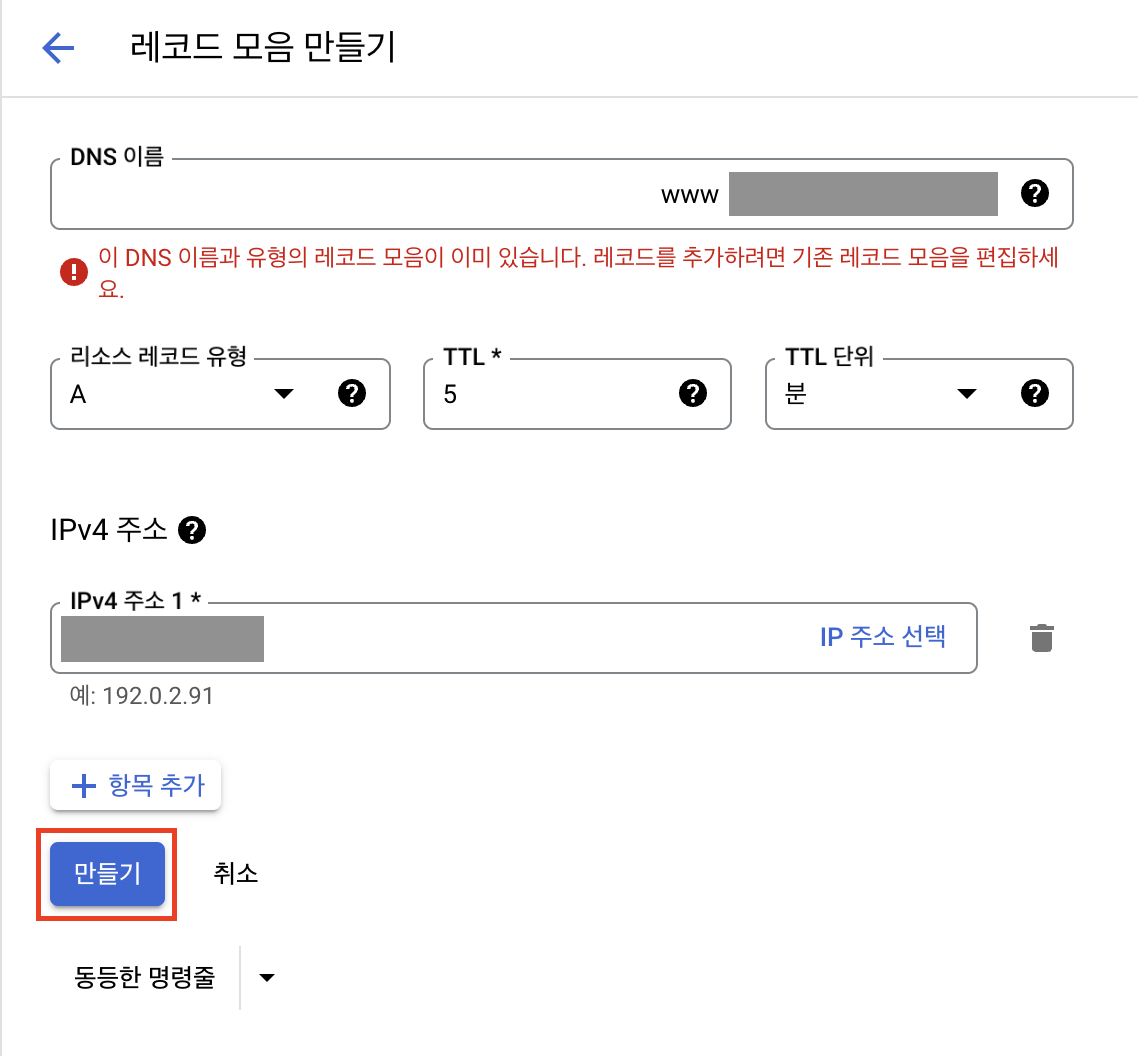
마지막으로 Cloud DNS에서 istio ingress에 정의했던 host와 동일한 레코드를 생성하고
istio-ingress-ip로 트래픽이 향하도록 구성합니다.
sample 프로젝트로 확인해보기
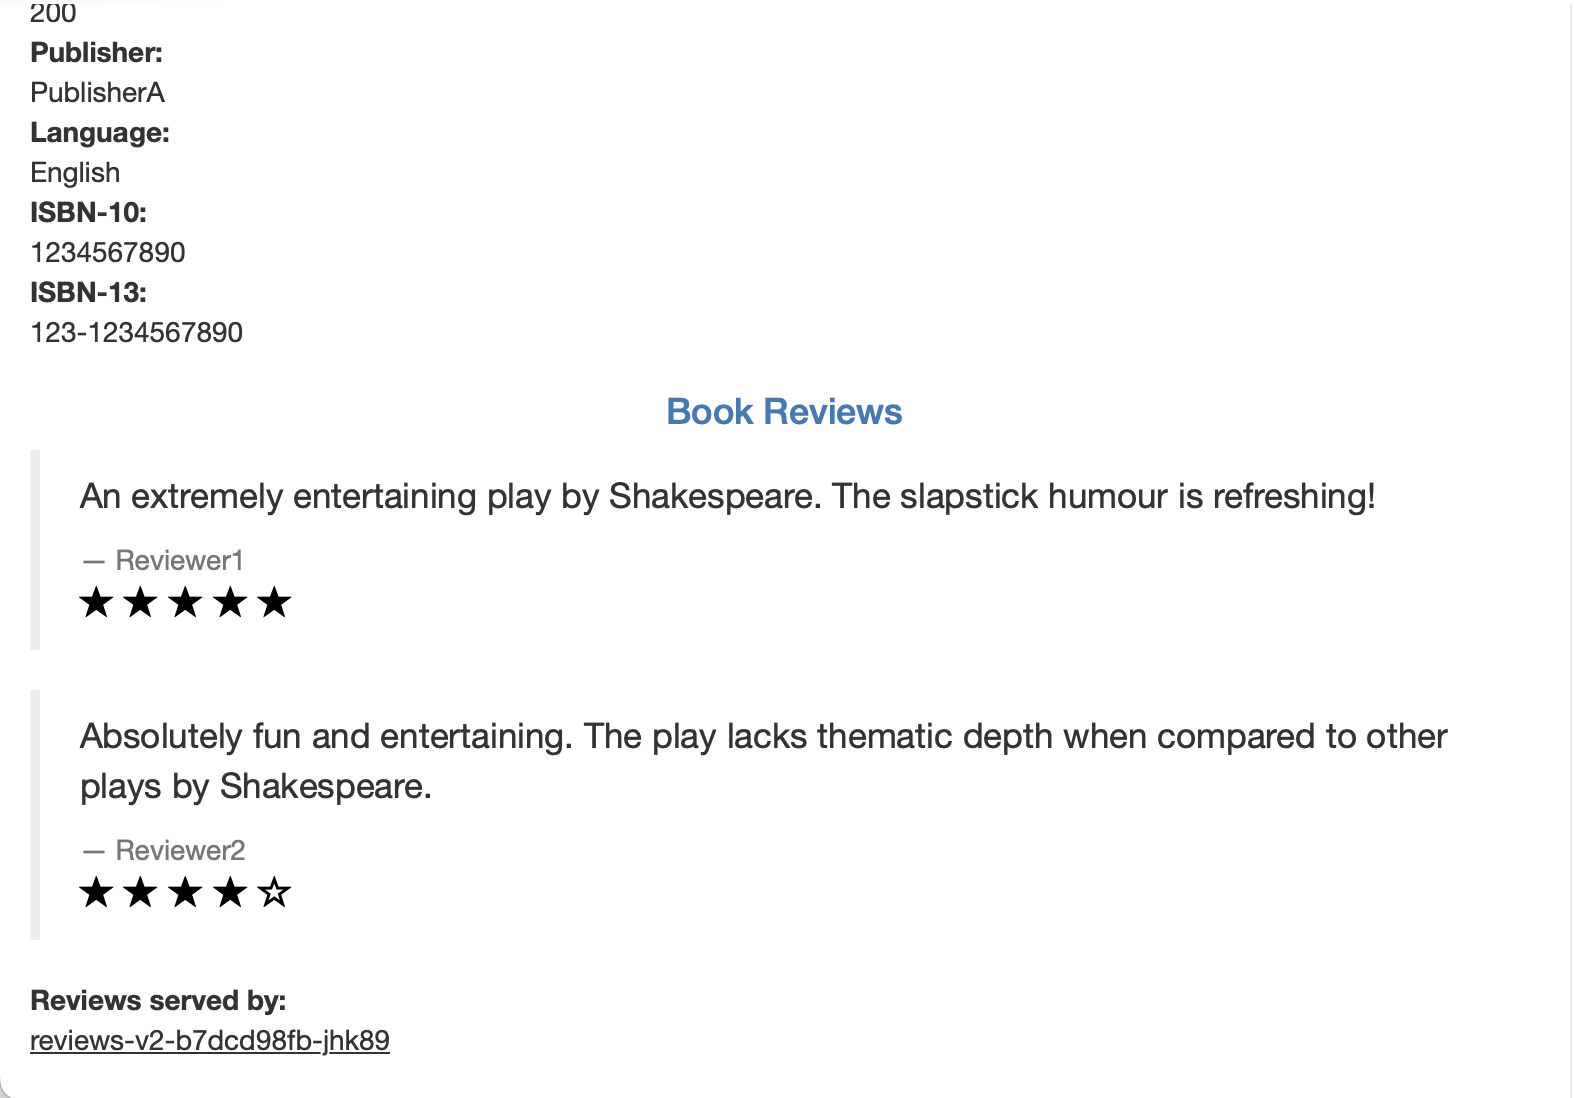
istio에서 제공하는 bookinfo 샘플 애플리케이션을 배포하여 istio가 잘 구성되었는지 확인하도록 합니다.
🔗 https://istio.io/latest/docs/examples/bookinfo/
먼저 istio에서 envoy sidecar 컨테이너를 생성할 수 있도록 샘플 애플리케이션이 배포될 default namespace에 istio-injection=enable 레이블을 추가하도록 합니다.
kubectl label namespace default istio-injection=enabled샘플 애플리케이션 manifest 파일을 이용하여 배포합니다.
kubectl apply -f https://raw.githubusercontent.com/istio/istio/release-1.20/samples/bookinfo/platform/kube/bookinfo.yaml배포가 잘 되었는지 pod와 service를 확인합니다.
원래 각각의 pod에는 컨테이너가 1개뿐이지만, sidecar envoy가 추가되어 pod마다 2개씩 띄워져 있는 것을 확인할 수 있습니다.
kubectl get pod,svcNAME READY STATUS RESTARTS AGE
pod/details-v1-5f4d584748-4dlbf 2/2 Running 0 3h20m
pod/productpage-v1-564d4686f-vsjxb 2/2 Running 0 3h20m
pod/ratings-v1-686ccfb5d8-zb2vc 2/2 Running 0 3h20m
pod/reviews-v1-86896b7648-mnwrk 2/2 Running 0 3h20m
pod/reviews-v2-b7dcd98fb-6crq8 2/2 Running 0 3h20m
pod/reviews-v3-5c5cc7b6d-w8rvk 2/2 Running 0 3h20m
NAME TYPE CLUSTER-IP EXTERNAL-IP PORT(S) AGE
service/details ClusterIP 192.168.1.82 <none> 9080/TCP 3h20m
service/kubernetes ClusterIP 192.168.1.1 <none> 443/TCP 28h
service/productpage ClusterIP 192.168.1.89 <none> 9080/TCP 3h20m
service/ratings ClusterIP 192.168.1.162 <none> 9080/TCP 3h20m
service/reviews ClusterIP 192.168.1.221 <none> 9080/TCP 3h20m이제 istio의 Gateway, VirtualService 오브젝트를 생성하여 istio ingressgateway에서 오는 트래픽이 샘플 애플리케이션으로 갈 수 있도록 추가합니다.
kubectl apply -f https://raw.githubusercontent.com/istio/istio/release-1.20/samples/bookinfo/networking/bookinfo-gateway.yamlkubectl get gateway,vs
NAME AGE
gateway.networking.istio.io/bookinfo-gateway 3h39m
NAME GATEWAYS HOSTS AGE
virtualservice.networking.istio.io/bookinfo ["bookinfo-gateway"] ["*"] 3h39m구성에 대한 검증을 위해 istioctl analyze 명령어를 사용할 수 있습니다.
istioctl 설치를 위해 아래 명령어를 실행합니다.
🔗 https://istio.io/latest/docs/ops/diagnostic-tools/istioctl/
curl -sL https://istio.io/downloadIstioctl | sh -
export PATH=$HOME/.istioctl/bin:$PATH
istioctl anaylize 명령어를 실행하면 잘 안될 것이라는 내용을 확인할 수 있습니다.
istioctl analyze

Warning [IST0162] (Gateway default/bookinfo-gateway) The gateway is listening
on a target port (port 8080) that is not defined in the Service associated with
its workload instances (Pod selector istio=ingressgateway). If you need to
access the gateway port through the gateway Service, it will not be available.
gateway의 타겟 포트가 8080으로 지정되어 있는데 istio-ingressgateway 파드는 istio-ingressgateway 서비스를 거쳐 80 포트로 열려 있기 때문에 이에 맞추어 gateway의 포트를 변경하도록 합니다.
kubectl get gateway bookinfo-gateway -o yaml

...
spec:
  selector:
    istio: ingressgateway
  servers:
  - hosts:
    - '*'
    port:
      name: http
      number: 8080
      protocol: HTTP
kubectl patch gateway bookinfo-gateway --type='json' \
-p='[{"op": "replace", "path": "/spec/servers/0/port/number", "value":80}]'다시 istioctl analyze를 실행하면 검증이 잘 되었다는 메시지를 확인할 수 있습니다.
istioctl analyze

✔ No validation issues found when analyzing namespace: default.
VirtualService를 확인하면 productpage 서비스로 가는 경로가 지정되어 있는 것을 확인할 수 있습니다.
kubectl get vs bookinfo -o yaml

...
spec:
  gateways:
  - bookinfo-gateway
  hosts:
  - '*'
  http:
  - match:
    - uri:
        exact: /productpage
    - uri:
        prefix: /static
    - uri:
        exact: /login
    - uri:
        exact: /logout
    - uri:
        prefix: /api/v1/products
    route:
    - destination:
        host: productpage
        port:
          number: 9080
따라서 istio ingress에 등록했던 도메인에 /productpage를 추가하여 접속하면 샘플 애플리케이션에 잘 접속되는 것을 확인할 수 있습니다.