개요
저번에 만들었던 JPS 알고리즘을 절차적으로 생성한 맵에 사용하려고 테스트 하던 중에, 크게 세 가지 문제를 발견했습니다.
기존 JPS알고리즘 코드에 대한 글은 아래 링크를 참고하시면 됩니다.
https://velog.io/@qweasfjbv/Unity2D-5-Enemy-AI-2-JPS-Algorithm
문제점
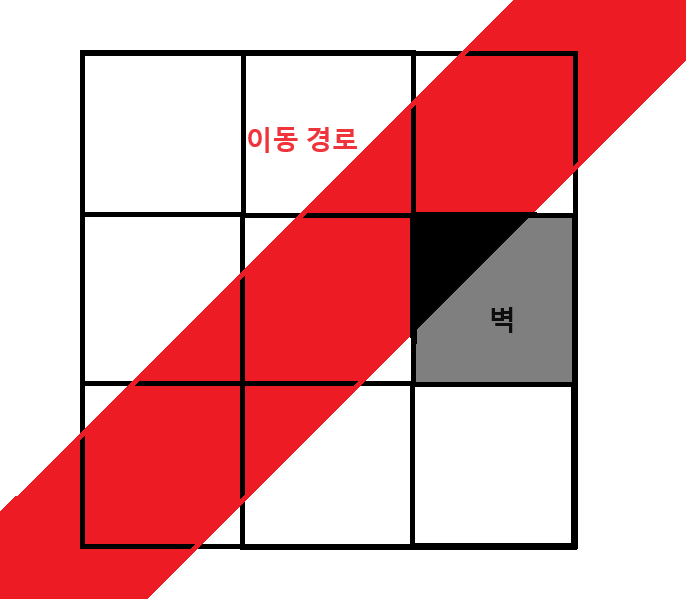
- 대각선 방향으로 움직일 때, 해당 경로에 벽이 있는 경우
대각선으로 이동할 수 있기 때문에 경로에는 문제가 없지만 물체와 벽의 콜라이더가 겹칠 수 있습니다.
- 대각선 방향 탐색 중 Forced Neighbor가 양쪽에 있는 경우
제가 만든 JPS 알고리즘에서는 벽이 저렇게 막고있어도 이동가능하지만, 실제로는 이동할 수 없기 때문에 예외처리를 해주어야 합니다.
- 직선 방향 탐색 중 Forced Neighbor가 양쪽에 있는 경우
이러한 경우에는 위쪽과 아래쪽 전부 탐색해야 하지만, 제 코드에서는 그렇지 않습니다.
구현
문제점 2, 3번은 단순 예외처리이기 때문에 생략하고, 1번의 경우 경로를 어떻게 수정할지 생각해보겠습니다.
단순하게 경로를 받은 뒤에 사이에 벽을 피하는 웨이포인트를 추가할 수도 있겠지만, 변경한 후의 경로도 피해진다는게 보장되지 않습니다. 확실하게 하기 위해서 JPS 알고리즘 자체를 수정해보겠습니다.
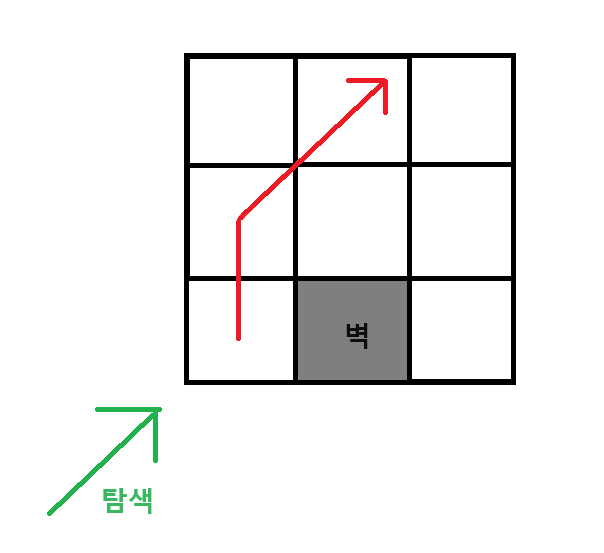
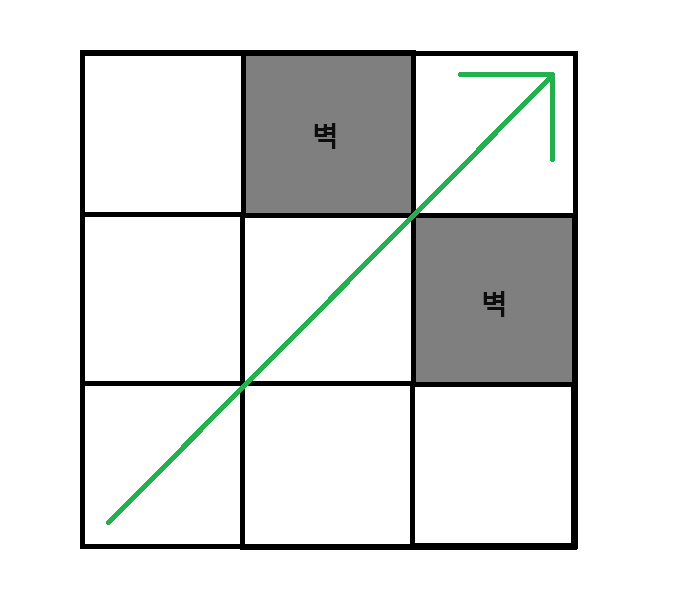
원래는 대각선으로 쭉 갈 수 있는 길이지만, 오른쪽( 혹은 왼쪽 ) 에 벽이 나타나면 방향을 바꾼 노드를 생성하고 탐색을 그만둡니다.
원래의 탐색 경로와는 약간 다르지만, 정말 간단한 수정으로도 세 가지 조건을 만족합니다.
- 최종 목적지에 도달
- 누락되는 Forced Neighbor 없음
- Collider가 부딪히지 않음
추가적으로, 두 번째 문제점도 같이 고칠 수 있습니다.
이제 코드로 구현해보겠습니다.
JPS알고리즘의 핵심 함수인 SearchLine 부터 보겠습니다.
SearchLine
// 현재 위치에서 한 방향으로 탐색하면서 JumpPoint 찾는 함수
private bool SearchLine(JPSNode parentNode, Vector2Int pos, JPSDir dir)
        {
        	//
            //	...
            //

                case JPSDir.Right:
                    for (int i = pos.x + 1; i < map.GetLength(0); i++)
                    {
                        checkPoint = pos + new Vector2Int(i - pos.x, 0);
                        check = JPCheck(parentNode, checkPoint, dir, out destDir);
                        if (check == 1)
                        {
                            AddToOpenList(new JPSNode(parentNode, checkPoint + new Vector2Int(1, 0), destDir, parentNode.GetPassedCost() + CalcHeuri(parentNode.pos, checkPoint), CalcHeuri(checkPoint, endPoint)));
                            return true;
                        }
                        else if (check == -1) return false;
                    }
                    break;

            //
            // other straight cases
            // ...

                case JPSDir.UpRight:
                    SecondarySearch(parentNode, pos, JPSDir.Up, JPSDir.Right);
                    for (int i = 1; ; i++)
                    {
                        checkPoint = pos + new Vector2Int(i, i);
                        check = JPCheck(parentNode, checkPoint, dir, out destDir);


                        if (check == -1) break;
                        if (AvoidWall(parentNode, checkPoint, dir)) return true;

                        if (check == 1)
                        {
                            found = true;
                            AddToOpenList(new JPSNode(parentNode, checkPoint, destDir, parentNode.GetPassedCost() + CalcHeuri(parentNode.pos, checkPoint), CalcHeuri(checkPoint, endPoint)));
                        }
                        else if (check == 0)
                        {
                            JPSNode tmpNode = new JPSNode(parentNode, checkPoint, dir, parentNode.GetPassedCost() + CalcHeuri(parentNode.pos, checkPoint), CalcHeuri(checkPoint, endPoint));

                            if (SecondarySearch(tmpNode, checkPoint, JPSDir.Up, JPSDir.Right))
                                closedList.Add(tmpNode);
                        }

                    }
                    return found;


            //
            // other diagonal cases
            // ...
직선의 경우 방향에 맞게 CheckPoint를 1 더해줍니다.
JPCheck에서 ForcedNeighbor을 검사할 때 한 칸 앞을 BoundCheck했기 때문에 바로 사용할 수 있습니다.
당연히 탐색 범위가 누락되지도 않습니다.
대각선도 직선과 같이 만들 수 없습니다.
직선은 ForcedNeighbor가 발견되어야 대각선 탐색을 시작하기 때문에 가능하지만,
대각선은 ForcedNeighbor가 없는 그냥 벽을 만나도 피해가야 합니다.
따라서, 벽을 확인하고 그에 맞게 JPSNode 를 생성하는 AvoidWall 함수를 따로 만들었습니다.
AvoidWall
        private bool AvoidWall(JPSNode parent,  Vector2Int check, JPSDir dir)
        {


            Vector2Int nextV1 = new Vector2Int(0, 0);
            Vector2Int nextV2 = new Vector2Int(0, 0);
            switch (dir) {
                case JPSDir.UpRight:
                    nextV1 = check + new Vector2Int(1, 0);
                    nextV2 = check + new Vector2Int(0, 1);
                    break;
                case JPSDir.UpLeft:
                    nextV1 = check + new Vector2Int(0, 1);
                    nextV2 = check + new Vector2Int(-1, 0);
                    break;
                case JPSDir.DownRight:
                    nextV1 = check + new Vector2Int(1, 0);
                    nextV2 = check + new Vector2Int(0, -1);
                    break;
                case JPSDir.DownLeft:
                    nextV1 = check + new Vector2Int(-1, 0);
                    nextV2 = check + new Vector2Int(0, -1);
                    break;
            }


            if (map[nextV1.x, nextV1.y] == (int)Define.GridType.None && map[nextV2.x, nextV2.y] == (int)Define.GridType.None) return true;
            if (map[nextV1.x, nextV1.y] != (int)Define.GridType.None && map[nextV2.x, nextV2.y] != (int)Define.GridType.None) return false;

            if (map[nextV1.x, nextV1.y] != (int)Define.GridType.None)
            {
                var tmpNode = new JPSNode(parent, check, JPSDir.None, parent.GetPassedCost() + CalcHeuri(parent.pos, check), CalcHeuri(check, endPoint));
                closedList.Add(tmpNode);
                AddToOpenList(new JPSNode(tmpNode, nextV1, dir, tmpNode.GetPassedCost() + 1, CalcHeuri(nextV1, endPoint)));
            }
            if (map[nextV2.x, nextV2.y] != (int)Define.GridType.None)
            {
                var tmpNode = new JPSNode(parent, check, JPSDir.None, parent.GetPassedCost() + CalcHeuri(parent.pos, check), CalcHeuri(check, endPoint));
                closedList.Add(tmpNode);
                AddToOpenList(new JPSNode(tmpNode, nextV2, dir, tmpNode.GetPassedCost() + 1, CalcHeuri(nextV2, endPoint)));
            }

            return true;
        }
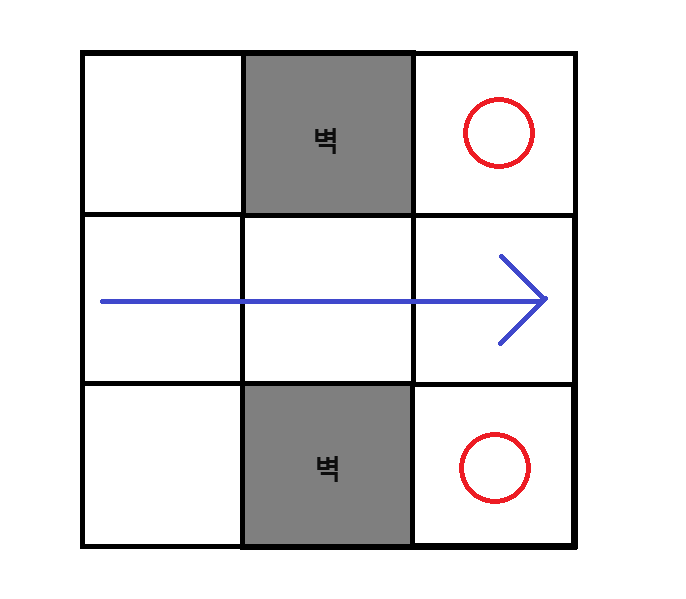
함수 로직은 간단합니다. 우선 양 옆에 벽이 있는지 확인합니다.
- 둘 다 있으면 true를 리턴해서 탐색을 중지합니다. ( 두 번째 문제점 해결 )
- 둘 다 없으면 피할 필요도 없고 탐색을 중지해도 안되므로 false를 리턴합니다.
- 둘 중 한 곳만 있는 경우, 현재 위치에 Jump Point 하나, 벽이 없는 곳에 하나를 만듭니다.
현재 위치에 만든 JP는 closedList에 들어가므로 dir을 None으로, 벽이 없는 곳에 만든 JP는 원래 탐색하던 방향을 마저 탐색해야 하므로 인자로 받은 방향을 그대로 줍니다.
그 후에 true를 리턴해서 현재 대각선 탐색을 마칩니다. 남은 부분은 벽이 없는 곳에 만든 JP가 탐색합니다.
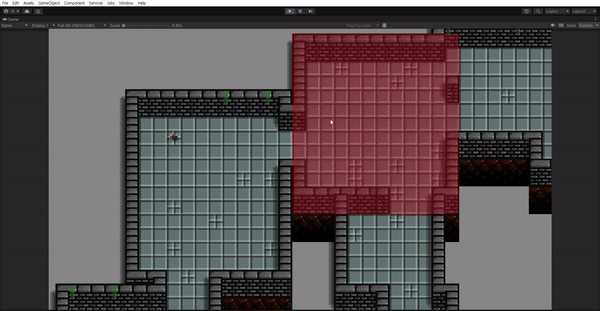
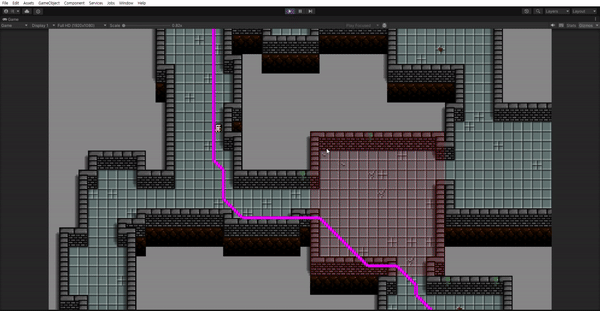
아래는 실행화면입니다.
마무리
대각선 방향으로 진행할 때 모서리에 부딪히지 않도록 경로가 달라진 모습을 볼 수 있습니다.
이미 만들어진 알고리즘에 필요한 기능만 살짝 추가하다 보니 간단하게 끝낼 수 있었습니다.
EnemyAI는 여기까지 만들고 추가적인 부분은 컨텐츠를 만들면서 같이 만들겠습니다.
다음에는 CardUI를 만들 예정입니다.
예를 들면, 슬레이 더 스파이어 같은 게임의 카드를 참고하여 위에 보이는 저 맵에 함정이나 몬스터를 직접 설치할 수 있도록 하겠습니다.