개요
저번에 만들었던 FolderConfig에 이어서 해당 설정을 변경할 수 있는 에디터를 만들어보도록 하겠습니다.
구현
Editor를 띄우는 부분부터 구현하겠습니다.
띄우는 부분은 MenuItem 어트리뷰트를 사용하여 구현가능하며, 관련 내용은 해당 문서에 있습니다.
해당 문서에 보시면 IsValidateFunction 이 있는것을 확인할 수 있습니다.
저희는 폴더에만 Config를 적용할 것이기 때문에 해당 에디터도 Folder인 경로에만 적용해야 합니다.
    public static class FolderCustomContextMenu
    {
    	// IsValidateFunction : true
		[MenuItem("Assets/IUtil/Customize Folder", true)]
        private static bool ValidateOpenEditor()
        {
            if (Selection.assetGUIDs.Length != 1)
                return false;

            // 선택된 에셋이 유효한 폴더 경로일 경우에만 유효
            string path = AssetDatabase.GUIDToAssetPath(Selection.assetGUIDs[0]);
            return AssetDatabase.IsValidFolder(path);
        }

		// Assets 로 시작하는 경로는 에셋에 우클릭해서 열 수 있음
        // Priority : 1000 (클수록 아래쪽에 배치)
        [MenuItem("Assets/IUtil/Customize Folder", false, 1000)]
        private static void OpenEditor()
        {
            string folderPath = AssetDatabase.GUIDToAssetPath(Selection.assetGUIDs[0]);
            FolderCustomEditorWindow.Open(folderPath);
        }
    }
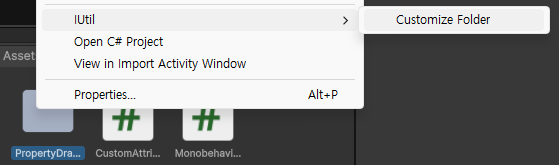

폴더는 해당 에디터를 열 수 있지만, 그 외에는 비활성화되는 모습을 확인하실 수 있습니다.
이제 에디터를 만들겠습니다.
FolderCustomEditorWindow.cs
public class FolderCustomEditorWindow : EditorWindow
{
private string folderPath;
public static void Open(string path)
{
var window = GetWindow<FolderCustomEditorWindow>("Folder Editor");
window.folderPath = path;
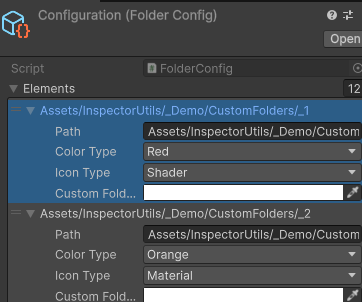
window.element = FolderConfigLoader.GetFolderConfigElement(path);
window.changedColor = window.element == null ? Color.white : window.element.CustomFolderColor;
Vector2 size = new Vector2(400, 400);
window.minSize = size;
window.maxSize = size + new Vector2(1, 1);
// minSize, maxSize가 달라야 maxSize 이상 커지지 않음
window.Show();
}
private FolderConfigElement element = null;
private void OnGUI()
{
// 폴더 Config 정보 받기
element = FolderConfigLoader.GetFolderConfigElement(folderPath);
GUIStyle centeredBoldLabel = new GUIStyle(EditorStyles.boldLabel);
centeredBoldLabel.alignment = TextAnchor.MiddleCenter;
GUILayout.Space(10);
GUILayout.Label("Folder Path ( Drag a folder below )", centeredBoldLabel, GUILayout.ExpandWidth(true));
GUILayout.Space(10);
// 1. 폴더 설정 DropBox
DrawFolderDropBox();
GUILayout.Space(10);
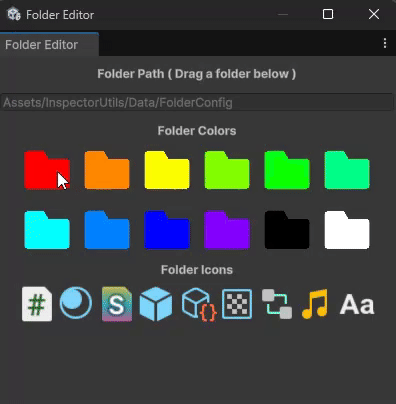
GUILayout.Label("Folder Colors", centeredBoldLabel, GUILayout.ExpandWidth(true));
// 2. FolderGrid - ColoredFolders 그리기
DrawFolderGrid(FolderConfigLoader.ColoredFolders, 6, position.width);
if (element != null && element.ColorType == FolderColorType.Custom)
{
GUILayout.Space(5);
// 2-1. 색 설정창 그리기
DrawColorSetter();
GUILayout.Space(5);
}
GUILayout.Label("Folder Icons", centeredBoldLabel, GUILayout.ExpandWidth(true));
GUILayout.Space(5);
// 3. FolderGrid - Icons 그리기
DrawFolderGrid(FolderConfigLoader.Icons, 9, position.width);
GUILayout.Space(10);
// 4. Reset 버튼 그리기
DrawResetButton();
}
// ...
}
OnGUI 를 통해 그리는 부분 중에서 레이아웃 관련된 부분들을 제외하고 확인해보겠습니다.
DrawFolderDropBox
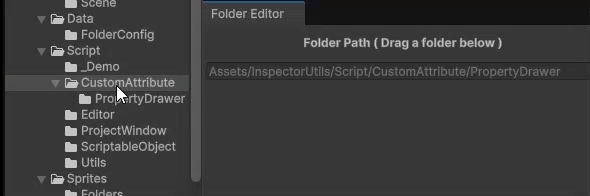
해당 에디터는 특정 폴더에 Config를 설정하는 기능을 가집니다.
따라서, 특정할 폴더를 빠르게 바꾸기 위해서 DropBox에 폴더를 드래그/드롭하면 선택한 폴더가 바뀌도록 하였습니다.
        private void DrawFolderDropBox()
		{
            GUI.enabled = false;
            // 드롭 이벤트를 탐지하기 위해 GetControlRect 사용
			Rect dropArea = EditorGUILayout.GetControlRect();
			EditorGUI.TextField(dropArea, folderPath);

			GUI.enabled = true;

			Event evt = Event.current;

			switch (evt.type)
			{
				case EventType.DragUpdated:
				case EventType.DragPerform:
					if (!dropArea.Contains(evt.mousePosition))	// 드래그 중 범위 체크
						return;

					DragAndDrop.visualMode = DragAndDropVisualMode.Copy;	// 범위 안이면 마우스 모드 바꿈

					if (evt.type == EventType.DragPerform) 		// 드래그 끝낼 때
					{
						DragAndDrop.AcceptDrag();

						foreach (string draggedPath in DragAndDrop.paths)
						{
							if (Directory.Exists(draggedPath))
							{
                            	// 드래그한 경로를 저장
								folderPath = draggedPath;
								break;
							}
						}
					}
                    // Event 사용 (다른곳에서 사용 불가)
					Event.current.Use();
					break;
			}
		}
이벤트를 사용하여 드래그/드롭했을 때, 선택된 첫 번째 Directory를 folderPath에 저장하여 Config를 설정할 수 있도록 합니다.
추가적으로, 드래그 이벤트는 외부 (Window 파일탐색기)에서도 받을 수 있습니다.
DrawFolderGrid
        private void DrawFolderGrid<T>(Dictionary<T, Texture2D> dict, int iconsPerRow, float width) where T : System.Enum
        {
            var values = (T[])System.Enum.GetValues(typeof(T));
            int count = dict.Count(kv => kv.Value != null && Convert.ToInt32(kv.Key) >= 0);	// 총 Texture 개수
            int rows = Mathf.CeilToInt((float)count / iconsPerRow);							// row 개수
            int drawn = 0;												// 현재 그린 texture 개수


            for (int y = 0; y < rows; y++)
            {
            	// 각 Row를 Horizontal로 묶어서 정렬
                EditorGUILayout.BeginHorizontal();
				GUILayout.Space(20f);

				for (int x = 0; x < iconsPerRow; x++)
                {
                    if (drawn >= count) break;

                    int enumIndex = y * iconsPerRow + x;
                    if (enumIndex >= values.Length) break;

                    var key = values[enumIndex];
                    if (Convert.ToInt32(key) < 0) continue;

                    // 해당하는 텍스쳐 찾기
                    if (dict.TryGetValue(key, out var tex) && tex != null)
                    {
                    	// ColorType이 Custom인 경우, 설정된 폴더 색으로 그려줌
                        if(typeof(T) == typeof(FolderColorType) && drawn == (int)FolderColorType.Custom)
                        {
                            if (element != null)
                                GUI.color = element.CustomFolderColor;
                        }
                        // 버튼에 Texture를 그리고,
                        // 누르면 SetCustomFolderConfig로 Configuration 파일에 저장되도록
                        if (GUILayout.Button(tex, GUIStyle.none, GUILayout.Width((width -40f)/ iconsPerRow), GUILayout.Height((width - 40f) / iconsPerRow)))
                        {
                            FolderConfigLoader.SetCustomFolderConfig<T>(folderPath, drawn);
                        }

                        GUI.color = Color.white;
                        drawn++;
                    }
                }

				GUILayout.Space(20f);
				EditorGUILayout.EndHorizontal();
            }
        }
간단하게 그려야 할 텍스쳐의 개수와 row, column을 계산한 뒤에, width, column 을 적절하게 맞춰주면 됩니다.
DrawColorSetter
        private Color changedColor = Color.white;
        private void DrawColorSetter()
        {
            GUILayout.BeginHorizontal();
            GUILayout.FlexibleSpace();

            // ColorField로 색을 입력
            changedColor = EditorGUILayout.ColorField(changedColor);
            changedColor.a = 1f;

            // ApplyColor 버튼으로 Config 파일에 저장
            if (GUILayout.Button("Apply Color"))
            {
                FolderConfigLoader.SetCustomFolderColor(folderPath, changedColor);
            }

            GUILayout.FlexibleSpace();
            GUILayout.EndHorizontal();
        }
여기까지의 Editor를 다시 확인해보겠습니다.
DrawResetButton
        private void DrawResetButton()
        {
            if (GUILayout.Button("Reset Custom"))
            {
                FolderConfigLoader.ResetCustom(folderPath);
            }
        }
마지막으로 Reset 버튼까지 만들어주면 Editor를 통해 FolderConfigLoader 의 기능을 모두 호출할 수 있게 되었습니다.
마무리
이제 Editor를 사용하여 FolderConfigLoader 의 모든 기능을 사용할 수 있게 되었습니다.
따라서, 이제 이 Config 정보를 가져다가 Folder에 그려주기만 하면 완성입니다.