유뷰브엔 연간 23억 명에 달하는 이용자들이 있다.
또한 매년
그리고 유뷰버들은 높은 조회수를 위해, 썸네일과 제목에 많은 신경을 쓴다.
특히 썸네일 속에 적힌 글은 유저들이 제일 처음 주목하는 부분으로
많은 유저들이 이 글을 통해 영상을 볼지 선택한다.
따라서 이 문구를 잘 선정하기 위해
썸네일 속 텍스트로 유튜브 조회수를 예측하는 모델을 개발해 보았다.
참고) 이 내용은 제목과 썸네일을 통한 유튜브 조회수 예측 인공지능 서비스, Hits-Hike 프로젝트의 일부이다. 아래 글을 통해 프로젝트 동기와 전반적인 흐름을 확인할 수 있다.
https://crong-dev.tistory.com/68
1. Youtube Data 수집
유튜브의 데이터를 대량으로 수집할 수 있는 방법은 대표적으로 2가지가 있다.
- 웹 크롤링
- API 활용
이 중 크롤링은 유뷰브 웹 사이트에서 보이는 정보를 모두 가져올 수 있다는 장점이 있지만, 시간이 많이 걸려 대량의 데이터를 수집할 때 문제가 될 수 있다. 또한 공식적으로 허락된 권한이 아니므로, 수익을 창출하는 등 활동을 할 경우 문제가 될 수 있다.
따라서
필요한 정보를 유뷰브에서 제공하는
공식 API를 활용해 수집할 수 있다면 베스트이다.
빠른 시간에 많은 정보를 얻을 수 있으며, 공식적으로 유뷰브에서 제공하는 정보이므로 문제가 될 가능성이 거의 없다.
따라서 이 글에서도 YoutubeAPI를 활용한다.
Youtube API로 수집할 수 있는 정보의 종류와 사용 방법 아래 글에 정리해 두었다.
https://velog.io/@recoder/Hits-Hike-%EC%9C%A0%EB%B7%B0%EB%B8%8C-%EB%8D%B0%EC%9D%B4%ED%84%B0-%EC%88%98%EC%A7%91-%EB%B0%A9%EB%B2%95
1-1) 필요한 데이터 확인
우리는 썸네일 텍스트를 통해 조회수를 예측할 것이므로
- 썸네일 이미지
- 조회수
2가지 정보를 필요로 한다.
Youtube API 중 영상 리스트를 받아오면서, 영상별 썸네일 이미지와 조회수를 동시에 가져올 수 있는 경로는 존재하지 않는다. 따라서
- 영상리스트와 영상별 썸네일 url을 수집한다.
- 영상 별 조회수를 수집한다.
2단계에 거쳐 수집한다.
1-2) 영상과 썸네일 정보 수집(video id, thumbnail url)
수집 결과를 저장할 DataFrame 만들기
import pandas as pd
df = pd.DataFrame(columns = ['video_id', 'thumbnail'])
데이터 불러와 DataFrame에 추가
from googleapiclient.discovery import build
youtube = build('youtube', 'v3', developerKey = config.API_KEY)
def get_youtube_vedio_search_list(keyword): page_token = '' while(len(df)<max_data_num): ##API 호출 search_response = youtube.search().list( type='video', maxResults = 50, #한 번에 가져오는 데이터 수 part = 'snippet, id', q = keyword, #검색 키워드 regionCode = 'US', #지역. 한국은 KR pageToken = page_token ).execute() ##불러온 데이터 저장 for item in search_response['items']: new_data = {'video_id':'not-yet', 'thumbnail':'not-yet'} new_data['video_id'] = item['id']['videoId'] new_data['thumbnail'] = item['snippet']['thumbnails']['default']['url'] df.loc[len(df)] = new_data ###다음 페이지 토큰 찾기 if ('nextPageToken' in search_response): page_token = search_response['nextPageToken'] else: break
- 검색 결과 리스트를 가져오기 위해, YoutubeAPI 함수 중 search()를 사용한다.
- max_data_num : 희망하는 데이터 개수
- keyword : 검색 키워드
생략해도 무방하나, 지정할 시 원하는 주제로 수집 결과를 한정할 수 있다. (나는 'vlog'키워드를 사용하였다.)- regionCode : 지역 지정
이후 사용할 AWS text recognition의 경우, 한글은 지원하지 않는다. 따라서 지역을 미국으로 지정하여, 알파벳 위주의 검색결과가 나오도록 한다.- page_token : 한 번 호출 시 최대 50개의 데이터를 불러올 수 있다. 그 이상 불러오고 싶을 경우, page_token을 지정해서 다음 정보를 불러올 수 있다.
이와 같이 수집할 경우
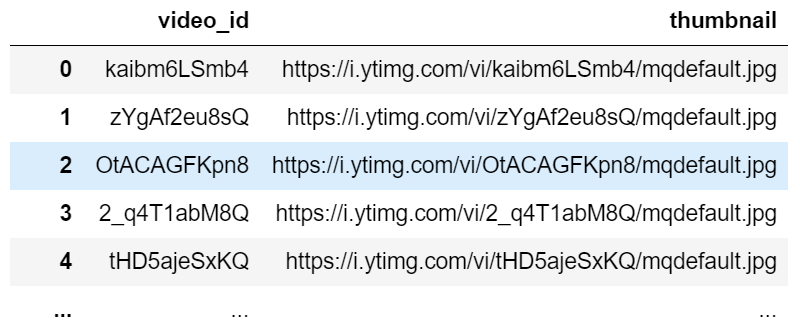
이와 같은 결과를 얻을 수 있다.
1-2-1) 500 개 이상 검색 방법 - 영상 날짜 지정
이때 유튜브 측에서 건 제한으로
검색 결과는 최대 500개까지만 불러올 수 있다.
(이후론 nextPageToken이 제공되지 않으며,
하드코딩으로 다음 page token을 지정해주어도
검색 결과를 빈 배열로 보내준다.)
하지만 LSTM 분석을 위해선 500개보다 훨씬 많은 데이터(10만개 이상)을 필요로 한다.
이때 수집 개수를 늘리기 위해, 꼼수로
publishedBefore, publishedAfter 값을 지정해 줄 수 있다.
즉, 특정 기간 이내의 검색결과를 500개 불러오고,
기간을 바꾸어 다시 500개를 불러오는 작업을 반복하는 것이다.
A. 날짜 갱신을 위한 함수(들어온 날짜의 바로 이전달 1일 계산)
def calcuate_next_publish_time(time):
    if(time[5:7]=='01'):
        return '%04d-12-01T00:00:00Z'%(int(time[:4])-1)
    else:
        return time[:5]+'%02d-01T00:00:00Z'%(int(time[5:7])-1)
B. publishedBefore, publishedAfter 지정한 YoutubeAPI 호출 코드
start_time=2021-06-01T00:00:00Z # 수집 시작할 날짜를 이 형식으로 지정(수집하는 당일 날짜 혹은 이전에 수집한 데이터 중 가장 예전 값
def get_youtube_vedio_search_list(keyword):
    page_token = ''
    while(len(df)<max_data_num):
    	##API 호출
        search_response = youtube.search().list(
            type='video',
            maxResults = 50,       #한 번에 가져오는 데이터 수
            part = 'snippet, id',
            q = keyword,		#검색 키워드
            regionCode = 'US',		#지역. 한국은 KR
            pageToken = page_token,
            publishedBefore = start_time,
            publishedAfter = calcuate_next_publish_time(start_time)
        ).execute()
        ##불러온 데이터 저장
        for item in search_response['items']:
            new_data = {'video_id':'not-yet', 'thumbnail':'not-yet', 'publish_time':'not-yet'}
            new_data['video_id'] = item['id']['videoId']
            new_data['thumbnail'] = item['snippet']['thumbnails']['default']['url']
            new_data['publish_time'] = item['snippet']['publishTime']
            df.loc[len(df)] = new_data
        ###다음 페이지 토큰 찾기
        if ('nextPageToken' in search_response):
            page_token = search_response['nextPageToken']
        else:
            print('count : ', len(df))
            start_time = calcuate_next_publish_time(start_time)
            page_token=''
위와 같은 방법으로 하면, 500 개 이후로도 계속 수집이 가능함을 확인할 수 있다.
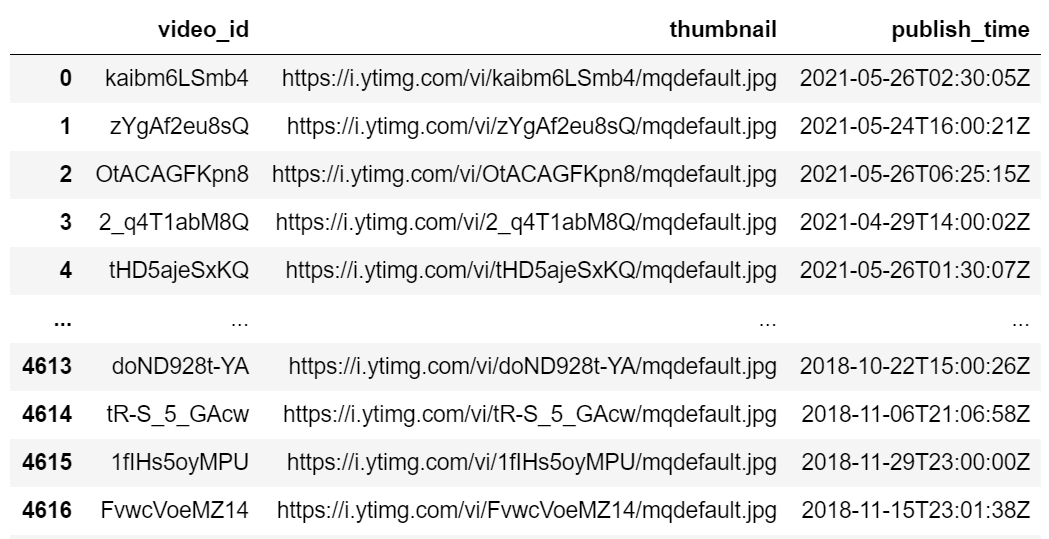
위 경우는 2018.09~2021.05기간의 데이터를, vlog keyword로 수집한 결과이다.
수집 간격을 줄이고, keyword를 바꾸면 5000개를 넘어서 훨씬 많은 데이터를 불러오는 것도 가능하다.
1-2-2) url open 불가능한 데이터 삭제
수집한 url 중 일부는
실제로 열려고 할 경우, 에러 메시지나
이런 그림이 뜨게 된다.
이 경우 text 분석이 불가능 하므로 해당 row를 삭제한다.
open을 시도하고, 실패할 경우 삭제하는 코드이다.for index in range(len(df)): try: urlopen(df['thumbnail'][index]).read() except: df.drop(index, inplace=True) print('drop', index)

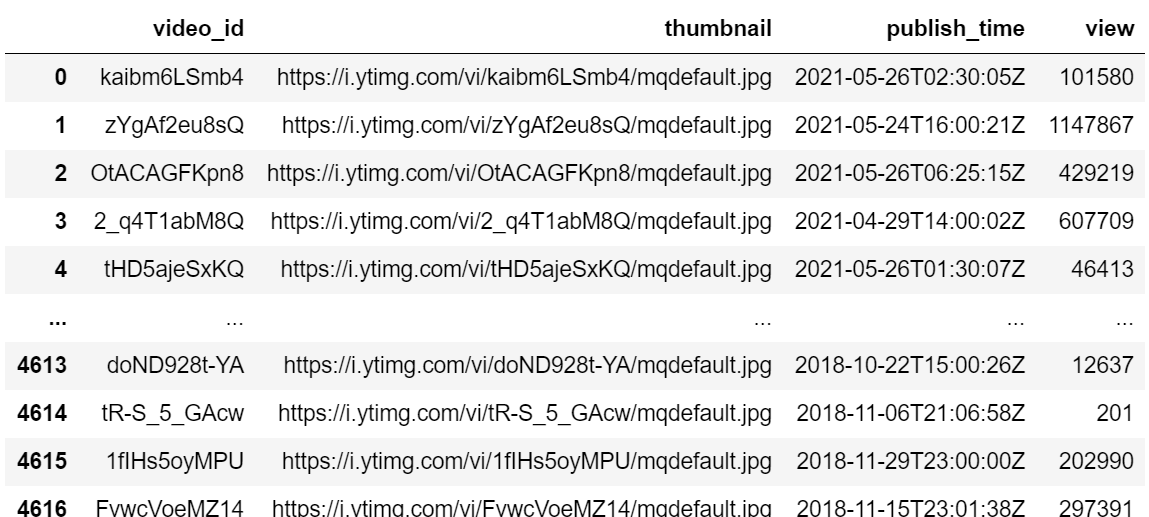
1-3) 조회수 수집(views)
YoutubeAPI 중 조회수(viewCount) 정보를 가지고 있는 videos()함수를 활용한다.
앞서 수집한 video_id를 활용한다.
조회수를 저장한 column을 만들고
아직 수집하지 않았다는 뜻의 -1를 입력한다.df['views']=-1수집해서 생성한 column에 저장
for index in range(len(df)):
    #API로 정보 불러오기
    response = youtube.videos().list(
        part = 'statistics',
        id = df.loc[index, 'video_id']  #앞서 수집한 video_id
    ).execute()
    #불러온 결과에 조회수 정보가 있는지 확인하고
    #있으면 해당 내용을, 없으면 -2를 넣는다.
    if (response['pageInfo']['totalResults'] > 0):
        if('viewCount' in response['items'][0]['statistics']):
            df.loc[index, 'view'] = response['items'][0]['statistics']['viewCount']
    else:
        df.loc[index, 'view'] = -2
1-3-1) 조회수 정보가 없는 데이터 삭제
조회수에 -2가 입력된 경우
Youtube에서 해당 영상의 조회수를 제공하지 않는 경우이다.
이 경우 썸네일 텍스트와 조회수의 상관관계를 분석하는 것이 불가능하므로 해당 ROW는 삭제한다.
for index in range(len(df)):
    if(df.loc[index, 'view']==-2):
        df.drop(index, inplace=True)
이 과정을 마치면 다음과 같은 결과를 얻을 수 있다.

1-4) 수집한 데이터 CSV파일로 저장
df.to_csv("./youtube_data.csv", header=True, index=False)
2. Thumbnail 속 Text 추출( AWS Image Rekognition - Text Detection 활용 )
썸네일 이미지 중 텍스트 정보를 알기 위해 아마존 AWS를 활용한다.
AWS 사용을 위한 설정 방법은
공식 홈페이지에 설명이 자세히 나와있으므로, 그대로 따라가면 된다.
https://docs.aws.amazon.com/rekognition/latest/dg/getting-started.html
위 설정을 마쳤다면,
앞서 수집해둔 썸네일 이미지를 AWS API로 보내 Text 정보를 불러오는 작업을 시작한다.
2-1) 텍스트 데이터를 분석할 이미지 url 불러오기
AWS Text Detection의 경우, 초반엔 월별 5000번까지는 무료로 사용이 가능하나,
이 이상을 원할 경우 (다른 카드를 사용해서 새로운 계정을 만들어 프리티어를 새로 받거나) 돈을 지불해야 한다.
따라서 한번에 분석을 끝낼 수 있게 url 정보를 명확히 해 두고 시작해야 한다.
요금 관련 규정은 아래와 같다.
A. 프리티어 오퍼(처음 12개월간 무료)
월별 5,000개의 이미지 분석
월별 최대 1,000개의 얼굴 메타데이터 저장B. 월별 처음 100만개
일반 이미지 : 개당 0.001USD (1000개당 1달러)
얼굴 메타데이터 스토리지 : 월별 메타데이터당 0.00001USD
- 개수 계산
여러개의 입력 이미지 수용하는 API는 1개 이미지 처리로 계산
단일 이미지에서 여러 API소환 시 여러 이미지로 계산
앞서 수집해둔 썸네일 이미지 url 불러오기
import pandas as pd
data_original = pd.read_csv("youtube_data.csv")
df = pd.DataFrame(data_original)
2-2) AWS로 분석 실행
필요 기능 import
import boto3
from urllib.request import urlopen
from PIL import Image
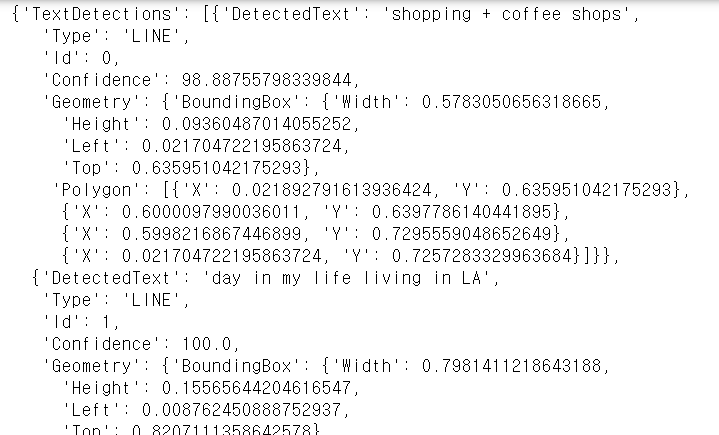
2-2-1) 우선 하나의 이미지로 실행

에 대해 분석을 실행해보면
response = client.detect_text(Image={'Bytes': urlopen('https://i.ytimg.com/vi/ErnyCWGoRd4/mqdefault.jpg')})
결과
 로 시작해서
 이렇게 끝나는
결과값을 얻을 수 있다.
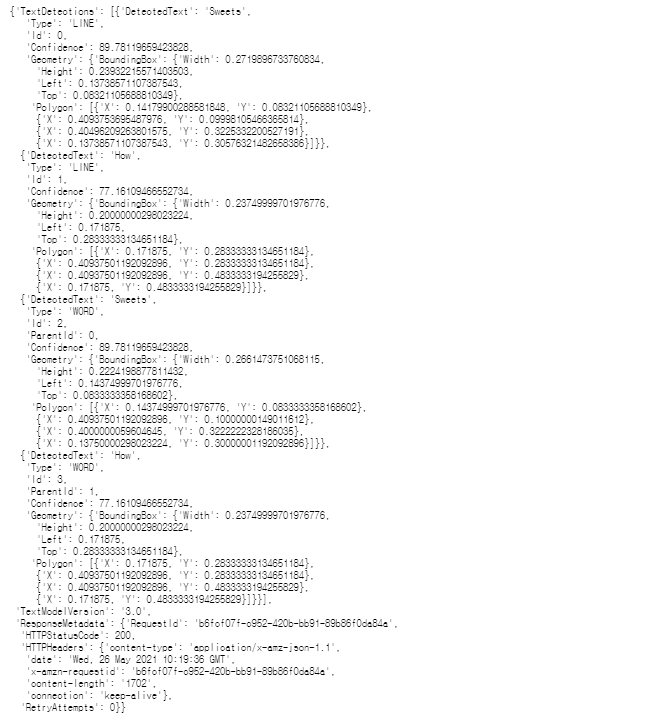
url을 눌러 이미지에 보이는 Text와 비교해 보자
- DetectedText내용을 살펴보면
"shopping + coffee shops
day in my life living in LA"
으로 정확한 텍스트를 찾았음을 알 수 있다. - Type은 'word'와 'line'이 있으며, 줄 단위와 단어 단위로 총 2번 씩 결과를 보내줌을 알 수 있다.
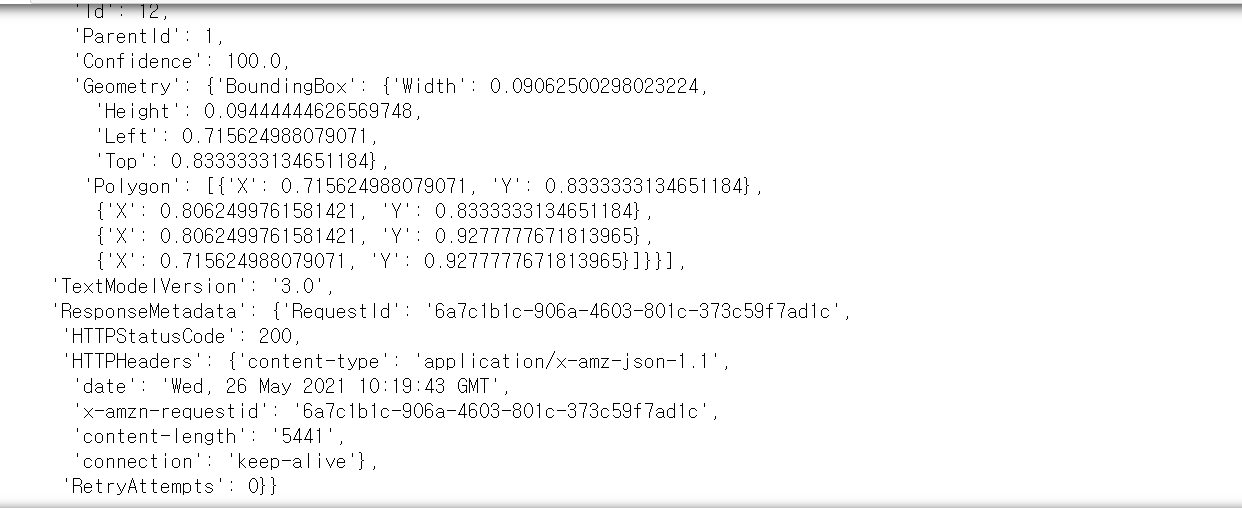
- BoundingBox의 Width, Height 값을 통해 Text의 크기 정보를 확인할 수 있고, Left, Top을 통해 Text의 위치 정보를 확인할 수 있다.
- Polygon을 통해 Text가 있는 곳의 모양을 알 수 있다.
2-2-2) 모든 url에 대해 실행
이제 모든 url에 대해 실행하여, 해당 결과를 다음 column에 저장한다.
(반복 호출을 피하기 위해, 우선 불러온 내용을 정제 없이 모두 저장한다.)
분석한 내용을 저장할 column 생성
df['thumbnail_text'] = 'not-yet'수집 수행
for index in range(start_index, len(df)):
    try:
        response = client.detect_text(Image={'Bytes': urlopen(df['thumbnail'][index]).read()})
        df['thumbnail_text'][index]=response
        print(index)
    except:
        df['thumbnail_text'][index]='error'
        print(index, 'error')
        pass
(앞서 url open이 실패할 경우, 해당 데이터를 삭제 했기 때문에 가능성은 낮지만)
잘못된 url 등 문제가 발생하는 경우를 대비해서 예외처리를 하고, 그 경우 'error'라는 string을 저장하도록 한다.
이렇게 진행할 경우
와 같은 전체 정보가 하나의 셀에 저장되어
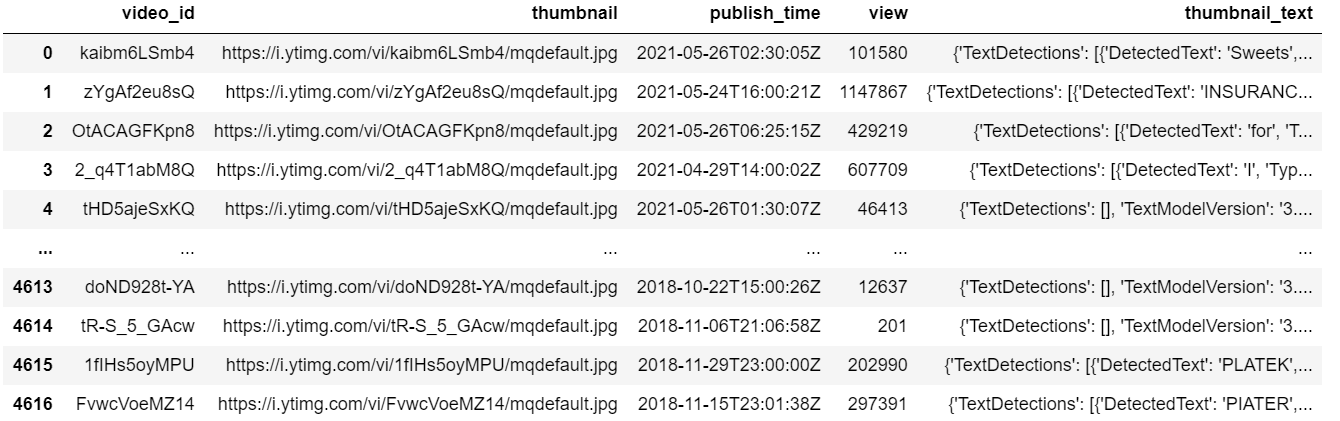
이와 같은 결과를 볼 수 있다.
2-3) 분석한 내용을 CSV 파일로 저장
df.to_csv("./youtube_data_including_thumbnailtext.csv", header=True, index=False)
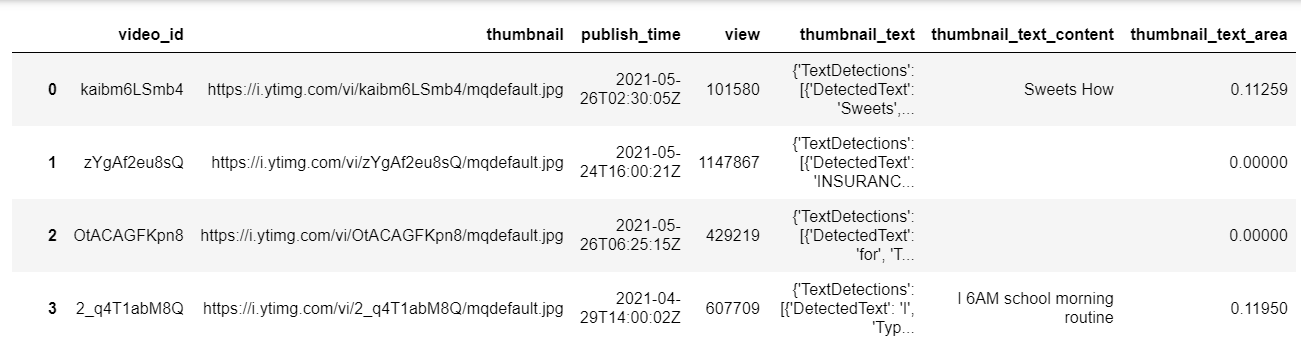
3. 필요한 정보 추출하기 ( from thumbnail_text Data )
AWS에서 불러온 데이터를 그대로 저장해 두었으므로, 이를 모델링에 활용할 수 있는 형태로 변환한다.
앞서 불러온 텍스트에 대한 정보엔
Text 내용, 가로세로 길이, 위치가 있다.
이 중 유의미한 정보들을 가장 간단한 형태로 추려보면
- 텍스트 내용
- 썸네일 중 텍스트가 차지하는 면적
으로 볼 수 있다.
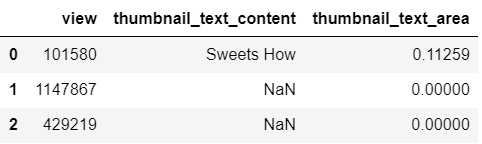
따라서
- 단어/줄 단위로 끊어여 넘어오는 Text 내용을 하나로 합쳐 content로
- 각 면적을 더한 값을 통해 area로
만들어 썸네일 속 텍스트에 대한 정보를 2가지 값으로 변환해보도록 하겠다.
3-1) 정보 불어오기 & Data Frame 생성
A. 파일 불러오기
import pandas as pd
data_original = pd.read_csv("../../data/english_data_including_thumbnailtext.csv")
df = pd.DataFrame(data_original)
B. content와 area를 저장할 column 추가
df['thumbnail_text_content']='not-yet'
df['thumbnail_text_area']=-1
C. csv을 불러오면, thumbnail_text의 내용이 string 형태로 넘어오게 된다.
따라서 다시 Dictionary Type으로 바꿔준다.for index in range(0, len(df)): df['thumbnail_text'][index] = eval(df['thumbnail_text'][index])
3-2) 텍스트 내용과 면적 계산
- conent : 검색된 텍스트 내용 합
- area : 썸네일 중 텍스트가 차지하는 면적
을 계산한다.
단, Text Detection 결과 중 부정확한 값들과 중복되는 값들이 있다.
예를 들면,

이 이미지에 대한 분석 결과는
{'TextDetections': [{'DetectedText': 'TOTAL',
   'Type': 'LINE',
   'Id': 0,
   'Confidence': 39.95512008666992,
   'Geometry': {'BoundingBox': {'Width': 0.02812499925494194,
     'Height': 0.2666666805744171,
     'Left': 0.909375011920929,
     'Top': 0.03333333507180214},
    'Polygon': [{'X': 0.909375011920929, 'Y': 0.30000001192092896},
     {'X': 0.909375011920929, 'Y': 0.03333333507180214},
     {'X': 0.9375, 'Y': 0.03333333507180214},
     {'X': 0.9375, 'Y': 0.30000001192092896}]}},
  {'DetectedText': 'GRADUATIONY',
   'Type': 'LINE',
   'Id': 1,
   'Confidence': 86.36436462402344,
   'Geometry': {'BoundingBox': {'Width': 0.7124999761581421,
     'Height': 0.12777778506278992,
     'Left': 0.15625,
     'Top': 0.8222222328186035},
    'Polygon': [{'X': 0.15625, 'Y': 0.8222222328186035},
     {'X': 0.8687499761581421, 'Y': 0.8222222328186035},
     {'X': 0.8687499761581421, 'Y': 0.949999988079071},
     {'X': 0.15625, 'Y': 0.949999988079071}]}},
  {'DetectedText': 'TOTAL',
   'Type': 'WORD',
   'Id': 2,
   'ParentId': 0,
   'Confidence': 39.95512008666992,
   'Geometry': {'BoundingBox': {'Width': 0.2666666805744171,
     'Height': 0.02812499925494194,
     'Left': 0.909375011920929,
     'Top': 0.30000001192092896},
    'Polygon': [{'X': 0.909375011920929, 'Y': 0.30000001192092896},
     {'X': 0.909375011920929, 'Y': 0.03333333507180214},
     {'X': 0.9375, 'Y': 0.03333333507180214},
     {'X': 0.9375, 'Y': 0.30000001192092896}]}},
  {'DetectedText': 'GRADUATIONY',
   'Type': 'WORD',
   'Id': 3,
   'ParentId': 1,
   'Confidence': 86.36436462402344,
   'Geometry': {'BoundingBox': {'Width': 0.7124999761581421,
     'Height': 0.12777778506278992,
     'Left': 0.15625,
     'Top': 0.8222222328186035},
    'Polygon': [{'X': 0.15625, 'Y': 0.8222222328186035},
     {'X': 0.8687499761581421, 'Y': 0.8222222328186035},
     {'X': 0.8687499761581421, 'Y': 0.949999988079071},
     {'X': 0.15625, 'Y': 0.949999988079071}]}}],
 'TextModelVersion': '3.0',
 'ResponseMetadata': {'RequestId': 'cb4a99fe-bae6-4ae4-a75b-3d584520ff07',
  'HTTPStatusCode': 200,
  'HTTPHeaders': {'content-type': 'application/x-amz-json-1.1',
   'date': 'Wed, 26 May 2021 15:42:41 GMT',
   'x-amzn-requestid': 'cb4a99fe-bae6-4ae4-a75b-3d584520ff07',
   'content-length': '1637',
   'connection': 'keep-alive'},
  'RetryAttempts': 0}}
로 나온다.
2가지 문제를 확인할 수 있는데
- GRADUCATION이라는 단어 하나만 검출되어야 하는데, TOTAL이라는 없는 단어가 검출된다.
- LINE TYPE과 WORD TYPE으로 모두 결과를 보내주기 때문에 같은 내용이 2번 씩 넘어온다.
이 2가지 문제를 개선하기 위해
- confidence가 70 이상이고
- Type은 LINE인 정보
만 활용하였다.
content와 area 구하기
for index in range(len(df)):
    content=''
    area=0
    for detected in df['thumbnail_text'][index]['TextDetections']:
        if(detected['Type']=="LINE" and detected['Confidence']>70):
            content = content + detected['DetectedText'] + ' '
            width = round(detected['Geometry']['BoundingBox']['Width'], 5)
            height = round(detected['Geometry']['BoundingBox']['Height'], 5)
            area = round(area + width * height, 5)
    df.loc[index, 'thumbnail_text_content'] = content
    df.loc[index, 'thumbnail_text_area'] = area
content : line 별 검색된 텍스트(DetectedText)를 모두 이어 붙인 것
area : line 별 width*height 값을 모두 더한 것
(width, height, area 는 소수점 5째 자리까지만 활용)
3-3) 해당 내용을 CSV 파일로 저장한다.
df.to_csv("data_including_content_and_area_of_thumbnailtext.csv", header=True, index=False)
4.전처리
필요한 데이터 수집 및 추출이 완료되었으므로
해당 내용을 LSTM 모델에서 활용할 수 있도록
간단한 숫자나 문자열 형태로 전처리해 준다.
영어 전처리 도구인 nltk를 활용하였다.
4-1) 필요한 데이터를 불러온다.
A. 앞서 수집해둔 데이터들 중 모델링에 필요한 데이터만 불러온다.
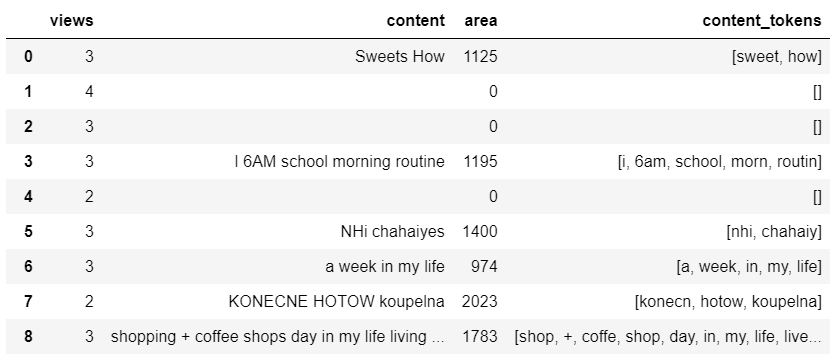
import pandas as pd
df = pd.read_csv('../../data/english_data_including_content_and_area_of_thumbnailtext.csv', usecols = [3, 5, 6])
B. 데이터를 좀 더 간단한 형태로 변환한다.
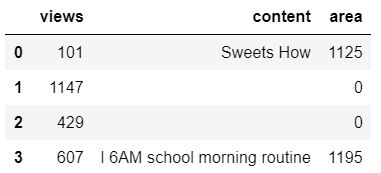
- views : 아래 4자리를 자른다.
- content : 빈 셀이라 NaN로넘어오는 값을 ' '로 문자열로 바꾸어, 후에 에러를 막는다.(텍스트가 없다는 것 자체가 유의미한 특성일 수 있으므로, 삭제하진 않는다.)
- area : 소숫점 5자리인 실수를 정수로 바꾸어 준다.
data_cat = df.copy()
data_cat['views'] = (data_cat['view'].floordiv(1000))
data_cat['content'] = data_cat['thumbnail_text_content'].fillna('  ')
data_cat['area'] = (data_cat['thumbnail_text_area']*10000).astype('int64')
data_cat.drop(['view', 'thumbnail_text_content', 'thumbnail_text_area'], axis='columns', inplace=True)
4-2) 조회수(views) 전처리
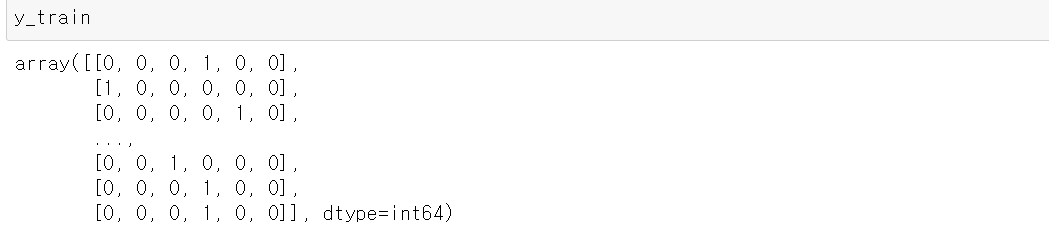
- one-hot endcoding
A. 조회수를 6가지 구간으로 나누어, 0~5의 값으로 변환한다.
import math
for index, view in enumerate(data_cat['views']):
  if view >=10000:  data_cat['views'][index] =  5
  elif view >=1000:  data_cat['views'][index] =  4
  elif view >=100:  data_cat['views'][index] = 3
  elif view >=10: data_cat['views'][index] = 2
  elif view > 0: data_cat['views'][index] = 1
  else data_cat['views'][index] = 0
B. one-hot encoding으로 0과 1의 배열로 변환한다.
from keras.utils import to_categorical
y = to_categorical(data_cat['views']).astype('int64')
y

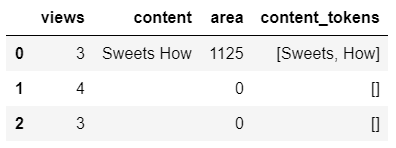
4-3) content 전처리
content엔 여러 단어들이 하나의 문자열로 저장되어 있다.
이 문자열을 토큰 리스트로 변환한 후,
숫자 시퀀스로 변환한다.
4-3-1) 문자열을 token list로 변환
영문 전저리 도구인 nltk를 활용한다.
A. 단어 단위로 자르는 word_tokenize 함수를 불러와서
import nltk
nltk.download('punkt')
nltk.download('wordnet')
from nltk.tokenize import word_tokenize
자른 결과를 넣을 column을 만들고
결과를 하나씩 저장한다.data_cat['content_tokens']=None for index in range(len(df)): data_cat['content_tokens'][index] = word_tokenize(data_cat['content'][index])
B. 토큰 원형을 찾아주는 함수인 PorterStemmer로
단어를 정리된 토큰으로 바꾸어 준다.from nltk.stem import PorterStemmer st1 = PorterStemmer() for index in range(len(df)): data_cat['content_tokens'][index] = [st1.stem(w) for w in data_cat['content_tokens'][index]]
5. LSTM 모델링
5-1) train data와 test data로 나누기
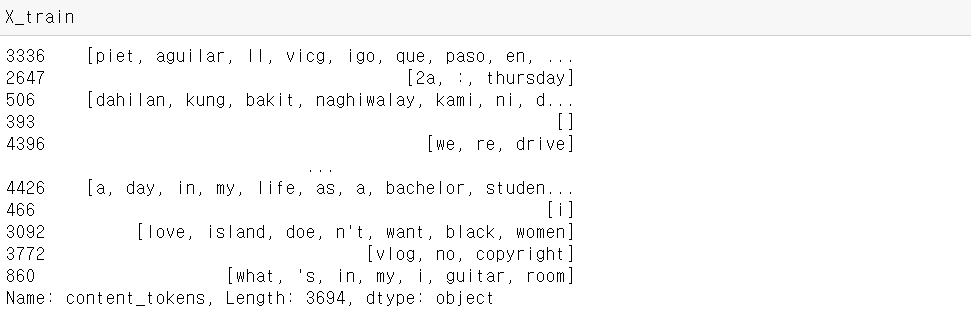
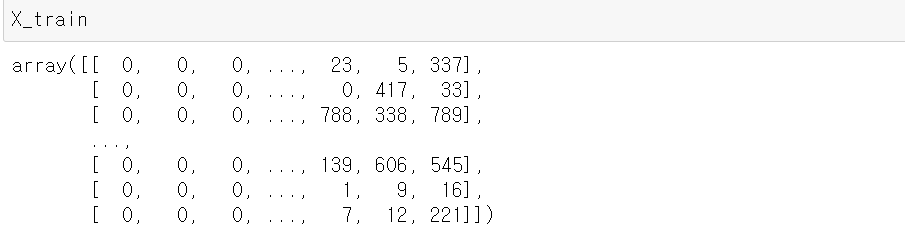
from sklearn.model_selection import train_test_split
X_train, X_test, y_train, y_test = train_test_split(data_cat['content_tokens'], y, test_size = 0.2, random_state = 42)
5-2) content token(X_train)을 숫자 sequence로 바꾸기
LSTM 모델에 적용하기 위해
string 배열인 X_train을 숫자 배열로 바꾸어야 한다.
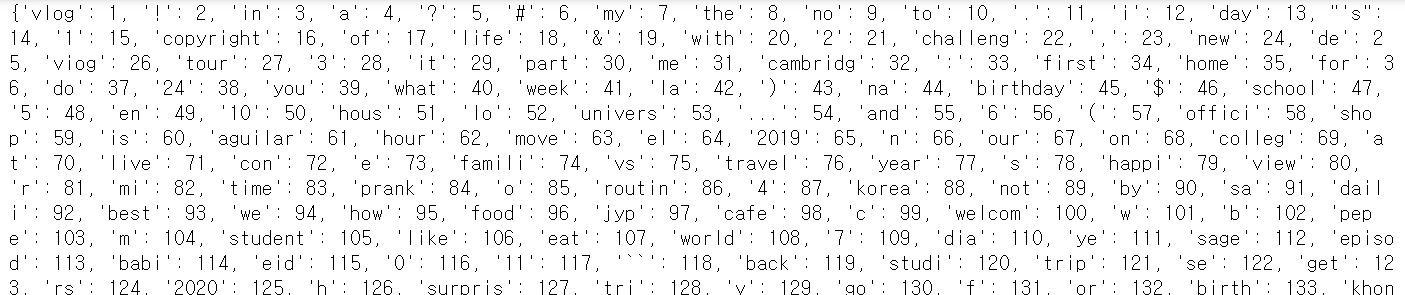
A. 단어 사전 말들기
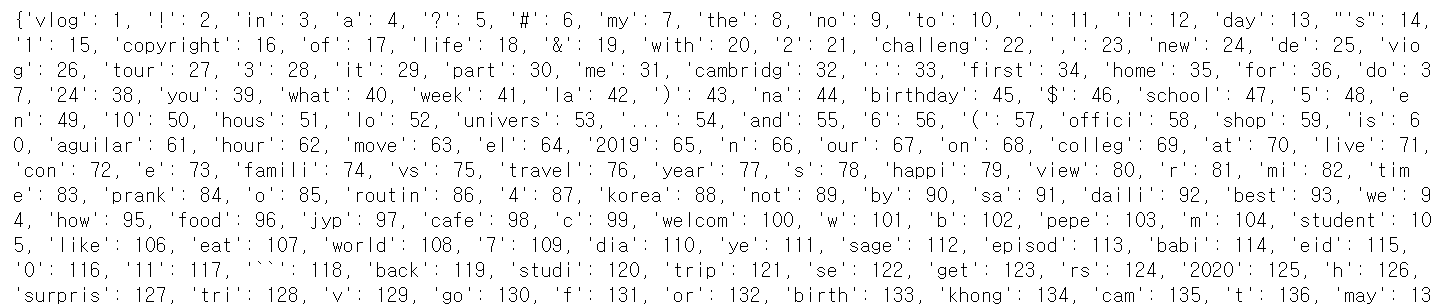
각 토큰들을 대응하는 index 값을 지정해서, 숫자로 바꾸어 준다.from tensorflow.keras.preprocessing.text import Tokenizer tokenizer = Tokenizer() tokenizer.fit_on_texts(X_train) print(tokenizer.word_index)
B. 단어별 등장 빈도 확인
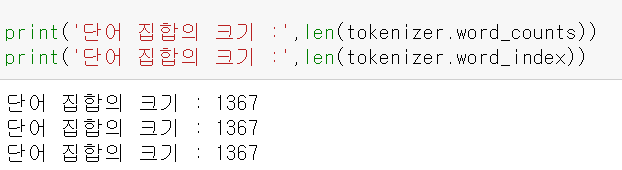
threshold = 2
total_cnt = len(tokenizer.word_index) # 단어의 수
rare_cnt = 0                          # 등장 빈도수가 threshold보다 작은 단어의 개수를 카운트
total_freq = 0                        # 훈련 데이터의 전체 단어 빈도수 총 합
rare_freq = 0                         # 등장 빈도수가 threshold보다 작은 단어의 등장 빈도수의 총 합
for key, value in tokenizer.word_counts.items():
    total_freq = total_freq + value
    if(value < threshold):
        rare_cnt = rare_cnt + 1
        rare_freq = rare_freq + value
print('단어 집합(vocabulary)의 크기 :',total_cnt)
print('등장 빈도가 %s번 이하인 희귀 단어의 수: %s'%(threshold - 1, rare_cnt))
print("단어 집합에서 희귀 단어의 비율:", (rare_cnt / total_cnt)*100)
print("전체 등장 빈도에서 희귀 단어 등장 빈도 비율:", (rare_freq / total_freq)*100)

C. 희귀 단어 제거
1번만 등장한 단어는 조회수 예측에 무의미할 가능성이 높으므로 제거한다.words_frequency = [w for w,c in tokenizer.word_index.items() if c >= vocab_size + 1] # 인덱스가 5 초과인 단어 제거 for w in words_frequency: del tokenizer.word_index[w] # 해당 단어에 대한 인덱스 정보를 삭제 del tokenizer.word_counts[w] # 해당 단어에 대한 카운트 정보를 삭제
D. 위 단어 집합을 이용해서, content token들을 숫자 시퀀스로 바꾸어 준다.
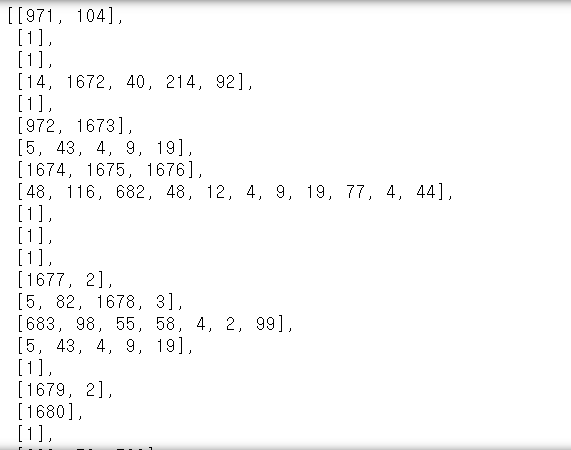
X_train = tokenizer.texts_to_sequences(X_train)
X_test = tokenizer.texts_to_sequences(X_test)
E. 이때 데이터별로 시퀀스의 길이가 다르므로 이를 동일하게 통일해 준다.
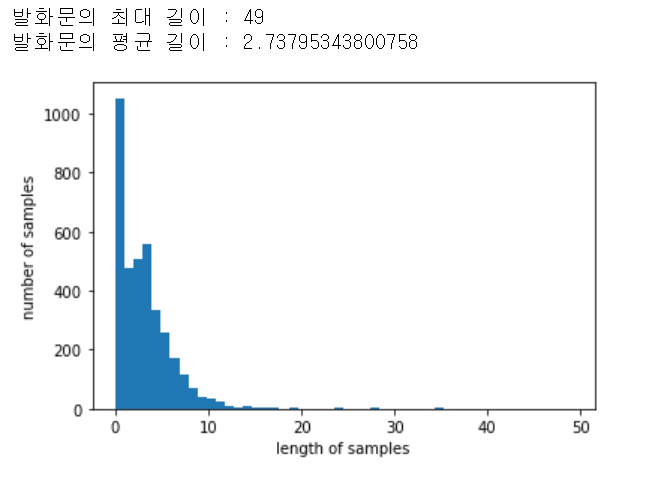
기존 시퀀스 길이들을 살펴보면import matplotlib.pyplot as plt print('발화문의 최대 길이 :',max(len(l) for l in X_train)) print('발화문의 평균 길이 :',sum(map(len, X_train))/len(X_train)) plt.hist([len(s) for s in X_train], bins=50) plt.xlabel('length of samples') plt.ylabel('number of samples') plt.show()
이고, 15를 길이로 잡으면def below_threshold_len(max_len, nested_list): cnt = 0 for s in nested_list: if(len(s) <= max_len): cnt = cnt + 1 print('전체 샘플 중 길이가 %s 이하인 샘플의 비율: %s'%(max_len, (cnt / len(nested_list))*100)) max_len = 15 below_threshold_len(max_len, X_train)
대부분의 단어를 포함함을 알 수 있다.
따라서 모든 시퀀스의 길이를 15로 맞춰준다.from tensorflow.keras.preprocessing.sequence import pad_sequences X_train = pad_sequences(X_train, maxlen = max_len) X_test = pad_sequences(X_test, maxlen = max_len)

5-3) 모델링
A. 사용할 기능들을 한번에 불러온다.
from tensorflow.keras.models import Sequential
from tensorflow.keras.layers import Embedding, Dense, LSTM, GRU, Bidirectional
from tensorflow.keras.models import load_model
from tensorflow.keras.callbacks import EarlyStopping, ModelCheckpoint
B. 모델 생성
model = Sequential([
    Embedding(vocab_size+1, 100),
    LSTM(128,  dropout= 0.2),
    Dense(6,activation='softmax')
])
C. 모델 학습
es = EarlyStopping(monitor='val_loss', mode='min', verbose=1, patience=5)
mc = ModelCheckpoint('Bi-LSTM_class6.h5', monitor='val_acc', mode='max', verbose=1, save_best_only=True)
model.compile(optimizer='adam', loss='CategoricalCrossentropy', metrics=['acc'])
history = model.fit(X_train, y_train, epochs=10, callbacks=[es, mc], batch_size=50, validation_data=(X_test, y_test))
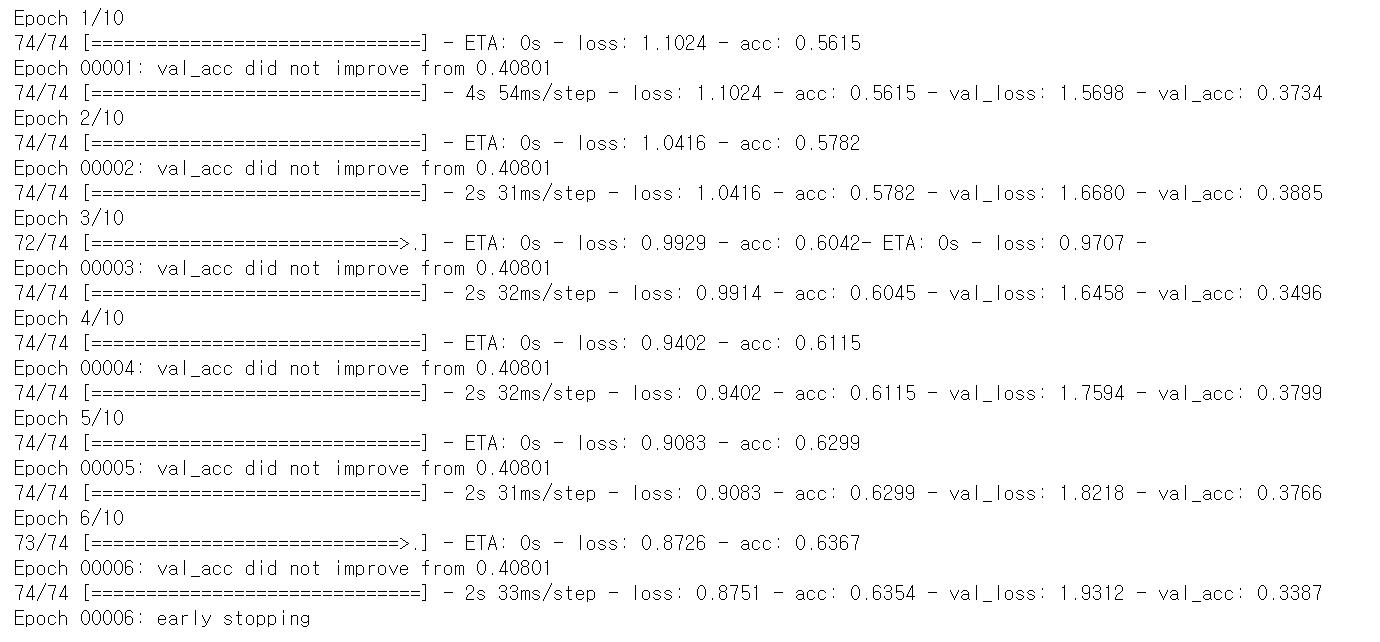
5-4) 테스트 시행 결과
loaded_model = load_model('Bi-LSTM_class6.h5')
print("\n 테스트 정확도: %.4f" % (loaded_model.evaluate(X_test, y_test)[1]))

이대로 4천개 가량의 데이터로 모델링을 진행할 경우 정확도는 0.4로 아쉽게 나온다.
하지만 일반적으로 인공지능 모델링에 필요한 데이터(최소 10만개 이상) 보다 한참 적은 데이터로 진행한 것을 감안하면 나쁘지 않은 정확도라고 볼 수 있다.
이를 조회수 카테고리 별로 나누어 살펴보면
from sklearn.metrics import confusion_matrix
conf_mat=confusion_matrix(true, pred)
class_accuracy=100*conf_mat.diagonal()/conf_mat.sum(1)
class_accuracy = pd.DataFrame(class_accuracy, columns = ['Accuracy'])
cat_to_id = {0:0, 1:1, 10:2, 100:3, 1000:4, 10000:5} id_to_cat = {0:0, 1:1, 2:10, 3:100, 4:1000, 5:10000}class_accuracy.insert(0, 'View Category', list(cat_to_id.keys())[:20])
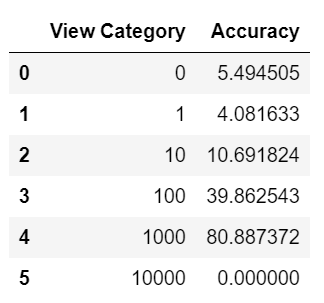
이와 같이 특정 카테고리에선 80%까지도 정확도가 올라감을 확인할 수 있다.
6. 앞으로의 과제
우선적으로 4616개의 데이터, 썸네일 텍스트 내용만으로 예측을 해 보았다.
당장의 결과론 40%로 한참 부족한 정확도를 보인다.
하지만 오로지 썸네일 텍스트 내용 하나만으로 예측한 결과라는 것과
데이터 개수가 4616개로 일반으로 모델 학습에 필요한 것보다 한참 부족했음을 감안하면
이 분석 방법의 가능성을 충분히 확인했다고 볼 수 있다.
따라서 추후엔 무료 프리티어 오퍼를 넘어서,
보다 많은 Text Detection을 위해 투자할 가치를 확인할 수 있다.
또한 위 내용에선 아직 모델에 적용하지 않은 area(텍스트 데이터가 자치하는 면적) 값을 모델에 적용해 정확도를 비교해 볼 수 있다.