UML
UML이란 Unified Modeling Language의 약자로 객체지향 프로그래밍에 흔히 사용되는 표준화된 모델링 표기 체계를 이야기한다.
객체에대한 설계도
객체모델링을 표현한 방법
UML 산출물(version up 된다) - 객체 모델링의 결과
- 클래스 다이어그램
- 시퀀스 다이어그램
- 유스케이스 다이어그램
다이어그램 만들어보기
tool
Eclipse - UML
스타 UML - https://staruml.io/
UML 특징
가시화
명세화
구축화
문서화
순공학
요구사항 정의 -> 분석 -> 설계 -> 구현
내부 클래스
내부 클래스
내부 클래스(inner class)는 다른 클래스 내부에 작성되는 클래스를 말한다.
내부 클래스 작성하면 외부 클래스의 멤버에 접근 제어자와 관계없이 접근 할 수 있고, 다른 곳에서는 사용되지 않는 클래스를 내부에 감춰서 프로그램의 복잡도를 감소시킬 수 있다.
중첩 클래스(nested class)라고도 한다.
인스턴스 내부클래스
외부 클래스의 멤버변수 선언 위치에 static 키워드 없이 선언된 클래스를 말한다.
내부클래스에서 외부 클래스의 멤버에 접근할 때 private를 포함한 모든 멤버에 대해 자유롭게 참조 가능
static 멤버를 가질 수 없다. 단 static final멤버는 상수로 취급돼서 예외로 사용할 수 있다.
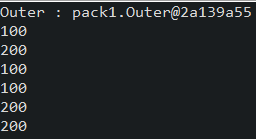
Outer 클래스 생성
package pack1;

public class Outer {
	private int x1 = 100;
	public int x2 = 100;

	class Inner {
		private int y1 = 200;
		public int y2 = 200;

		// 인스턴스 inner 클래스 선언
		public void viewInner() {
			System.out.println(x1);
			System.out.println(x2);
			System.out.println(y1);
			System.out.println(y2);
		}
	}

	public Outer() {
		System.out.println("Outer : " + this);
	}
}
OuterMain 클래스로 실행
package pack1;

public class OuterMain {

	public static void main(String[] args) {
		Outer outer = new Outer();

		// private이라 안됨
		// System.out.println(outer.x1);

		System.out.println(outer.x2);

		// inner는 outer 통해서 만듦
		Outer.Inner inner = outer.new Inner();

		// private이라 안됨
		// System.out.println(inner.y1);

		System.out.println(inner.y2);

		// 내부적인 접근이라서 x1, y1접근 가능하다
		inner.viewInner();

	}

}
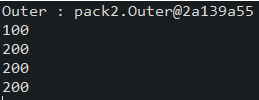
클래스 내부 클래스
Outer 클래스 생성
package pack2;

public class Outer {
	private int x1 = 100;
	public int x2 = 100;

	public Outer() {
		System.out.println("Outer : " + this);
	}

	// static 내부 클래스는 외부클래스의 static멤버처럼 다뤄진다.
    // static 메서드에서 사용될 목적으로 선언됨
	static class Inner {
		private int y1 = 200;
		public int y2 = 200;

		public void viewInner() {
			// System.out.println(x1);
			// System.out.println(x2);
			System.out.println(y1);
			System.out.println(y2);
		}
	}
}
MainOuter 실행 클래스 생성
package pack2;

public class OuterMain {

	public static void main(String[] args) {
		Outer outer = new Outer();
		System.out.println(outer.x2);

		// 내부클래스 접근 / 외부클래스 객체 생성 안해도 가능
		Outer.Inner inner = new Outer.Inner();
		System.out.println(inner.y2);

		inner.viewInner();

	}

}
책 예제
package pack2;

public class StaticInnerTest {
	static class StaticInner {
		private int iMember = 10;
		private static int sMember = 0;

		private void innerMethod() {
			StaticInnerTest sit = new StaticInnerTest();
			System.out.println("om: " + sit.oMember + " im: " + iMember);
		}
	}

	private int oMember = 1;

	private void outerMethod() {
		StaticInner inner = new StaticInner();
		inner.iMember = 100;
		inner.innerMethod();
	}

	public static void main(String[] args) {
		StaticInner inner = new StaticInner();
		inner.innerMethod();

	}

}

로컬 내부 클래스
메서드 내부에서 지역적으로 사용할 내용
Outer 클래스 생성
package pack3;

public class Outer {
	public void viewOuter() {
    	// 앞에 final이 있어서 값 변경이 안된다.
        // 1.7버전으로 바꾸면 직접 final 선언 해줘야함
		int x = 100;

		class Inner {
			private int y1 = 200;
			public int y2 = 200;

			public void viewInner() {
				System.out.println(x);
				System.out.println(y1);
				System.out.println(y2);
			}
		}

		Inner inner = new Inner();
		inner.viewInner();
	}
}
OuterMain 클래스로 실행
package pack3;

public class OuterMain {

	public static void main(String[] args) {
		Outer outer = new Outer();
		outer.viewOuter();

	}

}

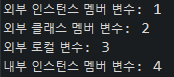
책 예제 372P
package pack3;

public class LocalInnerTest {
	int iMember = 1;
	static int cMember = 2;

	void method() {
		int localVar = 3;

		class LocalInner {
			int innerLocalVar = 4;
			void innerMethod() {
				System.out.println("외부 인스턴스 멤버 변수: " + iMember);
				System.out.println("외부 클래스 멤버 변수: " + cMember);
				System.out.println("외부 로컬 변수: " + localVar);
				System.out.println("내부 인스턴스 멤버 변수: " + innerLocalVar);
				iMember++;
				cMember++;
				// localVar++; - 편집은 여전히 불가능
				innerLocalVar++;
			}
		}
		// 내부에서만 객체 생성 가능
		LocalInner IIner = new LocalInner();
		IIner.innerMethod();
	}
	public static void main(String[] args) {
		LocalInnerTest lit = new LocalInnerTest();
		lit.method();

	}

}
익명의 내부 클래스 - 객체화가 이루어지지않음.
abstract클래스나 인터페이스의 구현에 많이 사용됨.
로컬 내부 클래스의 한 종류로 기본 특성은 동일하다.
가장 큰 차이점은 부를 수 있는 이름이 없다는 점.
InnerB 인터페이스 생성
package pack4;

public interface InnerB {
	int x= 100;
	void viewInner();
}
Outer 클래스에서 바로 실행
package pack4;

public class Outer {

	public static void main(String[] args) {
		int y = 200;
		new InnerB() {

			@Override
			public void viewInner() {
				System.out.println(x);
				System.out.println(y);

			}
		}.viewInner();

	}

}

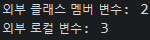
책 예제 376P
package pack4;

interface SomeInterface {
	void printlnfo();
}

public class AnonymousInnerTest {
	int iMember = 1;
	static int cMember = 2;

	void method(SomeInterface si) {
		si.printlnfo();
	}

	public static void main(String[] args) {
		AnonymousInnerTest lit = new AnonymousInnerTest();
		int localVar = 3;
		lit.method(new SomeInterface() {

			@Override
			public void printlnfo() {
				// System.out.println("외부 인스턴스 멤버 변수: " + iMember);
				System.out.println("외부 클래스 멤버 변수: " + cMember);
				System.out.println("외부 로컬 변수: " + localVar); // JDK 8 이후 가능

				cMember++;
				// localVar++ 여전히 편집 불가능
			}
		});
	}

}
람다식
함수형 인터페이스
MyfunctionalInter 인터페이스 선언
// 함수형 인터페이스
public interface MyfunctionalInter {
	 void method();
}
MyFunctionalInterMain 실행 클래스 생성 / 인터페이스 오버라이딩
public class MyFunctionalInterMain {
public static void main(String[] args) {
new MyfunctionalInter() {
@Override
public void method() {
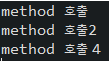
System.out.println("method 호출");
}
}.method();
// 인터페이스를 객체변수 선언
MyfunctionalInter f = new MyfunctionalInter() {
@Override
public void method() {
System.out.println("method 호출2");
}
};
f.method();
MyfunctionalInter f2 = () -> System.out.println("method 호출 4");
f2.method();
}
}
람다
MyFunctionalInter 인터페이스 생성
package pack1;

@FunctionalInterface // 애너테이션으로 사전에 발생하는 에러를 막아줄 수 있다.
public interface MyFunctionalInter {
	// 추상 메서드는 하나이여야 한다.
	void methodA();
//	void methodB();
}
MyFunctionalInterMain 실행 클래스 생성 / 람다식으로 호출
package pack1;

public class MyFunctionalInterMain {

	public static void main(String[] args) {
		MyFunctionalInter f;
		f = () -> {
			System.out.println("method 호출");
		};
	}

}
책 예제 385P
package pack1;
@FunctionalInterface
interface FunctionalInterface3 {
String methodB(String msg);
}
public class LambdaEx3 {
public static void useFIMethod(FunctionalInterface3 f1) {
System.out.println(f1.methodB("홍길동"));
}
public static void main(String[] args) {
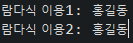
useFIMethod((String msg) -> {
return "람다식 이용1: " + msg;
} );
useFIMethod(msg -> "람다식 이용2: " + msg);
}
}
예외 처리와 디버깅
에러
컴파일 에러
- 문법에러
- javac 명령을 사용할 때 나타나는 에러
- eclipse에서는 빨간줄
런타임(실행) 에러
시스템에러
- 처리불가
예외( 보통 if문으로 처리하는데 발전적으로는 Exception(고급에러처리)) 사용
- java 명령을 사용할 때 나타나는 에러
- eclipse에서는 run as
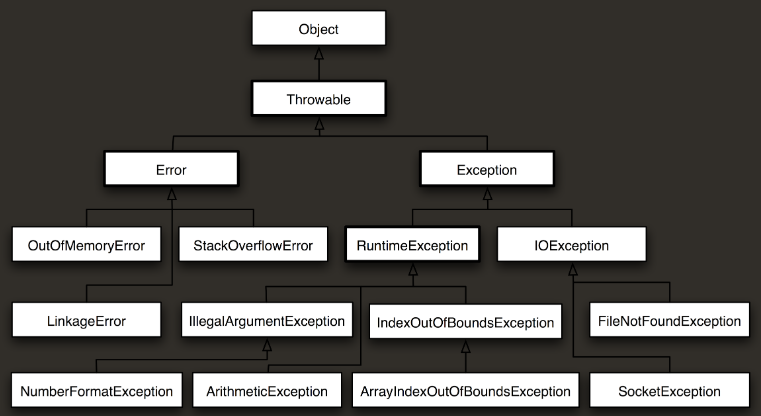
Error : 클래스, 모든 오류의 조상
Exception : 모든 예외의 최고조상 ( 모든 예외 처리 가능 )
런타임 에러
public class ExceptionEx01 {
	public static void main(String[] args) {
		System.out.println("시작");

		int num1 = 0;
		int num2 = 20;

		int result = num2 / num1;
		System.out.println(result);

		System.out.println("끝");
	}
}

if 문으로 처리해보기
public class ExceptionEx01 {
	public static void main(String[] args) {
		System.out.println("시작");

		int num1 = 0;
		int num2 = 20;

		if(num1 !=0) {
			int result = num2 / num1;
			System.out.println(result);
		} else {
			System.out.println("0으로 나눌 수 없습니다.");
		}

		int result = num2 / num1;
		System.out.println(result);

		System.out.println("끝");
	}
}

예외처리 try ~ catch
중간에 끊기지 않고 쭉 실행하게 해주는것이 예외처리이다.
예외처리는 try ~ catch블록을 이용
try 블록에는 예외가 발생할 수 있는 코드를 작성
catch의 파라미터에는 try 블록에서 발생할 수 있는 예외를 설정
catch 블록에서는 해당 예외가 처리할 코드를 작성
예외처리 실행
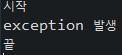
excetption이 발생하지 않으면 건너뛰고 실행이 된다.
public class ExceptionEx03 {
	public static void main(String[] args) {
		System.out.println("시작");

		int num1 = 0;
		int num2 = 20;

		try {
		int result = num2 / num1;
		System.out.println(result);
		} catch(ArithmeticException e) {
			System.out.println("exception 발생");
		}
		System.out.println("끝");
	}
}
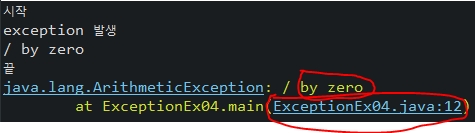
Exception 정보 얻는 메서드
getMessage()
발생한 예외 클래스의 인스턴스에 저장된 메세지를 얻을 수 있다.
public classExceptionEx04 {

	public static void main(String[] args) {
		// TODO Auto-generated method stub
		System.out.println("시작");

		int num1 = 0;
		int num2 = 20;

		try {
		int result = num2 / num1;
		System.out.println(result);
		}
		catch (ArithmeticException e) {
			System.out.println("exception 발생");
			System.out.println(e.getMessage());
			e.printStackTrace();

		}

		System.out.println("끝");
	}
}
다중 예외 처리
public class ExceptionEx04 {

	public static void main(String[] args) {
		System.out.println("시작");

		String name = null;
		int num1 = 0;
		int num2 = 10;

		System.out.println(name.length());
		System.out.println(num2/num1);

		System.out.println("끝");
	}
}
String name = null; 일때의 예외

String name = "";(정상)일때 발생하는 예외

위의 예외를 처리하기 위해 try ~ catch 사용
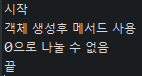
public class ExceptionEx04 {

	public static void main(String[] args) {
		System.out.println("시작");

		String name = null;
		int num1 = 0;
		int num2 = 10;

		try {
		System.out.println(name.length());
		}
		catch(NullPointerException e) {
			System.out.println("객체 생성후 메서드 사용");
		}
		try {
			System.out.println(num2/num1);
		}
		catch(ArithmeticException e) {
			System.out.println("0으로 나눌 수 없음");
		}
		System.out.println("끝");
	}
}
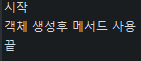
불필요한 코드를 줄이기 위해서 다중 예외 처리 - if else와 유사하게 실행
첫번째 catch 실행되면 빠져나감
public class ExceptionEx04 {

	public static void main(String[] args) {
		System.out.println("시작");

		String name = null;
		int num1 = 0;
		int num2 = 10;

		//다중 예외 처리, if ~ else if ~ else 와 유사
		try {
		System.out.println(name.length());
		System.out.println(num2/num1);
		}
		catch(NullPointerException e) {
			System.out.println("객체 생성후 메서드 사용");
		}
		catch(ArithmeticException e) {
			System.out.println("0으로 나눌 수 없음");
		}
		System.out.println("끝");
	}
}
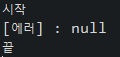
통합적으로 처리하기
public class ExceptionEx04 {

	public static void main(String[] args) {
		System.out.println("시작");

		String name = null;
		int num1 = 0;
		int num2 = 10;

		//다중 예외 처리, if ~ else if ~ else 와 유사
		try {
		System.out.println(name.length());
		System.out.println(num2/num1);
		}
		catch(Exception e) {   //에러를 통합적으로 처리
			System.out.println("[에러] : " + e.getMessage());
		}
		System.out.println("끝");
	}
}
특정한 것을 처리하고 나머지를 전부 처리할 때 / catch(exception e)
catch(exception e)에서 위에서 처리하지못한 것들을 다 처리해준다.
public class ExceptionEx04 {

	public static void main(String[] args) {
		System.out.println("시작");

		String name = null;
		int num1 = 0;
		int num2 = 10;

		//다중 예외 처리, if ~ else if ~ else 와 유사
		try {
		System.out.println(name.length());
		System.out.println(num2/num1);
		}
		catch(NullPointerException e) {
			System.out.println("객체 생성후 메서드 사용");
		}
		catch(Exception e) {   //--> 나머지는 여기서 처리, 순서 바꿔쓰면 안됨
			System.out.println("예외 처리!!");
		}
		System.out.println("끝");
	}
}
try ~ catch ~ finally 구문
try ~ catch 블록은 추가로 finally 블록을 가질 수 있다.
finally 블록은 예외 발생 여부와 상관없이 반두시 실행되어야 하는 내용을 작성한다.
중간에 return문을 만날때에도 먼저 finally블록을 싱행 후 메서드가 리턴.
try - catch - finally 순서로 구성
예외가 발생하지않으면 try -> finally순서로 실행
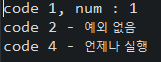
import java.util.Random;

public class FinallyEx01 {

	public static void main(String[] args) {
		int num = new Random().nextInt(2);

		try {
			System.out.println("code 1, num : " + num);
			int i = 1 / num;
			System.out.println("code 2 - 예외 없음");
			return;
		}
		catch(ArithmeticException e) {
			System.out.println("code 3 - 예외 처리 완료");
		}
		finally {   // --> 항상 실행되는 구문
			System.out.println("code 4 - 언제나 실행");
		}
		System.out.println("code 5");
	}

}
num = 0 일때 Exeption 발생시
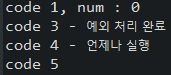
정상처리
throw
예외를 고의로 발생시키는 것
1. 연산자 new를 이용해서 발생시키려는 예외 클래스의 객체를 만든 후
Exception e = new Exception("고의로 발생시켰음");2. 키워도 throw를 이용해서 예외를 발생시킴
throw ethrow 해보기
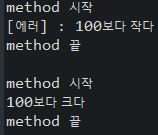
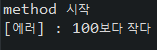
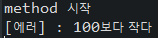
public class ExceptionEx04 {

	public void method1(int num) {
		System.out.println("method 시작");

		//입력값 검사
		if(num >= 100) {
			System.out.println("100보다 크다");
		}
		else {
			//강제 예외 발생시키기(만들기)
			try {
				// 강제로 예외 발생
				throw new Exception("100보다 작다");
			}
			catch(Exception e) {
				System.out.println("[에러] : " + e.getMessage());
			}
		}

		System.out.println("method 끝");
	}

	public static void main(String[] args) {
		ExceptionEx04 e = new ExceptionEx04();

		e.method1(10);
		System.out.println();
		e.method1(200);

	}
}
throws - 위임
예외를 메서드에 선언한다.
메서드에서 처리해야 할 하나 이상의 예외를 메서드를 호출한 곳으로 던진다.
위임은 예외를 없애지 못하고 단지 호출한 곳으로 예외를 전달한 뿐.
예외를 전달받은 메서드는 다시 예외 처리의 책임이 발생.
예외를 발생시키는 throw와 메서드에 선언할 때 쓰이는 throws 구별 잘 해야함.
public class ExceptionEx04 {

	public void method2(int num) throws Exception { //호출하는 쪽으로 던짐
		System.out.println("method 시작");

		//입력값 검사
		if(num >= 100) {
			System.out.println("100보다 크다");
		}
		else {
			//강제 예외 발생시키기(만들기)
			throw new Exception("100보다 작다"); // 던져짐
		}

		System.out.println("method 끝");
	}

	public static void main(String[] args) {
		ExceptionEx04 ee = new ExceptionEx04();

		try {
		ee.method2(10);  // 던진 예외를 받음, 대리로 예외 처리해줌
		}
		catch (Exception e) {
			System.out.println("[에러] : " + e.getMessage());
		}
	}
}
Unhandled exception
Unhandled exception 에러가 뜨면 try ~ catch를 해줘야한다.
try ~ catch 해주는 방법
try ~ catch 할 라인 블럭 잡고 오른쪽마우스 클릭 -> Surround With -> Try/catch Block 클릭
import java.io.IOException;

public class ExceptionEx08 {

	public static void main(String[] args) {
		ProcessBuilder processBuilder
		= new ProcessBuilder("C:\\Program Files (x86)\\Microsoft\\Edge\\Application\\msedge.exe");

		try {
		processBuilder.start();
		} catch(IOException e) {
			System.out.println("[에러] : " + e.getMessage());
		}

	}

}
예외처리 안하면 이렇게 예외가 발생한다. / try catch 하면 정상작동 됨.

사용자 Exception
Exception을 상속받은 CustomExeption 클래스 생성
// 사용자 Exception
public class CustomExeption extends Exception {
	public CustomExeption() {
		super();
	}

	public CustomExeption(String message) {
		super(message);
	}
}
예외를 발생시키고 throws로 위임하는 메서드를 만든다.
public class ExceptionEx05 {
	public void method2(int num) throws CustomException {
		System.out.println("method 시작");

		// 입력값 검사
		if(num >= 100) {
			System.out.println("100보다 크다");
		} else {
			throw new CustomException("100보다 작다");
		}
		System.out.println("method 끝");
	}
}
MainExceptionEx01 실행 클래스 만들어서 실행시켜보기
public class MainExceptionEx01 {

	public static void main(String[] args) {
		ExceptionEx05 ee = new ExceptionEx05();

		try {
			ee.method2(10);
		} catch (CustomException e) {
			System.out.println("[에러] : " + e.getMessage());
		}
	}
}
응용 - 아이디와 비밀번호 처리 책 352P 예제
사용자 정의 예외 클래스 만들기
public class LoginFailException extends RuntimeException {
	enum ErrorCode  {
		INVALID_ID, INVALID_PASS
	}

	private ErrorCode errorCode;

	public LoginFailException(ErrorCode errorCode, String data) {
		super(data);
		this.errorCode = errorCode;
	}

	@Override
	public String getLocalizedMessage() {
		String msg = this.getMessage();
		switch(errorCode) {
		case INVALID_ID:
			msg += ", 아이디를 확인하세요";
			break;
		case INVALID_PASS:
			msg += ", 비밀번호를 확인하세요";
			break;
		}
		return msg;
	}
}
사용자 정의 예외 활용
public class MainLoginFailExceptionEx01 {

	public boolean login(String id, String pass) {
		// id가 hong이 아니면 예외 던지기
		if(!id.equals("hong")) {
			throw new LoginFailException(LoginFailException.ErrorCode.INVALID_ID, id);
		}
		//pass가 1234가 아니면 예외 던지기
		else if(!pass.equals("1234")) {
			throw new LoginFailException(LoginFailException.ErrorCode.INVALID_PASS, pass);
		}
		return true;
	}

	public static void main(String[] args) {
		MainLoginFailExceptionEx01 uManager = new MainLoginFailExceptionEx01();
		try {
			//boolean result = uManager.login("hong", "1234");
			//boolean result = uManager.login("hong2", "1234");
			boolean result = uManager.login("hong", "5678");
			System.out.printf("로그인 성공 여부 : %b %n",result);
		}
		catch (LoginFailException e) {
			System.out.printf("예외 처리 : %s %n",e.getLocalizedMessage());
		}
	}
}

Arrays
Arrays클래스에는 배열을 다루는데 유용한 메서드가 정의되어 있다.
Arrays에 정의된 메서드는 모두 static 메서드이다.
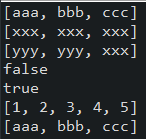
import java.util.Arrays;
import java.util.List;

public class ArraysEx01 {

	public static void main(String[] args) {
		String[] arrs = {"aaa", "bbb", "ccc"};

		System.out.println(Arrays.deepToString(arrs));

		// Arrays의 값 채우기 fill()
		Arrays.fill(arrs,"xxx");
		System.out.println(Arrays.deepToString(arrs));

		// 일부만 채우기
		Arrays.fill(arrs,0,2,"yyy");
		System.out.println(Arrays.toString(arrs));

		String[] arrs1 = {"aaa", "bbb", "ccc"};
		String[] arrs2 = {"aaa", "bbb", "ccc"};

		// 참조변수 값 비교이기때문에 false
		System.out.println(arrs1 == arrs2);

		// 내용비교하기 / 일차원 배열에서는 equals()쓰지만 다차원배열에서는 deepEquals() 써야한다.
		System.out.println(Arrays.equals(arrs1, arrs2));

		Integer[] arrNums = {5, 2, 3, 1, 4};

		// sort() : 내부 데이터가 오름차순으로 출력
		Arrays.sort(arrNums);
		// toString()은 일차원배열에만, 다차원배열은 deepToString() 사용
		System.out.println(Arrays.toString(arrNums));

		// 배열을 List로 다루기
		List<String> lists = Arrays.asList(arrs1);
		System.out.println(lists);
	}

}
배열의 크기 변경 - 책 163p 예제
import java.util.Arrays;

public class ArrayCopy {
	public static void main(String[] args) {

		int[] source = { 1, 2, 3, 4, 5 };
		int[] target = new int[10];
		for (int i = 0; i < source.length; i++) {
			target[i] = source[i];
		}

		System.out.println(Arrays.toString(target));

		int[] target2 = new int[10];
		System.arraycopy(source,  0,  target2,  0,  source.length);

		System.out.println(Arrays.toString(target2));
	}
}
2차배열
배열(컬렉션) + 클래스 (많이사용)
컬렉션(ArrayList) + 컬렉션(HashMap)
데이터 넣고 확인하기
import java.util.ArrayList;
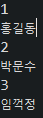
public class DataEx01 {
public static void main(String[] args) {
Student s1 = new Student("1", "홍길동", "010-111-1111", "20", "서울시");
Student s2 = new Student("2", "박문수", "010-222-2222", "22", "경기도");
Student s3 = new Student("3", "임꺽정", "010-333-3333", "25", "강원도");
ArrayList<Student> datas = new ArrayList<>();
datas.add(s1);
datas.add(s2);
datas.add(s3);
for(Student s : datas) {
System.out.println(s.getSeq());
System.out.println(s.getName());
}
}
}
형식화 / DecimalFormat 클래스
import java.text.DecimalFormat;
import java.text.ParseException;

public class DecimalFormatEx01 {

	public static void main(String[] args) {
		// $#, ###.# 형식으로 만듦
		DecimalFormat format1 = new DecimalFormat("$#, ###.#");

		double dblNum1 = 1234.5;
		double dblNum2 = 1234.56;
		double dblNum3 = 234.5;

		// format() : 읽어서 문자열화 시킴
		String strNum1 = format1.format(dblNum1);
		String strNum2 = format1.format(dblNum2);
		String strNum3 = format1.format(dblNum3);

		System.out.println(strNum1);
		System.out.println(strNum2);
		System.out.println(strNum3);

		try {
			String strNum4 = "$1,234.5";
			double parseNum = (double)format1.parse(strNum4);
			System.out.println(parseNum);
		} catch (ParseException e) {
			// TODO Auto-generated catch block
			e.printStackTrace();
		}
	}

}

SimpleDateFormat 클래스 479P 예제
throws로 처리
import java.text.ParseException;
import java.text.SimpleDateFormat;
import java.util.Date;

public class SimpleDataFormatTest {

	public static void main(String[] args) throws ParseException{
		String source = "2020년 12월 25일";
		System.out.println(source + "를 요일 정보까지 출력하려면?");

		SimpleDateFormat format = new SimpleDateFormat("yyy년 MM월 dd일");
		Date parsed = format.parse(source);
		format.applyPattern("yyy년 MM월 dd일(E)");
		System.out.println(format.format(parsed));
	}

}
try ~ catch 로 처리
import java.text.ParseException;
import java.text.SimpleDateFormat;
import java.util.Date;

public class SimpleDataFormatTest {

	public static void main(String[] args) {
		String source = "2020년 12월 25일";
		System.out.println(source + "를 요일 정보까지 출력하려면?");

		SimpleDateFormat format = new SimpleDateFormat("yyy년 MM월 dd일");
		try {
			Date parsed = format.parse(source);
			format.applyPattern("yyy년 MM월 dd(E)일");
			System.out.println(format.format(parsed));
		} catch (ParseException e) {
			// TODO Auto-generated catch block
			e.printStackTrace();
		}
	}

}
데이터베이스
www.mariadb.org
