AWS 3tier 테라폼 구현(ELB-ASG-WAS-DB)프로젝트
🚩 프로젝트
테라폼을 활용하여 AWS 3tier 구조를 구현하고 테스트해보자
📁 깃허브 주소
💆 프로젝트 다음 목표, 아쉬웠던 점
- 모듈화를 안하니 코드를 구현하는데 정리가 안되어 다음에는 모듈화를 실시할 예정
- ECS,EKS를 사용해 CI/CD 테스트를 진행
📌 3Tier 체계 구성도
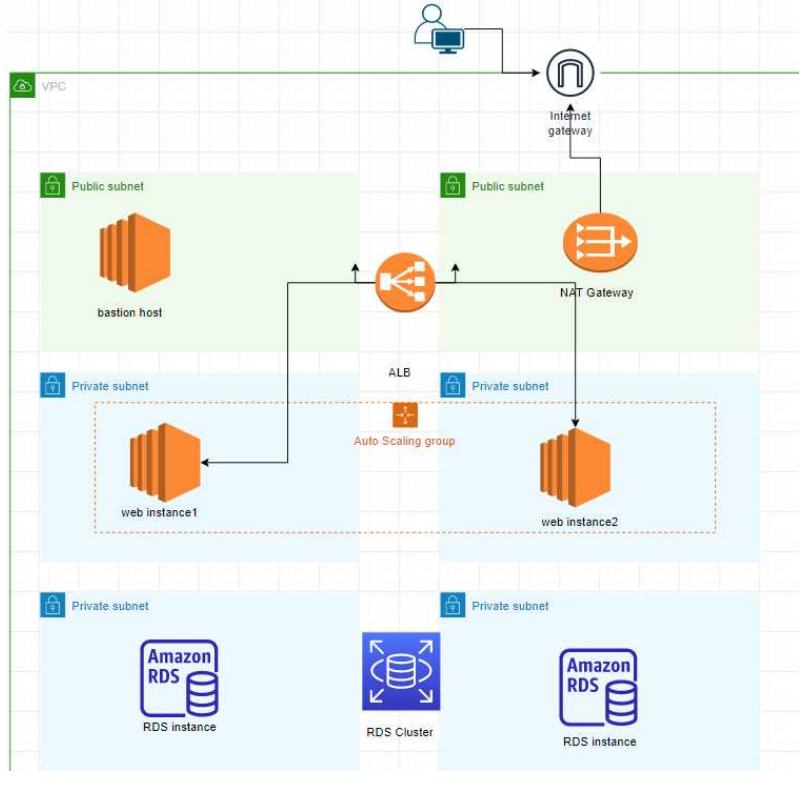
🤼프로젝트 환경 구성
> Network
Region : ap-northeast2
VPC :10.0.0.0/16
Subnet
 Public_Subnet : 10.0.1.0/24, 10.0.2.0/24
 Private_Subnet : 10.0.3.0/24, 10.0.4.0/24, 10.0.5.0/24, 10.0.6.0/24
 Internet Gateway
NAT Gateway

> Web
EC2 - Instance
 Public_Subnet - Instance : 1개 (BationHost)
 Private_Subnet - Instance : 2개 (Auto Scaling Group)
LB(ELB/ALB)
Security Group

> DB
RDS Cluster
 RDS Instance 1
 RDS instance 2
💆 Terraform 폴더 구조
network
|__main.tf
|__output.tf
|__terraform.tf
|__provider.tf
web
|__main.tf
|__output.tf
|__variables.tf
|__provider.tf
db
|__main.tf
|__output.tf
|__userdata.sh
|__provider.tf
🌐 3Tier Structure란?
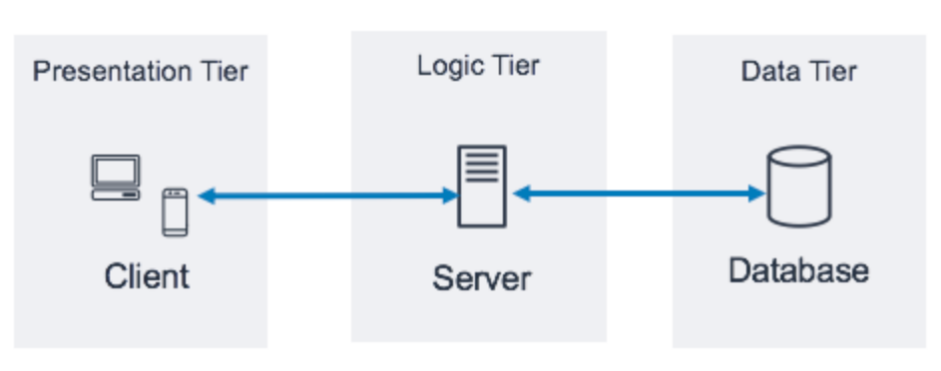
(출처 : Three-tier architecture overview - AWS Documentation)
3-Tier Structure (3계층 구조)는 소프트웨어 아키텍처에서 사용되는 구성 방식으로 이 구조는
애플리케이션의 기능과 역할을 세 가지 계층으로 나누어 구성한다. 각 계층은 고유한 역할과 책임을
가지며 서로 독립적으로 작동할 수 있다.
1. Presentation Tier (프레젠테이션 계층 또는 사용자 인터페이스 계층):
∎ 사용자와 상호작용하고 결과를 표시하는 역할을 담당
∎ 웹 브라우저, 모바일 앱 등의 클라이언트와 직접 연결되며 사용자의 요청을 처리
∎ 주로 사용자 인터페이스 로직, UI 디자인, 유효성 검사 등을 처리
2. Application Tier (응용 프로그램 계층 또는 비즈니스 로직 계층):
∎ 비즈니스 로직을 구현하고 처리하는 역할을 담당
∎ Presentation Tier로부터 받은 요청을 처리하고 필요한 데이터를 검색하거나 업데이트
∎ 비즈니스 규칙, 데이터 처리, 알고리즘 등을 포함
3. Data Tier (데이터 계층 또는 데이터 저장소 계층):
∎ 데이터를 저장, 검색 및 관리하는 역할을 담당
∎ 데이터베이스, 파일 시스템 등의 저장소와 상호작용
∎ 데이터의 영구 보관, 효율적인 데이터 액세스 및 데이터 무결성을 관리
3-Tier Structure는 각 계층이 독립적으로 개발, 유지보수, 확장할 수 있으므로 시스템의 유연성과
확장성을 높여주며, 또한 계층 간의 인터페이스를 통해 다른 계층에 영향을 주지 않고 변경이 가능하고
재사용성과 관리 용이성도 향상된다. 이러한 이점으로 인해 3-Tier Structure는 많은 소프트웨어
시스템에서 널리 사용되고 있다. 🏄Terraform Code
1. Network 구성
- main.tf
#############################
# 1. vpc 생성
#############################
resource "aws_vpc" "dj-vpc" {
  cidr_block = "10.0.0.0/16"
  instance_tenancy = "default"

  enable_dns_support = true
  enable_dns_hostnames = true

  tags = {
    Name = "dj-vpc"
  }
}
##############################
# 2. IGW(인터넷 게이트웨이) 생성
##############################
resource "aws_internet_gateway" "dj-internetgw" {
  vpc_id = aws_vpc.dj-vpc.id

  tags = {
    Name = "dj-internetgw"
  }
}
##################################
# 3. 탄력적 IP & NAT 게이트 웨이 생성
##################################
resource "aws_eip" "dj-eip" {
  vpc = true

  lifecycle {
  create_before_destroy = true
  }
  tags = {
  Name = "dj-eip"
  }
}
resource "aws_nat_gateway" "dj-natgw" {
  allocation_id = aws_eip.dj-eip.id
  subnet_id = aws_subnet.dj-pub1.id
  tags = {
  Name = "dj-natgw"
  }
  depends_on = [aws_internet_gateway.dj-internetgw]
}
#################################################
# 1. public-subnet x 2 / routing table 생성 & 연결
# 2. private-subnet x 4 / routing table 생성 & 연결
#################################################
### Subnet(public) x2 ###
resource "aws_subnet" "dj-pub1" {
  vpc_id     = aws_vpc.dj-vpc.id
  cidr_block = "10.0.1.0/24"
  availability_zone = "ap-northeast-2a"
  map_public_ip_on_launch = true

  tags = {
    Name = "dj-pub1"
  }
}
resource "aws_subnet" "dj-pub2" {
  vpc_id     = aws_vpc.dj-vpc.id
  cidr_block = "10.0.2.0/24"
  availability_zone = "ap-northeast-2c"
  map_public_ip_on_launch = true

  tags = {
    Name = "dj-pub2"
  }
}
### Public-Route 생성-연결 ###
resource "aws_route_table" "dj-pub-rt" {
  vpc_id = aws_vpc.dj-vpc.id

  tags = {
    Name = "dj-pub-rt"
  }
}
resource "aws_route" "public_route" {
  route_table_id = aws_route_table.dj-pub-rt.id
  destination_cidr_block = "0.0.0.0/0"
  gateway_id = aws_internet_gateway.dj-internetgw.id
}
resource "aws_route_table_association" "dj-pub-rt-ass1" {
  subnet_id      = aws_subnet.dj-pub1.id
  route_table_id = aws_route_table.dj-pub-rt.id
}
resource "aws_route_table_association" "dj-pub-rt-ass2" {
  subnet_id      = aws_subnet.dj-pub2.id
  route_table_id = aws_route_table.dj-pub-rt.id
}
### Subnet(private) x4 ###
resource "aws_subnet" "dj-pri1" {
  vpc_id     = aws_vpc.dj-vpc.id
  cidr_block = "10.0.3.0/24"
  availability_zone = "ap-northeast-2a"


  tags = {
    Name = "dj-pri1"
  }
}
resource "aws_subnet" "dj-pri2" {
  vpc_id     = aws_vpc.dj-vpc.id
  cidr_block = "10.0.4.0/24"
  availability_zone = "ap-northeast-2c"


  tags = {
    Name = "dj-pri2"
  }
}
resource "aws_subnet" "dj-pri3" {
  vpc_id     = aws_vpc.dj-vpc.id
  cidr_block = "10.0.5.0/24"
  availability_zone = "ap-northeast-2a"


  tags = {
    Name = "dj-pri3"
  }
}
resource "aws_subnet" "dj-pri4" {
  vpc_id     = aws_vpc.dj-vpc.id
  cidr_block = "10.0.6.0/24"
  availability_zone = "ap-northeast-2c"


  tags = {
    Name = "dj-pri4"
  }
}
### Private-Route 생성-연결 ###
resource "aws_route_table" "dj-pri-rt" {
  vpc_id = aws_vpc.dj-vpc.id

  tags = {
    Name = "dj-pri-rt"
  }
}
resource "aws_route" "private_route" {
  route_table_id = aws_route_table.dj-pri-rt.id
  destination_cidr_block = "0.0.0.0/0"
  nat_gateway_id = aws_nat_gateway.dj-natgw.id
}
resource "aws_route_table_association" "dj-pri-rt-ass1" {
  subnet_id      = aws_subnet.dj-pri1.id
  route_table_id = aws_route_table.dj-pri-rt.id
}
resource "aws_route_table_association" "dj-pri-rt-ass2" {
  subnet_id      = aws_subnet.dj-pri2.id
  route_table_id = aws_route_table.dj-pri-rt.id
}
코드 설명
1. VPC 생성
- 외부로 나가기위한 internetgateway 생성
- NAT게이트웨이 생성
- NAT게이트웨이에 탄력적 IP 설정
- Public subnet 생성
- routetable 생성
- 라우팅 테이블을 internetgateway와 연결 설정
- Private subnet 생성
- routetable 생성
- 라우팅 테이블을 NATgateway와 연결 설정
- output.tf
output "dj_vpc_id" {
description = "value"
value = aws_vpc.dj-vpc.id
}
output "dj_pub_1" {
value = aws_subnet.dj-pub1.id
}
output "dj_pub_2" {
value = aws_subnet.dj-pub2.id
}
output "dj_pri_1" {
value = aws_subnet.dj-pri1.id
}
output "dj_pri_2" {
value = aws_subnet.dj-pri2.id
}
output "dj_pri_3" {
value = aws_subnet.dj-pri3.id
}
output "dj_pri_4" {
value = aws_subnet.dj-pri4.id
}
terrafrom 자원을 사용하기 위한 output 설정
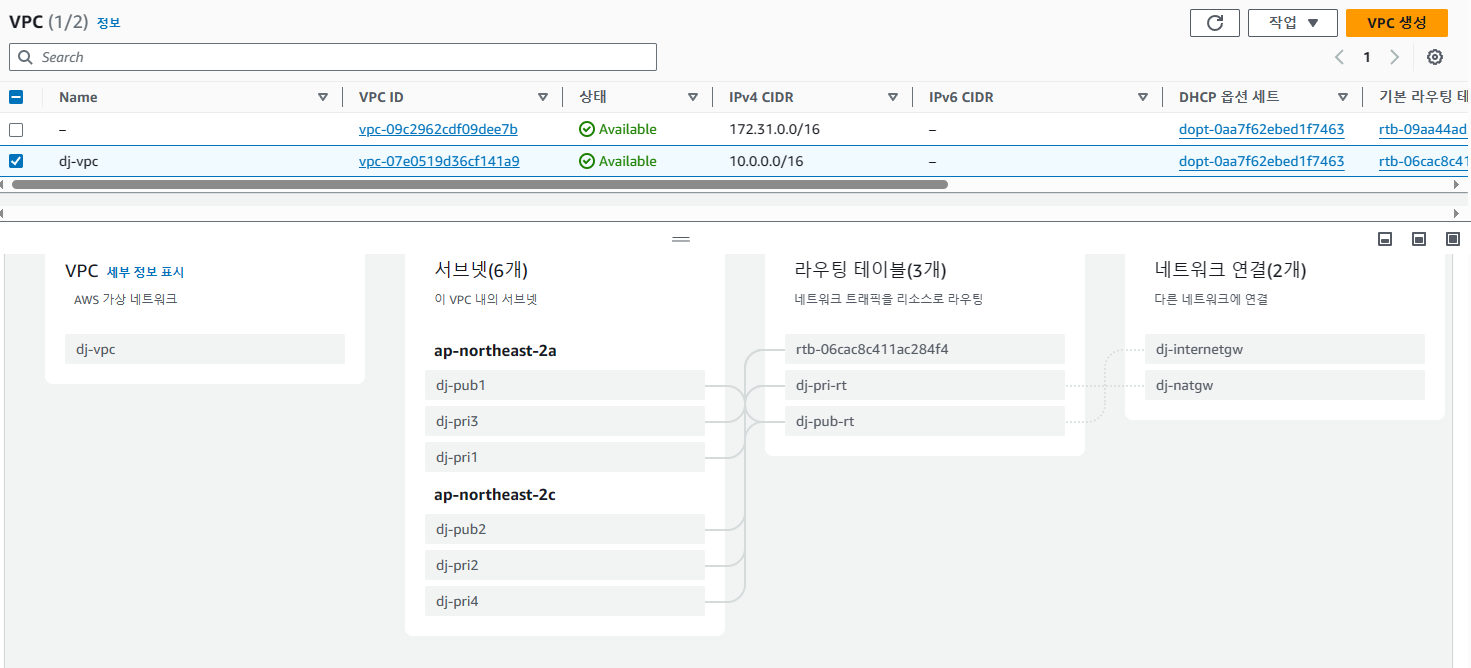
만들어진 AWS 자원 확인
2. DB 구성
data "terraform_remote_state" "network" {
  backend = "local"

  config = {
    path = "../network/terraform.tfstate"
  }
}

### RDS Security Group 생성 ###
resource "aws_security_group" "dj-dbsg" {
  name = "dj-dbsg"
  vpc_id = data.terraform_remote_state.network.outputs.dj_vpc_id

  ingress {
  description = "Allow DB(3306)"
  from_port = 3306
  to_port = 3306
  protocol = "tcp"
  cidr_blocks = ["0.0.0.0/0"]
  }

  egress {
  from_port = 0
  to_port = 0
  protocol = "-1"
  cidr_blocks = ["0.0.0.0/0"]
  }

  tags = {
    Name = "dj-dbsg"
  }
}
### DB Subnet Group 생성 ###
resource "aws_db_subnet_group" "dj-subnetgr" {
  name = "dj-subnetgr"

  subnet_ids = [
    data.terraform_remote_state.network.outputs.dj_pri_3,
    data.terraform_remote_state.network.outputs.dj_pri_4
    ]

  tags = {
    Name = "dj-subnetgr"
  }
}
### RDS Instance 생성 ###
resource "aws_rds_cluster_instance" "dj-rds-cluster_instance" {
  count = 2
  identifier = "aurora-cluster-demo-${count.index}"
  cluster_identifier = aws_rds_cluster.dj-rds-cluster.id
  instance_class = "db.t3.small"
  engine = aws_rds_cluster.dj-rds-cluster.engine
  engine_version = aws_rds_cluster.dj-rds-cluster.engine_version
}
### RDS Cluster 구성 ###
resource "aws_rds_cluster" "dj-rds-cluster" {
  db_subnet_group_name = aws_db_subnet_group.dj-subnetgr.name
  cluster_identifier = "aurora-cluster-dj"
  engine = "aurora-mysql"
  engine_mode = "provisioned"
  engine_version = "5.7.mysql_aurora.2.07.9"
  availability_zones = ["ap-northeast-2a", "ap-northeast-2c"]
  database_name = "djdb"
  master_username = var.database_user
  master_password = var.database_password
  skip_final_snapshot = true
  vpc_security_group_ids = [aws_security_group.dj-dbsg.id]
  port = 3306
}
코드 설명
- remote_state로 network 자원 끌어오기
- DB의 위치를 지정하기 위한 DB Subnet Group 생성
- RDS 클러스터 & Instance X 2 생성
- output.tf
# db에 대한 output_servername
output "DB_dns" {
  description = "DB Config dnsname"
  value = aws_rds_cluster.dj-rds-cluster.endpoint
}
# db에 대한 user_name
output "DB_user" {
  description = "DB Config DB_user"
  value = var.database_user
}
# db에 대한 password
output "DB_password" {
  description = "DB Config password"
  value = var.database_password
  sensitive = true
}
뒤에 RDS연동 테스트해서 사용할 DB 정보
- variable.tf
variable "database_user" {
  description = "DB-user-name "
  type = string
  default = "admin"
}
variable "database_password" {
  description = "DB-user-password"
  type = string
  default = "testtest"
}
편하게 정보를 바꿀 수 있도록 변수 지정
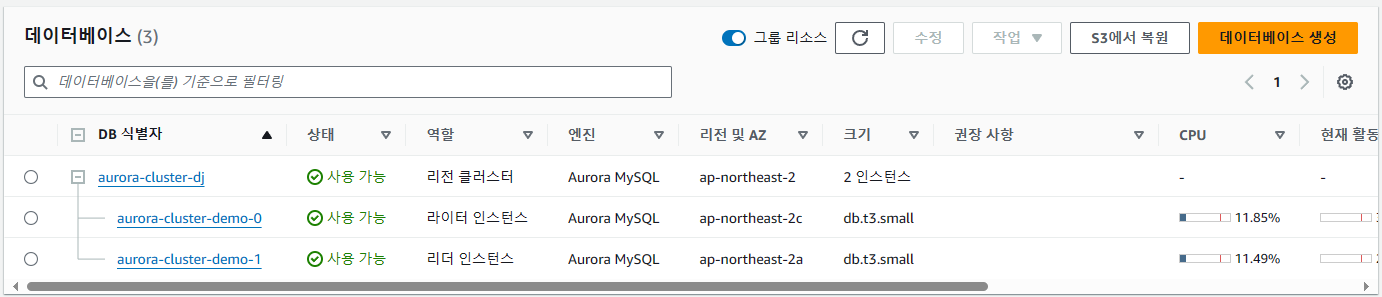
만들어진 aws 자원 확인
3. WEB 구성
- main.tf
### network 에서 데이터 끌어오기 ###
data "terraform_remote_state" "network" {
  backend = "local"
  config = {
  path = "../network/terraform.tfstate"
 }
}
### db에서 데이터 끌어오기 ###
data "terraform_remote_state" "db" {
  backend = "local"
  config = {
  path = "../db/terraform.tfstate"
  }
}
### Bation instance ###
resource "aws_instance" "bation" {
  ami = "ami-035da6a0773842f64"
  instance_type = "t2.micro"
  subnet_id = data.terraform_remote_state.network.outputs.dj_pub_1
  security_groups = [aws_security_group.dj-sg.id]
  associate_public_ip_address = "true"
  tags = var.my-tags
  key_name = aws_key_pair.deployer.key_name
}
### key pair 생성 ###
resource "aws_key_pair" "deployer" {
  key_name = "deployer-key"
  public_key = file("~/.ssh/testkey.pub")
}
resource "aws_key_pair" "prikey" {
  key_name = "prikey-key"
  public_key = file("~/.ssh/id_rsa.pub")
}
### EIP 생성 ###
resource "aws_eip" "lb" {
  domain = "vpc"
}
### 보안 그룹 생성 ###
resource "aws_security_group" "dj-sg" {
  name        = "dj-sg"
  description = "Allow 80/8080/22/tcp inbound traffic"
  vpc_id      = data.terraform_remote_state.network.outputs.dj_vpc_id

  ingress {
    description      = "80/tcp from VPC"
    from_port        = 80
    to_port          = 80
    protocol         = "tcp"
    cidr_blocks      = ["0.0.0.0/0"]
  }

  ingress {
    description      = "8080/tcp from VPC"
    from_port        = 8080
    to_port          = 8080
    protocol         = "tcp"
    cidr_blocks      = ["0.0.0.0/0"]
  }

  ingress {
    description      = "22/tcp from VPC"
    from_port        = 22
    to_port          = 22
    protocol         = "tcp"
    cidr_blocks      = ["0.0.0.0/0"]
  }

  ingress {
  from_port = -1
  to_port = -1
  protocol = "icmp"
  cidr_blocks = ["0.0.0.0/0"]
  }

  ingress {
    description = "Allow DB(3306)"
    from_port = 3306
    to_port = 3306
    protocol = "tcp"
    cidr_blocks = ["0.0.0.0/0"]
  }

  egress {
    from_port        = 0
    to_port          = 0
    protocol         = "-1"
    cidr_blocks      = ["0.0.0.0/0"]
  }

  tags = {
    Name = "dj-sg"
  }
}
### Launch Configuration ###
resource "aws_launch_configuration" "dj-conf" {
  name          = "dj-conf"
  image_id      = "ami-035da6a0773842f64"
  instance_type = "t2.micro"
  security_groups = [aws_security_group.dj-sg.id]
  key_name = aws_key_pair.prikey.key_name

  user_data = templatefile("userdata.sh", {
  db_address = data.terraform_remote_state.db.outputs.DB_dns
  })
}

### Target Group 생성 ###
resource "aws_lb_target_group" "dj-tg-gr" {
  name     = "dj-tg-gr"
  port     = 80
  protocol = "HTTP"
  vpc_id   = data.terraform_remote_state.network.outputs.dj_vpc_id
}
### Auto Scaling Group 생성 ###
resource "aws_autoscaling_group" "dj-asg" {
  name = "dj-asg"
  max_size           = 5
  min_size           = 2
  launch_configuration = aws_launch_configuration.dj-conf.name
  vpc_zone_identifier = [
  data.terraform_remote_state.network.outputs.dj_pri_1,
  data.terraform_remote_state.network.outputs.dj_pri_2
  ]

  target_group_arns = [aws_lb_target_group.dj-tg-gr.arn]
  health_check_type = "ELB"

  tag {
    key = "Name"
    value = "dj-asg"
    propagate_at_launch = true
  }
  lifecycle {
    create_before_destroy = true
  }
}
### ALB Security Group 생성 ###
resource "aws_security_group" "djalb-sg" {
  name        = "djalb-sg"
  description = "Allow 80/8080/22/tcp inbound traffic"
  vpc_id      = data.terraform_remote_state.network.outputs.dj_vpc_id

  ingress {
    description      = "80/tcp from VPC"
    from_port        = 80
    to_port          = 80
    protocol         = "tcp"
    cidr_blocks      = ["0.0.0.0/0"]
  }

  ingress {
    description      = "8080/tcp from VPC"
    from_port        = 8080
    to_port          = 8080
    protocol         = "tcp"
    cidr_blocks      = ["0.0.0.0/0"]
  }

  egress {
    from_port        = 0
    to_port          = 0
    protocol         = "-1"
    cidr_blocks      = ["0.0.0.0/0"]
  }

  tags = {
    Name = "djalb-sg"
  }
}
### LB 생성 ###
resource "aws_lb" "dj-lb" {
  name               = "dj-lb"
  load_balancer_type = "application"
  security_groups    = [aws_security_group.djalb-sg.id]
  subnets            = [
    data.terraform_remote_state.network.outputs.dj_pub_1,
    data.terraform_remote_state.network.outputs.dj_pub_2
    ]

  tags = {
    Environment = "dev"
  }
}
### LB 리스너 구성 ###
resource "aws_lb_listener" "dj-listner" {
  load_balancer_arn = aws_lb.dj-lb.arn
  port              =  80
  protocol          = "HTTP"

  default_action {
    type = "fixed-response"

    fixed_response {
      content_type = "text/plain"
      message_body = "404 not found."
      status_code  = "404"
    }
  }
}
### LB 규칙 구성 ###
resource "aws_lb_listener_rule" "health_check" {
  listener_arn = aws_lb_listener.dj-listner.arn
  priority     = 100

  condition {
    path_pattern {
      values = ["*"]
    }
  }

  action {
    type             = "forward"
    target_group_arn = aws_lb_target_group.dj-tg-gr.arn
  }
}
코드 설명
- remote state 명령어롤 통해 network와 db에서 output 자원 끌어오기
- 테스트를 진행할 Bation instance 생성, 보안 그룹 연결
- Auto Scailing Group 생성, 시작 구성 연결
- ALB 생성 (타겟 그룹, 리스너, 규칙 설정)
- 접속할 키페어 생성
- userdata.sh
#!/bin/bash
# 필요한 패키지들 설치
sudo yum update -y
sudo yum install -y libjpeg* libpng* freetype* gd-* gcc gcc-c++ gdbm-devel
sudo yum install -y httpd*
sudo yum install -y php php-common php-opcache php-cli php-gd php-curl php-mysqlnd php-mysqli

# 웹 서버 실행
sudo systemctl enable httpd
sudo systemctl start httpd

# 간단한 웹페이지 생성

# 로드밸런서 동작 확인을 위한 페이지
sudo sh -c 'echo "<?php echo \"Terraform Tutorial \" . gethostname(); ?>" > /var/www/html/index.php'

# PHP 동작 확인을 위한 페이지
sudo sh -c 'echo "<?php phpinfo(); ?>" > /var/www/html/phpinfo.php'

# DB 연동을 확인하기 위한 간단한 웹페이지

# 웹 서버 기본 루트 페이지 수정을 위해 /var/www 디렉토리의 소유권 및 권한을 변경
sudo groupadd www
sudo usermod -aG www ec2-user

# /var/www의 그룹 소유권을 www 그룹으로 변경
# /var/www와 하위 디렉토리에 그룹 쓰기 권한을 추가하고, 나중에 생성될 하위 디렉토리에서 GID 설정
# /var/www 및 하위 디렉토리의 파일 권한을 변경
sudo chown -R root:www /var/www
sudo chmod 2775 /var/www
find /var/www -type d -exec sudo chmod 2775 {} +
find /var/www -type f -exec sudo chmod 0664 {} +

# /var/www에 inc 디렉토리 생성
cd /var/www
mkdir inc
cd inc

# 연동을 위한 dbinfo 작성
cat << EOF > dbinfo.inc
<?php
define('DB_SERVER', '${db_address}');
# RDS의 라이터 엔드포인트
define('DB_USERNAME', 'admin');
define('DB_PASSWORD', 'testtest');
define('DB_DATABASE', 'djdb');
# RDS 생성할 때 만든 데이터베이스 이름
?>
EOF

# html 디렉토리로 이동
cd /var/www/html

# samplepage.php 작성
cat << 'EOF' > samplepage.php
<?php include "../inc/dbinfo.inc"; ?>
<html>
<body>
<h1>Sample page</h1>
<?php
/* MySQL에 연결하고 데이터베이스 선택 */
$connection = mysqli_connect(DB_SERVER, DB_USERNAME, DB_PASSWORD);
if(mysqli_connect_errno()) echo "MySQL에 연결 실패: " . mysqli_connect_error();
$database = mysqli_select_db($connection, DB_DATABASE);
/* Employees 테이블이 존재하는지 확인 */
VerifyEmployeesTable($connection, DB_DATABASE);

$employee_name = htmlentities($_POST['Name']);
$employee_address = htmlentities($_POST['Address']);
if(strlen($employee_name) || strlen($employee_address)) {
    AddEmployee($connection, $employee_name, $employee_address);
}
?>
<!-- 입력 폼 -->
<form action="<?PHP echo $_SERVER['SCRIPT_NAME'] ?>" method="POST">
    <table border="0">
        <tr>
            <td>이름</td>
            <td>주소</td>
        </tr>
        <tr>
            <td>
                <input type="text" name="Name" maxlength="45" size="30" />
            </td>
            <td>
                <input type="text" name="Address" maxlength="90" size="60" />
            </td>
            <td>
                <input type="submit" value="데이터 추가" />
            </td>
        </tr>
    </table>
</form>
<!-- 테이블 데이터 표시 -->
<table border="1" cellpadding="2" cellspacing="2">
    <tr>
        <td>ID</td>
        <td>이름</td>
        <td>주소</td>
    </tr>
    <?php
    $result = mysqli_query($connection, "SELECT * FROM Employees");
    while($query_data = mysqli_fetch_row($result)) {
        echo "<tr>";
        echo "<td>",$query_data[0], "</td>",
        "<td>",$query_data[1], "</td>",
        "<td>",$query_data[2], "</td>";
        echo "</tr>";
    }
    ?>
</table>
<!-- 정리 작업 -->
<?php
mysqli_free_result($result);
mysqli_close($connection);
?>
</body>
</html>
<?php
/* 직원을 테이블에 추가 */
function AddEmployee($connection, $name, $address) {
    $n = mysqli_real_escape_string($connection, $name);
    $a = mysqli_real_escape_string($connection, $address);
    $query = "INSERT INTO `Employees`(`Name`, `Address`) VALUES('$n', '$a');";
    if(!mysqli_query($connection, $query)) echo("<p>직원 데이터 추가 중 오류 발생.</p>");
}

/* 테이블이 존재하는지 확인하고 없으면 생성 */
function VerifyEmployeesTable($connection, $dbName) {
    if(!TableExists("Employees", $connection, $dbName)) {
        $query = "CREATE TABLE `Employees`(
        `ID` int(11) NOT NULL AUTO_INCREMENT,
        `Name` varchar(45) DEFAULT NULL,
        `Address` varchar(90) DEFAULT NULL,
        PRIMARY KEY(`ID`),
        UNIQUE KEY `ID_UNIQUE`(`ID`)
        ) ENGINE=InnoDB AUTO_INCREMENT=1 DEFAULT CHARSET=latin1";
        if(!mysqli_query($connection, $query)) echo("<p>테이블 생성 중 오류 발생.</p>");
    }
}

/* 테이블의 존재 여부 확인 */
function TableExists($tableName, $connection, $dbName) {
    $t = mysqli_real_escape_string($connection, $tableName);
    $d = mysqli_real_escape_string($connection, $dbName);
    $checktable = mysqli_query($connection, "SELECT TABLE_NAME FROM information_schema.TABLES WHERE TABLE_NAME = '$t' AND TABLE_SCHEMA = '$d'");
    if(mysqli_num_rows($checktable) > 0) return true;
    return false;
}
?>
EOF

# samplepage.php 파일에 권한 설정
sudo chmod 666 /var/www/html/samplepage.php
sudo yum install -y mysql
시작 구성을 통해 인스턴스에 자동으로 userdata코드를 배포시키고
이 userdata의 코드를 통해 db와의 연동 테스트를 확인할 수 있다.
userdata 출처: https://docs.aws.amazon.com/ko_kr/AmazonRDS/latest/UserGuide/CHAP_Tutorials.WebServerDB.CreateWebServer.html
만들어진 aws 자원 확인
- 인스턴스 확인

- 보안그룹 확인
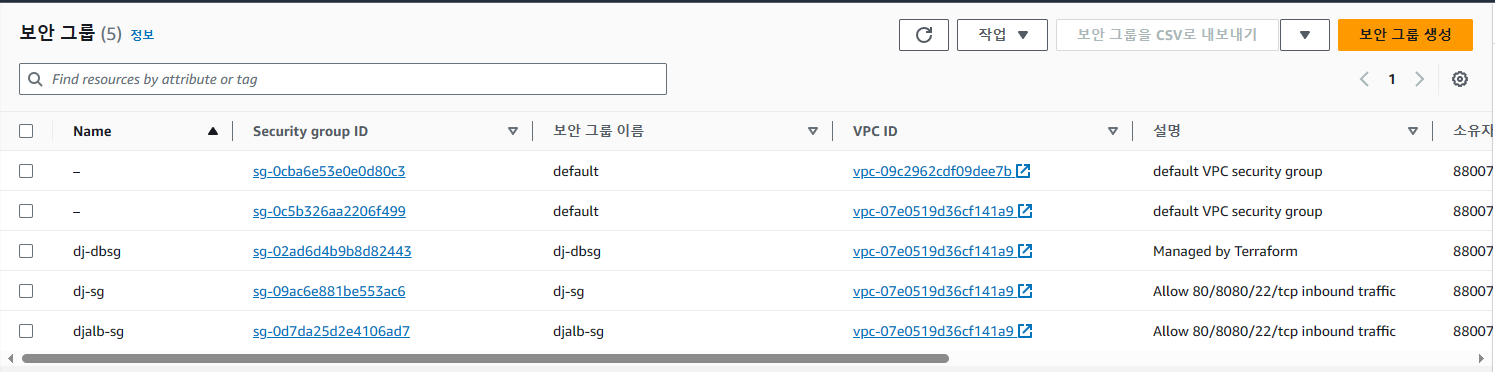
- 로드 밸런서 확인

- Auto Scaling 그룹 확인

지금 까지 전체 자원이 다 생성되었다. 이제 test를 진행해보자.
4. TEST
1. Bation-Instance로 접속
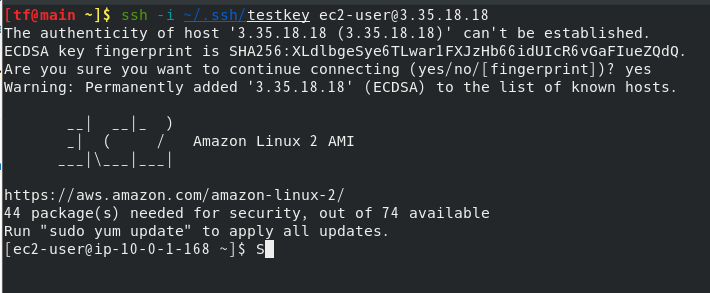
리눅스에서 ssh를 통해 접속하였다.
2. Bation-Instace에서 private subnet에 존재하는 인스턴스로 접속
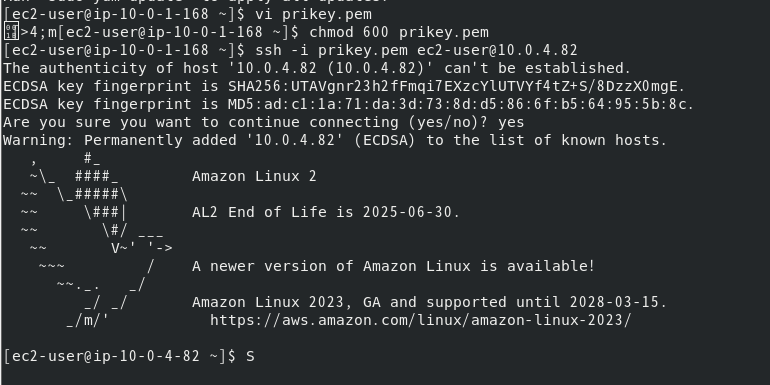
미리 userdata를 통해 prikey.pem파일을 만들어줬어야 했는데 깜빡해서
직접 인스턴스에 들어가서 pem키를 만들었다.
3. 인스턴스 외부 통신 확인
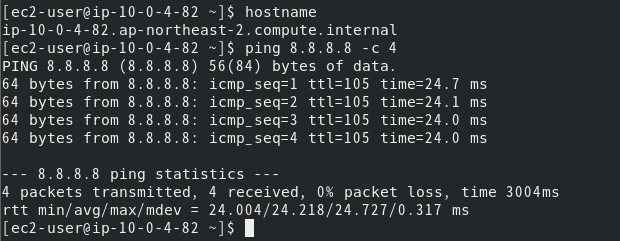
ping 명령어를 통해 외부와 통신을 확인하였다.
4. userdata 설정 확인
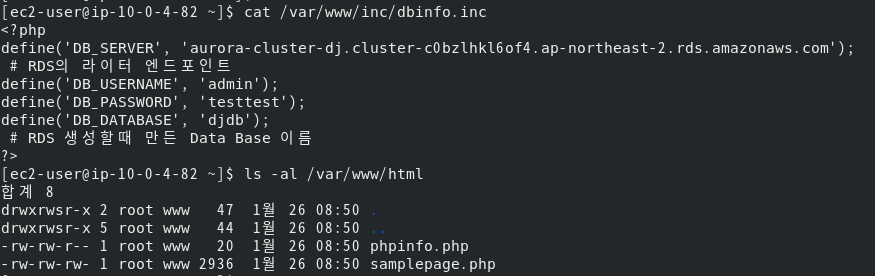
userdata를 통해 설정했던 파일들이 다 입력되었고 , rds 엔드포인트 주소가 잘들어갔다.
5. loadBalancer DNS 주소를 통한 samplepage.php 파일 테스트
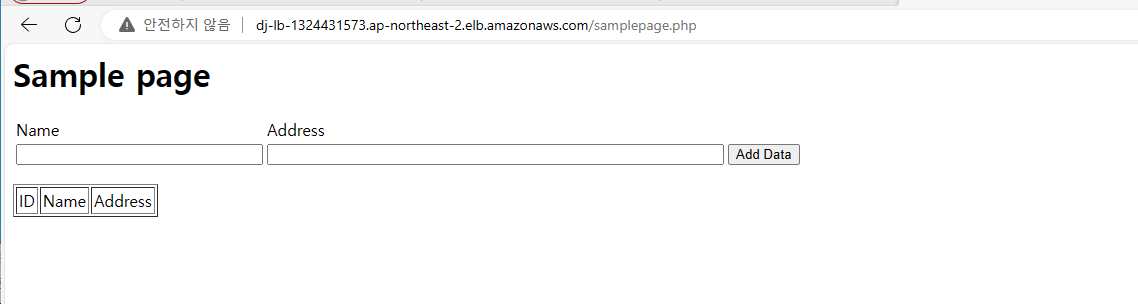
userdata를 통해 정의해둔 samplepage.php에 접속 가능한지 확인하기 위해
로컬에서 http://LoadBalacer DNS Name/samplepage.php 를 입력하여 접속 확인
6. 테이블 입력후 DB확인
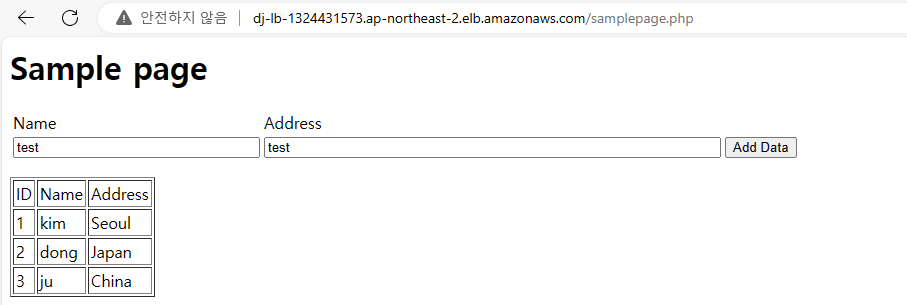
이제 테이블에 원하는 값을 입력하였으니 DB에 접속해 연동이 되었는지 확인하자.
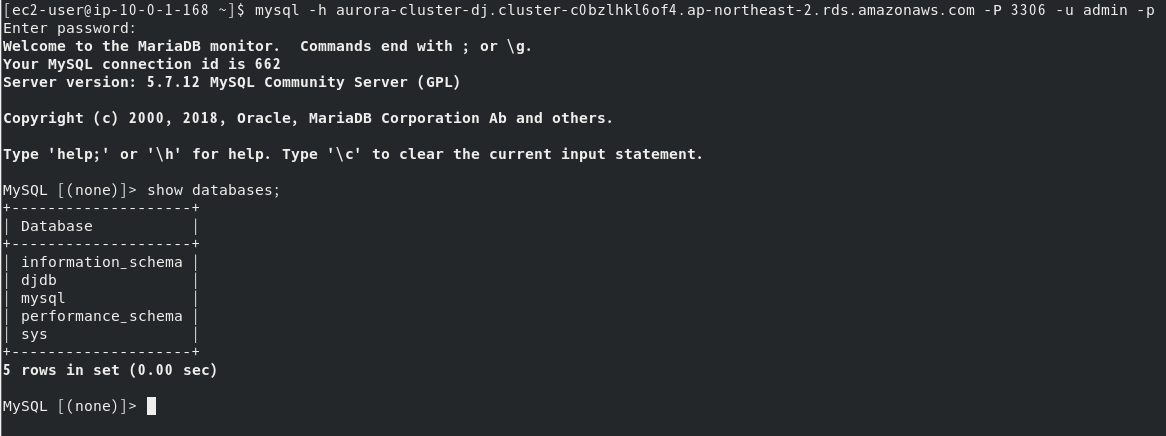
$ mysql -h RDS 리더 엔드포인트 -P 3306 -u admin -p
-> 정상 접속 확인
$ show datbases;
-> 나의 db확인
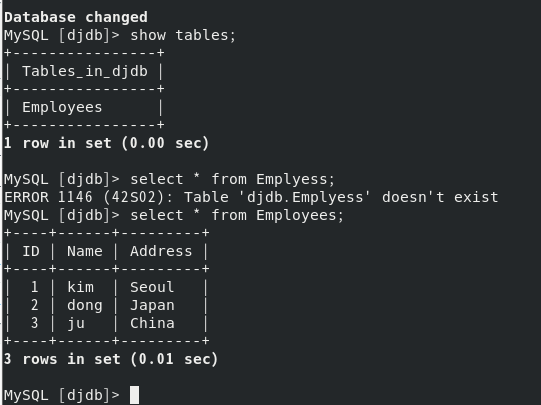
$ show tables;
$ select * from Employess;
-> 아까 로컬에서 입력한 정보를 그대로 확인할 수 있으며 모든 연동과정이 정상적으로
성공한 모습을 볼 수 있다.
