
1. 고급 위젯
1-1 날짜와 시간 관련 위젯
- 날짜 및 시간과 관련된 위젯으로는 타임피커, 데이트피커, 캘린더뷰, 크로노미터, 아날로그시계, 디지털시계 등이 있습니다.
아날로그시계, 디지털 시계
- 아래는 아날로그시계, 디지털시계의 계층도입니다.
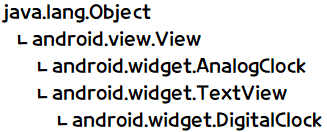
- 아날로그시계(AnalogClock)와 디지털시계(DigitalClock)는 화면에 시간을 표시하는 위젯으로서 시계를 표현하는 용도로 쓰입니다.
- 이 둘은 View 클래스에서 상속받기 때문에 background 속성 등을 설정할 수 있습니다.
- DigitalClock은 textColor 같은 속성도 설정할 수 있습니다.
예제 6-1 시계 관련 XML 코드
<?xml version="1.0" encoding="utf-8"?>
<androidx.appcompat.widget.LinearLayoutCompat
    xmlns:android="http://schemas.android.com/apk/res/android"
    xmlns:app="http://schemas.android.com/apk/res-auto"
    xmlns:tools="http://schemas.android.com/tools"
    android:layout_width="match_parent"
    android:layout_height="match_parent"
    android:orientation="vertical"
    tools:context=".MainActivity">

    <AnalogClock
        android:layout_width="match_parent"
        android:layout_height="wrap_content"/>
    <DigitalClock
        android:layout_width="match_parent"
        android:layout_height="wrap_content"
        android:gravity="center"/>

</androidx.appcompat.widget.LinearLayoutCompat>
크로노미터
- 아래는 크로노미터의 계층도입니다.
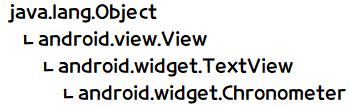
- 크로노미터(Chronometer)는 타이머 형식의 위젯이며 일반적으로 시간을 측정할 때 많이 사용됩니다.
- 사용되는 메서드로는 start( ), stop( ), reset( ) 등이 있는데 이는 각각 크로노미터를 시작, 정지, 초기화합니다.
예제 6-2 크로노미터의 XML 코드
<?xml version="1.0" encoding="utf-8"?>
<androidx.appcompat.widget.LinearLayoutCompat
    xmlns:android="http://schemas.android.com/apk/res/android"
    xmlns:app="http://schemas.android.com/apk/res-auto"
    xmlns:tools="http://schemas.android.com/tools"
    android:layout_width="match_parent"
    android:layout_height="match_parent"
    android:orientation="vertical"
    android:layout_margin="20dp"
    tools:context=".MainActivity">

    <Chronometer
        android:id="@+id/cm1"
        android:layout_width="match_parent"
        android:layout_height="wrap_content"
        android:format="시간 측정 : %s"
        android:gravity="center"
        android:textSize="30dp" />

</androidx.appcompat.widget.LinearLayoutCompat>
- format 속성에서 타이머 앞의 문자열을 지정할 수 있습니다.
- %s는 '분:초' 또는 '시:분:초' 형식으로 출력해줍니다.

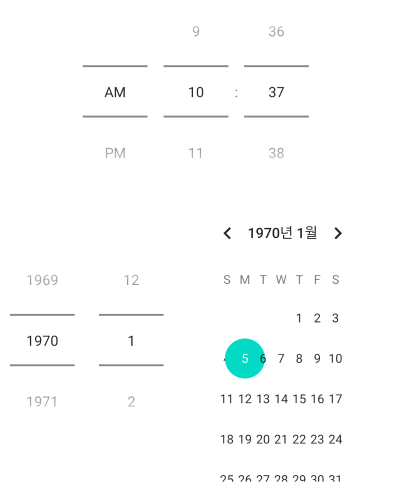
타임피커, 데이트피커, 캘린더뷰
- 아래는 타임피커, 데이트피커, 캘린더뷰 계층도입니다.
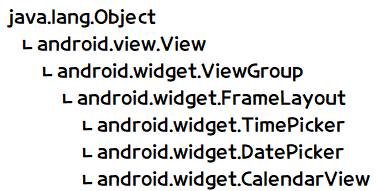
- 타임피커(TimePicker)는 시간을, 데이트피커(DatePicker)와 캘린더뷰(CalendarView)는 날짜를 표시하고 조절하는 기능을 합니다.
- 캘린더뷰는 XML 속성이 여러가지인데, 그중에서 디폴트가 true인 showWeekNumber 속성은 현재 몇 주 차인지를 각 주의 맨 앞에 출력해줍니다.
- showWeekNumber 속성은 false로 하는 것이 더 깔끔하고 보기 좋습니다.
예제 6-3 타임피커와 데이트피커의 XML 코드
<?xml version="1.0" encoding="utf-8"?>
<androidx.appcompat.widget.LinearLayoutCompat
    xmlns:android="http://schemas.android.com/apk/res/android"
    xmlns:app="http://schemas.android.com/apk/res-auto"
    xmlns:tools="http://schemas.android.com/tools"
    android:layout_width="match_parent"
    android:layout_height="match_parent"
    android:orientation="vertical"
    android:layout_margin="20dp"
    tools:context=".MainActivity">

    <TimePicker
        android:layout_width="match_parent"
        android:layout_height="wrap_content"
        android:timePickerMode="spinner" />
    <DatePicker
        android:layout_width="match_parent"
        android:layout_height="wrap_content"
        android:datePickerMode="spinner" />

</androidx.appcompat.widget.LinearLayoutCompat>
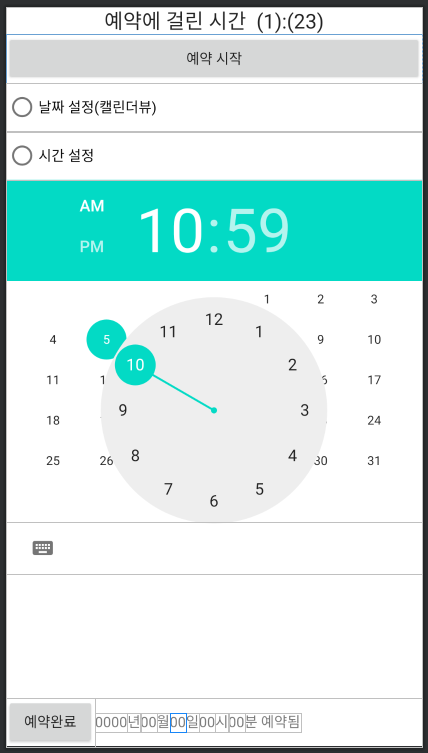
실습 6-1 날짜 / 시간 예약 앱 만들기
예제 6-4 activity_main.xml
<?xml version="1.0" encoding="utf-8"?>
<androidx.appcompat.widget.LinearLayoutCompat
    xmlns:android="http://schemas.android.com/apk/res/android"
    xmlns:app="http://schemas.android.com/apk/res-auto"
    xmlns:tools="http://schemas.android.com/tools"
    android:layout_width="match_parent"
    android:layout_height="match_parent"
    android:orientation="vertical"
    tools:context=".MainActivity">
    <androidx.appcompat.widget.LinearLayoutCompat
        android:layout_width="match_parent"
        android:layout_height="wrap_content"
        android:orientation="vertical">
        <Chronometer
            android:id="@+id/chronometer1"
            android:layout_width="match_parent"
            android:layout_height="wrap_content"
            android:gravity="center"
            android:format="예약에 걸린 시간  %s"
            android:textSize="20dp" />
        <androidx.appcompat.widget.AppCompatButton
            android:id="@+id/btnStart"
            android:layout_width="match_parent"
            android:layout_height="wrap_content"
            android:text="예약 시작" />
    </androidx.appcompat.widget.LinearLayoutCompat>

    <RadioGroup
        android:layout_width="match_parent"
        android:layout_height="wrap_content">
        <RadioButton
            android:id="@+id/rbCal"
            android:layout_width="match_parent"
            android:layout_height="wrap_content"
            android:text="날짜 설정(캘린더뷰)" />
        <RadioButton
            android:id="@+id/rbTime"
            android:layout_width="match_parent"
            android:layout_height="wrap_content"
            android:text="시간 설정" />
    </RadioGroup>

    <androidx.appcompat.widget.LinearLayoutCompat
        android:layout_width="match_parent"
        android:layout_height="wrap_content"
        android:orientation="vertical"
        android:layout_weight="1">
        <FrameLayout
            android:layout_width="match_parent"
            android:layout_height="match_parent">
            <CalendarView
                android:id="@+id/calendarView1"
                android:layout_width="match_parent"
                android:layout_height="wrap_content"/>
            <TimePicker
                android:id="@+id/timePicker1"
                android:layout_width="match_parent"
                android:layout_height="wrap_content"/>
        </FrameLayout>
    </androidx.appcompat.widget.LinearLayoutCompat>

    <androidx.appcompat.widget.LinearLayoutCompat
        android:layout_width="match_parent"
        android:layout_height="wrap_content"
        android:orientation="horizontal">
        <androidx.appcompat.widget.AppCompatButton
            android:id="@+id/btnEnd"
            android:layout_width="wrap_content"
            android:layout_height="wrap_content"
            android:text="예약완료" />
        <TextView
            android:id="@+id/tvYear"
            android:layout_width="wrap_content"
            android:layout_height="wrap_content"
            android:text="0000"/>
        <TextView
            android:layout_width="wrap_content"
            android:layout_height="wrap_content"
            android:text="년"/>
        <TextView
            android:id="@+id/tvMonth"
            android:layout_width="wrap_content"
            android:layout_height="wrap_content"
            android:text="00"/>
        <TextView
            android:layout_width="wrap_content"
            android:layout_height="wrap_content"
            android:text="월"/>
        <TextView
            android:id="@+id/tvDay"
            android:layout_width="wrap_content"
            android:layout_height="wrap_content"
            android:text="00"/>
        <TextView
            android:layout_width="wrap_content"
            android:layout_height="wrap_content"
            android:text="일"/>
        <TextView
            android:id="@+id/tvHour"
            android:layout_width="wrap_content"
            android:layout_height="wrap_content"
            android:text="00"/>
        <TextView
            android:layout_width="wrap_content"
            android:layout_height="wrap_content"
            android:text="시"/>
        <TextView
            android:id="@+id/tvMinute"
            android:layout_width="wrap_content"
            android:layout_height="wrap_content"
            android:text="00"/>
        <TextView
            android:layout_width="wrap_content"
            android:layout_height="wrap_content"
            android:text="분 예약됨"/>
    </androidx.appcompat.widget.LinearLayoutCompat>
</androidx.appcompat.widget.LinearLayoutCompat>
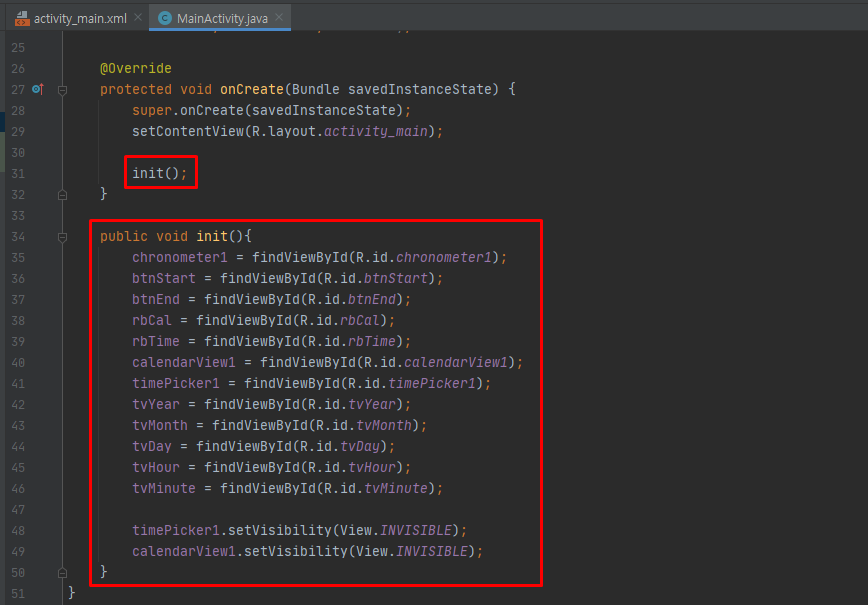
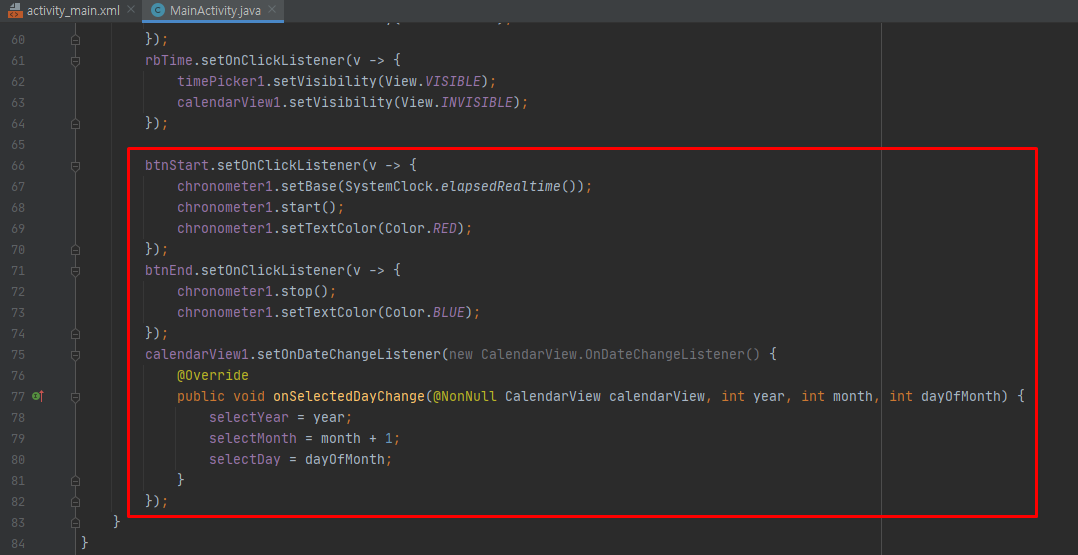
예제 6-5 Java 코드 1

예제 6-6 Java 코드 2
- setVisibility(View.INVISIBLE)를 이용해서 타임피커와 캘린더뷰가 보이지 않게 설정합니다.
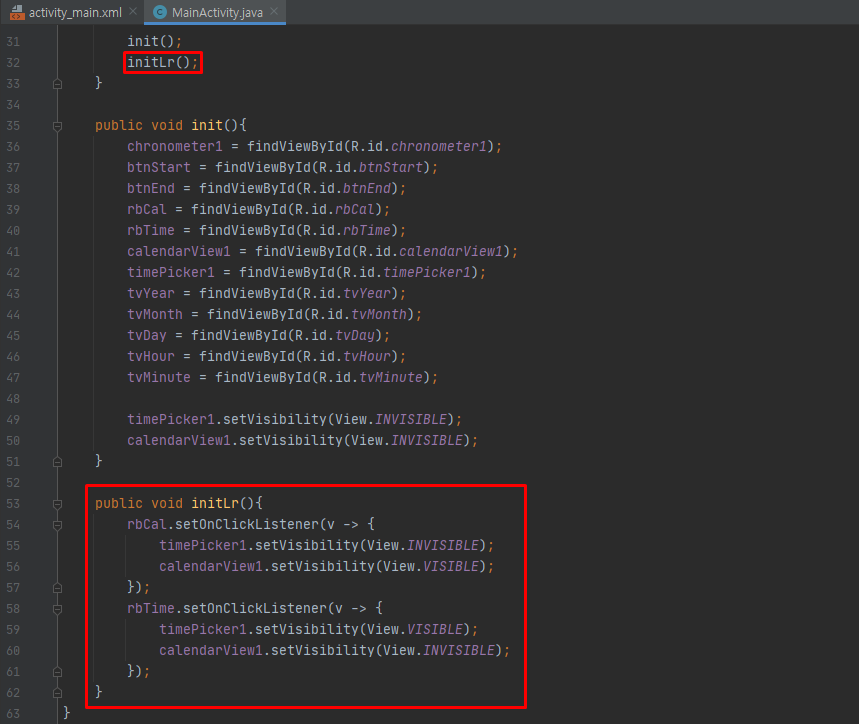
예제 6-7 Java 코드 3
- 날짜설정 라디오버튼을 클릭하면 캘린더뷰만 보이도록 설정합니다.
- 시간설정 라이도버튼을 클릭하면 타임피커만 보이도록 설정합니다.
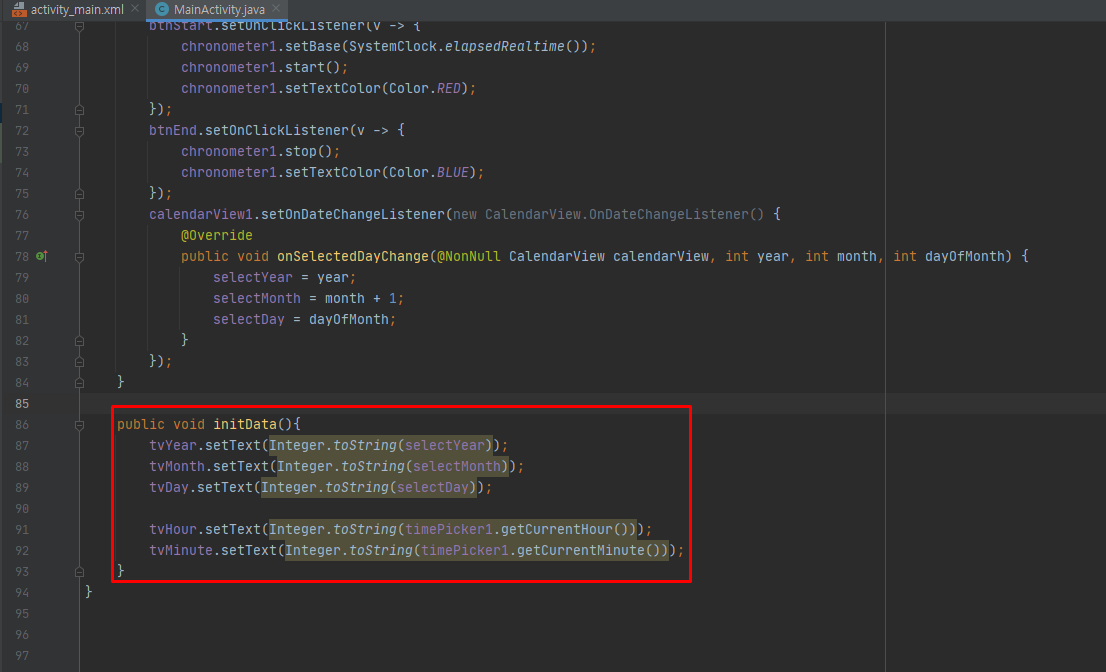
예제 6-8 Java 코드 4
- btnStart에서 크로노미터를 0으로 초기화합니다.
예제 6-9 Java 코드 5
결과
MainActivity 코드
public class MainActivity extends AppCompatActivity {
    private static final String TAG = "MainActivity2";

    private Chronometer chronometer1;
    private Button btnStart, btnEnd;
    private RadioButton rbCal, rbTime;
    private CalendarView calendarView1;
    private TimePicker timePicker1;
    private TextView tvYear, tvMonth, tvDay, tvHour, tvMinute;
    int selectYear, selectMonth, selectDay;

    @Override
    protected void onCreate(Bundle savedInstanceState) {
        super.onCreate(savedInstanceState);
        setContentView(R.layout.activity_main);

        init();
        initLr();
        initData();
    }

    public void init(){
        chronometer1 = findViewById(R.id.chronometer1);
        btnStart = findViewById(R.id.btnStart);
        btnEnd = findViewById(R.id.btnEnd);
        rbCal = findViewById(R.id.rbCal);
        rbTime = findViewById(R.id.rbTime);
        calendarView1 = findViewById(R.id.calendarView1);
        timePicker1 = findViewById(R.id.timePicker1);
        tvYear = findViewById(R.id.tvYear);
        tvMonth = findViewById(R.id.tvMonth);
        tvDay = findViewById(R.id.tvDay);
        tvHour = findViewById(R.id.tvHour);
        tvMinute = findViewById(R.id.tvMinute);

        timePicker1.setVisibility(View.INVISIBLE);
        calendarView1.setVisibility(View.INVISIBLE);
    }
    public void initLr(){
        rbCal.setOnClickListener(v -> {
            timePicker1.setVisibility(View.INVISIBLE);
            calendarView1.setVisibility(View.VISIBLE);
        });
        rbTime.setOnClickListener(v -> {
            timePicker1.setVisibility(View.VISIBLE);
            calendarView1.setVisibility(View.INVISIBLE);
        });

        btnStart.setOnClickListener(v -> {
            chronometer1.setBase(SystemClock.elapsedRealtime());
            chronometer1.start();
            chronometer1.setTextColor(Color.RED);
        });
        btnEnd.setOnClickListener(v -> {
            chronometer1.stop();
            chronometer1.setTextColor(Color.BLUE);
        });
        calendarView1.setOnDateChangeListener(new CalendarView.OnDateChangeListener() {
            @Override
            public void onSelectedDayChange(@NonNull CalendarView calendarView, int year,
            int month, int dayOfMonth) {
                selectYear = year;
                selectMonth = month + 1;
                selectDay = dayOfMonth;
            }
        });
    }
    public void initData(){
        tvYear.setText(Integer.toString(selectYear));
        tvMonth.setText(Integer.toString(selectMonth));
        tvDay.setText(Integer.toString(selectDay));

        tvHour.setText(Integer.toString(timePicker1.getCurrentHour()));
        tvMinute.setText(Integer.toString(timePicker1.getCurrentMinute()));
    }
}

1-2 기타 위젯
자동완성텍스트뷰와 멀티자동완성텍스트뷰
- 아래는 자동완성텍스트뷰와 멀티자동완성텍스트뷰의 계층도입니다.
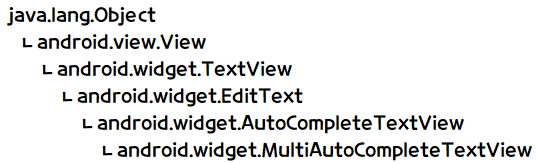
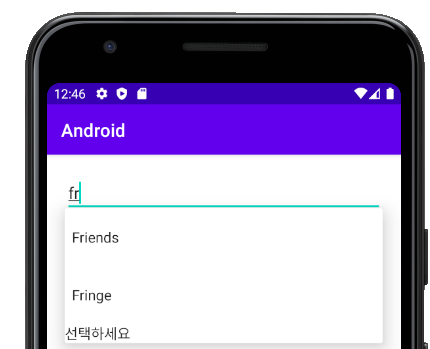
- 자동완성텍스트뷰(AutoCompleteTextView)와 멀티자동완성텍스트뷰(MultiAutoCompleteTextView)는 '텍스트'보다 '에디트텍스트'라는 용어가 더 적합하다고 여겨집니다.
- 위 계층도를 보면 에디트텍스트에서 상속받습니다.
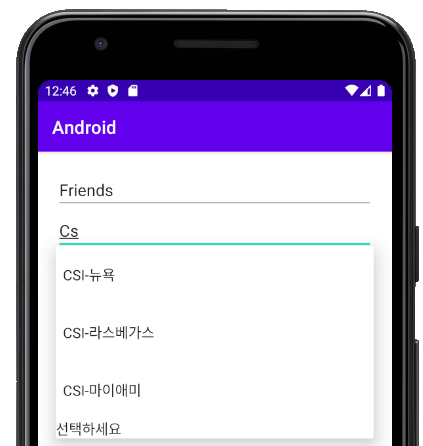
- 사용자가 단어의 일부만 입력해도 자동 완성되는데, 자동완성텍스트뷰는 단어 1개가 자동 완성되고, 멀티자동완성텍스트뷰는 쉼표( , )로 구분하여 여러 개의 단어가 자동 완성됩니다.
- 자동 완성 단어는 주로 Java 코드에서 배열로 설정하여 setAdapter( ) 메서드를 이용합니다.
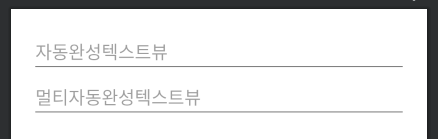
예제 6-10 자동완성텍스트뷰의 XML 코드
<?xml version="1.0" encoding="utf-8"?>
<androidx.appcompat.widget.LinearLayoutCompat
    xmlns:android="http://schemas.android.com/apk/res/android"
    xmlns:app="http://schemas.android.com/apk/res-auto"
    xmlns:tools="http://schemas.android.com/tools"
    android:layout_width="match_parent"
    android:layout_height="match_parent"
    android:orientation="vertical"
    android:layout_margin="20dp"
    tools:context=".MainActivity">

    <AutoCompleteTextView
        android:id="@+id/autoCompleteTextView"
        android:layout_width="match_parent"
        android:layout_height="wrap_content"
        android:completionHint="선택하세요"
        android:completionThreshold="2"
        android:hint="자동완성텍스트뷰" />
    <MultiAutoCompleteTextView
        android:layout_width="match_parent"
        android:layout_height="wrap_content"
        android:completionHint="선택하세요"
        android:completionThreshold="2"
        android:hint="멀티자동완성텍스트뷰" />

</androidx.appcompat.widget.LinearLayoutCompat>
예제 6-11 자동완성텍스트뷰의 Java 코드
package com.com.android;

import androidx.appcompat.app.AppCompatActivity;
import android.os.Bundle;
import android.widget.ArrayAdapter;
import android.widget.AutoCompleteTextView;
import android.widget.MultiAutoCompleteTextView;

public class MainActivity extends AppCompatActivity {

    private String[] items = {"CSI-뉴욕", "CSI-라스베가스", "CSI-마이애미",
    	"Friends", "Fringe", "Lost"};
    private AutoCompleteTextView auto;
    private MultiAutoCompleteTextView multi;

    @Override
    protected void onCreate(Bundle savedInstanceState) {
        super.onCreate(savedInstanceState);
        setContentView(R.layout.activity_main);

        init();
        initData();
    }
    public void init(){
        auto = findViewById(R.id.autoCompleteTextView);
        multi = findViewById(R.id.multiAutoCompleteTextView);
    }

    public void initData(){
        ArrayAdapter<String> adapter = new ArrayAdapter<>(this,
        	android.R.layout.simple_dropdown_item_1line, items);
        auto.setAdapter(adapter);

        MultiAutoCompleteTextView.CommaTokenizer token =
        	new MultiAutoCompleteTextView.CommaTokenizer();
        multi.setTokenizer(token);
        multi.setAdapter(adapter);
    }
}
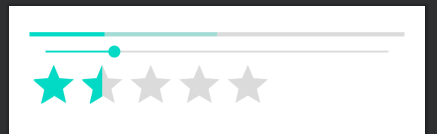
프로그레스바, 시크바, 레이팅바
- 프로그레스바, 시크바, 레이팅바는 진행 상태를 표시하는 기능을 합니다.
프로그레스바(ProgressBar)
- 작업의 진행 상태를 바(Bar) 또는 원 형태로 제공합니다.
- 바 형태는 어느 정도 진행되었는지를 확인할 수 있지만, 원 형태는 현재 진행 중이라는 상태만 보여줍니다.
- 주로 사용되는 XML 속성에는 범위를 지정하는 max, 시작 지점을 지정하는 progress, 두 번째 프로그레스바를 지정하는 secondaryProgress 등이 있습니다.
시크바(SeekBar)
- 프로그레스바의 하위 클래스로 프로그레스바와 대부분 비슷하며 사용자가 터치로 임의 조절이 가능합니다.
- 음량을 조절하거나 동영상 재생 시 사용자가 재생 위치를 지정한느 용도로 사용할 수 있습니다.
레이팅바(RatingBar)
- 진행 상태를 별 모양으로 표시합니다.
- 프로그레스바의 하위 클래스이므로 사용법이 비슷하며 서적, 음악, 영화 등에 대한 선호도를 나타낼 때 주로 사용됩니다.
- 별의 개수를 정하는 numStars, 초기값을 지정하는 rating, 한 번에 채워지는 개수를 정하는 stepSize 등의 XML 속성이 주로 사용됩니다.
예제 6-12 프로그레스바, 시크바, 레이팅바의 XML 코드
<?xml version="1.0" encoding="utf-8"?>
<androidx.appcompat.widget.LinearLayoutCompat
    xmlns:android="http://schemas.android.com/apk/res/android"
    xmlns:app="http://schemas.android.com/apk/res-auto"
    xmlns:tools="http://schemas.android.com/tools"
    android:layout_width="match_parent"
    android:layout_height="match_parent"
    android:orientation="vertical"
    android:layout_margin="20dp"
    tools:context=".MainActivity">

    <ProgressBar
        android:layout_width="match_parent"
        android:layout_height="wrap_content"
        style="?android:attr/progressBarStyleHorizontal"
        android:max="100"
        android:progress="20"
        android:secondaryProgress="50" />
    <SeekBar
        android:layout_width="match_parent"
        android:layout_height="wrap_content"
        android:progress="20" />
    <RatingBar
        android:layout_width="wrap_content"
        android:layout_height="wrap_content"
        android:numStars="5"
        android:rating="1.5"
        android:stepSize="0.5" />

</androidx.appcompat.widget.LinearLayoutCompat>
- ProgressBar에서 style="?android:attr/progressBarStyleHorizontal"를 생략하면 프로그레스 바의 모양이 원 모양으로 나옵니다.
- stepSize는 레이팅바의 한 스텝 크기를 결정하므로, 여기서는 별이 5개이므로 총 열 번의 스텝으로 구성됩니다.
2. 뷰 컨테이너
- TextView 클래스 하위의 위젯(버튼, 체크박스 등)은 자체가 하나의 개체로 사용되지만, View Group 클래스 하위의 위젯은 주로 다른 위젯을 담는 컨테이너 역할을 합니다. 그중 5장에서 배운 5개 레이아웃을 제외한 것들을 뷰 컨테이너(View Container)라고 합니다.
2-1 간단한 기능의 뷰 컨테이너
스크롤뷰
- 아래는 스크롤뷰의 계층도입니다.
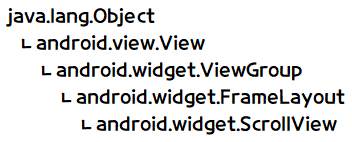
- 위젯이나 레이아웃이 화면에 넘칠 때 스크롤뷰(ScrollView)에 넣으면 스크롤 효과를 낼 수 있습니다.
- 스크롤뷰는 수직(위아래)으로 스크롤하는 기능이며 수평(좌우)으로 스크롤하는 수평 스크롤뷰(HorizontalScrollView)는 따로 있습니다.
- 주의할 점은 스크롤뷰에는 단 하나의 위젯만 넣을 수 있습니다.
- 주로 스크롤뷰 안에 리니어 레이아웃을 1개 넣고, 리니어레이아웃 안에 필요한 것을 여러 개 넣는 방법을 사용합니다.
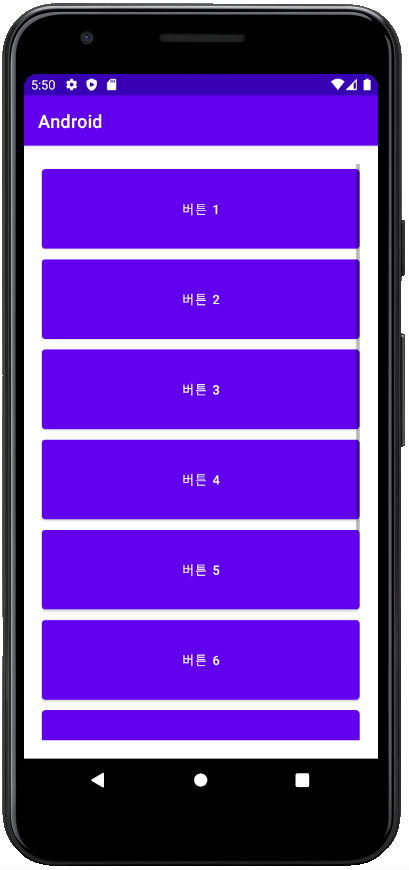
예제 6-13 스크롤뷰의 XML 코드
<?xml version="1.0" encoding="utf-8"?>
<ScrollView
    xmlns:android="http://schemas.android.com/apk/res/android"
    xmlns:app="http://schemas.android.com/apk/res-auto"
    xmlns:tools="http://schemas.android.com/tools"
    android:layout_width="match_parent"
    android:layout_height="match_parent"
    android:layout_margin="20dp"
    tools:context=".MainActivity">

    <androidx.appcompat.widget.LinearLayoutCompat
        android:layout_width="match_parent"
        android:layout_height="match_parent"
        android:orientation="vertical">
        <Button
            android:layout_width="match_parent"
            android:layout_height="100dp"
            android:text="버튼 1" />
        <Button
            android:layout_width="match_parent"
            android:layout_height="100dp"
            android:text="버튼 2" />
        <Button
            android:layout_width="match_parent"
            android:layout_height="100dp"
            android:text="버튼 3" />
        <Button
            android:layout_width="match_parent"
            android:layout_height="100dp"
            android:text="버튼 4" />
        <Button
            android:layout_width="match_parent"
            android:layout_height="100dp"
            android:text="버튼 5" />
        <Button
            android:layout_width="match_parent"
            android:layout_height="100dp"
            android:text="버튼 6" />
        <Button
            android:layout_width="match_parent"
            android:layout_height="100dp"
            android:text="버튼 7" />
        <Button
            android:layout_width="match_parent"
            android:layout_height="100dp"
            android:text="버튼 8" />
        <Button
            android:layout_width="match_parent"
            android:layout_height="100dp"
            android:text="버튼 9" />
        <Button
            android:layout_width="match_parent"
            android:layout_height="100dp"
            android:text="버튼 10" />

    </androidx.appcompat.widget.LinearLayoutCompat>
</ScrollView>
슬라이딩드로어
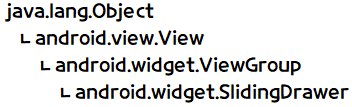
- 아래는 슬라이딩드로어의 계층도입니다.
- 서랍을 뜻하는 슬라이딩드로어(SlidingDrawer)는 위젯을 서랍처럼 열어서 보여주거나 닫아서 감춤니다.
- 슬라이딩드로어는 보통 아래와 같은 형태를 갖습니다.
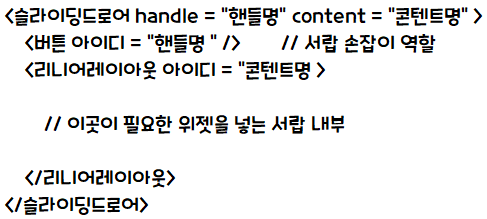
- 슬라이딩드로어에는 몇가지 규칙이 있습니다.
1. 슬라이딩드로어의 handle 속성에 지정된 이름과 슬라이딩드로어의 손잡이 역할을 하는 버튼의 아이디가 동일해야 합니다.
- 버튼 대신 이미지뷰나 이미지 버튼으로 예쁘게 꾸며도 상관 없습니다.
2. 슬라이딩드로어의 content 속성에 지정된 이름과 리니어레이아웃의 아이디도 동일해야 합니다.
- 리니어레이아웃이 아닌 다른 레이아웃도 가능합니다.
예제 6-14 슬라이딩드로어의 XMl 코드
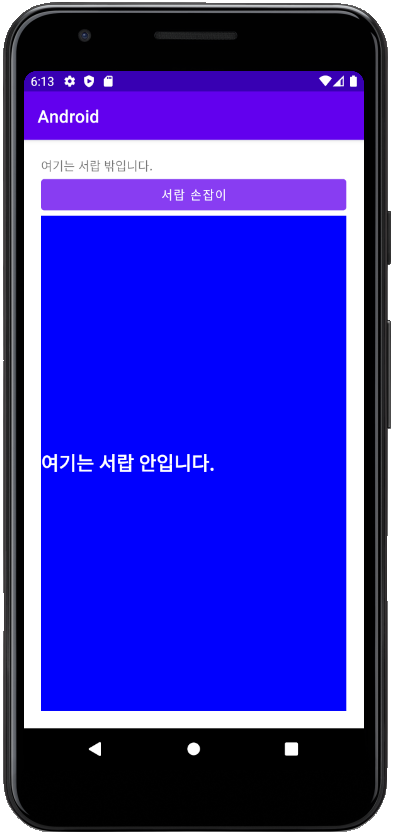
<?xml version="1.0" encoding="utf-8"?>
<androidx.appcompat.widget.LinearLayoutCompat
    xmlns:android="http://schemas.android.com/apk/res/android"
    xmlns:app="http://schemas.android.com/apk/res-auto"
    xmlns:tools="http://schemas.android.com/tools"
    android:layout_width="match_parent"
    android:layout_height="match_parent"
    android:layout_margin="20dp"
    tools:context=".MainActivity">

   <TextView
       android:layout_width="match_parent"
       android:layout_height="wrap_content"
       android:text="여기는 서랍 밖입니다." />
    <SlidingDrawer
        android:layout_width="match_parent"
        android:layout_height="match_parent"
        android:handle="@+id/handle"
        android:content="@+id/content">
        <Button
            android:layout_width="match_parent"
            android:layout_height="wrap_content"
            android:id="@+id/handle"
            android:text="서랍 손잡이" />
        <LinearLayout
            android:id="@+id/content"
            android:layout_width="match_parent"
            android:layout_height="wrap_content"
            android:gravity="center"
            android:background="#0000FF"
            android:orientation="vertical">
            <TextView
                android:layout_width="match_parent"
                android:layout_height="wrap_content"
                android:text="여기는 서랍 안입니다." />
        </LinearLayout>
    </SlidingDrawer>

</androidx.appcompat.widget.LinearLayoutCompat>

2-2 복잡한 기능의 뷰 컨테이너
- XML 코드만으로는 완성되지 않고 Java 코드와 함께 구현해야 하는 뷰 컨테이너도 있습니다.
뷰플리퍼
- 아래는 뷰플리퍼의 계층도입니다.
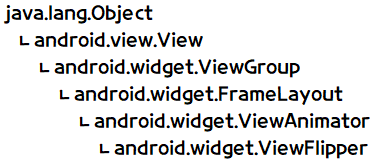
- 뷰플리퍼(ViewFlipper)는 안에 여러 개의 위젯을 배치하고 필요에 따라 화면을 왼쪽이나 오른쪽으로 밀어서 위젯을 하나씩 화면에 보여주는 방식의 뷰 컨테이너입니다.
- 뷰플리너는 일반적으로 아래와 같은 형태입니다.
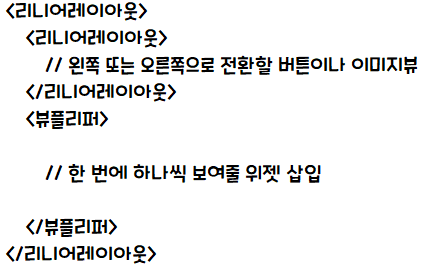
- 한 번에 보여줄 위젯이 여러 개라면 뷰플리퍼 안에 레이아웃을 여러개 넣고 각 레이아웃에 필요한 위젯을 배치하면 됩니다.
예제 6-15 뷰플리퍼의 XML 코드
<?xml version="1.0" encoding="utf-8"?>
<androidx.appcompat.widget.LinearLayoutCompat
    xmlns:android="http://schemas.android.com/apk/res/android"
    xmlns:app="http://schemas.android.com/apk/res-auto"
    xmlns:tools="http://schemas.android.com/tools"
    android:layout_width="match_parent"
    android:layout_height="match_parent"
    android:orientation="vertical"
    android:layout_margin="20dp"
    tools:context=".MainActivity">

    <androidx.appcompat.widget.LinearLayoutCompat
        android:layout_width="match_parent"
        android:layout_height="match_parent"
        android:orientation="horizontal">
        <Button
            android:id="@+id/btnPrev"
            android:layout_weight="50"
            android:layout_width="0dp"
            android:layout_height="wrap_content"
            android:text="이전 화면"
            android:layout_margin="1dp"/>
        <Button
            android:id="@+id/btnNext"
            android:layout_weight="50"
            android:layout_width="0dp"
            android:layout_height="wrap_content"
            android:text="다음 화면"
            android:layout_margin="1dp"/>
    </androidx.appcompat.widget.LinearLayoutCompat>
    <ViewFlipper
        android:id="@+id/viewFlipper"
        android:layout_width="match_parent"
        android:layout_height="match_parent">
        <androidx.appcompat.widget.LinearLayoutCompat
            android:layout_width="match_parent"
            android:layout_height="match_parent"
            android:orientation="vertical"
            android:background="@android:color/holo_purple">
            <Button
                android:layout_weight="50"
                android:layout_width="wrap_content"
                android:layout_height="0dp"
                android:text="첫 번째"
                android:layout_margin="1dp"/>
            <Button
                android:layout_weight="50"
                android:layout_width="wrap_content"
                android:layout_height="0dp"
                android:text="화면"
                android:layout_margin="1dp"/>
        </androidx.appcompat.widget.LinearLayoutCompat>
        <androidx.appcompat.widget.LinearLayoutCompat
            android:layout_width="match_parent"
            android:layout_height="match_parent"
            android:orientation="vertical"
            android:background="@android:color/darker_gray">
            <RatingBar
                android:layout_width="wrap_content"
                android:layout_height="wrap_content"
                android:rating="10"
                android:stepSize="1"/>
        </androidx.appcompat.widget.LinearLayoutCompat>
        <androidx.appcompat.widget.LinearLayoutCompat
            android:layout_width="match_parent"
            android:layout_height="match_parent"
            android:orientation="vertical"
            android:background="@android:color/darker_gray">
            <TextView
                android:layout_width="wrap_content"
                android:layout_height="wrap_content"
                android:text="배고프다 배고파"
                android:textSize="30dp"
                android:textStyle="bold"
                android:textColor="@color/white" />

        </androidx.appcompat.widget.LinearLayoutCompat>
    </ViewFlipper>
</androidx.appcompat.widget.LinearLayoutCompat>
예제 6-16 뷰플리퍼의 Java 코드
- 왜 어째서 안되는지 모르겠음
<?xml version="1.0" encoding="utf-8"?>
<androidx.appcompat.widget.LinearLayoutCompat
    xmlns:android="http://schemas.android.com/apk/res/android"
    xmlns:app="http://schemas.android.com/apk/res-auto"
    xmlns:tools="http://schemas.android.com/tools"
    android:layout_width="match_parent"
    android:layout_height="match_parent"
    android:orientation="vertical"
    android:layout_margin="20dp"
    tools:context=".MainActivity">

    <androidx.appcompat.widget.LinearLayoutCompat
        android:layout_width="match_parent"
        android:layout_height="match_parent"
        android:orientation="horizontal">
        <Button
            android:id="@+id/btnPrev"
            android:layout_weight="50"
            android:layout_width="0dp"
            android:layout_height="wrap_content"
            android:text="이전 화면"
            android:layout_margin="1dp"/>
        <Button
            android:id="@+id/btnNext"
            android:layout_weight="50"
            android:layout_width="0dp"
            android:layout_height="wrap_content"
            android:text="다음 화면"
            android:layout_margin="1dp"/>
    </androidx.appcompat.widget.LinearLayoutCompat>
    <ViewFlipper
        android:id="@+id/viewFlipper"
        android:layout_width="match_parent"
        android:layout_height="match_parent">
        <androidx.appcompat.widget.LinearLayoutCompat
            android:layout_width="match_parent"
            android:layout_height="match_parent"
            android:orientation="vertical"
            android:background="@android:color/holo_purple">
            <Button
                android:layout_weight="50"
                android:layout_width="wrap_content"
                android:layout_height="0dp"
                android:text="첫 번째"
                android:layout_margin="1dp"/>
            <Button
                android:layout_weight="50"
                android:layout_width="wrap_content"
                android:layout_height="0dp"
                android:text="화면"
                android:layout_margin="1dp"/>
        </androidx.appcompat.widget.LinearLayoutCompat>
        <androidx.appcompat.widget.LinearLayoutCompat
            android:layout_width="match_parent"
            android:layout_height="match_parent"
            android:orientation="vertical"
            android:background="@android:color/darker_gray">
            <RatingBar
                android:layout_width="wrap_content"
                android:layout_height="wrap_content"
                android:rating="10"
                android:stepSize="1"/>
        </androidx.appcompat.widget.LinearLayoutCompat>
        <androidx.appcompat.widget.LinearLayoutCompat
            android:layout_width="match_parent"
            android:layout_height="match_parent"
            android:orientation="vertical"
            android:background="@android:color/darker_gray">
            <TextView
                android:layout_width="wrap_content"
                android:layout_height="wrap_content"
                android:text="배고프다 배고파"
                android:textSize="30dp"
                android:textStyle="bold"
                android:textColor="@color/white" />

        </androidx.appcompat.widget.LinearLayoutCompat>
    </ViewFlipper>
</androidx.appcompat.widget.LinearLayoutCompat>
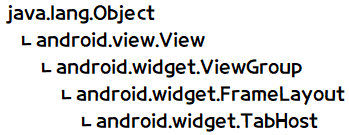
탭호스트
- 아래는 탭호스트의 계층도입니다.
- 뷰플리퍼가 차례대로 다음이나 이전 화면을 보여주는 기능을 하는 반면, 탭호스트(TabHost)는 여러 탭을 두고 각 탭을 클릭할 때마다 해당 화면이 나오도록 설정하는 뷰 컨테이너입니다.
- 인터넷 익스플로러의 상단 탭을 생각하면 됩니다.
- 탭호스트도 실제 동작하는 부분은 Java로 코딩합니다.
- 아래는 XML로 구성할 탭호스트입니다.
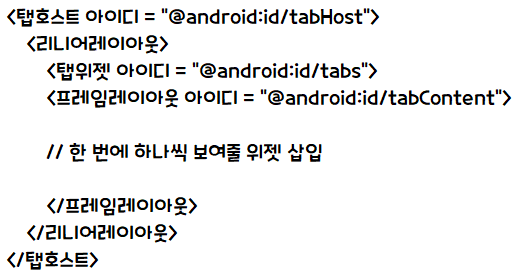
- 주의할 점은 탭호스트, 탭위젯, 프레임레이아웃은 아이디가 지정되어 있는데, 이 지정된 아이디를 변경하지 말고 그대로 사용해야 안드로이드가 탭호스트의 구성을 인식한다는 것입니다.
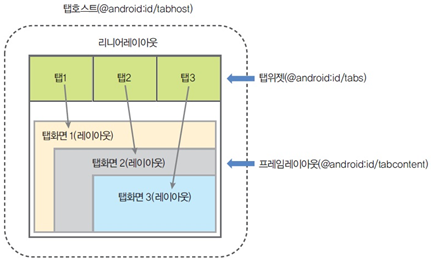
- 탭 호스트, 리니어레이아웃, 탭위젯, 프레임레이아웃은 Java 코드에서 특별히 접근할 일이 없으므로 XML 코드로만 제대로 생성되어 있으면 됩니다.
- 실제로 Java 코드에서 중요하게 할 작업은 탭위젯 안에 들어가는 3개의 탭을 생성하는 것입니다.
- 각 탭과 대응되는 탭 화면(레이아웃)의 연결도 Java 코드에서 해결해야 합니다.
- 아래는 탭을 생성하고 탭 화면에 연결하기 위한 Java 코드의 형식입니다.

- 탭스펙(TabSpec)은 탭을 구성하는 요소들의 집합이라고 생각하면 됩니다.
- 탭스펙을 준비하여 탭호스트에 붙여넣으면 탭이 됩니다.
- 탭호스트를 처리할 때 거의 고정된 형식의 코드입니다.
현재 탭호스트는 지원하지 않으므로, BottomNavigation을 쓰는 것이 좋습니다.
액션바와 프레그먼트
- 허니콤(Android 3.0, API 11)부터 지원되는 액션바(ActionBar)는 태블릿과 같은 대형 화면에서 여러 화면을 사용하기 위해 고안되었습니다.
- 아이스크림 샌드위치(Android 4.0, API 14)부터는 태블릿과 스마트폰의 SDK가 통합되었으므로 태블릿과 스마트폰에서 모두 액션바 사용이 가능하며, 상황에 따라 다양한 형태로 나타낼 수 있습니다.
- 액션바는 태블릿, 스마트폰 등 다양한 크기의 화면을 디자인하는데 활용할 수 있고 뒤에서 배울 메뉴를 대체하여 사용할 수도 있습니다.
- 많은 기능 때문에 액션바의 구현은 다른 위젯보다 복잡한 편입니다.
- 액션바를 구현할 때는 프레그먼트(Fragment)를 사용하는 것이 좋습니다.
- 프레그먼트는 허니콤에서 소개된 기능으로, 대형 태블릿의 화면을 효율적으로 사용하기 위한 것입니다.
- 프레그먼트는 간단히 말해 액티비티보다 작은 단위의 화면이라고 할 수 있습니다.
- 프레그먼트를 사용하면 대형 화면에서 액티비티 화면을 분할하여 표현할 수 있으며, 스마트폰과 같은 소형 화면에서는 화면의 분할보다는 실행 중에 화면을 동적으로 추가하거나 제거하는데 더 많이 활용됩니다.
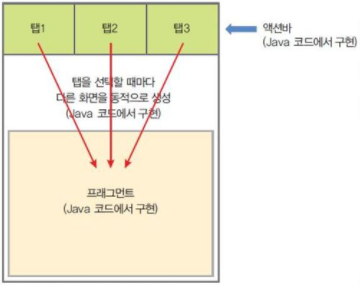
- 위 그림을 보면 우선 액션바를 생성한 후 탭위젯을 액션바에 등록하는 방법을 사용합니다.
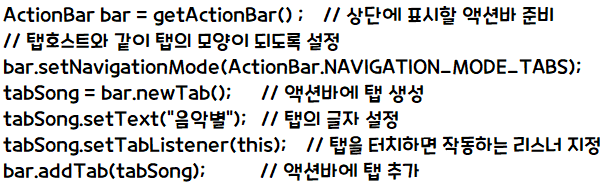
- 이 방법을 사용하기 위해서는 MainActivty에 TabListener 인터페이스를 구현해야 합니다. - 아래는 액션바에 탭을 추가하는 Java 코드의 형식입니다.
액션바도 사용을 하지 않으며 TabLayout을 사용하므로 AndroidLesson 리스트의 08-05 TabLayout 글을 참고하면 됩니다.
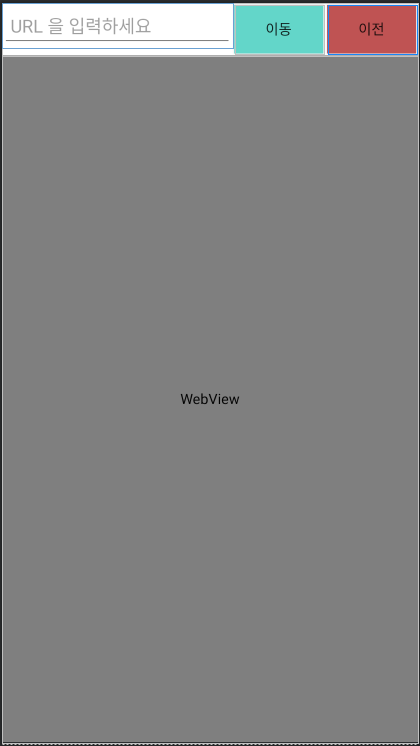
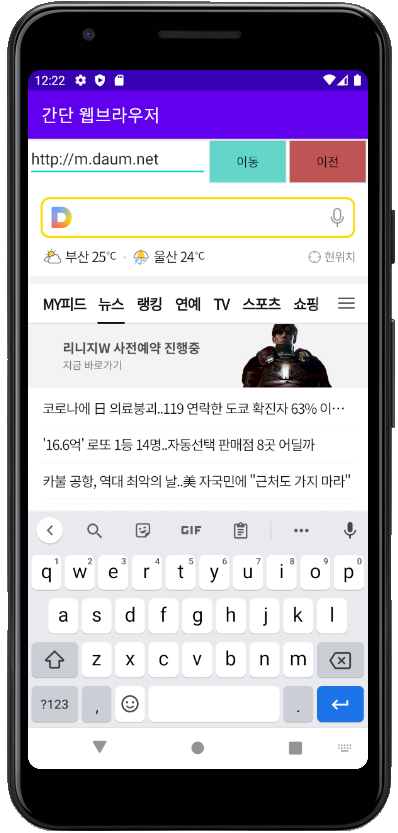
실습 6-2 간단 웹브라우저 앱 만들기
예제 6-17 activity_main.xml
<?xml version="1.0" encoding="utf-8"?>
<androidx.appcompat.widget.LinearLayoutCompat
    xmlns:android="http://schemas.android.com/apk/res/android"
    xmlns:app="http://schemas.android.com/apk/res-auto"
    xmlns:tools="http://schemas.android.com/tools"
    android:layout_width="match_parent"
    android:layout_height="match_parent"
    android:orientation="vertical"
    tools:context=".MainActivity">

    <androidx.appcompat.widget.LinearLayoutCompat
        android:layout_width="match_parent"
        android:layout_height="wrap_content"
        android:orientation="horizontal">
        <EditText
            android:id="@+id/etUrl"
            android:layout_width="0dp"
            android:layout_height="wrap_content"
            android:layout_weight="1"
            android:hint=" URL 을 입력하세요"/>
        <androidx.appcompat.widget.AppCompatButton
            android:id="@+id/btnMove"
            android:layout_width="wrap_content"
            android:layout_height="wrap_content"
            android:background="#63D6C9"
            android:text="이동"
            android:layout_margin="2dp"/>
        <androidx.appcompat.widget.AppCompatButton
            android:id="@+id/btnBack"
            android:layout_width="wrap_content"
            android:layout_height="wrap_content"
            android:background="#BF5353"
            android:text="이전"
            android:layout_margin="2dp"/>
    </androidx.appcompat.widget.LinearLayoutCompat>

    <WebView
        android:id="@+id/webView"
        android:layout_width="match_parent"
        android:layout_height="match_parent"/>

</androidx.appcompat.widget.LinearLayoutCompat>
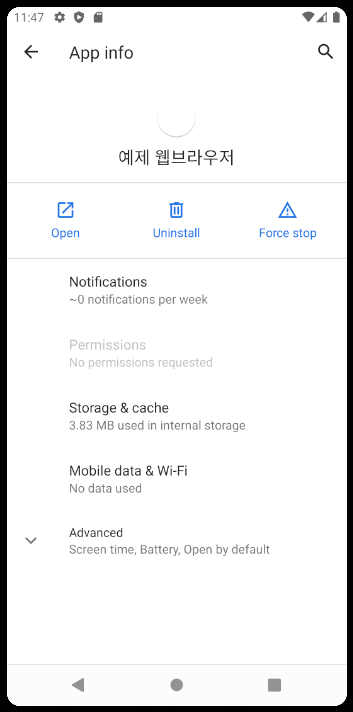
예제 6-18 AndroidManifest.xml
<?xml version="1.0" encoding="utf-8"?>
<manifest
    xmlns:android="http://schemas.android.com/apk/res/android"
    package="com.com.project6_2">

    <uses-permission android:name="android.permission.INTERNET" />

    <application
    	android:usesCleartextTraffic="true"
        android:allowBackup="true"
        android:icon="@drawable/ic_test"
        android:label="예제 웹브라우저"
        android:roundIcon="@drawable/ic_web"
        android:supportsRtl="true"
        android:theme="@style/Theme.Project6_2">
        <activity android:name=".MainActivity"
            android:label="간단 웹브라우저">
            <intent-filter>
                <action android:name="android.intent.action.MAIN" />

                <category android:name="android.intent.category.LAUNCHER" />
            </intent-filter>
        </activity>
    </application>

</manifest>
- <uses-permission android:name="android.permission.INTERNET"/>와 android:usesCleartextTraffic="true"를 꼭 AndoridManifest에 지정된 위치에 넣어줘야만 인터넷이 정상적으로 연결됩니다.
예제 6-19 Java 코드
public class MainActivity extends AppCompatActivity {

    private EditText etUrl;
    private AppCompatButton btnMove, btnBack;
    private WebView webView;

    @Override
    protected void onCreate(Bundle savedInstanceState) {
        super.onCreate(savedInstanceState);
        setContentView(R.layout.activity_main);
        init();
    }

    public void init(){
        etUrl = findViewById(R.id.etUrl);
        btnMove = findViewById(R.id.btnMove);
        btnBack = findViewById(R.id.btnBack);
        webView = findViewById(R.id.webView);
        webView.setWebViewClient(new WebViewClient());
    }

    public void initLr(){
        WebSettings webSet = webView.getSettings();
        webSet.setBuiltInZoomControls(true);
        webSet.setJavaScriptEnabled(true);

        btnMove.setOnClickListener(v -> {
            webView.loadUrl(etUrl.getText().toString());
        });

        btnBack.setOnClickListener(v -> {
            webView.goBack();
        });
    }

    class WebViewClient extends android.webkit.WebViewClient {
        @Override
        public boolean shouldOverrideUrlLoading(WebView view, String url) {
            return super.shouldOverrideUrlLoading(view, url);
        }
    }
}

Nil Desperandum <절대 절망하지 마라>