
개요
iOS 와 협업을 위해 JAVA/Spring으로 REST API 로 login 기능을 만들고자 합니다. 추후 복습을 위해 공부 과정을 기록하고자 합니다.
공부 중이므로 틀린 내용, 의견, 질문 있으시면 댓글 남겨주시면 감사하겠습니다.
전체 구조
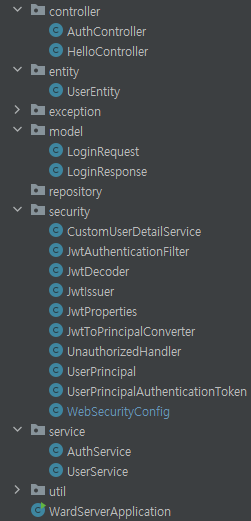
Basic Roles
단순 유저 기능만 필요한 시스템까지는 전 단계까지의 과정을 통해 구현 완료 되었습니다. 이번에는 관리자 기능이 필요한 경우에 대해 공부해보고자한다.
1. UserService 수정
학습을 위해 USER/ ADMIN 계정 만들기
1.1. 코드
package com.ward.ward_server.service;

import com.ward.ward_server.entity.UserEntity;
import org.springframework.stereotype.Service;

import java.util.Optional;

@Service
public class UserService {
    private static final String EXISTING_EMAIL = "test@test.com";
    private static final String ANOTHER_EMAIL = "next@test.com";

    public Optional<UserEntity> findByEmail(String email) {
        // TODO : Move this to a database
        if (EXISTING_EMAIL.equalsIgnoreCase(email)) {
            var user = new UserEntity();
            user.setId(1L);
            user.setEmail(EXISTING_EMAIL);
            user.setPassword("$2a$12$kivpiZrLUW9.44c4P4KpgOrgvH.Y6UkWNP9/nxV5sZW2K5ztE78e6"); // test
            user.setRole("ROLE_ADMIN");
            user.setExtraInfo("My nice admin");
            return Optional.of(user);
        } else if (ANOTHER_EMAIL.equalsIgnoreCase(email)) {
            var user = new UserEntity();
            user.setId(99L);
            user.setEmail(ANOTHER_EMAIL);
            user.setPassword("$2a$12$kivpiZrLUW9.44c4P4KpgOrgvH.Y6UkWNP9/nxV5sZW2K5ztE78e6"); // test
            user.setRole("ROLE_USER");
            user.setExtraInfo("My nice user");
            return Optional.of(user);
        }

        return Optional.empty();
    }
}
1.2. 설명
- 다수 유저 생성을 위한 ADMIN/USER 데이터 만들기
- Spring Security에서는 주로 역할(권한)을 설정할 때 "ROLE_" 접두사를 사용하는 관례가 있습니다. 따라서 "ROLE_USER"나 "ROLE_ADMIN"과 같이 설정하면, Spring Security는 실제로는 "USER"와 "ADMIN"만을 인식하게 됩니다.
- 예를 들어, hasRole("USER")와 같이 권한을 확인할 때 "ROLE"은 생략하고 "USER"만을 사용합니다. 그러므로 "ROLE"은 명시적으로 필요하지 않습니다. 다음과 같이 사용할 수 있습니다.
2. AuthController수정, AuthService 생성
컨트롤러 이렇게 복잡하게 만들지말자. AuthService 만들어서 Service 에서 담당하게 하자.
2.1. AuthController 코드
AuthController는 /auth/login 엔드포인트에서 로그인을 처리합니다.
AuthService를 통해 실제 로그인 처리를 위임합니다.
package com.ward.ward_server.controller;

import com.ward.ward_server.model.LoginRequest;
import com.ward.ward_server.model.LoginResponse;
import com.ward.ward_server.service.AuthService;
import lombok.RequiredArgsConstructor;
import org.springframework.validation.annotation.Validated;
import org.springframework.web.bind.annotation.PostMapping;
import org.springframework.web.bind.annotation.RequestBody;
import org.springframework.web.bind.annotation.RestController;

@RestController
@RequiredArgsConstructor
public class AuthController {
    private final AuthService authService;

    @PostMapping("/auth/login")
    public LoginResponse login(@RequestBody @Validated LoginRequest request){
        return authService.attemtLogion(request.getEmail(), request.getPassword());
    }
}
2.2. AuthService 코드
AuthService는 사용자 로그인을 처리하는 서비스입니다.
JwtIssuer를 사용하여 JWT 토큰을 발급합니다.
AuthenticationManager를 사용하여 사용자 인증을 수행하고, 성공한 경우 SecurityContextHolder에 인증 정보를 저장합니다.
인증된 Principal 정보를 사용하여 JWT 토큰을 생성하고, 이를 LoginResponse 객체로 반환합니다.
package com.ward.ward_server.service;

import com.ward.ward_server.model.LoginResponse;
import com.ward.ward_server.security.JwtIssuer;
import com.ward.ward_server.security.UserPrincipal;
import lombok.RequiredArgsConstructor;
import org.springframework.security.authentication.AuthenticationManager;
import org.springframework.security.authentication.UsernamePasswordAuthenticationToken;
import org.springframework.security.core.GrantedAuthority;
import org.springframework.security.core.context.SecurityContextHolder;
import org.springframework.stereotype.Service;

@Service
@RequiredArgsConstructor
public class AuthService {
    private final JwtIssuer jwtIssuer;
    private final AuthenticationManager authenticationManager;
    public LoginResponse attemtLogion(String email, String password) {
        var authentication = authenticationManager.authenticate(
                new UsernamePasswordAuthenticationToken(email, password)
        );
        SecurityContextHolder.getContext().setAuthentication(authentication);
        var principal = (UserPrincipal) authentication.getPrincipal();

        var roles = principal.getAuthorities().stream()
                .map(GrantedAuthority::getAuthority)
                .toList();

        var token = jwtIssuer.issue(principal.getUserId(), principal.getEmail(), roles);
        return LoginResponse.builder()
                .accessToken(token)
                .build();
    }
}
2.3. 설명
-
AuthController
- AuthController는 /auth/login 엔드포인트에서 로그인을 처리합니다.
AuthService를 통해 실제 로그인 처리를 위임합니다.
- AuthController는 /auth/login 엔드포인트에서 로그인을 처리합니다.
-
AuthService
- AuthService는 사용자 로그인을 처리하는 서비스입니다.
- JwtIssuer를 사용하여 JWT 토큰을 발급합니다.
- AuthenticationManager를 사용하여 사용자 인증을 수행하고, 성공한 경우 SecurityContextHolder에 인증 정보를 저장합니다.
- 인증된 Principal 정보를 사용하여 JWT 토큰을 생성하고, 이를 LoginResponse 객체로 반환합니다.
3. HelloController 에 관리자 endpoint 추가
3.1. 코드
package com.ward.ward_server.controller;

import com.ward.ward_server.security.UserPrincipal;
import lombok.RequiredArgsConstructor;
import org.springframework.security.core.annotation.AuthenticationPrincipal;
import org.springframework.web.bind.annotation.GetMapping;
import org.springframework.web.bind.annotation.RestController;

@RestController
@RequiredArgsConstructor
public class HelloController {

    @GetMapping("/")
    public String greeting(){
        return "Hello, World";
    }

    @GetMapping("/secured")
    public String secured(@AuthenticationPrincipal UserPrincipal principal) {
        return "If you see this, then you're logged in as user " + principal.getEmail()
                + " User ID: " + principal.getUserId();
    }

    @GetMapping("/admin")
    public String admin(@AuthenticationPrincipal UserPrincipal principal) {
        return "If you see this, then you are an Admin. User ID: " + principal.getUserId();
    }
}
3.2. 설명
- 추가된 부분 : admin()
- 이렇게 작성하고 "/admin" 하면 ADMIN 이 아니더라도 들어가짐. 이 부분 해결을 위해 WebSecurityConfig 수정
4. WebSecurityConfig 수정
"/admin" endpoint 만 하나 추가해서는 ADMIN/USER 구분 없이 다 허용됩니다. 이를 위해 Config 수정해야합니다.
4.1. 코드
.requestMatchers("/admin/**").hasRole("ADMIN")
한 줄 추가
4.2. 설명
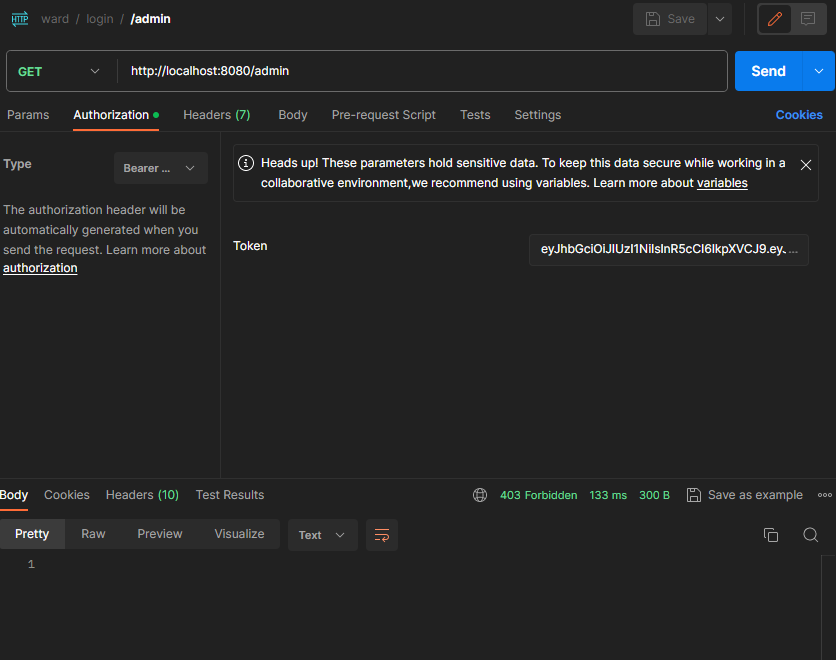
-
ADMIN 권한 있어야만 해당 경로 이동 가능합니다. 따라서 USER 계정으로 접근하면 위와 같이 403forbidden이 뜹니다.
- next@test.com(USER) - 403
- test@test.com(ADMIN) - 접근 허용
-
Spring Security에서는 주로 역할(권한)을 설정할 때 "ROLE_" 접두사를 사용하는 관례가 있습니다. 따라서 "ROLE_USER"나 "ROLE_ADMIN"과 같이 설정하면, Spring Security는 실제로는 "USER"와 "ADMIN"만을 인식하게 됩니다.
- 예를 들어, hasRole("USER")와 같이 권한을 확인할 때 "ROLE"은 생략하고 "USER"만을 사용합니다. 그러므로 "ROLE"은 명시적으로 필요하지 않습니다. 다음과 같이 사용할 수 있습니다.
5. 추가 정보
- 추가 정보
ADMIN 계정은 보통 개발자에 의해 설정되거나, 다른 ADMIN 계정에 의해 추가됩니다.(USER 계정에서 변경) 새로운 endpoint를 만들어서 ADMIN으로 등록시키는 방법은 일반적이지 않습니다.
참고