Git
Git
- 로컬에서 관리되는 버전 관리 시스템(VCS)
- 로컬에 저장소가 있고, 공유가 필요할 때 push
Github
- 클라우드 방식으로 관리되는 버전 관리 시스템(VCS)
- Git을 클라우드 형식으로 관리
상태
- Working Directory
- modified : 수정한 소스코드 및 파일이 아직 commit되지 않은 상태
- 원격에서 git clone을 받으면 working directory가 된다
- Staging Area
- Staged : 수정한 소스코드 및 파일을 곧 commit할 것이라고 표시한 상태
- Repository
- Commited : Staged된 파일들이 안전하게 저장되었다는 상태
-> 다시 working directory 영역으로 돌아간다
Launch Screen
- Scene & Logic 옵션이 불가능하기 때문에 정적인 이미지만 담을 수 있다.
- 영상이나 애니메이션 같은 건 main 스토리보드에서 launch screen인 척 하는거다
- 그렇다고 launch screen 파일을 삭제하면 리젝 사유가 될 수 있다
다음 화면 전환
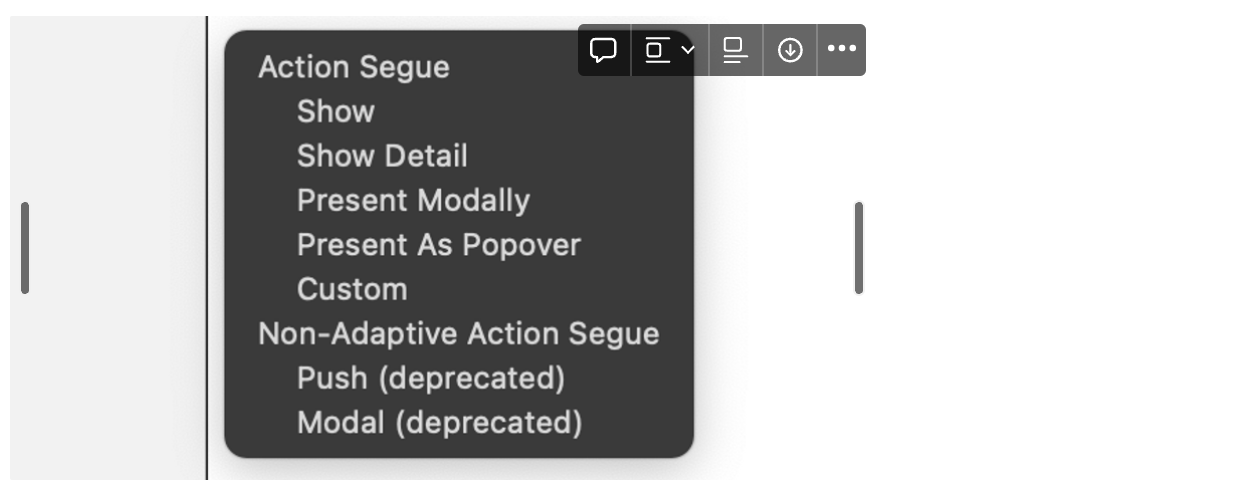
- Show (오 -> 왼 in Navigation Controller)
- 뒤로가기 버튼 자동으로 생김
- Show Detail (split view)
- Present Modally (아 -> 위)
- Present As Popover (iPad)
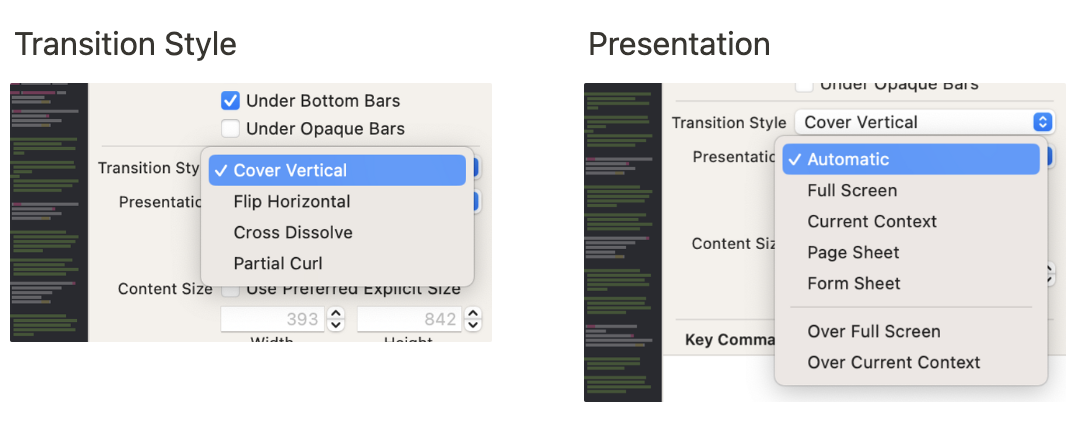
- full screen : 뒤로 돌아갈 수 없음
- over full screen : 배경 opacity 조절하면 이전 화면 보임
- current context : full screend이랑 비슷한데 bar가 보임
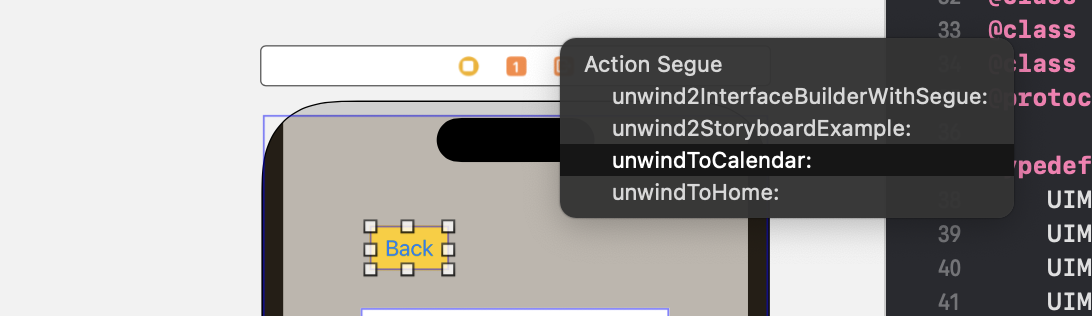
이전 화면 돌아가기
-
이전 화면에 코드'만' 작성
@IBAction func unwindToCalendar(_ segue: UIStoryboardSegue) { } -
다음 화면에서 버튼 exit 연결 후 함수 선택
라이브러리
- 필요한 기능들이 묶인 코드의 묶음
CocoaPod
- 지원하는 라이브러리 많고, 빌드 속도 느림
Carthage
- 지원하는 라이브러리 별로 없고, 빌드 속소 빠름
Swift Package Manager
- 버튼 몇 개면 설치 가능
- 연습
- FSCalendar
- HoshiTextField
- IQ keyboard
- King Fisher
직접 설치
뷰 컨트롤러의 생명주기
함수
- viewDidLoad : 화면 뜨기 전
- viewWillAppear : 화면 뜨기 직전
- viewDidAppear : 화면 완벽하게 뜬 후
- viewWillDisappear : 화면이 사라지기 직전
- viewDidDisappear : 화면 사라졌어
포인트
- Naviagtion Controller나 Tapbar Controller 등의 root view controller는
다른 화면 갔다와도, viewDidLoad를 단 한번만 실행한다
- 기본적으로 새로운 화면이 나오면, 이전 화면은 disappear한다
- 하지만 모달 창 같은 경우는, 아직 이전 창이 열려있다고 생각해야 하기 때문에 disappear 함수가 실행되지 않는다
- show : disappear
- show detail : NOT disappear
- present modally
- automatic (≑ page sheet) : NOT disappear
- fullscreen : disappear
- current context : NOT disappear
- 하지만 모달 창 같은 경우는, 아직 이전 창이 열려있다고 생각해야 하기 때문에 disappear 함수가 실행되지 않는다
- 순서 (1 -> 2)
- 1 will disappear
- 2 will appear
- 2 did appear
- 1 did disappear
Saving Data
| UserDefaults | DataBase |
|---|---|
| 단일 데이터 값 (경량) | 유사한 대량 데이터 값 (중량) |
| 자동 로그인 여부, 알림 수신 여부, 인앱 결제 여부 이메일, 닉네임, 성별 등 간단한 사용자 기본 설정 앱 테마, 앱 첫 실행, 팝업 다시 보지 않기 등 | 제목, 메모, 별점, 배우, 줄거리 등 영화 관리 데이터 감정, 내용, 위치, 날짜 등 작성한 일기 데이터 상대방과 주고받은 채팅 내역 데이터 |
| Apple에서 제공해주는 key-value 형태의 기본 저장소 | Core data (by Apple) Realm, SQLite |
- 앱이 삭제되면 데이터는 함께 사라진다
- 앱의 삭제 유무와 관계 없이 데이터를 저장하고 싶은 경우에는,
백업/복구 기능을 지원하거나 KeyChain, iCloud 동기화 등의 기능을 사용해야 함
iOS의 SandBox (사물함)
- Bundle Container : 앱 용량
- Data Container : 문서 및 데이터 용량
- iCloud Container
Property Wrapper
- 여러 프로퍼티들에 동일한 관리 코드를 작성해줘야 하는 경우, 유용하게 사용 가능
- When you use a property wrapper, you write the management code once when you define the wrapper, and then reuse that management code by applying it to multiple properties
- 기본 형태
- propertyWraper 어노테이션
- wrapped Value
- projected Value (선택)
// property wrapper 사용
@propertyWrapper
struct TwelveOrLess {
	private var number: Int

	init() {
		self.number = 0
	}

	var wrappedValue: Int {  // wrappedValue 네이밍 필수
		get { return number }
		set { number = min(newValue, 12) }
	}
}

struct SmallRectangle {
	@TwelveOrLess var height: Int
	@TwelveOrLess var width: Int
}

var rectangle = SmallRectangle()
print(rectangle.height)  // 0
rectangle.height = 10
print(rectangle.height)  // 10
rectangler.height = 24
print(rectangle.height)  // 12


// 기존 코드
struct SmallRectangle {
	var height: Int {
		get { self.height }
		set { self.height = min(newValue, 12) }
	}

	var width: Int {
		get { self.width }
		set { self.width = min(newValue, 12) }
	}
}

// projected Value
@propertyWrapper
struct SmallNumber {
	private var number = 0
	var projectedValue = false  // projectedValue 네이밍 사용 필수

	var wrappedValue: Int {
		get { return number }
		set {
					if newValue > 12 {
						number = 12
						projectedValue = true  // 값이 조정되었다는 뜻으로 사용
					else {
						number = newValue
						projectedValue = false
					}
		}
	}

	init() {self.number = 0}
}

struct SomeStruct {
	@SmallNumber var num: Int
}
var s = SomeStruct()
s.num = 4

print(s.num)	// wrappedValue 접근
print(s.$num)	// projectedValue 접근
활용 - UserDefaults
Table View Controller
- 테이블 뷰 : 많은 데이터를 반복적으로 다룰 때
-
TableView = Section + Cell
-
TableView
- Content
- Static
- Dynamic
- View
- Header (인스타 스토리)
- Footer (화면아래 정보)
- Style
- Plain
- Grouped
- Inset Grouped
- Content
-
Section
- System
- Custom
-
Cell
- System
- Basic : textLabel, imageView
- Subtitle : textLabel, imageView, detailTextLabel
- Right detail : textLabel, imageView, detailTextLabel
- Left detail : textLabel, detailTextLabel
- Custom
- Contents / Accessory
- System
-
셀의 재사용 메커니즘
- 필요한 셀을 모두 생성하는 건 부담스럽기 때문에 스크롤해서 없어진 셀을 재활용해서 다시 사용한다
- 약간 컨베이어벨트같은 느낌
dequeReusableCell- 떨이처리 제대로 안해주면 위에 없어졌던 셀이 아래에서 또 올라올 수도 있다
- if -> else 써주기
- switch -> default 써주기
메서드
-
section의 개수 (디폴트 : 1)
override func numberOfSections(in tableView: UITableView) -> Int { return 2 } -
section의 헤더 이름 (디폴트 : nil)
override func tableView(_ tableView: UITableView, titleForHeaderInSection section: Int) -> String? { return (section == 0) ? "첫 번째 섹션" : "첫 번째가 아닌 섹션" } -
section의 cell 개수 (디폴트 : 1)
override func tableView(_ tableView: UITableView, numberOfRowsInSection section: Int) -> Int { return (section == 0) ? studyList.count : anotherList.count } -
section의 cell 데이터 및 디자인 처리
override func tableView(_ tableView: UITableView, cellForRowAt indexPath: IndexPath) -> UITableViewCell { let cell = tableView.dequeueReusableCell(withIdentifier: "todoCell")! // [0, 0] 좌표에서 앞 : section / 뒤 : row 라고 생각하면 될 듯 if (indexPath.section == 0) { cell.textLabel?.text = studyList[indexPath.row] } else { cell.textLabel?.text = anotherList[indexPath.row] } return cell } -
section의 cell 높이
override func tableView(_ tableView: UITableView, heightForRowAt indexPath: IndexPath) -> CGFloat { if indexPath.row == 0 { return 90 } else if indexPath.row == 1 { return 150 } return 50 } // 매번(셀마다) 위 함수를 실행시키는 건 좀 비효율적이고, // viewDidLoad에서 모든 셀의 높이를 통일시키는 방법이 있다 // 모든 셀이 같은 높이를 가지면 아래 방식이 더 낫다 override func viewDidLoad() { super.viewDidLoad() tableView.rowHeight = 60 } -
화면 새로 로드
tableView.reloadDate() -
셀 선택 시
override func tableView(_ tableView: UITableView, didSelectRowAt indexPath: IndexPath) {
    print("select", indexPath)

    //tableView.deselectRow(at: indexPath, animated: true)
}
