👩🏻💻 오늘 공부한 내용
✅ Type 'Wish' does not conform to protocol 'Decodable' / 'Encodable' 오류 ( 참고 사이트 )
UIImage가 Encodable 및 Decodable 프로토콜을 따르지 않아서 생기는 오류.
- 변경 전
struct Wish: Codable {
    var timestamp: TimeInterval
    var name: String
    var tag: [String]
    var content: String
    var photo: [UIImage] // 오류
    var link: String
    var place: String
}- 변경 후
struct Wish: Codable {
    var timestamp: TimeInterval
    var name: String
    var tag: [String]
    var content: String
    var photo: [String] // [String]으로 바꿔줌
    var link: String
    var place: String
}
✅ Notification ( 부스트코스 )

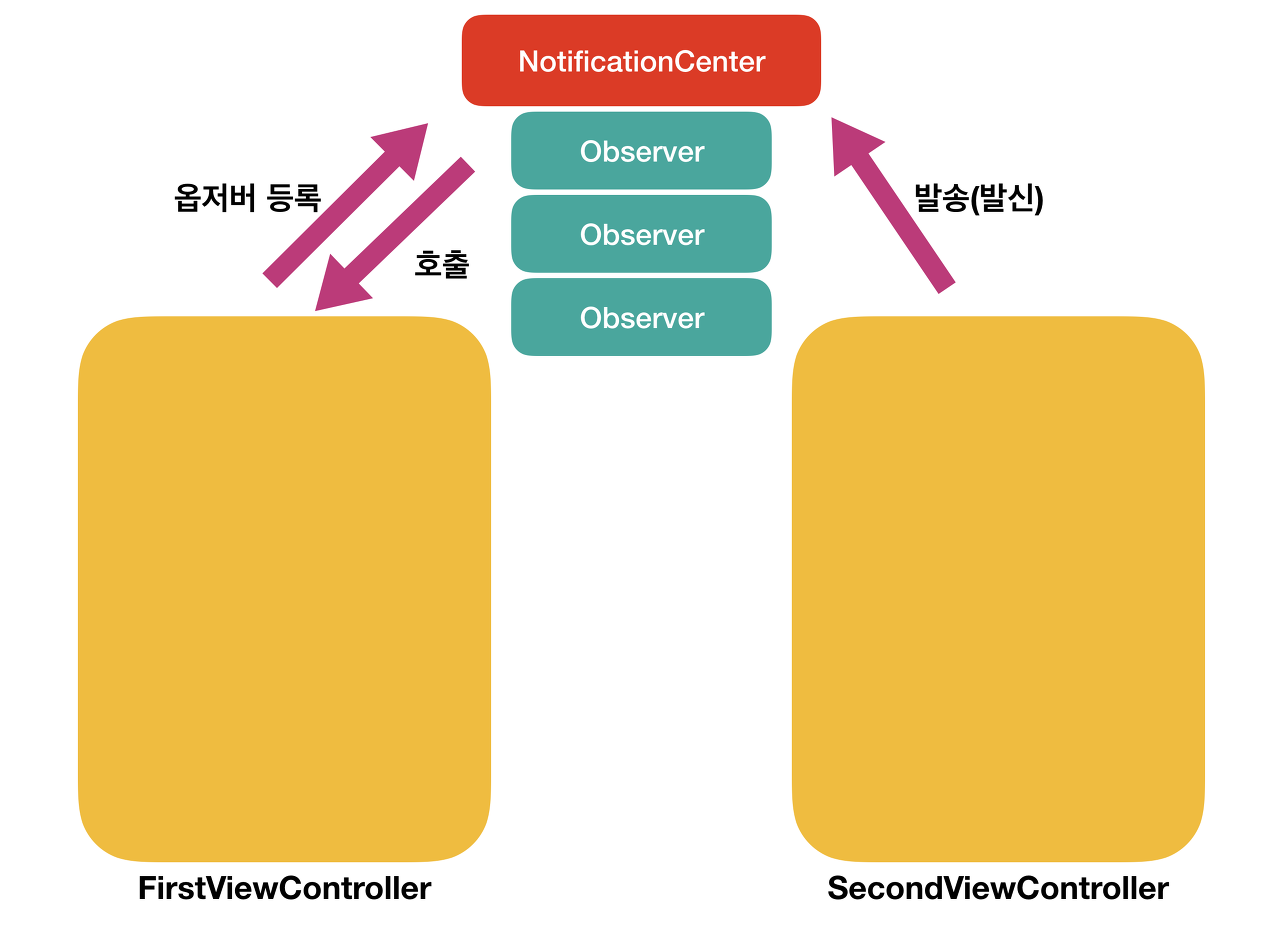
FirstViewController에서 옵저버를 등록하고 SecondViewController에서 발송하면 다시 FirstController에서 호출되는 방식.
- 주요 프로퍼티
- var name: Notification.Name // 알림을 식별하는 태그
- var object: Any? // 발송자가 옵저버에게 보내려고 하는 객체. 주로 발송자 객체를 전달하는데 쓰임
- var userInfo:[AnyHashable: Any]? // 노티피케이션과 관련된 값 또는 객체의 저장소
- NotificationCenter : Notification을 발송하면 NotificationCenter에서 메세지를 전달한 옵저버를 처리할 때까지 대기합니다. 즉, 흐름이 동기적(synchronous)으로 흘러갑니다. 노티피케이션을 비동기적으로 사용하려면 NotificationQueue를 사용하면 된다.
✅ Notification 활용하여 서버에서 데이터를 받은 후 collectionView를 reloaddata() 하기
- Notification 생성
let DidReceiveWishsNotification: Notification.Name = Notification.Name("DidReceiveWishsNotification")- Notification 발송
    func loadData(){
        db.observeSingleEvent(of:.value) { (snapshot) in
            guard let wishValue = snapshot.value as? [String:Any] else {
                return
            }
            print("---> snapshot : \(wishValue.values)")
            do {
                let data = try JSONSerialization.data(withJSONObject: Array(wishValue.values), options: [])
                let decoder = JSONDecoder()
                // 현재 data는 Array안에 Dictionary가 있는 형태인데 [Wish]로 디코딩 하기
                let wish = try decoder.decode([WishDB].self, from: data)
                let wishList = wish.sorted{ $0.timestamp > $1.timestamp}
 		// ----> Notification 발송
                NotificationCenter.default.post(name: DidReceiveWishsNotification, object: nil, userInfo: ["wishs" :wishList])
            }
            catch {
                print("---> error : \(error)")
            }
        }
}- 전송 받을 ViewController에 옵저버 등록
    override func viewDidLoad() {
        super.viewDidLoad()
        // Do any additional setup after loading the view.
        print("--> 실행")
        NotificationCenter.default.addObserver(self, selector: #selector(self.didReciveWishsNotification(_:)), name: DidReceiveWishsNotification , object: nil)
}- 옵저버 호출
    @objc func didReciveWishsNotification(_ noti: Notification){
        guard let wishs = noti.userInfo?["wishs"] as? [Wish] else { return }
        self.wishListViewModel.setWish(wishs)

        DispatchQueue.main.async {
            self.collectionView.reloadData()
        }
    }
✅ M1 HomeBrew 설치 ( 참고 사이트 )
# We'll be installing Homebrew in the /opt directory.
cd /opt

# Create a directory for Homebrew. This requires root permissions.
sudo mkdir homebrew

# Make us the owner of the directory so that we no longer require root permissions.
sudo chown -R $(whoami) /opt/homebrew

# Download and unzip Homebrew. This command can be found at https://docs.brew.sh/Installation.
curl -L https://github.com/Homebrew/brew/tarball/master | tar xz --strip 1 -C homebrew

# Add the Homebrew bin directory to the PATH. If you don't use zsh, you'll need to do this yourself.
echo "export PATH=/opt/homebrew/bin:$PATH" >> ~/.zshrc
✍🏻 오늘은..
오늘은 어제 서버에 저장한 정보들을 불러와 collectionView에 띄우는것까지 구현하였다. 데이터를 받아오는 시간이 오래걸려 Notification을 통해 collectionView를 update 해주는 방법을 공부해보았다. 받아온 데이터를 띄우는데 총 7초 정도 시간이 걸려 아주 답답했다. 다음엔 시간을 단축시킬 수 있는 방법을 찾아봐야겠다..
카카오맵과 네이버맵 중 네이버맵을 사용하기로 결정했다. 네이버맵이 정보가 더 많아 네이버맵으로 선택할 수 밖에 없었다. 가이드를 보며 차근차근해가고 있는데 M1칩이라 그런지 설치가 기존 방법과 다른 경우가 종종 있는듯 하다.. 괜히 M1 샀나 싶다..😭
내일은 맵api를 사용해 장소추가를 구현해봐야겠다 😊
