이미지 데이터 전처리란 ?
CNN 모델의 성능을 향상시키기 위해서는 데이터 전처리가 필수적!!
원본 이미지를 모델이 이해할 수 있는 형태로 변환하고, 노이즈를 제거하며, 데이터의 다양성을 높여 모델의 일반화 능력을 향상시킨다.
✅사용할 라이브러리
📌Pandas
import pandas as pd- 역할 : CSV 파일로 된 데이터셋을 로드하고, 데이터프레임 형태로 다룸
📌Numpy
import numpy as np- 역할 : 배열 및 행렬 연산을 효율적으로 수행하며, 이미지 데이터를 배열 형태로 처리함
📌OpenCV
import cv2- 역할 : 이미지 처리 및 조작을 위한 함수들을 제공하며, 이미지 크기 조정 등에 사용됨
📌TensorFlow Keras
from tensorflow.keras.utils import to_categorical, rom tensorflow.keras.preprocessing.image import ImageDataGenerator- 딥러닝 모델 구현 및 학습을 위한 함수를 제공. 라벨 인코딩 및 데이터 증강에 사용됨
📌Scikit-learn
from sklearn.model_selection import train_test_split- 데이터 분할, 모델 평가 등의 머신러닝 관련 기느을 제공함
✅데이터셋 로드
예시 데이터셋 : Kaggle Sign Language MNIST Dataset
- 구성 : 28 * 28 픽셀의 흑백 이미지이며, 각 이미지에는 해당 알파벳 라벨이 부여되어 있음

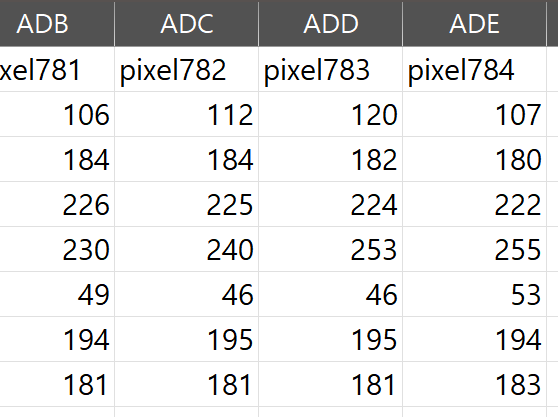
이런 이미지가 픽셀값으로 이뤄진 csv 파일 형태로 제공됨
28 * 28 픽셀, 총 784픽셀로 이뤄져 784행까지 존재
레이블의 수(행의 수)는 이미지의 개수와 동일
레이블의 종류는 25가지 0~24, 근데 이미지 종류는 24가지. 알파벳 j,z는 제외(동적인 움직임)
알파벳의 순서를 유지하기 위해 그냥 레이블 9로 설정
📌데이터셋 로드
 import pandas as pd
 #데이터 로드
 train_df = pd.read_csv('sign_mnist_train.csv')
 test_df = pd.read_csv('sign_mnist_test.csv')
✅데이터 구조 및 내용 확인
📌데이터 구조 확인
 import pandas as pd
#데이터 로드
train_df = pd.read_csv('sign_mnist_train.csv')
test_df = pd.read_csv('sign_mnist_test.csv')
✅이미지와 라벨 분리
= 이미지 데이터와 라벨 데이터를 분리하여 각각의 전처리를 수행, 서로 다른 작업을 필요로 하기 때문에
- 이미지 데이터 : 크기 조정, 정규화, 데이터 증강 등과 같은 이미지 전처리 작업이 필요함
- 라벨 데이터 : 모델이 이해할 수 있는 형태로 인코딩(ex:원-핫 인코딩)하는 작업이 필요
📌라벨 데이터 추출
= 라벨 데이터를 넘파이 배열로 추출함train_labels = train_df['label'].values
📌이미지 데이터 추출
= 이미지 픽셀 값만을 추출train_images = train_df.drop('label', axis=1).values
✅이미지 크기 조정(Resizing)
= 모든 이미지를 동일한 크기로 조정하여 모델의 입력 형태를 통일함
- 더 큰 이미지 크기는 더 많은 세부 정보를 포홤할 수 있지만, 연산량이 증가함
📌이미지 크기 조정 함수
def resize_images(images, size=(64, 64)):
    resized_images = []
    for img in images:
        img = img.reshape(28, 28)  # 원본 이미지가 28x28 픽셀이므로 재구성
        resized_img = cv2.resize(img, size, interpolation=cv2.INTER_AREA)
        resized_images.append(resized_img)
    return np.array(resized_images)

#이미지 크기 조정 적용
train_images_resized = resize_images(train_images)- OpenCV의 cv2.resize 함수를 사용하여 이미지를 64*64로 확대함.
✅정규화(Normalization)
= 픽셀 값을 0~1 범위로 스케일링하여 모델의 학습을 안정화함
- astype('float32')를 통해 데이터 타입을 부동소수점으로 변경함
- 픽셀값을 255로 나누어 0~1 범위로 변환함
📌데이터 타입 변환 및 정규화
train_images_normalized = train_images_resized.astype('float32') / 255.0✅라벨 인코딩(Label Encoding)
= 라벨 (이미지의 정답)을 모델이 이해할 수 있는 형태로 변환함
- 다중 클래스 분류를 위해 One-Hot Encoding을 사용함
- np.unique를 사용하여 고유한 라벨 값을 확인하고, 클래스 수를 결정
- to_categorical을 통해 라벨을 원-핫 벡터로 변환
📌 코드
from tensorflow.keras.utils import to_categorical

# 클래스 수 확인
num_classes = len(np.unique(train_labels))

# 라벨 인코딩
train_labels_encoded = to_categorical(train_labels, num_classes)
✅데이터 분할(Train/Test Split)
= 모델의 일반화 성능을 평가하기 위해 데이터를 학습용과 검증용으로 분할함
- test_size=0.2는 전체 데이터의 20%를 검증용으로 사용합니다.
- random_state=42는 결과의 재현성을 위해 설정합니다.
- shuffle=True로 데이터를 무작위로 섞습니다
📌 코드
from sklearn.model_selection import train_test_split

# 데이터 분할
X_train, X_val, y_train, y_val = train_test_split(
    train_images_normalized, train_labels_encoded, test_size=0.2, random_state=42, shuffle=True)
✅데이터 증강(Data Augmentation)
= 데이터의 다양성을 높여 모델의 일반화 능력을 향상시킴
- 데이터 부족 문제 해결
- 학습 데이터 과적합 방지
대표적인 데이터 증강 방법
1. 기하학적 변환
- 회전,이동,확대 및 축소,좌우/상하 반전
*주의사항 : 위치나 방향이 중요한 이미지는 회전,반전을 이용하면 안됨!!
2. 색상 및 밝기 조정
3. 노이즈 추가 - 이미지에 가우시안 분포를 따르는 노이즈를 추가
- 회전,이동,확대 및 축소,좌우/상하 반전
TensorFlow Keras를 이용한 데이터 증강
= Keras의 ImageDataGenerator를 사용하여 쉽게 데이터 증강을 구현할 수 있음
📌 코드
from tensorflow.keras.preprocessing.image import ImageDataGenerator

# 데이터 증강 설정
datagen = ImageDataGenerator(
    rotation_range=15,           # 이미지 회전 범위 (각도 단위)
    width_shift_range=0.1,       # 가로 이동 범위 (이미지 너비의 10%)
    height_shift_range=0.1,      # 세로 이동 범위 (이미지 높이의 10%)
    zoom_range=0.1,              # 확대 및 축소 범위 (10%)
    horizontal_flip=True,        # 좌우 반전 수행 여부
    brightness_range=[0.8, 1.2], # 밝기 조절 범위 (80% ~ 120%)
    fill_mode='nearest'          # 이미지 변환 시 생기는 빈 공간을 가장 가까운 픽셀로 채움
)

# 채널 차원 추가
X_train_expanded = X_train.reshape(-1, 64, 64, 1) # -1은 이미지의 개수(라벨 수)를 자동으로 저장

# 데이터 증강 적용
datagen.fit(X_train_expanded)
📢 채널 차원을 추가하는 이유
= ImageDataGenerator는 데이터 증강을 수행할 때 입력 데이터가 4차원 배열이어야 함.
일반적인 입력 데이터 형태는 (샘플 수, 높이, 너비, 채널 수)
- 컬러 이미지의 경우 : 채널 수가 3(RGB)이므로 (샘플 수, 높이, 너비, 3) 형태
- 흑백 이미지의 경우 : 채널 수가 1이므로 (샘플 수, 높이, 너비, 1) 형태
💻 전체 전처리 코드
import pandas as pd
import numpy as np
import cv2
from tensorflow.keras.utils import to_categorical
from sklearn.model_selection import train_test_split
from tensorflow.keras.preprocessing.image import ImageDataGenerator

# 1. 데이터 로드
train_df = pd.read_csv('sign_mnist_train.csv')

# 2. 이미지와 라벨 분리
train_labels = train_df['label'].values            # 라벨 데이터
train_images = train_df.drop('label', axis=1).values  # 이미지 데이터

# 3. 이미지 형태 재구성
train_images_reshaped = train_images.reshape(-1, 28, 28)

# 4. 이미지 크기 조정
def resize_images(images, size=(64, 64)):
    resized_images = []
    for img in images:
        resized_img = cv2.resize(img, size, interpolation=cv2.INTER_AREA)
        resized_images.append(resized_img)
    return np.array(resized_images)

train_images_resized = resize_images(train_images_reshaped)

# 5. 정규화
train_images_float = train_images_resized.astype('float32')
train_images_normalized = train_images_float / 255.0

# 6. 라벨 인코딩
num_classes = len(np.unique(train_labels))
train_labels_encoded = to_categorical(train_labels, num_classes)

# 7. 데이터 분할
X_train, X_val, y_train, y_val = train_test_split(
    train_images_normalized, train_labels_encoded, test_size=0.2, random_state=42, shuffle=True)

# 8. 데이터 증강
datagen = ImageDataGenerator(
    rotation_range=15,           # 최대 15도 회전
    width_shift_range=0.1,       # 가로로 최대 10% 이동
    height_shift_range=0.1,      # 세로로 최대 10% 이동
    zoom_range=0.1,              # 최대 10% 확대/축소
    horizontal_flip=True,        # 좌우 반전
    brightness_range=[0.8, 1.2], # 밝기를 80%에서 120% 사이로 조정
    fill_mode='nearest'          # 변환 시 생기는 빈 공간을 가장 가까운 픽셀로 채움
)

# 채널 차원 추가
X_train_expanded = X_train.reshape(-1, 64, 64, 1)

# 데이터 증강 적용
datagen.fit(X_train_expanded)