
MVC
- Model View Controller
- 소프트웨어 설계와 관련된 디자인 패턴
- 상황에 따라 자주 쓰이는 설계 방법을 정리한 코딩 방법론
- MVC 이용 웹 프레임워크
(1) PHP
(2) Django
(3) Express
(4) Angular
etc
장점
- 유지보수가 용이
- 패턴들을 구분해 개발함.
- 유연성이 높음
- 확장성이 높음
- 협업에 용이
단점
- 완벽한 의존성 분리가 어려움
- 설계 단계가 복잡함
- 설계 시간이 오래 걸림
- 클래스(단위)가 많아
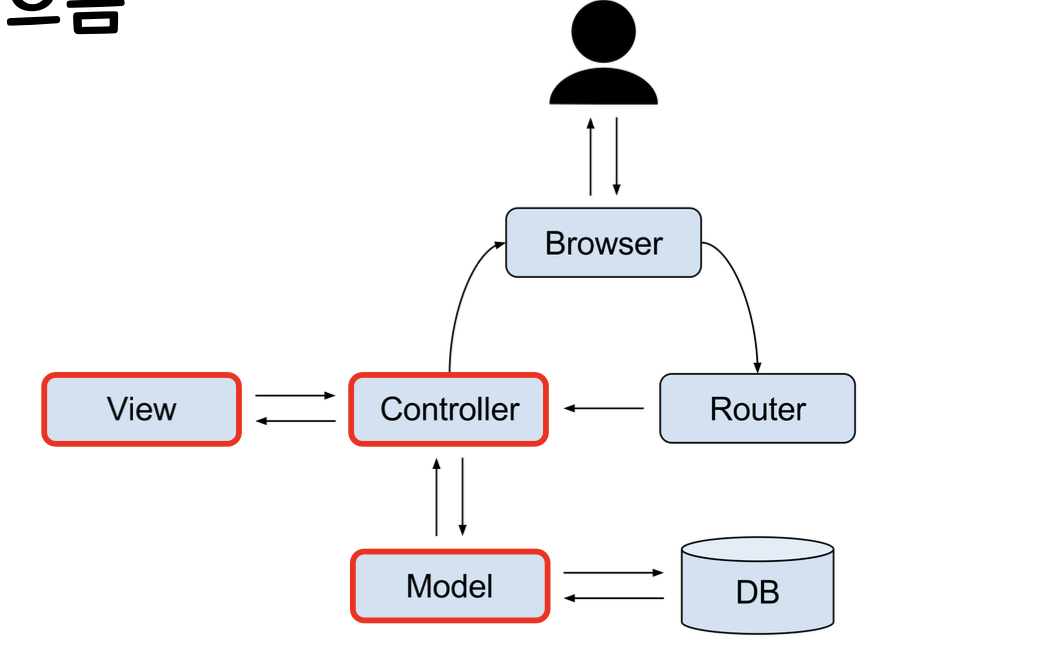
MVC 흐름
-
USER는 DB에 접근할 필요가 없다.
-
백엔드에 관련된 로직들이 대부분
Controller에 저장된다.
: View와 Model을 연결해주는 부분 -
UI와 관련된 것을 처리하는 부분인View는 브라우저라고 생각하면 된다. (즉, 사용자에게 보여지는 부분) -
데이터베이스 관련된 건 대부분
Model에 저장된다. (데이터를 처리하는 부분)
Node.js MVC 구조
-
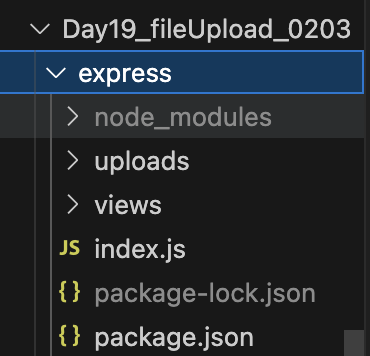
MVC 패턴을 적용하기 전 폴더 구조
-
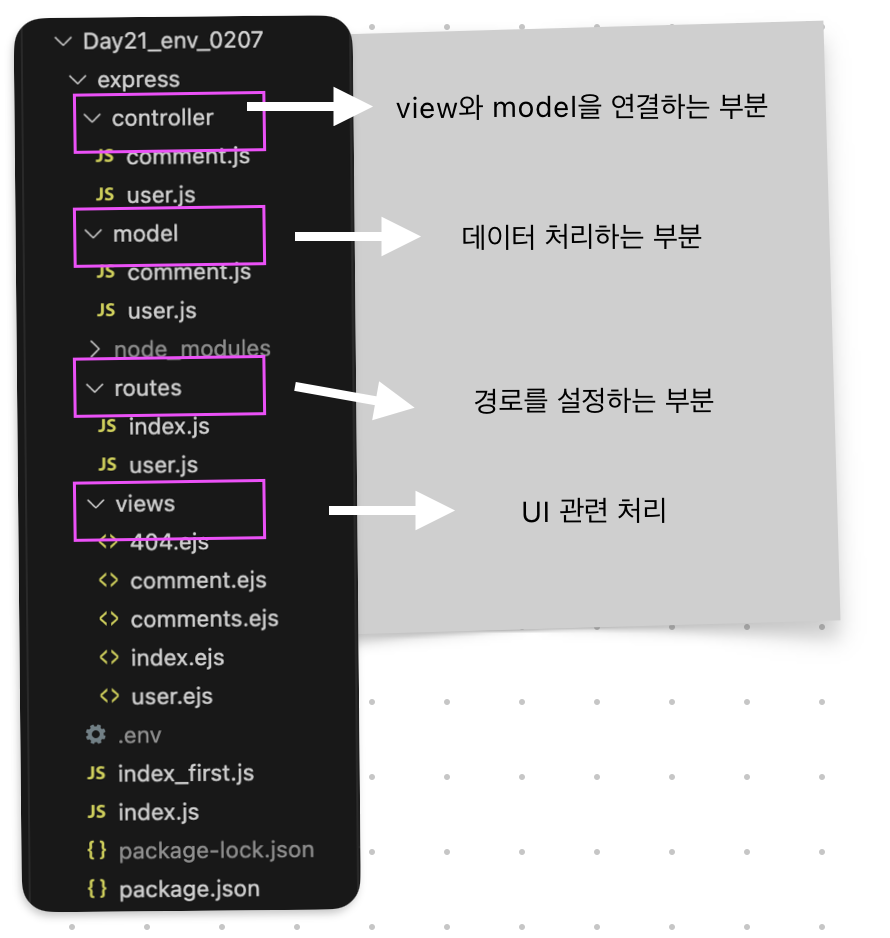
MVC 패턴을 적용한 폴더 구조
index.js(app.js)
const router = require('./routes/index'); //index는 생략 가능 ---(1)
// const router = require('./routes'); (1)과 동일한 의미
app.use('/', router); // /뒤에 무엇을 붙이든간에 router 파일을 보여주는 공통적인 이름이다. /board 라고 설정을 하면, /board/comment 이런식으로 보여준다.
// localhost:PORT/ 경로를 기본으로 ./routes/index.js파일에 선언한대로 동작
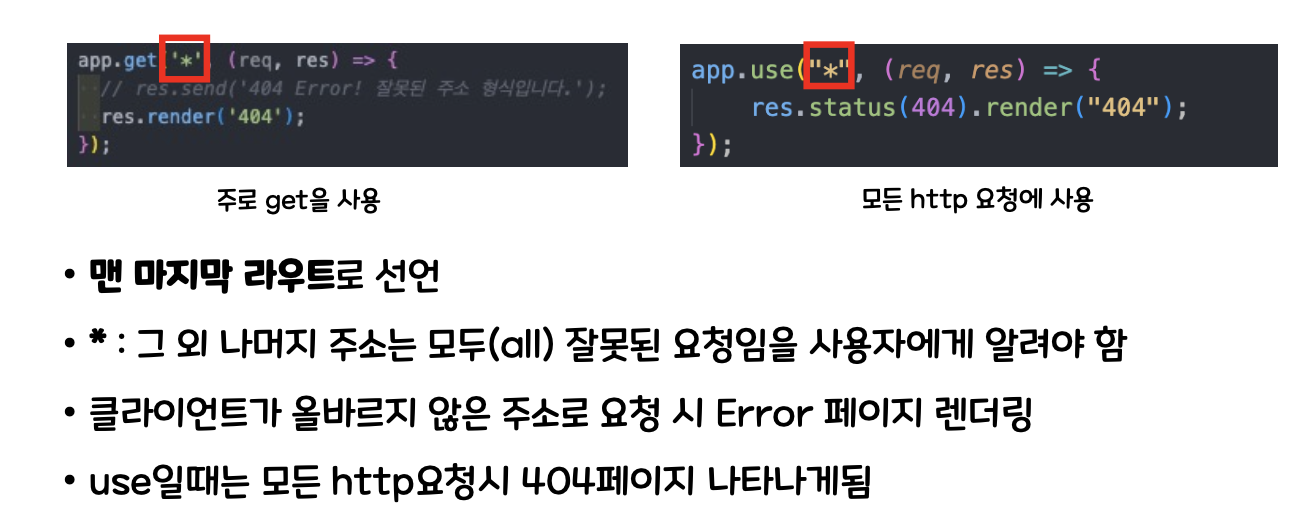
//오류처리
app.use('*', (req, res) => {
res.status(404).render('404');
}); //status를 통해 서버가 클라이언트에게 전달하는 HTTP 응답의 상태를 지정, 모든 http 요청에 사용➡️ Router 불러오는 부분
➡️ 특정 시작 url의 역할 구분 가능
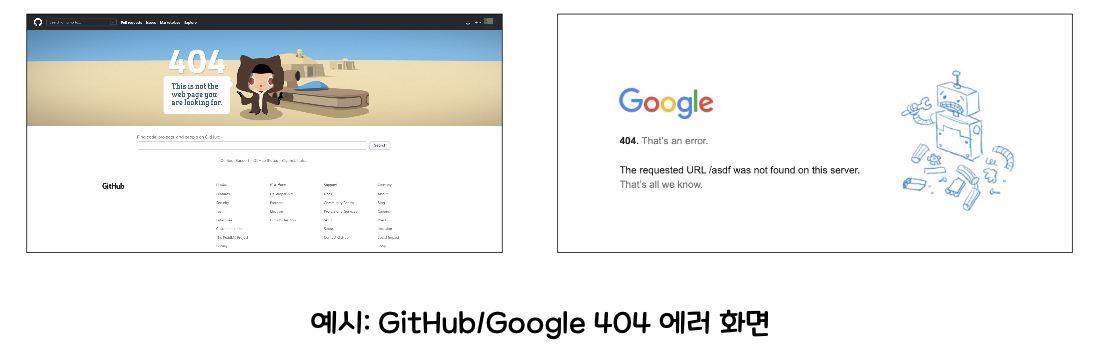
📌 404 Error
클라이언트가 잘못된 주소로 접속했을 때 발생하는 Error
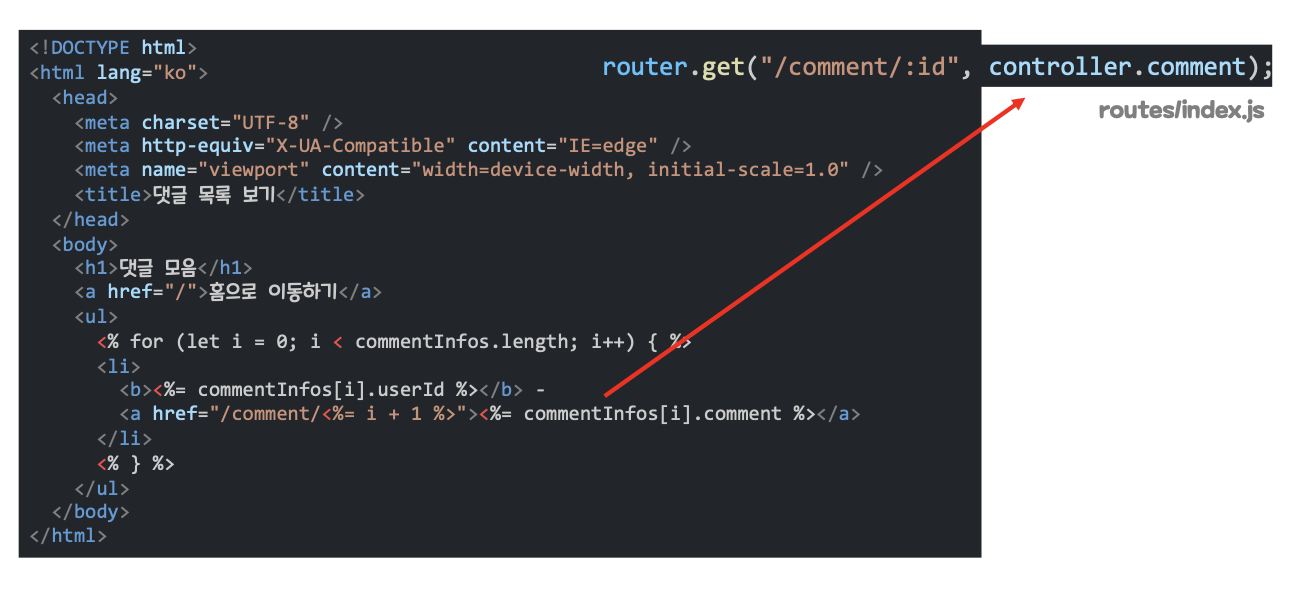
routes/index.js
const express = require('express');
const router = express.Router();
const controller = require('../controller/comment'); //js는 생략가능

//router
router.get('/', controller.main); // GET /

//이 밑에 것들은 controller로 보내진다.
router.get('/comments', controller.comments);// GET /comments

//외부에서 router 담은 걸 사용가능하다.
module.exports = router;
➡️ 경로를 controller와 연결해 설정 가능
model/comment.js
//임시db
//길이가 4인 배열
//key값들은 동일해야함
const comments = [
    {
        id: 1,
        userid: 'hello',
        date: '2024-02-07',
        comment: '안녕하세요',
    },
    {
        id: 2,
        userid: 'haaaapy',
        date: '2023-02-04',
        comment: '행복하세요',
    },
    {
        id: 3,
        userid: 'Good',
        date: '2024-02-10',
        comment: '좋은 날이에요',
    },
    {
        id: 4,
        userid: 'lucky',
        date: '2024-03-07',
        comment: '럭키한 날이 가득하길 바랍니다.',
    },
];

//하단에 작성, 외부에서 사용할 수 있게 작성
module.exports = comments;
➡️ 객체로 만들 수 있고, 함수로도 만들 수 있다.
➡️ (임시) DB에서 댓글 목록 데이터를 가져왔음을 가정(현 예시)
- 댓글 목록은 배열로 가져옴
- 각 댓글은 객체로 저장됨
controller/Cmain.js
exports.main = (req, res) => {
  res.render('index');
 }

exports.comments = (req, res) => {
  res.render('comments', { list: comments });
 }
➡️ 경로와 연결될 함수 내용을 정의
➡️ 경로와 연결되는 함수이기에 req객체, res객체를 사용 가능하다.
controller - model
const commentsModel = require('../model/comment');

const main = (req, res) => {
    res.render('index');
};

const comments = (req, res) => {
    res.render('comments', { list: commentsModel });
};

const comment = (req, res) => {
    console.log(req.params);
    console.log(req.params.page); //값만 표시
    const page = Number(req.params.page);
    //comments 배열의 요소에 접근 => 즉, 객체 하나하나에 접근
    res.render('comment', { data: commentsModel[page - 1] });
};
module.exports = { main, comments, comment };
➡️ 컨트롤러와 모델을 연결한다.
views/comments.ejs
➡️ 사용자에게 보여지는 브라우저로 ejs파일로 쓰인다.
예제코드(MVC 구조를 사용하여 댓글보기)
controller,model,routes이렇게 세개로 세분화하여 폴더를 나눠야한다.
controller - view와 model을 연결하는 부분
const commentsModel = require('../model/comment');

//방법1
exports.main = (req, res) => {
  res.render('index');
}

exports.comments = (req, res) => {
  res.render('comments', { list: commentsModel }); //comments를 list로 받겠다.
}

exports.comment = (req, res) => {
  //console.log(req.params);
  //console.log(req.params.page); //값만 표시
  const page = Number(req.params.page);
  //comments 배열의 요소에 접근 => 즉, 객체 하나하나에 접근
  res.render('comment', { data: commentsModel[page - 1] });
}

//방법2
const main = (req, res) => {
    res.render('index');
};

const comments = (req, res) => {
    res.render('comments', { list: commentsModel });
};

const comment = (req, res) => {
    //console.log(req.params);
    //console.log(req.params.page); //값만 표시
    const page = Number(req.params.page);
    //comments 배열의 요소에 접근 => 즉, 객체 하나하나에 접근
    res.render('comment', { data: commentsModel[page - 1] });
};
//외부 파일에서 사용할 수 있게 하기위해서 module화 작업(항상 맨 하단에 작성할 것)
module.exports = { main, comments, comment };
model - 데이터 처리하는 부분
- 임시DB생성
//임시db
//길이가 4인 배열
//key값들은 동일해야함
const comments = [
    {
        id: 1,
        userid: 'hello',
        date: '2024-02-07',
        comment: '안녕하세요',
    },
    {
        id: 2,
        userid: 'haaaapy',
        date: '2023-02-04',
        comment: '행복하세요',
    },
    {
        id: 3,
        userid: 'Good',
        date: '2024-02-10',
        comment: '좋은 날이에요',
    },
    {
        id: 4,
        userid: 'lucky',
        date: '2024-03-07',
        comment: '럭키한 날이 가득하길 바랍니다.',
    },
];

//하단에 작성, 외부에서 사용할 수 있게 작성
module.exports = comments;
routes - 경로를 설정하는 부분
const express = require('express');
const router = express.Router();
const controller = require('../controller/comment'); //js는 생략가능

//router
router.get('/', controller.main);

//이 밑에 것들은 controller로 보내진다. 즉, 경로설정
router.get('/comments', controller.comments);

//전체 리스트의 상세페이지로 이동하는 페이지
//id :2 누르면 2번에 대한 정보만 나오게 해야함
// /: 백엔드로 받는주소, 상세내용을 누를때마다 값이 달라짐, page 부분은 이름명 상관없음
// /:page 는 {page : "값"} 형태
router.get('/comment/:page', controller.comment);

//외부에서 router 담은 걸 사용가능하다.
module.exports = router;
views - UI부분
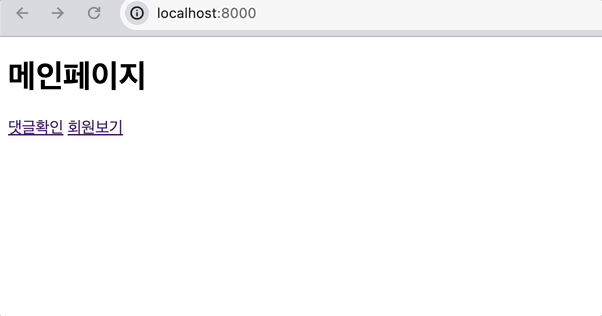
(1) - 메인페이지(가장 처음에 보여지는 화면)
<!DOCTYPE html>
<html lang="en">
    <head>
        <meta charset="UTF-8" />
        <meta name="viewport" content="width=device-width, initial-scale=1.0" />
        <title>Document</title>
    </head>
    <body>
        <h1>메인페이지</h1>
        <a href="/comments">댓글확인</a>
        <a href="/user">회원보기</a>
    </body>
</html>
(2) 상세 댓글이 보여지는 화면
<!DOCTYPE html>
<html lang="en">
    <head>
        <meta charset="UTF-8" />
        <meta name="viewport" content="width=device-width, initial-scale=1.0" />
        <title>Document</title>
    </head>
    <body>
        <h1><%= data.userid%></h1>
        <ul>
            <li>작성일 : <%= data.date%></li>
            <li>댓글내용 : <%= data.comment%></li>
        </ul>
        <br />
        <a href="/comments">목록으로 이동</a>
    </body>
</html>
(3) 전체 댓글보기
<!DOCTYPE html>
<html lang="en">
    <head>
        <meta charset="UTF-8" />
        <meta name="viewport" content="width=device-width, initial-scale=1.0" />
        <title>Document</title>
    </head>
    <body>
        <h1>댓글모음</h1>
        <a href="/">메인으로 이동</a>
        <br />
        <ul>
          <%  for(let i = 0; i<list.length; i++){ %>
                  <li>
                    <b><%= list[i].userid%></b>
                    <!-- 여기서 Id는 데이터베이스에서 오는 id, 즉 임시db만든 파일 -->
                    <a href="/comment/<%= list[i].id%>"><%= list[i].comment%></a>
                    <!-- list[i].id : controller에서 list로 나오게끔 지정한 데이터의 id추출 -->
                  </li>
         <%   } %>
        </ul>
    </body>
</html>
index.js(app.js)
// 상단에 dotenv를 써주는 걸 추천
require('dotenv').config();
const express = require('express');
const app = express();
const PORT = 8000;

app.set('view engine', 'ejs');

const router = require('./routes/index');
app.use('/', router);


//오류처리
app.get('*', (req, res) => {
    res.status(404).render('404');
});

app.listen(PORT, () => {
    console.log(`http://localhost:${PORT}`);
});
실행결과
 - url이 어떻게 변하는지도 확인하자.
✅ list 형태인 데이터들을 하나씩 클릭할때마다 순서에 맞게 다른 url이 생성하게끔 만들었다. -> localhost:8000/comment/1, localhost:8000/comment/2 ..이렇게 변화한다.
마무리
리더님이 어렵다고 단단히 경고한 MVC구조.. 여러 폴더를 생성하고, 각 폴더에 맞는 파일을 만들고 구분하는게 더 어려웠다. 어떤 파일에 어떤걸 써야하는지 익숙치 않았다. 예제를 더 연습해보면서 익숙해져야 나중에 views를 react로 쓸때도 따라갈 수 있을 것 같다.

Thank you for the great and quality information resources. Easy access and access geometry dash lite!