VMware, GNS3, GNS3 VM 설치/실습 (교육 4~5일차)
실습> VMware 설치하기
VMware 공식 사이트: https://www.vmware.com
https://www.vmware.com/kr/products/workstation-player/workstation-player-evaluation.html
PC에서 가상환경을 제공하는 프로그램.
오라클회사에서 제공하는 프로그램
- 버추얼박스: 무료
VMware-player-full-16.2.4-20089737.exe
실습> 네트워크 설정
vmwaredll.zip 압축을 해제하고 vmnetdll 디렉터리 안에 vmnetcfg.exe 파일을 실행한다.
VMnet1:
- SubnetIP: 10.10.10.0, Subnet mask: 255.255.255.0
VMnet8:
- SubnetIP: 200.200.200.0, Subnet mask: 255.255.255.0
설정 후 Apply > OK 를 클릭한다.
실습> GNS 설치하기
참고 : https://cafe.naver.com/linuxmasternet/27
GNS3 공식 사이트 : https://www.gns3.com/
- GNS 설치
다운로드 받은 GNS3를 설치한다.
GNS3-2.2.34-all-in-one-regular.exe
참고: https://cafe.naver.com/linuxmasternet/1675
- GNS VM 이미지 압축 해제
다운로드 받은 GNS3 VM이미지를 작업할 폴더를 설정해서 그 안으로 저장하고 압축을 해제한다.
GNS3.VM.VMware.Workstation.2.2.34.zip
!!! 중요 !!!
GNS3 & GNS3.VM 의 버전이 동일해야 한다.
**GNS3 VM.ova 파일을 더블클릭해서 VMware에 import 한다.
GNS3 VM은 IP주소를 자동으로 받아와야 하지만 수동으로도 설정할 수 있다.
부팅이 완료되면 중지한다.
중지하는 이유는 GNS3와 VM(Virtual Machine)이 연동되면 자동으로 켜지고 꺼지고 하기 때문에 이것을 확인하기 위해서다.**
- GNS3와 VM 이미지 연동
GNS3의 메뉴 -> help -> Setup wizard -> Server 부분을 설정한다.
첫 번째 부분을 선택하고 진행한다.
마지막에 finish를 눌러서 연동을 마친다.
4. GNS3와 VM 이미지 연동 테스트
GNS3를 종료하면 VM이미지가 잘 종료되는지 확인한다.
GNS3를 시작하면 VM이미지가 잘 시작되는지 확인한다.
GNS3 프로그램에서 오른쪽에 녹색불이 2개가 들어오면 GNS3 프로그램과 VM이미지가 잘 통신이 되는 것이다.
여기서 주의해야할 사항들
VMware에 VMnet1, VMnet8 이 DHCP를 활성화시킨 상태가 되야 자동으로 VM이 IP주소를 할당받을 수 있다.
VMware 설치 시 아래 두 개의 네트워크 어댑터가 설치되어야 한다.
VMware Network Adapter VMnet1
VMware Network Adapter VMnet8
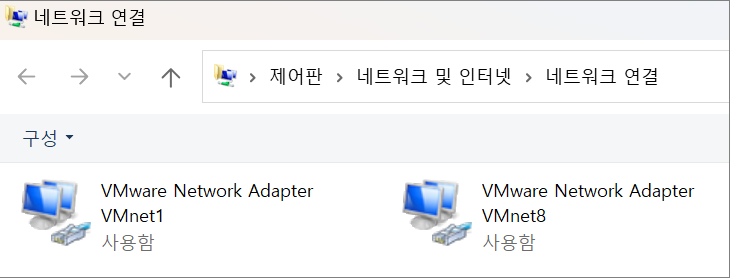
cmd에서 ncpa.cpl을 실행해서 네트워크 연결에서 확인하거나
cmd에서 ipconfig를 실행해서 확인한다.
GNS3 VM 을 import 시킬 때 그냥 import 시키면 내문서 -> Virtual Machines을 확인한다.
그 안에 GNS3 VM 폴더에 설치되어야 한다.
절대 경로는 아래처럼 되어있다.
C:\Users\<사용자>\Documents\Virtual Machines
📌 Tip1 📌
윈도우를 부팅했는데 GNS가 인식이 안될 때 인식하는 방법
윈도우키 + r 에서 ncpa.cpl 입력하고
사용안함 -> 사용함 변경하면 인식이 된다.
📌 Tip2 📌
GNS3 콘솔창 폰트 변경 및 크기 조정 메뉴

👉 Appearance > Font settings > Change 버튼을 클릭후 변경하고,,,
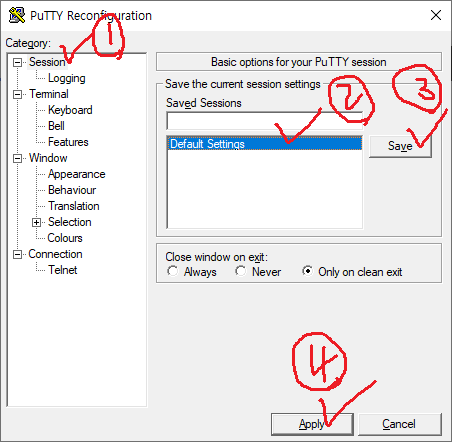
👉 반드시 ②번 Default Settings를 선택후 ③번 save와 ④번 Apply 버튼을 클릭해야 한다.
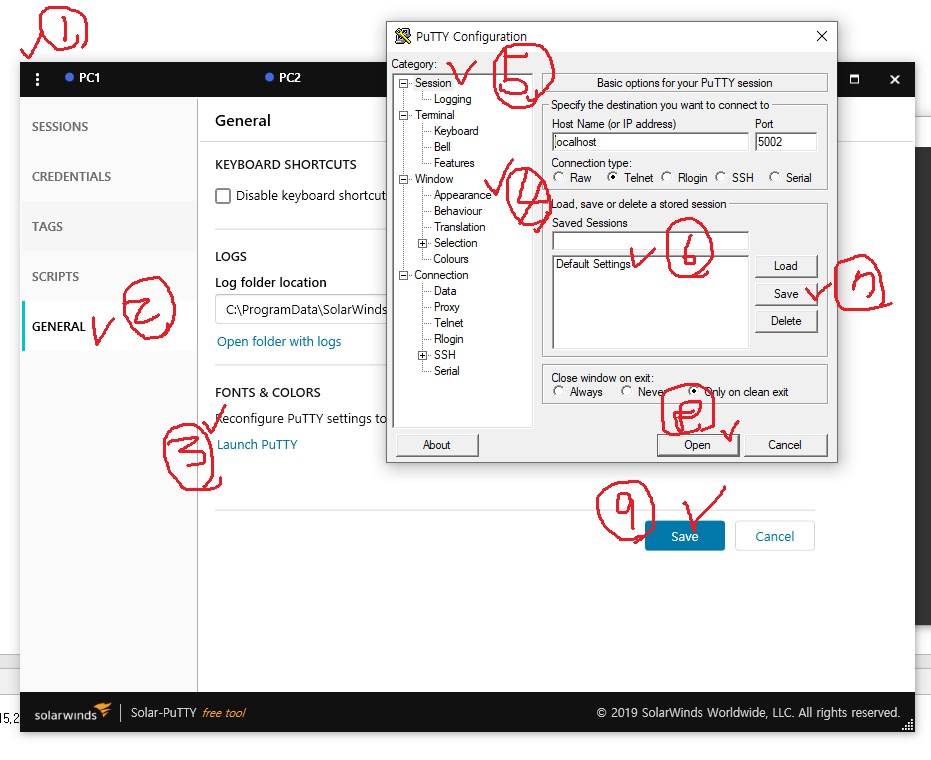 👉 콘솔창 > Settings > GENERAL에서 설정하는 방법은 조금 다르다.
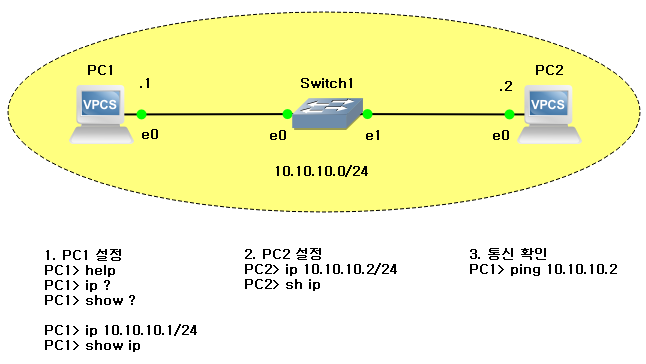
실습> GNS3를 이용해서 아래 네트워크를 구현하시오.
name: network1
파일명: network1.gns3
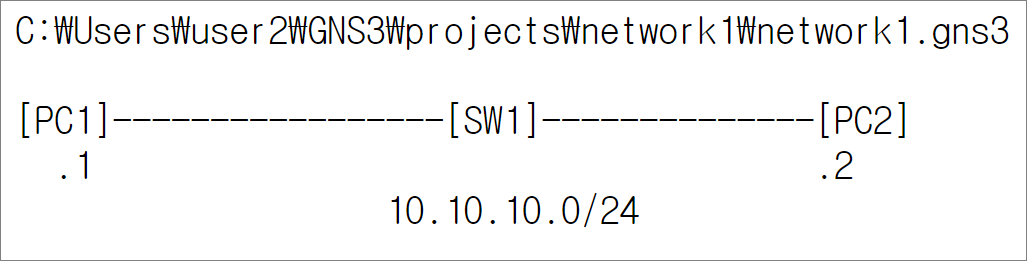
- PC1 설정
PC1> help
PC1> ip ?
PC1> show ?
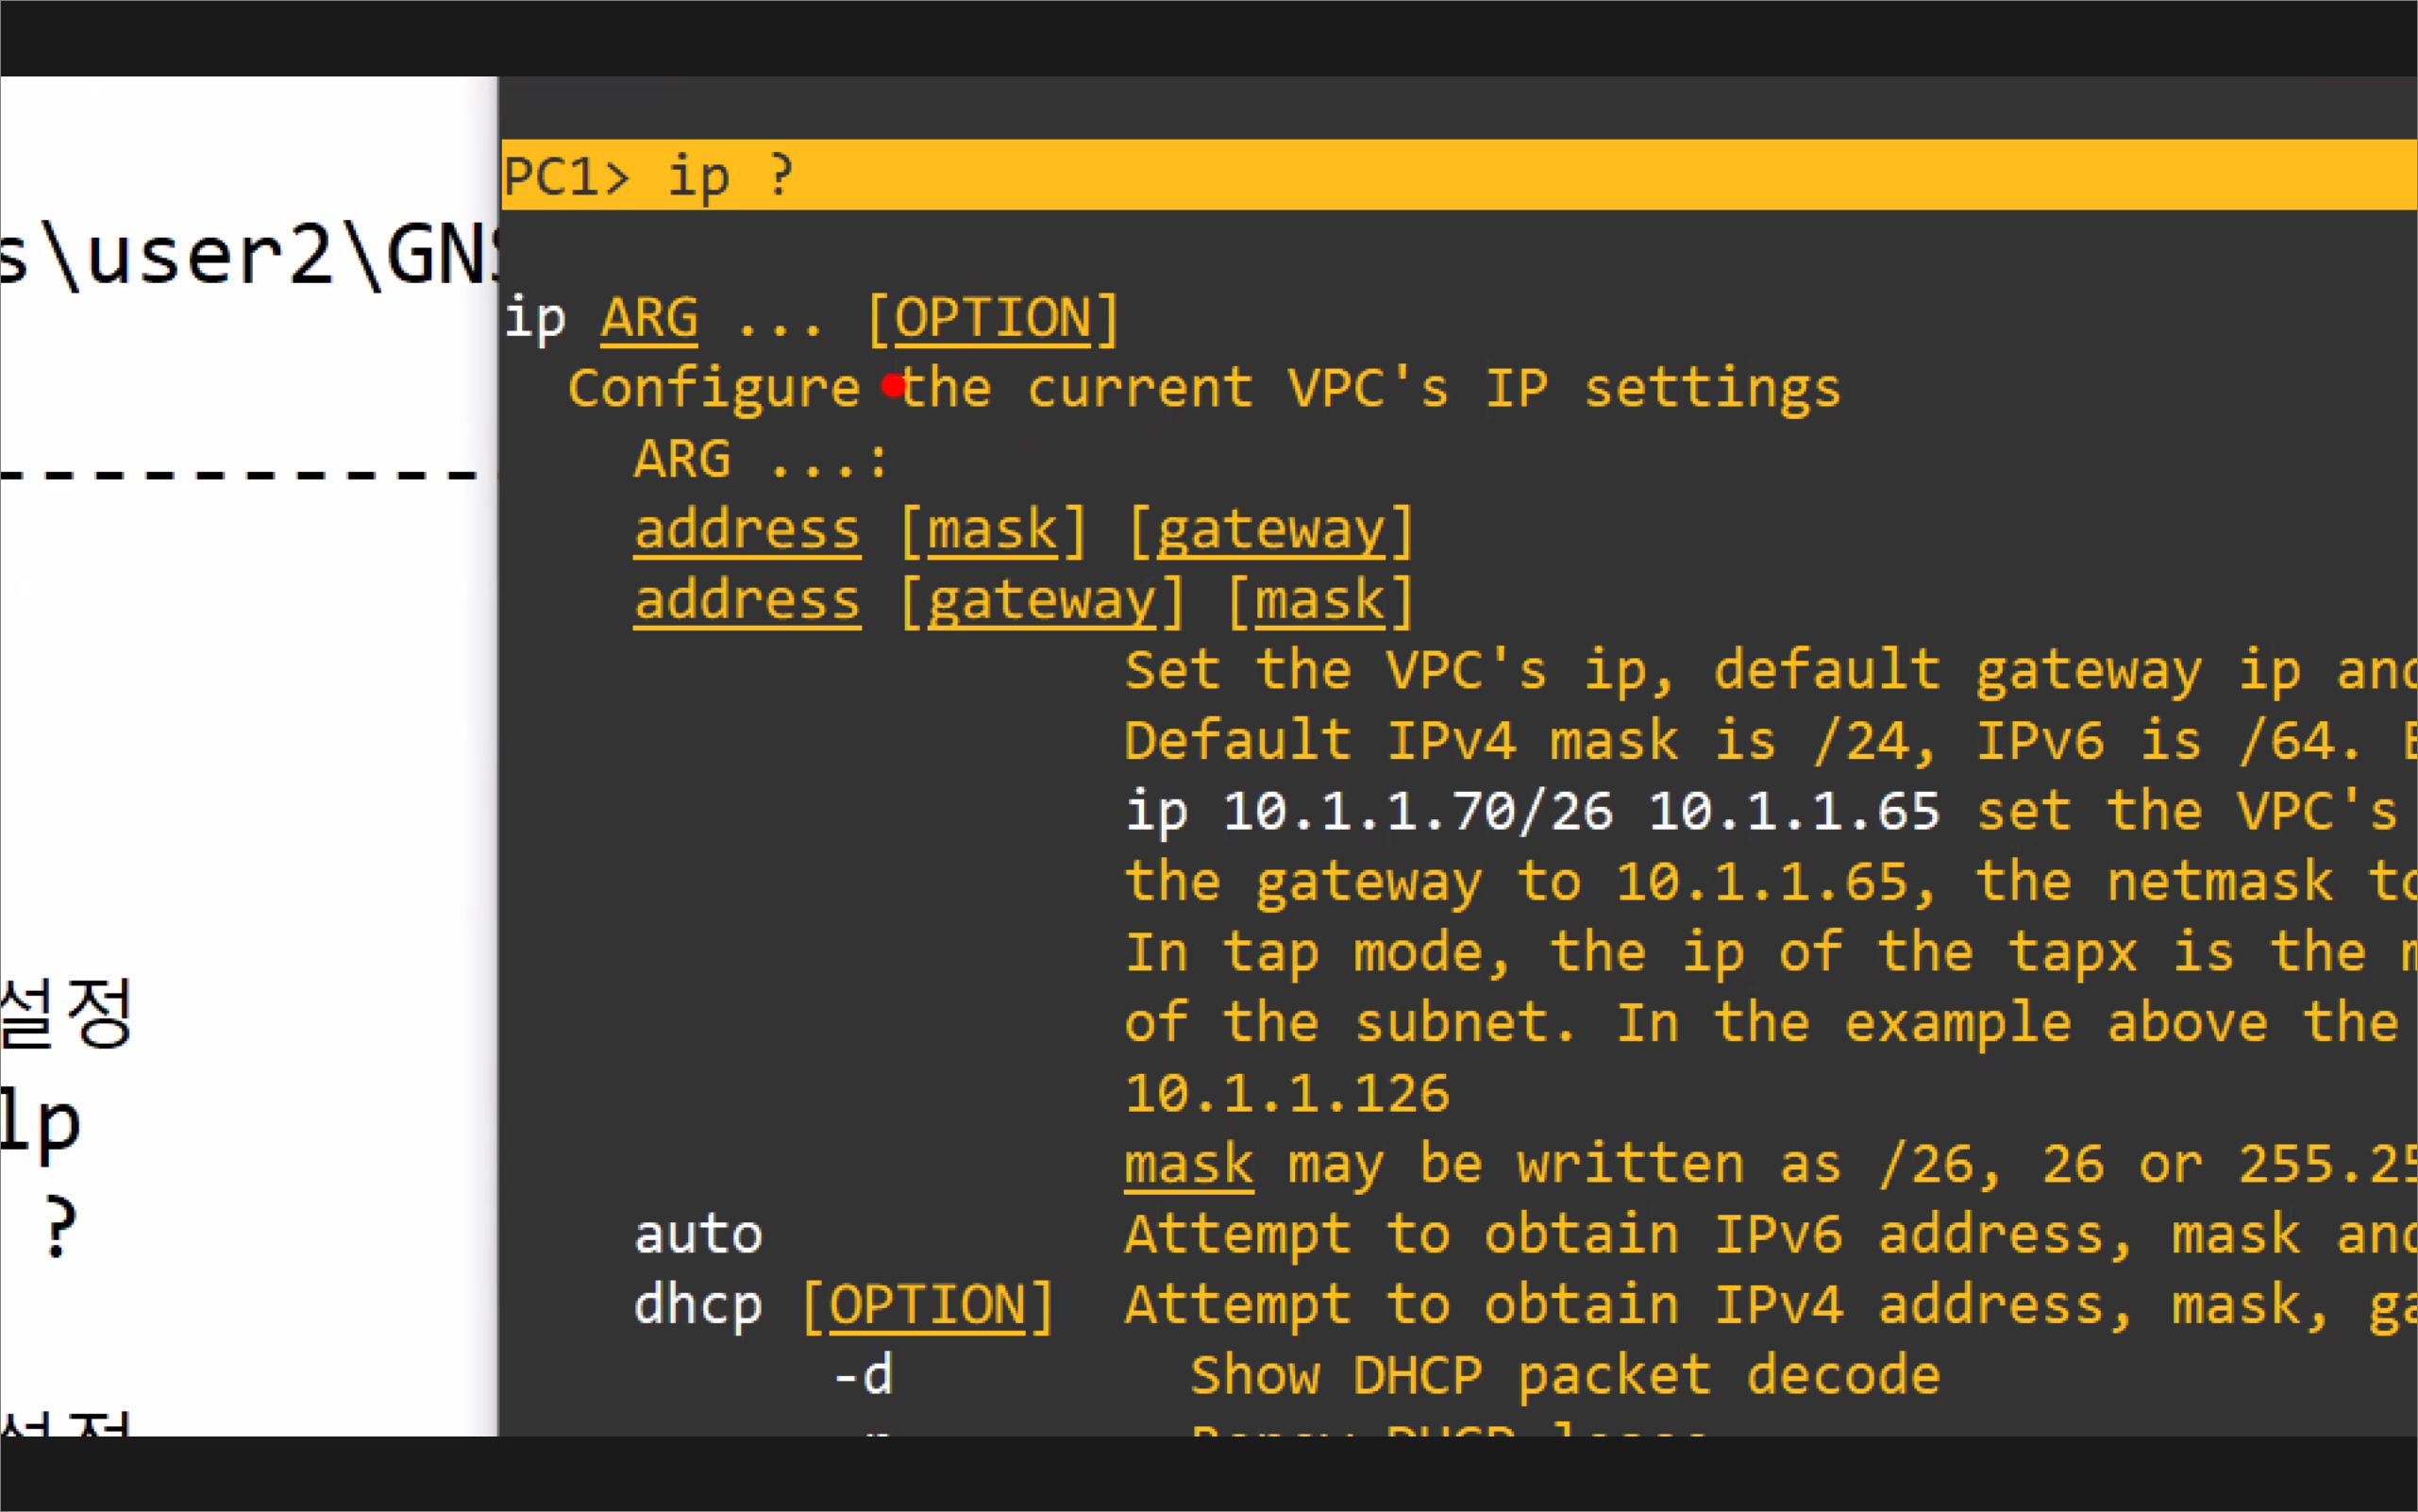
PC1> ip 10.10.10.1/24
PC1> show ip
NAME : PC1[1]
IP/MASK : 10.10.10.1/24
GATEWAY : 0.0.0.0
DNS :
MAC : 00:50:79:66:68:00
LPORT : 10004
RHOST:PORT : 127.0.0.1:10005
MTU: : 1500
- PC2 설정
PC2> ip 10.10.10.2/24
PC2> sh ip
NAME : PC2[1]
IP/MASK : 10.10.10.2/24
GATEWAY : 0.0.0.0
DNS :
MAC : 00:50:79:66:68:01
LPORT : 10006
RHOST:PORT : 127.0.0.1:10007
MTU: : 1500
- 통신 확인
PC1> ping 10.10.10.2
84 bytes from 10.10.10.2 icmp_seq=1 ttl=64 time=0.558 ms
84 bytes from 10.10.10.2 icmp_seq=2 ttl=64 time=1.204 ms
84 bytes from 10.10.10.2 icmp_seq=3 ttl=64 time=1.237 ms
84 bytes from 10.10.10.2 icmp_seq=4 ttl=64 time=1.315 ms
84 bytes from 10.10.10.2 icmp_seq=5 ttl=64 time=1.373 ms
실습> 라우터 이미지 올리기
참고: https://cafe.naver.com/linuxmasternet/28
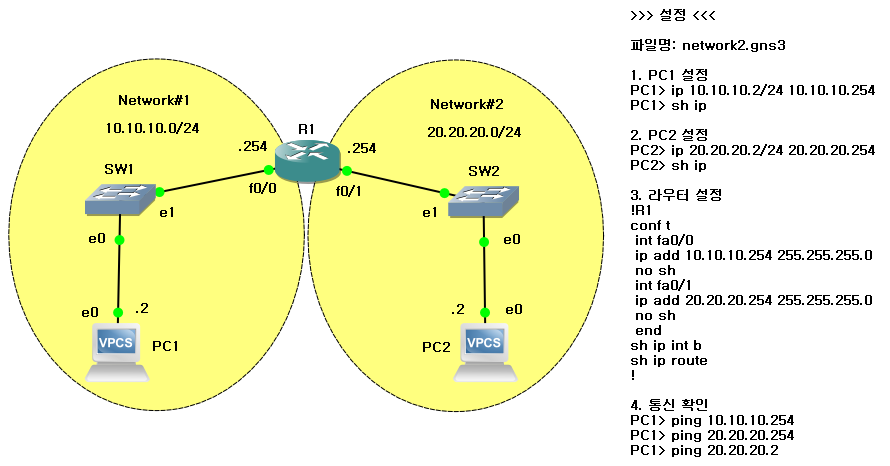
실습> GNS3를 이용해서 아래 네트워크를 구현하시오.
name: network2
파일명: network2.gns3
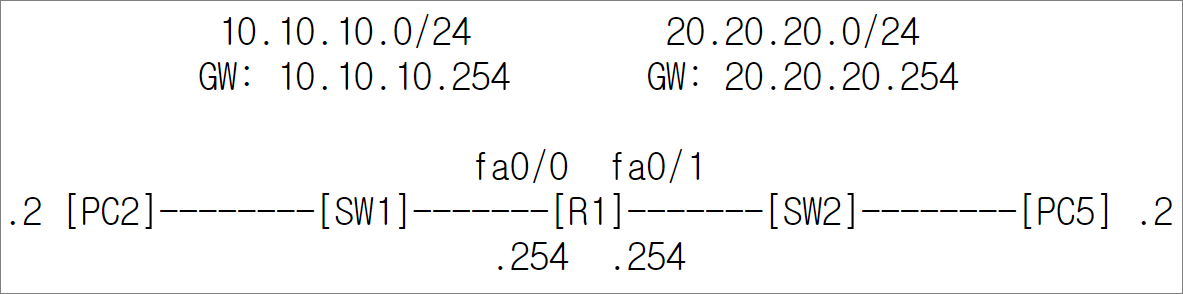
- PC1 설정
PC1> ip 10.10.10.2/24 10.10.10.254
Checking for duplicate address...
PC1 : 10.10.10.2 255.255.255.0 gateway 10.10.10.254
PC1> sh ip
NAME : PC1[1]
IP/MASK : 10.10.10.2/24
GATEWAY : 10.10.10.254
DNS :
MAC : 00:50:79:66:68:00
LPORT : 10014
RHOST:PORT : 127.0.0.1:10015
MTU: : 1500
- PC2 설정
PC2> ip 20.20.20.2/24 20.20.20.254
Checking for duplicate address...
PC1 : 20.20.20.2 255.255.255.0 gateway 20.20.20.254
PC2> sh ip
NAME : PC2[1]
IP/MASK : 20.20.20.2/24
GATEWAY : 20.20.20.254
DNS :
MAC : 00:50:79:66:68:01
LPORT : 10012
RHOST:PORT : 127.0.0.1:10013
MTU: : 1500
-
라우터 설정
!R1
conf t
int fa0/0
ip add 10.10.10.254 255.255.255.0
no sh
int fa0/1
ip add 20.20.20.254 255.255.255.0
no sh
end
sh ip int b
sh ip route
! -
통신 확인
PC1> ping 10.10.10.254
10.10.10.254 icmp_seq=1 timeout
84 bytes from 10.10.10.254 icmp_seq=2 ttl=255 time=15.035 ms
84 bytes from 10.10.10.254 icmp_seq=3 ttl=255 time=15.922 ms
84 bytes from 10.10.10.254 icmp_seq=4 ttl=255 time=15.276 ms
84 bytes from 10.10.10.254 icmp_seq=5 ttl=255 time=15.320 ms
PC1> ping 20.20.20.254
84 bytes from 20.20.20.254 icmp_seq=1 ttl=255 time=14.955 ms
84 bytes from 20.20.20.254 icmp_seq=2 ttl=255 time=15.417 ms
84 bytes from 20.20.20.254 icmp_seq=3 ttl=255 time=15.723 ms
84 bytes from 20.20.20.254 icmp_seq=4 ttl=255 time=15.023 ms
84 bytes from 20.20.20.254 icmp_seq=5 ttl=255 time=15.652 ms
PC1> ping 20.20.20.2
20.20.20.2 icmp_seq=1 timeout
84 bytes from 20.20.20.2 icmp_seq=2 ttl=63 time=30.640 ms
84 bytes from 20.20.20.2 icmp_seq=3 ttl=63 time=31.055 ms
84 bytes from 20.20.20.2 icmp_seq=4 ttl=63 time=30.128 ms
84 bytes from 20.20.20.2 icmp_seq=5 ttl=63 time=30.222 ms
서브넷마스크
00000000.00000000.00000000.00000000
11111111.11111111.11111111.00000000
255 255 255 0
=> /24 (총 8bit x 3 = 24bit)
실습> 간단하게 리눅스 사용하기
gns3 VM에 접속하는 방법
- 첫 번째 접속 방법
putty로 접속한다.
- 두 번째 접속 방법
윈도우키 + r > 실행 > cmd
접속방법: ssh 사용자@IP주소 or ssh 사용자@도메인주소
C:\Users\user2>ssh gns3@200.200.200.128
The authenticity of host '200.200.200.128 (200.200.200.128)' can't be established.
ECDSA key fingerprint is SHA256:A6zirsaMLkpaiS+Q+KmjTKZ8+UchuZTeWP2nM4vt990.
Are you sure you want to continue connecting (yes/no/[fingerprint])? yes
Warning: Permanently added '200.200.200.128' (ECDSA) to the list of known hosts.
gns3@200.200.200.128's password: <-- gns3 입력 (리눅스에서는 입력되는 문자는 안보인다.)
gns3@gns3vm:~$ ls
GNS3
관리자로 변경한다.
gns3@gns3vm:~$ sudo su -
관리자에서 빠져나간다.
root@gns3vm:~# exit
종료한다.
gns3@gns3vm:~$ exit
Please run 'sudo gns3restore' in case the menu is no longer showing
gns3@gns3vm:~$ exit
logout
Connection to 200.200.200.128 closed.
