리눅스 명령어 /grep/wc/pipe/cp/mv/rm/ln/find/압축 (교육 27일차)


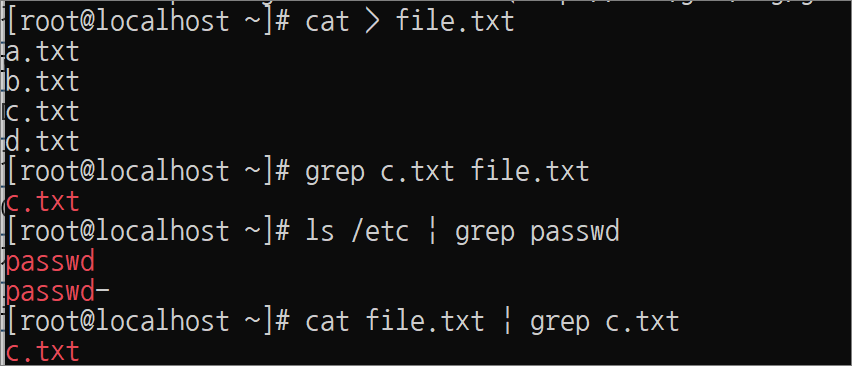
실습> grep
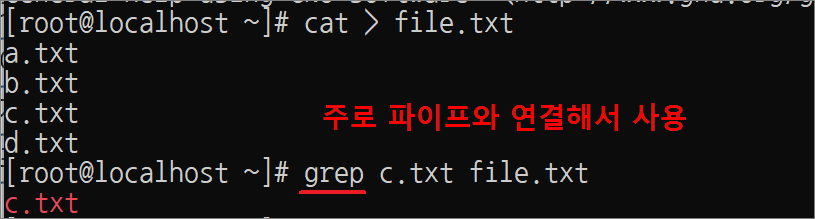
파일에서 특정 단어를 검색할 때 사용하는 명령어
– 단어를 찾으면: 화면에 출력한다. (standard output: stdout 으로 출력)
– 단어를 못찾으면: 화면에는 아무것도 출력이 안된다.
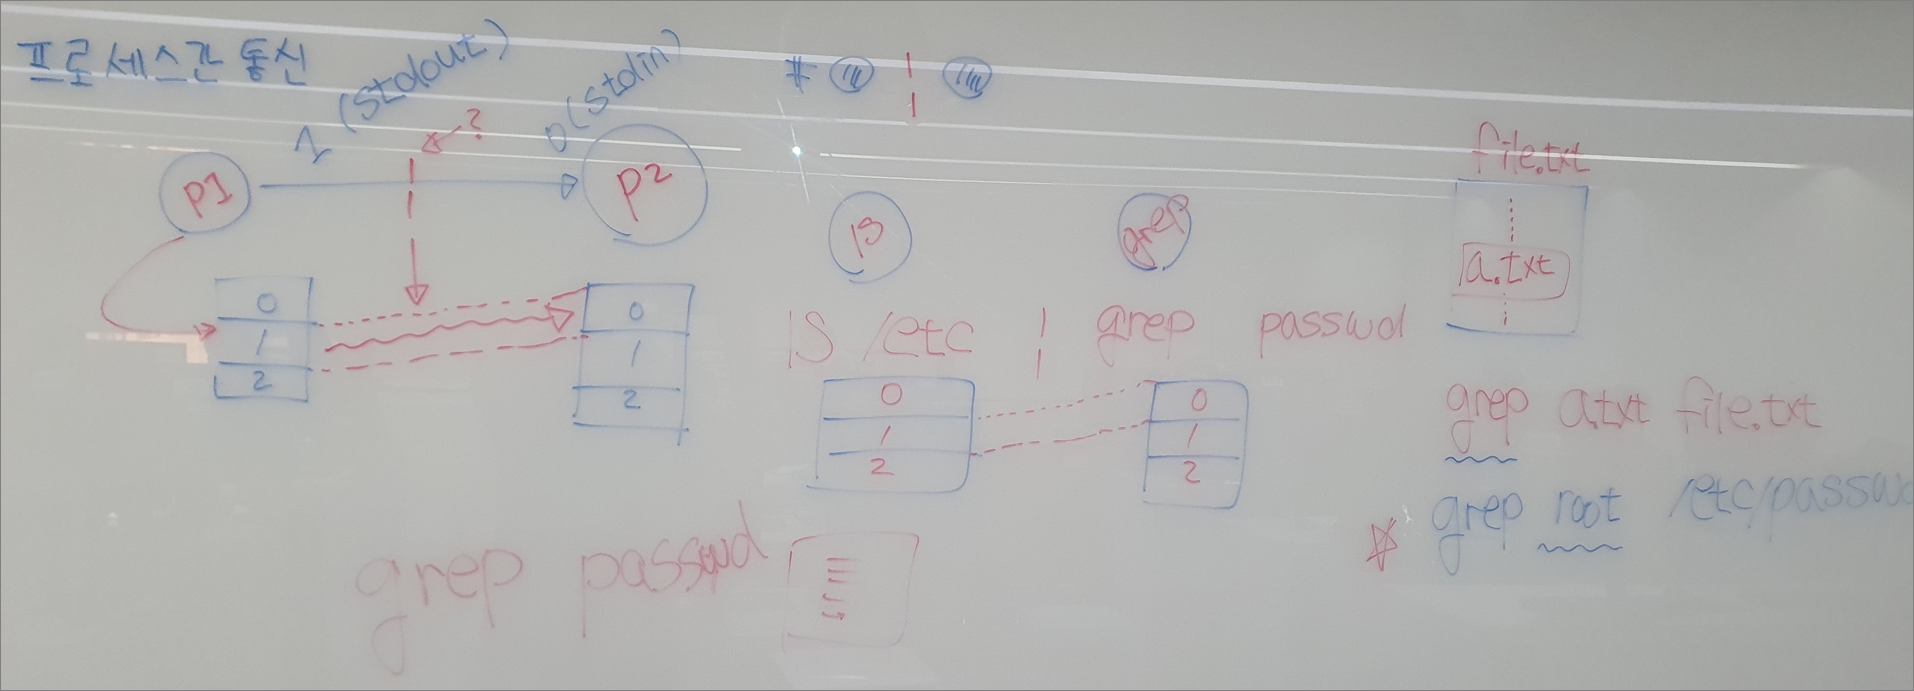
grep은 파이프를 이용해서 다른 명령어와 결합해서 사용한다.
[root@localhost ~]# grep root /etc/passwd
root:x:0:0:root:/root:/bin/bash
operator:x:11:0:operator:/root:/sbin/nologin
[root@localhost ~]# cat /etc/passwd | grep root
root:x:0:0:root:/root:/bin/bash
operator:x:11:0:operator:/root:/sbin/nologin
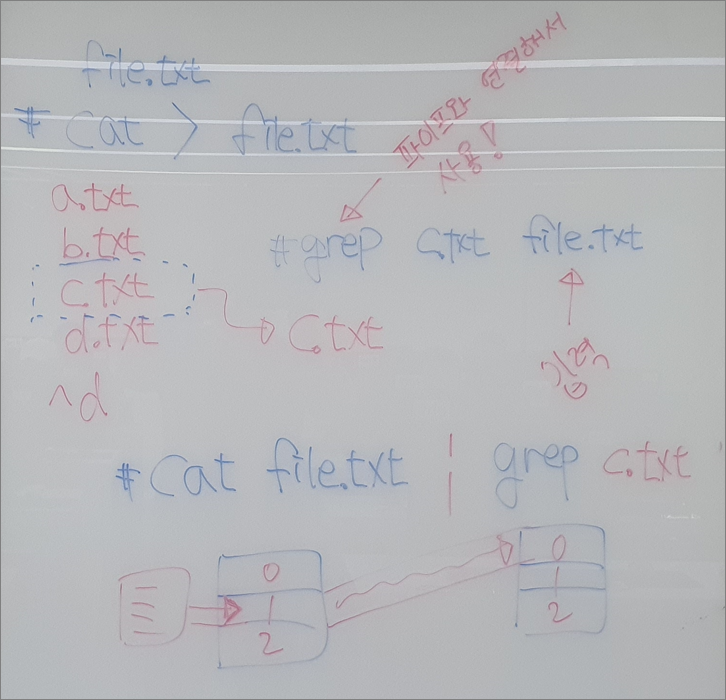
실습> 파이프 이해하기
PID: 프로세스 아이디
프로세스 번호는 순환하고 먼저 실행한 프로그램이 나중에 실행한 프로그램 보다 PID의 값이 작다.
[root@localhost ~]# sleep 1000 | sleep 2000 &
[1] 20231
[root@localhost ~]# ps
PID TTY TIME CMD
17776 pts/0 00:00:00 bash
20230 pts/0 00:00:00 sleep
20231 pts/0 00:00:00 sleep
20247 pts/0 00:00:00 ps
[root@localhost ~]# ps -l
F S UID PID PPID C PRI NI ADDR SZ WCHAN TTY TIME CMD
4 S 0 17776 17771 0 80 0 - 28886 do_wai pts/0 00:00:00 bash
0 S 0 20230 17776 0 80 0 - 27013 hrtime pts/0 00:00:00 sleep
0 S 0 20231 17776 0 80 0 - 27013 hrtime pts/0 00:00:00 sleep
0 R 0 20335 17776 0 80 0 - 38331 - pts/0 00:00:00 ps
[root@localhost ~]# ps -lf
F S UID PID PPID C PRI NI ADDR SZ WCHAN STIME TTY TIME CMD
4 S root 17776 17771 0 80 0 - 28886 do_wai 12월27 pts/0 00:00:00 -bash
0 S root 20230 17776 0 80 0 - 27013 hrtime 00:25 pts/0 00:00:00 sleep 1000
0 S root 20231 17776 0 80 0 - 27013 hrtime 00:25 pts/0 00:00:00 sleep 2000
0 R root 20432 17776 0 80 0 - 38862 - 00:29 pts/0 00:00:00 ps -lf
[root@localhost ~]# ls -l /proc/20230/fd
합계 0
lrwx------. 1 root root 64 12월 28 00:29 0 -> /dev/pts/0
l-wx------. 1 root root 64 12월 28 00:29 1 -> pipe:[44130]
lrwx------. 1 root root 64 12월 28 00:25 2 -> /dev/pts/0
[root@localhost ~]# ls -l /proc/20231/fd
합계 0
lr-x------. 1 root root 64 12월 28 00:29 0 -> pipe:[44130]
lrwx------. 1 root root 64 12월 28 00:29 1 -> /dev/pts/0
lrwx------. 1 root root 64 12월 28 00:25 2 -> /dev/pts/0
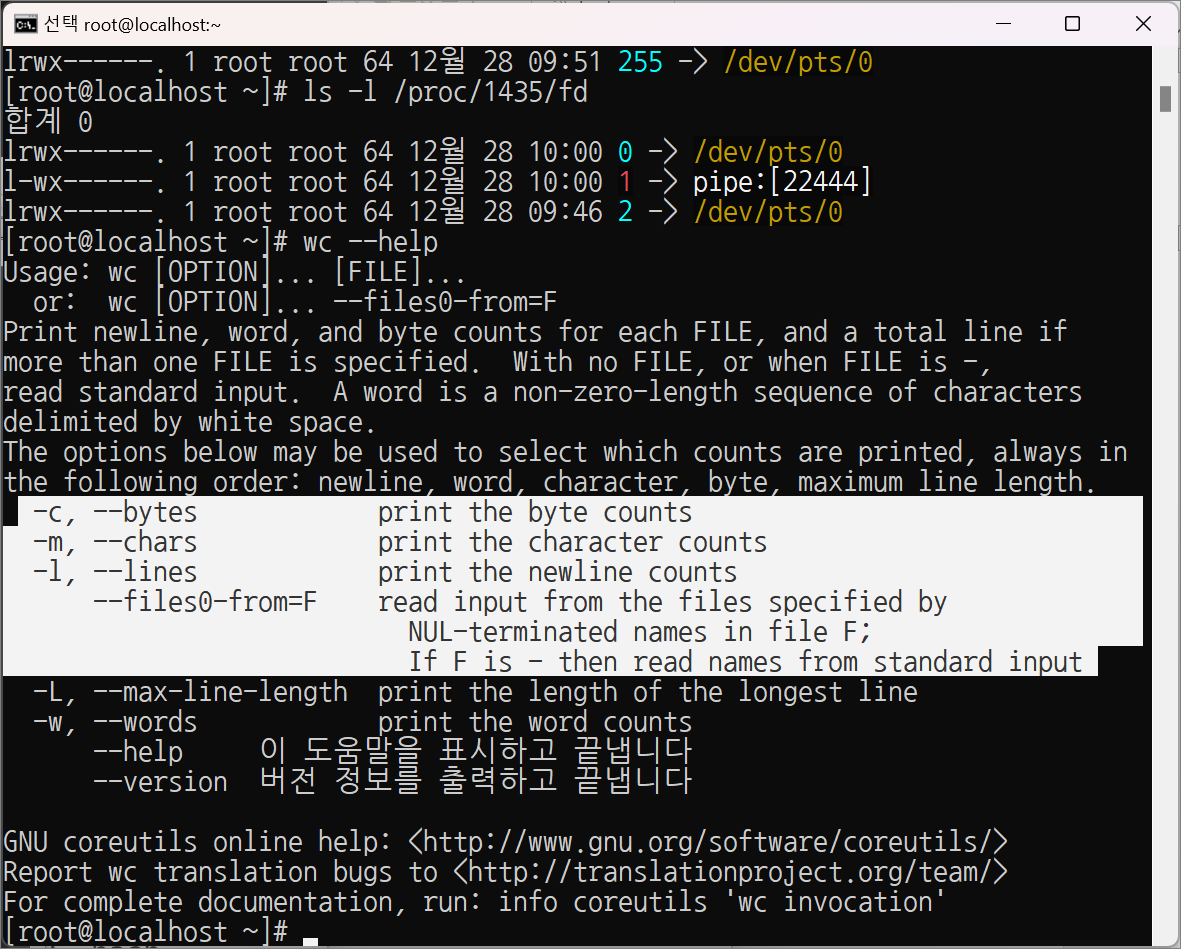
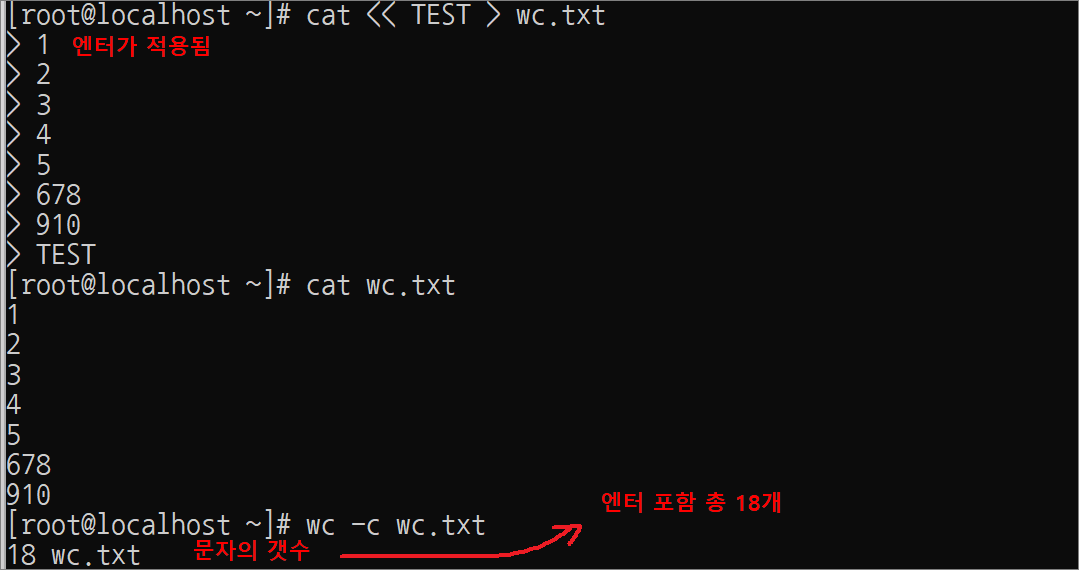
실습> wc 명령어
[root@localhost ~]# cat << TEST > wc.txt
> 1
> 2
> 3
> 4
> 5
> 678
> 910
> TEST
[root@localhost ~]# ll wc.txt
-rw-r--r--. 1 root root 18 12월 28 00:47 wc.txt

[root@localhost ~]# cat wc.txt
1
2
3
4
5
678
910
od 명령어를 이용하면 파일의 엔터문자를 볼 수 있다.
[root@localhost ~]# od -c wc.txt
0000000 1 \n 2 \n 3 \n 4 \n 5 \n 6 7 8 \n 9 1
0000020 0 \n
0000022

라인의 카운트를 구해주는 -l 옵션을 사용하면 wc.txt 파일의 라인이 7개라는 것을 확인할 수 있다.
[root@localhost ~]# wc -l wc.txt
7 wc.txt
[root@localhost ~]# wc -l /etc/passwd
24 /etc/passwd
파이프 통신을 이용해서 현재 시스템의 사용자 수를 구할 수 있다.
[root@localhost ~]# cat /etc/passwd|wc -l
24

실습> grep
mariadb-server 패키지를 설치한다.
mariadb: 자료를 체계적으로 저장하는 프로그램
[root@localhost ~]# yum -y install mariadb-server
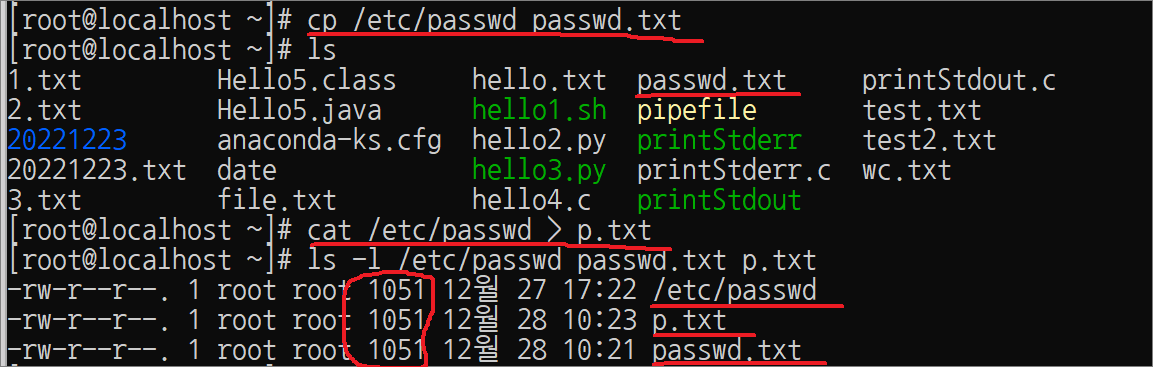
/etc/passwd 파일을 현재 디렉터리에 passwd.txt 파일로 복사한다.
[root@localhost ~]# cp /etc/passwd passwd.txt

passwd.txt 파일에서 games라는 단어를 찾아서 화면에 출력한다.
[root@localhost ~]# grep games passwd.txt
games:x:12:100:games:/usr/games:/sbin/nologin

passwd.txt 파일에서 mysql이라는 단어를 찾아서 화면에 출력한다.
[root@localhost ~]# grep mysql passwd.txt
mysql:x:27:27:MariaDB Server:/var/lib/mysql:/sbin/nologin

-i 옵션은 대소문자를 구별하지 않고 검색한다.
[root@localhost ~]# grep ROOT passwd.txt
[root@localhost ~]# grep -i ROOT passwd.txt
root:x:0:0:root:/root:/bin/bash
operator:x:11:0:operator:/root:/sbin/nologin
--color 옵션은 찾은 패턴을 color로 출력한다.
[root@localhost ~]# alias grep
alias grep='grep --color=auto'
[root@localhost ~]# unalias grep
[root@localhost ~]# alias grep
-bash: alias: grep: not found
[root@localhost ~]# grep -i ROOT passwd.txt
root:x:0:0:root:/root:/bin/bash <-- 흑백으로 출력
operator:x:11:0:operator:/root:/sbin/nologin <-- 흑백으로 출력
[root@localhost ~]# grep -i ROOT --color passwd.txt
root:x:0:0:root:/root:/bin/bash <-- color로 출력
operator:x:11:0:operator:/root:/sbin/nologin <-- color로 출력
[root@localhost ~]# alias grep='grep --color=auto'
root 문자열을 검색하면 두 줄이 출력된다.
[root@localhost ~]# grep root passwd.txt
root:x:0:0:root:/root:/bin/bash
operator:x:11:0:operator:/root:/sbin/nologin
^root (root로 시작하는 행)을 의미하므로 한 줄만 출력된다.
[root@localhost ~]# grep ^root passwd.txt
root:x:0:0:root:/root:/bin/bash
-E 옵션을 이용해서 패턴을 두 개이상 검색한다.
– -E 'root|user1': root와 user1을 검색한다.
[root@localhost ~]# grep 'root|user1' passwd.txt
<-- -E가 없기 때문에 아무것도 출력되지 않는다.
-E 옵션을 사용할 때 작은 따옴표가 없다면 파이프로 인식하므로 에러가 발생한다.
[root@localhost ~]# grep -E root|user1 passwd.txt
-bash: user1: command not found

-E 옵션을 사용할 때 작은 따옴표가 있다면 파이프로 인식하지 않고 구분자로 인식한다.
[root@localhost ~]# grep -E 'root|user1' passwd.txt
root:x:0:0:root:/root:/bin/bash
operator:x:11:0:operator:/root:/sbin/nologin
user1:x:1000:1000::/home/user1:/bin/bash
-A 3 옵션은 찾은 패턴에서 다음 3줄을 더 출력한다.
[root@localhost ~]# grep -A 3 ^root passwd.txt
root:x:0:0:root:/root:/bin/bash
bin:x:1:1:bin:/bin:/sbin/nologin <--
daemon:x:2:2:daemon:/sbin:/sbin/nologin <--
adm:x:3:4:adm:/var/adm:/sbin/nologin <--
-B 3 옵션은 찾은 패턴에서 이전 3줄을 더 출력한다.
[root@localhost ~]# grep -B 3 nobody passwd.txt
operator:x:11:0:operator:/root:/sbin/nologin <--
games:x:12:100:games:/usr/games:/sbin/nologin <--
ftp:x:14:50:FTP User:/var/ftp:/sbin/nologin <--
nobody:x:99:99:Nobody:/:/sbin/nologin
-q 옵션은 조용하게 처리한다.
– 주로 쉘스크립트 프로그래밍에서 사용한다.
– 리턴값 0: 패턴을 찾은 것이다.
– 리턴값 1: 패턴을 찾지 못한 것이다.
리턴값을 확인하는 명령어: echo $?
– 명령어의 결과가 성공이면 0 리턴한다.
– 명령어의 결과가 실패이면 0 이외의 값을 리턴한다.
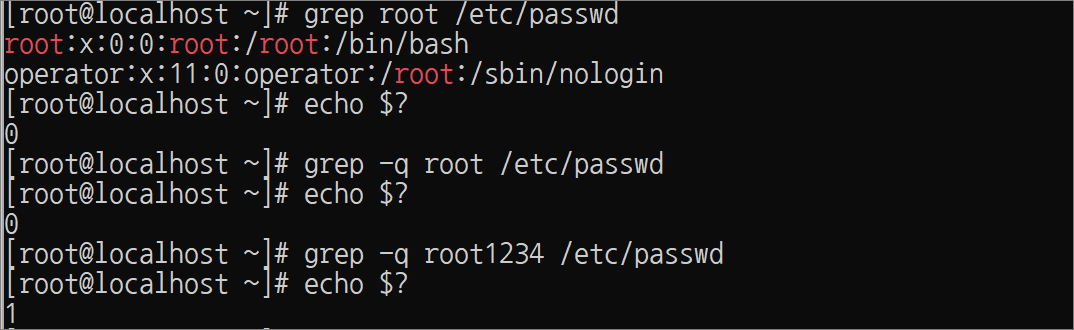
[root@localhost ~]# grep -q root passwd.txt
[root@localhost ~]# echo $?
0
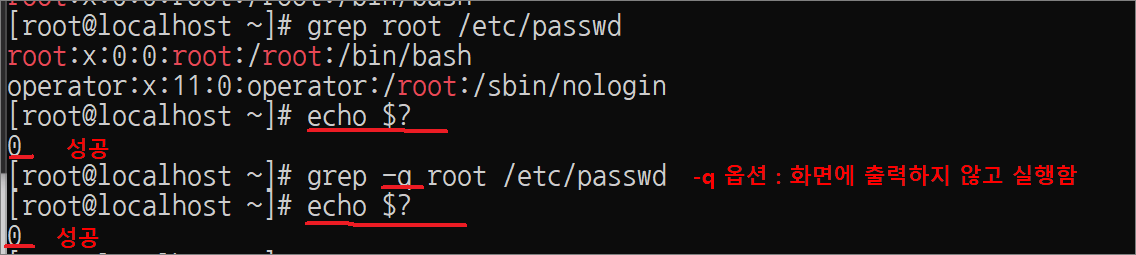
[root@localhost ~]# grep -q root1234 passwd.txt
[root@localhost ~]# echo $?
1
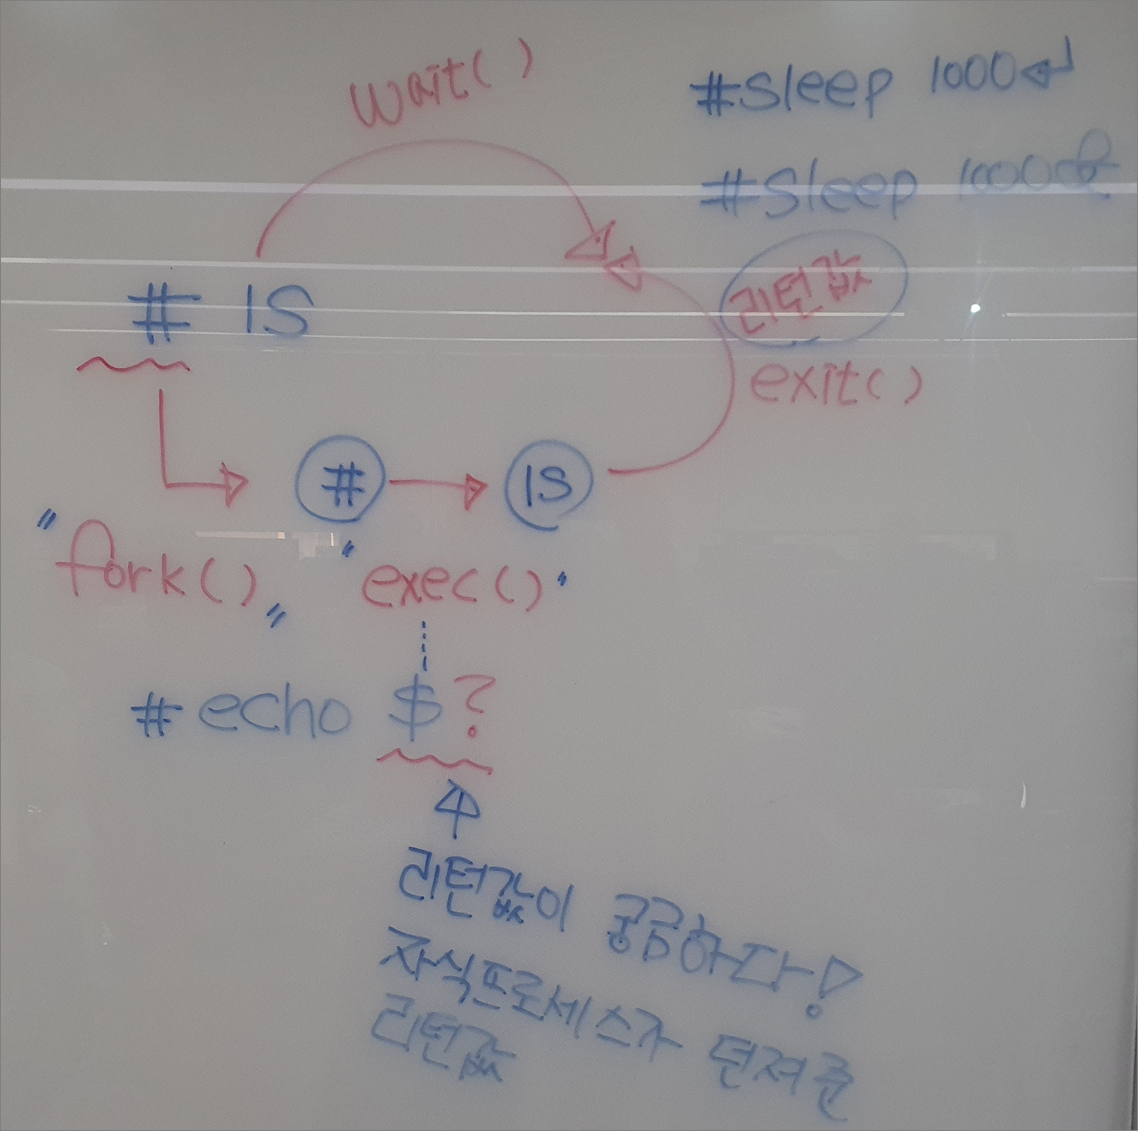
시스템 콜(함수) : fork() -> 자식 프로세스를 생성하는 함수
wait() : 자식 프로세스가 끝날때 까지 기다린다. ex) sleep 1000
#sleep 1000& -> 뒤로 돌리면 사용 가능
exit() : 리턴값 (성공은 0, 실패는 그 이외의 값)
실습> cp 명령어
CoPy
파일을 복사하는 명령어
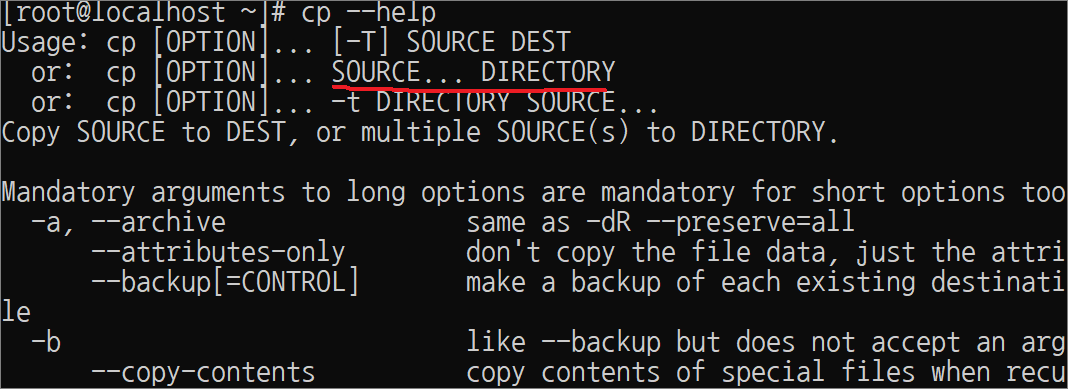
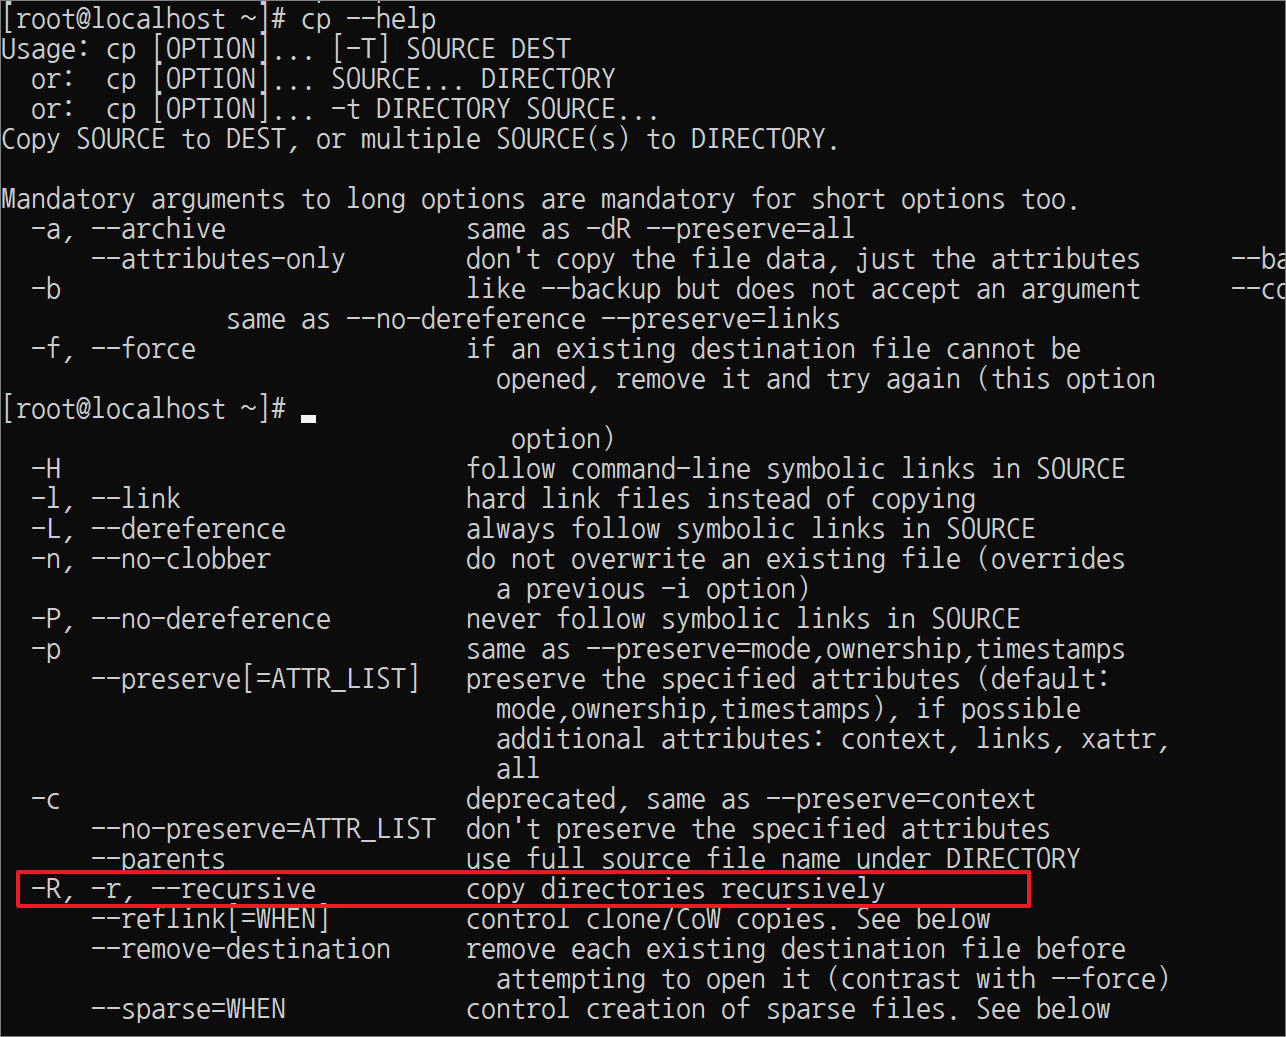
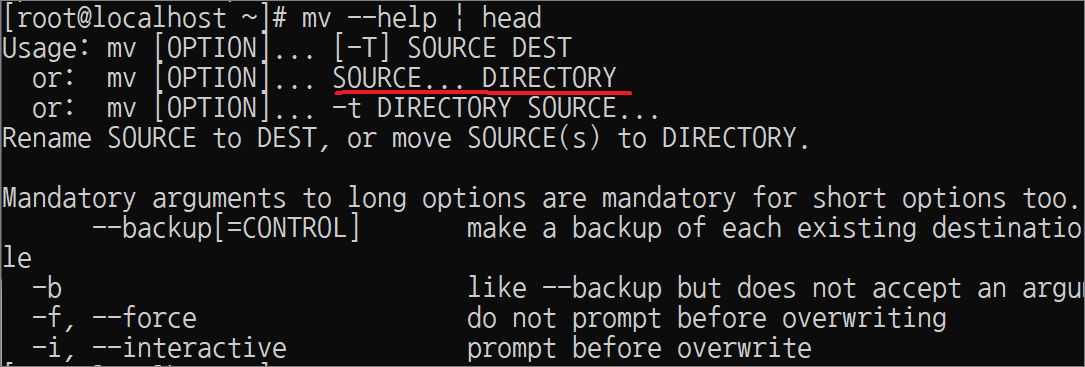
Usage: cp [OPTION]... [-T] SOURCE DEST
or: cp [OPTION]... SOURCE... DIRECTORY
or: cp [OPTION]... -t DIRECTORY SOURCE...
Copy SOURCE to DEST, or multiple SOURCE(s) to DIRECTORY.
/etc/passwd: 사용자 정보가 저장된 파일
/etc/shadow: 사용자의 암호화된 해시(sha512) 비밀번호가 저장된 파일
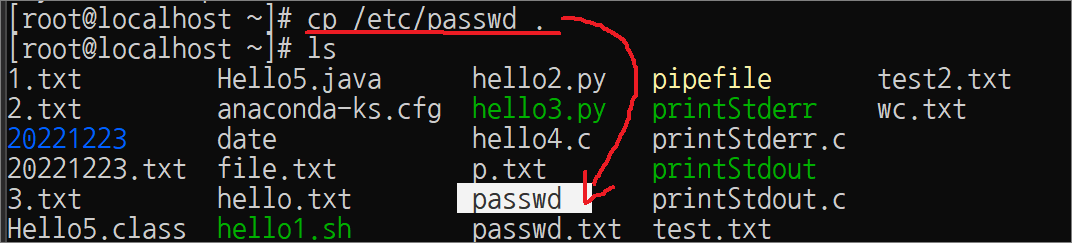
파일 1개를 복사할 때는 두 번째 인수가 디렉터리이면 파일명이 그대로 복사된다.
[root@localhost ~]# cp /etc/passwd .
[root@localhost ~]# cp /etc/shadow shadow
[root@localhost ~]# ls
passwd shadow
[root@localhost ~]# mkdir test
[root@localhost ~]# ls -l
합계 8
-rw-r--r--. 1 root root 1109 12월 28 02:07 passwd
----------. 1 root root 1034 12월 28 02:09 shadow
drwxr-xr-x. 2 root root 6 12월 28 02:12 test
파일 2개 이상을 복사할 때는 마지막 인수는 반드시 디렉터리가 되어야 한다.
형식: cp [OPTION]... SOURCE... DIRECTORY
이때는 인수에 지정한 파일들이 파일명을 그대로 유지한채로 마지막 디렉터리에 복사된다.
[root@localhost ~]# cp passwd shadow shadow2
cp: target `shadow2' is not a directory
[root@localhost ~]# ls -l
합계 8
-rw-r--r--. 1 root root 1109 12월 28 02:07 passwd
----------. 1 root root 1034 12월 28 02:09 shadow
drwxr-xr-x. 2 root root 6 12월 28 02:12 test
[root@localhost ~]# cp passwd shadow test
[root@localhost ~]# ls -l test
합계 8
-rw-r--r--. 1 root root 1109 12월 28 02:14 passwd
----------. 1 root root 1034 12월 28 02:14 shadow

💥 참고 💥
현재 디렉터리에 passwd 파일을 passwd2로 복사한다.
– 아래 10개는 모두 동일하다. (중요한 것은 경로만 맞춰주면 된다.)
[root@localhost ~]# cd
[root@localhost ~]# cp passwd passwd2
[root@localhost ~]# cp /root/passwd passsw2
[root@localhost ~]# cp /root/passwd /root/passwd2
[root@localhost ~]# cp ./passswd passwd2
[root@localhost ~]# cp passwd ./passwd2
[root@localhost ~]# cp ./passwd ./passwd2
[root@localhost ~]# cp passwd /home/../root/passwd2
[root@localhost ~]# cp passwd /usr/local/bin/../../../root/passwd2
[root@localhost ~]# cp /root/passwd /usr/local/bin/../../../root/passwd2
[root@localhost ~]# cp /root/passwd /usr/local/bin/./../../../root/passwd2
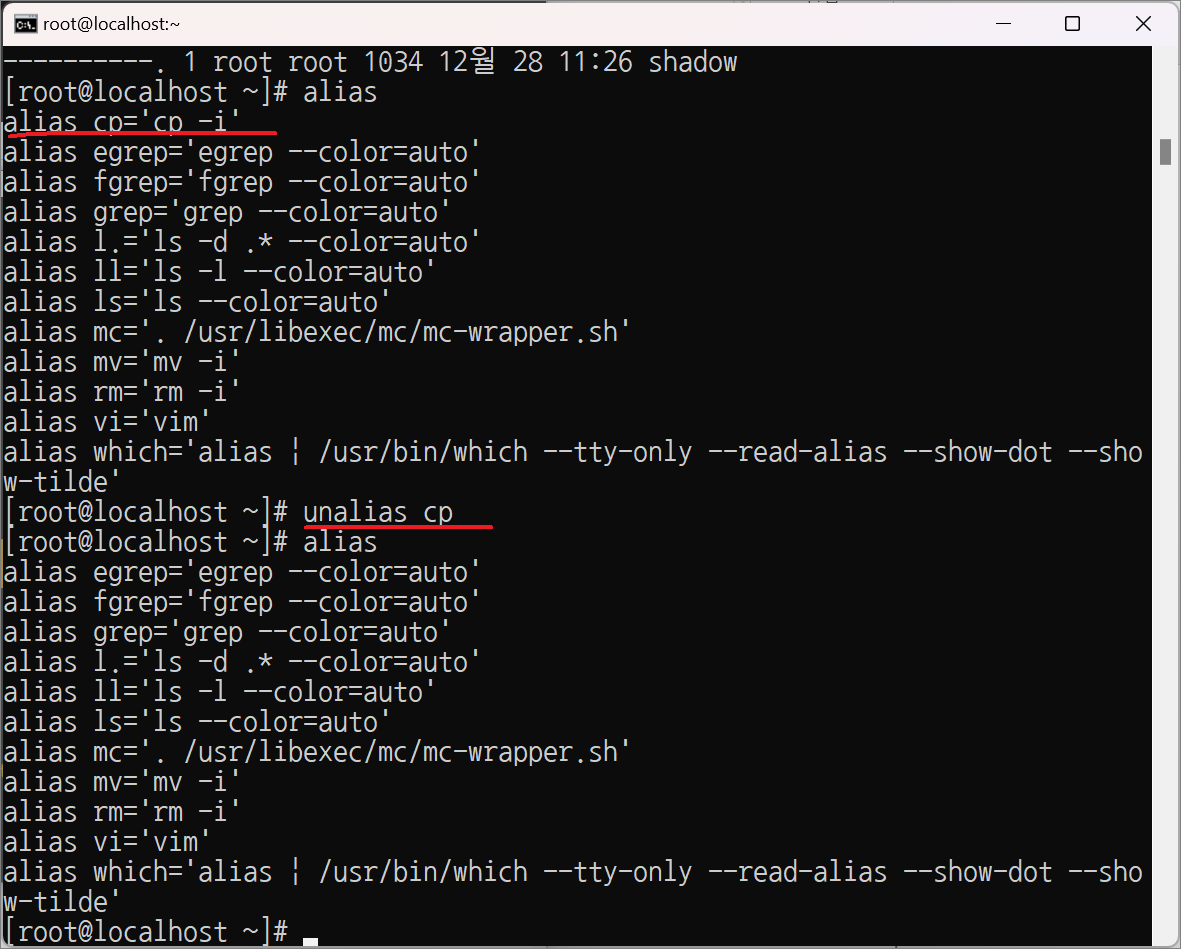
alias 된 cp를 삭제한다.
[root@localhost ~]# alias cp
alias cp='cp -i'
[root@localhost ~]# unalias cp
[root@localhost ~]# alias cp
-bash: alias: cp: not found
[root@localhost ~]# ls -l
합계 8
-rw-r--r--. 1 root root 1109 12월 28 02:07 passwd
----------. 1 root root 1034 12월 28 02:09 shadow
drwxr-xr-x. 2 root root 34 12월 28 02:14 test
cp 명령어는 복사할 때 대상 파일이 있어도 그대로 덮어쓴다.
덮어쓸 것인지 물어보지 않는다.
[root@localhost ~]# cp /etc/fstab passwd
[root@localhost ~]# ls -l /etc/fstab passwd
-rw-r--r--. 1 root root 465 12월 20 15:48 /etc/fstab
-rw-r--r--. 1 root root 465 12월 28 02:23 passwd <-- 크기가 변경되었다.
-i 옵션: 복사하는 파일을 덮어쓸 것인지 물어본다.
– 엔터(복사하기 취소), y(복사하기)
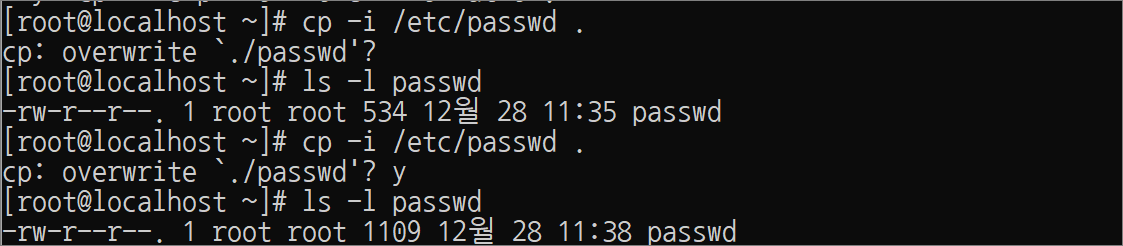
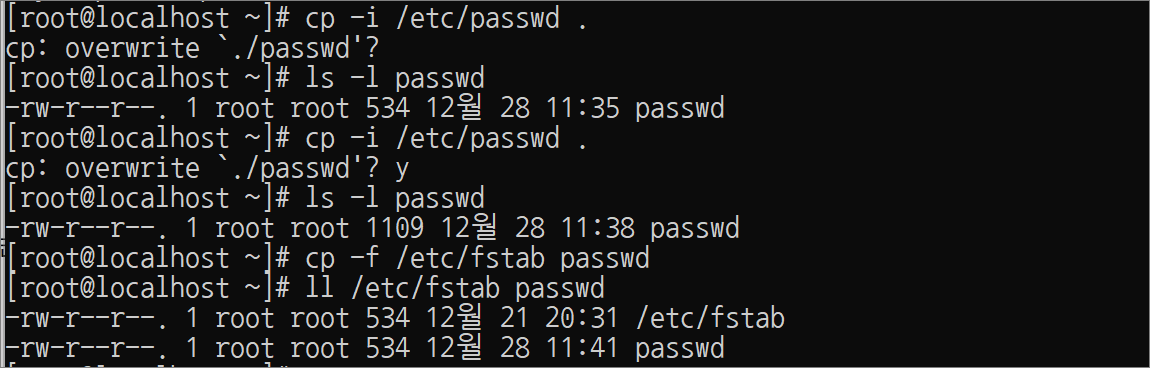
[root@localhost ~]# cp -i /etc/passwd .
cp: overwrite ‛./passwd'? <-- 그냥 엔터 (취소)
[root@localhost ~]# ls -l passwd
-rw-r--r--. 1 root root 465 12월 28 02:23 passwd
[root@localhost ~]# cp -i /etc/passwd .
cp: overwrite `./passwd'? y <-- y 는 파일을 덮어쓴다.
[root@localhost ~]# ls -l passwd
-rw-r--r--. 1 root root 1109 12월 28 02:25 passwd
[root@localhost ~]# ls -l /etc/passwd
-rw-r--r--. 1 root root 1109 12월 28 01:08 /etc/passwd
-f 옵션: 파일을 강제로 복사한다.
[root@localhost ~]# cp -f /etc/fstab passwd
[root@localhost ~]# ls -l /etc/fstab passwd
-rw-r--r--. 1 root root 465 12월 20 15:48 /etc/fstab
-rw-r--r--. 1 root root 465 12월 28 02:29 passwd <-- 1109에서 465로 변경되었다.
디렉터리는 cp 명령어의 옵션을 이용해야 복사할 수 있다.
-rf , -Rf, -a, -dR
[root@localhost ~]# cp /etc .
cp: omitting directory `/etc'
[root@localhost ~]# cp -rf /etc etc1
[root@localhost ~]# cp -a /etc etc2
[root@localhost ~]# cp -dR /etc etc3
[root@localhost ~]# ls -l
합계 44
drwxr-xr-x. 75 root root 8192 12월 28 02:32 etc1
drwxr-xr-x. 75 root root 8192 12월 28 01:08 etc2
drwxr-xr-x. 75 root root 8192 12월 28 02:32 etc3
-rw-r--r--. 1 root root 465 12월 28 02:29 passwd
----------. 1 root root 1034 12월 28 02:09 shadow
drwxr-xr-x. 2 root root 34 12월 28 02:14 test
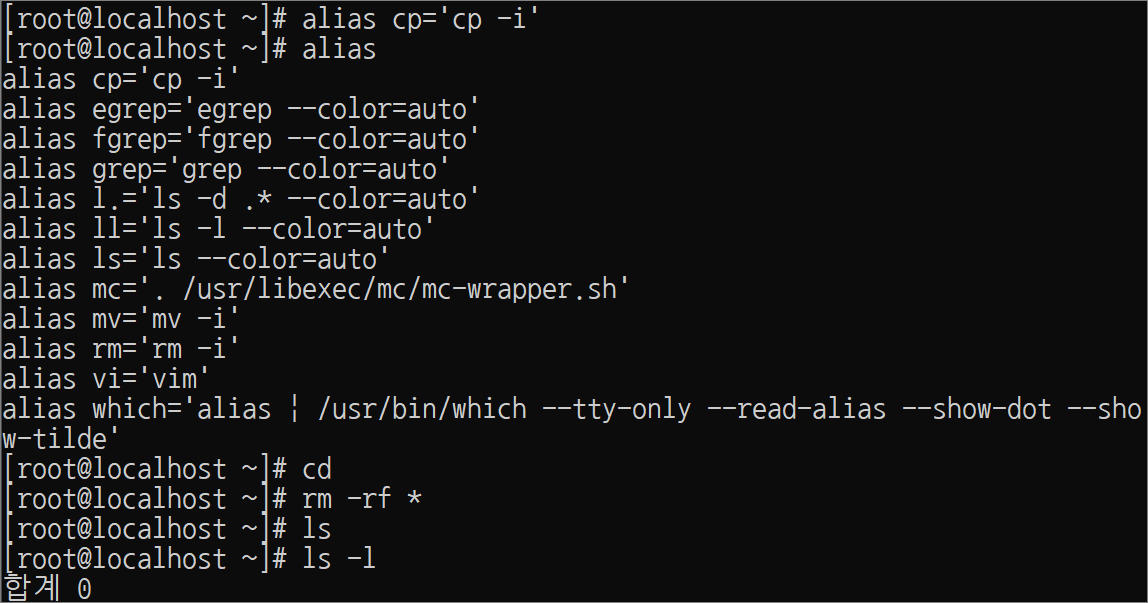
cp를 cp -i로 실행할 수 있게 alias cp를 생성한다.
[root@localhost ~]# alias cp='cp -i'
[root@localhost ~]# alias cp
alias cp='cp -i'
[root@localhost ~]# cd
[root@localhost ~]# rm -rf *
[root@localhost ~]# cp /etc/passwd .
[root@localhost ~]# ll
합계 4
-rw-r--r--. 1 root root 1109 12월 28 02:57 passwd
[root@localhost ~]# cp /etc/shadow passwd
cp: overwrite `passwd'?
[root@localhost ~]# ll
합계 4
-rw-r--r--. 1 root root 1109 12월 28 02:57 passwd
HDD에 있는 명령어 /bin/cp 보다 alias로 설정된 명령어 cp가 먼저 실행된다.
그것을 테스트하기 위해서 cp를 echo hello로 설정한 것이다.
[root@localhost ~]# alias cp='echo hello'
[root@localhost ~]# cp /etc/shadow passwd
hello /etc/shadow passwd
[root@localhost ~]# echo hello /etc/shadow passwd
hello /etc/shadow passwd
[root@localhost ~]# alias cp='cp -i'
[root@localhost ~]# ll
합계 4
-rw-r--r--. 1 root root 1109 12월 28 02:57 passwd
[root@localhost ~]# ll /etc/fstab
-rw-r--r--. 1 root root 465 12월 20 15:48 /etc/fstab
💥 복사 여부를 물어보는 옵션과 강제로 복사하는 옵션 두 가지를 동시에 사용할 때 💥
cp -if 파일1 파일2: 파일을 복사할 때 복수 여부를 확인한다.
cp -fi 파일1 파일2: 파일을 복사할 때 복수 여부를 확인한다.
[root@localhost ~]# cp -f /etc/fstab passwd
cp: overwrite `passwd'?
이 두 옵션을 테스트하기 위해서 사용한 것이다.
[root@localhost ~]# unalias cp
[root@localhost ~]# cp -if /etc/fstab passwd
cp: overwrite 'passwd'? <-- 복사를 하지 않을 것이므로 그냥 엔터
[root@localhost ~]# cp -fi /etc/fstab passwd
cp: overwrite `passwd'? <-- 복사를 하지 않을 것이므로 그냥 엔터
실습> mv 명령어
mv 명령어는 두 가지의 기능을 가지고 있다.
-파일의 이름을 변경한다.
-파일을 다른 디렉터리로 이동한다.
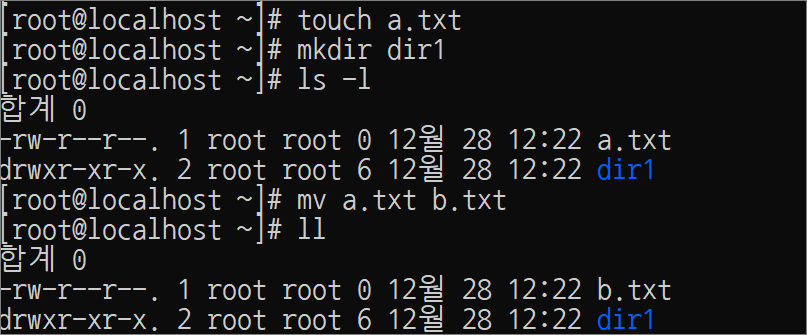
[root@localhost ~]# cd
[root@localhost ~]# rm -f *
[root@localhost ~]# touch a.txt
[root@localhost ~]# mkdir dir1
[root@localhost ~]# ls -l
합계 0
-rw-r--r--. 1 root root 0 12월 28 03:14 a.txt
drwxr-xr-x. 2 root root 6 12월 28 03:14 dir1
a.txt 파일을 b.txt 파일로 파일명을 변경한다.
[root@localhost ~]# mv a.txt b.txt
[root@localhost ~]# ll
합계 0
-rw-r--r--. 1 root root 0 12월 28 03:14 b.txt
drwxr-xr-x. 2 root root 6 12월 28 03:14 dir1
b.txt 파일을 c.txt 파일로 파일명을 변경한다.
[root@localhost ~]# mv b.txt c.txt
[root@localhost ~]# ll
합계 0
-rw-r--r--. 1 root root 0 12월 28 03:14 c.txt
drwxr-xr-x. 2 root root 6 12월 28 03:14 dir1
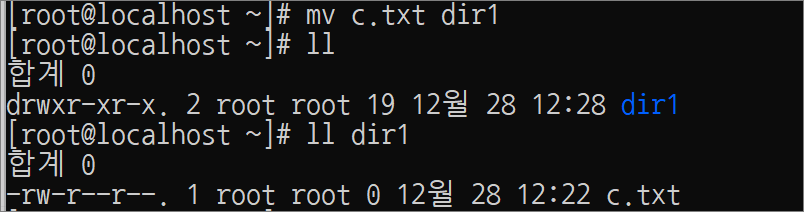
💥 중요 💥
파일을 이동시킬 때 디렉토리명만 오면 파일명을 그대로 유지한 채로 이동된다.
c.txt 파일을 dir1/c.txt 파일로 이동시킨다.
[root@localhost ~]# mv c.txt dir1
[root@localhost ~]# ls
dir1
[root@localhost ~]# ls dir1
c.txt
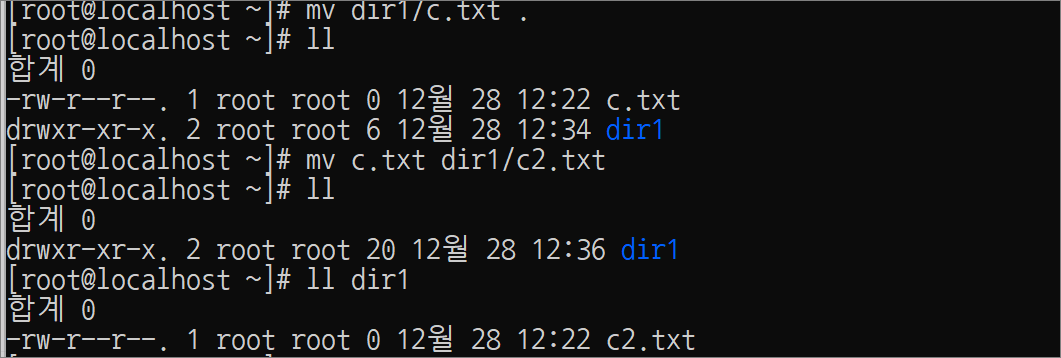
dir1/c.txt 파일을 /root/c.txt 파일로 이동시킨다.
[root@localhost ~]# mv dir1/c.txt .
[root@localhost ~]# ll
합계 0
-rw-r--r--. 1 root root 0 12월 28 03:14 c.txt
drwxr-xr-x. 2 root root 6 12월 28 03:27 dir1

💥 중요 💥
파일을 이동시킬 때 파일명을 적으면 파일명이 변경되면서 이동된다.
c.txt 파일을 dir1/c2.txt 파일로 이동시킨다.
[root@localhost ~]# ll
합계 0
-rw-r--r--. 1 root root 0 12월 28 03:14 c.txt
drwxr-xr-x. 2 root root 6 12월 28 03:27 dir1
[root@localhost ~]# mv c.txt dir1/c2.txt
[root@localhost ~]# ll dir1/
합계 0
-rw-r--r--. 1 root root 0 12월 28 03:14 c2.txt
💥 중요 💥
mv 를 실행하면 복사와 삭제가 동시에 실행이 된다.
-mv를 현재 디렉터리에서 작업하면 파일의 이름이 변경된다.
-mv c.txt c2.txt
-./c.txt ---(복사)--> ./c2.txt --(삭제)--> ./c.txt --> c2.txt만 남아있다.
-mv를 다른 디렉터리에서 작업하면 파일이 이동된다.
-mv c.txt dir1
-./c.txt ---(복사)--> ./dir1/c.txt --(삭제)--> ./c.txt --> dir1/c.txt로 이동된다.
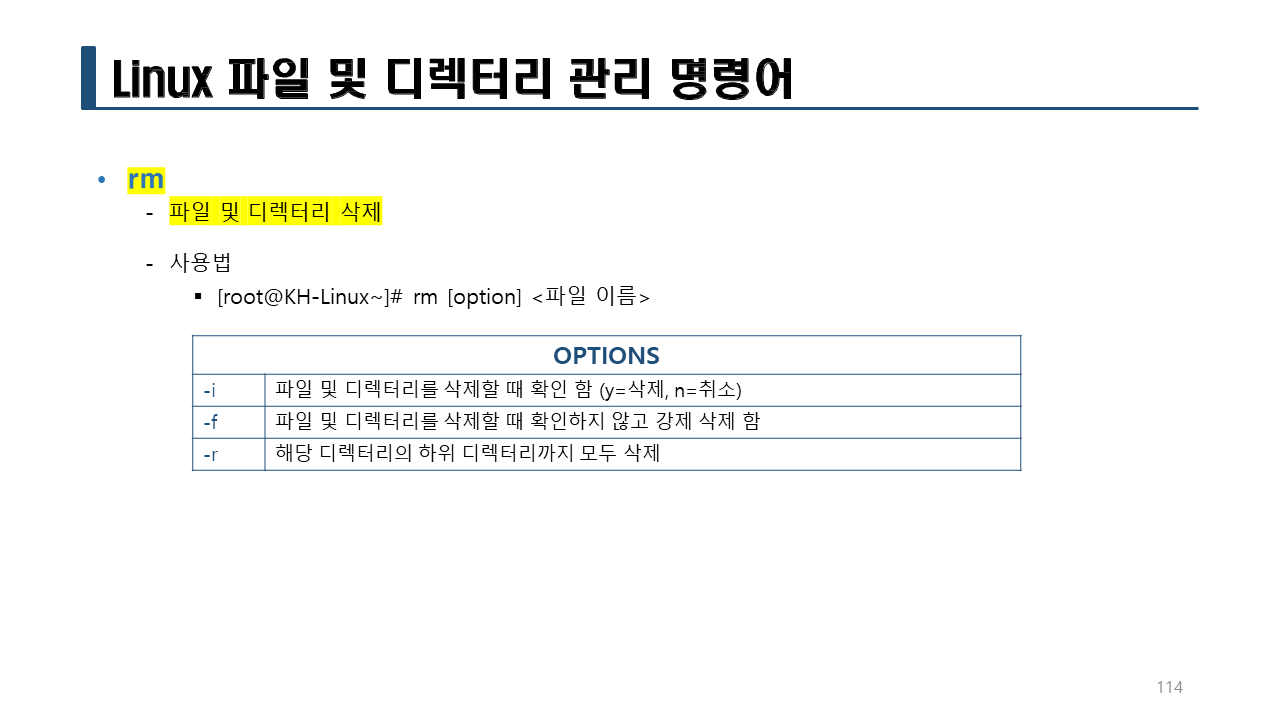
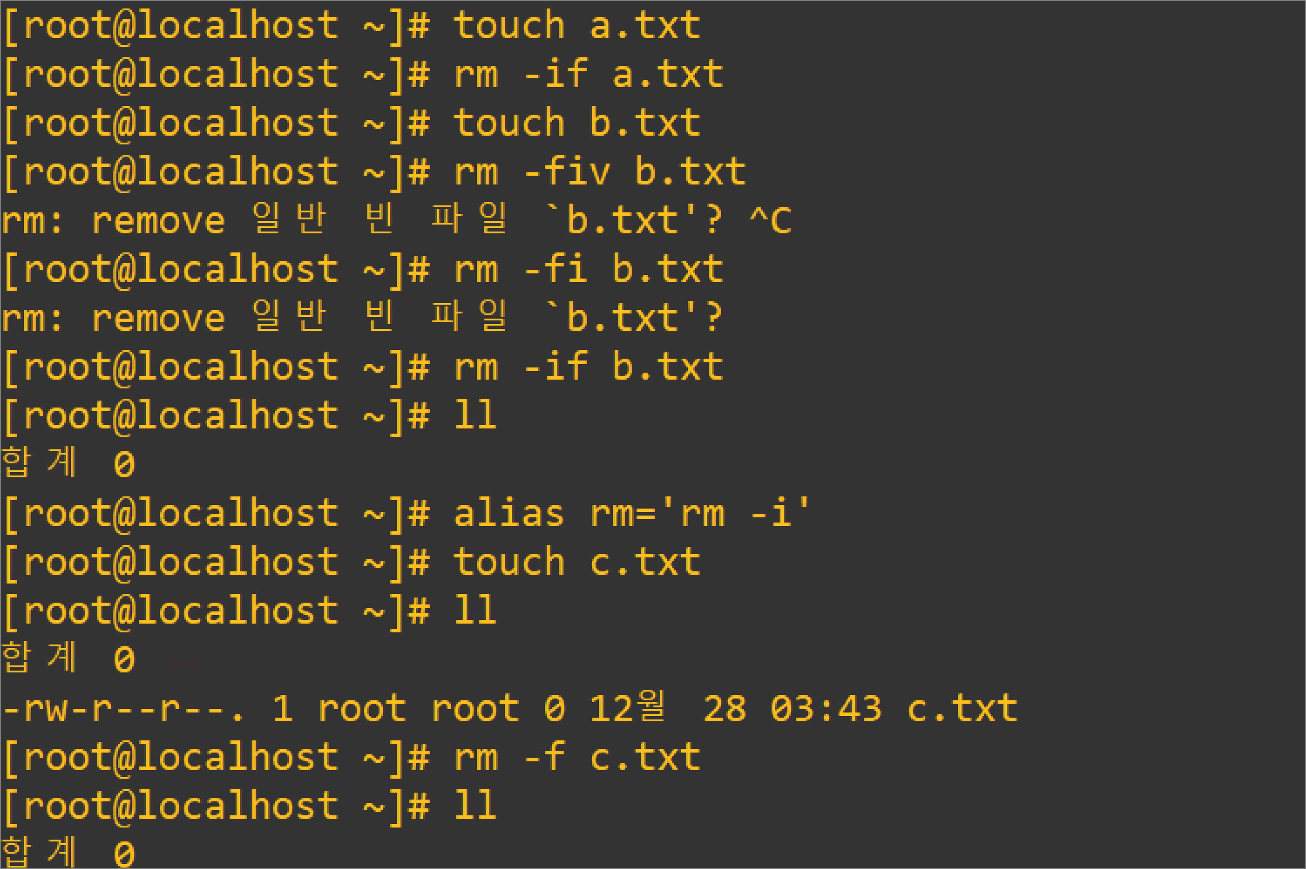
실습> rm 명령어
-i 옵션: 파일을 삭제할 때 삭제 여부를 확인한다.
-f 옵션: 파일을 삭제할 때 강제로 삭제한다.
💥 삭제 여부를 물어보는 옵션과 강제로 삭제하는 옵션 두 가지를 동시에 사용할 때 💥
rm -if 파일: 파일을 강제로 삭제한다.
rm -fi 파일: 파일을 삭제할 때 삭제 여부를 확인한다.
[root@localhost ~]# rm a.txt
rm: remove 일반 빈 파일 'a.txt'?
[root@localhost ~]# ll
합계 0
-rw-r--r--. 1 root root 0 12월 28 03:41 a.txt
[root@localhost ~]# rm -f a.txt
[root@localhost ~]# unalias rm
[root@localhost ~]# alias rm
-bash: alias: rm: not found
[root@localhost ~]# touch a.txt
[root@localhost ~]# rm -if a.txt
[root@localhost ~]# touch b.txt
[root@localhost ~]# rm -fiv b.txt
rm: remove 일반 빈 파일 'b.txt'? ^C
[root@localhost ~]# rm -fi b.txt
rm: remove 일반 빈 파일 `b.txt'?
[root@localhost ~]# rm -if b.txt
[root@localhost ~]# ll
합계 0
[root@localhost ~]# alias rm='rm -i'
[root@localhost ~]# touch c.txt
[root@localhost ~]# ll
합계 0
-rw-r--r--. 1 root root 0 12월 28 03:43 c.txt
[root@localhost ~]# rm -f c.txt
[root@localhost ~]# ll
합계 0
rm -rf 옵션은 조심해야 한다.

관리자 모드 #에서 rm -rf 명령어는 디렉터리까지 모두 삭제가 되므로 운영체제에 상당한 장애가 발생될 수 있다. (r 조심)
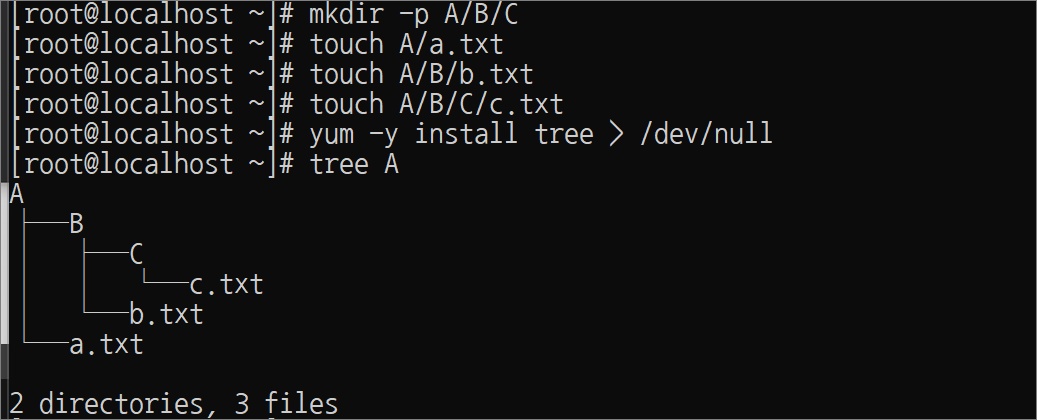
실습> rm -rfv 테스트
[root@localhost ~]# mkdir -p A/B/C
[root@localhost ~]# touch A/a.txt
[root@localhost ~]# touch A/B/b.txt
[root@localhost ~]# touch A/B/C/c.txt
[root@localhost ~]# yum -y install tree > /dev/null
[root@localhost ~]# tree A
A
├── B
│ ├── C
│ │ └── c.txt
│ └── b.txt
└── a.txt
2 directories, 3 files
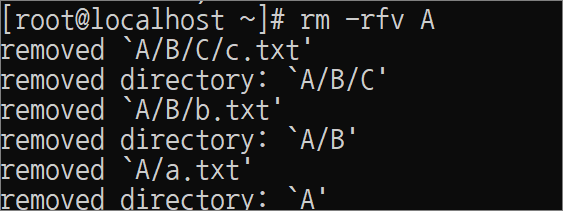
[root@localhost ~]# rm -rfv A
removed 'A/B/C/c.txt'
removed directory: 'A/B/C'
removed 'A/B/b.txt'
removed directory: 'A/B'
removed 'A/a.txt'
removed directory: 'A'
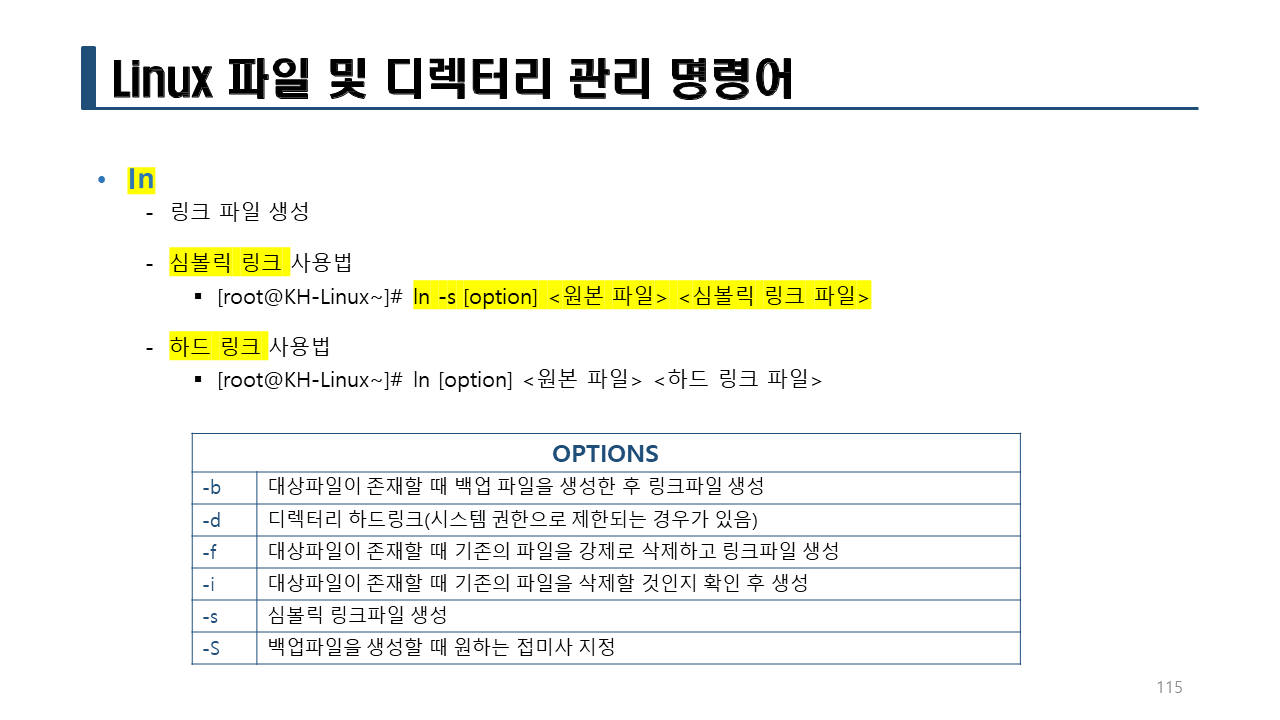
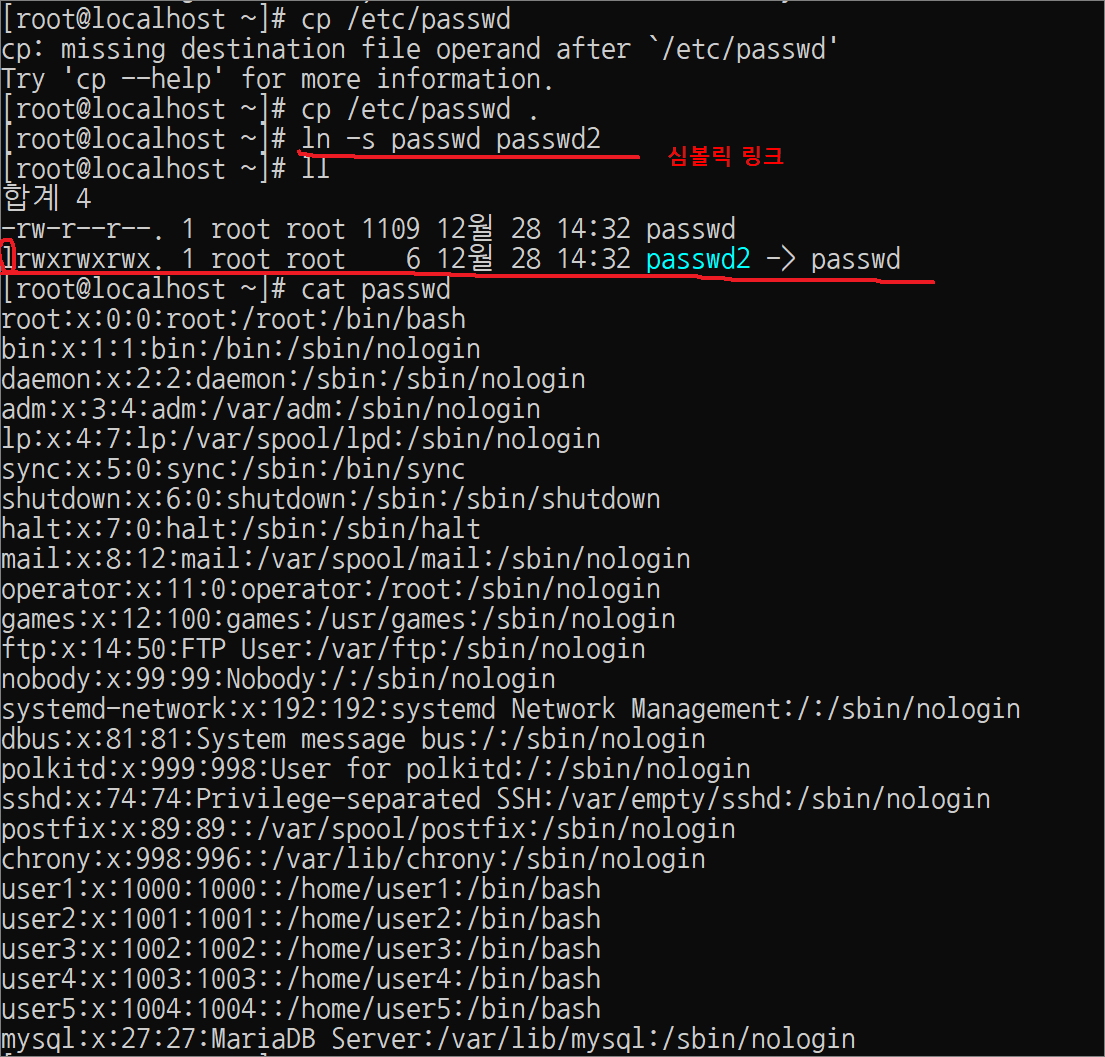
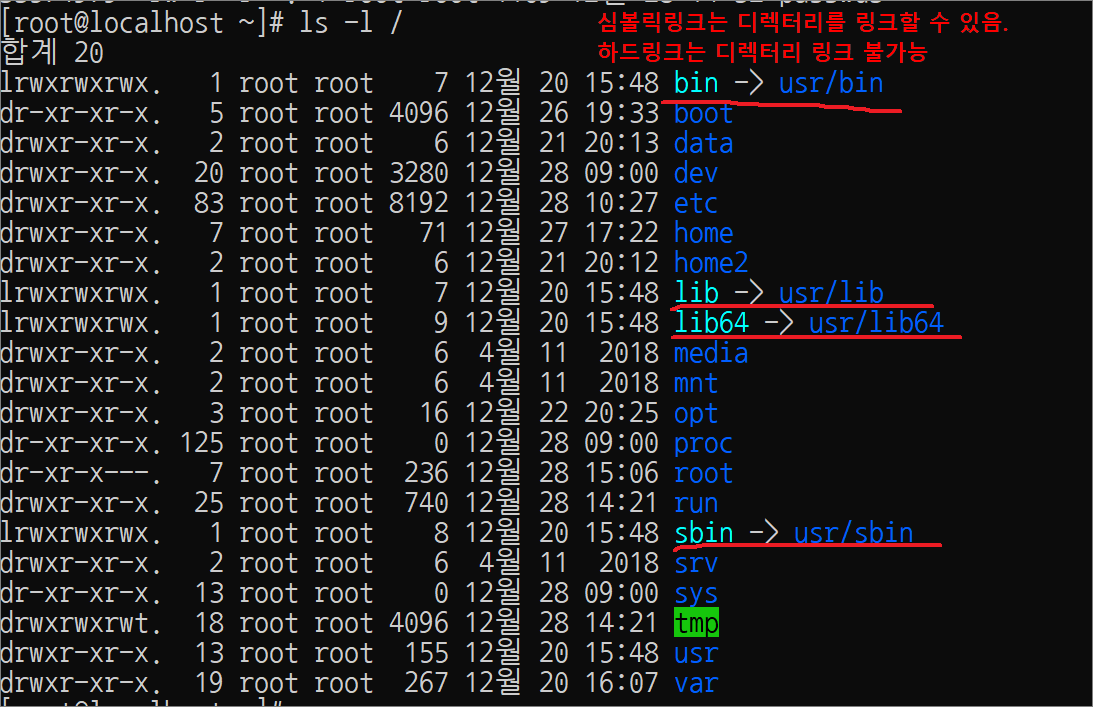
실습> ln 명령어
링크의 종류
-심볼릭 링크
-하드 링크
심볼릭 링크 생성하기
-s 옵션: 심볼릭 링크를 생성하는 옵션
심볼릭링크는 파일의 종류에서 l로 표시된다.
[root@localhost ~]# cp /etc/passwd .
[root@localhost ~]# ln -s passwd passwd2
[root@localhost ~]# ll
합계 4
-rw-r--r--. 1 root root 1109 12월 28 05:34 passwd
lrwxrwxrwx. 1 root root 6 12월 28 05:35 passwd2 -> passwd
[root@localhost ~]# ll -i
합계 4
33574979 -rw-r--r--. 1 root root 1109 12월 28 05:34 passwd
33575012 lrwxrwxrwx. 1 root root 6 12월 28 05:35 passwd2 -> passwd
[root@localhost ~]# head passwd
root:x:0:0:root:/root:/bin/bash
bin:x:1:1:bin:/bin:/sbin/nologin
daemon:x:2:2:daemon:/sbin:/sbin/nologin
adm:x:3:4:adm:/var/adm:/sbin/nologin
lp:x:4:7:lp:/var/spool/lpd:/sbin/nologin
sync:x:5:0:sync:/sbin:/bin/sync
shutdown:x:6:0:shutdown:/sbin:/sbin/shutdown
halt:x:7:0:halt:/sbin:/sbin/halt
mail:x:8:12:mail:/var/spool/mail:/sbin/nologin
operator:x:11:0:operator:/root:/sbin/nologin
[root@localhost ~]# head passwd2
root:x:0:0:root:/root:/bin/bash
bin:x:1:1:bin:/bin:/sbin/nologin
daemon:x:2:2:daemon:/sbin:/sbin/nologin
adm:x:3:4:adm:/var/adm:/sbin/nologin
lp:x:4:7:lp:/var/spool/lpd:/sbin/nologin
sync:x:5:0:sync:/sbin:/bin/sync
shutdown:x:6:0:shutdown:/sbin:/sbin/shutdown
halt:x:7:0:halt:/sbin:/sbin/halt
mail:x:8:12:mail:/var/spool/mail:/sbin/nologin
operator:x:11:0:operator:/root:/sbin/nologin
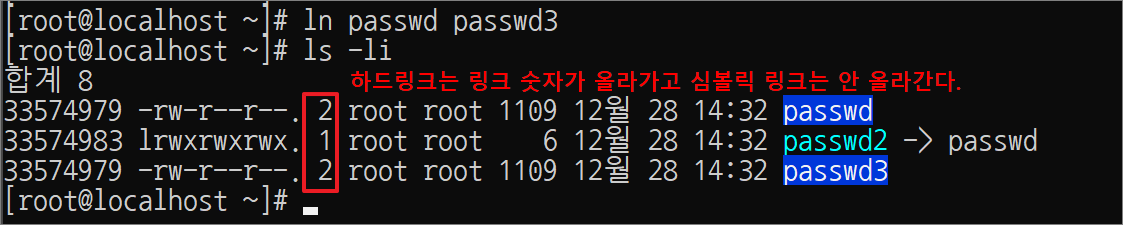
하드링크를 생성한다.
하드링크는 -s 옵션을 사용할 수 없다.
[root@localhost ~]# ln passwd passwd3
[root@localhost ~]# ls -li
합계 8
33574979 -rw-r--r--. 2 root root 1109 12월 28 05:34 passwd
33575012 lrwxrwxrwx. 1 root root 6 12월 28 05:35 passwd2 -> passwd
33574979 -rw-r--r--. 2 root root 1109 12월 28 05:34 passwd3
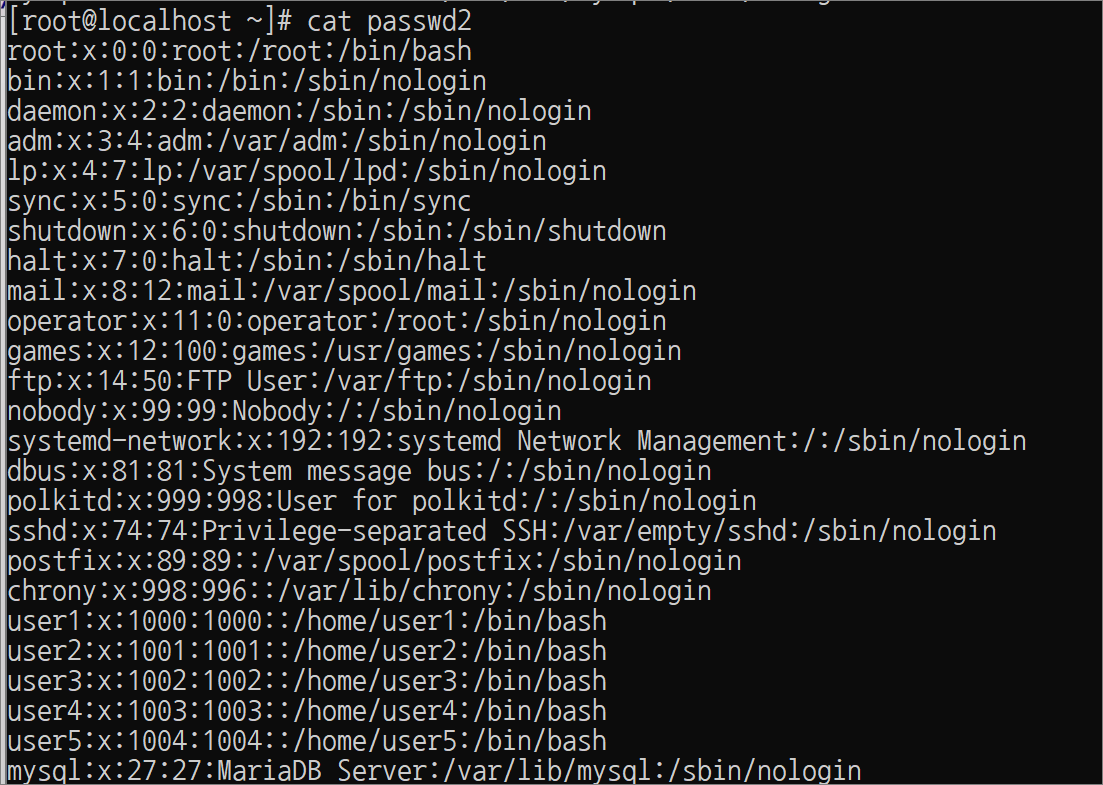
원본 파일을 삭제한다.
[root@localhost ~]# rm -f passwd
[root@localhost ~]# ls -li
합계 4
33575012 lrwxrwxrwx. 1 root root 6 12월 28 05:35 passwd2 -> passwd
33574979 -rw-r--r--. 1 root root 1109 12월 28 05:34 passwd3
[root@localhost ~]# cat passwd2
cat: passwd2: 그런 파일이나 디렉터리가 없습니다
[root@localhost ~]# cat passwd3
root:x:0:0:root:/root:/bin/bash
bin:x:1:1:bin:/bin:/sbin/nologin
daemon:x:2:2:daemon:/sbin:/sbin/nologin
:
:(생략)
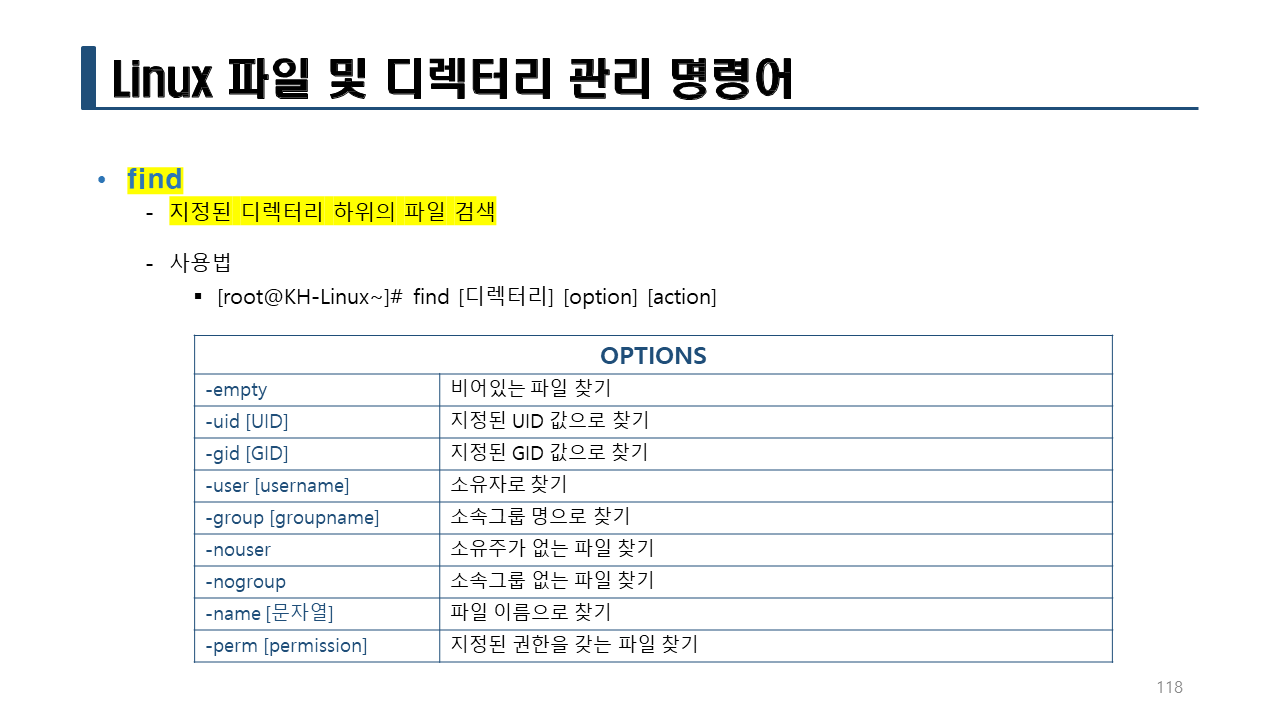
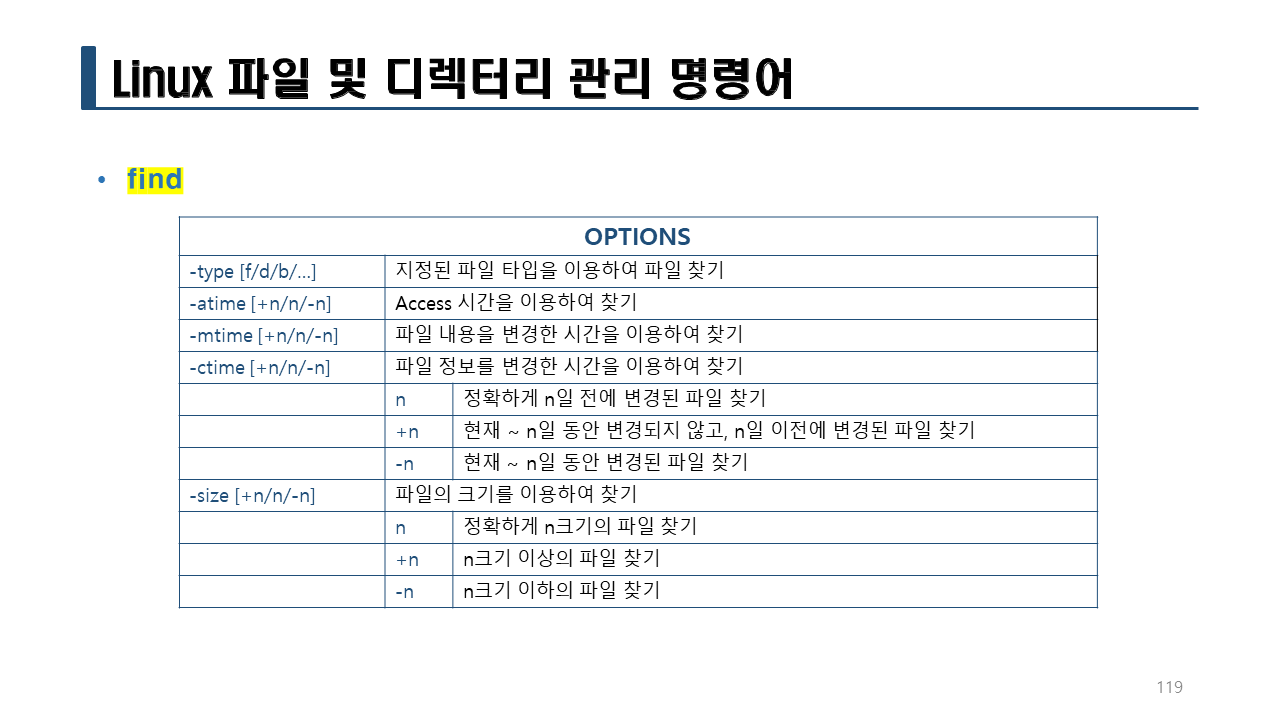
실습> find
Usage: find [-H][-L] [-P][-Olevel] [-D help|tree|search|stat|rates|opt|exec][path...] [expression]
!!!참고!!!:
다른 유닉스에서는 -print 를 생략하면 에러가 발생하지만 리눅스는 default로 설정되어 있기 때문에 생략 가능하다.
/etc/passwd 파일을 검색한다.
-find /etc -name passwd [-print]
-find /etc -name passwd -ls [-print]

/dev 디렉터리에서 소켓 파일을 검색한다.
-find /dev -type s -ls
/dev 디렉터리에서 파이프 파일을 검색한다.
-find /dev -type p -ls
/dev 디렉터리에서 디렉터리 파일을 검색한다.
-find /dev -type d -ls
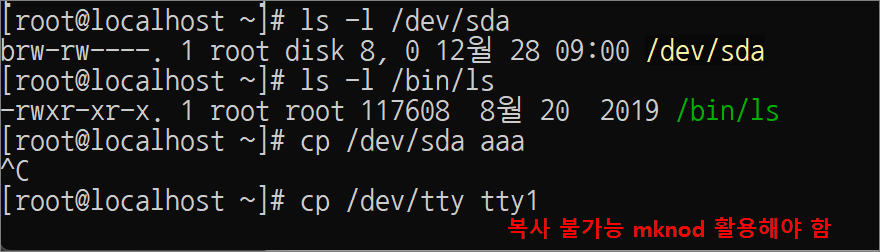
/dev 디렉터리에서 블럭 장치 파일(block device)을 검색한다.
-find /dev -type b -ls
/dev 디렉터리에서 문자 장치 파일(character device)을 검색한다.
-find /dev -type c -ls
/dev 디렉터리에서 정규(일반) 파일을 검색한다.
-find /etc -type f -ls
/bin 디렉터리에서 심볼릭 링크 일반 파일을 검색한다.
find /bin -type l -ls
find 명령어는 특정 디렉터리를 지정하면 그 디렉터리 밑으로 모두 검색한다.
– -maxdepth 옵션은 디렉터리의 깊이를 지정하는 옵션이다.
find /etc -type l -ls
find /etc -maxdepth 2 -type l -ls
find /etc -maxdepth 1 -type l -ls
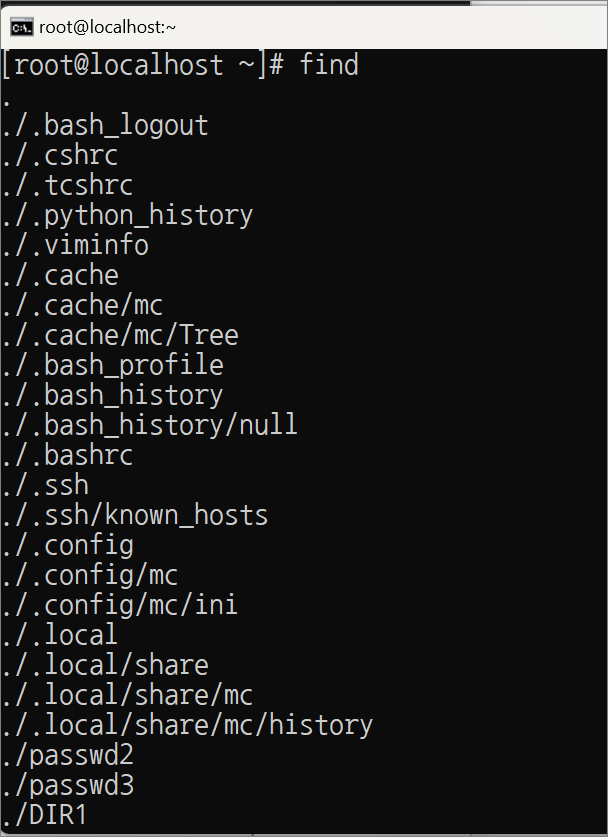
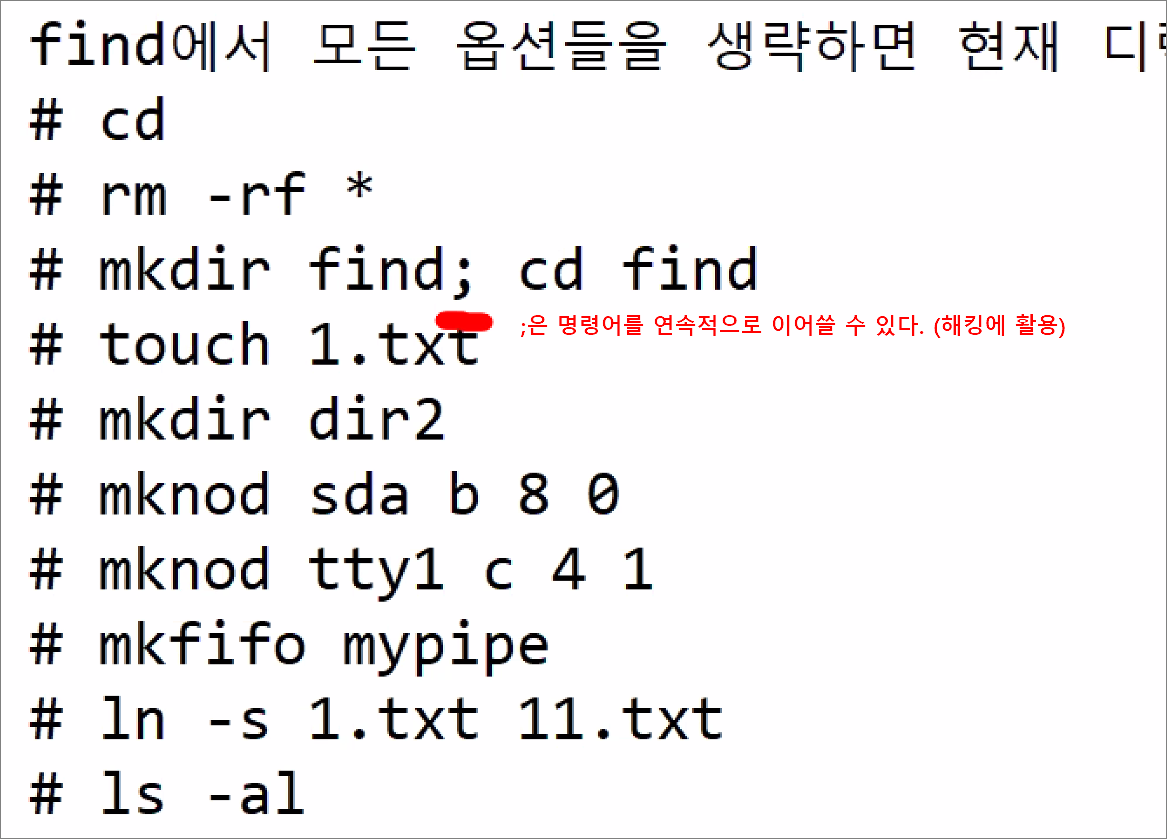
find에서 경로를 지정하지 않으면 현재 디렉터리에서 검색한다.
find -name a.txt
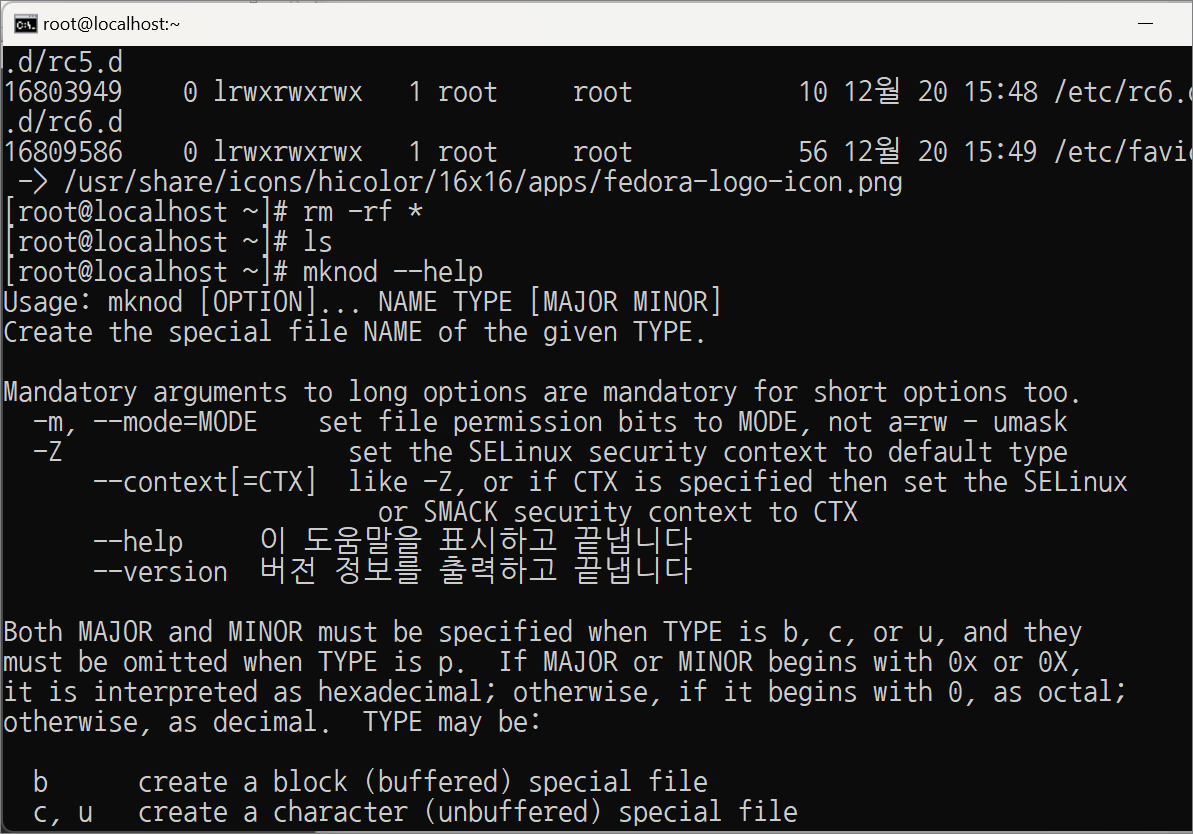
find에서 모든 옵션들을 생략하면 현재 디렉터리에서 파일을 검색한다.
[root@localhost find]# cd
[root@localhost find]# rm -rf *
[root@localhost find]# mkdir find; cd find
[root@localhost find]# touch 1.txt
[root@localhost find]# mkdir dir2
[root@localhost find]# mknod sda b 8 0
[root@localhost find]# mknod tty1 c 4 1
[root@localhost find]# mkfifo mypipe
[root@localhost find]# ln -s 1.txt 11.txt
[root@localhost find]# ls -al
합계 0
drwxr-xr-x. 3 root root 82 6월 25 16:47 .
dr-xr-x---. 3 root root 216 6월 25 16:44 ..
-rw-r--r--. 1 root root 0 6월 25 16:44 1.txt
lrwxrwxrwx. 1 root root 5 6월 25 16:47 11.txt -> 1.txt
drwxr-xr-x. 2 root root 6 6월 25 16:45 dir2
prw-r--r--. 1 root root 0 6월 25 16:46 mypipe
brw-r--r--. 1 root root 8, 0 6월 25 16:45 sda
crw-r--r--. 1 root root 4, 1 6월 25 16:45 tty1
[root@localhost find]# find -ls
805856 0 drwxr-xr-x 3 root root 82 6월 25 16:47 .
805857 0 -rw-r--r-- 1 root root 0 6월 25 16:44 ./1.txt
18055136 0 drwxr-xr-x 2 root root 6 6월 25 16:45 ./dir2
805858 0 brw-r--r-- 1 root root 8, 0 6월 25 16:45 ./sda
805859 0 crw-r--r-- 1 root root 4, 1 6월 25 16:45 ./tty1
805860 0 prw-r--r-- 1 root root 0 6월 25 16:46 ./mypipe
805861 0 lrwxrwxrwx 1 root root 5 6월 25 16:47 ./11.txt -> 1.txt
find 명령어의 옵션을 생략하는 것은 아래와 같다.
[root@localhost find]# find -type f -o -type d -o -type b -o -type c -o -type p -o -type l
[root@localhost find]# find
-o (or 연산)
한쪽이 참이면 참
0 -o 0 0
0 -o 1 1
1 -o 0 1
1 -o 1 1
-a (and 연산)
둘 다 참이면 참
0 -a 0 0
0 -a 1 0
1 -a 0 0
1 -a 1 1
시스템 전체 디렉터리에서 passwd 파일을 검색한다.
[root@localhost find]# find / -name passwd -ls
[root@localhost find]# ls -li /etc/passwd
17662889 -rw-r--r--. 1 root root 1354 6월 25 11:51 /etc/passwd
1 2 3 4 5 6 7
- -inum: 아이노드 번호로 검색
- -perm: 퍼미션(허가권)을 검색
- -user: 사용자 이름으로 검색
- -uid : UID(유저 아이디)로 검색
- -nouser: 없는 사용자명으로 검색
- -group: 그룹명으로 검색
- -gid : GID(그룹 아이디)로 검색
- -nogroup: 없는 그룹명으로 검색
- -size: 파일 사이즈로 검색
- -mtime: 수정 시간으로 검색
-atime: 접근 시간으로 검색
-ctime: 변경 시간으로 검색 - -name: 파일명으로 검색
MAC를 볼 수 있는 명령어
-stat
-ls 옵션
[root@localhost find]# stat /etc/passwd
File: `/etc/passwd'
Size: 1109 Blocks: 8 IO Block: 4096 일반 파일
Device: fd00h/64768d Inode: 18060311 Links: 1
Access: (0644/-rw-r--r--) Uid: ( 0/ root) Gid: ( 0/ root)
Context: system_u:object_r:passwd_file_t:s0
Access: 2022-12-28 01:08:57.636807294 +0900 <-- ls -lu --full-time
Modify: 2022-12-28 01:08:57.630307224 +0900 <-- ls -l --full-time
Change: 2022-12-28 01:08:57.632473914 +0900 <-- ls -lc --full-time
Birth: -
[root@localhost find]# ls -l /etc/passwd
-rw-r--r--. 1 root root 1109 12월 28 01:08 /etc/passwd
[root@localhost find]# ls -l --full-time /etc/passwd
-rw-r--r--. 1 root root 1109 2022-12-28 01:08:57.630307224 +0900 /etc/passwd
[root@localhost find]# ls -lu --full-time /etc/passwd
-rw-r--r--. 1 root root 1109 2022-12-28 01:08:57.636807294 +0900 /etc/passwd
[root@localhost find]# ls -lc --full-time /etc/passwd
-rw-r--r--. 1 root root 1109 2022-12-28 01:08:57.632473914 +0900 /etc/passwd
[root@localhost find]# useradd user1
/dev/null
-블랙홀과 같고 이쪽으로 보내면 메세지가 버려진다.
-주로 출력 리다이렉션과 같이 사용한다.
-> 와 1> 동일하다.
[root@localhost find]# echo Linux > /dev/null
[root@localhost find]# echo Linux 1> /dev/null
[root@localhost find]# echo Linux 2> /dev/null
Linux
[root@localhost find]# ls > /dev/null
[root@localhost find]# lsaskdfja
-bash: lsaskdfja: command not found
[root@localhost find]# lsaskdfja > /dev/null
-bash: lsaskdfja: command not found
[root@localhost find]# lsaskdfja 2> /dev/null
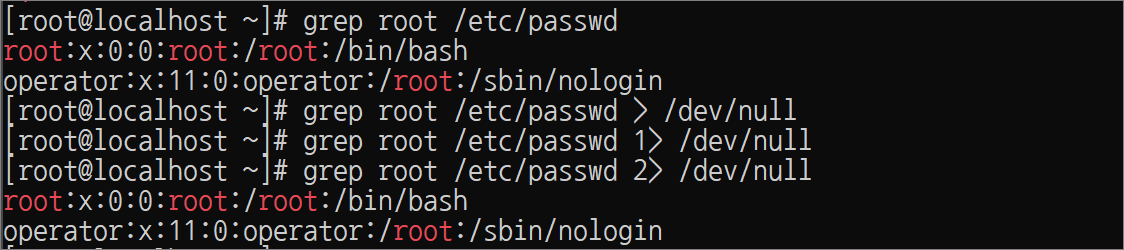
/ 디렉터리에서 user1 사용자의 파일을 자세히 출력하고 에러가 발생하면 에러는 출력하지 않는다.
[root@localhost find]# find / -user user1 -ls 2> /dev/null
6774 0 -rw-rw---- 1 user1 mail 0 12월 26 20:31 /var/spool/mail/user1
33630375 0 drwx------ 2 user1 user1 83 12월 26 20:37 /home/user1
33630376 4 -rw-r--r-- 1 user1 user1 18 4월 1 2020 /home/user1/.bash_logout
33630377 4 -rw-r--r-- 1 user1 user1 193 4월 1 2020 /home/user1/.bash_profile
33630378 4 -rw-r--r-- 1 user1 user1 231 4월 1 2020 /home/user1/.bashrc
33630379 4 -rw------- 1 user1 user1 65 12월 26 21:56 /home/user1/.bash_history
[root@localhost find]# ll
합계 0
-rw-r--r--. 1 root root 0 12월 28 07:01 1.txt
lrwxrwxrwx. 1 root root 5 12월 28 07:01 11.txt -> 1.txt
drwxr-xr-x. 2 root root 6 12월 28 07:01 dir2
prw-r--r--. 1 root root 0 12월 28 07:01 mypipe
brw-r--r--. 1 root root 8, 0 12월 28 07:01 sda
crw-r--r--. 1 root root 4, 1 12월 28 07:01 tty1
[root@localhost find]# find -type f
./1.txt
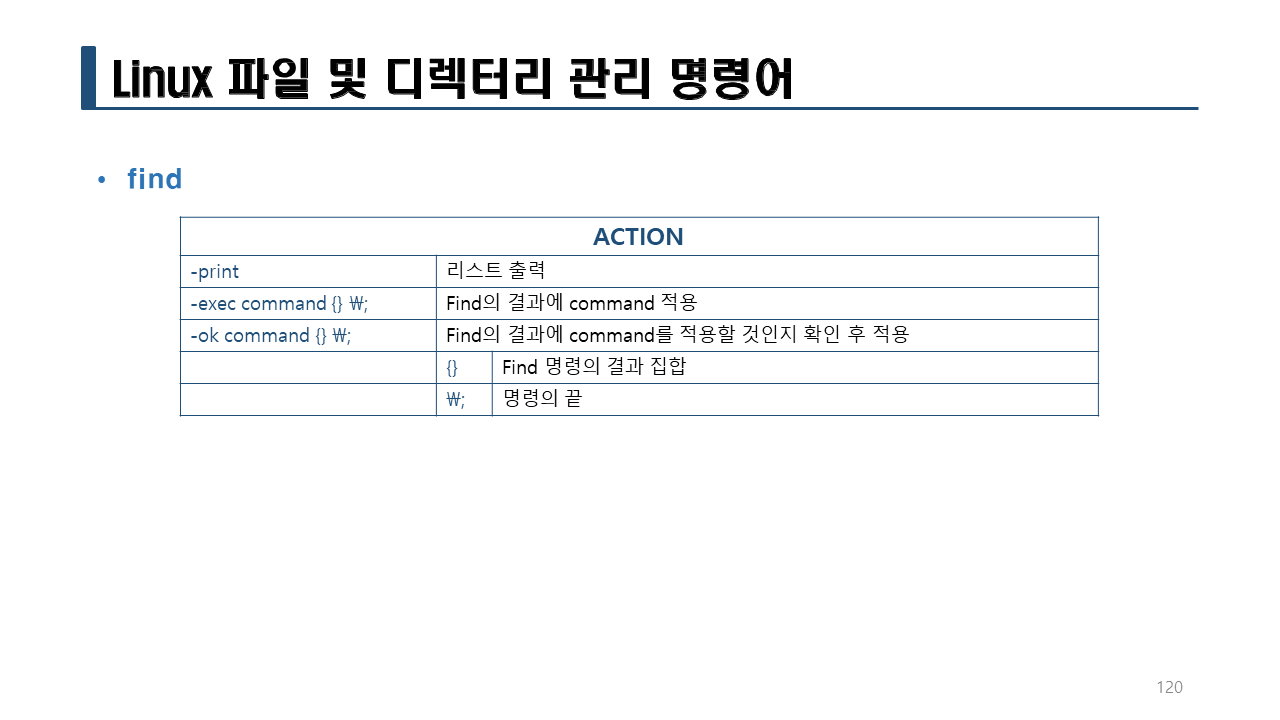
find로 정규 파일을 찾아서 삭제하는 명령어
[root@localhost find]# find -type f -exec rm -f {} \;
[root@localhost find]# ll
합계 0
lrwxrwxrwx. 1 root root 5 12월 28 07:01 11.txt -> 1.txt
drwxr-xr-x. 2 root root 6 12월 28 07:01 dir2
prw-r--r--. 1 root root 0 12월 28 07:01 mypipe
brw-r--r--. 1 root root 8, 0 12월 28 07:01 sda
crw-r--r--. 1 root root 4, 1 12월 28 07:01 tty1
find로 블록 장치 파일을 찾아서 삭제하는 명령어
[root@localhost find]# find -type b -ok rm -f {} \;
< rm ... ./sda > ? y
[root@localhost find]# ll
합계 0
lrwxrwxrwx. 1 root root 5 12월 28 07:01 11.txt -> 1.txt
drwxr-xr-x. 2 root root 6 12월 28 07:01 dir2
prw-r--r--. 1 root root 0 12월 28 07:01 mypipe
crw-r--r--. 1 root root 4, 1 12월 28 07:01 tty1
[root@localhost find]#
실습>
-
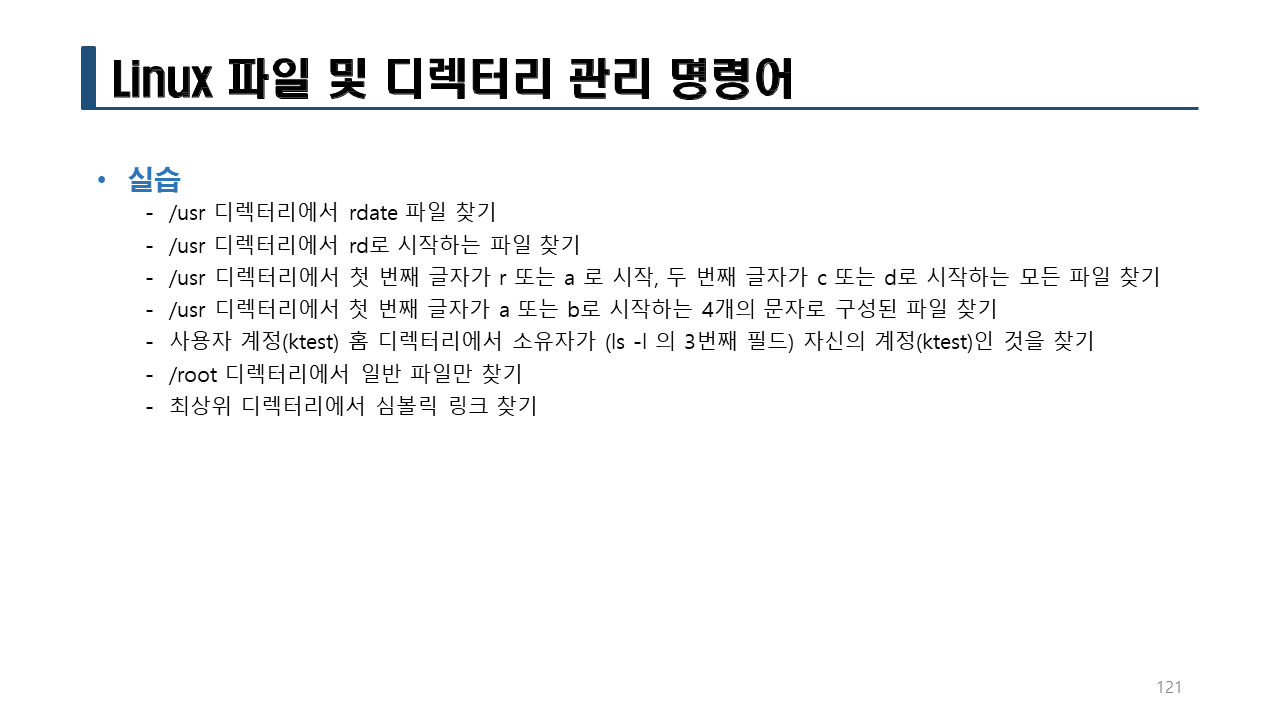
/usr 디렉터리에서 rdate 파일 찾기
find /usr -name rdate -
/usr 디렉터리에서 rd로 시작하는 파일 찾기
find /usr -name "rd*" -
/usr 디렉터리에서 첫 번째 글자가 r또는 a로 시작하고 두 번째 글자가 c 또는 d로 시작하는 모든 파일 찾기
[a,r]: a or r
find /usr -name "[a,r][c,d]*" -
최상위 디렉터리에서 심볼릭 링크 파일 찾기
find / -type l
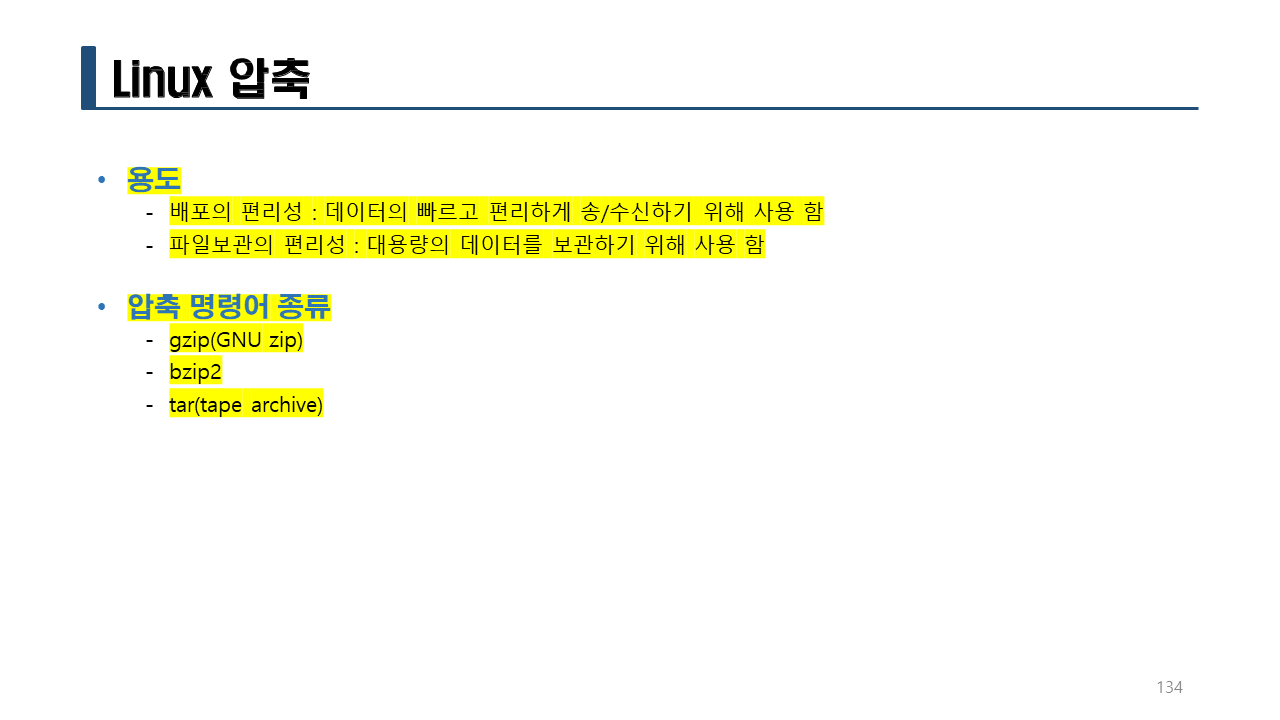
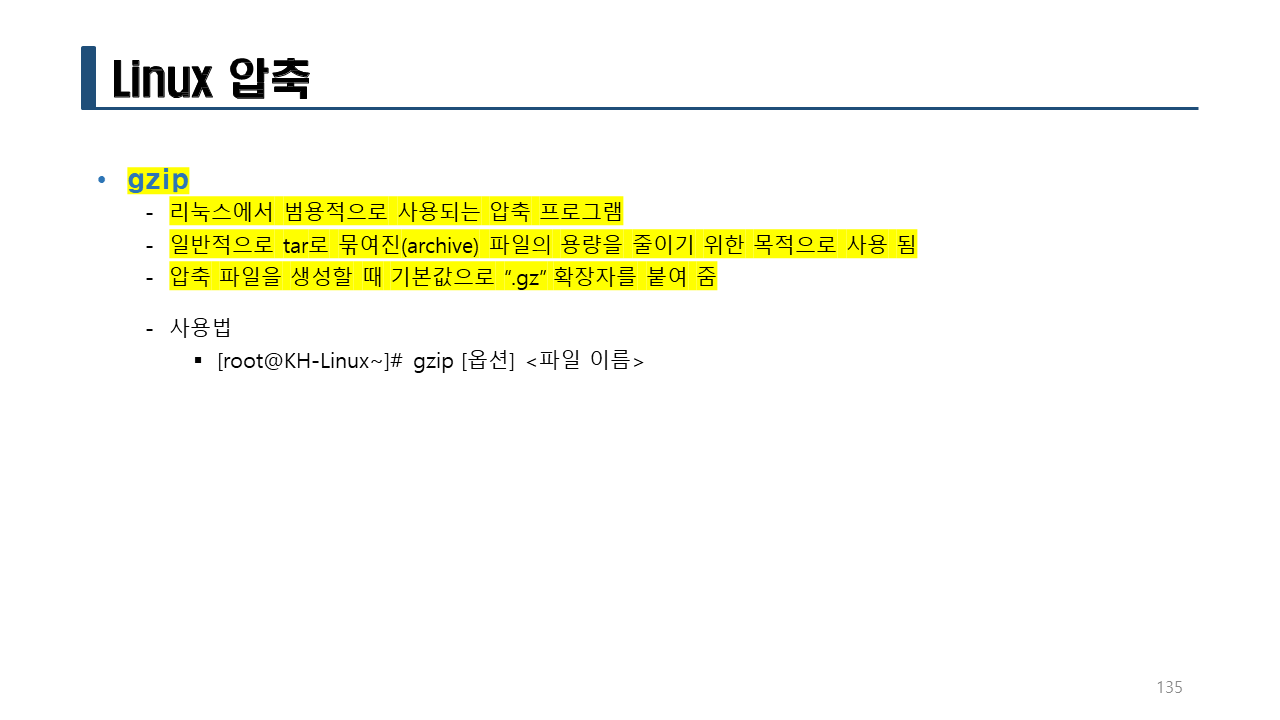
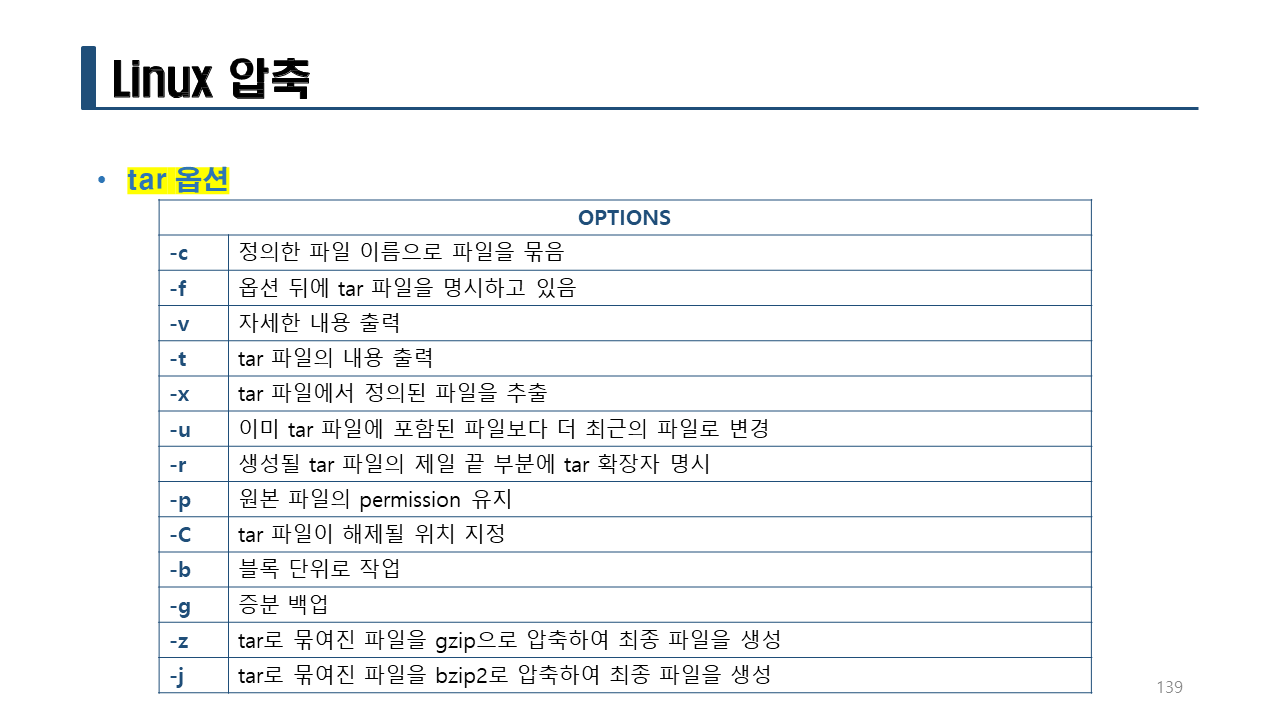
실습> 압축
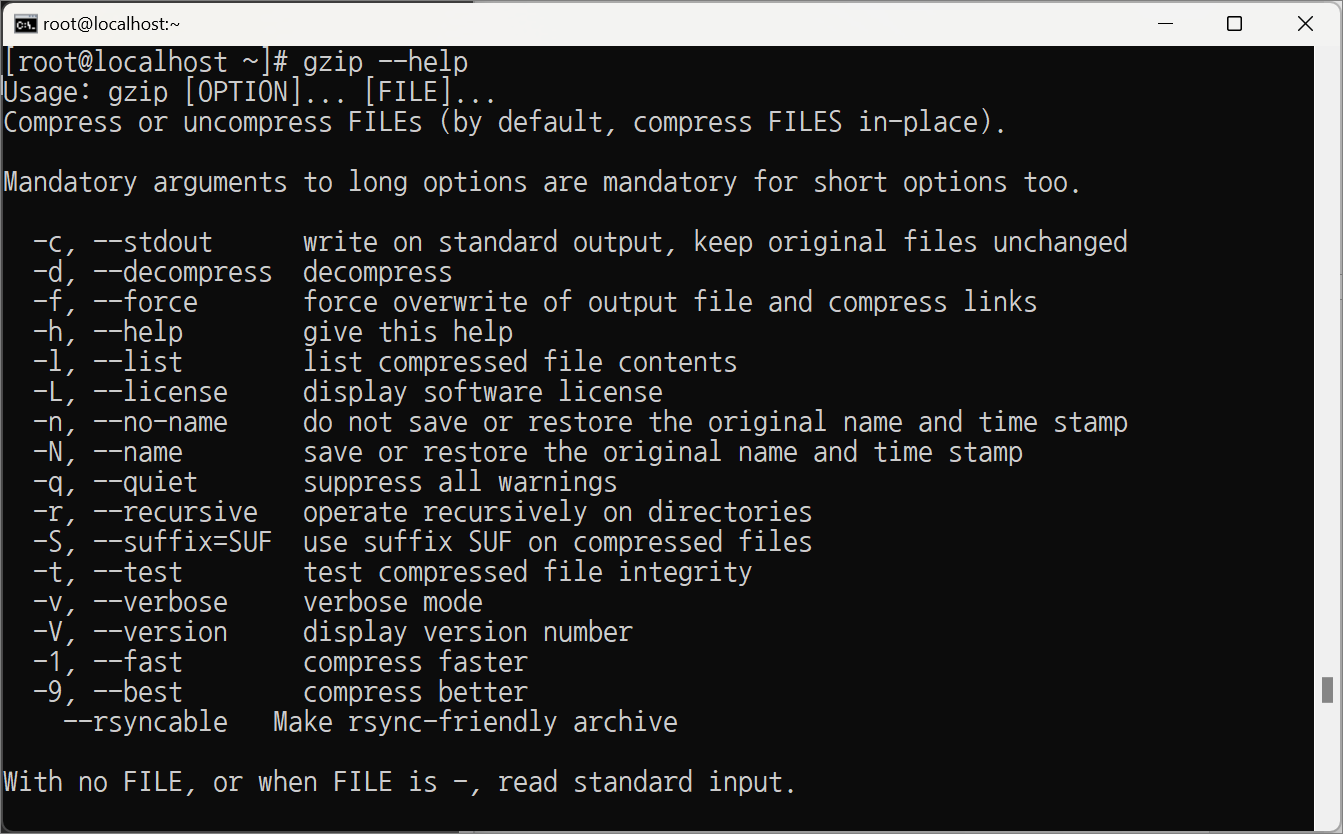
1. gzip
-gzip: 압축
-gzip -d: 압축 해제
-gunzip: 압축 해제 (쉘스크립트로 되어 있고 내부에서 gzip -d를 사용한다.)
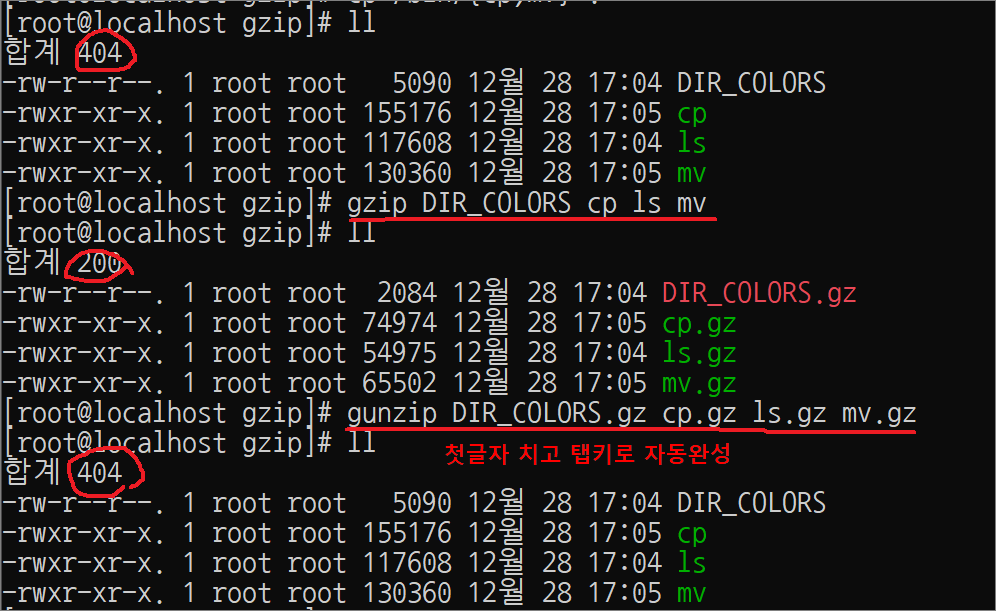
[root@localhost find]# mkdir gzip; cd gzip
[root@localhost find]# cp /etc/DIR_COLORS .
[root@localhost find]# cp /bin/ls .
[root@localhost find]# cp /bin/{cp,mv} .
[root@localhost find]# ll
합계 404
-rw-r--r--. 1 root root 5090 12월 28 08:19 DIR_COLORS
-rwxr-xr-x. 1 root root 155176 12월 28 08:19 cp
-rwxr-xr-x. 1 root root 117608 12월 28 08:19 ls
-rwxr-xr-x. 1 root root 130360 12월 28 08:19 mv
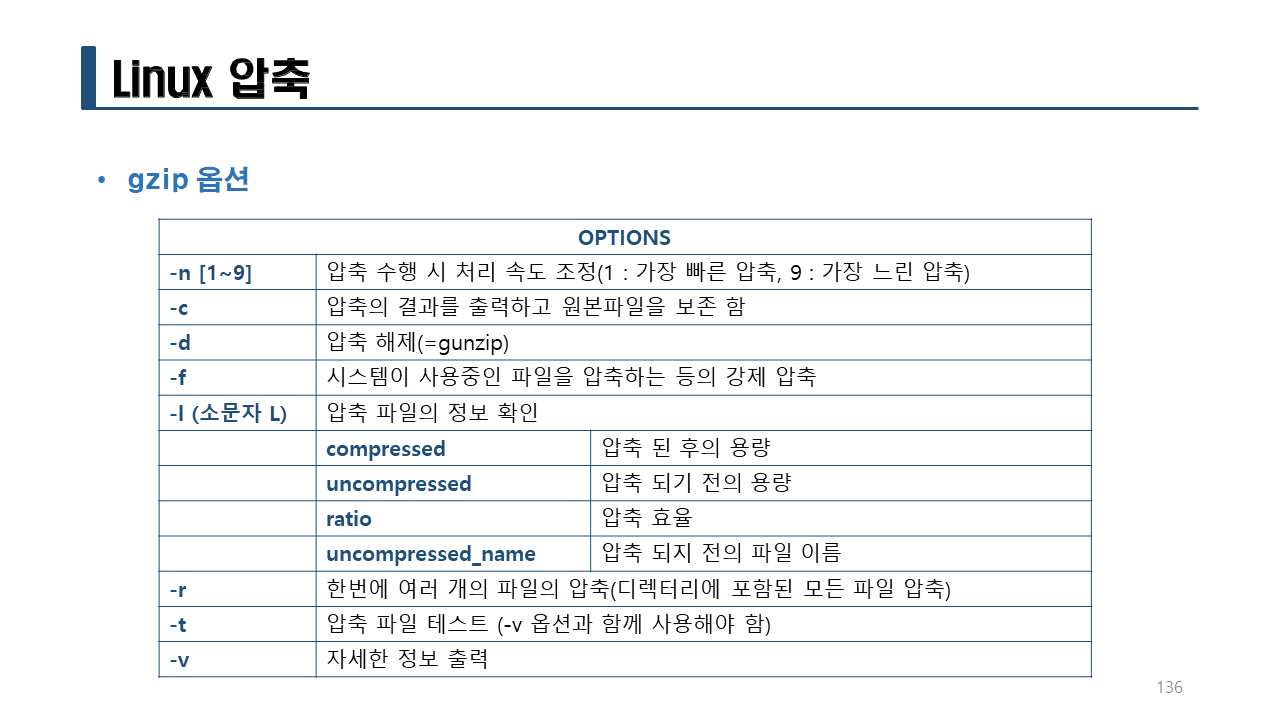
gzip 명령어로 각각의 파일들을 압축한다.
[root@localhost find]# gzip DIR_COLORS cp ls mv
[root@localhost find][root@localhost find]# ll
합계 200
-rw-r--r--. 1 root root 2084 12월 28 08:19 DIR_COLORS.gz
-rwxr-xr-x. 1 root root 74974 12월 28 08:19 cp.gz
-rwxr-xr-x. 1 root root 54975 12월 28 08:19 ls.gz
-rwxr-xr-x. 1 root root 65502 12월 28 08:19 mv.gz
gunzip 명령어로 각각의 파일들을 압축을 해제한다.
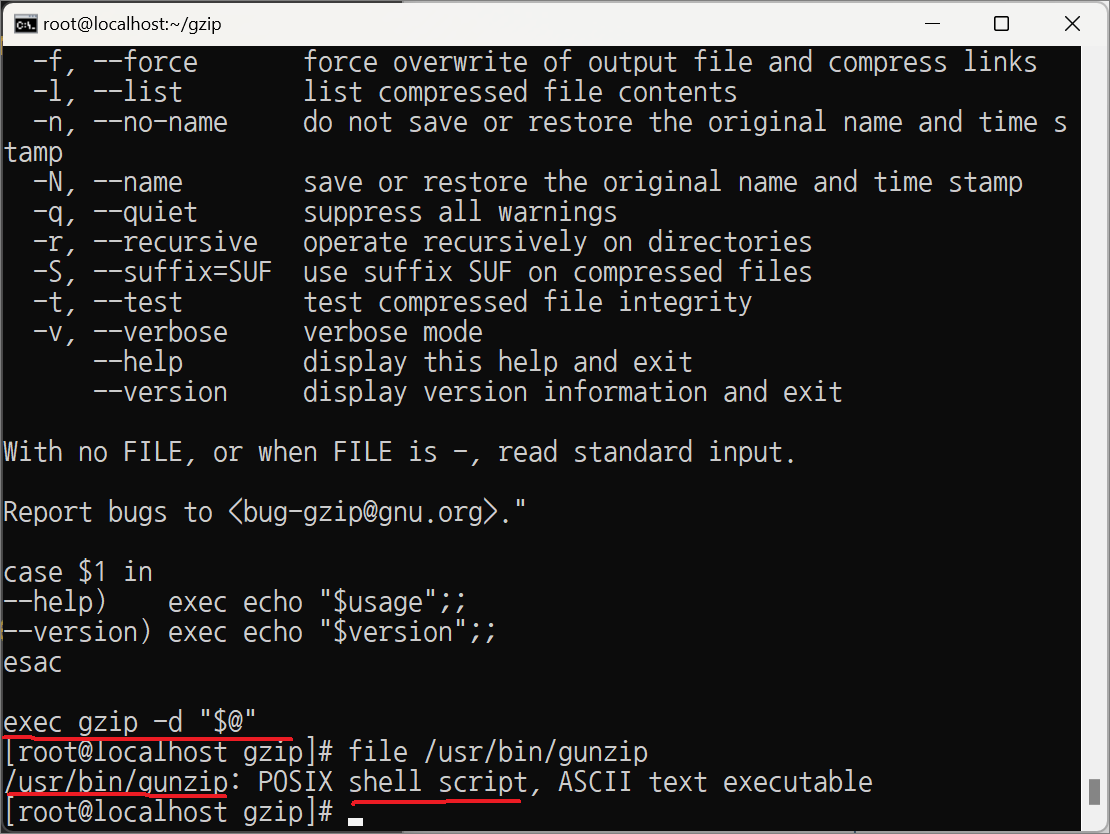
gunzip: /usr/bin/gunzip 파일로 쉘스크립트로 작성되어 있다.
gunzip 스크립트
[root@localhost find]# tail /bin/gunzip
#!/bin/sh
:
:(생략)
exec gzip -d "$@"
[root@localhost find]# gunzip DIR_COLORS.gz cp.gz ls.gz mv.gz
[root@localhost find]# ll
합계 404
-rw-r--r--. 1 root root 5090 12월 28 08:19 DIR_COLORS
-rwxr-xr-x. 1 root root 155176 12월 28 08:19 cp
-rwxr-xr-x. 1 root root 117608 12월 28 08:19 ls
-rwxr-xr-x. 1 root root 130360 12월 28 08:19 mv
gzip 명령어로 각각의 파일들을 압축한다.
[root@localhost find]# gzip DIR_COLORS cp ls mv
[root@localhost find]# ll
합계 200
-rw-r--r--. 1 root root 2084 12월 28 08:19 DIR_COLORS.gz
-rwxr-xr-x. 1 root root 74974 12월 28 08:19 cp.gz
-rwxr-xr-x. 1 root root 54975 12월 28 08:19 ls.gz
-rwxr-xr-x. 1 root root 65502 12월 28 08:19 mv.gz
gzip -d 명령어로 각각의 파일들을 압축을 해제한다.
[root@localhost find]# gzip -d DIR_COLORS.gz cp.gz ls.gz mv.gz
[root@localhost find]# ll
합계 404
-rw-r--r--. 1 root root 5090 12월 28 08:19 DIR_COLORS
-rwxr-xr-x. 1 root root 155176 12월 28 08:19 cp
-rwxr-xr-x. 1 root root 117608 12월 28 08:19 ls
-rwxr-xr-x. 1 root root 130360 12월 28 08:19 mv
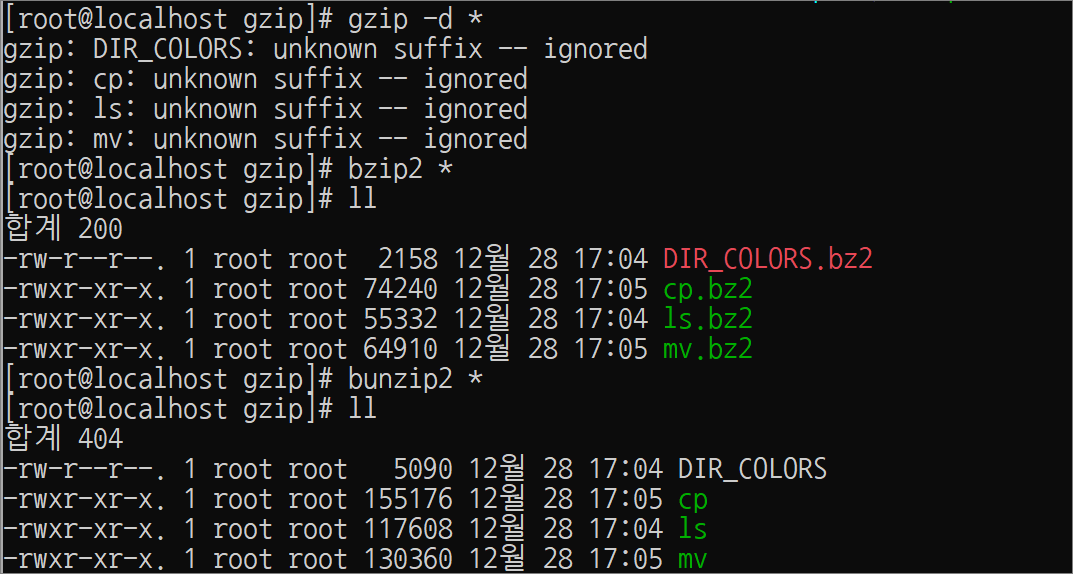
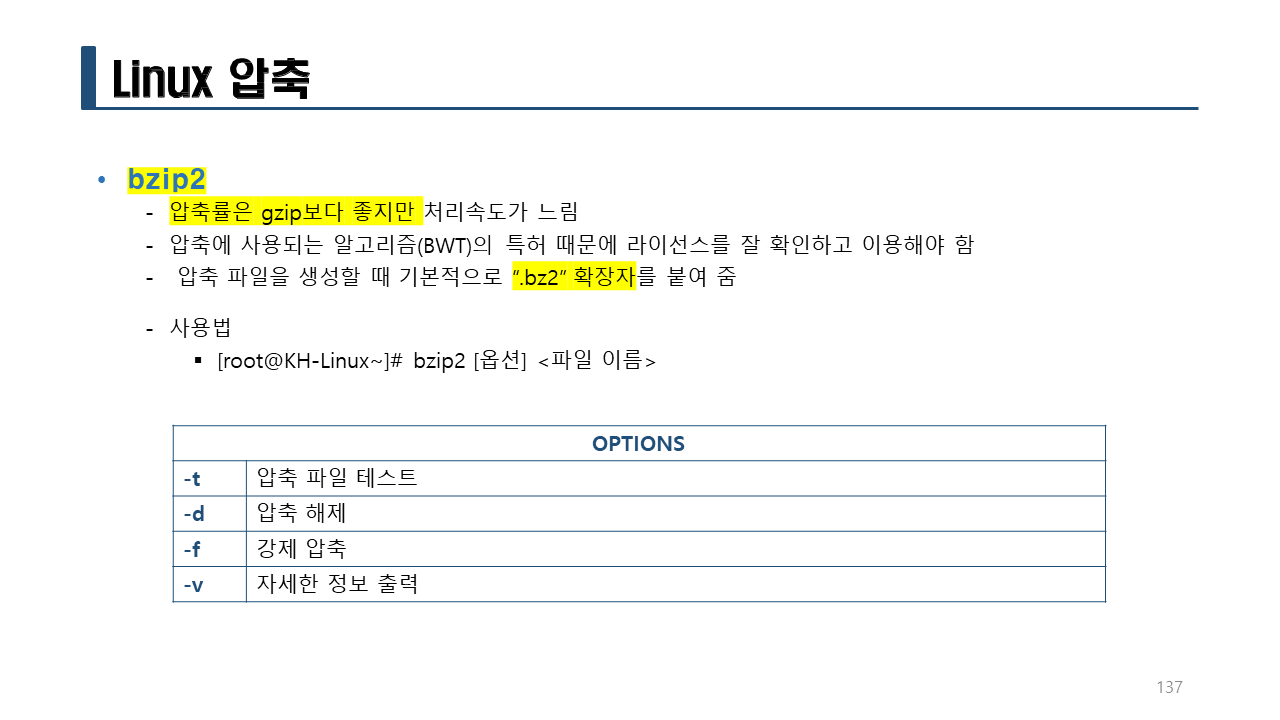
2. bzip2
-bzip2: 압축
-bzip2 -d: 압축 해제
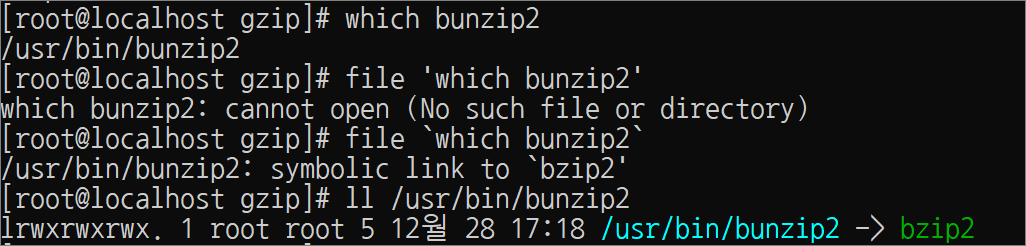
-bunzip2: 압축 해제 (bzip2의 심볼릭 링크 파일이다.)
[root@localhost find]# yum -y install bzip2
[root@localhost find]# ll /usr/bin/bunzip2
lrwxrwxrwx. 1 root root 5 12월 28 08:35 /usr/bin/bunzip2 -> bzip2
[root@localhost find]# bzip2
[root@localhost find]# ll
합계 200
-rw-r--r--. 1 root root 2158 12월 28 08:19 DIR_COLORS.bz2
-rwxr-xr-x. 1 root root 74240 12월 28 08:19 cp.bz2
-rwxr-xr-x. 1 root root 55332 12월 28 08:19 ls.bz2
-rwxr-xr-x. 1 root root 64910 12월 28 08:19 mv.bz2
[root@localhost find]# bunzip2 or bzip2 -d *
[root@localhost find]# ll
합계 404
-rw-r--r--. 1 root root 5090 12월 28 08:19 DIR_COLORS
-rwxr-xr-x. 1 root root 155176 12월 28 08:19 cp
-rwxr-xr-x. 1 root root 117608 12월 28 08:19 ls
-rwxr-xr-x. 1 root root 130360 12월 28 08:19 mv
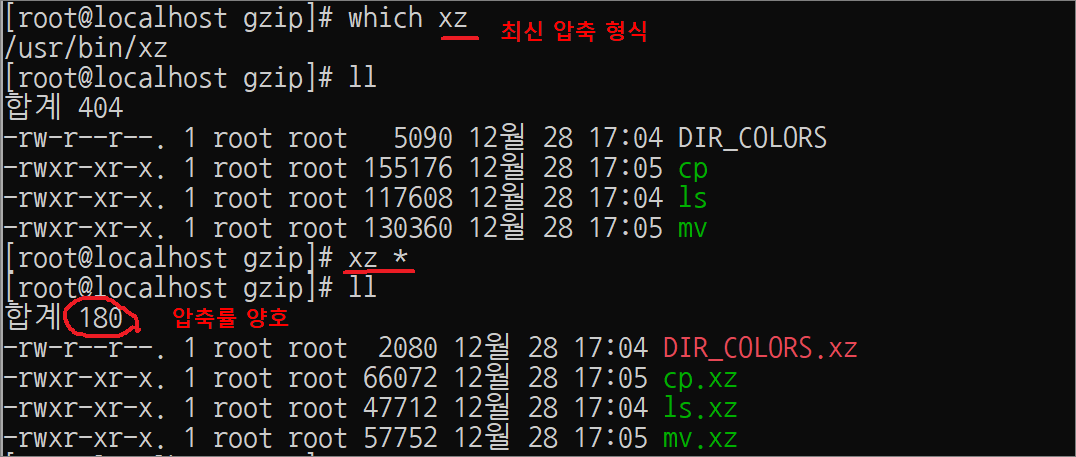
3. xz
– xz: 압축
– xz -d: 압축 해제
– unxz: 압축 해제 (xz의 심볼릭 링크 파일이다.)
[root@localhost find]# xz *
[root@localhost find]# ll
합계 180
-rw-r--r--. 1 root root 2080 12월 28 08:19 DIR_COLORS.xz
-rwxr-xr-x. 1 root root 66072 12월 28 08:19 cp.xz
-rwxr-xr-x. 1 root root 47712 12월 28 08:19 ls.xz
-rwxr-xr-x. 1 root root 57752 12월 28 08:19 mv.xz
[root@localhost find]# unxz *
[root@localhost find]# ll
합계 404
-rw-r--r--. 1 root root 5090 12월 28 08:19 DIR_COLORS
-rwxr-xr-x. 1 root root 155176 12월 28 08:19 cp
-rwxr-xr-x. 1 root root 117608 12월 28 08:19 ls
-rwxr-xr-x. 1 root root 130360 12월 28 08:19 mv
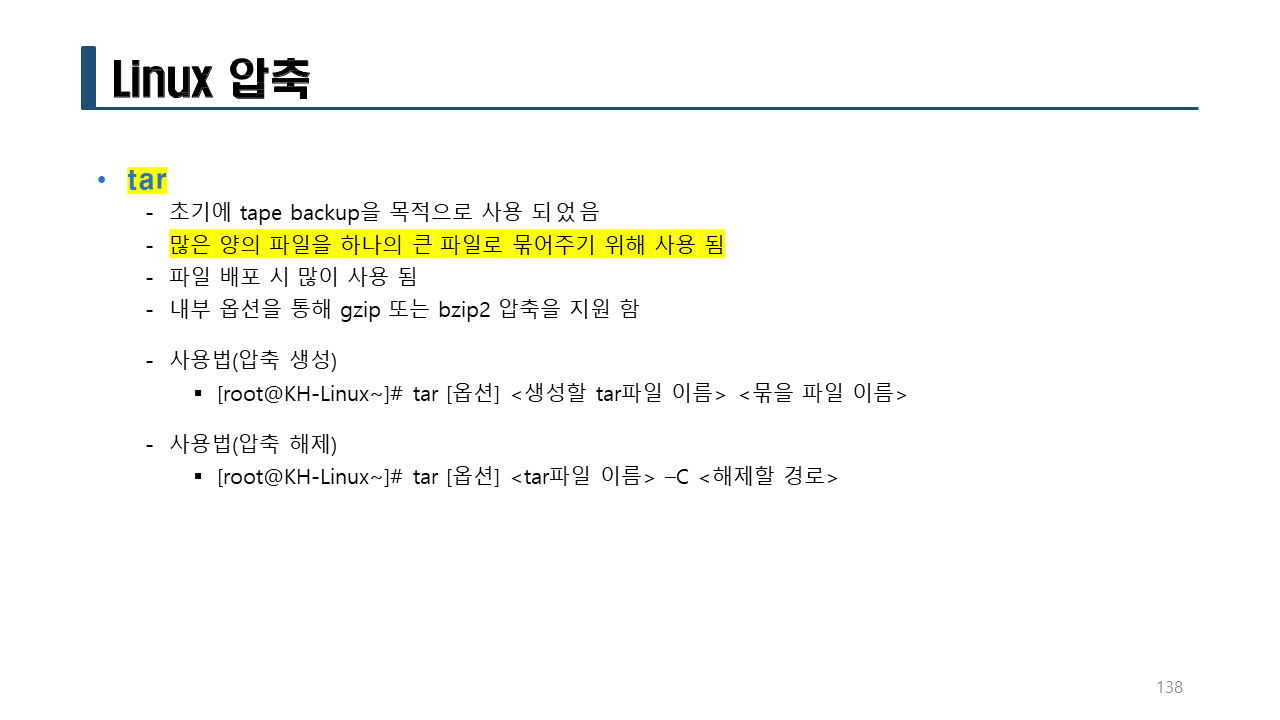
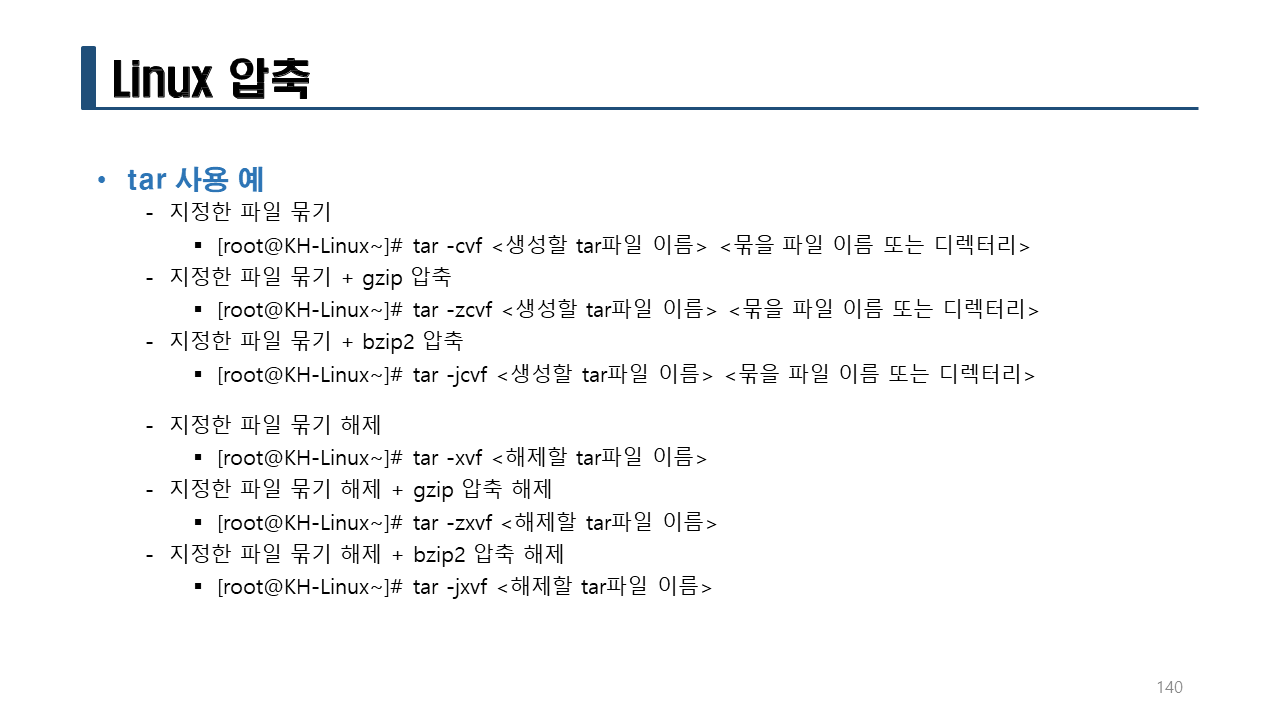
4. tar
-c: 파일 생성
-x: 압축해제
-f archive.tar: 파일명 archive.tar
-z: gzip
-j: bzip2
-J: xz
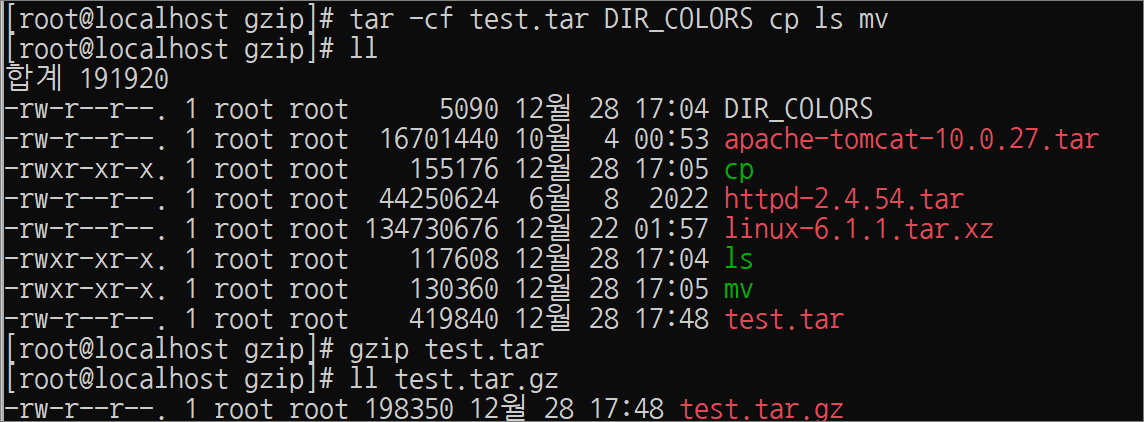
[root@localhost find]# tar -cf test.tar DIR_COLORS cp ls mv
[root@localhost find]# ll test.tar
-rw-r--r--. 1 root root 419840 12월 28 09:07 test.tar
[root@localhost find]# gzip test.tar
[root@localhost find]# ll test.tar.gz
-rw-r--r--. 1 root root 198350 12월 28 09:07 test.tar.gz
실습> gzip 압축

[root@localhost find]# yum -y install wget
[root@localhost find]# wget --no-check-certificate https://dlcdn.apache.org/httpd/httpd-2.4.54.tar.bz2
[root@localhost find]# bunzip2 httpd-2.4.54.tar.bz2

실습> bzip2 압축
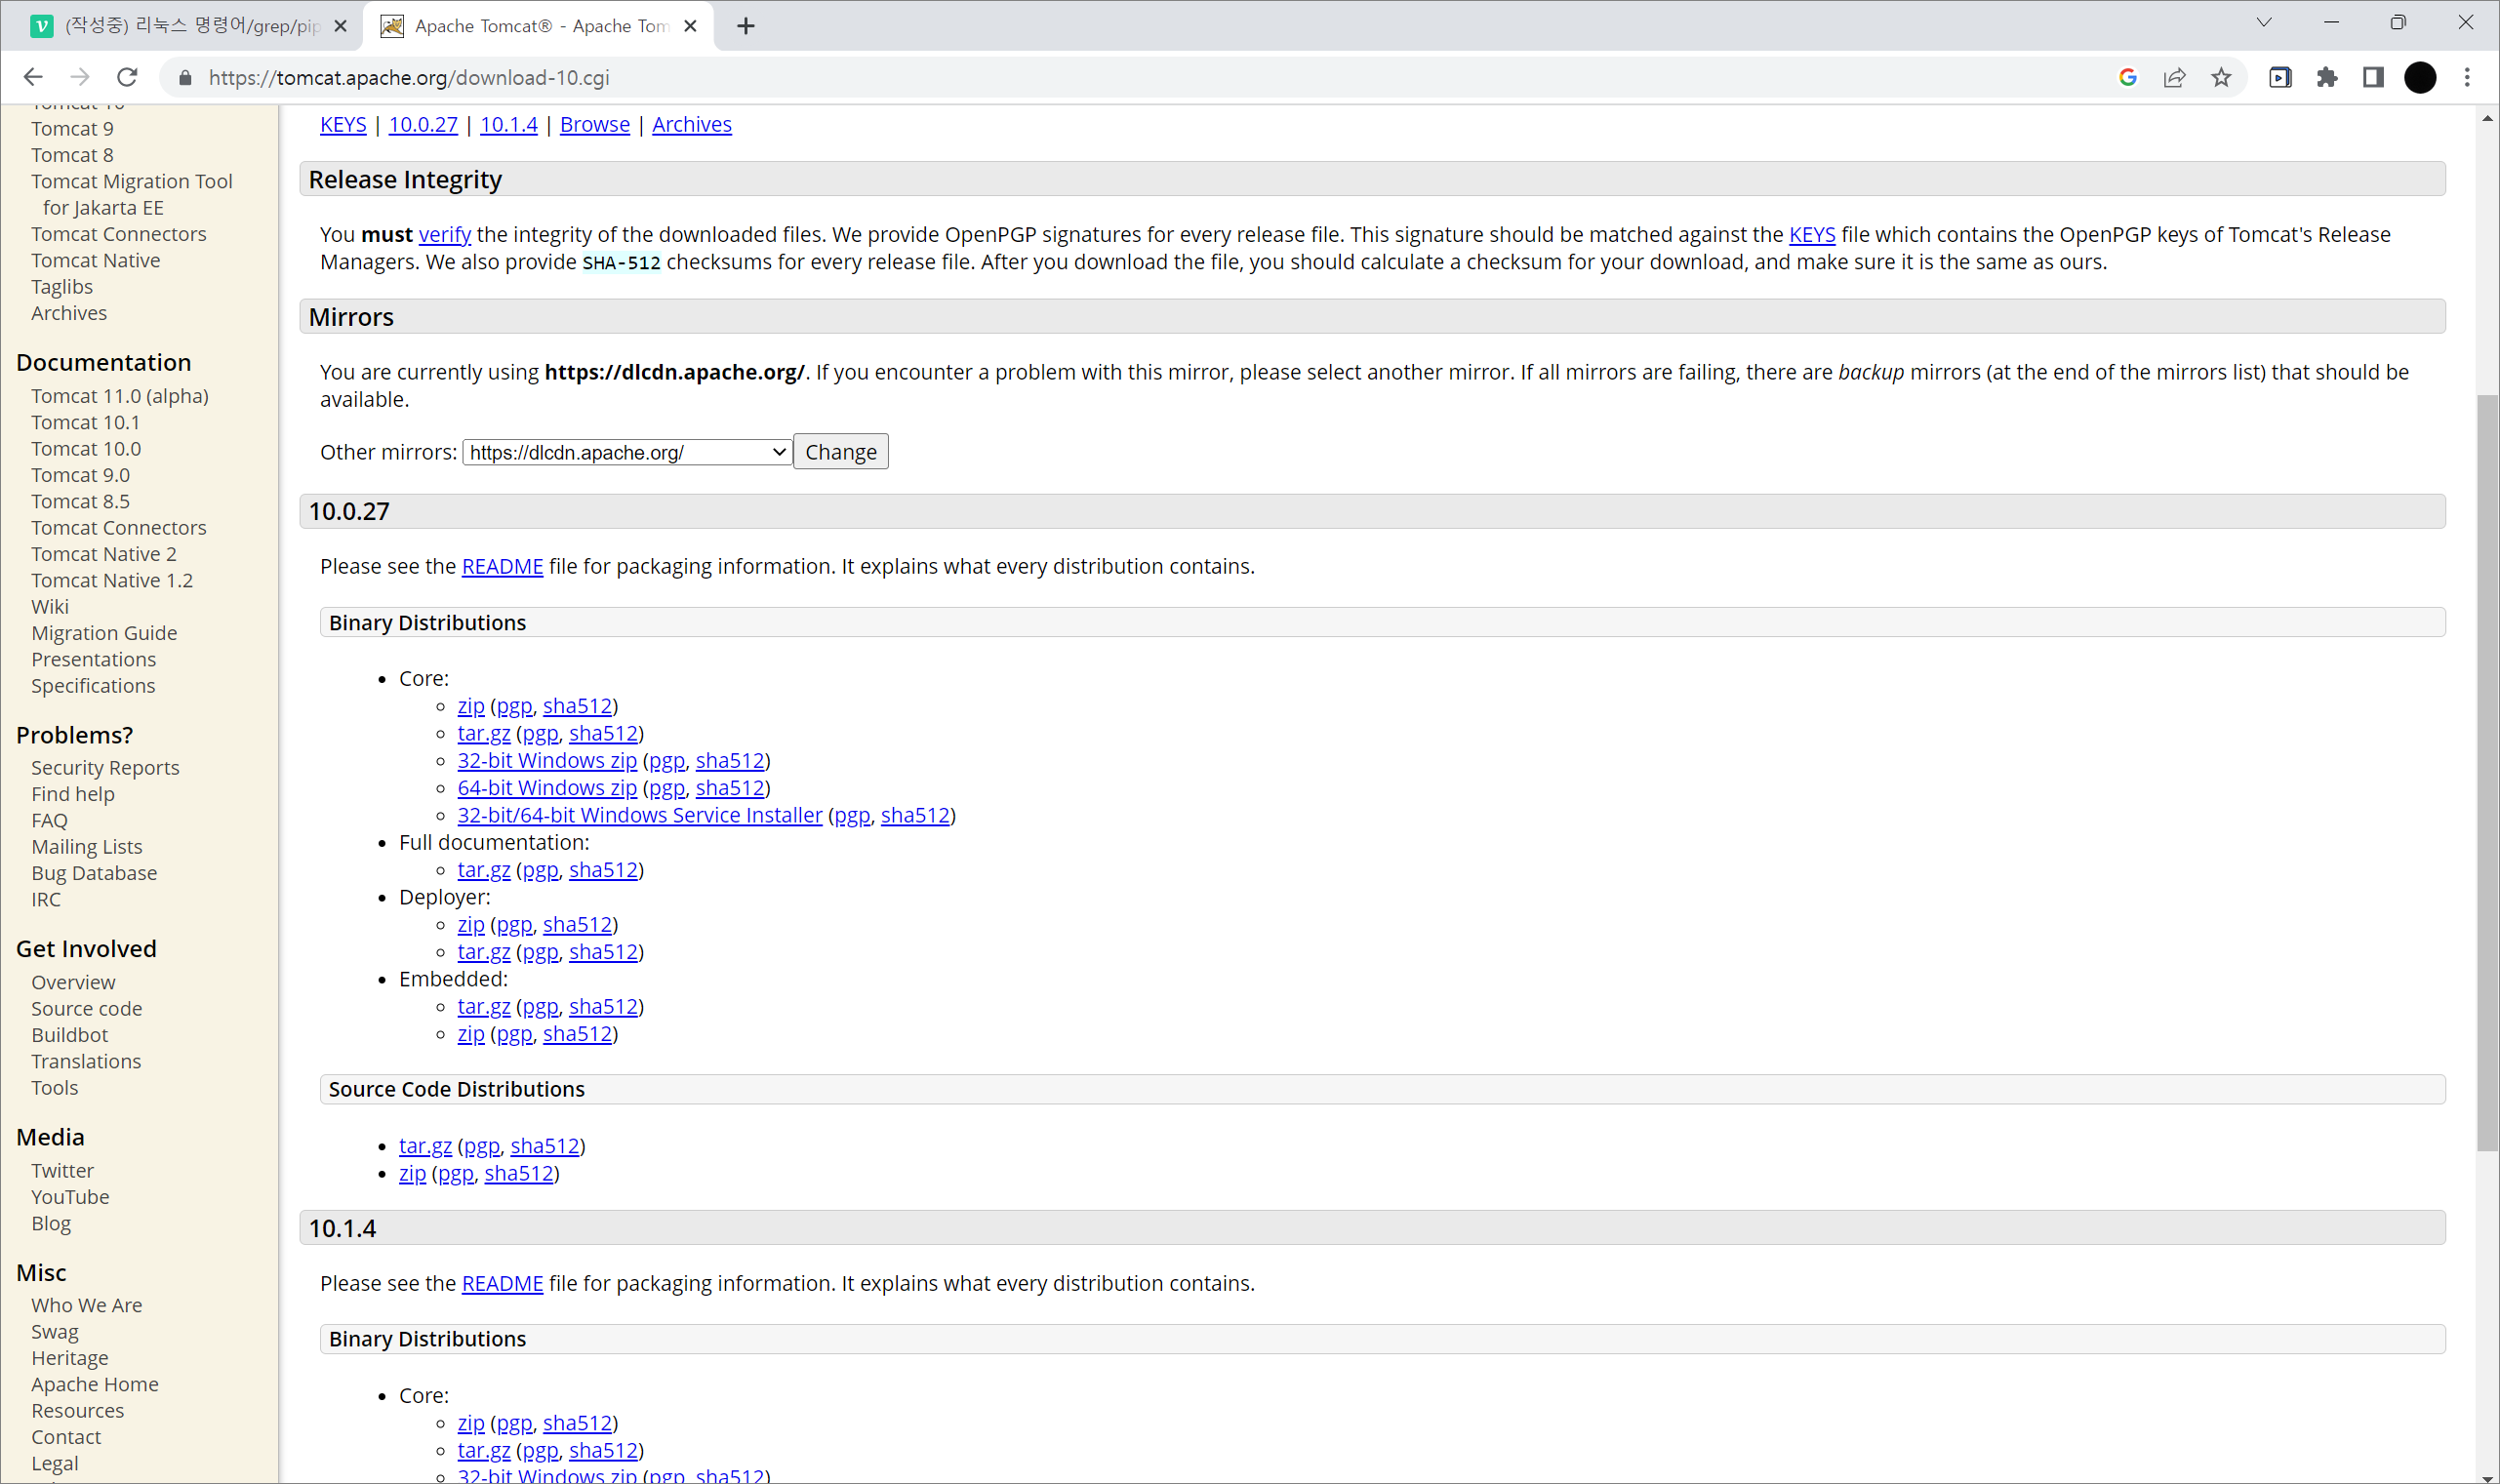
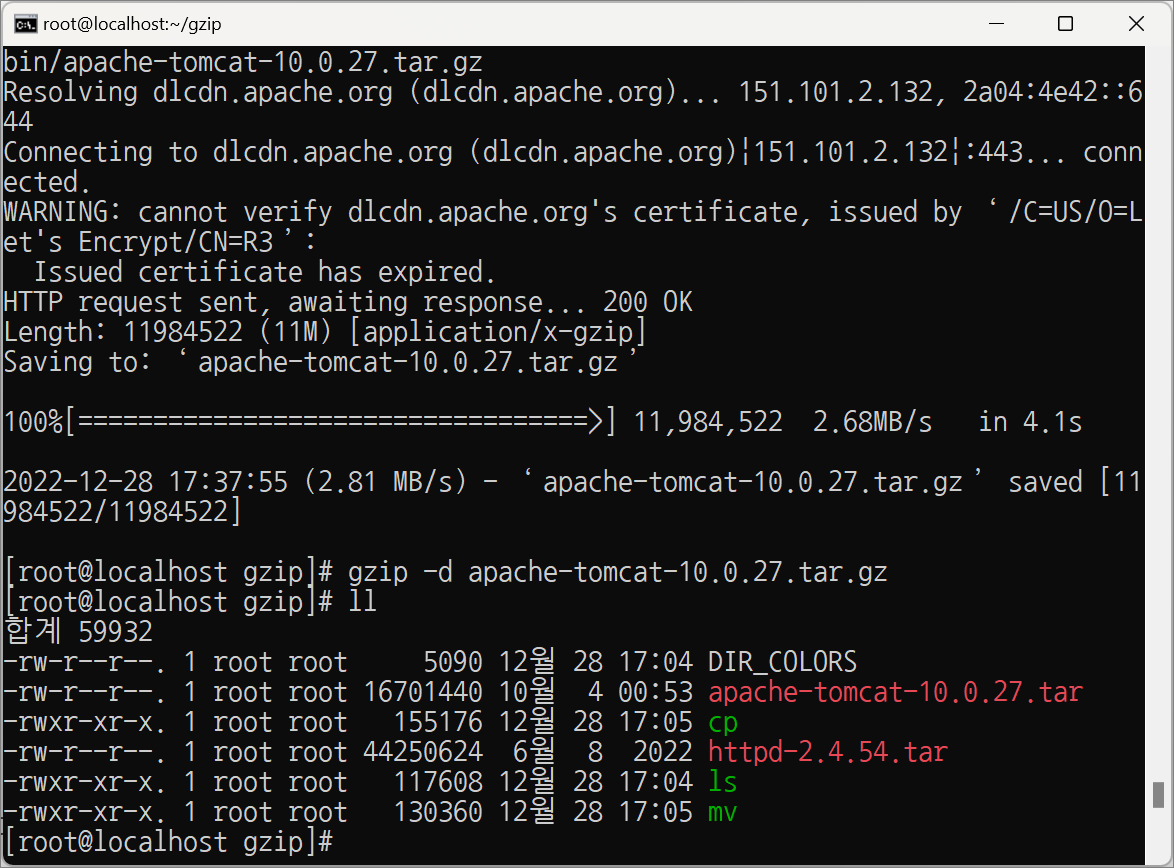
[root@localhost find]# wget --no-check-certificate \
https://dlcdn.apache.org/tomcat/tomcat-10/v10.0.27/bin/apache-tomcat-10.0.27.tar.gz
[root@localhost find]# gzip -d apache-tomcat-10.0.27.tar.gz
실습> xz 압축
[root@localhost find]# wget --no-check-certificate \
https://cdn.kernel.org/pub/linux/kernel/v6.x/linux-6.1.1.tar.xz