
https://learngitbranching.js.org/
Git Remotes
Remote repositories aren't actually that complicated. In today's world of cloud computing it's easy to think that there's a lot of magic behind git remotes, but they are actually just copies of your repository on another computer. You can typically talk to this other computer through the Internet, which allows you to transfer commits back and forth.
That being said, remote repositories have a bunch of great properties:
-
First and foremost, remotes serve as a great backup! Local git repositories have the ability to restore files to a previous state (as you know), but all that information is stored locally. By having copies of your git repository on other computers, you can lose all your local data and still pick up where you left off.
-
More importantly, remotes make coding social! Now that a copy of your project is hosted elsewhere, your friends can contribute to your project (or pull in your latest changes) very easily.
It's become very popular to use websites that visualize activity around remote repos (like GitHub or Phabricator), but remote repositories always serve as the underlying backbone for these tools. So it's important to understand them!
Our Command to create remotes
Up until this point, Learn Git Branching has focused on teaching the basics of local repository work (branching, merging, rebasing, etc). However now that we want to learn about remote repository work, we need a command to set up the environment for those lessons. git clone will be that command.
Technically, git clone in the real world is the command you'll use to create local copies of remote repositories (from github for example). We use this command a bit differently in Learn Git Branching though -- git clone actually makes a remote repository out of your local one. Sure it's technically the opposite meaning of the real command, but it helps build the connection between cloning and remote repository work, so let's just run with it for now.
Lets start slow and just look at what a remote repository looks like (in our visualization).
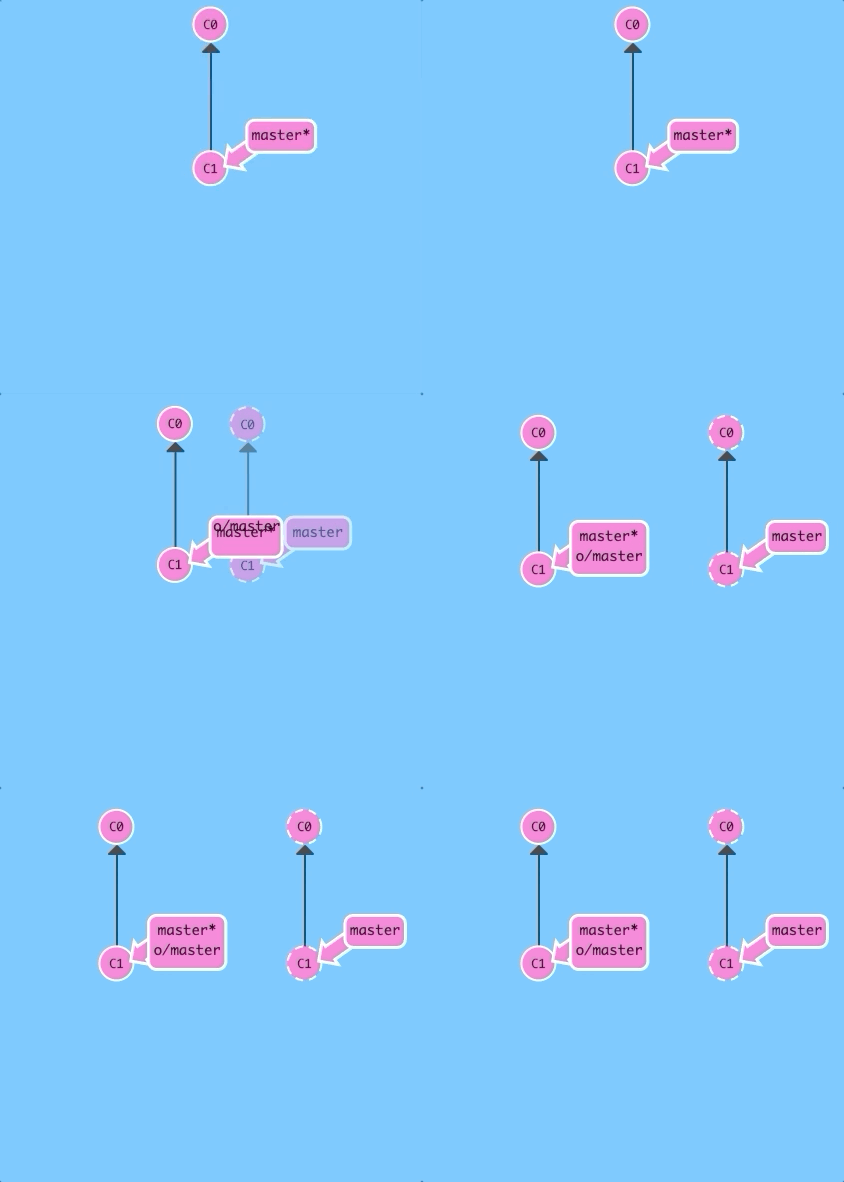
$ git cloneThere it is! Now we have a remote repository of our project. It looks pretty similar except for some visual changes to make the distinction apparent -- in later levels you'll get to see how we share work across these repositories.
Git Remote Branches
Now that you've seen git clone in action, let's dive into what actually changed.
The first thing you may have noticed is that a new branch appeared in our local repository called o/master. This type of branch is called a remote branch; remote branches have special properties because they serve a unique purpose.
Remote branches reflect the state of remote repositories (since you last talked to those remote repositories). They help you understand the difference between your local work and what work is public -- a critical step to take before sharing your work with others.
Remote branches have the special property that when you check them out, you are put into detached HEAD mode. Git does this on purpose because you can't work on these branches directly; you have to work elsewhere and then share your work with the remote (after which your remote branches will be updated).
What is o/?
You may be wondering what the leading o/ is for on these remote branches. Well, remote branches also have a (required) naming convention -- they are displayed in the format of:
<remote name>/<branch name>
Hence, if you look at a branch named o/master, the branch name is master and the name of the remote is o.
Most developers actually name their main remote origin, not o. This is so common that git actually sets up your remote to be named origin when you git clone a repository.
Unfortunately the full name of origin does not fit in our UI, so we use o as shorthand :( Just remember when you're using real git, your remote is probably going to be named origin!
That's a lot to take in, so let's see all this in action.
Lets check out a remote branch and see what happens.
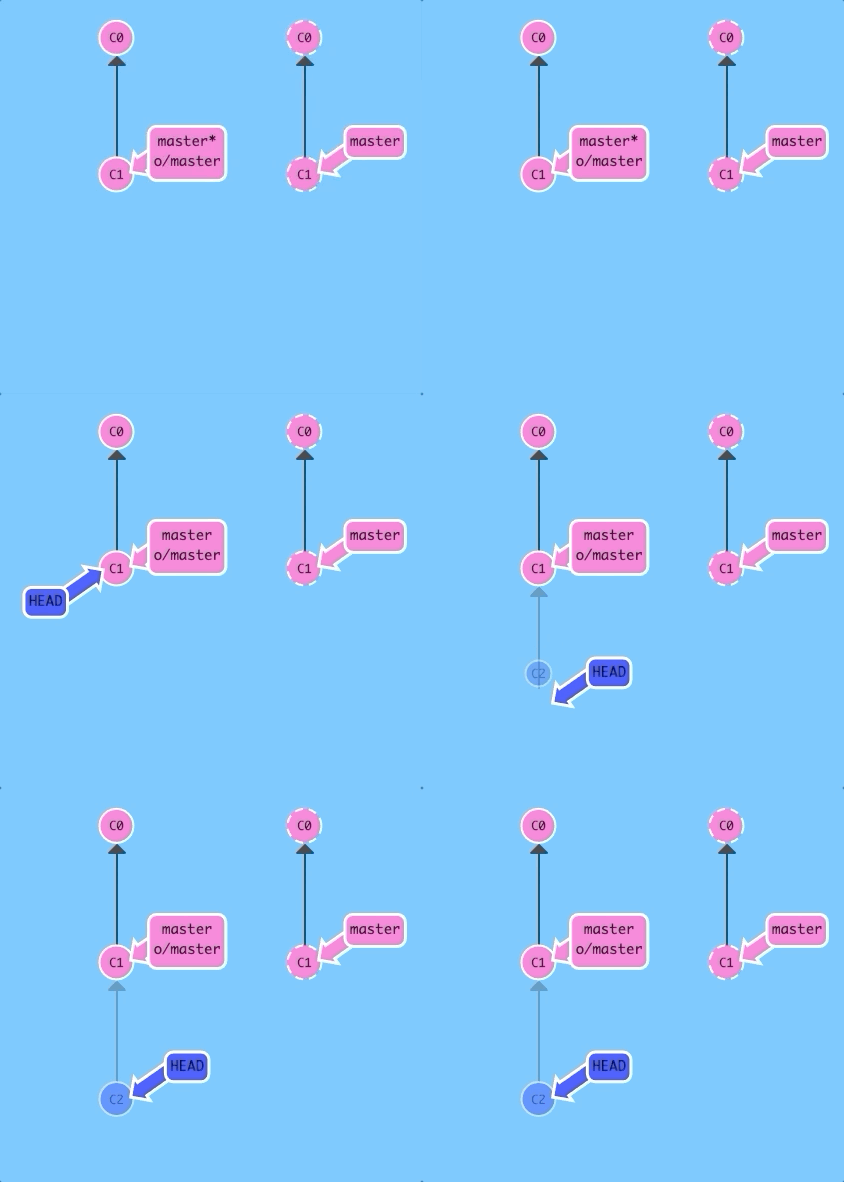
$ git checkout o/master; git commitAs you can see, git put us into detached HEAD mode and then did not update o/master when we added a new commit. This is because o/master will only update when the remote updates.
Git Fetch
Working with git remotes really just boils down to transferring data to and from other repositories. As long as we can send commits back and forth, we can share any type of update that is tracked by git (and thus share work, new files, new ideas, love letters, etc.).
In this lesson we will learn how to fetch data from a remote repository -- the command for this is conveniently named git fetch.
You'll notice that as we update our representation of the remote repository, our remote branches will update to reflect that new representation. This ties into the previous lesson on remote branches.
Before getting into the details of git fetch, let's see it in action! Here we have a remote repository that contains two commits that our local repository does not have.
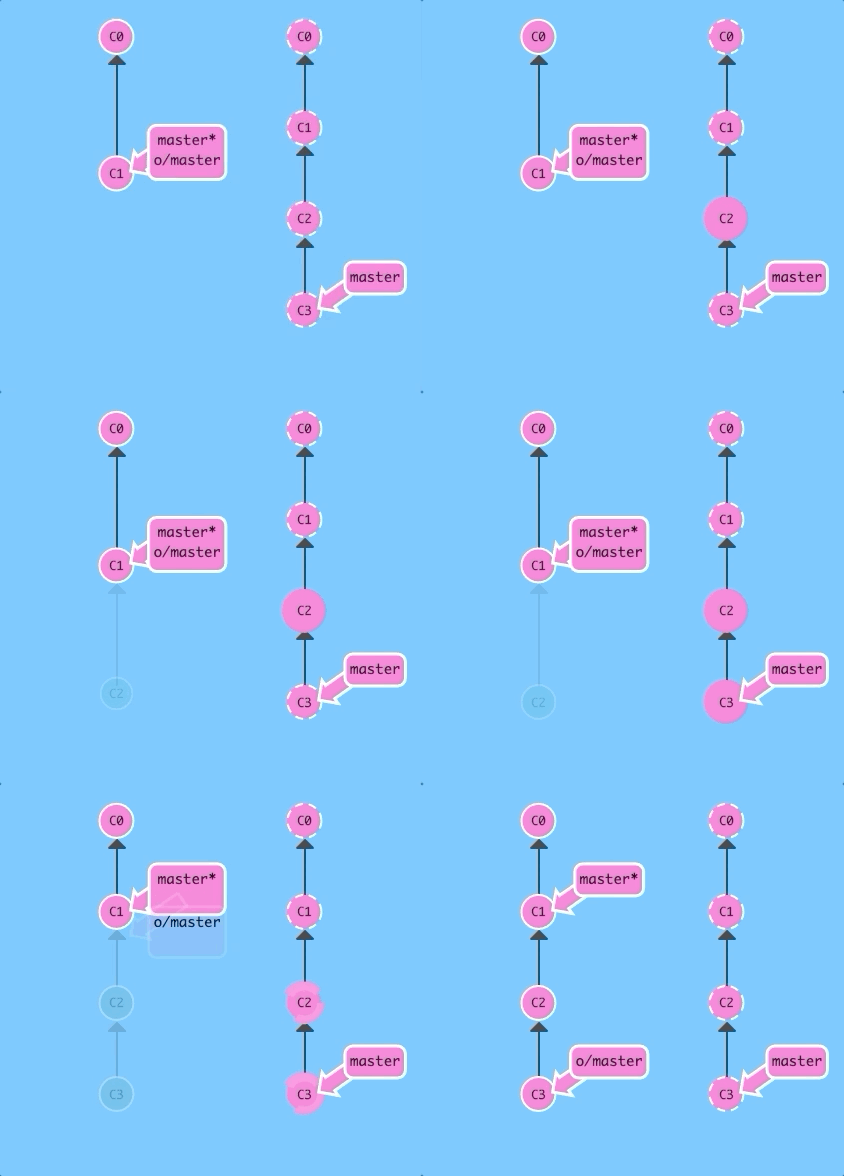
$ git fetchThere we go! Commits C2 and C3 were downloaded to our local repository, and our remote branch o/master was updated to reflect this.
What fetch does
git fetch performs two main steps, and two main steps only. It:
- downloads the commits that the remote has but are missing from our local repository, and...
- updates where our remote branches point (for instance,
o/master)
git fetch essentially brings our local representation of the remote repository into synchronization with what the actual remote repository looks like (right now).
If you remember from the previous lesson, we said that remote branches reflect the state of the remote repositories since you last talked to those remotes. git fetch is the way you talk to these remotes! Hopefully the connection between remote branches and git fetch is apparent now.
git fetch usually talks to the remote repository through the Internet (via a protocol like http:// or git://).
What fetch doesn't do
git fetch, however, does not change anything about your local state. It will not update your master branch or change anything about how your file system looks right now.
This is important to understand because a lot of developers think that running git fetch will make their local work reflect the state of the remote. It may download all the necessary data to do that, but it does not actually change any of your local files. We will learn commands in later lessons to do just that :D
So at the end of the day, you can think of running git fetch as a download step.
Git Pull
Now that we've seen how to fetch data from a remote repository with git fetch, let's update our work to reflect those changes!
There are actually many ways to do this -- once you have new commits available locally, you can incorporate them as if they were just normal commits on other branches. This means you could execute commands like:
git cherry-pick o/mastergit rebase o/mastergit merge o/master- etc., etc.
In fact, the workflow of fetching remote changes and then merging them is so common that git actually provides a command that does both at once! That command is git pull.
Let's first see a fetch and a merge executed sequentially.
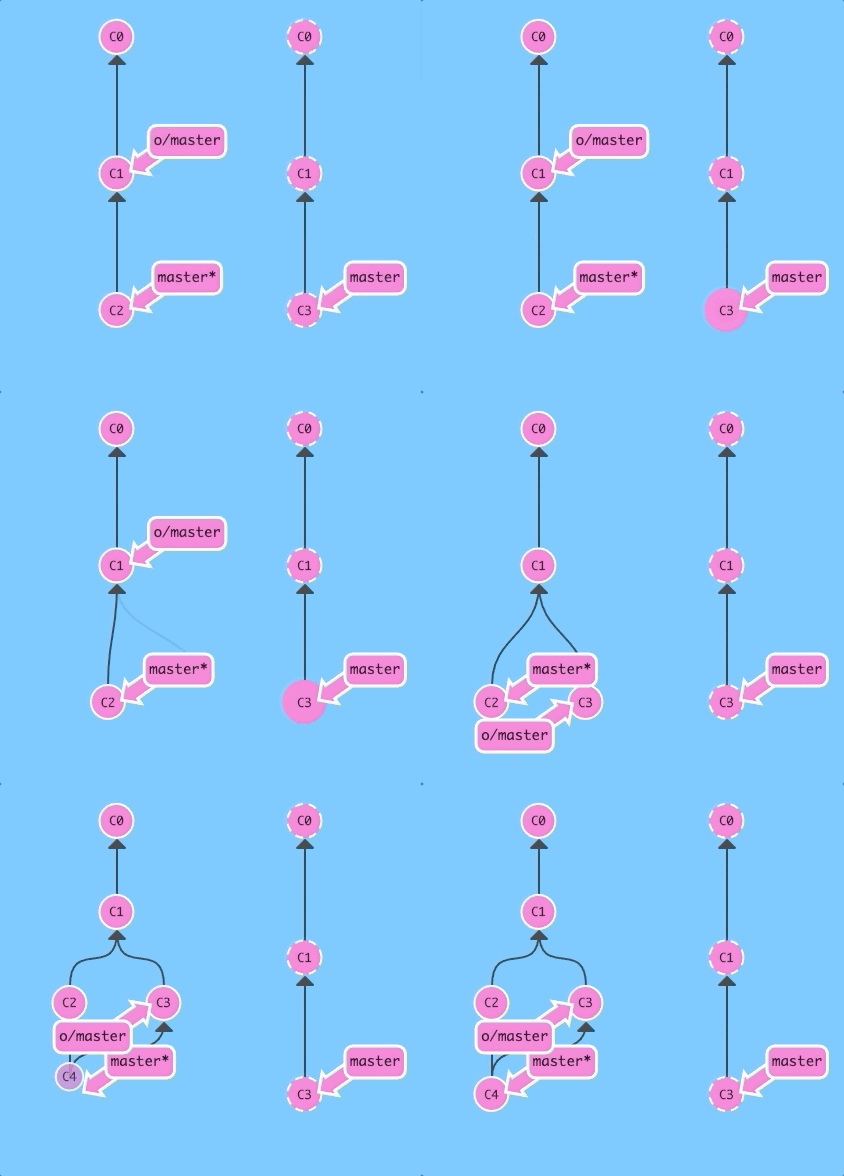
git fetch; git merge o/masterBoom -- we downloaded C3 with a fetch and then merged in that work with git merge o/master. Now our master branch reflects the new work from the remote (in this case, named origin)
What would happen if we used git pull instead?
The same thing! That should make it very clear that git pull is essentially shorthand for a git fetch followed by a merge of whatever branch was just fetched.
What would happen if we used git pull instead?
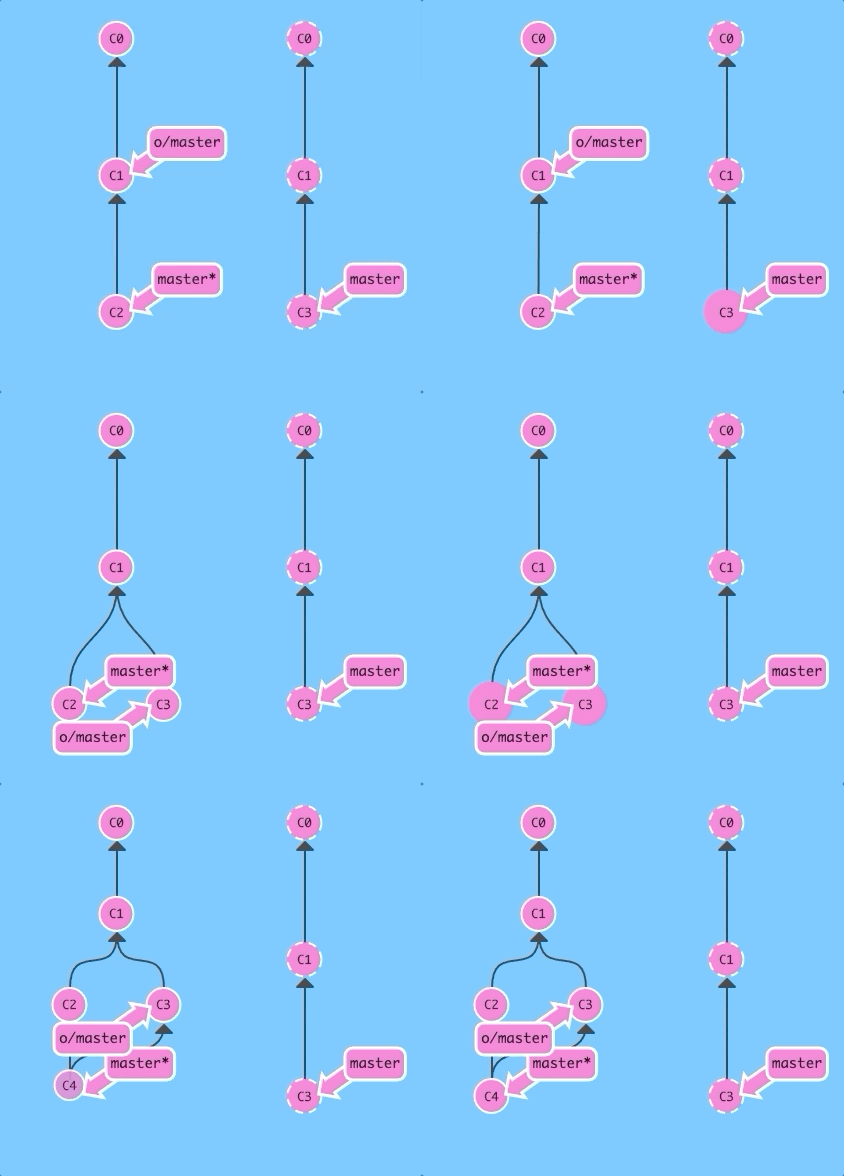
git pullThe same thing! That should make it very clear that git pull is essentially shorthand for a git fetch followed by a merge of whatever branch was just fetched.
Simulating collaboration
So here is the tricky thing -- for some of these upcoming lessons, we need to teach you how to pull down changes that were introduced in the remote.
That means we need to essentially "pretend" that the remote was updated by one of your coworkers / friends / collaborators, sometimes on a specific branch or a certain number of commits.
In order to do this, we introduced the aptly-named command git fakeTeamwork! It's pretty self explanatory, let's see a demo...
The default behavior of fakeTeamwork is to simply plop down a commit on master.
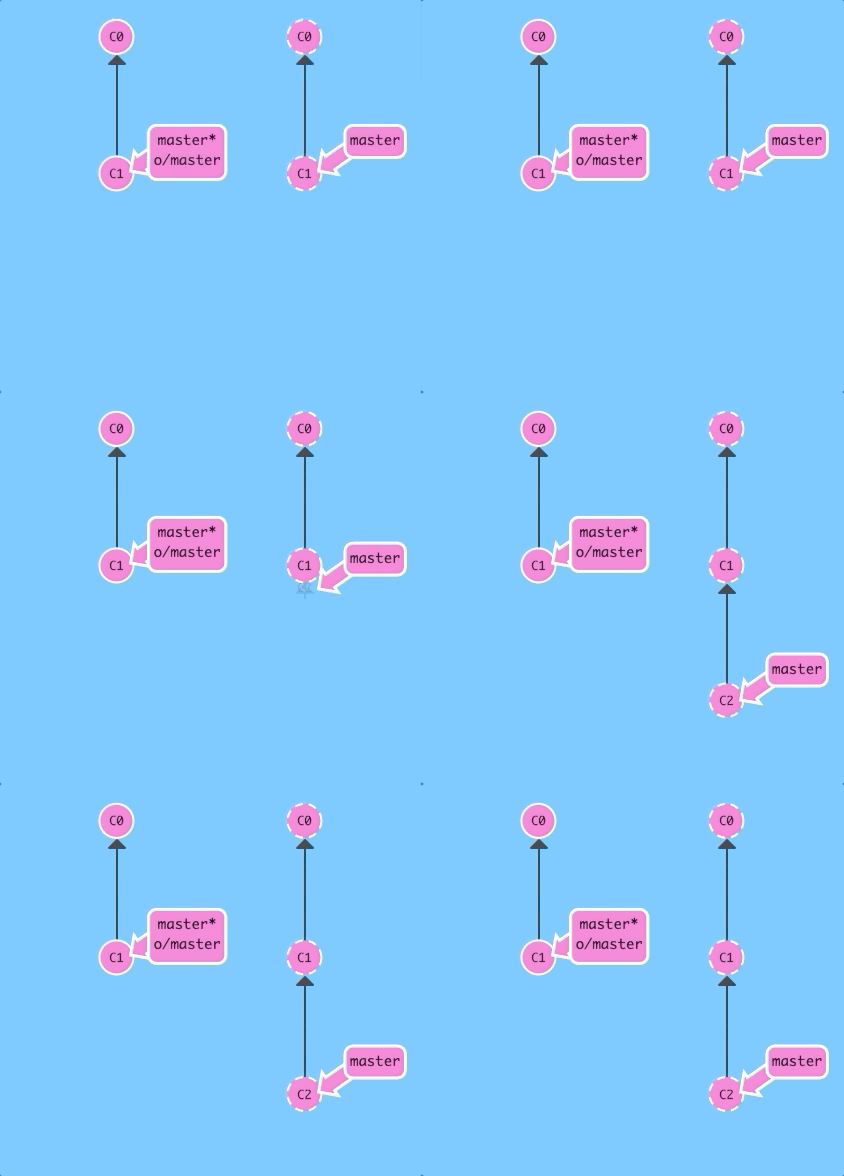
git fakeTeamworkThere we go -- the remote was updated with a new commit, and we haven't downloaded that commit yet because we haven't run git fetch.
You can also specify the number of commits or the branch by appending them to the command.
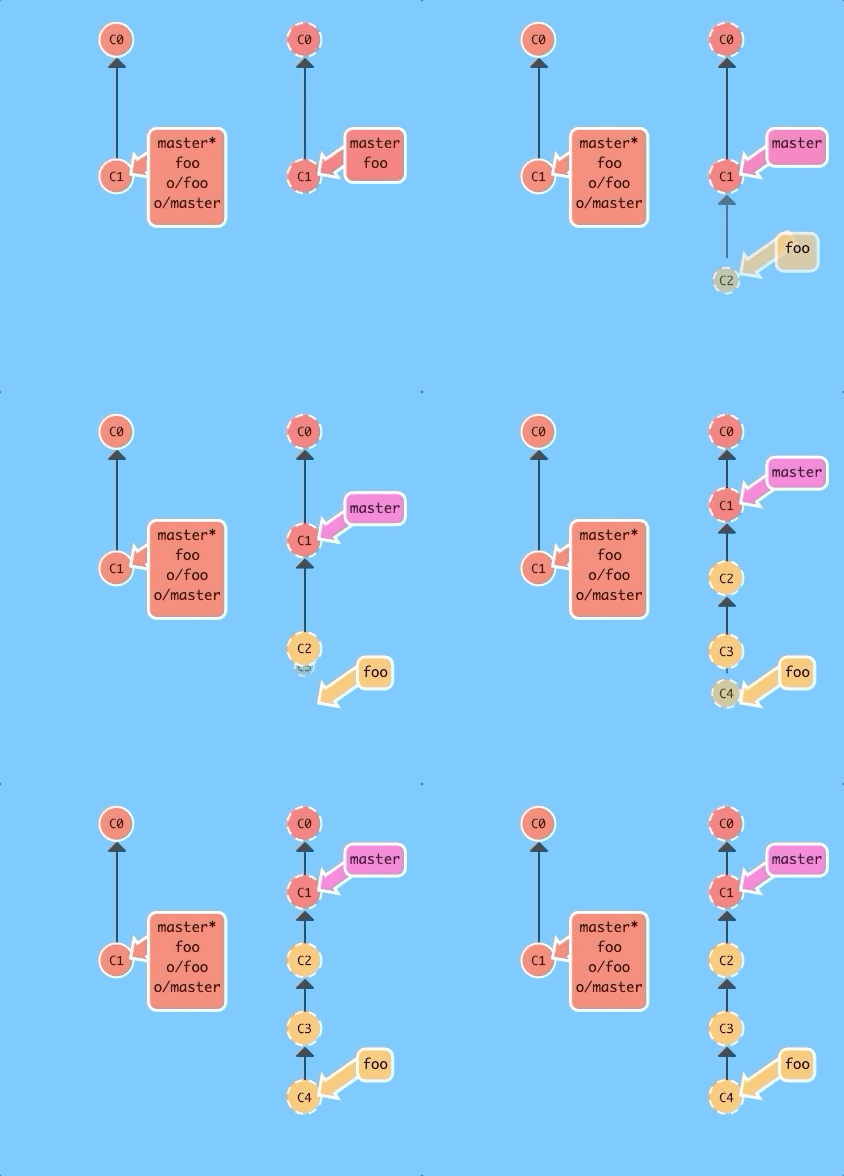
git fakeTeamwork foo 3With one command we simulated a teammate pushing three commits to the foo branch on our remote.
Git Push
Ok, so I've fetched changes from remote and incorporated them into my work locally. That's great and all... but how do I share my awesome work with everyone else?
Well, the way to upload shared work is the opposite of downloading shared work. And what's the opposite of git pull? git push!
git push is responsible for uploading your changes to a specified remote and updating that remote to incorporate your new commits. Once git push completes, all your friends can then download your work from the remote.
You can think of git push as a command to "publish" your work. It has a bunch of subtleties that we will get into shortly, but let's start with baby steps...
note -- the behavior of git push with no arguments varies depending on one of git's settings called push.default. The default value for this setting depends on the version of git you're using, but we are going to use the upstream value in our lessons. This isn't a huge deal, but it's worth checking your settings before pushing in your own projects.
Here we have some changes that the remote does not have. Let's upload them!
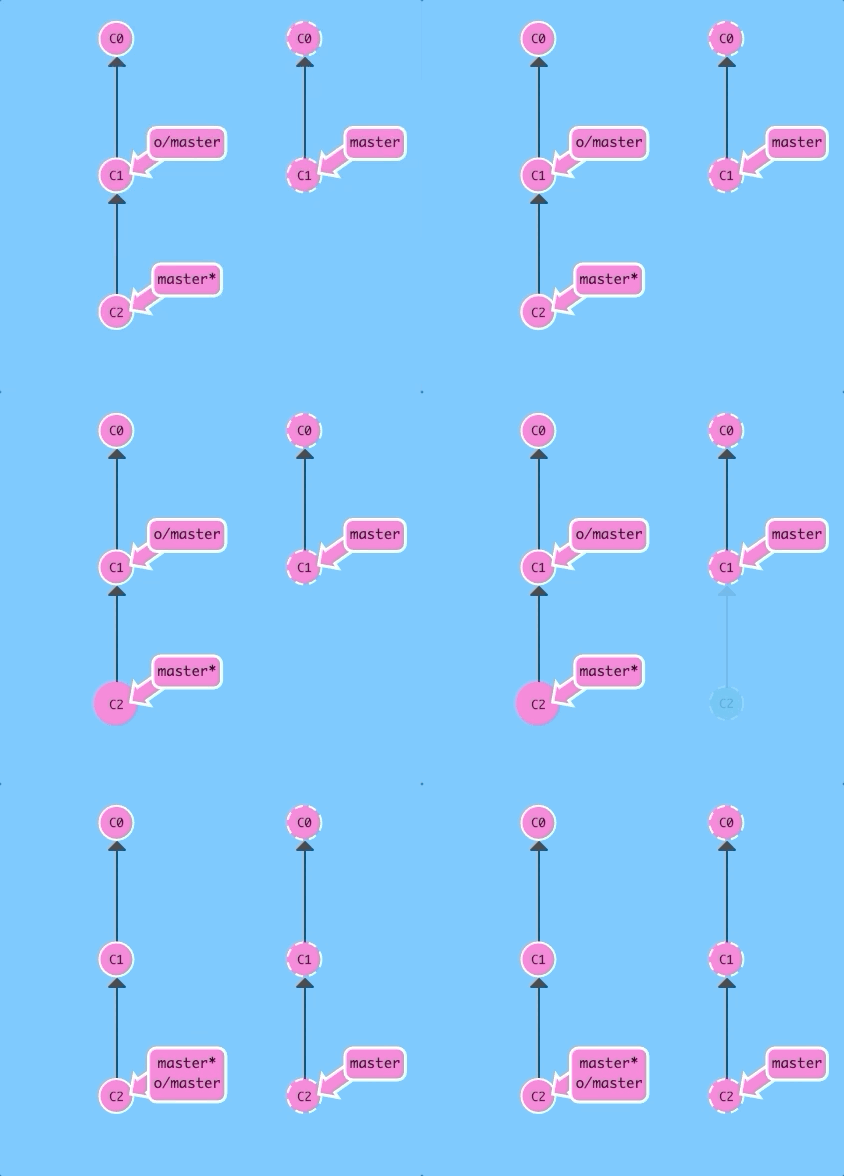
git pushThere we go -- the remote received commit C2, the branch master on the remote was updated to point at C2, and our own reflection of the remote (o/master) was updated as well. Everything is in sync!
Diverged Work
So far we've seen how to pull down commits from others and how to push up our own changes. It seems pretty simple, so how can people get so confused?
The difficulty comes in when the history of the repository diverges. Before discussing the details of this, let's see an example...
Imagine you clone a repository on Monday and start dabbling on a side feature. By Friday you are ready to publish your feature -- but oh no! Your coworkers have written a bunch of code during the week that's made your feature out of date (and obsolete). They've also published these commits to the shared remote repository, so now your work is based on an old version of the project that's no longer relevant.
In this case, the command git push is ambiguous. If you run git push, should git change the remote repository back to what it was on Monday? Should it try to add your code in while not removing the new code? Or should it totally ignore your changes since they are totally out of date?
Because there is so much ambiguity in this situation (where history has diverged), git doesn't allow you to push your changes. It actually forces you to incorporate the latest state of the remote before being able to share your work.
So much talking! Let's see this situation in action.
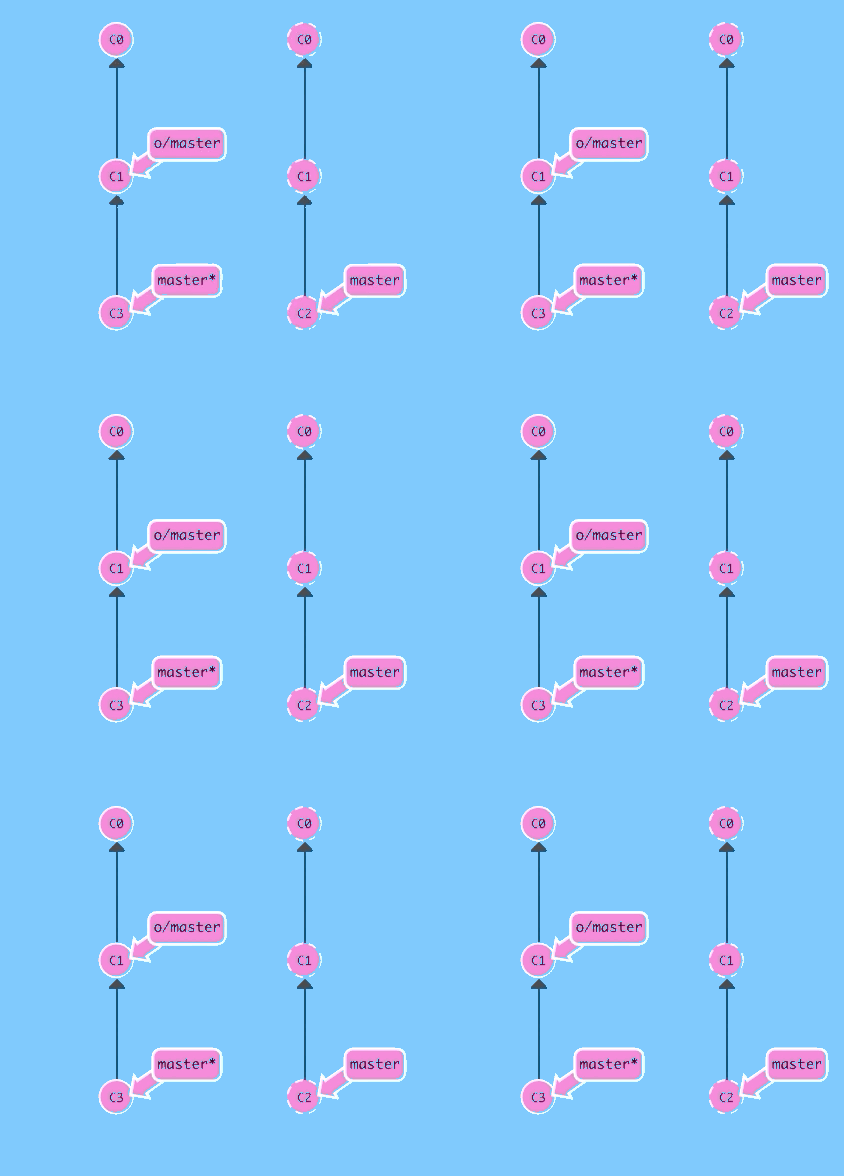
git pushSee? Nothing happened because the command fails. git push fails because your most recent commit C3 is based off of the remote at C1. The remote has since been updated to C2 though, so git rejects your push.
How do you resolve this situation? It's easy, all you need to do is base your work off of the most recent version of the remote branch.
There are a few ways to do this, but the most straightforward is to move your work via rebasing. Let's go ahead and see what that looks like.
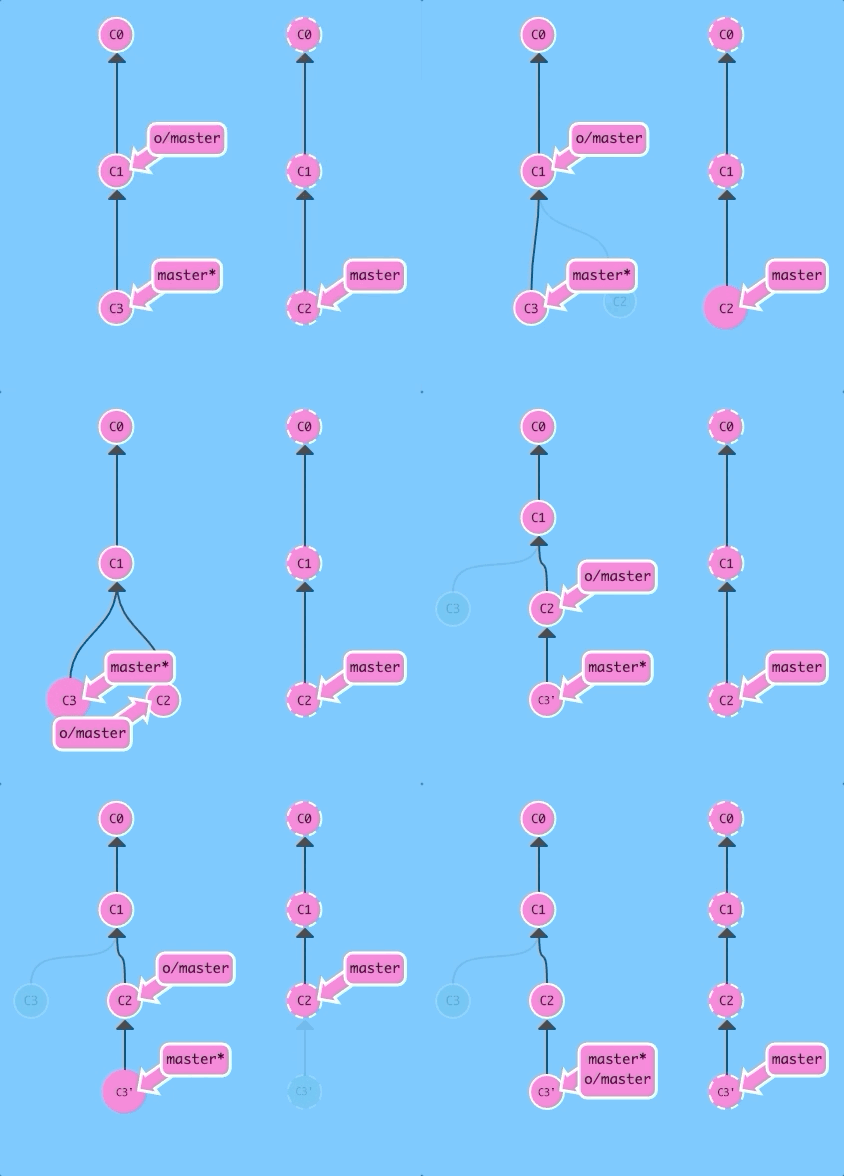
git fetch; git rebase o/master; git pushBoom! We updated our local representation of the remote with git fetch, rebased our work to reflect the new changes in the remote, and then pushed them with git push.
Are there other ways to update my work when the remote repository has been updated? Of course! Let's check out the same thing but with merge instead.
Although git merge doesn't move your work (and instead just creates a merge commit), it's a way to tell git that you have incorporated all the changes from the remote. This is because the remote branch is now an ancestor of your own branch, meaning your commit reflects all commits in the remote branch.
Lets see this demonstrated...
Now if we merge instead of rebasing...
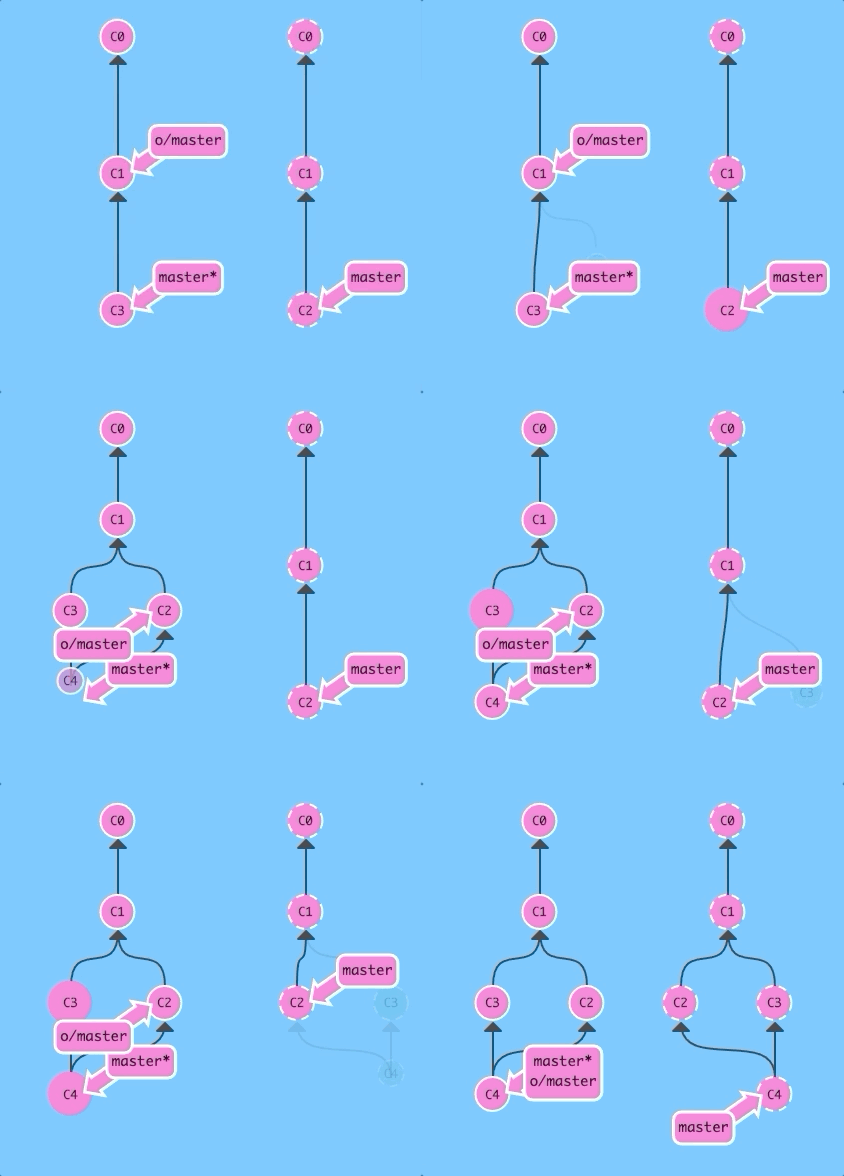
git fetch; git merge o/master; git pushBoom! We updated our local representation of the remote with git fetch, merged the new work into our work (to reflect the new changes in the remote), and then pushed them with git push.
Awesome! Is there any way I can do this without typing so many commands?
Of course -- you already know git pull is just shorthand for a fetch and a merge. Conveniently enough, git pull --rebase is shorthand for a fetch and a rebase!
Let's see these shorthand commands at work.
First with --rebase...
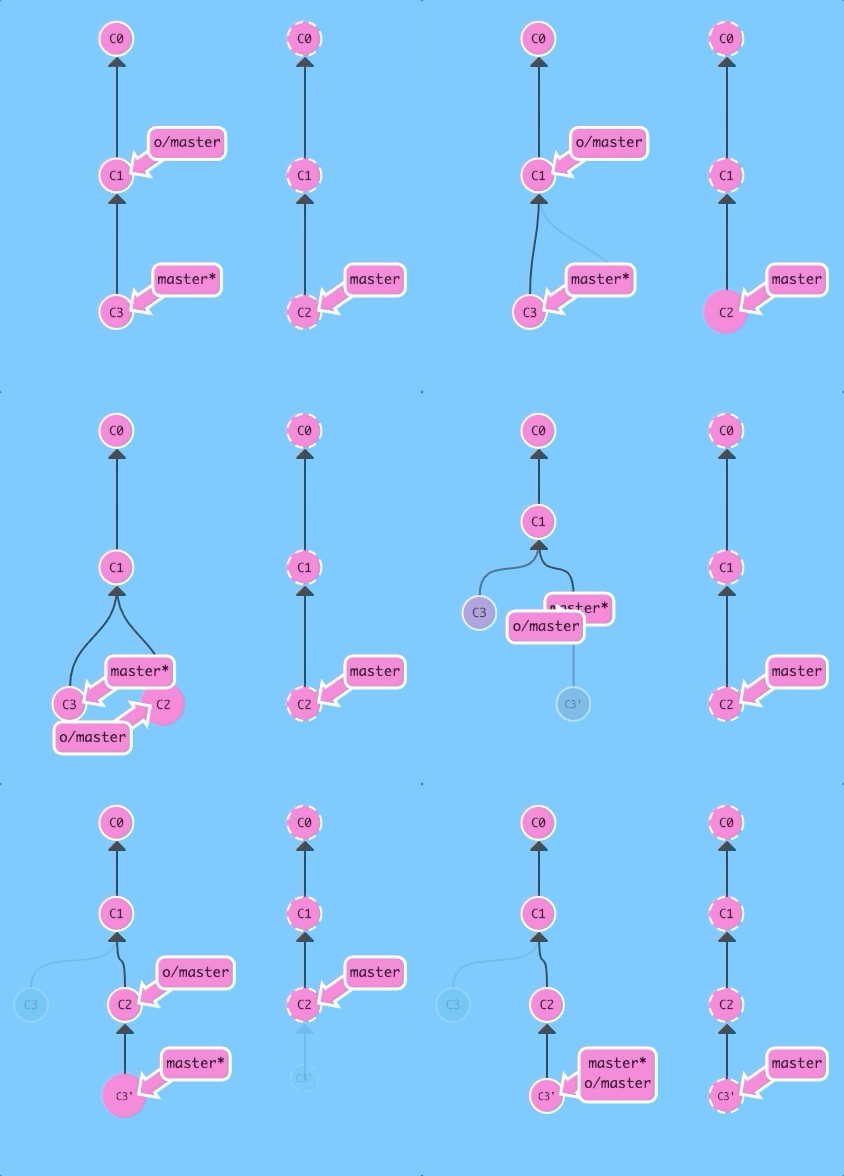
git pull --rebase; git pushSame as before! Just a lot shorter.
And now with regular pull.
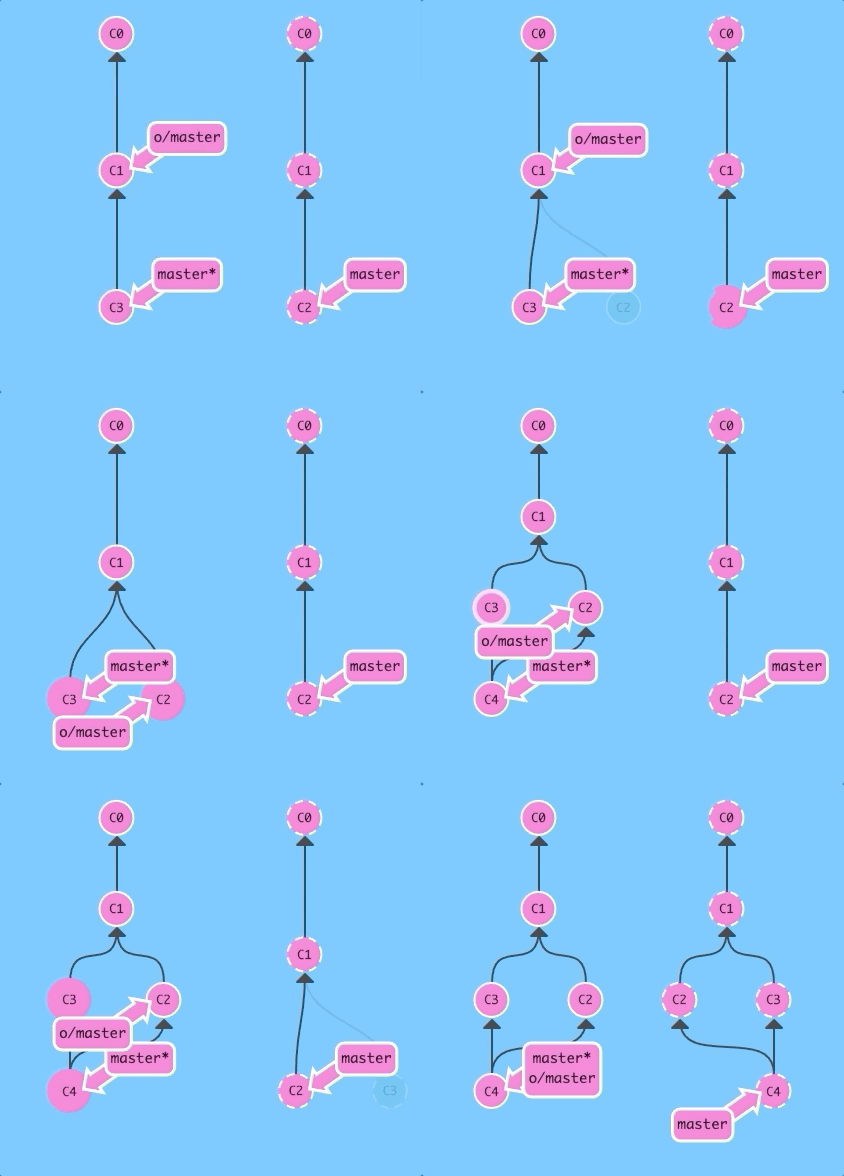
git pull; git pushAgain, exact same as before!
Remote Rejected!
If you work on a large collaborative team its likely that master is locked and requires some Pull Request process to merge changes. If you commit directly to master locally and try pushing you will be greeted with a message similar to this:
! [remote rejected] master -> master (TF402455: Pushes to this branch are not permitted; you must use a pull request to update this branch.)
Why was it rejected?
The remote rejected the push of commits directly to master because of the policy on master requiring pull requests to instead be used.
You meant to follow the process creating a branch then pushing that branch and doing a pull request, but you forgot and committed directly to master. Now you are stuck and cannot push your changes.
The solution
Create another branch called feature and push that to the remote. Also reset your master back to be in sync with the remote otherwise you may have issues next time you do a pull and someone else's commit conflicts with yours.
