
📢 개요
데이터 인코딩(Encoding) 과정은 데이터를 효율적으로 저장하고 전송하며 처리할 수 있도록 하는 중요한 과정이다. 해당 과정을 거침으로써 저장 공간을 절약 할 수 있으며 데이터 전송 시간을 줄일 수 있다. 이번 포스트에서는 데이터 전처리 과정에서의 인코딩에 대해 전반적으로 정리해보고자 한다.
✏️ 인코딩(Encoding)이란?
👉 인간이 인지가능한 문자(언어)를 약속된 규칙에 따라 컴퓨터가 이해 가능한 언어인 (0과 1)로 이루어진 코드로 바꾸는 작업
👉 정해진 규칙에 따라 코드화, 부호화 하는 작업
📌 인코딩의 장단점
장점 단점 작은 정보를 기록하므로 적은 메모리 사용 데이터의 정확도에 손실 발생 가능 코드화 되어 원데이터의 의미를 알 수 없기에 보안에 유리 가치 판단에 대한 코드화 시 의미와 정확도 감소 빠른 시간에 데이터의 입력이 가능 사용자가 변환된 코드를 알고 있어야 사용 가능 코드는 규격화 되어 있어 데이터 검증에 유리 코드의 수가 제한될 수 있음 데이터가 규격화 되어 비교하기 용이 코드가 정확히 기록된 것인지 오류의 검증이 어려움
📣 데이터 전처리 과정에서 인코딩이 필요한 이유?
👉 실제 데이터셋은 대체로 수치형(Numerical)과 범주형(Categorical) 변수가 혼재
👉 머신러닝 알고리즘은 문자열 데이터 속성을 입력 받지 않기 때문에 모든 데이터는 수치형으로 표현되어야 함
👉 따라서 범주형 변수는 모두 수치형으로 변환/인코딩되어야 함
🔎 범주형(Categorical) 변수?
👉 숫자 값 대신에 그룹이나 범주형 값을 가지는 변수들을 의미
👉 질적변수(Qualitative Variable)라고도 불림
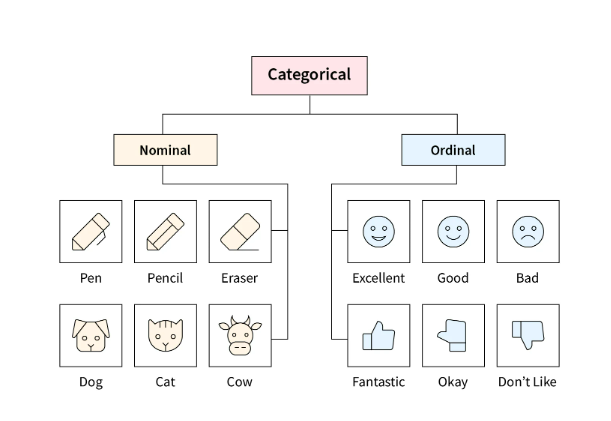
📗 순서변수(Ordinal Categorical Variable)
👉 순서가 있는 범주형 변수
🧩 예) 학력수준, 만족도, 나이 등
🧩 예) 높은 학위를 가진 사람이 일반적으로 낮은 학위를 가진 사람보다 높은 급여를 받을 것이다
📘 명목변수(Nominal Categorical Variable)
👉 순서가 없는 범주형 변수
👉 단지 범주를 정의하는데 사용되며, 범주 간에는 어떠한 순서도 없음
🧩 예) 성별, 인종, 색깔, 혈액형 등
📂 종류
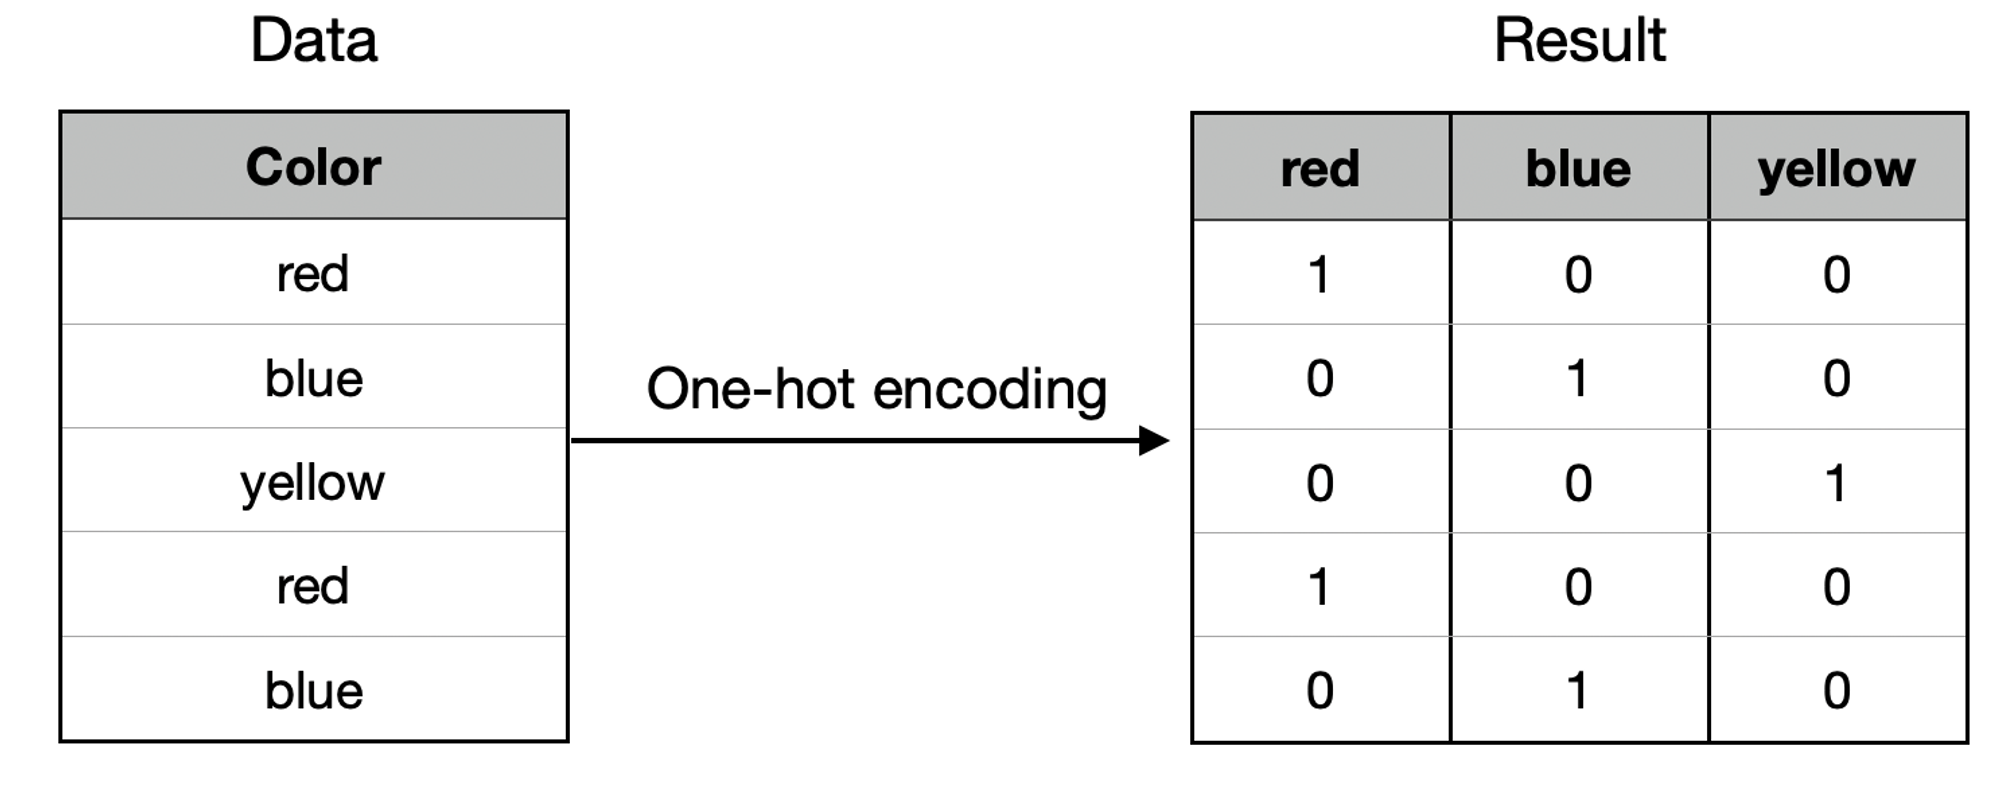
1. One Hot Encoding
👉 고유값에 해당하는 column에만 1을 부여하고 나머지 column에는 0을 부여하는 기법
👉 각 범주를 0과 1의 원-핫 벡터(One-Hot Vector)로 표현하는 기법
👉 범주의 개수만큼 Dummy 변수가 생성되므로 각 범주가 새로운 특성(feature)이 되어 표현됨
🔥 단점
👉 범주가 너무 많은 특성(feature)의 경우 데이터의 Cardinality를 매우 크게 증가시킬 수 있음
👉 단어의 유사도를 표현하지 못함
❓ Cardinality : 특정 데이터 집합의 고유(Unique)값 개수를 의미
💻 코드 예시
import pandas as pd
import numpy as np

# 독립변수 'Temperature', 'Color' , 종속변수 'Target'의 예시 데이터 생성
data = {
"Temperature": ["Hot", "Cold", "Very Hot", "Warm", "Hot", "Warm", "Warm", "Hot", "Hot", "Cold"],
"Color": ["Red", "Yellow", "Blue", "Blue", "Red", "Yellow", "Red", "Yellow", "Yellow", "Yellow"],
"Target": [1, 1, 1, 0, 1, 0, 1, 0, 1, 1]}
df = pd.DataFrame(data, columns = ["Temperature", "Color", "Target"])
1-1. Pandas get_dummies
| Parameters | Description |
|---|---|
| data | One-Hot Encoding을 적용할 데이터 |
| prefix | 생성할 더미변수의 column 이름 앞에 붙을 prefix 지정 |
| prefix_sep | prefix와 범주 사이의 separator 지정 |
| dummy_na | NaN을 더미변수에 포함 시킬지 여부 지정 |
| columns | One-Hot Encoding 실시할 column 지정 |
| drop_first | n개의 범주에서 n-1개의 더미변수를 만들 때 사용 |
| dtype | 새로운 column의 데이터 type 설정 |
pd.get_dummies(df, prefix=["Temp"], columns=["Temperature"])# result
Color Target Temp_Cold Temp_Hot Temp_Very Hot Temp_Warm
0 Red 1 False True False False
1 Yellow 1 True False False False
2 Blue 1 False False True False
3 Blue 0 False False False True
4 Red 1 False True False False
5 Yellow 0 False False False True
6 Red 1 False False False True
7 Yellow 0 False True False False
8 Yellow 1 False True False False
9 Yellow 1 True False False False1-2. Scikit-learn OneHotEncoder
from sklearn.preprocessing import OneHotEncoder

# 데이터프레임 복사
df_ohe=df.copy()

# OneHotEncoder 학습
ohe = OneHotEncoder().fit(df_ohe[['Temperature']])

# 학습된 결과를 토대로 새로운 컬럼 삽입
# OneHotEncoder는 결과를 sparse matrix로 반환하므로 toarray()를 통해 ndarray로 변환
df_ohe[ohe.categories_[0]] = ohe.transform(df_ohe[['Temperature']]).toarray()
# result
Temperature Color Target Cold Hot Very Hot Warm
0 Hot Red 1 0.0 1.0 0.0 0.0
1 Cold Yellow 1 1.0 0.0 0.0 0.0
2 Very Hot Blue 1 0.0 0.0 1.0 0.0
3 Warm Blue 0 0.0 0.0 0.0 1.0
4 Hot Red 1 0.0 1.0 0.0 0.0
5 Warm Yellow 0 0.0 0.0 0.0 1.0
6 Warm Red 1 0.0 0.0 0.0 1.0
7 Hot Yellow 0 0.0 1.0 0.0 0.0
8 Hot Yellow 1 0.0 1.0 0.0 0.0
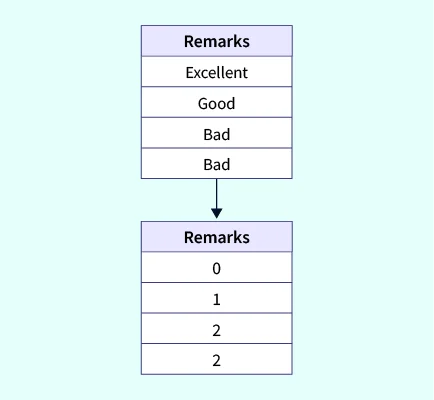
9 Cold Yellow 1 1.0 0.0 0.0 0.02. Label Encoding
👉 각 범주가 1에서 N(특성(feature)의 전체 범주의 수)의 숫자(정수)로 변환되는 기법
👉 변수에 순서가 있음을 고려하지 않고 각 범주에 정수를 지정
👉 데이터 셋에 등장하는 순서대로, 혹은 알파벳 순서대로 mapping을 실시하며 순서 정보를 담지 않음
👉 하나의 column에만 사용 가능
💻 코드 예시
2-1. Scikit-learn LabelEncoder
from sklearn.preprocessing import LabelEncoder

df["Temp_le"] = LabelEncoder().fit_transform(df.Temperature)
# result
Temperature Color Target Temp_le
0 Hot Red 1 1
1 Cold Yellow 1 0
2 Very Hot Blue 1 2
3 Warm Blue 0 3
4 Hot Red 1 1
5 Warm Yellow 0 3
6 Warm Red 1 3
7 Hot Yellow 0 1
8 Hot Yellow 1 1
9 Cold Yellow 1 02-2. Pandas factorize
df.loc[:, "Temp_factorize_encode"] = pd.factorize(df["Temperature"])[0].reshape(-1,1)# result
Temperature Color Target Temp_factorize_encode
0 Hot Red 1 0
1 Cold Yellow 1 1
2 Very Hot Blue 1 2
3 Warm Blue 0 3
4 Hot Red 1 0
5 Warm Yellow 0 3
6 Warm Red 1 3
7 Hot Yellow 0 0
8 Hot Yellow 1 0
9 Cold Yellow 1 13. Ordinal Encoding
👉 Label Encoding과 동일하게 각 범주가 1에서 N(특성(feature)의 전체 범주의 수)의 숫자(정수)로 변환되는 기법
👉 Label Encoding과 달리 변수의 순서를 고려하여 정수를 부여하는 방식으로 순서 정보를 포함하는 기법
👉 순서가 중요한 특성(feature)에 대해 주로 사용
👉 여러 column에 사용 가능
💻 코드 예시
3-1. Category_encoders OrdinalEncoder
- 정수형 값이 0이 아닌 1부터 변환
from category_encoders import OrdinalEncoder

df[['Temp_oe','Color_oe']] = OrdinalEncoder().fit_transform(df[['Temperature','Color']])
# result
Temperature Color Temp_oe Color_oe
0 Hot Red 1 1
1 Cold Yellow 2 2
2 Very Hot Blue 3 3
3 Warm Blue 4 3
4 Hot Red 1 1
5 Warm Yellow 4 2
6 Warm Red 4 1
7 Hot Yellow 1 2
8 Hot Yellow 1 2
9 Cold Yellow 2 23-2. Scikit-learn OrdinalEncoder
from sklearn.preprocessing import OrdinalEncoder

df["Temp_oe"] = OrdinalEncoder().fit_transform(df[['Temperature']])
# result
Temperature Color Target Temp_oe
0 Hot Red 1 1.0
1 Cold Yellow 1 0.0
2 Very Hot Blue 1 2.0
3 Warm Blue 0 3.0
4 Hot Red 1 1.0
5 Warm Yellow 0 3.0
6 Warm Red 1 3.0
7 Hot Yellow 0 1.0
8 Hot Yellow 1 1.0
9 Cold Yellow 1 0.03-3. Pandas map
- Direct mapping을 활용한 Ordinal Encoding 방법
- 각 변수의 본래 순서를 dictionary를 통해 지정 후, dictionary에서 각 변수인 Key에 대해 map 함수를 통해 Value를 지정
temp_dict = {"Cold": 0, "Warm": 1, "Hot": 2, "Very Hot": 3}
df["Temp_Ordinal"] = df.Temperature.map(temp_dict)
# result
Temperature Color Target Temp_Ordinal
0 Hot Red 1 2
1 Cold Yellow 1 0
2 Very Hot Blue 1 3
3 Warm Blue 0 1
4 Hot Red 1 2
5 Warm Yellow 0 1
6 Warm Red 1 1
7 Hot Yellow 0 2
8 Hot Yellow 1 2
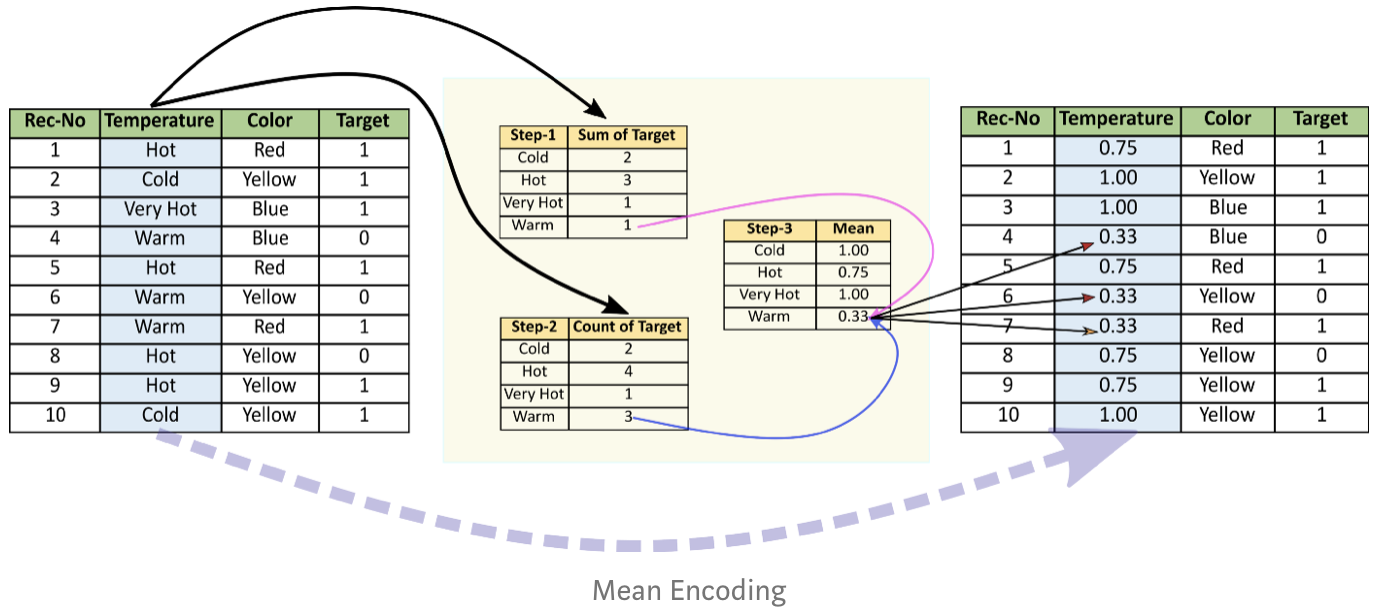
9 Cold Yellow 1 04. Target Encoding
👉 범주형 데이터를 종속변수(target)값의 크기와 비례한 숫자로 변환되는 기법
👉 범주형의 독립변수들이 종속변수의 값들과 상관관계가 있음을 가정하여 동작하는 기법
👉 Label Encoding과 유사하나 label과 target이 직접적으로 연관이 있다는 점이 차이
⭐ 장점
- 데이터 셋의 양에 영향을 받지 않아 빠른 학습이 가능
🔥 단점
- 과적합(Overfitting) 문제에 매우 취약하여 교차검증(Cross Validation)이나 정규화(Regularization) 같은 후속 조치들이 거의 필수적
💻 코드 예시
4-1. Pandas Groupby
import pandas as pd
mean_encode = df.groupby("Temperature")["Target"].mean()
df.loc[:, "Temp_mean_encode"] = df["Temperature"].map(mean_encode)
# result
Temperature
Cold 1.000000
Hot 0.750000
Very Hot 1.000000
Warm 0.333333
Name: Target, dtype: float64
------------------------------------------------------------------------------------------
Temperature Color Target Temp_mean_encode
0 Hot Red 1 0.750000
1 Cold Yellow 1 1.000000
2 Very Hot Blue 1 1.000000
3 Warm Blue 0 0.333333
4 Hot Red 1 0.750000
5 Warm Yellow 0 0.333333
6 Warm Red 1 0.333333
7 Hot Yellow 0 0.750000
8 Hot Yellow 1 0.750000
9 Cold Yellow 1 1.000000
4-2. Scikit-learn TargetEncoder
import pandas as pd
import numpy as np

# Feature 'weight', 'height', 'sex','blood_type', 'health'의 예시 데이터 생성
data = {
"weight": [40, 80, 60, 50, 90],
"height": [162, 155, 182, 173, 177],
"sex": ['f', 'm', 'm', 'f', 'm'],
"blood_type": ['O', 'A', 'B', 'O', 'A'],
"health": ['good', 'excellent', 'bad', 'bad', 'good']}
df = pd.DataFrame(data, columns = ["weight", "height", "sex", "blood_type", "health"])

from sklearn.preprocessing import TargetEncoder

te = TargetEncoder(smooth=0, target_type='continuous')
te.fit(df['blood_type'].values.reshape(-1, 1), df.weight)
df['blood_type_target'] = te.transform(df['blood_type'].values.reshape(-1,1))
# result
weight height sex blood_type health blood_type_target
0 40 162 f O good 45.0
1 80 155 m A excellent 85.0
2 60 182 m B bad 60.0
3 50 173 f O bad 45.0
4 90 177 m A good 85.05.Binary Encoding
👉 범주형 데이터를 0과 1의 이진형으로 변환하는 기법
👉 One-Hot Encoding은 범주의 수만큼 feature가 생성되는 것과 달리, Binary Encoding은 훨씬 더 적은 수의 feature만을 필요로 함
⭐ 장점
- One-Hot Encoding이 가지는 메모리 부족 문제 발생 및 차원의 저주에 빠질 확률을 현저히 낮출 수 있음
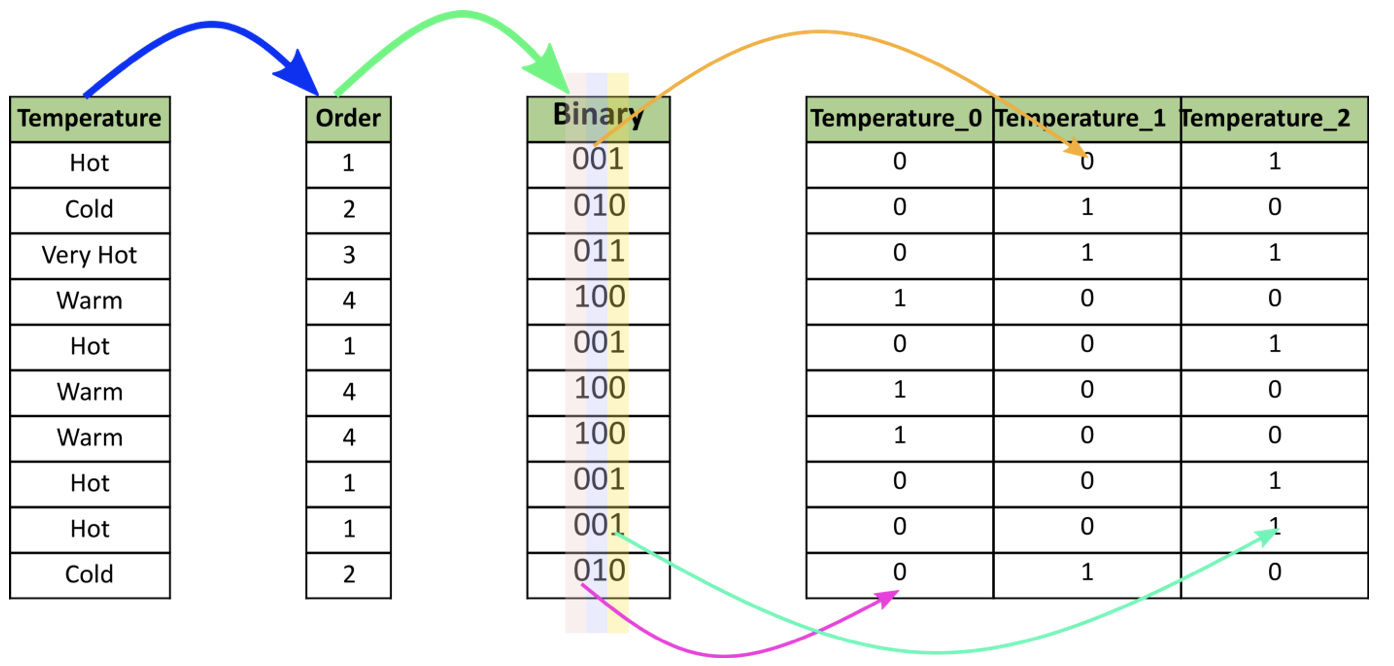
📌 Binary Encoding 메커니즘
1) 범주형 데이터가 데이터셋에 나타나는 순서대로 정수형으로 인코딩
2) 인코딩된 정수가 이진형으로 변환됨
3) 이진형의 숫자들이 별도의 feature를 형성
💻 코드 예시
5-1. Category_encoders BinaryEncoder
from category_encoders import BinaryEncoder

be = BinaryEncoder(cols=['Temperature'])

df_be = be.fit_transform(df['Temperature'])
df1 = pd.concat([df, df_be], axis=1)
# result
Temperature Color Target Temperature_0 Temperature_1 Temperature_2
0 Hot Red 1 0 0 1
1 Cold Yellow 1 0 1 0
2 Very Hot Blue 1 0 1 1
3 Warm Blue 0 1 0 0
4 Hot Red 1 0 0 1
5 Warm Yellow 0 1 0 0
6 Warm Red 1 1 0 0
7 Hot Yellow 0 0 0 1
8 Hot Yellow 1 0 0 1
9 Cold Yellow 1 0 1 06. Helmert Encoding
👉 특정 범주형 변수의 각 level(예시 데이터의 'Cold', 'Warm', 'Hot', 'Very Hot')을 후속 level의 평균과 비교하여 인코딩하는 기법
📌 Helmert Encoding 메커니즘
- 'cold'는 'warm', 'hot', 'very hot'의 종속변수(Target)의 평균으로 비교
- 'warm'은 'cold', 'hot', 'very hot'의 종속변수(Target)의 평균으로 비교
- 'hot'는 'cold', 'warm', 'very hot'의 종속변수(Target)의 평균으로 비교
- 'very hot'은 'cold', 'warm', 'hot'의 종속변수(Target)의 평균으로 비교
💻 코드 예시
6-1. Category_encoders HelmertEncoder
from category_encoders import HelmertEncoder

he = HelmertEncoder(cols=['Temperature'], drop_invariant=True)
df_he = he.fit_transform(df['Temperature'])
df = pd.concat([df, df_he], axis=1)
# result
Temperature Color Target Temperature_0 Temperature_1 Temperature_2
0 Hot Red 1 -1.0 -1.0 -1.0
1 Cold Yellow 1 1.0 -1.0 -1.0
2 Very Hot Blue 1 0.0 2.0 -1.0
3 Warm Blue 0 0.0 0.0 3.0
4 Hot Red 1 -1.0 -1.0 -1.0
5 Warm Yellow 0 0.0 0.0 3.0
6 Warm Red 1 0.0 0.0 3.0
7 Hot Yellow 0 -1.0 -1.0 -1.0
8 Hot Yellow 1 -1.0 -1.0 -1.0
9 Cold Yellow 1 1.0 -1.0 -1.0🙏 Reference
https://conanmoon.medium.com/%EB%8D%B0%EC%9D%B4%ED%84%B0%EA%B3%BC%ED%95%99-%EC%9C%A0%EB%A7%9D%EC%A3%BC%EC%9D%98-%EB%A7%A4%EC%9D%BC-%EA%B8%80%EC%93%B0%EA%B8%B0-%EC%9D%BC%EA%B3%B1%EB%B2%88%EC%A7%B8-%EC%9D%BC%EC%9A%94%EC%9D%BC-7a40e7de39d4
https://haehwan.github.io/posts/sta-BaseNEncoder/
https://techblog-history-younghunjo1.tistory.com/99