
어제에 이어 MSA(Microservice Architecture)에 대한 강의를 들었고, 오늘은 그 중 API 게이트웨이, 보안 구성(OAuth2 + JWT)에 대한 내용을 수강하였다.
API 게이트웨이 (Spring Cloud Gateway)
API 게이트웨이란?
- 클라이언트의 요청을 받아 백엔드 서비스로 라우팅하고, 다양한 부가 기능을 제공하는 중간 서버이다.
- 주요 기능으로는 라우팅, 인증 및 권한 부여, 로드 밸런싱, 모니터링 및 로깅, 요청 및 응답 변환이 가능하다.
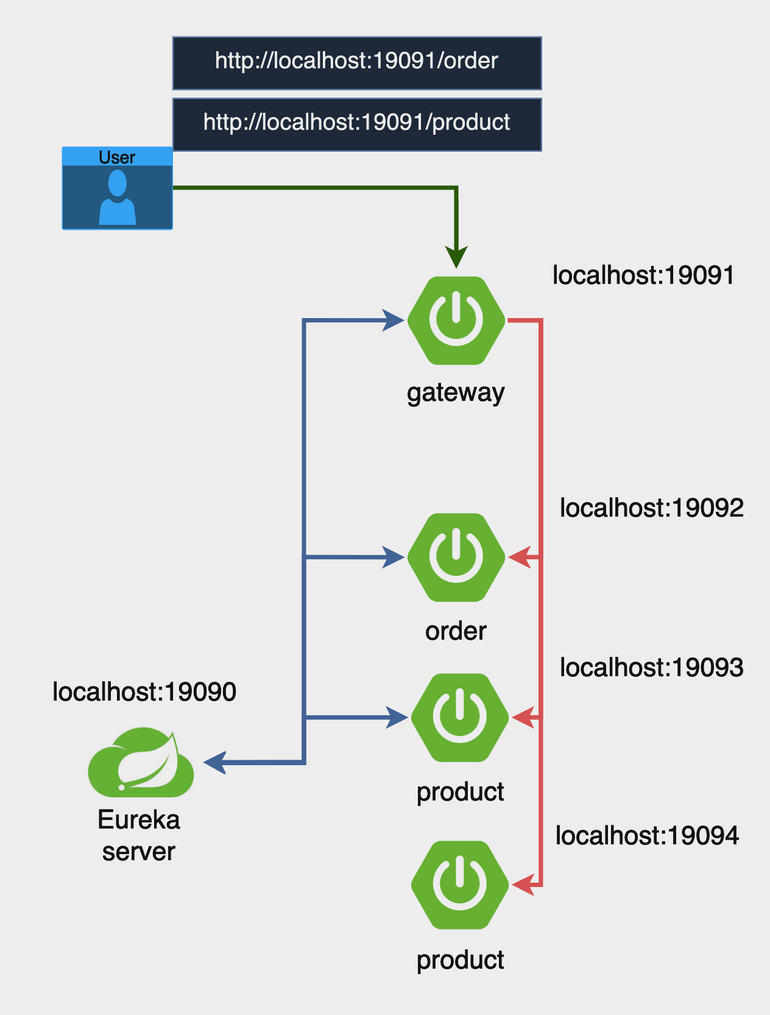
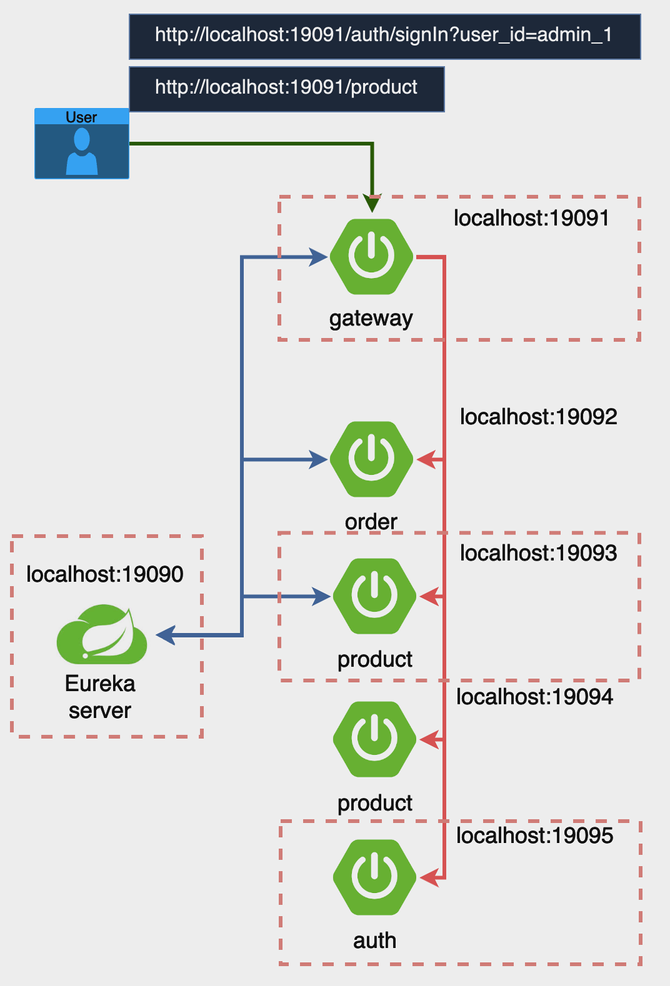
예를 들어, 위와같이 order 인스턴스와 product 인스턴스가 여러 개 있는 경우, 각각 다른 포트로 연결하여 접속하는 것보다 gateway를 설정하여 하나의 gateway에서 자동으로 적절한 서비스의 url을 찾아가도록 라우팅하는 기능을 이용하면 api 작성에 용이하다.
실습
위의 사진처럼 클라우드 게이트웨이 + 유레카 + Order 인스턴스(1개) + Product 인스턴스(2개)를 사용하여 진행해보자. 유레카 서버, Order 인스턴스, Product 인스턴스는 지난 TIL 포스팅(클릭)의 로드 밸런싱 실습에서 사용된 프로젝트들을 그대로 가져와 사용했다.
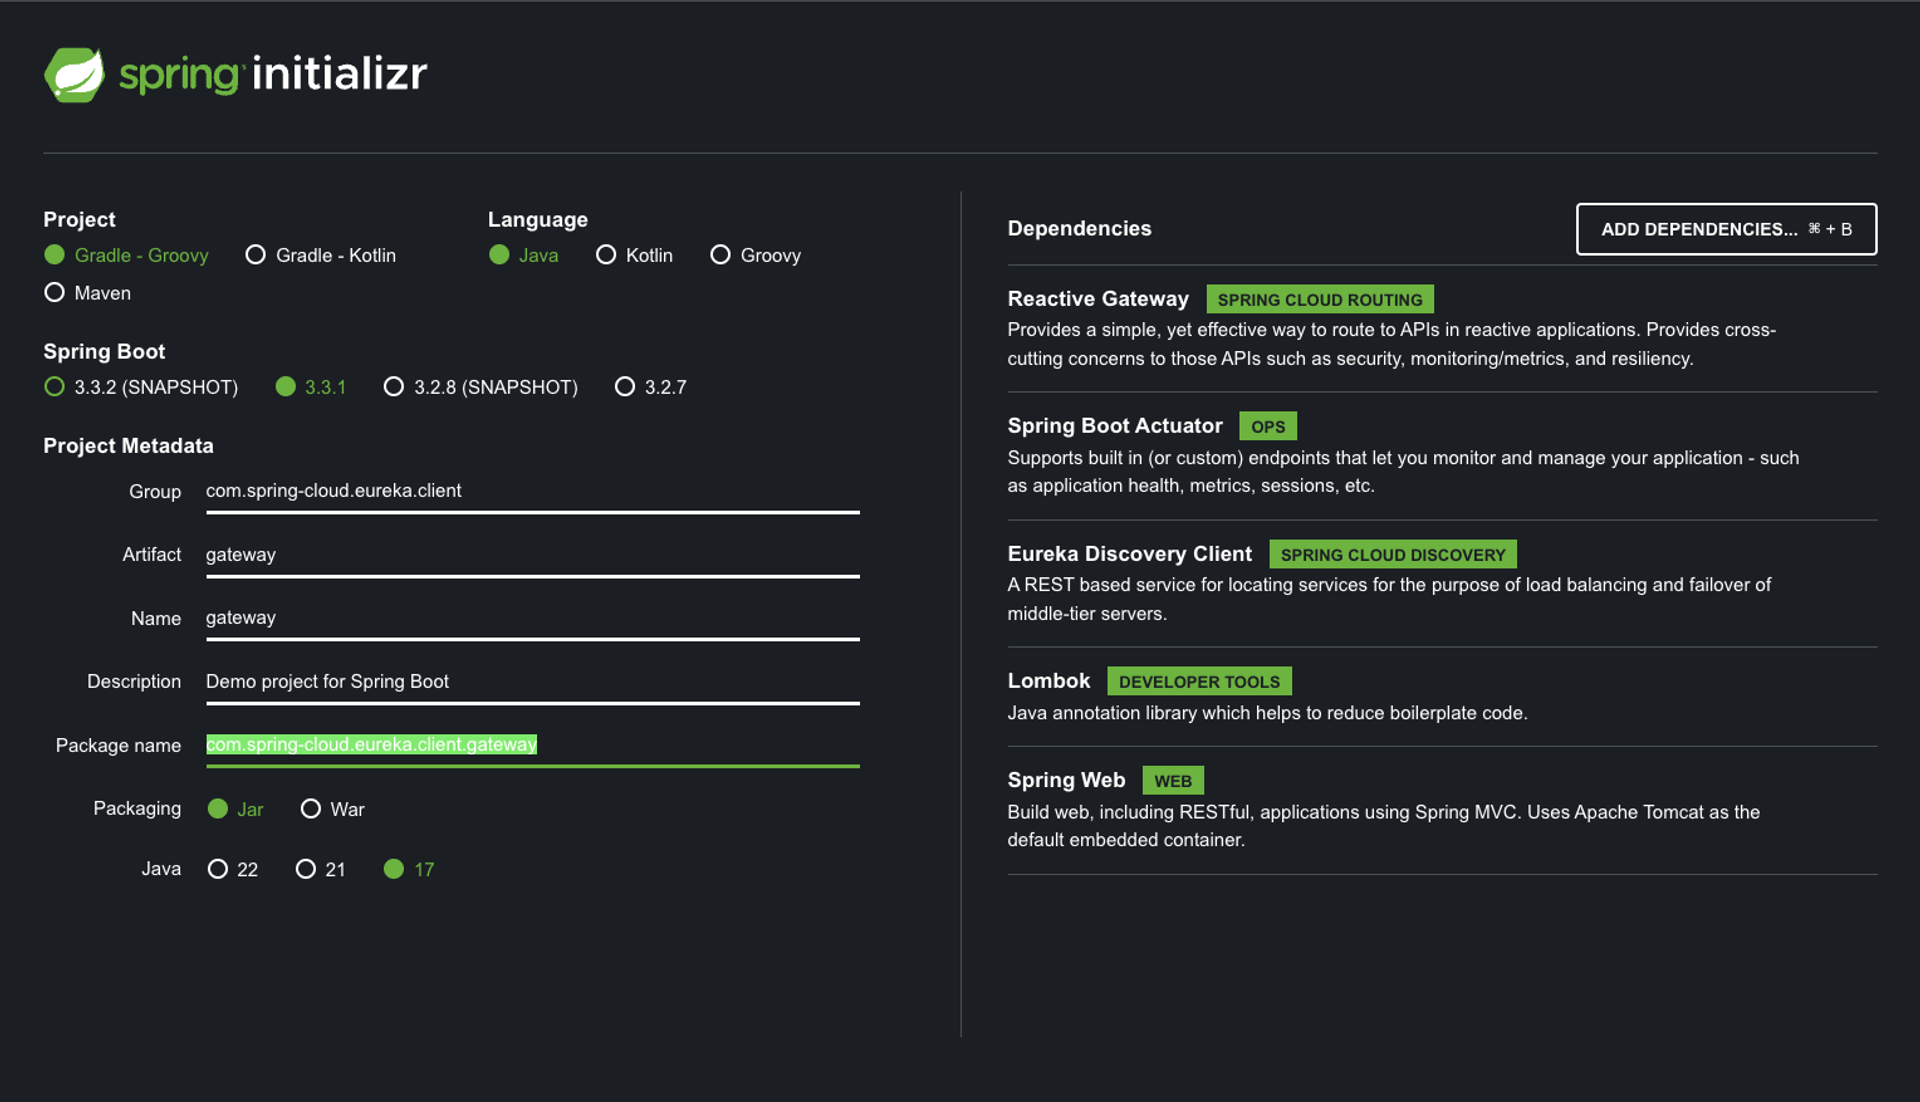
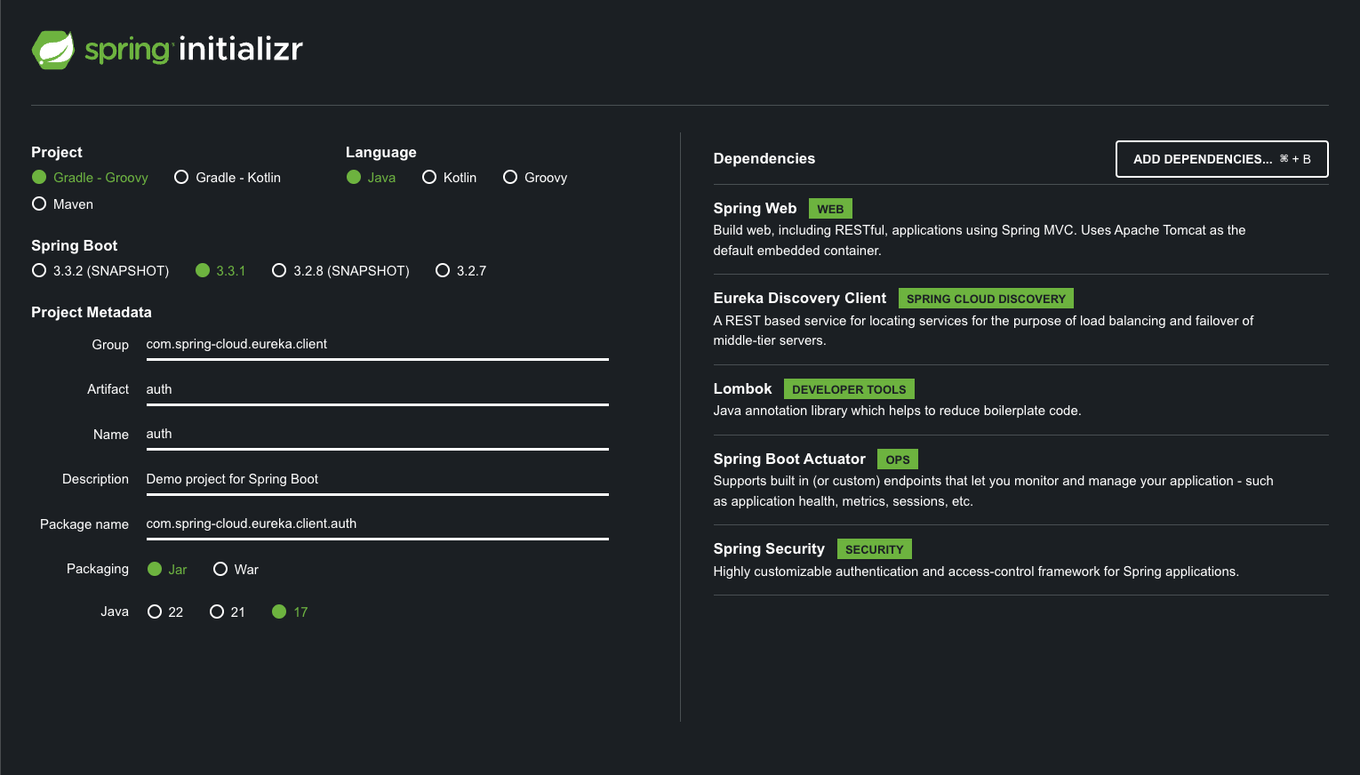
- 게이트웨이 프로젝트를 생성해보자. start.spring.io 에서 아래와 같은 디펜던시를 추가 후 프로젝트를 생성한다.
이후 PreFilter와 PostFilter 코드를 작성하고 application.yml 파일을 구성한다.
-
CustomPreFilter.java
import org.springframework.cloud.gateway.filter.GatewayFilterChain; import org.springframework.cloud.gateway.filter.GlobalFilter; import org.springframework.core.Ordered; import org.springframework.http.server.reactive.ServerHttpRequest; import org.springframework.stereotype.Component; import org.springframework.web.server.ServerWebExchange; import reactor.core.publisher.Mono; import java.util.logging.Logger; @Component public class CustomPreFilter implements GlobalFilter, Ordered { private static final Logger logger = Logger.getLogger(CustomPreFilter.class.getName()); @Override public Mono<Void> filter(ServerWebExchange exchange, GatewayFilterChain chain) { ServerHttpRequest response = exchange.getRequest(); logger.info("Pre Filter: Request URI is " + response.getURI()); // Add any custom logic here return chain.filter(exchange); } @Override public int getOrder() { return Ordered.HIGHEST_PRECEDENCE; } } -
CustomPostFilter.java
import org.springframework.cloud.gateway.filter.GlobalFilter; import org.springframework.core.Ordered; import org.springframework.http.server.reactive.ServerHttpResponse; import org.springframework.stereotype.Component; import org.springframework.web.server.ServerWebExchange; import reactor.core.publisher.Mono; import java.util.logging.Logger; @Component public class CustomPostFilter implements GlobalFilter, Ordered { private static final Logger logger = Logger.getLogger(CustomPostFilter.class.getName()); @Override public Mono<Void> filter(ServerWebExchange exchange, org.springframework.cloud.gateway.filter.GatewayFilterChain chain) { return chain.filter(exchange).then(Mono.fromRunnable(() -> { ServerHttpResponse response = exchange.getResponse(); logger.info("Post Filter: Response status code is " + response.getStatusCode()); // Add any custom logic here })); } @Override public int getOrder() { return Ordered.LOWEST_PRECEDENCE; } } -
resources/application.yml(application.properties 파일은 삭제)
server:
  port: 19091  # 게이트웨이 서비스가 실행될 포트 번호

spring:
  main:
    web-application-type: reactive  # Spring 애플리케이션이 리액티브 웹 애플리케이션으로 설정됨
  application:
    name: gateway-service  # 애플리케이션 이름을 'gateway-service'로 설정
  cloud:
    gateway:
      routes:  # Spring Cloud Gateway의 라우팅 설정
        - id: order-service  # 라우트 식별자
          uri: lb://order-service  # 'order-service'라는 이름으로 로드 밸런싱된 서비스로 라우팅
          predicates:
            - Path=/order/**  # /order/** 경로로 들어오는 요청을 이 라우트로 처리
        - id: product-service  # 라우트 식별자
          uri: lb://product-service  # 'product-service'라는 이름으로 로드 밸런싱된 서비스로 라우팅
          predicates:
            - Path=/product/**  # /product/** 경로로 들어오는 요청을 이 라우트로 처리
      discovery:
        locator:
          enabled: true  # 서비스 디스커버리를 통해 동적으로 라우트를 생성하도록 설정

eureka:
  client:
    service-url:
      defaultZone: http://localhost:19090/eureka/  # Eureka 서버의 URL을 지정
Run
-
유레카 서버 ⇒ 게이트웨이 ⇒ 주문 ⇒ 상품 순으로 어플리케이션을 실행한다.
-
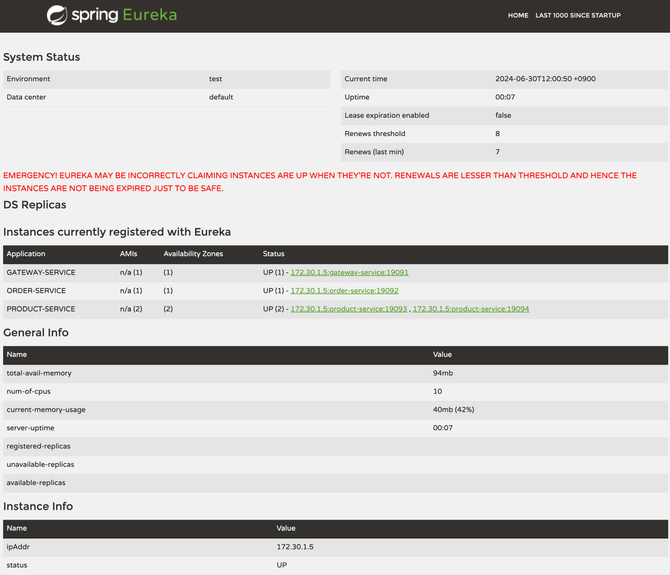
http://localhost:19090 에 접속하여 각 인스턴스를 확인한다.
-
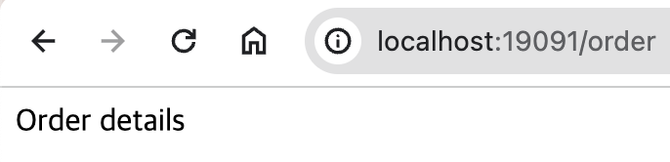
http://localhost:19091/order 로 접속하여 게이트웨이에서 order 서비스를 호출하는 것을 확인 할 수 있다.
-
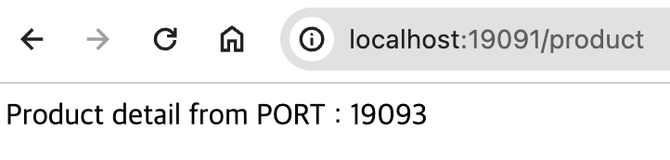
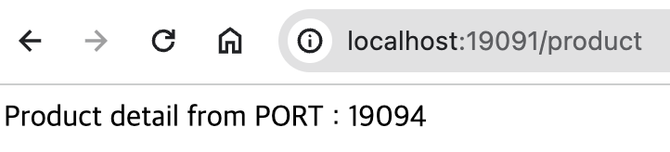
http://localhost:19091/product 를 여러번 호출 하면서 포트가 달라지는 것을 확인한다. 이를통해 로드밸런싱이 동작함을 확인한다.
-
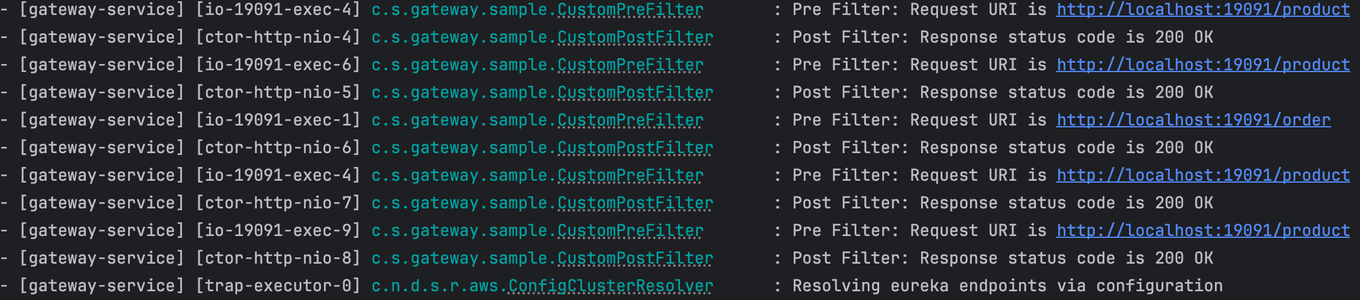
게이트웨이의 로그를 보면 호출 할때마다 미리 작성해둔 필터가 동작하는것을 확인 할 수 있다.
보안 구성 (OAuth2 + JWT)
MSA에서는 각 서비스가 독립적으로 배포되고 통신하기 때문에 보안이 매우 중요하다. 데이터 보호, 인증 및 권한 부여, 통신 암호화 등을 통해 시스템의 보안성을 확보해야 한다.
이러한 보안성 확보를 위해 OAuth2, JWT를 사용해 실습을 진행할 것이다.
OAuth2란?
- OAuth2는 토큰 기반의 인증 및 권한 부여 프로토콜이다.
- 클라이언트 애플리케이션이 리소스 소유자의 권한을 얻어 보호된 리소스에 접근할 수 있도록 한다.
- 리소스 소유자, 클라이언트, 리소스 서버, 인증 서버 총 네 가지 역할을 정의한다.
JWT란?
- JWT(JSON Web Token)는 JSON 형식의 자가 포함된 토큰으로, 클레임(claim)을 포함하여 사용자에 대한 정보를 전달한다.
- JWT는 헤더, 페이로드, 서명 총 세 부분으로 구성된다.
- JWT는 암호화를 통해 데이터의 무결성과 출처를 보장한다.
- https://jwt.io/ 사이트에서 JWT 토큰의 내용 확인이 가능하다.
실습
❗ 실습을 통해 클라우드 게이트웨이의 Pre 필터에서 JWT 인증을 진행해보자. 우선 이전의 API 게이트웨이 실습에서 사용한 모든 프로젝트를 복사하여 사용한다.여기에 Auth Service 를 생성하여 로그인 기능을 아주 간단하게 구현하여 보자.
게이트웨이 프로젝트에 Pre 필터를 하나 더 생성하여 로그인을 체크하여 보자.
아래 이미지의 점선만 실행하여 확인한다.
Auth Service
-
로그인을 담당하는 서비스 어플리케이션을 생성한다. 로그인을 진행하면 토큰을 발급받고 이 토큰을 사용하여 Gateway를 호출한다.
-
https://start.spring.io/ 를 사용하여 프로젝트를 생성합니다. 디펜던시는 아래와 같이 설정한다.
-
build.gradle 파일의 디펜던시를 아래와 같이 수정한다. ( jwt 추가 )
dependencies { implementation 'io.jsonwebtoken:jjwt:0.12.6' implementation 'org.springframework.boot:spring-boot-starter-actuator' implementation 'org.springframework.boot:spring-boot-starter-security' implementation 'org.springframework.boot:spring-boot-starter-web' implementation 'org.springframework.cloud:spring-cloud-starter-netflix-eureka-client' compileOnly 'org.projectlombok:lombok' annotationProcessor 'org.projectlombok:lombok' testImplementation 'org.springframework.boot:spring-boot-starter-test' testImplementation 'org.springframework.security:spring-security-test' testRuntimeOnly 'org.junit.platform:junit-platform-launcher' testImplementation 'io.projectreactor:reactor-test' } -
resources/application.yml(application.properties 파일은 삭제)
spring: application: name: auth-service eureka: client: service-url: defaultZone: http://localhost:19090/eureka/ service: jwt: access-expiration: 3600000 secret-key: "401b09eab3c013d4ca54922bb802bec8fd5318192b0a75f201d8b3727429080fb337591abd3e44453b954555b7a0812e1081c39b740293f765eae731f5a65ed1" server: port: 19095 -
AuthConfig.java
import org.springframework.context.annotation.Bean; import org.springframework.context.annotation.Configuration; import org.springframework.security.config.annotation.web.builders.HttpSecurity; import org.springframework.security.config.annotation.web.configuration.EnableWebSecurity; import org.springframework.security.config.http.SessionCreationPolicy; import org.springframework.security.web.SecurityFilterChain; @Configuration @EnableWebSecurity public class AuthConfig { // SecurityFilterChain 빈을 정의 // 이 메서드는 Spring Security의 보안 필터 체인을 구성 @Bean public SecurityFilterChain securityFilterChain(HttpSecurity http) throws Exception { http // CSRF 보호 비활성화 .csrf(csrf -> csrf.disable()) // 요청에 대한 접근 권한을 설정합니다. .authorizeRequests(authorize -> authorize // /auth/signIn 경로에 대한 접근을 허용 .requestMatchers("/auth/signIn").permitAll() // 그 외의 모든 요청은 인증이 필요 .anyRequest().authenticated() ) // 세션 관리 정책을 정의 // 여기서는 세션을 사용하지 않도록 STATELESS로 설정 .sessionManagement(session -> session .sessionCreationPolicy(SessionCreationPolicy.STATELESS) ); // 설정된 보안 필터 체인을 반환 return http.build(); } } -
AuthService.java
import io.jsonwebtoken.Jwts; import io.jsonwebtoken.io.Decoders; import io.jsonwebtoken.security.Keys; import org.springframework.beans.factory.annotation.Value; import org.springframework.stereotype.Service; import javax.crypto.SecretKey; import java.util.Date; @Service public class AuthService { @Value("${spring.application.name}") private String issuer; @Value("${service.jwt.access-expiration}") private Long accessExpiration; private final SecretKey secretKey; /** * AuthService 생성자. * Base64 URL 인코딩된 비밀 키를 디코딩하여 HMAC-SHA 알고리즘에 적합한 SecretKey 객체를 생성 * * @param secretKey Base64 URL 인코딩된 비밀 키 */ public AuthService(@Value("${service.jwt.secret-key}") String secretKey) { this.secretKey = Keys.hmacShaKeyFor(Decoders.BASE64URL.decode(secretKey)); } /** * 사용자 ID를 받아 JWT 액세스 토큰을 생성 * * @param user_id 사용자 ID * @return 생성된 JWT 액세스 토큰 */ public String createAccessToken(String user_id) { return Jwts.builder() // 사용자 ID를 클레임으로 설정 .claim("user_id", user_id) .claim("role", "ADMIN") // JWT 발행자를 설정 .issuer(issuer) // JWT 발행 시간을 현재 시간으로 설정 .issuedAt(new Date(System.currentTimeMillis())) // JWT 만료 시간을 설정 .expiration(new Date(System.currentTimeMillis() + accessExpiration)) // SecretKey를 사용하여 HMAC-SHA512 알고리즘으로 서명 .signWith(secretKey, io.jsonwebtoken.SignatureAlgorithm.HS512) // JWT 문자열로 컴팩트하게 변환 .compact(); } } -
AuthController.java
import lombok.AllArgsConstructor;
import lombok.Data;
import lombok.NoArgsConstructor;
import lombok.RequiredArgsConstructor;
import org.springframework.http.ResponseEntity;
import org.springframework.web.bind.annotation.GetMapping;
import org.springframework.web.bind.annotation.RequestParam;
import org.springframework.web.bind.annotation.RestController;

@RestController
@RequiredArgsConstructor
public class AuthController {

    private final AuthService authService;

    /**
     * 사용자 ID를 받아 JWT 액세스 토큰을 생성하여 응답
     *
     * @param user_id 사용자 ID
     * @return JWT 액세스 토큰을 포함한 AuthResponse 객체를 반환
     */
    @GetMapping("/auth/signIn")
    public ResponseEntity<?> createAuthenticationToken(@RequestParam String user_id){
        return ResponseEntity.ok(new AuthResponse(authService.createAccessToken(user_id)));
    }

    /**
     * JWT 액세스 토큰을 포함하는 응답 객체
     */
    @Data
    @AllArgsConstructor
    @NoArgsConstructor
    static class AuthResponse {
        private String access_token;

    }
}
7.4.2 Cloud Gateway
- 기존 게이트웨이 코드에 JWT인증 및 auth-service 라우팅 정보를 추가한다.
build.gradle파일에 필요한 의존성을 추가한다. ( jwt 추가 )dependencies { implementation 'io.jsonwebtoken:jjwt:0.12.6' implementation 'org.springframework.boot:spring-boot-starter-actuator' implementation 'org.springframework.cloud:spring-cloud-starter-gateway' implementation 'org.springframework.cloud:spring-cloud-starter-netflix-eureka-client' compileOnly 'org.projectlombok:lombok' annotationProcessor 'org.projectlombok:lombok' testImplementation 'org.springframework.boot:spring-boot-starter-test' testImplementation 'io.projectreactor:reactor-test' testRuntimeOnly 'org.junit.platform:junit-platform-launcher' }- application.yml 을 다음과 같이 수정합니다.
server: port: 19091 # 게이트웨이 서비스가 실행될 포트 번호 spring: main: web-application-type: reactive # Spring 애플리케이션이 리액티브 웹 애플리케이션으로 설정됨 application: name: gateway-service # 애플리케이션 이름을 'gateway-service'로 설정 cloud: gateway: routes: # Spring Cloud Gateway의 라우팅 설정 - id: order-service # 라우트 식별자 uri: lb://order-service # 'order-service'라는 이름으로 로드 밸런싱된 서비스로 라우팅 predicates: - Path=/order/** # /order/** 경로로 들어오는 요청을 이 라우트로 처리 - id: product-service # 라우트 식별자 uri: lb://product-service # 'product-service'라는 이름으로 로드 밸런싱된 서비스로 라우팅 predicates: - Path=/product/** # /product/** 경로로 들어오는 요청을 이 라우트로 처리 - id: auth-service # 라우트 식별자 uri: lb://auth-service # 'auth-service'라는 이름으로 로드 밸런싱된 서비스로 라우팅 predicates: - Path=/auth/signIn # /auth/signIn 경로로 들어오는 요청을 이 라우트로 처리 discovery: locator: enabled: true # 서비스 디스커버리를 통해 동적으로 라우트를 생성하도록 설정 eureka: client: service-url: defaultZone: http://localhost:19090/eureka/ # Eureka 서버의 URL을 지정 service: jwt: secret-key: "401b09eab3c013d4ca54922bb802bec8fd5318192b0a75f201d8b3727429080fb337591abd3e44453b954555b7a0812e1081c39b740293f765eae731f5a65ed1" - LocalJwtAuthenticationFilter.java
import io.jsonwebtoken.Claims;
import io.jsonwebtoken.Jws;
import io.jsonwebtoken.Jwts;
import io.jsonwebtoken.io.Decoders;
import io.jsonwebtoken.security.Keys;
import lombok.extern.slf4j.Slf4j;
import org.springframework.beans.factory.annotation.Value;
import org.springframework.cloud.gateway.filter.GatewayFilterChain;
import org.springframework.cloud.gateway.filter.GlobalFilter;
import org.springframework.http.HttpStatus;
import org.springframework.stereotype.Component;
import org.springframework.web.server.ServerWebExchange;
import reactor.core.publisher.Mono;

import javax.crypto.SecretKey;
@Slf4j
@Component
public class LocalJwtAuthenticationFilter implements GlobalFilter {

    @Value("${service.jwt.secret-key}")
    private String secretKey;

    @Override
    public Mono<Void> filter(ServerWebExchange exchange, GatewayFilterChain chain) {
        String path = exchange.getRequest().getURI().getPath();
        if (path.equals("/auth/signIn")) {
            return chain.filter(exchange);  // /signIn 경로는 필터를 적용하지 않음
        }

        String token = extractToken(exchange);

        if (token == null || !validateToken(token)) {
            exchange.getResponse().setStatusCode(HttpStatus.UNAUTHORIZED);
            return exchange.getResponse().setComplete();
        }

        return chain.filter(exchange);
    }

    private String extractToken(ServerWebExchange exchange) {
        String authHeader = exchange.getRequest().getHeaders().getFirst("Authorization");
        if (authHeader != null && authHeader.startsWith("Bearer ")) {
            return authHeader.substring(7);
        }
        return null;
    }

    private boolean validateToken(String token) {
        try {
            SecretKey key = Keys.hmacShaKeyFor(Decoders.BASE64URL.decode(secretKey));
            Jws<Claims> claimsJws = Jwts.parser()
                    .verifyWith(key)
                    .build().parseSignedClaims(token);
            log.info("#####payload :: " + claimsJws.getPayload().toString());

            // 추가적인 검증 로직 (예: 토큰 만료 여부 확인 등)을 여기에 추가할 수 있음
            return true;
        } catch (Exception e) {
            return false;
        }
    }

}
7.4.3 RUN
-
유레카 서버 ⇒ 게이트웨이⇒ 인증 ⇒ 상품 순으로 어플리케이션을 실행한다.
-
http://localhost:19090 에 접속하여 각 인스턴스를 확인한다.

-
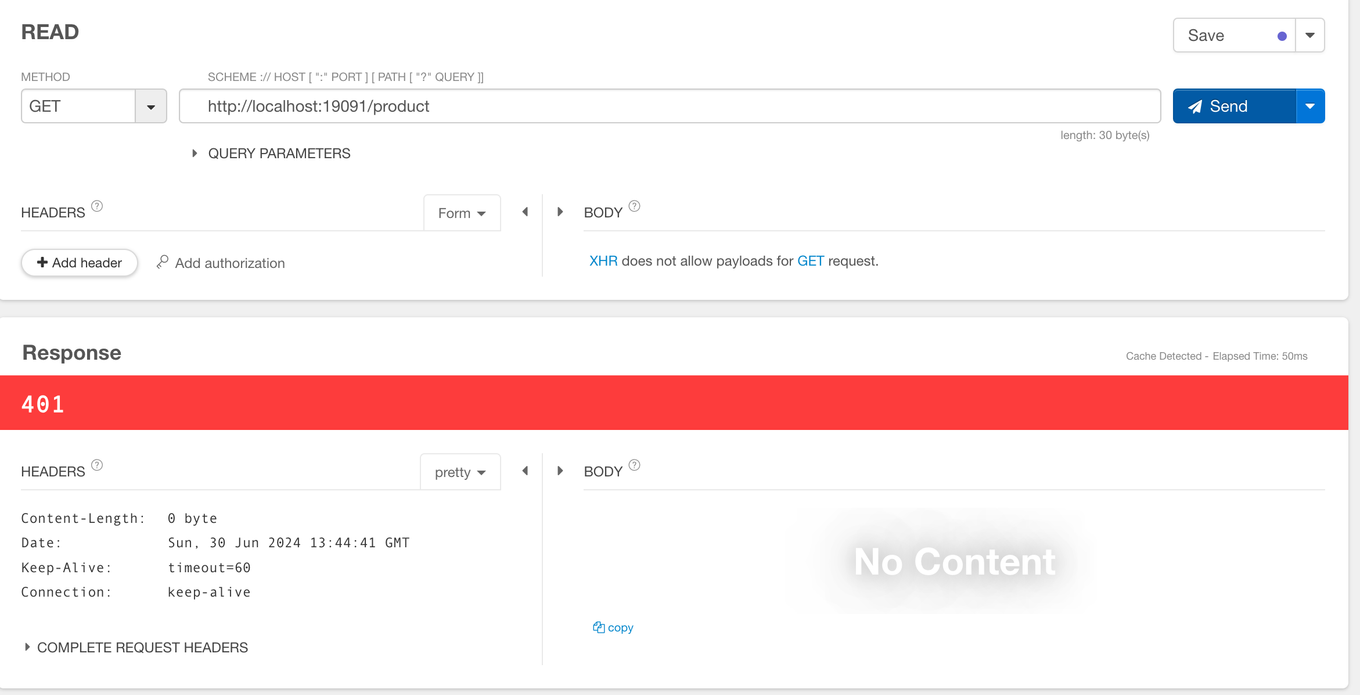
게이트웨이에서 상품을 요청해 보자. 401 에러가 발생하는것을 확인할 수 있다.
-
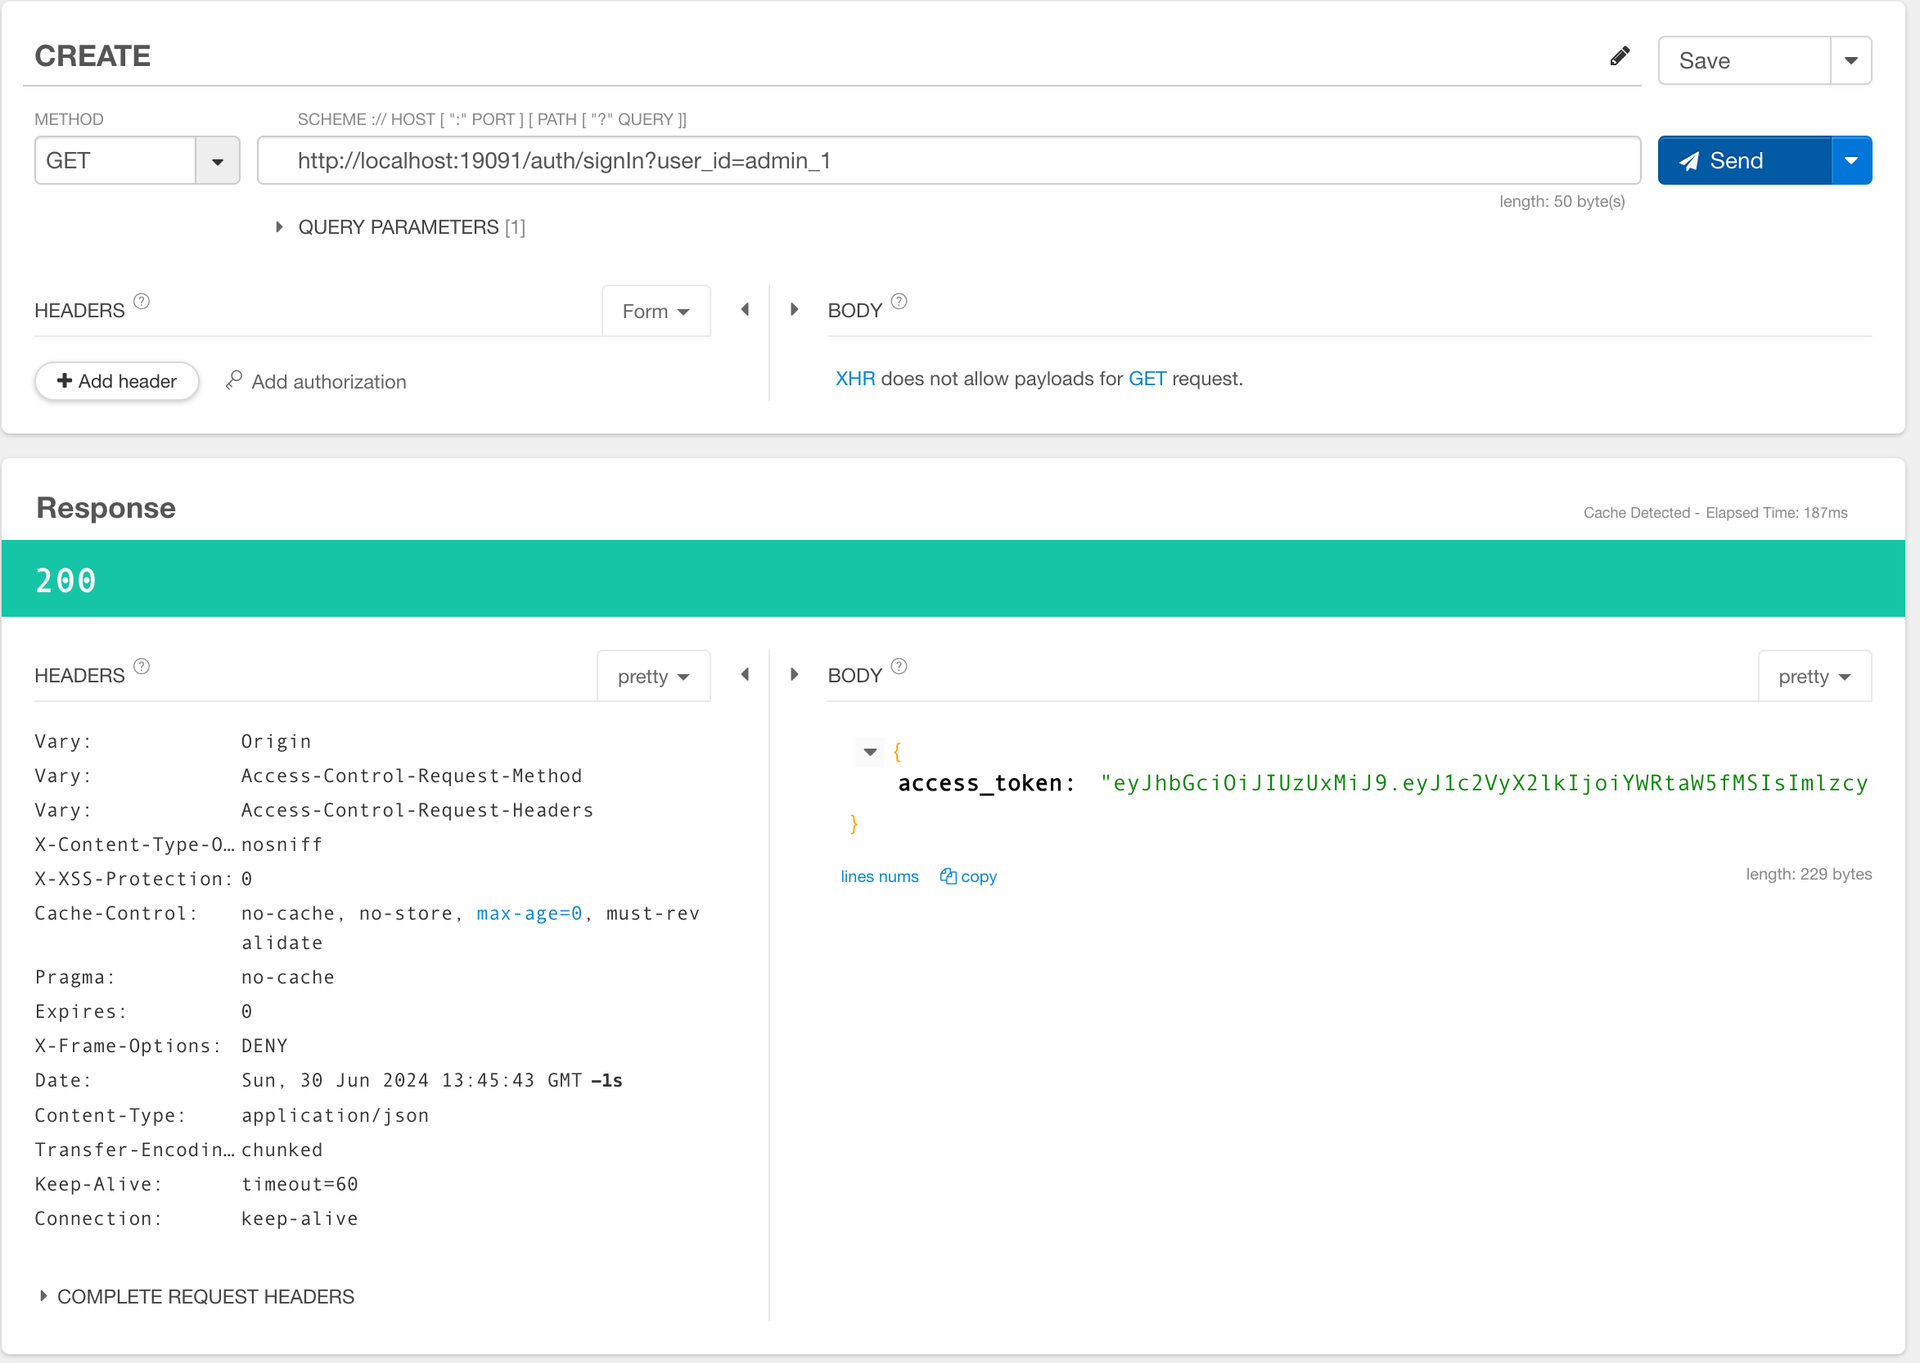
게이트웨이에서 로그인을 요청하여 토큰을 발급받아보자.
-
해당 토큰을 상품요청에 헤더에 넣어서 요청한다.
요청을 통해 정상적으로 응답이 오는 것을 볼 수 있다.
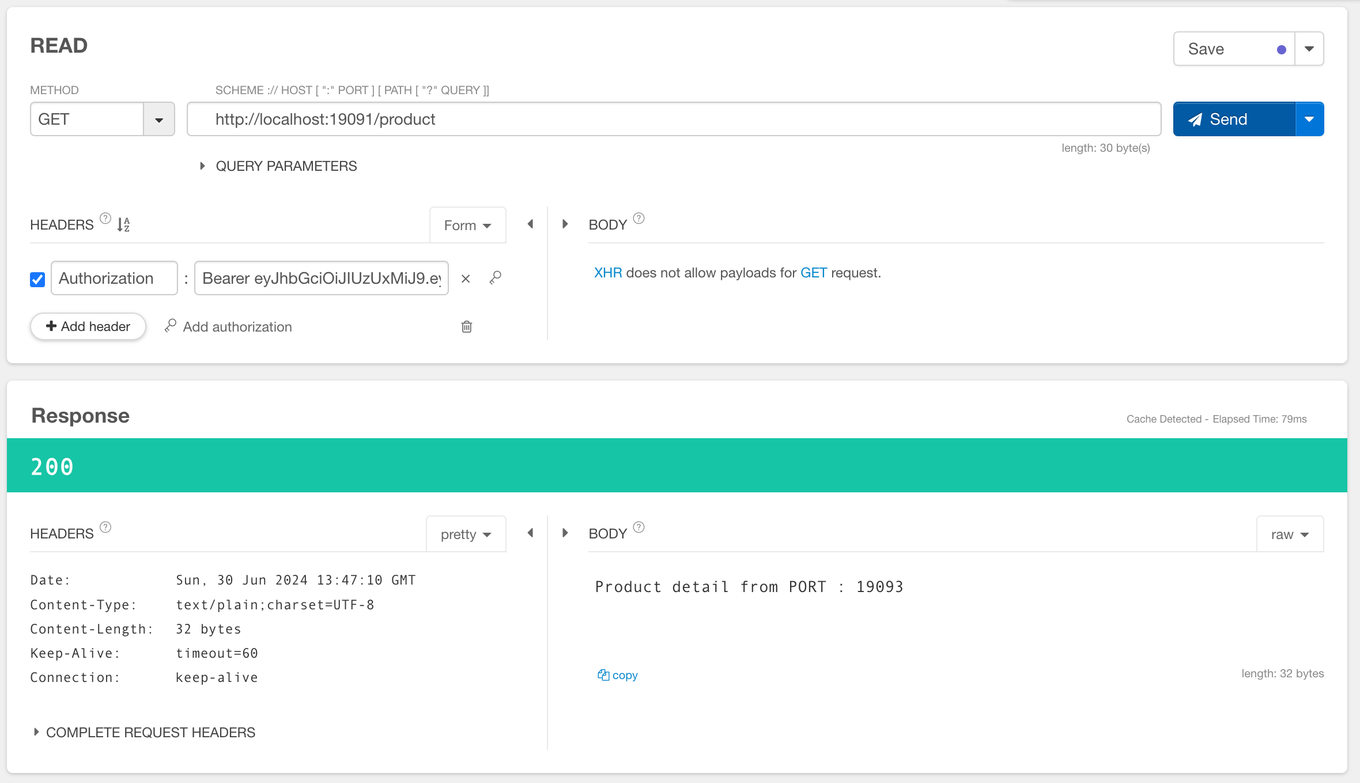
❗ 요청 헤더에 Bearer를 적은 후 토큰을 입력하는 것을 확인할 수 있다.
- 여기서 Bearer 란?
Bearer는 OAuth 2.0 프로토콜에서 사용하는 인증 토큰 유형 중 하나로, 액세스 토큰을 통해 보호된 리소스에 접근할 수 있도록 한다.Bearer토큰은 요청 헤더에 포함되어 서버에 전달되며, 서버는 이를 검증하여 요청이 유효한지 확인한다.- 간단한 사용법: 클라이언트는 서버에서 받은
Bearer토큰을 HTTP 요청 헤더에 포함시키기만 하면 된다 - 서버 측 검증: 서버는 이 토큰을 검증하여 요청이 인증된 사용자의 요청인지 확인한다. 일반적으로 토큰의 유효성, 만료 시간 등을 확인한다.
- 보안:
Bearer토큰은 HTTPS를 통해 전달되어야 한다. 이를 통해 토큰이 전송 중에 도난당하지 않도록 보호할 수 있다.
- 여기서 Bearer 란?
