(아키텍처 내 왼쪽에 해당하는)
2019년 겨울 프로젝트 정리 2 - from Twitter API to Kafka
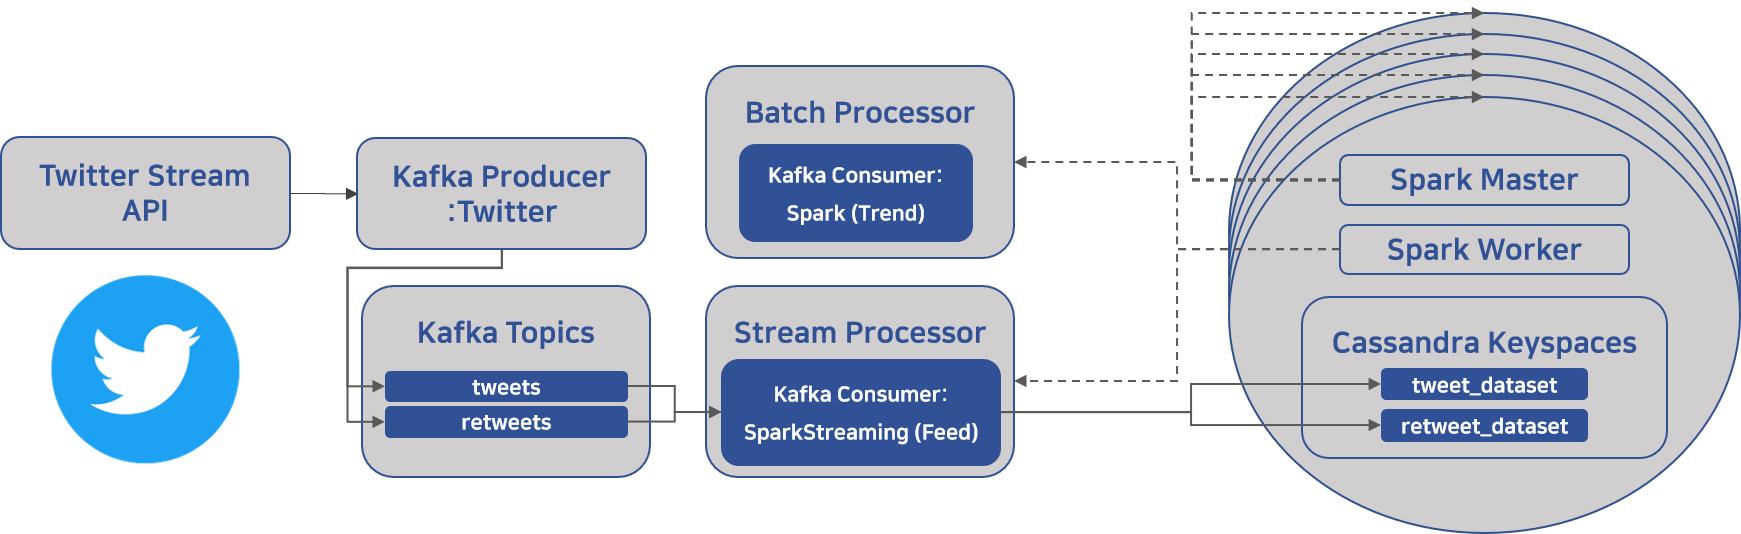
TweetDeck Clone Project
= 데이터 파이프라인 및 tweet 실시간 피드 개발
Twitter API로부터 실시간 tweet들을 받아서 tweet과 retweet으로 분리하여 Kafka에 보내는 부분에 대해 설명해보려 한다.
- API - Filter realtime Tweets
- Code - TwitterKafkaProducer.py
- Specs
- CentOS Linux release 7.7.1908
- Java 8
- kafka_2.11-2.1.1
🚨Twitter API를 사용하려면, 개발자 승인을 받아야 한다.🚨
(필자의 경우 신청 후 2주 뒤어 승인되었음)
쉽게 진행했던 부분
Kafka 설치 및 topic 생성
-
본 게시글에는 damage를 최소화하기 위해 User를 생성하여 Kafka 실행을 관리하는데, 그냥 devcampadm으로 설정하였다.
(어차피 root와 devcampadm 두 계정으로 서버 관리할 예정) -
필자는 오픈소스를 설치할 때 주로 소스 코드가 아닌 binary zip을 다운 받아 실행 파일을 그저 실행한다.
> su -l kafka

# ~/은 User에 따른 Default Path
> mkdir ~/Download

> curl "https://www.apache.org/dist/kafka/2.1.1/kafka_2.11-2.1.1.tgz" -o ~/Downloads/kafka.tgz

> mkdir ~/kafka && cd ~/kafka

# We specify the --strip 1 flag to ensure that
# the archive’s contents are extracted in ~/kafka/ itself
# and not in another directory (such as ~/kafka/kafka_2.11-2.1.1/) inside of it.
> tar -xvzf ~/Download/kafka.tgz --strip 1

# Creating Systemd Unit Files and Starting the Kafka Server
> sudo vi /etc/systemd/system/zookeeper.service
# 여기서 오류가 많이 발생했는데, 알고보니 PATH 및 User 설정 때문

# 시작
> sudo systemctl start kafka

# 로그 확인
> sudo journalctl -u kafka

# 서버 실행 시 자동으로 실행시키려면
> sudo systemctl enable kafka

# 정지
> sudo systemctl stop kafka
토픽 생성 및 분산 처리 관련된 설정도 모두 포함하고 있으니 나중에 참고
Kafka 관련 명령어
간단하게 정리해보았다.
# zookeeper 실행(환경 변수 ZOOKEEPER_HOME 존재)
>> zkServer

# kafka 실행
>> bin/kafka-server-start.sh config/server.properties

# kafka Topic List
>> bin/kafka-topics.sh --list --zookeeper localhost:2181

# kafka Topic Create
>> bin/kafka-topics.sh --create --zookeeper localhost:2181 --replication-factor 1 --partitions 1 --topic Test

# kafka Topic Deletion (config -> delete.topic.enable=true)
>> bin/kafka-topics.sh --zookeeper localhost:2181 --topic <topic_name> --delete

# kafka Version 확인
>> find ./libs/ -name \*kafka_\* | head -1 | grep -o '\kafka[^\n]*'

# kafka Queue Messages 확인
>> bin/kafka-console-consumer.sh --bootstrap-server localhost:9092 --topic test --from-beginning
Twitter API를 활용해 Kafka로 메시지 보내기
python으로 Twitter API를 활용하는데 도움을 주는 다양한 라이브러리가 존재하는데, 필자는 tweepy를 사용하였다.
tweepy 내 streaming 예시
from __future__ import absolute_import, print_function

from tweepy import OAuthHandler, Stream, StreamListener

# Go to http://apps.twitter.com and create an app.
# The consumer key and secret will be generated for you after
consumer_key=""
consumer_secret=""

# After the step above, you will be redirected to your app's page.
# Create an access token under the the "Your access token" section
access_token=""
access_token_secret=""

class StdOutListener(StreamListener):
    """ A listener handles tweets that are received from the stream.
    This is a basic listener that just prints received tweets to stdout.
    """
    def on_data(self, data):
        print(data)
        return True

    def on_error(self, status):
        print(status)

if __name__ == '__main__':
    l = StdOutListener()
    auth = OAuthHandler(consumer_key, consumer_secret)
    auth.set_access_token(access_token, access_token_secret)

    stream = Stream(auth, l)
stream.filter(track=['basketball'])-
데이터 형태는 NoSQL로 데이터 스키마 및 Twitter의 프로세스를 이해해야 데이터를 다룰 수 있다. (차후 처리 과정에서 간단히 설명할 예정)
-
위 코드를 살펴보면, Listener를 통해 데이터가 유입되면서 on_data 함수가 실행되게 된다. 저 순간에 Kafka로 데이터를 보내주면 된다.
-
그리하여 만든 코드가 바로, TwitterKafkaProducer.py
(코드를 적기에는 길어져서 생략)- 할 수 예외 처리를 최대한 담았고,
- 여기저기 예시 코드를 둘러보면서 예쁘게 짜려고 노력했다.
- 그럼에도 부족하지만, 참고하실 분들은 환영합니다.
(지금 다시보면 많이 부족하다. 사실 데이터를 다룰 때 항상 스키마 유효성 검증 및 메타 데이터로써 관리가 필요하다)
추가 필독 자료
Kafka 에러 핸들링 - kafka.errors.KafkaError Python Example
Kafka topic 아키텍처 - Kafka Topic Architecture
어렵게 진행했던 부분
Kafka Configuration에서 중요한 것들
설정한 것들

Essential
broker.id→ The broker id for this server. If unset, a unique broker id will be generatedlog.dirs→ The directories in which the log data is keptzookeeper.connect
Important
log.retention.hours=72 (너무 크면 데이터 폭파 위험)delete.topic.enable=true (이거 없으면, 표시만 되고 삭제되지 않아 데이터 폭파 위험)allow.auto.create.topics→ Allow automatic topic creation on the broker when subscribing to or assigning a topic. A topic being subscribed to will be automatically created only if the broker allows for it usingauto.create.topics.enablebroker configuration. This configuration must be set tofalsewhen using brokers older than 0.11.0auto.create.topics.enable→ Enable auto creation of topic on the server- 이 친구 때문에 Error Handling을 고생했다. 존재하지 않는 토픽이라서 오류가 나야하는데 너무나 잘 흘러갔었던...
ETC
추가로 하기로 마음만 먹었던 사항들...
- offset 관리
- partition 관리
- broker 관리
- data replication 관리
Producer 생성 시 추가 설정 및 Data Sending 관련 handling
- 사용한 코드
try:
    self.producer = KafkaProducer(
        bootstrap_servers = bootstrap_servers,
        max_block_ms = 10000,
        retries = 0, # default value
        acks = 1, # default value
        value_serializer = lambda v: json.dumps(v).encode("utf-8")
    )
except KafkaError as exc:
    print("kafka producer - Exception during connecting to broker - {}".format(exc))
    return False
# Asynchronous by default
future = self.producer.send(topic, data).add_callback(self.on_send_success).add_errback(self.on_send_error)
# Block for 'synchronous' sends
try:
record_metadata = future.get(timeout=1)
except KafkaError as e:
# Decide what to do if produce request failed
log.exception()
return e
# block until all async messages are sent
self.producer.flush()-
max_block_ms→ Number of milliseconds to block during send() and partitions_for().- 가장 중요한 부분이 바로 send() 부분인데, 이 부분에서 카프카 특성 상 실패 시 재요청을 자동으로 하게 된다. 이때 시간 제한을 두어서 에러를 발생시킨다.
-
value_serializer→ used to convert user-supplied message values to bytes.
- kafka-python 의
send()를 살펴보면, value 조건에 type bytes를 볼 수 있다. 따라서 value를 bytes로 변환시켜 카프카에 전송하도록 하였다.
- kafka-python 의
-
acks→ 카프카에 메세지를 보내고, 잘 받았는지 level에 따라서 분류하는데, default는 1로써 자신이 보낸 메시지에 대해 카프카의 leader가 메시지를 받았는지 기다린다. follower들은 확인하지 않습니다.
retweet과 tweet으로 분류하는 과정
json 형태로 들어오는 raw data에 대한 분석이 필요하고,
분석을 위해서는 기본적으로 Twitter에 대해서 알아야 한다.
전반적인 데이터 처리 흐름은 Spark를 설명하면서 하고,
간단하게 설명하면,
if 'retweeted_status' in data:
    try:
        self.producer.send_data("retweets", data)
    except KafkaError as e:
        print(e)
        return False

elif 'in_reply_to_status_id' in data:
    try:
        self.producer.send_data("tweets", data)
    except KafkaError as e:
        print(e)
        return False

elif 'delete' in data:
    print(data)
    pass
elif 'event' in data:
    print(data)
    pass
elif 'direct_message' in data:
    print(data)
    pass
elif 'friends' in data:
    print(data)
    pass
elif 'limit' in data:
    print(data)
    pass
elif 'disconnect' in data:
    print(data)
    pass
elif 'warning' in data:
    print(data)
    pass
elif 'scrub_geo' in data:
    print(data)
    pass
elif 'status_withheld' in data:
    print(data)
    pass
elif 'user_withheld' in data:
    print(data)
    pass
else:
log.error("Unknown message type: %s", raw_data)retweeted_status를 통해 retweet을in_reply_to_status_id를 통해 tweet을 걸러주었다.- 아래 예외 처리를 살펴보면 두 가지 말고도 수 많은 종류의 데이터가 들어온다
- 이를 다 공부할 순 없고, 며칠 간의 데이터를 확인하면서, 위와 같은 처리를 통해 tweet과 retweet을 구분하였다.
Tweet 구분하기
- Tweet
- Normal → 일반적인 글쓰기

- Reply → 어떤 게시글에 Reply 버튼을 눌러서 작성

- Quoted Tweet → 의견을 덧붙여서 리트윗하기로 작성.
"retweeted":false

- Normal → 일반적인 글쓰기
- Retweet
- 그냥 곧바로 리트윗만. 게시글 클릭 시 원글로 이동한다.

Twitter API Raw Data
- 아래는 (길이초과 + 해시태크 + 영상 + Reply + Quote 짬뽕) 인 Tweet Raw 데이터이다.
// 글 자체에 대한 URL은 존재하지 않는다.
{
    "created_at":"Tue Jan 28 02:21:06 +0000 2020",
    "id":1221981496820453376,
    "id_str":"1221981496820453376",
    "text":"smilegateserverdev #smilegateserverdev\nsmilegateserverdev #smilegateserverdev\nsmilegateserverdev\u2026 https:\/\/t.co\/tolbTYmZU5",
    "display_text_range":[
        0,
        140
    ],
    "source":"\u003ca href=\"https:\/\/mobile.twitter.com\" rel=\"nofollow\"\u003eTwitter Web App\u003c\/a\u003e",

    // **길이 제한 생략** (항상 존재)
    "truncated":true,

    // **Reply Data** (아래 5개) (항상 존재)
    "in_reply_to_status_id":null,
    "in_reply_to_status_id_str":null,
    "in_reply_to_user_id":null,
    "in_reply_to_user_id_str":null,
    "in_reply_to_screen_name":null,

    // **User Data** (항상 존재)
    "user":{...},

    "geo":null,
    "coordinates":null,
    "place":null,
    "contributors":null,

    // **Retweet Data** (Retweet이 아니라면 생략)
    "retweeted_status":{...},

    // **Quoted Data** (아래 5개) (Quoted가 없다면 상위 4개 생략)
    "quoted_status_id":1222013115358990336,
    "quoted_status_id_str":"1222013115358990336",
    "quoted_status":{...},
    "quoted_status_permalink":{...},
    "is_quote_status":false,

    // **초과된 데이터** (Text 관련) (없다면 생략)
    "extended_tweet":{...},

    "quote_count":0,
    "reply_count":0,
    "retweet_count":0,
    "favorite_count":0,

    // **Entity** (해시태그, URL, User_mentions, Symbols 등) (항상 존재)
    "entities":{...},

    // **영상 사진 데이터** (영상 및 사진 관련) (없다면 생략)
    "extended_entities":{...},

    "favorited":false,
    // **Retweet** (항상 존재)
    "retweeted":false,
    "possibly_sensitive":false,
    "filter_level":"low",
    "lang":"it",
    "timestamp_ms":"1580178066817"
}
다음은 Spark Streaming을 활용한 데이터 처리를 다룰 것이다.🙋♂️