
본 포스팅은 "Do it! LLM을 활용한 AI 에이전트 개발 입문"을 독학하며 쓴 글입니다.
내돈내산 포스팅임을 참고해주시면 감사하겠습니다.
2026년 2월 11일 기준으로 작성되었습니다.
Chapter 6
AI 투자자
본 포스팅에서는 펑션 콜링에 대해 알아보고 이를 활용하는 코드를 작성해보겠습니다
1. 펑션 콜링의 기초
이전 포스팅에서 GPT와 멀티턴 대화하는 챗봇을 만들 때(multi_turn.py) "지금 몇시야?" 라는 질문을 하면
챗봇이 대답을 할 수 없다는 답변을 받게 된다
GPT와 같은 언어모델은 똑똑하지만 현재 시간이 몇시인지, 현재 날씨가 어떠한지 등과 같은 작업은 수행할 수 없다
이러한 GPT의 한계를 극복하기 위해 오픈AI에서는 펑션 콜링(Function Calling)기능을 제공한다
펑션 콜링을 이용하면 GPT에게 함수와 그에 관한 설명을 제공하고 상황에 맞는 특정 함수를 호출하도록 할 수 있다
그리고 GPT는 함수의 실행 결과를 해석해서 사용자에게 답변을 제공하는 것이다
오픈AI에서는 펑션 콜링 기능에 사용할 수 있는 함수를 담은 도구 목록을 딕셔너리 형태로 정의한다
만약 사용자가 '지금 몇시야?'라는 질문을 한다면 GPT는 이 도구 목록에서 시간을 확인할 수 있는 도구를 찾고 그 도구를 사용해서 답변하는 것이다
우리가 이전에 만든 챗본세 펑션 콜링을 적용해서 지금이 몇 시인지 GPT가 대답할 수 있도록 해보자
# gpt_functions.py
from datetime import datetime

def get_current_time():
  now = datetime.now().strftime("%Y-%m-%d %H:%M:%S")
  print(now)
  return now

if __name__ == "__main__":
  get_current_time()
일단 위와 같이 간단하게 현재 시간을 불러오는 함수를 작성해보자
이 코드를 실행시키면 지금 현재 시간을 결과로 확인할 수 있다
위 함수를 펑션 콜링 기능으로 활용하기 위해 설명을 추가해보자
앞에서 설명한것 처럼 딕셔너리 형태로 해당 함수의 이름과 어떤 기능을 하는지 설명을 추가했다
from datetime import datetime

def get_current_time():
  now = datetime.now().strftime("%Y-%m-%d %H:%M:%S")
  print(now)
  return now

tools = [
  {
    "type" : "function",
    "function" :
      {"name" : "get_current_time",
      "description" : "현재 날짜와 시간을 반환합니다",
      }
  }
]

if __name__ == "__main__":
  get_current_time()
이제 multi_turn.py에서 만든 코드를 끌어와서 재활용해보자!!
# what_time_is_it_terminal.py
from gpt_functions import get_current_time, tools
from openai import OpenAI
from dotenv import load_dotenv
import os

load_dotenv()
api_key = os.getenv('OPENAI_API_KEY')

client = OpenAI(api_key = api_key)

def get_ai_response(messages, tools = None):
  response = client.chat.completions.create(
    model = "gpt-4o",
    messages = messages,
    tools = tools
  )

  return response
위 코드에서 확인해야 할 부분은 다음과 같다
- def get_ai_response(messages, tools = None):
get_ai_response 의 매개변수 부분에 tools = None으로 추가해준다
이 tools를 client.chat.completions에서 활용한다
아래 부분에 다음과 같은 코드도 추가해준다
messages = [
  {"role" : "system", "content" : "너는 사용자를 도와주는 상담사야"},
]

while True:
  user_input = input("사용자\t: ")

  if user_input == "exit":
    break

  messages.append({"role" : "user", "content" : user_input})
  ai_response = get_ai_response(messages, tools = tools)
  ai_message = ai_response.choices[0].message
  print(ai_message)

  tool_calls = ai_message.tool_calls
  if tool_calls:
    tool_name = tool_calls[0].function.name
    tool_call_id = tool_calls[0].id

    if tool_name == "get_current_time":
      messages.append({
        "role" : "function",
        "tool_call_id" : tool_call_id,
        "name" : tool_name,
        "content" : get_current_time(),   # 함수 실행 결과를 content로 설정
      })


    ai_response = get_ai_response(messages, tools = tools)
    ai_message = ai_response.choices[0].message

  messages.append(ai_message)

  print("AI\t: " + ai_message.content)
- tool_calls = ai_message.tool_calls
만약 GPT가 특정 함수를 실행해야 한다고 판단하면 ai_message의 tool_calls 라는 속성에 실행할 함수의 정보가 포함된다
즉, tool_calls가 있다면 함수를 실행해야 한다고 GPT가 판단한 것이다
여기서 실행할 함수명과 펑션 콜링의 id를 받아온다
- ai_response = get_ai_response(messages, tools = tools)
tool_calls가 있는 경우 get_ai_response 함수에 gpt_functions.py 에서 정의한 tools 딕셔너리를 함수에 같이 전달해준다
위 코드를 실행시킨 결과를 다음과 같이 확인할 수 있다
사용자  : 안녕
ChatCompletionMessage(content='안녕하세요! 무엇을 도와드릴까요?', refusal=None,
role='assistant', audio=None, function_call=None, tool_calls=None, annotations=[])
AI      : 안녕하세요! 무엇을 도와드릴까요?

사용자  : 지금 몇시야?
ChatCompletionMessage(content=None, refusal=None, role='assistant', audio=None, function_call=None,
tool_calls=[ChatCompletionMessageToolCall(id='call_wORBWm9u2qsVHrJw3i5fy8Tw',
function=Function(arguments='{}', name='get_current_time'), type='function')], annotations=[])
2026-02-11 03:35:14
AI      : 지금 시간은 2026년 2월 11일 오전 3시 35분입니다.
사용자  :
이렇게 펑션 콜링을 사용하니까 현재 시간을 정확하게 대답해준다!!
하지만 여기서 한가지 문제가 있다
GPT는 현재 내 위치를 모른다는 것인데 그렇기 때문에 해당 시각이 어느 지역에 해당하는 시간인지 알 수 없다
그렇기 때문에 내가 갑자기 영국의 시간을 물어본다면 GPT는 이상한 답변을 하게 된다
이 문제를 해결해보기 위해 pytz 라이브러리를 사용해보려 한다
pytz 라이브러리는 타임존 정보를 입력하면 지역별 시간을 알 수 있다
2. 각 도시별 시간 알려주기
pytz 라이브러리를 활용해서 GPT가 특정 도시의 시간을 알려줄 수 있도록 구현해보자
우선 gpt_functions.py를 아래와 같이 수정한다
get_current_time에 timezone을 명시하도록 매개변수로 지정한다
또한 description의 내용을 수정하였으며 테스트로 get_current_time()에 'America/New_York'를 추가했다
from datetime import datetime
import pytz

def get_current_time(timezone : str = "Asia/Seoul"):
  tz = pytz.timezone(timezone)
  now = datetime.now(tz).strftime("%Y-%m-%d %H:%M:%S")

  now_timezone = f'{now} {timezone}'
  print(now_timezone)
  return now_timezone

tools = [
  {
    "type" : "function",
    "function" :
      {"name" : "get_current_time",
      "description" : "해당 타임존의 날짜와 시간을 반환합니다",
      "parameters" : {
        "type" : "object",
        "properties" : {
          'timezone' : {
            'type' : 'string',
            'description' : '현재 날짜와 시간을 반환할 타임존을 입력하세요. (예 : Asia/Seoul)',
            }
          },
          "required" : ['timezone']
        }
      }
  }
]

if __name__ == "__main__":
  get_current_time('America/New_York')
- "required" : ['timezone']
해당 함수를 실행하기 위해서는 무조건 timezone 파라미터가 있어야 한다고 명시한다
다음으로 what_time_is_it_terminal.py 에서도 추가한 타임존 정보를 반영해보자
GPT가 JSON 형태의 문자열을 반환할때 읽기 위해 JSON 라이브러리를 추가로 import 해야한다
위의 what_time_is_it_terminal.py에서 while 문만 아래와 같이 변경하였다
import json

while True:
  user_input = input("사용자\t: ")

  if user_input == "exit":
    break

  messages.append({"role" : "user", "content" : user_input})
  ai_response = get_ai_response(messages, tools = tools)
  ai_message = ai_response.choices[0].message
  print(ai_message)

  tool_calls = ai_message.tool_calls
  if tool_calls:
    tool_name = tool_calls[0].function.name
    tool_call_id = tool_calls[0].id

    # 추가된 부분
    arguments = json.loads(tool_calls[0].function.arguments)

    if tool_name == "get_current_time":
      messages.append({
        "role" : "function",
        "tool_call_id" : tool_call_id,
        "name" : tool_name,
        "content" : get_current_time(timezone = arguments['timezone']),   # 함수 실행 결과를 content로 설정
      })


    ai_response = get_ai_response(messages, tools = tools)
    ai_message = ai_response.choices[0].message

  messages.append(ai_message)

  print("AI\t: " + ai_message.content)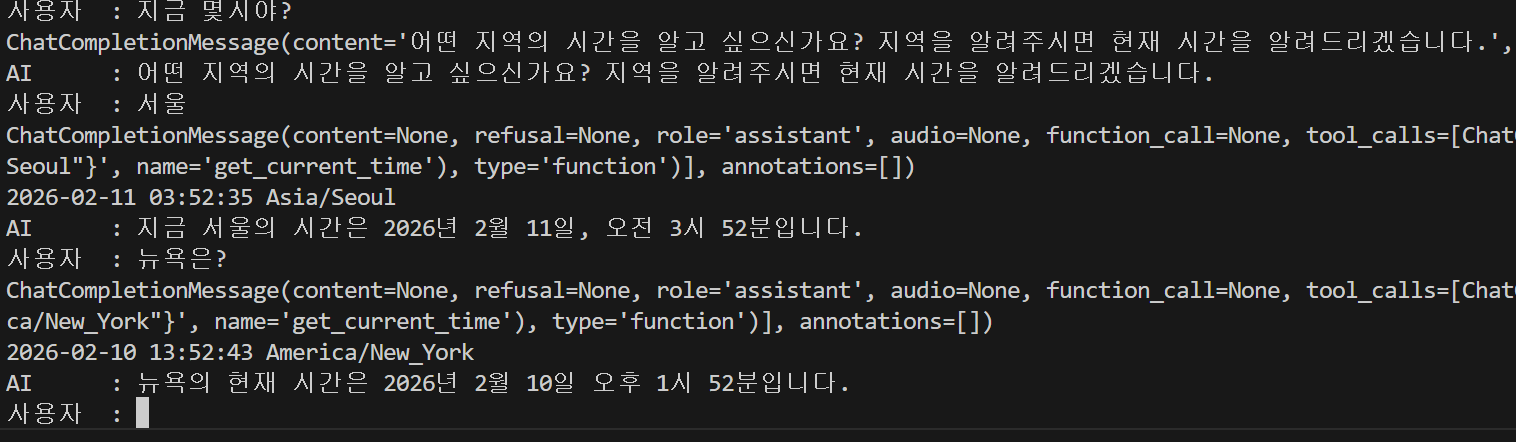
위 코드를 실행시켜보니 이제 GPT가 어느 지역의 시간을 요구하는지 물어보고 사용자가 물어본 지역에 맞게 시간을 알려주는 것을 볼 수 있다!!
3. 여러 도시의 시간을 한번에 대답할 수 있게 하기
앞에서 만든 챗봇에서 한 번에 여러 도시의 시간을 물어보면 명확하게 답을 해주지 못하는 경우가 많다
심지어 GPT가 여러 함수를 한번에 실행하려고 계획을 한다면 현재 코드에서는 함수 호출을 한번만 할 수 있게 되어서 오류가 발생하기도 한다
이런 단점을 극복하기 위해 여러 함수가 연속으로 실행되고 GPT가 이를 차례로 실행할 수 있도록 코드를 수정해보자
for 반복문을 사용하면 생각보다 간단하게 수정할 수 있다
while True:
  user_input = input("사용자\t: ")

  if user_input == "exit":
    break

  messages.append({"role" : "user", "content" : user_input})
  ai_response = get_ai_response(messages, tools = tools)
  ai_message = ai_response.choices[0].message
  print(ai_message)

  tool_calls = ai_message.tool_calls
  if tool_calls:
    # 반복문을 이용해서 함수를 차례대로 실행할 수 있도록 함
    for tool_call in tool_calls:
      tool_name = tool_call.function.name
      tool_call_id = tool_call.id

      # 추가된 부분
      arguments = json.loads(tool_call.function.arguments)

      if tool_name == "get_current_time":
        messages.append({
          "role" : "function",
          "tool_call_id" : tool_call_id,
          "name" : tool_name,
          "content" : get_current_time(timezone = arguments['timezone']),   # 함수 실행 결과를 content로 설정
        })

    messages.append({"role" : "system", "content" : "이제 주어진 결과를 바탕으로 답변할 차례다"})

    ai_response = get_ai_response(messages, tools = tools)
    ai_message = ai_response.choices[0].message

  messages.append(ai_message)

  print("AI\t: " + ai_message.content)
사용자 : 뉴욕 태국 런던의 시간을 알려줘
ChatCompletionMessage(content=None, refusal=None, role='assistant', audio=None, function_call=None,
tool_calls=[ChatCompletionMessageToolCall(id='call_Vmk6mlsJsIWWAjlbo9UAlyC0', function=Function(arguments='{"timezone": "America/New_York"}', name='get_current_time'), type='function'),
ChatCompletionMessageToolCall(id='call_p4nwtAw5f1O8BDDe8LX6d2NG',
function=Function(arguments='{"timezone": "Asia/Bangkok"}', name='get_current_time'), type='function'),
ChatCompletionMessageToolCall(id='call_h9gQdj9DWXTTICDOg3NS5ZJ9',
function=Function(arguments='{"timezone": "Europe/London"}', name='get_current_time'), type='function')], annotations=[])
2026-02-10 13:57:47 America/New_York
2026-02-11 01:57:47 Asia/Bangkok
2026-02-10 18:57:47 Europe/London
AI : 현재 시간은 다음과 같습니다:
- 뉴욕: 2026년 2월 10일, 13시 57분
- 태국(방콕): 2026년 2월 11일, 01시 57분
- 런던: 2026년 2월 10일, 18시 57분이렇게 하니까 여러 도시의 시간도 한번에 물어볼 수 있게 되었다!!
이제 최종적으로 스트림릿으로 우리가 만든 챗봇을 웹 브라우저에서 사용할 수 있게 바꿔보자
지금까지의 파일에서 일부만 스트림릿 기준으로 바꿔주면 된다
4. 스트림릿에서 펑션 콜링 사용하기
일단 스트림릿을 사용하기 위해 스트림릿을 import 하자
st.title("💬 Chatbot")

if "messages" not in st.session_state:
  st.session_state["messages"] = [
    {"role" : "system", "content" : "너는 사용자를 도와주는 상담사야"}
  ]

for msg in st.session_state.messages:
    st.chat_message(msg["role"]).write(msg["content"])
스트림릿을 이용해서 챗봇을 만들었을 때 사용했던 코드를 가져와서 추가해주도록 한다
- if "message" not in st.session_state:
스트림릿을 사용할 때 st.session_state에 messages가 없다면 대화가 시작되지 않은 상태이므로 초기 시스템 메세지를 설정한다
- for msg in st.session_state.messages:
스트림릿은 파이썬 파일을 매번 새로 읽어서 실행하는 방식으로 작동하므로 기존 대화 내용을 유지하기 위해 대화 내용을 계속 출력해야한다
최종적으로 while 문을 삭제하고 아래와 같이 변경한다
if user_input := st.chat_input():
st.session_state.messages.append({"role": "user", "content": user_input})
st.chat_message("user").write(user_input)
ai_response = get_ai_response(st.session_state.messages, tools = tools)
ai_message = ai_response.choices[0].message
print(ai_message)
tool_calls = ai_message.tool_calls
if tool_calls:
# 반복문을 이용해서 함수를 차례대로 실행할 수 있도록 함
for tool_call in tool_calls:
tool_name = tool_call.function.name
tool_call_id = tool_call.id
# 추가된 부분
arguments = json.loads(tool_call.function.arguments)
if tool_name == "get_current_time":
st.session_state.messages.append({
"role" : "function",
"tool_call_id" : tool_call_id,
"name" : tool_name,
"content" : get_current_time(timezone = arguments['timezone']), # 함수 실행 결과를 content로 설정
})
st.session_state.messages.append({"role" : "system", "content" : "이제 주어진 결과를 바탕으로 답변할 차례다"})
ai_response = get_ai_response(st.session_state.messages, tools = tools)
ai_message = ai_response.choices[0].message
st.session_state.messages.append({
"role" : "assistant",
"content" : ai_message.content
})
print("AI\t: " + ai_message.content)
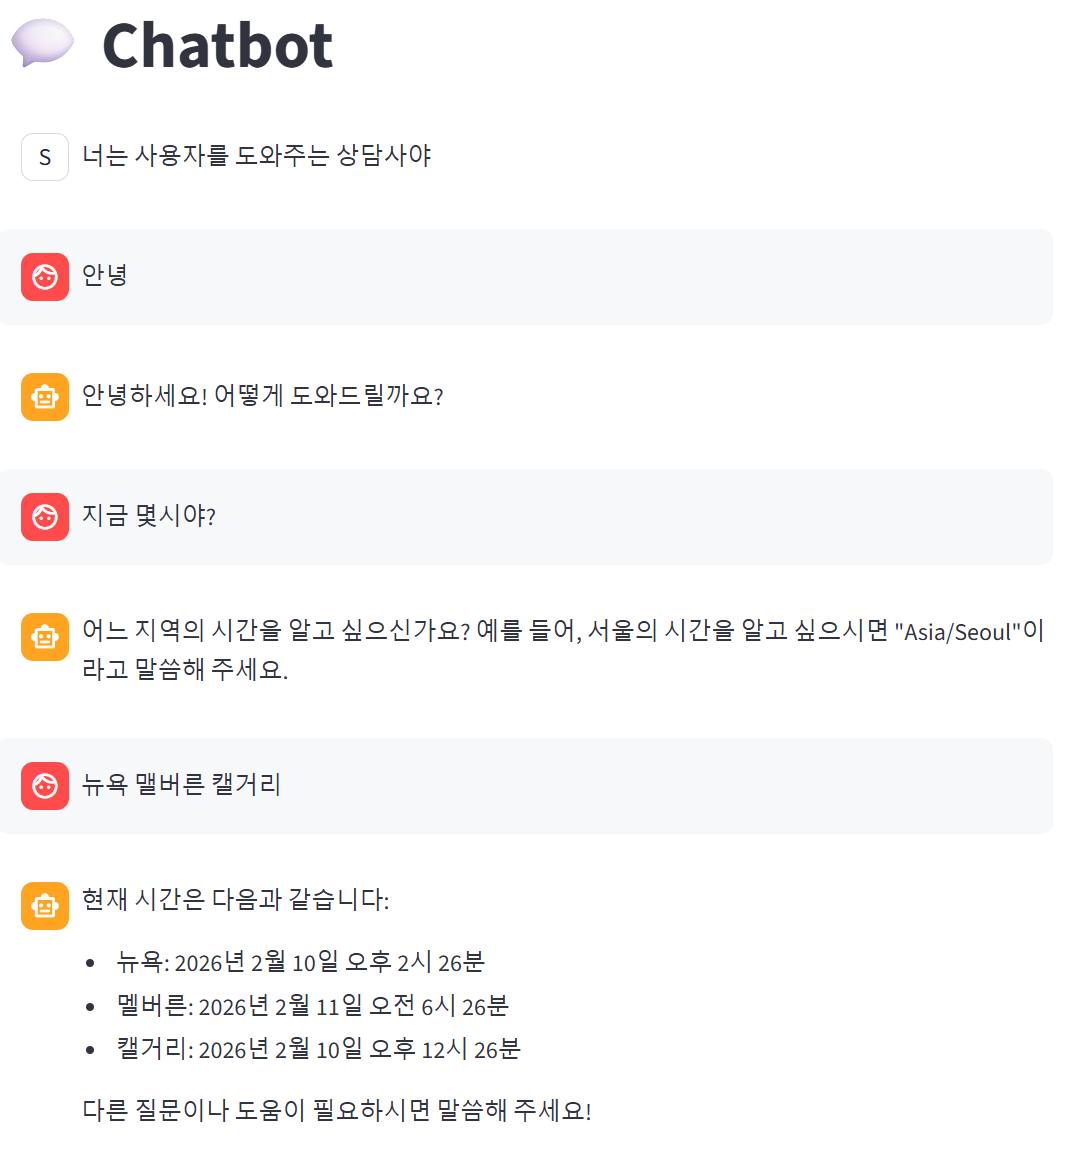
st.chat_message("assistant").write(ai_message.content)이제 터미널 창에서 streamlit run 파일명.py를 입력해 실험해보자
브라우저에서 GPT와 펑션 콜링 기능을 활용해 채팅 할 수 있다
만약 터미널에 뜨는것 처럼 시스템 메세지가 스트림릿에서도 뜨는 것을 미리 방지하려면 코드를 약간 수정해주도록 하자
for msg in st.session_state.messages:
    if msg["role"] == "assistant" or msg["role"] == "user":
      st.chat_message(msg["role"]).write(msg["content"])
for문을 이렇게 수정해준다면 메세지의 role이 assistant 또는 user일 때만 출력하게 된다
최종 코드는 아래를 참고하시라~
# what_time_is_it_streamlit.py
from gpt_functions import get_current_time, tools
from openai import OpenAI
from dotenv import load_dotenv
import os
import json   # GPT가 JSON 형태의 문자열을 반환할때 읽기 위한 라이브러리
import streamlit as st

load_dotenv()
api_key = os.getenv('OPENAI_API_KEY')

client = OpenAI(api_key = api_key)

def get_ai_response(messages, tools = None):
  response = client.chat.completions.create(
    model = "gpt-4o",
    messages = messages,
    tools = tools
  )

  return response

st.title("💬 Chatbot")

if "messages" not in st.session_state:
  st.session_state["messages"] = [
    {"role" : "system", "content" : "너는 사용자를 도와주는 상담사야"}
  ]

for msg in st.session_state.messages:
    if msg["role"] == "assistant" or msg["role"] == "user":
      st.chat_message(msg["role"]).write(msg["content"])

if user_input := st.chat_input():
  st.session_state.messages.append({"role": "user", "content": user_input})
  st.chat_message("user").write(user_input)

  ai_response = get_ai_response(st.session_state.messages, tools = tools)
  ai_message = ai_response.choices[0].message
  print(ai_message)

  tool_calls = ai_message.tool_calls

  if tool_calls:
    # 반복문을 이용해서 함수를 차례대로 실행할 수 있도록 함
    for tool_call in tool_calls:
      tool_name = tool_call.function.name
      tool_call_id = tool_call.id

      # 추가된 부분
      arguments = json.loads(tool_call.function.arguments)

      if tool_name == "get_current_time":
        st.session_state.messages.append({
          "role" : "function",
          "tool_call_id" : tool_call_id,
          "name" : tool_name,
          "content" : get_current_time(timezone = arguments['timezone']),   # 함수 실행 결과를 content로 설정
        })

    st.session_state.messages.append({"role" : "system", "content" : "이제 주어진 결과를 바탕으로 답변할 차례다"})

    ai_response = get_ai_response(st.session_state.messages)
    ai_message = ai_response.choices[0].message

  st.session_state.messages.append({
    "role" : "assistant",
    "content" : ai_message.content
  })

  print("AI\t: " + ai_message.content)
  st.chat_message("assistant").write(ai_message.content)
5. 마무리
이렇게 해서 GPT를 이용해서 함수를 이용하는 것까지 해봤다
기존까지의 LLM은 캡디를 하면서 좀 다뤄본 적이 있는데 함수를 사용할 수 있다는 부분에 대해서는 처음 알았다
이전까지는 프롬프트만 이용해서 GPT에게 명령을 내렸는데 내가 함수를 잘 짤수만 있다면
더욱 똑똑하게 GPT를 사용할 수 있지 않을까 라는 생각이 들었다
다음 포스팅부터는 본격적으로 AI 주식 투자자를 만들기 위해 실습을 해보려고 한다