✏️ 오늘 학습한 내용
1. Airflow DAG 작성
2. 예제 프로그램 Airflow로 포팅
🔎 Airflow DAG 작성
Python Operator 사용 예시
# python operator import
from airflow.operators.python import PythonOperator

def python_func(**cxt):
# 아래의 params로 전달한 파라미터를 사용
 table = cxt["params"]["table"]
 schema = cxt["params"]["schema"]
 ex_date = cxt["execution_date"]
 ...

# python operator instance 생성
load_nps = PythonOperator(
 # Parent DAG가 무엇인지 지정
 dag=dag,
 # Operator로 만들 Task의 id가 무엇인지 지정
 task_id='task_id',
 # 이 태스크가 실행이 될 때
 # 실행해야하는 python 함수를 지정
 python_callable=python_func,
 # 함수에 넘길 파라미터를 지정
 params={
 # dictionary 형식으로 지정
 'table': 'delighted_nps',
 'schema': 'raw_data'
 },
)
Python Operator를 사용한 Hello World
from airflow import DAG
from airflow.operators.python import PythonOperator
from datetime import datetime

# dag 지정
dag = DAG(
    dag_id = 'HelloWorld',
    start_date = datetime(2022,5,5),
    catchup=False,
    tags=['example'],
    # 매일 2시 0분에 시행
    schedule = '0 2 * * *')

# 실행할 함수들
def print_hello():
    print("hello!")
    return "hello!"

def print_goodbye():
    print("goodbye!")
    return "goodbye!"

# PythonOperator로 Task 구현
print_hello = PythonOperator(
    task_id = 'print_hello',
    #python_callable param points to the function you want to run
    python_callable = print_hello,
    #dag param points to the DAG that this task is a part of
    dag = dag)

print_goodbye = PythonOperator(
    task_id = 'print_goodbye',
    python_callable = print_goodbye,
    dag = dag)

# DAG의 태스크 작업 순서 지정
# 이를 지정하지 않으면 각자 독립적으로 실행됨
print_hello >> print_goodbye
Airflow에서 제공하는 Task Decorators를 사용한 Hello World
Decorators를 사용하면 프로그래밍이 단순해집니다.
from airflow.decorators import task

# @task가
# 각각의 Python Operator역할을 수행
@task
def print_hello():
 print("hello!")
 return "hello!"

@task
def print_goodbye():
 print("goodbye!")
 return "goodbye!"

# DAG를 사용할 때, with DAG로 시작해서
# as dag:로 종료
with DAG(
 dag_id = 'HelloWorld_v2',
 start_date = datetime(2022,5,5),
 catchup=False,
 tags=['example'],
 schedule = '0 2 * * *'
) as dag:

# 함수 이름이 task id가 됨
print_hello() >> print_goodbye()
중요한 DAG 파라미터
- max_active_runs :
- 동시에 실행이 될 수 있는 DAG의 수
- 동시에 실행이 될 수 있는 DAG의 수
-
max_active_tasks :
- 이 DAG에 속한 Task가 동시에 몇 개 실행될 수 있는 지
( Airflow worker에 등록된 CPU 수의 총합이 한계점, 이 이상을 넘어설 수 없음 )
- 이 DAG에 속한 Task가 동시에 몇 개 실행될 수 있는 지
-
catchup :
- whether to backfill past runs
- 위의 파라미터들은 모두 DAG 파라미터
- DAG 객체를 만들 때 지정
🔎 예제 프로그램 Airflow로 포팅
이전에 S3에 있는 name_gender.csv파일을 Redshift로 적재한 Colab Python 코드를 Airflow로 포팅해보겠습니다.
📃 초안
from airflow import DAG
from airflow.operators.python import PythonOperator
from airflow.models import Variable

from datetime import datetime
from datetime import timedelta
import requests
import logging
import psycopg2


def get_Redshift_connection():
    host = "..."
    redshift_user = "..."
    redshift_pass = "..."
    port = 5439
    dbname = "dev"
    conn = psycopg2.connect(f"dbname={dbname} user={redshift_user} host={host} password={redshift_pass} port={port}")
    conn.set_session(autocommit=True)
    return conn.cursor()

# logging.info로 로그 기록만 남길 뿐 나머진 원래 함수와 동일

def extract(url):
    logging.info("Extract started")
    f = requests.get(url)
    logging.info("Extract done")
    return (f.text)


def transform(text):
    logging.info("Transform started")
    lines = text.strip().split("\n")[1:] # 첫 번째 라인을 제외하고 처리
    records = []
    for l in lines:
      (name, gender) = l.split(",")
      records.append([name, gender])
    logging.info("Transform ended")
    return records


def load(records):
    logging.info("load started")
    """
    records = [
      [ "Keeyong", "M" ],
      [ "Claire", "F" ],
      ...
    ]
    """
    schema = "..."
    cur = get_Redshift_connection()
    try:
        cur.execute("BEGIN;")
        cur.execute(f"DELETE FROM {schema}.name_gender;")
        for r in records:
            name = r[0]
            gender = r[1]
            print(name, "-", gender)
            sql = f"INSERT INTO {schema}.name_gender VALUES ('{name}', '{gender}')"
            cur.execute(sql)
        cur.execute("COMMIT;")
    except (Exception, psycopg2.DatabaseError) as error:
        print(error)
        cur.execute("ROLLBACK;")
    logging.info("load done")

# task 하나로 통일
def etl(**context):
    link = context["params"]["url"]

    # task 실행 날짜
    execution_date = context['execution_date']

    logging.info(execution_date)

    data = extract(link)
    lines = transform(data)
    load(lines)


dag = DAG(
    dag_id = 'name_gender_v2',
    start_date = datetime(2023,4,6), # 날짜가 미래인 경우 실행이 안됨
    schedule = '0 2 * * *',  # 적당히 조절
    catchup = False,
    max_active_runs = 1,
    default_args = {
        'retries': 1,
        'retry_delay': timedelta(minutes=3),
    }
)


task = PythonOperator(
    task_id = 'perform_etl',
    python_callable = etl,
    params = {
    	# 파라미터로 url를 전달
        'url': "https://s3-geospatial.s3-us-west-2.amazonaws.com/name_gender.csv"
    },
dag = dag)- 위 코드의 개선점
계정 정보가 불필요하게 노출될 수 있습니다.
코드 안에서 하드코딩하지 않고 직접 입력 혹은 환경변수로 받을 수 있게 설정하는 게 좋습니다.
또한,
delete from보다truncate를 사용하는게 훨씬 효율적입니다.
( SQL 트랜잭션을 무시하고 삭제를 하기 때문 )Task Decorator를 통해 코드를 보다 가독성 좋게 변경할 수 있습니다.
Connections and Variables
- Connections
: 계정 정보 등을 환경 설정 형태로 코드 밖으로 빼내는 역할 - Variables
: Airflow를 Key-Value 스토리지처럼 사용하는 것, Task에서 그 정보를 읽어와서 사용 - Web UI에 위치
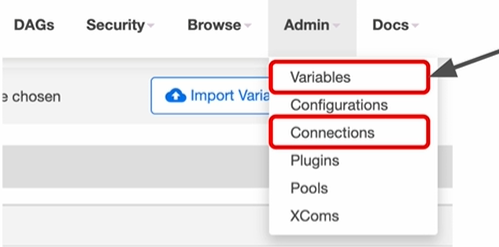
즉, 코드 내에서 민감한 정보들을 전부 감추고 단순히 Connection 혹은 Variables의 id만 가지고 코드를 작성할 수 있습니다.
📃 개선 코드 (1)
-
Variables을 사용해 CSV parameter 전달
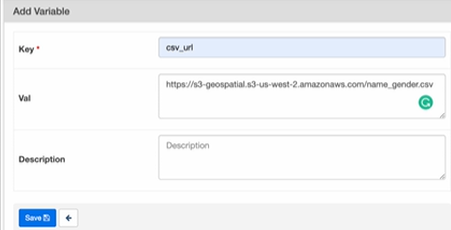
Key : csv_url
-
Connection을 사용해 Redshift 연결
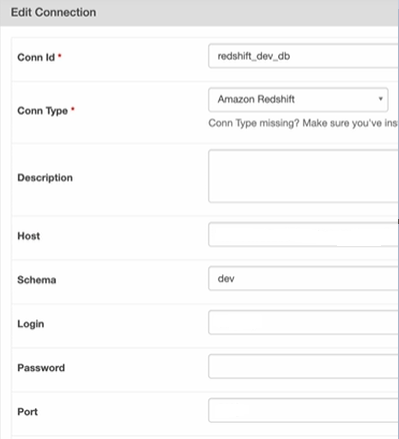
Conn Id : redshift_dev_db
-
하나의 Task에서 3개의 태스크로 나누기
- 관건 : 태스크 간의 값을 어떻게 전달할 것인가?
-> Xcom을 사용
- 관건 : 태스크 간의 값을 어떻게 전달할 것인가?
-
Xcom이란?
-
태스크(Operator)들 간에 데이터를 주고 받기 위한 방식
-
보통 한 Operator의 리턴 값을 다른 Operator에서 읽어가는 형태
-
이 값들은 Airflow 메타 데이터 DB에 저장되기에 큰 데이터를 주고 받는 데는 사용 불가능
( 데이터가 큰 경우는 보통 S3 등에 로드하고 그 위치를 넘기는 것이 일반적 ) -
Airflow 메타 데이터를 캐쉬처럼 사용하는 방식
-
from airflow import DAG
from airflow.operators.python import PythonOperator
# variable을 import
from airflow.models import Variable

# connection을 위해
# PostgresHook을 import
from airflow.providers.postgres.hooks.postgres import PostgresHook

from datetime import datetime
from datetime import timedelta
# from plugins import slack

import requests
import logging
import psycopg2

def get_Redshift_connection(autocommit=True):
	# PostgresHook을 통해 Connection설정 값을 불러옴
    hook = PostgresHook(postgres_conn_id='redshift_dev_db')
    conn = hook.get_conn()
    conn.autocommit = autocommit
    return conn.cursor()


def extract(**context):
    link = context["params"]["url"]
    # task 자체에 대한 정보 (일부는 DAG의 정보가 되기도 함)
    task_instance = context['task_instance']
    execution_date = context['execution_date']

    logging.info(execution_date)
    f = requests.get(link)
    return (f.text)


def transform(**context):
    logging.info("Transform started")

    # Xcom을 사용하여 extract라는 태스크의
    # return 값을 읽어오는 것
    text = context["task_instance"].xcom_pull(key="return_value", task_ids="extract")

    lines = text.strip().split("\n")[1:] # 첫 번째 라인을 제외하고 처리
    records = []
    for l in lines:
      (name, gender) = l.split(",") # l = "Keeyong,M" -> [ 'keeyong', 'M' ]
      records.append([name, gender])
    logging.info("Transform ended")
    return records


def load(**context):
    logging.info("load started")
    schema = context["params"]["schema"]
    table = context["params"]["table"]

	# Xcom을 사용하여 transform의 결과를 호출
    lines = context["task_instance"].xcom_pull(key="return_value", task_ids="transform")

    # BEGIN과 END를 사용해서 SQL 결과를 트랜잭션으로 만들어주는 것이 좋음
    cur = get_Redshift_connection()
    try:
        cur.execute("BEGIN;")
        cur.execute(f"DELETE FROM {schema}.name_gender;")
        # DELETE FROM을 먼저 수행 -> FULL REFRESH을 하는 형태
        for r in records:
            name = r[0]
            gender = r[1]
            print(name, "-", gender)
            sql = f"INSERT INTO {schema}.name_gender VALUES ('{name}', '{gender}')"
            cur.execute(sql)
        cur.execute("COMMIT;")
    except (Exception, psycopg2.DatabaseError) as error:
        print(error)
        cur.execute("ROLLBACK;")
    logging.info("load done")


dag = DAG(
    dag_id = 'name_gender_v3',
    start_date = datetime(2023,4,6), # 날짜가 미래인 경우 실행이 안됨
    schedule = '0 2 * * *',  # 적당히 조절
    catchup = False,
    max_active_runs = 1,
    default_args = {
        'retries': 1,
        'retry_delay': timedelta(minutes=3),
    }
)

# Task를 3개로 나눔
extract = PythonOperator(
    task_id = 'extract',
    python_callable = extract,
    params = {
        'url':  Variable.get("csv_url")
    },
    dag = dag)

transform = PythonOperator(
    task_id = 'transform',
    python_callable = transform,
    params = {
    },
    dag = dag)

load = PythonOperator(
    task_id = 'load',
    python_callable = load,
    params = {
        'schema': 'keeyong',
        'table': 'name_gender'
    },
    dag = dag)

extract >> transform >> load
📃 개선 코드 (2)
task decorator를 사용하여 xcom을 사용하지않고 코드의 가독성을 높여보겠습니다.
from airflow import DAG
from airflow.models import Variable
from airflow.providers.postgres.hooks.postgres import PostgresHook

# PythonOperator 대신 task decorator를 사용!
from airflow.decorators import task

from datetime import datetime
from datetime import timedelta

import requests
import logging


def get_Redshift_connection(autocommit=True):
    hook = PostgresHook(postgres_conn_id='redshift_dev_db')
    conn = hook.get_conn()
    conn.autocommit = autocommit
    return conn.cursor()

# task decorator
# **context를 통해 값을 넘겨주었는데
# 이젠 단순히 url이란 변수 하나만 넘겨줌
# -> 상당히 직관적
@task
def extract(url):
    logging.info(datetime.utcnow())
    f = requests.get(url)
    return f.text


@task
def transform(text):
    lines = text.strip().split("\n")[1:]
    records = []
    for l in lines:
      (name, gender) = l.split(",")
      records.append([name, gender])
    logging.info("Transform ended")
    return records


@task
def load(schema, table, records):
    logging.info("load started")
    cur = get_Redshift_connection()
    try:
        cur.execute("BEGIN;")
        cur.execute(f"DELETE FROM {schema}.name_gender;")
        for r in records:
            name = r[0]
            gender = r[1]
            print(name, "-", gender)
            sql = f"INSERT INTO {schema}.name_gender VALUES ('{name}', '{gender}')"
            cur.execute(sql)
        cur.execute("COMMIT;")   # cur.execute("END;")
    except (Exception, psycopg2.DatabaseError) as error:
        print(error)
        cur.execute("ROLLBACK;")
    logging.info("load done")


with DAG(
    dag_id='namegender_v5',
    start_date=datetime(2022, 10, 6),  # 날짜가 미래인 경우 실행이 안됨
    schedule='0 2 * * *',  # 적당히 조절
    max_active_runs=1,
    catchup=False,
    default_args={
        'retries': 1,
        'retry_delay': timedelta(minutes=3),
        # 'on_failure_callback': slack.on_failure_callback,
    }
) as dag:
	# 여기서 task들의 작업순서를 설정
    url = Variable.get("csv_url")
    schema = '...'   ## 자신의 스키마로 변경
    table = 'name_gender'

    # decorator를 통해 함수들 각각이
    # task로서 작동
    lines = transform(extract(url))
    load(schema, table, lines)
터미널에서 DAG 실행
# 컨테이너 중 Airflow를 찾기
docker ps

# 컨테이너 안으로 로그인.(airflow)
docker exec -it container_id sh

# DAG 리스트 출력
airflow dags list

# 등록되있는 variables 목록 출력
airflow variables list

# 특정 variable 정보 출력
# key-value에 해당하는 value가 출력됨
airflow variables get KEY이름 #ex) csv_url

# 선택한 DAG 내의 태스크 리스트 출력
airflow tasks list DAG이름

# DAG의 특정 Task를 실행하고 싶은 경우
airflow tasks test DAG이름 Task이름 날짜
📃 Airflow 관련 기타 정보
PostgresHook의 autocommit 파라미터
-
Default값은 False
(자동으로 commit을 안하는 것) -
False인 경우
BEGIN은 아무런 작업을 하지 않습니다. ( 아무 영향도 끼치지 않음 )
(no-operation)
DAG에서 task를 어느 정도로 분리하는 것이 좋을지?
장단점이 각각 분명히 있기에 적당히 밸런스있게 분리하는 것이 좋습니다.
-
task를 많이 만들면 전체 DAG이 실행되는데 오래 걸리고 스케줄러에 부하가 갑니다.
-
task를 너무 적게 만들면 모듈화가 안되고 실패시 재실행을 시간이 오래 걸립니다.
( 처음부터 다시 실행해야 하므로 ) -
오래 걸리는 DAG이라는 실패시 재실행이 쉽게 다수의 task로 나누는 것이 좋습니다.
Airflow의 Variable 관리 vs. 코드 관리
Airflow Variable 사용시
-
장점 : 코드 푸시의 필요성이 없습니다.
-
단점 : 관리나 테스트가 안되어서 사고로 이어질 가능성이 있습니다.
굉장히 중요한 코드의 경우 Variable로 관리하는 것은 위험할 수 있습니다.
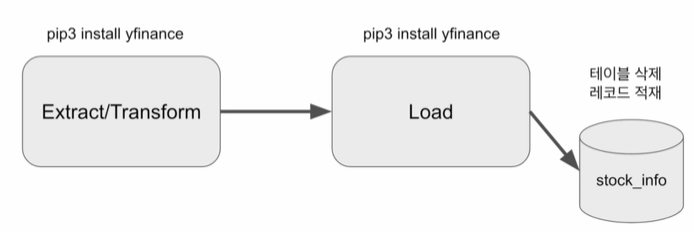
🔎 Yahoo Finance API - DAG 작성
Yahoo Finance API를 호출해서 애플 주식을 읽어오는 Full Refresh 기반의 DAG를 만들어보겠습니다.
Full Refresh : 다 지우고 통째로 복사해서 테이블 재생성
구현 DAG의 세부 사항
- Yahoo Finance API를 호출하여 애플 주식 정보 수집 (지난 30일 간의 데이터)
- Redshift 상의 테이블로 위에서 받은 레코드들을 적재
(Full Refresh로 구현)
- Yahoo Finance API
import yfinance as yf- 기본적으로 지난 한달의 주식 가격을 Pandas Dataframe으로 리턴
코드
from airflow import DAG
from airflow.decorators import task
from airflow.providers.postgres.hooks.postgres import PostgresHook
from datetime import datetime
from pandas import Timestamp

import yfinance as yf
import pandas as pd
import logging


def get_Redshift_connection(autocommit=True):
    hook = PostgresHook(postgres_conn_id='redshift_dev_db')
    conn = hook.get_conn()
    conn.autocommit = autocommit
    return conn.cursor()

# 한달 간의 주식 데이터를
# Pandas Dataframe 형식으로 반환
@task
def get_historical_prices(symbol):
	# 미국 주식의 경우 symbol이 4글자로 구성
    # apple의 경우 aapl
    # google의 경우 goog
    # 이 symbol을 Ticker 함수에 인자로 주면 ticket정보가 반환
    ticket = yf.Ticker(symbol)
    # ticket에서 지난 30일 간의 해당 주식의 정보를 추출
    # 여기에서 Pandas Dataframe 형식으로 리턴
    data = ticket.history()
    records = []

    for index, row in data.iterrows():
    	# index가 날짜 정보, timestamp형식이므로 str으로 변환
        date = index.strftime('%Y-%m-%d %H:%M:%S')
		# records 리스트에 날짜와, 조건별 가격대를 리턴
        records.append([date, row["Open"], row["High"], row["Low"], row["Close"], row["Volume"]])

    return records

@task
def load(schema, table, records):
    logging.info("load started")
    cur = get_Redshift_connection()
    try:
    	# 트랜잭션 BEGIN ~ END
        cur.execute("BEGIN;")
        # Full Refresh DROP TABLE & CREATE TABLE
        cur.execute(f"DROP TABLE IF EXISTS {schema}.{table};")
        cur.execute(f"""
CREATE TABLE {schema}.{table} (
    date date,
    "open" float,
    high float,
    low float,
    close float,
    volume bigint
);""")

        for r in records:
        	# 위에서 받아온 주가 정보를 insert
            sql = f"INSERT INTO {schema}.{table} VALUES ('{r[0]}', {r[1]}, {r[2]}, {r[3]}, {r[4]}, {r[5]});"
            print(sql)
            cur.execute(sql)
        cur.execute("COMMIT;")   # cur.execute("END;")
    except Exception as error:
        print(error)
        cur.execute("ROLLBACK;")
        raise

    logging.info("load done")


with DAG(
    dag_id = 'UpdateSymbol',
    start_date = datetime(2023,5,30),
    catchup=False,
    tags=['API'],
    # 매일 10시에 실행
    schedule = '0 10 * * *'
) as dag:
	# symbol이 AAPL
    results = get_historical_prices("AAPL")
    load("schema_name", "stock_info", results)
terminal로 실행
- 우선 위 코드를 airflow의 dags폴더에 저장
저의 경우 airflow-setup/dags
UpdateSymbol.py
# scheduler container찾기
docker ps
# airflow scheduler 실행
docker exec -it container_id sh
# yfinance 설치
pip3 install yfinance
# dags 폴더로 이동
cd dags
# UpdateSymbol.py가 있는지 확인
ls -tl UpdateSymbol.py
# DAG의 task 목록을 추출
airflow tasks list UpdateSymbol

# 이때, error가 발생한다면,
# 높은 확률로 모듈이 설치가 되어있지 않을 것입니다.
# 아래 명령어를 통해,
# 필요한 모듈을 확인하고 설치해줍니다.
airflow dags list-import-errors

# 저의 경우 mysql이 없었네요
pip3 install pymysql

# UpdateSymbol이란 DAG를 실행
airflow dags test UpdateSymbol 2023-05-30- Root 유저로 로그인하는 방법
docker exec --user root -it container_id sh
🔎 Yahoo Finance API - 중복 제거
위의 Yahoo Finance API를 통해 DAG를 만드는 과정에서 중복을 제거하는 과정을 추가해보겠습니다.
구현 DAG의 세부사항
- Yahoo Finance API를 호출하여 애플 주식 정보 수집 (지난 30일 간의 데이터)
- Redshift 상의 테이블에서 받은 레코드들을 적재하고 중복 제거
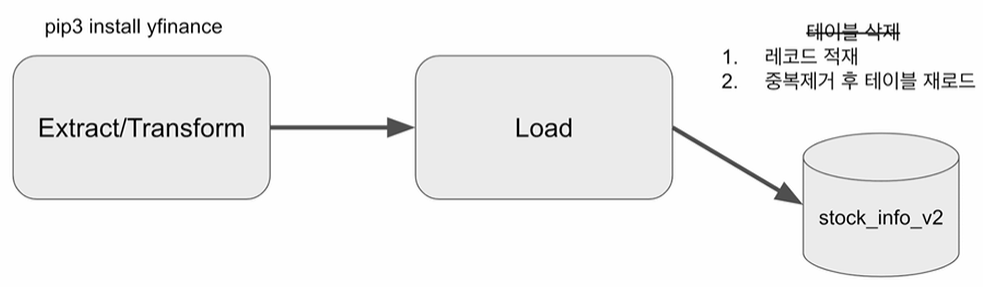
Load task 업데이트
-
Incremental Update로 구현
-
매일 레코드가 추가되므로 Incremental Update 사용
-
임시 테이블을 생성하면서 현재 테이블의 레코드를 복사
CREATE TEMP TABLE ... -
임시 테이블에 API에 읽어온 레코드를 추가 적재
-
원본 테이블을 삭제하고 임시 테이블의 내용 복사
( 이때, 중복을 제거 )
-
-
트랜잭션 형태로 구성 (BEGIN ~ END)
# False의 경우 원본 테이블을 첫 생성
# True의 경우 원본 테이블을 삭제하고 재생성
def _create_table(cur, schema, table, drop_first):
    if drop_first:
        cur.execute(f"DROP TABLE IF EXISTS {schema}.{table};")
    cur.execute(f"""
CREATE TABLE IF NOT EXISTS {schema}.{table} (
    date date,
    "open" float,
    high float,
    low float,
    close float,
    volume bigint
);""")


@task
def load(schema, table, records):
    logging.info("load started")
    cur = get_Redshift_connection()
    try:
        cur.execute("BEGIN;")
        # 원본 테이블이 없으면 생성 - 테이블이 처음 한번 만들어질 때 필요한 코드
        _create_table(cur, schema, table, False)
        # 임시 테이블로 원본 테이블을 복사
        cur.execute(f"CREATE TEMP TABLE t AS SELECT * FROM {schema}.{table};")
        for r in records:
            sql = f"INSERT INTO t VALUES ('{r[0]}', {r[1]}, {r[2]}, {r[3]}, {r[4]}, {r[5]});"
            print(sql)
            cur.execute(sql)

        # 원본 테이블 삭제 후 재생성
        _create_table(cur, schema, table, True)
        # 임시 테이블 내용을 원본 테이블로 복사
        # 이때, 중복을 제거
        # insert into ... select distinct문을 사용
        cur.execute(f"INSERT INTO {schema}.{table} SELECT DISTINCT * FROM t;")
        cur.execute("COMMIT;")   # cur.execute("END;")
    except Exception as error:
        print(error)
        cur.execute("ROLLBACK;")
        raise
    logging.info("load done")