카카오톡, 디스코드는 어떻게 수억 명의 메시지를 처리할까?
소개
이전 글에서는 Netty 기반의 모놀리식 인스턴트 메시징 서비스를 구축했습니다.
모놀리식 아키텍처는 개발 초기 단계에서는 간단하고 효율적이지만, 사용자 수가 증가하고 사업 규모가 커짐에 따라 점차 한계가 드러납니다.
높은 동시성 시나리오에서 모놀리식 Netty 서비스는 성능 한계에 쉽게 도달하여 메시지 푸시 지연 및 잦은 연결 끊김과 같은 문제가 발생할 수 있습니다.
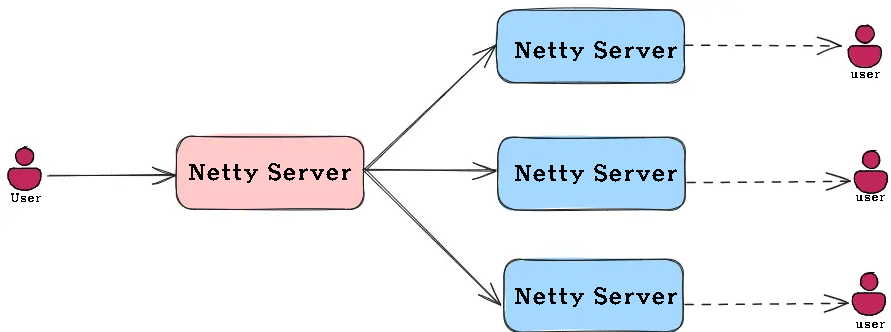
그러나 수평적 확장을 위해 여러 Netty 인스턴스를 간단히 복제한다면
이 솔루션은 새로운 문제를 야기합니다.
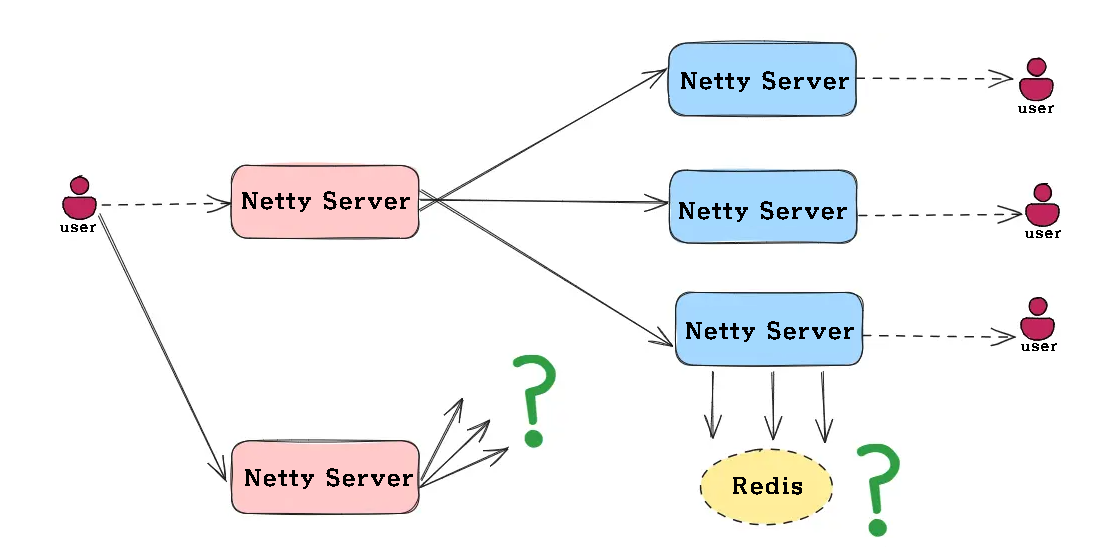
클라이언트 연결이 여러 서버에 분산되어 메시지가 여러 서버로 전달될 수 없습니다. 예를 들어, 사용자 A와 사용자 B가 서로 다른 Netty 인스턴스에 연결하면 두 서버 간의 메시지가 전달되지 않습니다.
Netty 클러스터 구축을 위한 세 가지 솔루션
레이어를 추가하면 해결할 수 없는 문제는 없습니다.
Netty 클러스터 구축을 위한 세 가지 일반적인 해결책은 다음과 같습니다.
솔루션 1: Nginx 기반 로드 밸런싱 아키텍처
Nginx는 사용자 요청을 여러 Netty 서버로 분산하는 로드 밸런서로 사용됩니다.
각 사용자는 서버에 고정적으로 연결되어 있어 지점 간 통신의 간편성을 보장합니다.
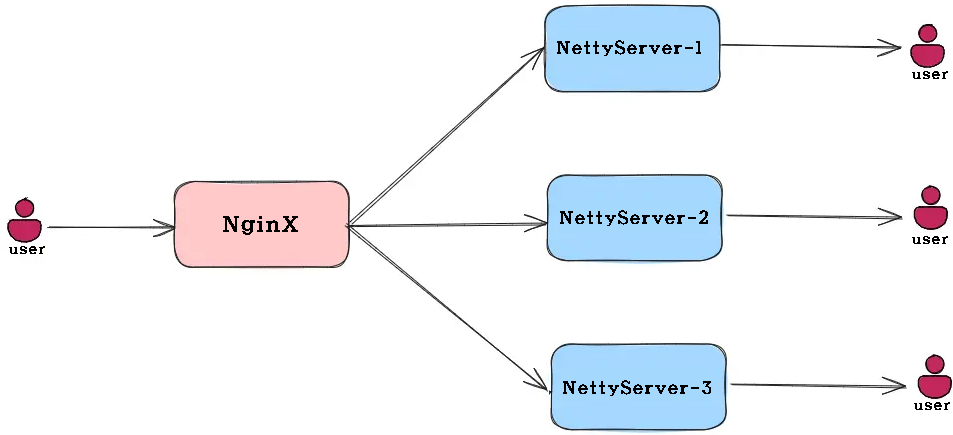
이 솔루션은 아키텍처가 간단하고 배포가 쉽습니다.
Nginx는 성숙하고 안정적인 미들웨어입니다. 하지만 서버 간 메시지 전송은 불가능합니다.
사용자는 동일 서버에 있는 다른 사용자와만 통신할 수 있으며, 진정한 클러스터링을 구현할 수 없습니다.
솔루션 2: 등록 센터 기반 서비스 검색 아키텍처
Nacos는 서비스 등록 센터로 소개됩니다. Netty 서버는 시작 시 Nacos에 등록됩니다.
클라이언트는 Gateway를 통해 사용 가능한 서버 목록을 얻어 동적 서비스 검색을 수행합니다
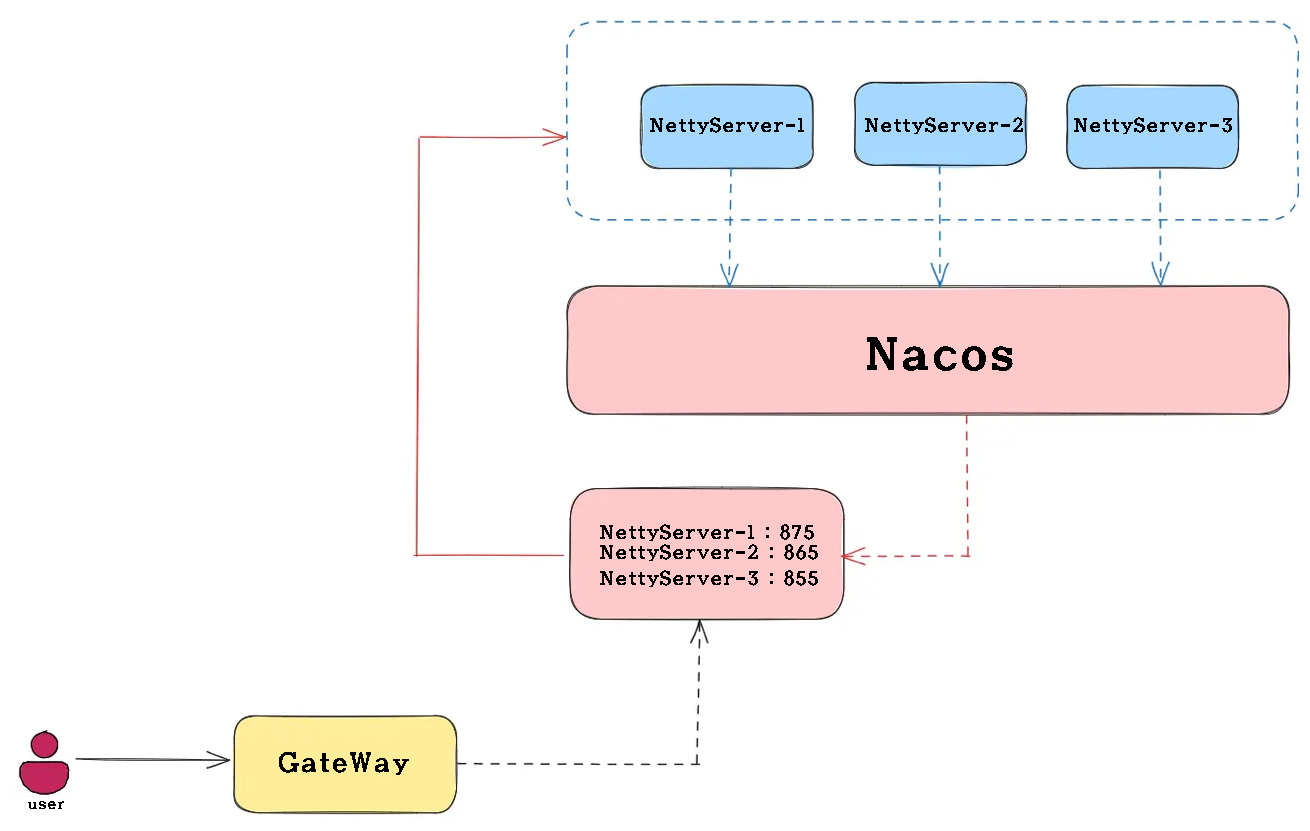
이 솔루션은 동적 온라인 및 오프라인 서비스, 유연한 로드 밸런싱 전략, 그리고 편리한 서비스 모니터링 및 관리를 지원합니다.
하지만 관련 알리바바 미들웨어 도입이 필요합니다.
기존 아키텍처에서 사용되지 않을 경우, 갑자기 많은 미들웨어가 도입되면서 아키텍처의 복잡성이 증가할 수 있습니다.
또한, 알리바바는 일반적으로 Java를 하나만 도입하기 때문에, 제대로 활용하려면 여러 솔루션 세트를 사용해야 합니다.
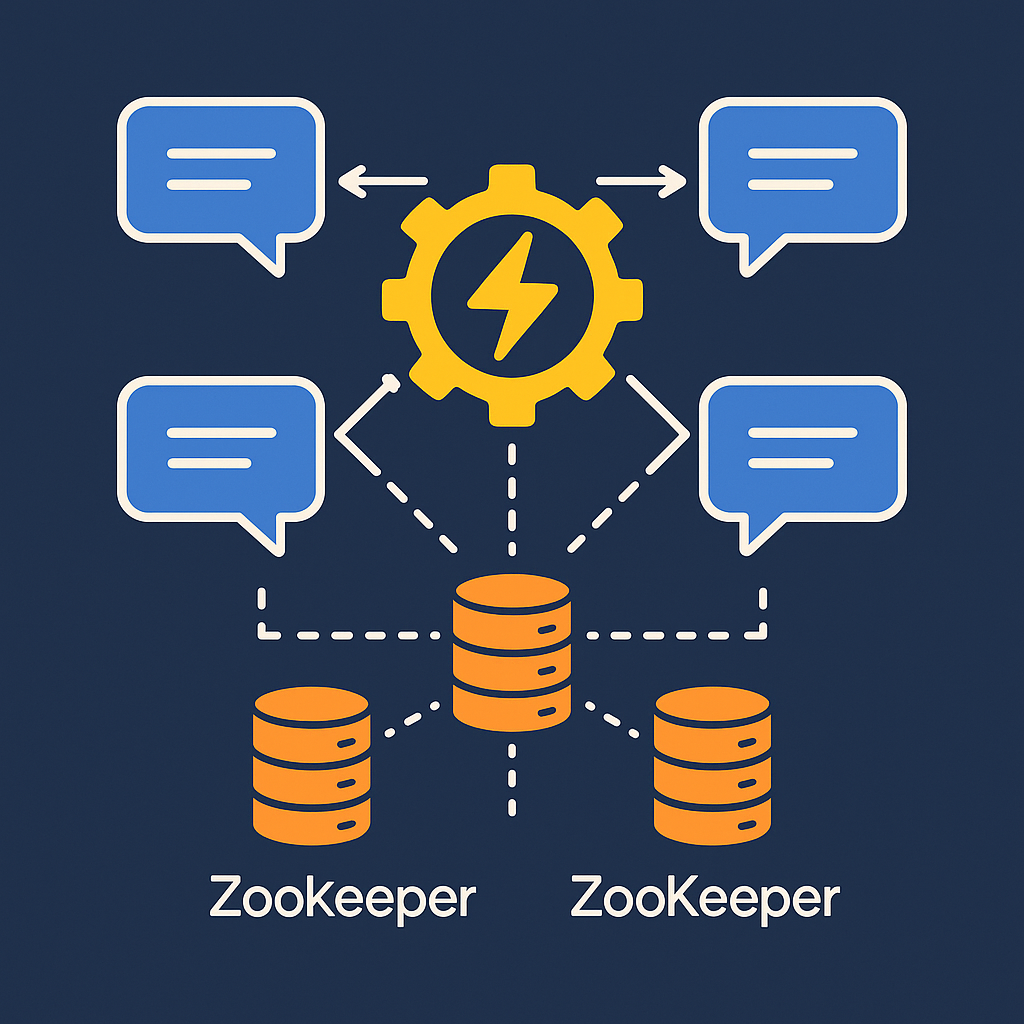
솔루션 3: 메시지 라우팅 기반 분산 아키텍처
ZooKeeper를 통해 사용자 연결 정보를 기록함으로써, Controller 서비스는 사용자 위치를 쿼리하고 메시지를 올바른 Netty 인스턴스로 라우팅하여 서버 간 통신을 구현합니다.
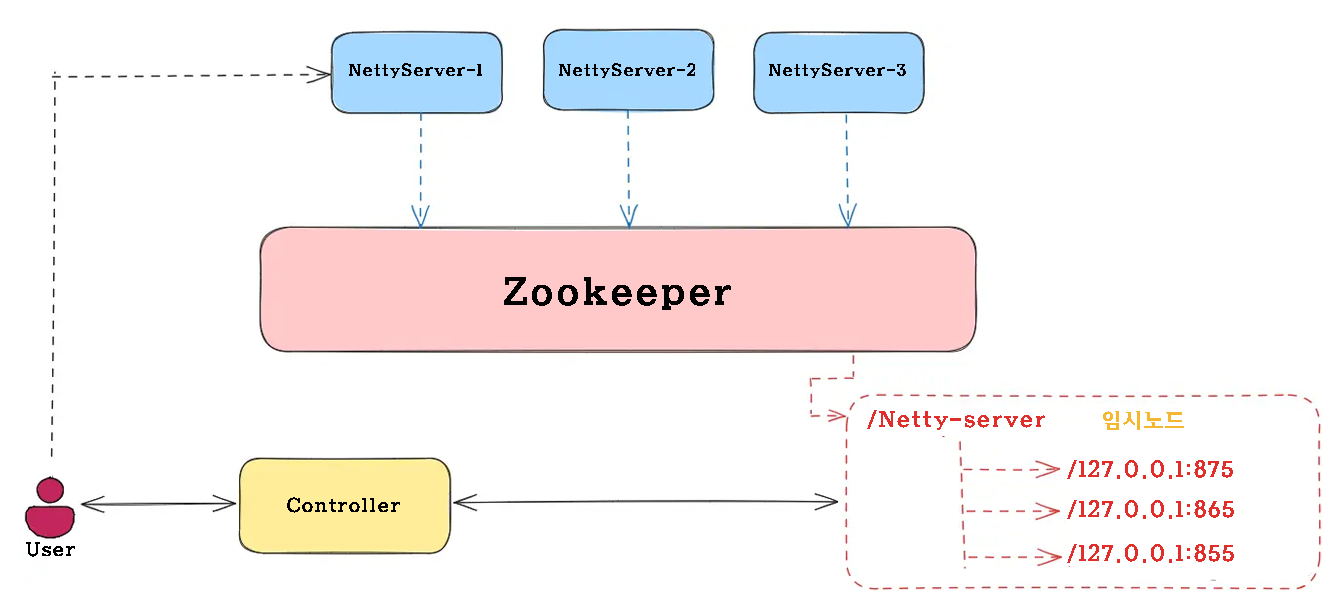
이 솔루션은 서버 간 메시지 전달 문제를 완벽하게 해결하고 무제한 수평 확장을 지원합니다.
미들웨어 ZooKeeper만 도입하면 해당 컨트롤러를 통해 메시지를 전달합니다.
세 가지 솔루션의 장단점을 종합적으로 검토한 후, 최종적으로 솔루션 3을 선택했습니다.
이 솔루션은 Netty 서비스의 클러스터링을 완벽하게 구현하고, 서버 간 메시지 전달이라는 핵심 문제를 해결하며, 비교적 간단한 아키텍처를 갖추고 있어 Netty 클러스터 구축에 가장 적합한 솔루션입니다.
메시지 발송 구현
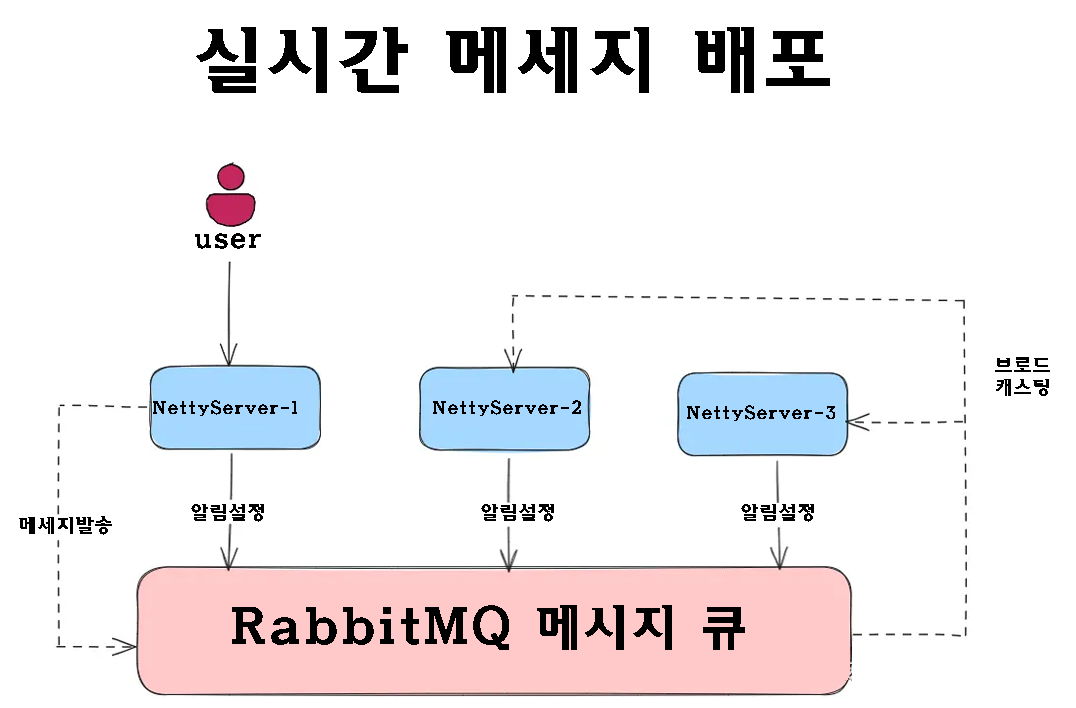
메시지 라우팅 기반 분산 아키텍처를 선택한 후, 우리가 직면한 다음 과제는 효율적인 메시지 브로드캐스팅을 어떻게 달성할 것인가입니다.
사용자가 메시지를 보낼 때, 특정 수신자에게 푸시되어야 할 뿐만 아니라 그룹 구성원이나 시스템 알림용으로 브로드캐스팅되어야 할 수도 있습니다.
이를 위해서는 안정적인 메시지 배포 메커니즘이 필요합니다.
이전 글에서는 오프라인 메시지의 영구 저장을 처리하는 RabbitMQ를 소개했습니다.
이제 성숙한 메시지 미들웨어가 있으므로, 발행/구독 모드를 최대한 활용하여 브로드캐스트 기능을 구현할 수 있습니다.
ZooKeeper 환경 구축
솔루션 3(메시지 라우팅 기반 분산 아키텍처)을 선택했으므로 프로젝트 변환 전에 ZooKeeper 환경을 구축해야 합니다.
ZooKeeper는 분산 조정 서비스 역할을 하며, 사용자 연결 정보를 기록하고, Controller 서비스가 사용자가 있는 Netty 인스턴스를 정확하게 찾을 수 있도록 지원합니다.
인스턴트 메시징 아키텍처에서 ZooKeeper는 다음과 같은 책임을 갖습니다.
- 사용자와 Netty 서버 간의 매핑을 저장합니다.
- Netty 서버의 상태를 모니터링합니다
- 서비스 검색 기능 제공
ZooKeeper를 설치하는 방법은 여러 가지가 있으며, 원하는 방법을 선택할 수 있습니다.
여기서는 Docker를 통해 설치하는 방법만 보여드리겠습니다.
1. 이미지를 끌어오세요
먼저 ZooKeeper 이미지를 가져오세요.
설치 시 Docker Hub에서 최신 버전을 확인하세요.
이 글을 작성할 당시 최신 버전은 3.9.3이었습니다.
docker pull zookeeper:3.9.32. 마운트 디렉토리 생성
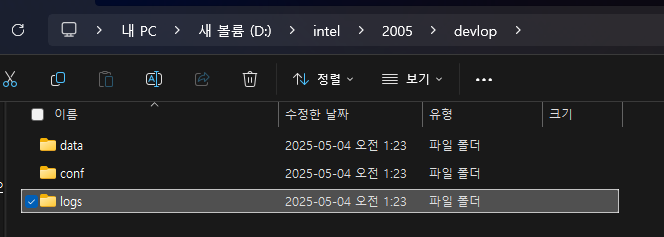
데이터 지속성과 편리한 구성 관리를 위해 로컬 마운트 디렉토리를 만들어야 합니다.
3. 컨테이너를 시작하세요
다음 명령을 사용하여 ZooKeeper 컨테이너를 시작하세요.
이 명령을 사용할 때는 운영 체제 경로와 마운트 디렉터리를 주의 깊게 살펴보고 실제 상황에 맞게 수정해야 합니다.
docker run --name zookeeper \
-p 2181:2181 \
--restart always \
-v D:\devolop\zookeeper\data:/data \
-v D:\devolop\zookeeper\conf:/conf \
-v D:\devolop\zookeeper\logs:/datalog \
-d zookeeper:3.9.3
4. 보충 구성 파일
컨테이너가 시작된 후 conf디렉토리를 확인하면 구성 파일이 자동으로 생성된 것을 확인할 수 있습니다 zoo.cfg.
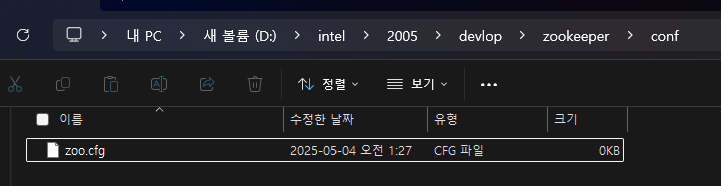
하지만 로그 구성 파일이 아직 없습니다.
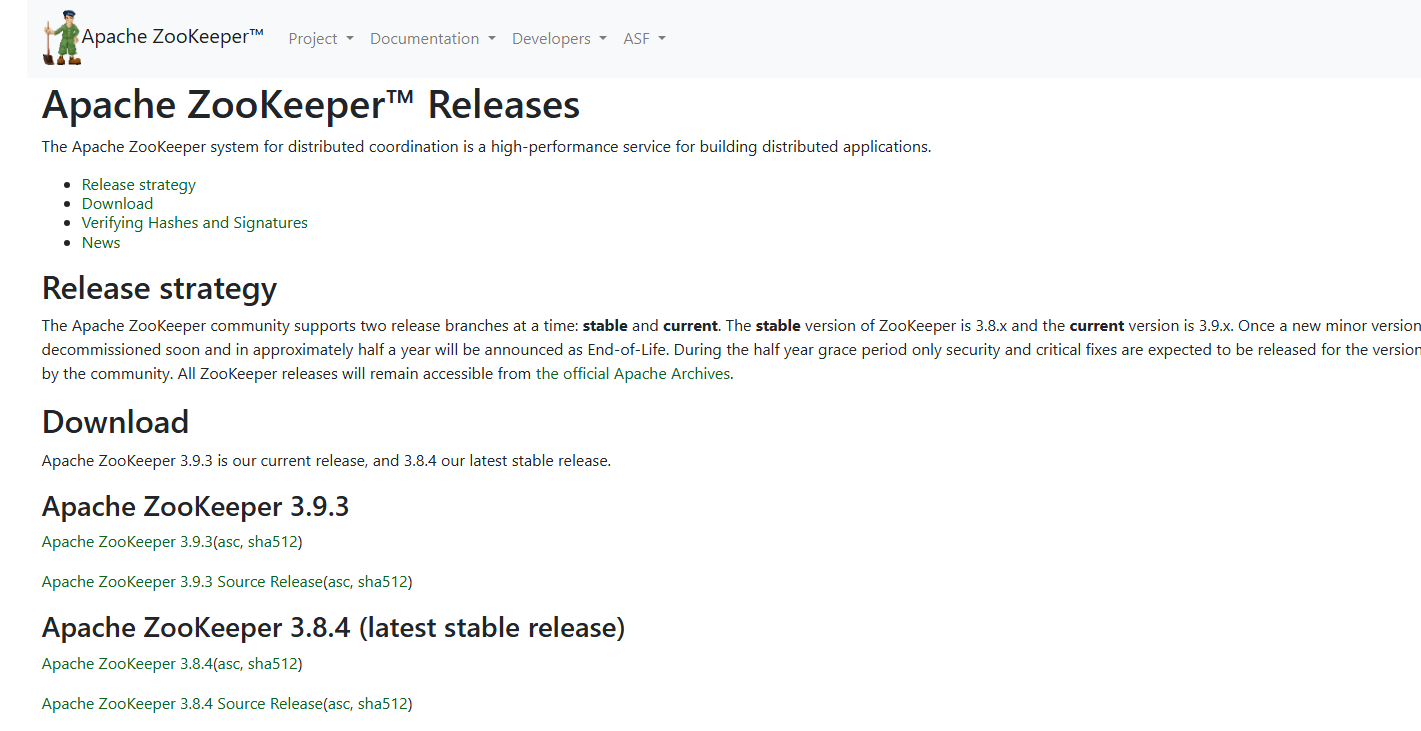
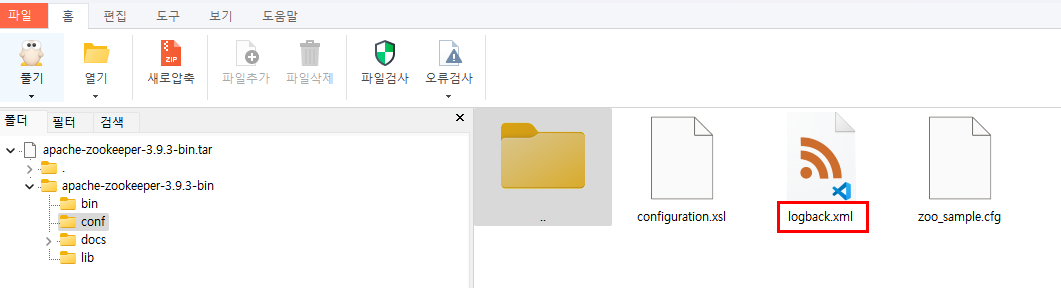
logback.xml. Apache ZooKeeper 공식 웹사이트에서 해당 버전의 설치 패키지를 다운로드하여 전체 구성 파일을 얻어야 합니다.
zookeeper.apache.org/releases.htm을 방문하여 버전 3.9.3의 바이너리 패키지를 다운로드하고 압축을 푼 다음 conf/logback.xml파일을 로컬로 마운트된 conf디렉토리에 복사합니다.
5. 설치 확인
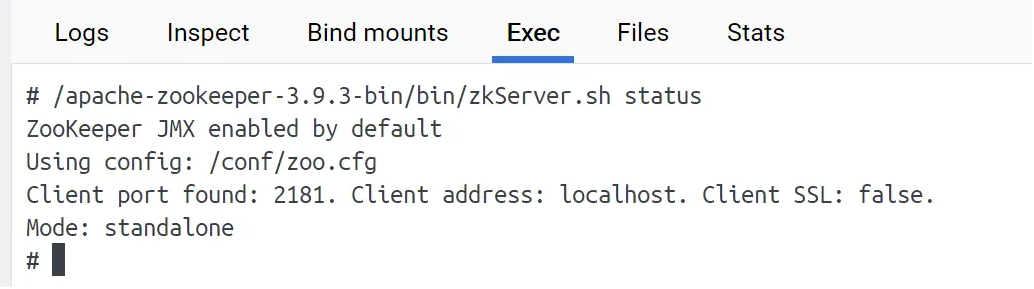
그런 다음 컨테이너를 다시 시작하고 컨테이너에 들어가서 ZooKeeper 상태를 확인하세요.
/apache-zookeeper-3.9.3-bin/bin/zkServer.sh status다음과 같은 출력이 표시되면 ZooKeeper가 성공적으로 시작된 것입니다.
Netty 클러스터 변환 연습
ZooKeeper 환경을 설정한 후, 원래 단일 Netty 서비스를 클러스터로 변환하기 시작했습니다.
이 변환의 핵심 아이디어는 다음과 같습니다.
- 각 Netty 인스턴스가 시작될 때 ZooKeeper에 자동으로 등록되도록 합니다.
- 최소 연결 수를 기반으로 부하 분산 전략 구현
- RabbitMQ를 통한 크로스 서버 메시지 브로드캐스팅 구현
- 사용자가 온라인과 오프라인으로 전환될 때 온라인 사용자의 동기화를 처리합니다.
Spring Boot는 ZooKeeper를 통합합니다
1. 종속성 소개
먼저, Apache Curator 종속성을 프로젝트에 추가합니다.
Apache Curator는 ZooKeeper 클라이언트로, 더욱 사용하기 편리한 API를 제공합니다.
<dependency>
    <groupId>org.apache.zookeeper</groupId>
    <artifactId>zookeeper</artifactId>
    <version>3.9.3</version>
</dependency>

<dependency>
    <groupId>org.apache.curator</groupId>
    <artifactId>curator-recipes</artifactId>
    <version>5.8.0</version>
</dependency>

<dependency>
    <groupId>org.apache.curator</groupId>
    <artifactId>curator-framework</artifactId>
    <version>5.8.0</version>
</dependency>
2. ZooKeeper 연결 구성
application.ymlZooKeeper 구성을 다음에 추가합니다
# Zookeeper 설정
zookeeper:
  curator:
    host: 127.0.0.1:2181
    connectionTimeoutMs: 30000
    sessionTimeoutMs: 3000
    sleepMsBetweenRetry: 2000
    maxRetries: 3
    namespace: kokochat
3. Curator 구성 클래스 생성
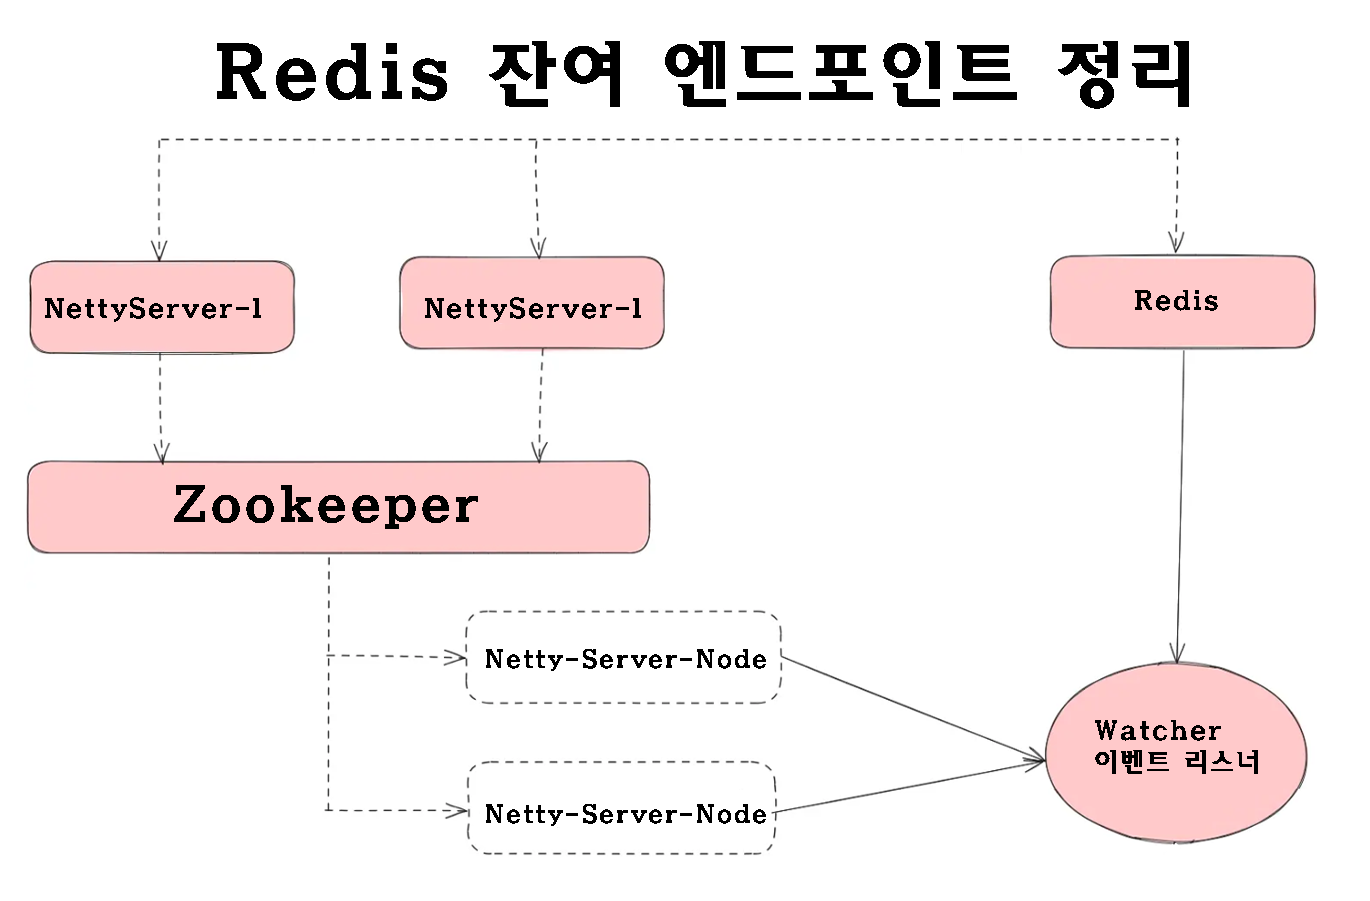
여기에 잔여 Redis 포트를 처리하기 위한 리스너가 추가되었습니다.
처리되지 않으면 포트 수가 계속 누적되어 상한값에 도달하게 됩니다.
@Slf4j
@Component
@Data
@ConfigurationProperties(prefix = "zookeeper.curator")
public class CuratorConfig {

    // Zookeeper 호스트 주소
    private String host;

    // 연결 타임아웃 시간
    private Integer connectionTimeout;

    // 세션 타임아웃 시간
    private Integer sessionTimeout;

    // 재시도 간격(ms)
    private Integer sleepMsBetweenRetry;

    // 최대 재시도 횟수
    private Integer maxRetries;

    // 네임스페이스 설정
    private String namespace;

    // Redis 연산자 의존성 주입
    @Autowired
    private RedisOperator redisOperator;

    // Zookeeper에서 사용하는 노드 경로 상수
    public static final String PATH = "/server-list";

    /**
     * CuratorFramework 클라이언트를 빈으로 등록합니다.
     */
    @Bean("curatorClient")
    public CuratorFramework curatorClient() {
        // 재시도 정책 설정
        RetryPolicy retryPolicy = new ExponentialBackoffRetry(
                sleepMsBetweenRetry,
                maxRetries);

        // CuratorFramework 클라이언트 생성
        CuratorFramework client = CuratorFrameworkFactory.builder()
                .connectString(host)
                .connectionTimeoutMs(connectionTimeout)
                .sessionTimeoutMs(sessionTimeout)
                .retryPolicy(retryPolicy)
                .namespace(namespace)
                .build();

        // 클라이언트 시작
        client.start();

        // 노드 이벤트 감시자 등록
        addWatcher(PATH, client);

        return client;
    }

    /**
     * 지정한 경로에 노드 이벤트 감시자를 등록합니다.
     */
    public void addWatcher(String path, CuratorFramework client) {
        // 노드 캐시 생성
        CuratorCache curatorCache = CuratorCache.build(client, path);

        // 이벤트 리스너 추가
        curatorCache.listenable().addListener(((type, oldData, data) -> {
            switch (type.name()) {
                case "NODE_DELETED":
                    log.info("노드 삭제 이벤트 발생");

                    // Redis에서 해당 포트 캐시 삭제
                    NettyServerNode oldNode = JsonUtils.jsonToPojo(
                        new String(oldData.getData()),
                        NettyServerNode.class
                    );
                    String oldPort = oldNode.getPort() + "";
                    redisOperator.hdel("netty_port", oldPort);
                    break;

                default:
                    // 다른 이벤트는 처리하지 않음
                    break;
            }
        }));
    }
}
Netty 서비스 시작 프로세스 수정
1. 동적 포트 할당
동일한 서버에서 여러 Netty 인스턴스를 시작할 수 있도록 동적 포트 할당을 구현해야 합니다. Redis를 사용하여 사용된 포트를 기록하고, 시작될 때마다 자동으로 새 포트를 할당합니다.
public class ChatServer {

    // 기본 Netty 포트 번호를 상수로 정의
    public static final Integer nettyDefaultPort = 875;

    /**
     * 포트 번호를 동적으로 할당하는 메서드입니다.
     * 만약 Redis에 저장된 포트 정보가 없다면 기본 포트를 할당하고,
     * 기존에 사용 중인 포트가 있다면 그 중 최대값에 10을 더한 새 포트를 생성합니다.
     */
    public static Integer selectPort(Integer port) {
        // Redis에서 사용할 해시 키
        String portKey = "netty_port";

        // Redis 연결 가져오기
        Jedis jedis = JedisPoolUtils.getJedis();

        // Redis에서 모든 포트 정보 조회 (Hash 형태)
        Map<String, String> portMap = jedis.hgetAll(portKey);

        // 키 값을 정수형 포트 번호 리스트로 변환
        List<Integer> portList = portMap.entrySet().stream()
                .map(entry -> Integer.valueOf(entry.getKey()))
                .collect(Collectors.toList());

        Integer nettyPort = null;

        // Redis에 포트 정보가 아무것도 없을 경우
        if (portList == null || portList.isEmpty()) {
            // 기본 포트를 Redis에 저장
            jedis.hset(portKey, port + "", "0");
            nettyPort = port;
        } else {
            // 가장 큰 포트 번호를 찾아서 10을 더한 값 사용
            Optional<Integer> maxInteger = portList.stream()
                    .max(Integer::compareTo);
            Integer maxPort = maxInteger.get().intValue();
            Integer currentPort = maxPort + 10;

            // 새 포트 번호를 Redis에 저장
            jedis.hset(portKey, currentPort + "", "0");
            nettyPort = currentPort;
        }

        // 최종적으로 선택된 포트 반환
        return nettyPort;
    }
}
2. ZooKeeper에 서비스 등록
서비스 등록 도구 클래스를 만듭니다.
public class ZookeeperRegister {

    /**
     * Netty 서버를 ZooKeeper에 등록하는 메서드입니다.
     *
     * @param nodeName ZooKeeper에 등록할 노드 이름
     * @param ip       Netty 서버의 IP 주소
     * @param port     Netty 서버의 포트 번호
     */
    public static void registerNettyServer(String nodeName,
                                           String ip,
                                           Integer port) throws Exception {
        // Curator 클라이언트 가져오기
        CuratorFramework zkClient = CuratorConfig.getClient();
        String path = "/" + nodeName;

        // 해당 노드가 존재하는지 확인
        Stat stat = zkClient.checkExists().forPath(path);

        // 노드가 존재하지 않으면 영구 노드 생성
        if (stat == null) {
            zkClient.create()
                    .creatingParentsIfNeeded()
                    .withMode(CreateMode.PERSISTENT)
                    .forPath(path);
        }

        // Netty 서버 정보를 담는 임시 순차 노드 생성
        NettyServerNode serverNode = new NettyServerNode();
        serverNode.setIp(ip);
        serverNode.setPort(port);
        serverNode.setOnlineCounts(0); // 초기 접속자 수는 0

        // 서버 정보를 JSON 문자열로 변환
        String nodeJson = JsonUtils.objectToJson(serverNode);

        // 임시 순차 노드로 ZooKeeper에 등록
        zkClient.create()
                .withMode(CreateMode.EPHEMERAL_SEQUENTIAL)
                .forPath(path + "/im-", nodeJson.getBytes());
    }

    /**
     * 현재 실행 중인 서버의 IP 주소를 가져옵니다.
     */
    public static String getLocalIp() throws UnknownHostException {
        InetAddress address = InetAddress.getLocalHost();
        return address.getHostAddress();
    }

    /**
     * Netty 서버의 현재 접속자 수를 처리하는 메서드입니다.
     * ZooKeeper에 저장된 서버 노드를 찾아 접속자 수를 갱신합니다.
     * (분산 락 사용으로 데이터 일관성을 보장합니다.)
     *
     * @param serverNode 대상 서버 노드
     * @param counts     변경할 접속자 수 (양수 또는 음수)
     */
    public static void dealOnlineCounts(NettyServerNode serverNode,
                                        Integer counts) throws Exception {
        CuratorFramework zkClient = CuratorConfig.getClient();

        // ZooKeeper의 분산 읽기-쓰기 락 사용
        InterProcessReadWriteLock readWriteLock =
            new InterProcessReadWriteLock(zkClient, "rw-lock");
        readWriteLock.writeLock().acquire(); // 쓰기 락 획득

        try {
            String path = "/server-list";
            List<String> list = zkClient.getChildren().forPath(path);

            // 모든 서버 노드를 순회하며 해당 노드를 찾음
            for (String node : list) {
                String nodeValue = new String(
                    zkClient.getData().forPath(path + "/" + node)
                );
                NettyServerNode pendingNode = JsonUtils.jsonToPojo(
                    nodeValue,
                    NettyServerNode.class
                );

                // IP와 포트가 일치하는 노드를 찾았을 경우
                if (pendingNode.getIp().equals(serverNode.getIp()) &&
                    pendingNode.getPort().intValue() == serverNode.getPort().intValue()) {

                    // 접속자 수 변경
                    pendingNode.setOnlineCounts(
                        pendingNode.getOnlineCounts() + counts
                    );

                    // 변경된 정보를 다시 JSON으로 변환하여 ZooKeeper에 저장
                    String nodeJson = JsonUtils.objectToJson(pendingNode);
                    zkClient.setData().forPath(
                        path + "/" + node,
                        nodeJson.getBytes()
                    );
                }
            }
        } finally {
            // 락 해제
            readWriteLock.writeLock().release();
        }
    }

    /**
     * Netty 서버의 접속자 수를 1 증가시킵니다.
     */
    public static void incrementOnlineCounts(NettyServerNode serverNode)
        throws Exception {
        dealOnlineCounts(serverNode, 1);
    }

    /**
     * Netty 서버의 접속자 수를 1 감소시킵니다.
     */
    public static void decrementOnlineCounts(NettyServerNode serverNode)
        throws Exception {
        dealOnlineCounts(serverNode, -1);
    }
}
3. Netty 시작 클래스 수정
클라이언트 부하 분산 구현
클라이언트가 연결을 요청하면 ZooKeeper에서 사용 가능한 모든 Netty 서버를 가져와서 연결 수가 가장 적은 서버를 선택해야 합니다.
public class ChatServer {

    public static final Integer nettyDefaultPort = 875;

    public static void main(String[] args) throws Exception {
        // Netty의 이벤트 루프 그룹 생성 (Boss와 Worker)
        EventLoopGroup bossGroup = new NioEventLoopGroup();
        EventLoopGroup workerGroup = new NioEventLoopGroup();

        // 포트를 동적으로 할당
        Integer nettyPort = selectPort(nettyDefaultPort);

        // ZooKeeper에 Netty 서버 등록
        ZookeeperRegister.registerNettyServer(
            "Netty-Server-List",                     // 노드 이름
            ZookeeperRegister.getLocalIp(),          // 현재 IP 주소
            nettyPort                                // 할당된 포트 번호
        );

        // RabbitMQ 수신 대기 설정
        String queueName = "queue_" + ZookeeperRegister.getLocalIp() + "_" + nettyPort;
        RabbitMQConnectUtils mqConnectUtils = new RabbitMQConnectUtils();
        mqConnectUtils.listen("fanout_exchange", queueName);

        try {
            // Netty 서버 부트스트랩 설정
            ServerBootstrap server = new ServerBootstrap();
            server.group(bossGroup, workerGroup)                       // Boss와 Worker 그룹 설정
                  .channel(NioServerSocketChannel.class)              // 채널 유형 지정
                  .childHandler(new WSServerInitializer());           // 채널 초기화 핸들러 설정

            // 서버 바인딩 및 실행
            ChannelFuture channelFuture = server.bind(nettyPort).sync();
            log.info("Netty 서버가 성공적으로 시작되었습니다. 포트: {}", nettyPort);

            // 채널이 종료될 때까지 대기
            channelFuture.channel().closeFuture().sync();
        } finally {
            // 서버 종료 시 리소스 정리
            bossGroup.shutdownGracefully();
            workerGroup.shutdownGracefully();
        }
    }

    /**
     * 포트를 동적으로 선택하는 유틸리티 메서드
     */
    public static Integer selectPort(Integer port) {
        String portKey = "netty_port";
        Jedis jedis = JedisPoolUtils.getJedis();
        Map<String, String> portMap = jedis.hgetAll(portKey);

        List<Integer> portList = portMap.entrySet().stream()
                .map(entry -> Integer.valueOf(entry.getKey()))
                .collect(Collectors.toList());

        Integer nettyPort = null;

        if (portList == null || portList.isEmpty()) {
            // 포트가 없다면 기본 포트로 설정
            jedis.hset(portKey, port + "", "0");
            nettyPort = port;
        } else {
            // 사용 중인 포트 중 가장 큰 값 + 10을 새 포트로 설정
            Optional<Integer> maxInteger = portList.stream().max(Integer::compareTo);
            Integer maxPort = maxInteger.get();
            Integer currentPort = maxPort + 10;
            jedis.hset(portKey, currentPort + "", "0");
            nettyPort = currentPort;
        }

        return nettyPort;
    }
}
클라이언트 부하 분산 구현
클라이언트가 연결을 요청하면 ZooKeeper에서 사용 가능한 모든 Netty 서버를 가져와서 연결 수가 가장 적은 서버를 선택해야 합니다.
import org.apache.curator.framework.CuratorFramework;
import org.springframework.web.bind.annotation.PostMapping;
import org.springframework.web.bind.annotation.RestController;
import javax.annotation.Resource;
import java.util.*;
import java.util.stream.*;

@RestController
public class NettyController {

    // Curator 클라이언트를 의존성 주입 (Zookeeper 연결용)
    @Resource(name = "curatorClient")
    private CuratorFramework zkClient;

    /**
     * ZooKeeper에서 등록된 모든 Netty 서버 노드를 조회하고,
     * 접속자 수가 가장 적은 서버를 선택하여 반환합니다.
     *
     * @return GraceJSONResult 형태로 최소 접속자 서버 정보 반환
     */
    @PostMapping("getNettyOnlineInfo")
    public GraceJSONResult getNettyOnlineInfo() throws Exception {
        // Zookeeper에서 모든 Netty 서버 노드 경로 가져오기
        String path = "/server-list";
        List<String> list = zkClient.getChildren().forPath(path);

        // 서버 노드 정보를 담을 리스트 초기화
        List<NettyServerNode> serverNodeList = new ArrayList<>();

        // 각 노드의 데이터를 가져와 객체로 변환 후 리스트에 추가
        for (String node : list) {
            String nodeValue = new String(
                zkClient.getData().forPath(path + "/" + node)
            );

            NettyServerNode serverNode = JsonUtils.jsonToPojo(
                nodeValue,
                NettyServerNode.class
            );

            serverNodeList.add(serverNode);
        }

        // 접속자 수가 가장 적은 서버를 선택
        Optional<NettyServerNode> minNodeOptional = serverNodeList.stream()
                .min(Comparator.comparing(NettyServerNode::getOnlineCounts));

        // 결과가 존재할 경우 반환
        NettyServerNode minNode = minNodeOptional.get();

        return GraceJSONResult.ok(minNode);
    }
}
크로스 서버 메시지 브로드캐스팅
1. RabbitMQ 연결 도구 클래스
import com.rabbitmq.client.*;
import java.io.IOException;
import java.util.ArrayList;
import java.util.List;

public class RabbitMQConnectUtils {

    // 연결 풀 리스트
    private final List<Connection> connections = new ArrayList<>();

    // 최대 연결 수 제한
    private final int maxConnection = 20;

    // RabbitMQ 접속 설정
    private final String host = "127.0.0.1";
    private final int port = 5672;
    private final String username = "guest";
    private final String password = "guest";
    private final String virtualHost = "/";

    private ConnectionFactory factory;

    /**
     * 연결 팩토리 초기화
     */
    private void initFactory() {
        if (factory == null) {
            factory = new ConnectionFactory();
            factory.setHost(host);
            factory.setPort(port);
            factory.setUsername(username);
            factory.setPassword(password);
            factory.setVirtualHost(virtualHost);
        }
    }

    /**
     * RabbitMQ 연결 하나 가져오기
     */
    private Connection getConnection() throws Exception {
        initFactory();
        if (connections.size() < maxConnection) {
            Connection connection = factory.newConnection();
            connections.add(connection);
            return connection;
        } else {
            // 기존 연결 중 하나를 재사용
            return connections.get((int) (Math.random() * connections.size()));
        }
    }

    /**
     * 메시지 큐를 수신 대기
     *
     * @param exchangeName 교환기 이름
     * @param queueName    큐 이름
     */
    public void listen(String exchangeName, String queueName) throws Exception {
        Connection connection = getConnection();
        Channel channel = connection.createChannel();

        // 교환기 선언 (fanout: 모든 큐에 메시지 브로드캐스트)
        channel.exchangeDeclare(
                exchangeName,
                BuiltinExchangeType.FANOUT,
                true,
                false,
                null
        );

        // 큐 선언
        channel.queueDeclare(queueName, true, false, false, null);

        // 큐를 교환기에 바인딩
        channel.queueBind(queueName, exchangeName, "");

        // 소비자 생성
        Consumer consumer = new DefaultConsumer(channel) {
            @Override
            public void handleDelivery(String consumerTag,
                                       Envelope envelope,
                                       AMQP.BasicProperties properties,
                                       byte[] body) throws IOException {
                String msg = new String(body);
                String exchange = envelope.getExchange();

                if (exchange.equalsIgnoreCase(exchangeName)) {
                    // 수신된 메시지를 처리
                    DataContent dataContent = JsonUtils.jsonToPojo(msg, DataContent.class);

                    String senderId = dataContent.getChatMsg().getSenderId();
                    String receiverId = dataContent.getChatMsg().getReceiverId();

                    // 수신자에게 메시지 전송
                    List<Channel> receiverChannels =
                            UserChannelSession.getMultiChannels(receiverId);
                    UserChannelSession.sendToTarget(receiverChannels, dataContent);

                    // 송신자의 다른 디바이스에도 동기화
                    String currentChannelId = dataContent.getExtend();
                    List<Channel> senderChannels =
                            UserChannelSession.getMyOtherChannels(senderId, currentChannelId);
                    UserChannelSession.sendToTarget(senderChannels, dataContent);
                }
            }
        };

        // 큐에서 메시지를 소비 시작
        channel.basicConsume(queueName, true, consumer);
    }
}
2. 메시지 게시 도구
public class MessagePublisher {

    // 교환기 이름 정의
    public static final String EXCHANGE = "pitayafruits_exchange";           // 메시지 저장용 교환기
    public static final String FANOUT_EXCHANGE = "fanout_exchange";          // Netty 브로드캐스트용 교환기

    // 라우팅 키 정의
    public static final String ROUTING_KEY_SEND = "pitayafruits.wechat.send";

    /**
     * 메시지를 데이터베이스에 저장하기 위해 RabbitMQ로 전송
     *
     * @param msg 저장할 채팅 메시지
     */
    public static void sendMsgToSave(ChatMsg msg) throws Exception {
        RabbitMQConnectUtils connectUtils = new RabbitMQConnectUtils();
        connectUtils.sendMsg(
            JsonUtils.objectToJson(msg),  // 객체를 JSON 문자열로 변환
            EXCHANGE,                     // 지정된 교환기
            ROUTING_KEY_SEND              // 라우팅 키
        );
    }

    /**
     * 모든 Netty 서버에 메시지를 브로드캐스트 전송
     *
     * @param msg 브로드캐스트할 메시지 (문자열)
     */
    public static void sendMsgToNettyServers(String msg) throws Exception {
        RabbitMQConnectUtils connectUtils = new RabbitMQConnectUtils();
        connectUtils.sendMsg(
            msg,                 // 메시지 문자열
            FANOUT_EXCHANGE,    // fanout 교환기
            ""                  // fanout은 라우팅 키 사용하지 않음
        );
    }
}
3. 메시지 프로세서 수정
ChatHandler사용자 연결, 메시지 전송 및 연결 해제를 처리합니다 .
import io.netty.channel.*;
import io.netty.channel.group.ChannelGroup;
import io.netty.channel.group.DefaultChannelGroup;
import io.netty.handler.codec.http.websocketx.TextWebSocketFrame;
import io.netty.util.concurrent.GlobalEventExecutor;
import redis.clients.jedis.Jedis;

import java.time.LocalDateTime;

public class ChatHandler extends SimpleChannelInboundHandler<TextWebSocketFrame> {

    // 모든 클라이언트 채널을 관리하는 그룹
    public static ChannelGroup clients = new DefaultChannelGroup(GlobalEventExecutor.INSTANCE);

    /**
     * 클라이언트로부터 메시지를 수신했을 때 호출되는 메서드
     */
    @Override
    protected void channelRead0(ChannelHandlerContext ctx, TextWebSocketFrame msg) throws Exception {
        String content = msg.text();

        // JSON 문자열을 DataContent 객체로 변환
        DataContent dataContent = JsonUtils.jsonToPojo(content, DataContent.class);
        ChatMsg chatMsg = dataContent.getChatMsg();

        Integer msgType = chatMsg.getMsgType();
        Channel currentChannel = ctx.channel();
        String currentChannelId = currentChannel.id().asLongText();
        String senderId = chatMsg.getSenderId();

        // 1. 최초 연결 시
        if (msgType == MsgTypeEnum.CONNECT_INIT.type) {
            // 사용자 채널 등록
            UserChannelSession.putMultiChannels(senderId, currentChannel);
            UserChannelSession.putUserChannelIdRelation(currentChannelId, senderId);

            // ZooKeeper를 통해 온라인 사용자 수 증가
            NettyServerNode minNode = dataContent.getServerNode();
            ZookeeperRegister.incrementOnlineCounts(minNode);

            // Redis에 사용자-서버 매핑 저장
            Jedis jedis = JedisPoolUtils.getJedis();
            jedis.set(senderId, JsonUtils.objectToJson(minNode));

        }
        // 2. 일반 메시지 처리 (텍스트, 이미지, 동영상, 음성)
        else if (msgType == MsgTypeEnum.WORDS.type
                || msgType == MsgTypeEnum.IMAGE.type
                || msgType == MsgTypeEnum.VIDEO.type
                || msgType == MsgTypeEnum.VOICE.type) {

            // 고유 메시지 ID 생성
            Snowflake snowflake = new Snowflake(new IdWorkerConfigBean());
            chatMsg.setMsgId(snowflake.nextId());

            // 서버 시간 기록
            chatMsg.setChatTime(LocalDateTime.now());

            // 메시지 갱신
            dataContent.setChatMsg(chatMsg);
            dataContent.setExtend(currentChannelId);

            // 2-1. 메시지를 모든 Netty 서버에 브로드캐스트
            MessagePublisher.sendMsgToNettyServers(JsonUtils.objectToJson(dataContent));

            // 2-2. 메시지를 데이터베이스에 저장
            MessagePublisher.sendMsgToSave(chatMsg);
        }
    }

    /**
     * 클라이언트와의 연결이 해제되었을 때 호출
     */
    @Override
    public void handlerRemoved(ChannelHandlerContext ctx) throws Exception {
        Channel currentChannel = ctx.channel();
        String userId = UserChannelSession.getUserIdByChannelId(currentChannel.id().asLongText());

        // 세션에서 사용자 채널 제거
        UserChannelSession.removeUserChannels(userId, currentChannel.id().asLongText());
        clients.remove(currentChannel);

        // Redis에서 서버 정보 조회 후 ZooKeeper에 온라인 수 감소
        Jedis jedis = JedisPoolUtils.getJedis();
        NettyServerNode serverNode = JsonUtils.jsonToPojo(jedis.get(userId), NettyServerNode.class);
        ZookeeperRegister.decrementOnlineCounts(serverNode);
    }

    /**
     * 예외가 발생했을 때 호출됨
     */
    @Override
    public void exceptionCaught(ChannelHandlerContext ctx, Throwable cause) throws Exception {
        // 예외 발생 시 연결 해제와 동일한 로직 처리
        handlerRemoved(ctx);
    }
}
요약
이 글을 통해 단일 Netty 서비스를 고가용성 분산 클러스터 아키텍처로 성공적으로 전환했습니다.
전체 솔루션은 ZooKeeper의 분산 조정 기능을 사용하여 서비스 등록 및 검색을 수행하고, RabbitMQ의 브로드캐스트 모드를 통해 서버 간 메시지 전송 문제를 해결하며, Redis를 사용하여 동적 포트 할당을 구현합니다.
이 아키텍처는 이미 대부분의 인스턴트 메시징 시나리오의 요구 사항을 충족할 수 있습니다.
물론, 초대규모 시나리오에서는 더욱 스마트한 부하 분산 전략 도입 및 지역 간 배포 구현 등 추가적인 최적화가 가능합니다.
이 글의 실제 경험이 고성능 인스턴트 메시징 서비스를 구축하는 모든 분께 참고 자료가 되기를 바랍니다.
다음 편에서는 글로벌 서비스를 위한 멀티 리전 배포 전략을 다룰 예정 입니다.