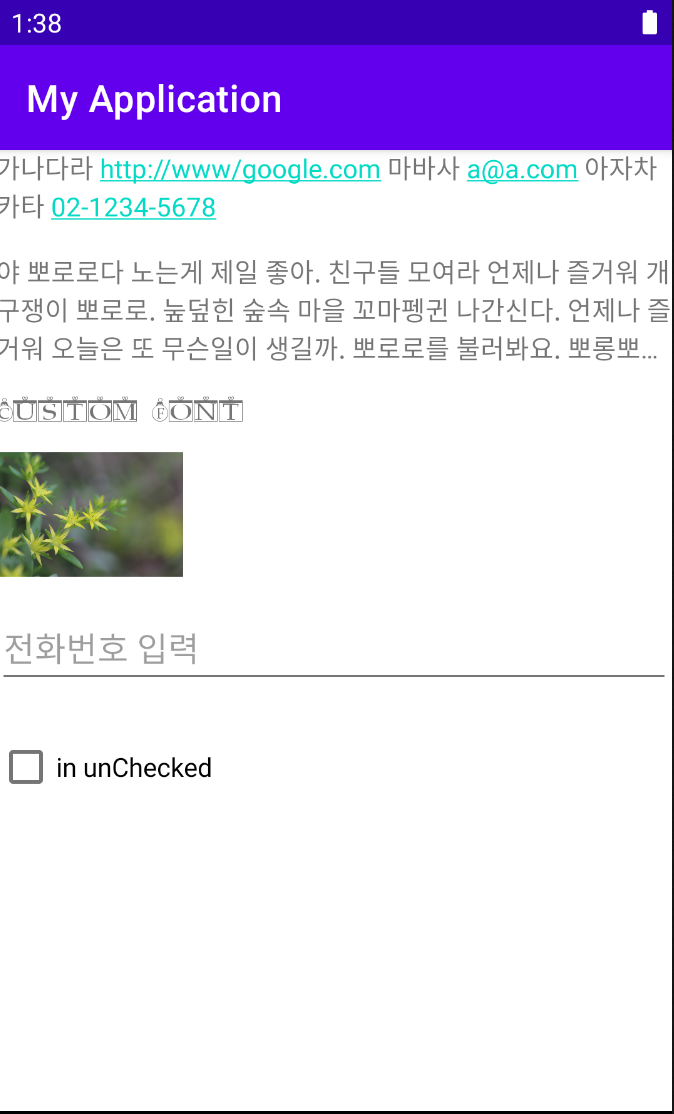
오늘 기초 뷰를 활요하여 실습할 결과 화면이다.
◼︎ 레이아웃 XML
<LinearLayout xmlns:android="http://schemas.android.com/apk/res/android"
    android:layout_width="match_parent"
    android:layout_height="match_parent"
    android:orientation="vertical">

    <TextView
        android:layout_width="match_parent"
        android:layout_height="wrap_content"
        android:text="가나다라 http://www/google.com 마바사 a@a.com 아자차카타 02-1234-5678"
        android:autoLink="web|email|phone"/>

    <TextView
        android:layout_width="match_parent"
        android:layout_height="wrap_content"
        android:text="@string/long_text"
        android:layout_marginTop="16dp"
        android:ellipsize="end"
        android:maxLines="3"/>

    <TextView
        android:layout_width="match_parent"
        android:layout_height="wrap_content"
        android:id="@+id/fontView"
        android:text="Custom Font"
        android:layout_marginTop="16dp"/>

    <ImageView
        android:layout_width="wrap_content"
        android:layout_height="wrap_content"
        android:src="@drawable/sample"
        android:maxWidth="100dp"
        android:maxHeight="100dp"
        android:adjustViewBounds="true"
        android:layout_marginTop="16dp"/>
    <EditText
        android:layout_width="match_parent"
        android:layout_height="wrap_content"
        android:inputType="phone"
        android:hint="전화번호 입력"
        android:layout_marginTop="16dp"/>
    <CheckBox
        android:layout_width="wrap_content"
        android:layout_height="wrap_content"
        android:id="@+id/checkbox"
        android:text="in unChecked"
        android:layout_marginTop="16dp"/>

</LinearLayout>
■ TextView
앱을 개발할 때 가장 많이 사용하는 뷰로, 문자열을 화면에 출력한다.
∙ text: 화면에 출력할 문자열을 지정하는 속성
∙ typeface: 화면에 출력할 문자열의 폰트를 지정하는 속성
∙ textStyle: 문자열 효과로 normal(default), bold, italic 중 하나를 입력한다.
∙ textColor: 문자열의 색상을 16진수 RGB 포맷으로 지정할 때 사용한다.
∙ textSize: 문자열의 폰트 크기를 지정할 때 사용한다.
∙ autoLink: TextView의 문자열을 분석해 자동으로 브라우저, 이메일 앱, 전화 앱이 실행된다.
∙ maxLines: TextView에 긴 문자열을 대입할 때, 틀정 줄만큼만 출력할 때 사용한다.
∙ ellipsize: maxLines로 지정한 중만큼만 출력할 수 있는데, 이때 줄임 표시(...)를 하고 싶을 때, 문자열 줄임 표시를 자동화하는 속성이다. 속성값으로 end, start, middle 등을 지정하여 줄임 표시의 위치를 정할 수 있다.
■ ImageView
화면에 이미지를 출력하고자 할 때 사용하는 뷰이다.
∙ src: 화면에 출력할 이미지를 지정하는 속성이다.
∙ maWidth, maxHeight: 화면에 출력할 이미지의 최대 크기를 지정하는 속성이다. adjustViewBounds라는 속성과 함께 사용해야 하며, adjustViewBounds에 따라 이미지의 가로세로 비율을 유지할 수 있다.
∙ adjustViewBounds: 이미지의 크기를 변경할 때 가로세로 비율을 유지할 지(true, false) 지정하는 속성이다.
∙ tint: 이미지 위에 다른 색상을 입힐 때 사용하는 속성이다.
■ EditText
사용자에게 데이터를 입력받을 때 사용하는 뷰이다. TextView와 성격이 같아 TextView를 상속받아 작성되었다.
∙ lines: 처음 화면에 보일 때부터 특정 줄만큼 보이게 할 때 사용하는 속성이다. 만약 lines="3"로 지정하면, 처음부터 세로 방향 3줄 입력 크기로 출력되고 더는 늘거나 줄지 않는다.
∙ maxlines: lines 속성과 차이가 있는데 lines="3"로 지정하여도 처음 화면 보일 때는 한 줄 입력크기로 보인다.
∙inputType: 아주 중요하고 자주 이용하는 속성으로 두 가지 목적으로 이용한다. 첫 번째 목적은 EditText에 글을 입력하기 위해 올라오는 키보드의 모드를 제어하는데 있고, 두 번째 목적은 사용자에게 한 줄 혹은 여러 줄 입력을 강제하는 데 있다.
✓inputType의 속성값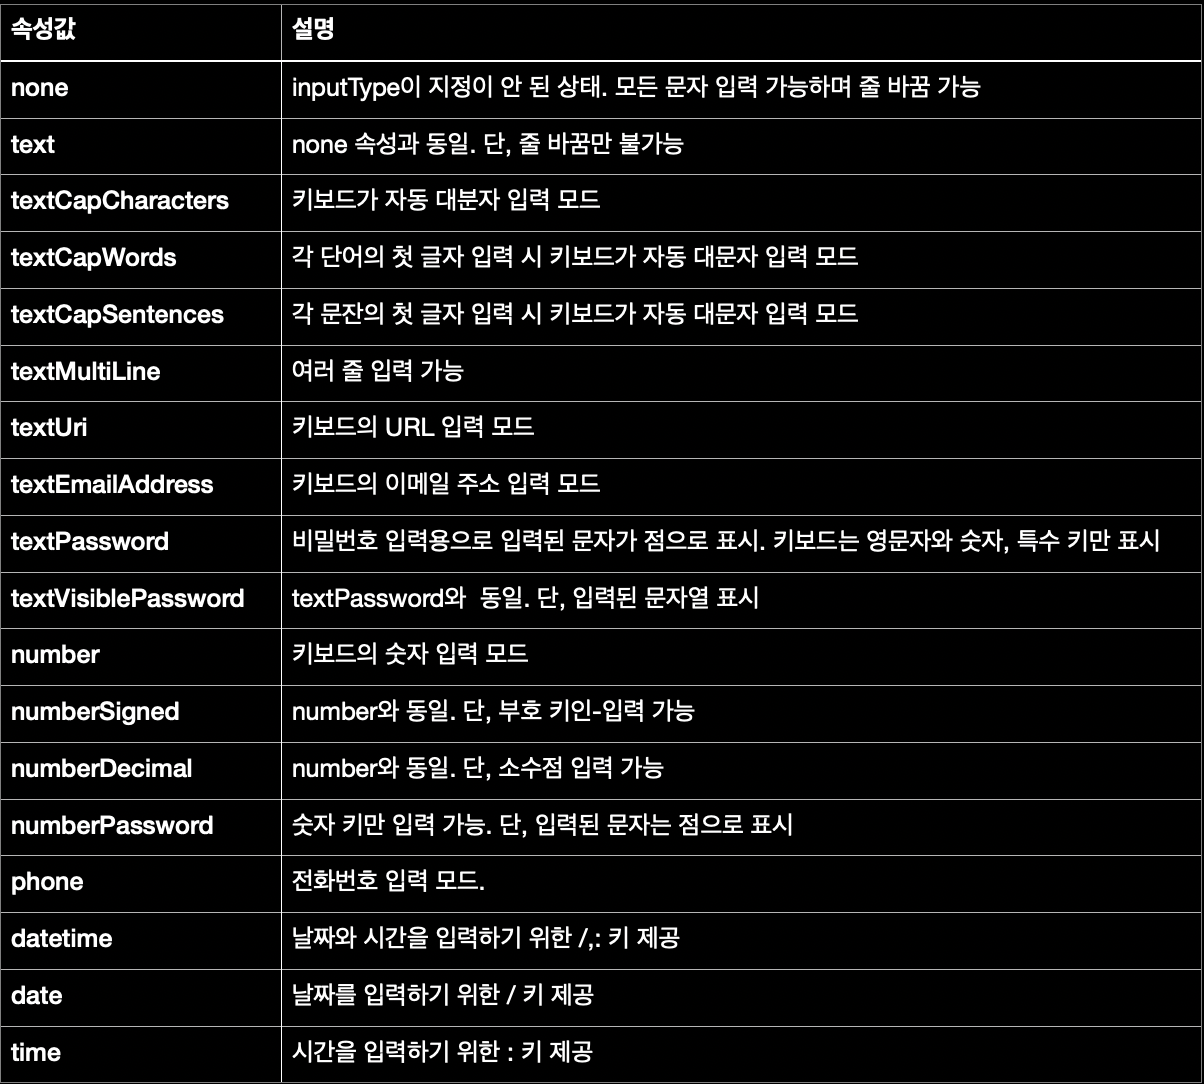
∙ gravity
EditText에 입력할 글의 위치를 지정할 수 있다. 기본값은 left top이며 이를 center 혹은 right 등을 지정하여 위치를 조정한다.
gravity 속성은 EditText만을 위한 속성은 아니며, 모든 뷰에서 내용이 정렬되는 위치를 지정할 때 사용된다.
■ Button
Button은 화면에서 사용자의 이벤트를 처리하기 위한 가장 기본이 되는 뷰이다.
사용자 클릭 이벤트는 Button에서 뿐만 아니라 모든 뷰에서 클릭 이벤트를 처리할 수 있다. 문자열을 출력한다는 의미에서 TextView의 서브클래스로 만들어져서 TextView에서 설정했던 대부분의 속성을 그대로 사용할 수 있다.
Button 하위 클래스로 CheckBox, RadioButton, ToggleButton 등이 있다.
■ CheckBox, RadioButton
▪︎ CheckBox
선택과 선택되지 않은 두 가지 상태를 표현하기 위한 뷰이다. TextView의 서브 클래스이므로 TextView에서 설정하는 textColor, textSize 등의 문자열 속성을 그대로 적용할 수 있다.
속성 설정 설명을 위해서 예시를 들어보자.
<LinearLayout xmlns:android="http://schemas.android.com/apk/res/android"
    android:layout_width="match_parent"
    android:layout_height="match_parent">

    <CheckBox
        android:layout_width="wrap_content"
        android:layout_height="wrap_content"
        android:id="@+id/checkbox"
        android:text="is unChecked"/>

</LinearLayout>
위 레이아웃 XML 파일은 CheckBox를 하나 준비한 코드다.
문자열로 "is unCheckBox"라는 문자열을 출력하였다. CheckBox는 사용자에게 글이 아니라 true, false 값을 입력받을 때 사용하므로 코드에서 CheckBox의 상태를 획득하거나 조정할 필요가 있다.
이때 다음 함수를 이용한다.
∙isCheckBox(): 해당 Checkbox가 체크된 상태인지를 반환한다. true가 반환되면 체크된 상태, false가 반환되면 체크가 안 된 상태이다.
∙setChecked(): Checkbox의 체크 상태를 바꾸기 위한 함수로 매개변수 값을 true로 지정하면 체크 상태로 바뀌고, false로 지정하면 체크가 안 된 상태로 바뀐다.
∙toggle(): 이 함수를 이용하면 현재 Checkbox의 상태와 상관없이 반대로 바뀐다.
또한, 때에 따라 사용자가 체크 상태를 바꾼 순간의 이벤트 처리로 상태를 파악해야 하는 경우 OnCheckedChangeListener 이벤트를 이용한다.
public class MainActivity5 extends AppCompatActivity {

    CheckBox checkBox;

    @Override
    protected void onCreate(Bundle savedInstanceState) {
        super.onCreate(savedInstanceState);
        setContentView(R.layout.activity_main5);

        checkBox=findViewById(R.id.checkbox);
        checkBox.setOnCheckedChangeListener(new CompoundButton.OnCheckedChangeListener() {
            @Override
            public void onCheckedChanged(CompoundButton buttonView, boolean isChecked) {
                if (isChecked){
                    checkBox.setText("is Checked");
                }else {
                    checkBox.setText("is unChecked");
                }
            }
        });

    }
}
위의 코드는 체크 상태 변경 시 이벤트를 처리하는 코드이다. 체크 상태가 바뀔 때마다 onCheckedChanged() 함수가 자동으로 출력되며, 두 번째 매개변수인 boolean isChecked를 통해 체크 상태를 알려준다.
체크 상태이면 Checkbox의 문자열을 "is Checked", 체크 되지 않은 상태이면 "is unChecked"라고 조정한 코드이다.
▪︎RadioButton
Checkbox처럼 체크 상태를 표현하기 위한 뷰이다. 여러 개 중 하나만 선택할 수 있으며, RadioGroup 클래스가 제공된다. 같은 클래스에 묶인 RadioButton의 체크 상태를 파악하기 위해서 각각의 RadioButton에 id 값을 부여하는 것이 편리하다.
RadioButton에서 제공하는 함수는 다음과 같다.
∙ check(): 매개변수로 체크하고자 하는 RadioButton의 id 값을 주면 해당 RadioButton이 체크된다.
∙ clearCheck(): RadioGroup의 RadioButton의 체크 상태를 해제한다.
∙ getCheckedRadioButtonId(): 체크된 RadioButton의 id 값을 획득한다.
◼︎ 자바 코드
public class MainActivity4 extends AppCompatActivity {


    CheckBox checkBox;

    @Override
    protected void onCreate(Bundle savedInstanceState) {
        super.onCreate(savedInstanceState);
        setContentView(R.layout.activity_main4);

        TextView textView = findViewById(R.id.fontView);
        Typeface typeface = Typeface.createFromAsset(getAssets(), "xmas.ttf");
        textView.setTypeface(typeface);

        checkBox = findViewById(R.id.checkbox);
        checkBox.setOnCheckedChangeListener(new CompoundButton.OnCheckedChangeListener() {
            @Override
            public void onCheckedChanged(CompoundButton buttonView, boolean isChecked) {
                if (isChecked) {
                    checkBox.setText("is Checked");
                }else {
                    checkBox.setText("is unChecked");
                }
            }
        });
    }
}
✏️ 저번주에 올린 줄 알았는데.. 비몽사몽해서 잘 못 봤나보다.. ㅜㅜ
다음주 부터는 근무일이 많아져서 새벽 공부 위주로 해야 할 것 같다...
오늘은 하나만 더 올리고 알람어플 작업해야 한다.. 깃허브 올리고 정신없는 하루