100 days of swiftui: 16
https://www.hackingwithswift.com/100/swiftui/16
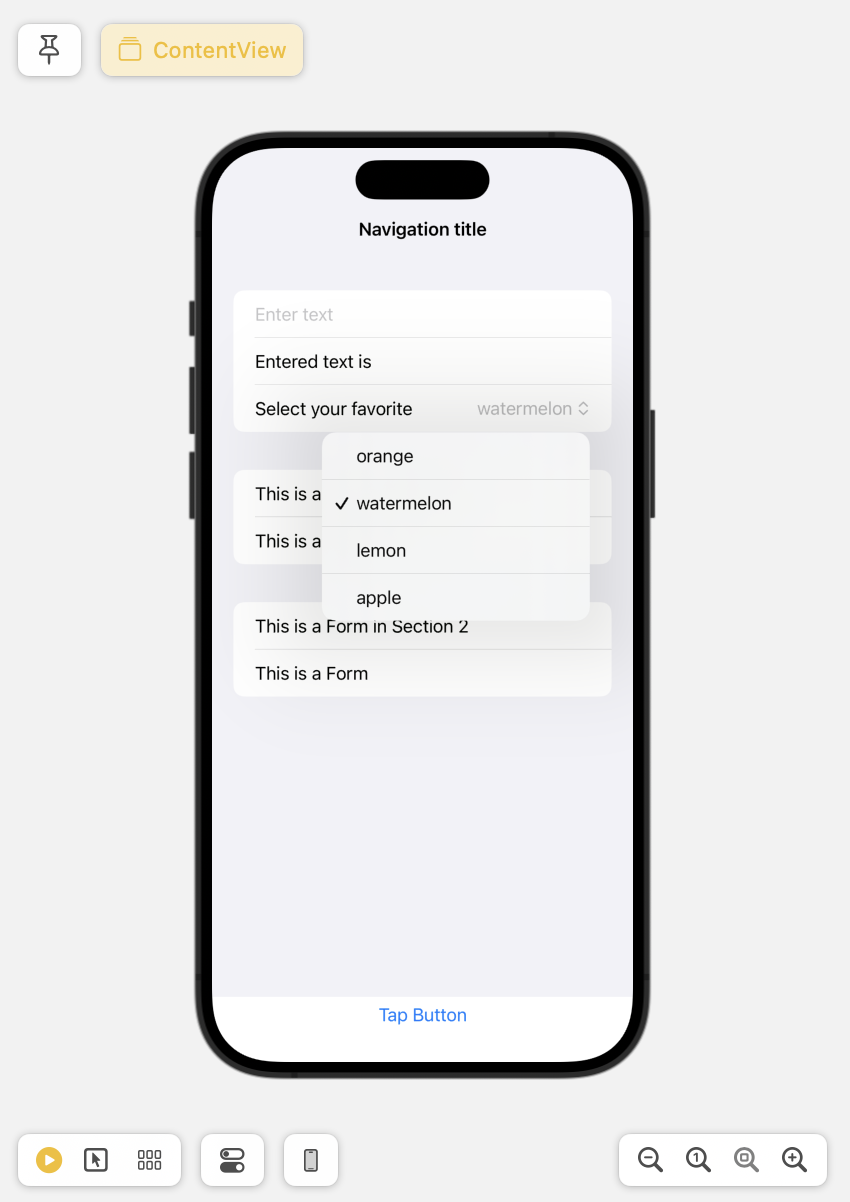
오늘 구현한 View 사진
코드 파일
https://github.com/soaringwave/Ios-WeSplit/commit/f9ea93be2d2d7d83d4b4c04176a06828b205d2c1
Form
사용자로부터 입력을 받을 때 사용한다. Form을 입력하면 자동적으로 iphone의 환경설정 ui처럼 회색 바탕에 내용물이 표현된다. Section을 통해 그룹별로 나타낼 수 있다.
        Form {
            Section {
                Text("This is a Form in Section 1")
                Text("This is a Form")
            }
            Section {
                Text("This is a Form in Section 2")
                Text("This is a Form")
            }
        }
Navigation bar
navigationTitle()을 설정하면 ui 화면의 가능한 가장 위에 보이며, 스크롤할 때 화면의 가장 위에서 유지된다. 이를 통해 화면 요소들이 safe area 안에서 보이게 할 수 있다. navigationBarTitleDisplayMode()를 통해 스타일을 수정할 수도 있다.
        NavigationStack {
            Form {
                Section {
                    Text("This is a Form in Section 1")
                    Text("This is a Form")
                }
                Section {
                    Text("This is a Form in Section 2")
                    Text("This is a Form")
                }
                Section {
                    Text("This is a Form in Section 3")
                    Text("This is a Form")
                }
                Section {
                    Text("This is a Form in Section 4")
                    Text("This is a Form")
                }
                Section {
                    Text("This is a Form in Section 5")
                    Text("This is a Form")
                }
            }
            .navigationTitle("Navigation title")
            .navigationBarTitleDisplayMode(.inline)
        }
State & Binding
View는 state(상태)의 function이다. struct인 ContentView의 값에 변화를 주고, 변화를 화면에 나타내기 위해선 @State와 $를 사용해야 한다.
예: tap Button을 눌렀을 때 tapCount의 값을 변화를 주기
struct ContentView: View {
    @State var tapCount = 0

    var body: some View {
        Button("Tap Count: \(tapCount)") {
            tapCount += 1
        }
    }
}
예: TextField의 값을 입력과 함께 화면에서 변경하고, 입력에 따라 text 값을 설정하기
struct ContentView: View {
    @State private var text = ""

    var body: some View {
        Form {
            TextField("Enter text", text: $text)
            Text("Entered text is \(text)")
        }
    }
}
아래 Text는 text 변수 값을 읽는 것이기에 state & binding이 필요없다.
Picker with ForEach
Picker는 라벨을 보여주고 설정된 선택지들을 선택할 수 있게 한다. 이때 많은 선택지를 ForEach라는 루프를 통해 화면에 구현할 수 있다.
struct ContentView: View {
    @State private var selected = "orange"
    let picks = ["orange", "watermelon", "lemon", "apple"]

    var body: some View {
        NavigationStack {
            Form {
                Picker("Select your favorite", selection: $selected) {
                    ForEach(picks, id: \.self) { pick in
                        Text(pick)
                    }
                }
            }
        }
    }
}selected에 초기 값을 설정해두고, picks에 선택지들을 저장해두었다. 그리고 ForEach를 통해 picks의 값을 Text로 나타낸다.
swiftui의 경우 모든 View가 알아보고 탐색할 수 있게 유일해야 한다. 그래서 반복문의 경우 각각의 요소가 모두 unique함을 보여줘야 하는데, id: \.self를 통해 확인시킬 수 있다.
