7. 가중치 저장과 전이 학습
학습된 가중치의 저장 및 적재
일반적으로 신경망 학습 시에는 많은 시간이 소요된다.
딥러닝 신경망을 사용할 때마다 매번 이렇게 학습을 시켜야 할까?
아니다. 우리는 이미 학습된 모델의 가중치를 저장할 수 있고, 필요할 때마다 가중치를 불러와서 바로 신경망이 예측을 할 수 있게 할 수 있다.
케라스에서 학습된 가중치를 저장하는 방법은 아주 간단하다.
바로 모델의 save() 함수를 호출하면 된다.
model.save('mymodel')위의 코드가 실행되면 현재 디렉토리에 mymodel이라는 디렉토리가 생성되고, 아래와 같이 안에 모델과 관련된 정보를 담고 있는 파일들이 생성된다.
- 신경망 모델의 아키텍처 및 구성
- 훈련 중에 학습된 모델의 가중치 값
- 신경망 모델의 컴파일 정보
- 옵티마이저와 현재 상태(훈련을 중단한 곳에서 다시 시작하기 위해)
실습해보자.
import numpy as np
import tensorflow as tf
# 테스트 데이터 생성
test_input = np.random.random((128, 32))
test_target = np.random.random((128,1))

# 입력이 32, 출력이 1 노드인 신경망 모델을 구축한다. 함수형 API를 사용
inputs = tf.keras.Input(shape=(32,))
outputs = tf.keras.layers.Dense(1)(inputs)

model = tf.keras.Model(inputs, outputs)
model.compile(optimizer = 'adam', loss = 'mean_squared_error')

# 신경망 3번 학습
model.fit(test_input, test_target, epochs = 3)

# 3번 epoch를 진행한 모델을 저장
model.save("my_model")

# 저장된 모델 불러오기
saved_model = tf.keras.models.load_model("my_model")

# 저장된 모델을 다시 학습시킨다.
saved_model.fit(test_input, test_target, epochs=3)
전이 학습
전이 학습(Transfer Learning): 하나의 문제에 대해 학습한 신경망의 모델과 가중치를, 새로운 문제에 적용하는 것이다.
일반적으로 훈련은 며칠이 소요될 수도 있다.
따라서 사전 훈련된 모델을 컴퓨터 시각 및 자연어 처리 작업의 시각점으로 사용하는 방법을 이용한다.
사전 학습된 모델을 받아서 모델의 일부를 제거하고 우리의 목적에 맞는 레이어를 추가하여 사용하는 것이 일반적이다.
이와 같이 사전 훈련된 모델을 이용하는 것은 매우 좋은 방법이다.
이 전략을 사용하는 방법은 아래와 같다.
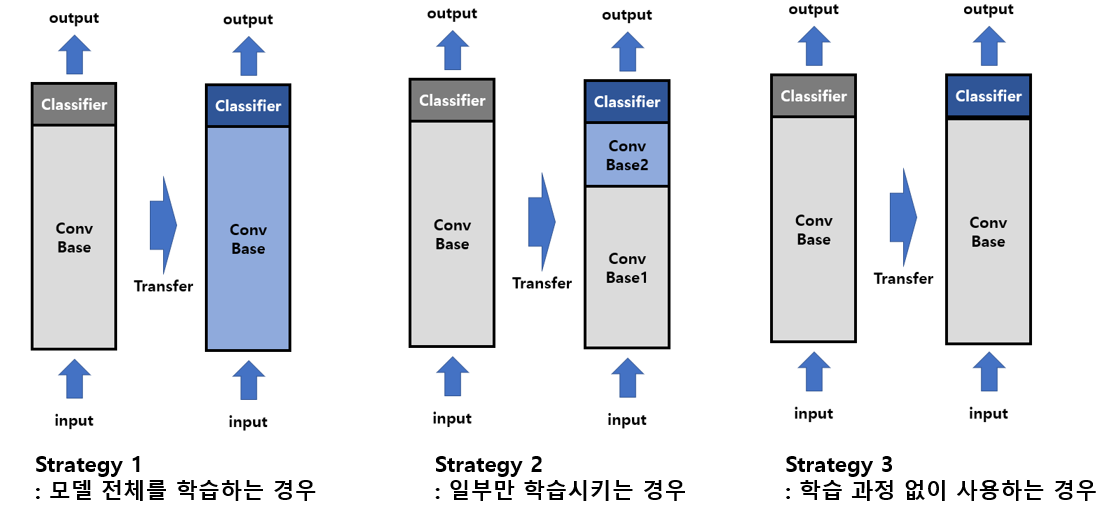
- 크기가 크고 유사성이 작은 데이터셋인 경우: 새롭게 만들어진 모델을 전부 새로 학습시킨다.
- 크기가 크고 유사성도 높은 데이터셋인 경우/크기가 작고 유사성도 작은 데이터셋인 경우: 사전 훈련된 모델의 일부분은 변경되지 않도록 한 상태에서 나머지 부분을 새로 학습시킨다. (주로 Convolutional Base의 일부분 고정, 나머지 계층과 Classifier를 새로 학습)
- 크기가 작고 유사성이 높은 데이터셋인 경우: 특징을 추출하는 레이어들을 학습시키지 않는다. 오직 분류기 레이어만을 학습시킨다. 이것을 미세조정(fine-tunning)이라고 한다.
예제 #1: ResNet50을 다운받아서 강아지 분류
- 필요한 라이브러리를 포함
from tensorflow.keras.applications.resnet50 import ResNet50
from tensorflow.keras.preprocessing import image
from tensorflow.keras.applications.resnet50 import preprocess_input, decode_predictions
import numpy as np
- ResNet50 객체를 생성
model = ResNet50(weights = 'imagenet')- 인터넷에서 다운받은 강아지 영상을 전처리
img_path= 'dog.jpg'
img = image.load_img(img_path, target_size = (224, 224))

x = image.img_to_array(img)
x = np.expand_dims(x, axis = 0)
x = preprocess_input(x)- ResNet50 모델을 이용하여 예측
preds = model.predict(x)
print("예측: ", decode_predictions(preds, top=3)[0])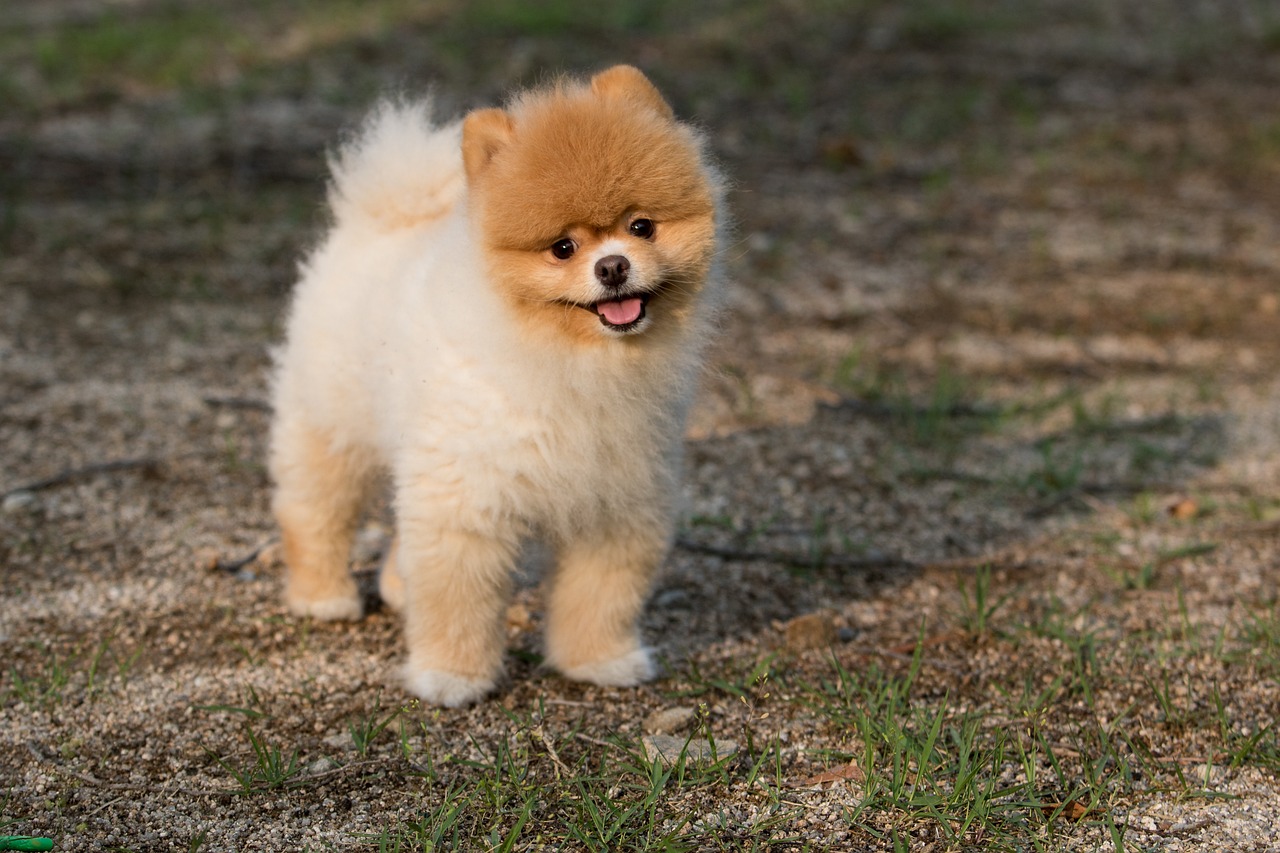

포메라니안! 맞췄다!🐶
예제 #2: MobileNet을 다운받아서 강아지 고양이 분류하기
- 필요한 라이브러리를 포함
import numpy as np
import matplotlib.pyplot as plt
from tensorflow.keras.layers import Dense, GlobalAveragePooling2D
from tensorflow.keras.applications import MobileNet
from tensorflow.keras.preprocessing import image
from tensorflow.keras.applications.mobilenet import preprocess_input
from tensorflow.keras.preprocessing.image import ImageDataGenerator
from tensorflow.keras.models import Model
from tensorflow.keras.optimizers import Adam- 사전 훈련된 모델을 생성
include_top:False로 해줌으로써 최상위(분류) 레이어를 제외한다.weights:imagenet의 방대한 사진들을 대상으로 훈련한 가중치 다운로드
base_model = MobileNet(weights = 'imagenet', include_top = False) - 사전 훈련된 모델에 분류기 레이어를 추가
base_model.output: MobileNet 기본 모델의 마지막 레이어 출력을 가져온다.GlobalAveragePooling2D: 각 특징 맵을 하나의 숫자로 평균화한다.Dense:ReLU활성화 함수를 사용하는 완전 연결 레이어다.preds: 2개의 유닛(이진 분류)과 softmax 활성화 함수를 갖는 출력 레이어이다.
x = base_model.output
x = GlobalAveragePooling2D()(x)
x = Dense(1024, activation = 'relu')(x)
x = Dense(1024, activation = 'relu')(x)
x = Dense(512, activation = 'relu')(x)
preds = Dense(2, activation = 'softmax')(x)

model= Model(inputs=base_model.input, outputs = preds)- 변경되는 부분과 변경되지 않는 부분을 지정
- 초기 20개의 layer는 동결, 나머지는 학습 가능하도록 유지
for layer in model.layers[:20]:
    layer.trainable = False
for layer in model.layers[20:]:
layer.trainable = True- 강아지와 고양이 영상을 가지고 훈련
ImageDataGenerator: 실시간 데이터 증강을 통해 텐서 이미지 데이터를 배치로 생성preprocessing_function = preprocess_input: MobileNet에 맞게 입력 이미지를 전처리flow_from_directory: 지정된 디렉토리에서 이미지를 로드하고 데이터 증강을 적용
train_datagen = ImageDataGenerator(preprocessing_function = preprocess_input)
train_generator = train_datagen.flow_from_directory('./PetImage/',
                                                    target_size = (128,128),
                                                    color_model = 'rgb',
                                                    batch_size = 32,
                                                    class_mode = 'categorical',
                                                    shuffle = True)
train_generator는 대체 무슨 객체일까?
ImageDataGenerator클래스의flow_from_directory메소드를 통해 생성된 객체로, 주로 이미지 데이터를 배치(batch) 단위로 생성하고 제공하는 역할을 한다.
역할 및 특징은 아래와 같다.
- 이미지 데이터 로드
- 지정된 디렉토리 구조에서 이미지를 로드
- 예를 들어, 디렉토리 구조가 './PetImage/cats', './PetImage/dogs/'와 같이 되어 있다면, 각각의 하위 디렉토리 이름이 클래스 레이블로 사용된다.
- 데이터 증강
ImageDataGenerator클래스의 다양한 옵션을 사용해 실시간 데이터 증강을 수행- 이 예제에서는
preprocessing_function=preprocess_input옵션을 사용하여 이미지를 전처리하지만, 회전/이동/확대 등의 데이터 증강도 가능- 배치 생성
- 데이터를 배치 단위로 생성
- 셔플링
- epoch마다 데이터를 섞어준다.
- 타켓 크기
- 이미지를 모델에 입력하기 전에 지정된 크기로 resize
- 컬러 모드
- 이미지를 RGB 모드로 로드 가능
- 클래스 모드
- 여기서는 다중 클래스 분류를 위해
categorical로 설정
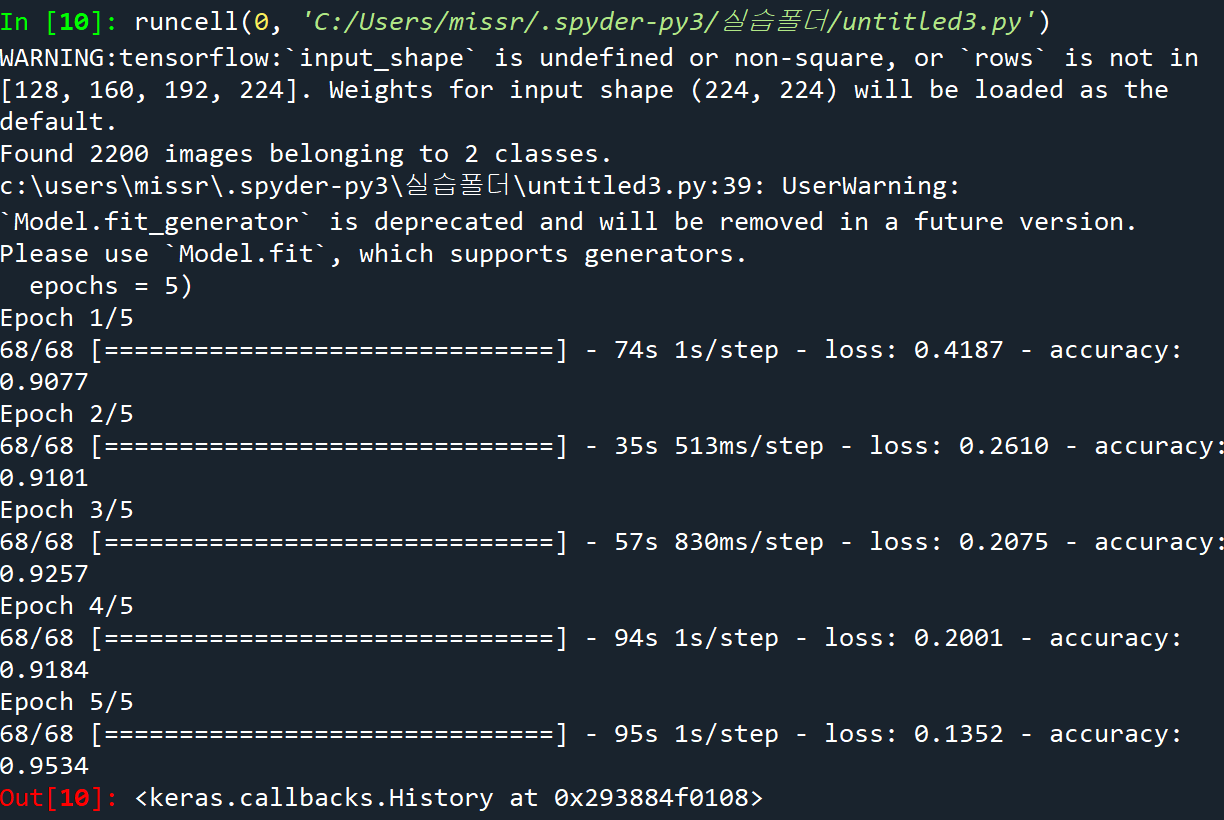
- 신경망 모델 훈련
fit_generator: 학습 데이터를 배치 단위로 생성하는 train_generator를 사용하여 모델을 학습steps_per_epoch: epoch당 실행할 단계 수 지정
model.compile(optimizer = 'Adam', loss = 'categorical_crossentropy', metrics = ['accuracy'])
step_size_train= train_generator.n//train_generator.batch_size
model.fit_generator(generator=train_generator,
                    steps_per_epoch = step_size_train,
                    epochs = 5)
지금까지 전이 학습에 대해서 잘못알고 있었던 것같다!
앞으로 기다림의 시간이 반으로 줄 듯하다ㅎㅎ🥹
