1. 언리얼 엔진 입력 시스템
1.1. Input Action
-
Input Action은 Data Asset을 상속받은 단순한 데이터 에셋
-
입력의 타입과 의미를 정의해주는 설정 파일
1.2. 입력 처리 파이프라인
-
키보드/마우스 등으로 입력을 넣음
-
Modifier로 인해 입력값이 수정됨
Negate : 음수로 반전 / Scale : 민감도(마우스) 조절 / Dead Zone : 잡음 제거(미세한 스틱입력 무시) / Swizzle : 축 변경 (XYZ->YXZ) -
Trigger 평가 (해당 입력이 Trigger 시키는지 판단)
Velog -
Trigger 시, InputAction 발생 -> IA에 Bind된 함수 호출
1.3. 엔진 내부 처리
// Simplified Code
void UEnhancedPlayerInput::ProcessInputStack(float DeltaTime)
{
    for (auto& IMC : ActiveContexts)
    {
        for (auto& Mapping : IMC->Mappings)
        {
            if (IsKeyPressed(Mapping.Key))
            {
                FInputActionValue Value = Mapping.Key.GetRawValue();
                for (auto& Mod : Mapping.Modifiers)
                    Value = Mod->ModifyRaw(Value);

                ActionValues[Mapping.Action].Accumulate(Value);
            }
        }
    }

    for (auto& Pair : ActionValues)
    {
        auto Action = Pair.Key;
        auto Value  = Pair.Value;
        auto Event  = EvaluateTriggers(Action, Value, DeltaTime);

        if (Event != ETriggerEvent::None)
            BroadcastInputAction(Action, Event, Value);
    }
}-
활성화된 IMC들은 우선순위가 높은순서대로 정렬되어 있어 높은 우선순위대로 IMC를 순회함
-
IMC와 입력이 매핑되면, 순회 멈추고 해당 IMC로만 입력 처리함
-
매 프레임마다 여러 입력값들에 Modifier를 적용하고, Action에 값을 누적시킴
즉, w와 s를 같이 누르면 MoveAction에 값이 같이 누적되어 이동하지 않게 됨 -
누적된 Action값으로 Trigger를 평가하고 이벤트를 호출함
-
우선순위가 높은 IMC부터 처리하므로, 평소엔 방향키로 걷다가, 차 타면 방향키로 운전하는 등의 입력 처리도 가능
2. Subsystem
-
언리얼에서 특정 범위에서만 관리해주는 시스템
-
UGameInstanceSubsystem: 게임 전체에서 세이브데이터를 관리 -
UWorldSubsystem: 월드 단위에서 날씨, AI Navigation 등을 관리 -
ULocalPlayerSubsystem: 플레이어 단위에서 EnhancedInput을 관리
2.1. ULocalPlayerSubsystem
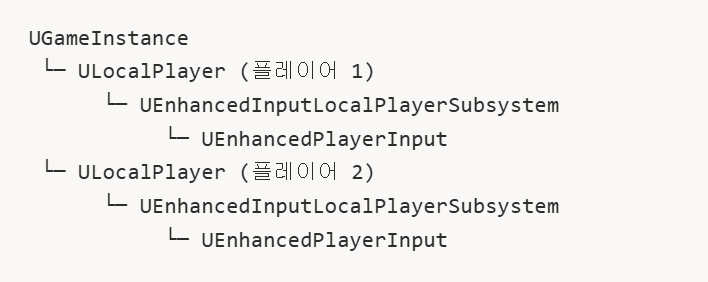
-
IMC들을 관리하고, 입력이 들어왔을 때 어떤 IMC를 확인할 것인지 등등 Input을 받아 관리해주는 시스템
-
활성화된 IMC들을 우선순위가 높은 순서대로 정렬해주는 역할을 얘가 해줌
-
플레이어가 생기면 같이 생성되고, 플레이어가 사라지면 같이 사라짐. 레벨이 바뀌어도 유지됨. 컨트롤러가 바뀌어도 유지됨.
-
따라서 입력관리 시스템은 컨트롤러가 아니라 바뀌지 않는
ULocalPlayer에 달아줌
AActor* Owner = GetOwner();
APlayerController* PC = Cast<APlayerController>(Owner->GetInstigatorController());
ULocalPlayer* LocalPlayer = PC->GetLocalPlayer();

CachedSubsystem =
ULocalPlayer::GetSubsystem<UEnhancedInputLocalPlayerSubsystem>(LocalPlayer);- 그래서 캐릭터에서 컨트롤러를 가져오고, 컨트롤러에서
LocalPlayer를 가져오고, 여기서 Subsystem을 가져오는 방식으로 코드를 작성해왔었던 것
2.2. 단점
-
ULocalPlayerSubsystem은 정말 IMC만 추가, 관리, 제거만 해주고 그 이외의 작업은 안 함 -
IMC 객체만 알고 이 IMC가 어떤 상황인건지를 모름
-
Priority기반이라, 최근추가라는 개념이 없음
-
중복 방지가 없어, 같은 IMC가 여러번 추가될 수 있음
-
문자열/객체 기반, enum 같은 타입을 지원해주지 않음
-
그래서 ContextManager라는 의미론적인 Layer를 하나 더 추가하여 관리함
3. Context Manager
USTRUCT()
struct FActiveContext
{
    EGameplayContext Context;              // enum 기반 이름
    UInputMappingContext* MappingContext;  // 실제 IMC
    float ActivationTime;                  // 활성화 시점
};

UCLASS()
class UContextManagerComponent : public UActorComponent
{
    TArray<FActiveContext> ContextStack;
    UEnhancedInputLocalPlayerSubsystem* CachedSubsystem;
    TMap<EGameplayContext, UInputMappingContext*> ContextMappings;
};-
ULocalPlayerSubsystem을 내부적으로 가지면서,FActiveContext라는 구조체를 추가하여 여러 관리 기능을 추가 -
Context적인 의미와, Stack 구조를 통해 마지막으로 들어간 Context가 무엇인지도 알 수 있게 됨
3.1. Push Context
void UContextManagerComponent::PushContext(EGameplayContext NewContext)
{
    if (!CachedSubsystem) return;

    for (auto& Ctx : ContextStack)
        if (Ctx.Context == NewContext) return;	// 중복 방지

    UInputMappingContext* IMC = *ContextMappings.Find(NewContext);
    int32 Priority = ContextStack.Num(); // Stack 크기 = Priority
    CachedSubsystem->AddMappingContext(IMC, Priority);

    ContextStack.Add({NewContext, IMC, GetWorld()->GetTimeSeconds()});
}- Stack 크기만큼 Priority를 넣어줌으로써, IMC에서 Priority가 같아서 발생할 수 있는 문제들을 예방함
3.2. Pop
void UContextManagerComponent::PopContext()
{
    if (ContextStack.Num() == 0) return;

    const FActiveContext& Top = ContextStack.Last();
    CachedSubsystem->RemoveMappingContext(Top.MappingContext);
    ContextStack.Pop();
}
3.3. GetCurrentContext
EGameplayContext UContextManagerComponent::GetCurrentContext() const
{
    return ContextStack.Num() == 0 ?
        EGameplayContext::Default :
        ContextStack.Last().Context;
}
4. State
-
하지만, Context만 고려하여 동작하기에는 무리가 있음
-
취침하라는 Context가 되어도, 현재 피격상태면 잘 수 없듯이, 현재상태(State)까지 고려를 해줘야함
void OnInteract()
{
    if (CurrentContext == FloorCleaning)
        CleanFloor();
}- State가 없으면 이미 청소중인데 입력 들어올 때마다 계속 호출됨
void OnInteract()
{
    if (CurrentContext == FloorCleaning && CurrentState == Idle)
    {
        CleanFloor();
        CurrentState = Cleaning;
    }
}- State까지 고려해야 원하는 동작 전환이 가능
4.1. FSM
-
State를 관리하기 위한 패턴
-
State, Transition, Guard로 구성
State
enum class ECleaningState : uint8
{
    Idle,
    Cleaning,
};- Enum Class로 State를 정의하고, 타입 안정성을 확보
Transition
- 각 State에서 다른 State로 전환되는 규칙
   ┌──────────┐
   │   Idle   │◄──────────────┐
   └────┬─────┘               │
        │                     │
        │ StartCleaning()     │ InterruptCleaning()
        │ (E키 입력)          │ (이동/점프/시간 종료)
        ↓                     │
   ┌──────────┐               │
   │ Cleaning │───────────────┘
   └──────────┘
Guard
- Transition이 가능한지를 체크해주는 조건 함수
bool CanStartCleaning() const { return CurrentState == Idle; }
bool CanMove() const          { return CurrentState != Cleaning; }
bool CanJump() const          { return CurrentState != Cleaning; }
4.2. State Machine 구조
헤더
// header

class UCleaningStateMachine : public UActorComponent
{
    GENERATED_BODY()

private:
    ECleaningState CurrentState = ECleaningState::Idle;
    float StateStartTime = 0.f;

public:
    // Transition
    void StartCleaning();
    void InterruptCleaning();

    // Guard
    bool CanStartCleaning() const;

    // Getter, Setter
    ECleaningState GetCurrentState() const { return CurrentState; }
private:
    void SetState(ECleaningState NewState);
};
cpp
void UCleaningStateMachine::StartCleaning(float Duration)
{
    // 1단계: Guard 체크
    if (!CanStartCleaning())
    {
        return;
    }

    // 2단계: Exit Current State
    // 기존의 State를 정리 (타이머 정리, 애니메이션 정지..)

    // 3단계: Transition
    ECleaningState OldState = CurrentState;
    CurrentState = ECleaningState::Cleaning;

    // 4단계: Enter New State
    StateStartTime = GetWorld()->GetTimeSeconds();

    // 5단계: Event (필요 시 상태 변경 알림)
    OnStateChanged.Broadcast(OldState, CurrentState);
}-
Enter-Update-Exit 패턴을 준수
-
새 State로 바뀌려면, 기존 State를 먼저 정리하고, 다음 State로 변경 후 매 틱마다, 초마다 Update해주는 패턴
void UCleaningStateMachine::SetState(ECleaningState NewState)
{
    // 같은 상태로의 중복 전환 방지
    if (CurrentState == NewState)
    {
        return;
    }

    // 이전 상태 저장
    ECleaningState OldState = CurrentState;

    // Exit Old State
    switch (OldState)
    {
    // 각 상태마다 정리해주는 부분
    case ECleaningState::Cleaning:
        // 청소 상태 정리
        break;

    case ECleaningState::Idle:
        // Idle 상태 정리
        break;
    }

    // Transition
    CurrentState = NewState;

    // Enter New State
    switch (NewState)
    {
    // 각 상태로의 Enter 부분 초기화
    case ECleaningState::Idle:
        // Idle 초기화
        break;

    case ECleaningState::Cleaning:
        // Cleaning 초기화
        break;
    }

    // 필요하면 Broadcast
    OnStateChanged.Broadcast(OldState, NewState);
}
5. 총정리
- 언리얼은 아래와 같은 Pipeline으로 입력과 행동이 연결되게 된다
Input - Input Action - Context Layer(EnhancedInputSubsystem) - State Machine - Animation