라우터, 스위치, pc 등 명령어 총정리
https://blog.naver.com/4glac/223155764183
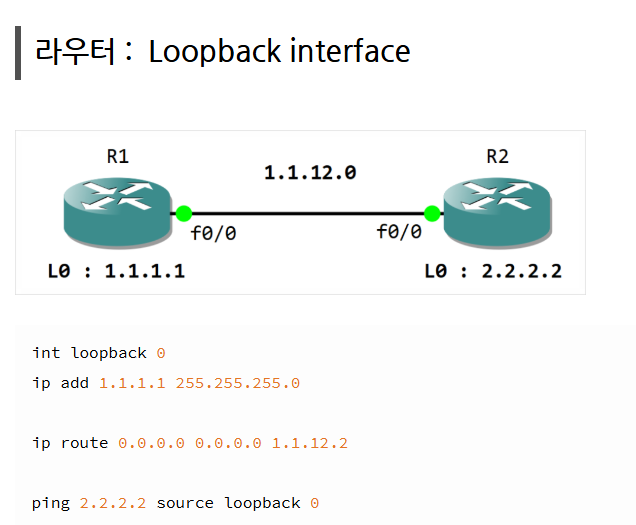
1. Loopback
물리적인 Port가 아닌 논리적은 Port로 ip를 입력하여 통신을 확인할 수 있음
1-1. Loopback int를 지울 때
no int loopback 0
int l0
ip add 1.1.1.1 255.255.255.0
no sh

1-2. Loopback 실습
각 라우터에서 상대방의 라우터 루프백 인터페이스와 통신이 가능하게 하시오.
R1> ping 2.2.2.2 // 성공
R2> ping 1.1.1.1 // 성공

R1
conf t
int l0
ip add 1.1.1.1 255.255.255.0
R2
conf t
int l0
ip add 2.2.2.2 255.255.255.0
R1
conf t
ip route 0.0.0.0 0.0.0.0 2.2.2.2
ping 2.2.2.2
R2
conf t
ip route 0.0.0.0 0.0.0.0 1.1.1.1
ping 1.1.1.1
ping 옵션 사용해서 써보기
ping 2.2.2.2 repeat 1 source 10
ping 2.2.2.2 size 5000 repeat 1
ping 2.2.2.2 size 5000 repeat 1 df-bit
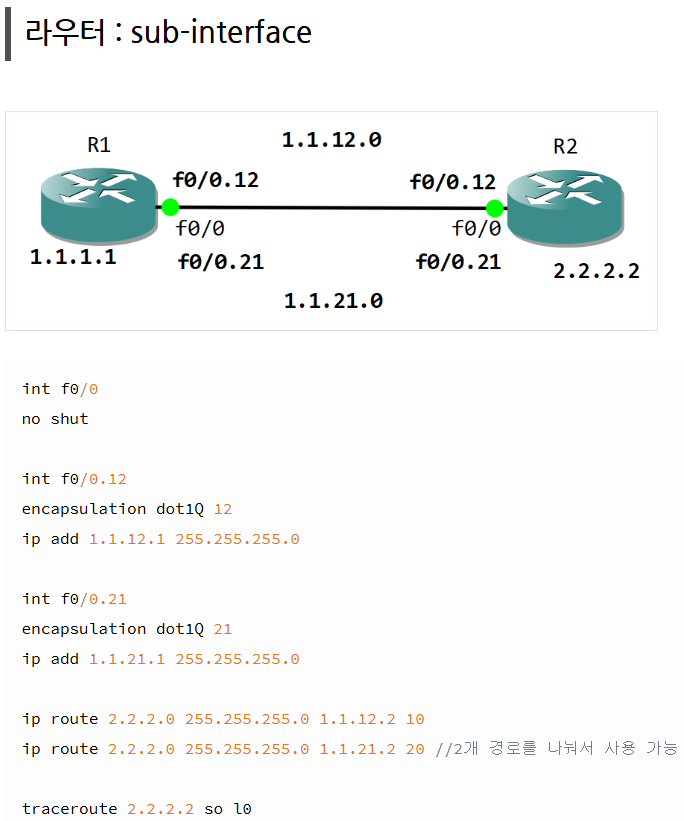
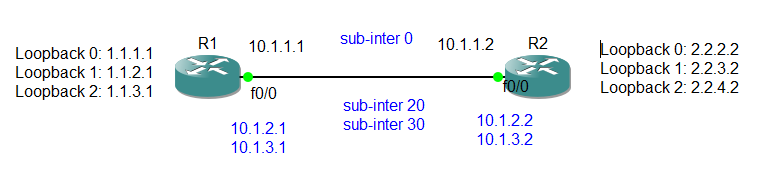
각 라우터에서 10번, sub-inter 생성 10.1.1.0/24
각 라우터에서 20번, sub-inter 생성 10.1.2.0/24
각 라우터에서 30번, sub-inter 생성 10.1.3.0/24
- 각 라우터에 루프백 인터페이스 추가
- 소스핑을 활영하여 각 루프백 간에 연결 확인
R1
conf t
int f0/0.20
encapsulation dot1Q 20
ip add 10.1.2.1 255.255.255.0
int f0/0.30
encapsulation dot1Q 30
ip add 10.1.3.1 255.255.255.0
end
conf t
int l1
ip add 1.1.2.1 255.255.255.0
int l2
ip add 1.1.3.1 255.255.255.0
end
conf t
ip route 2.2.2.0 255.255.255.0 10.1.1.2 = 10.1.2.2 = 10.1.3.2 다 가능
이때 여러개를 사용할 수 있어서 우선순위 설정
ip route 2.2.2.0 255.255.255.0 10.1.3.2 10
ip route 2.2.2.0 255.255.255.0 10.1.2.2 20
ip route 2.2.2.0 255.255.255.0 10.1.1.2 30
비용 설정, 10.1.3.2를 통해 가면 10이라는 비용만 발생하지만
10.1.3.2를 통해 가면 20이라는 더 큰 비용이 발생하도록 설정함
이걸 통해 우선순위를 설정할 수 있음
ip route 0.0.0.0 0.0.0.0 10.1.3.2 10
ip route 0.0.0.0 0.0.0.0 10.1.2.2 20
ip route 0.0.0.0 0.0.0.0 10.1.1.2 30
이렇게 해서 하나가 잘못되면 다음꺼 쓰고 그렇게 설정할 수 있음
R2
conf t
int f0/0.20
encapsulation dot1Q 20
ip add 10.1.2.1 255.255.255.0
int f0/0.30
encapsulation dot1Q 30
ip add 10.1.3.1 255.255.255.0
ping 10.1.1.1
end
conf t
int l1
ip add 2.2.3.2 255.255.255.0
int l2
ip add 2.2.4.2 255.255.255.0
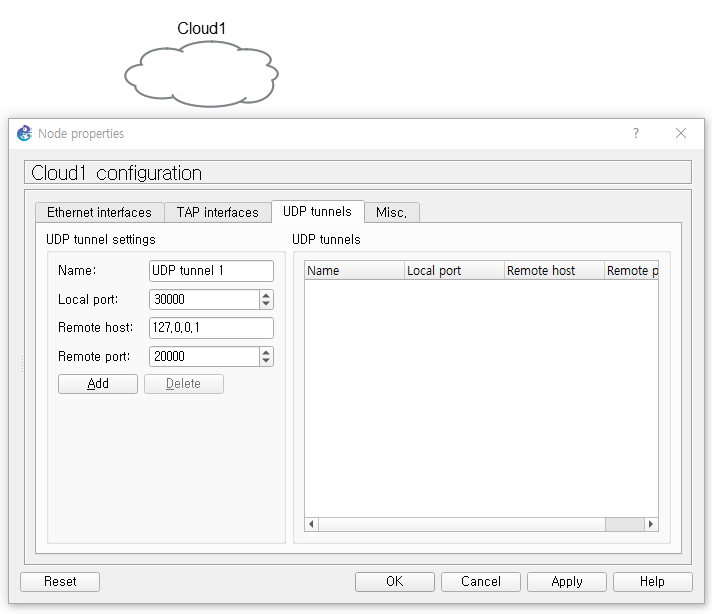
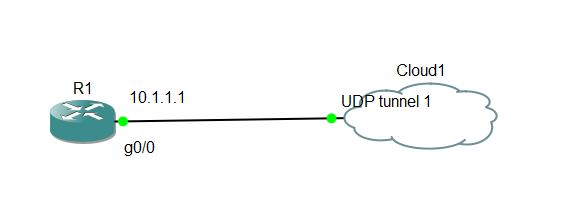
외부 (다른 사람과 연결 할 때)와 연결할 때는 Remote host ip를 변경해서 사용해야함
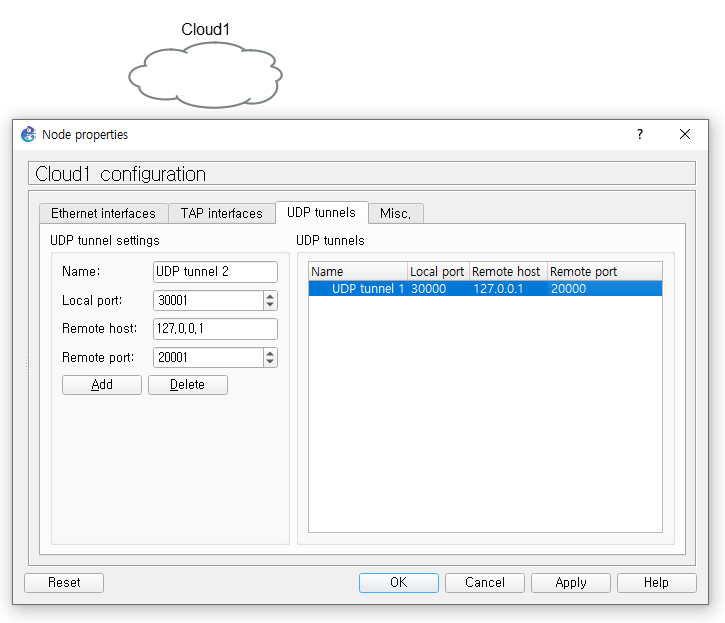
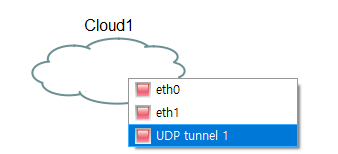
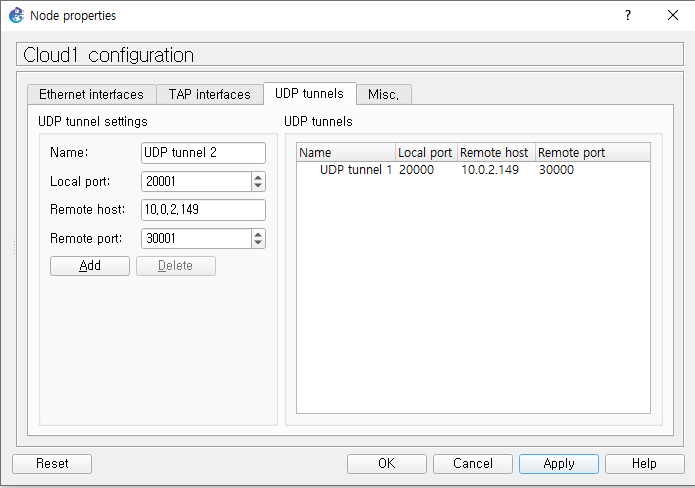
그 후에 선을 연결하기 위해 포트를 확인하면 내가 추가한 tunnel 포트가 있는것을 알 수 있음
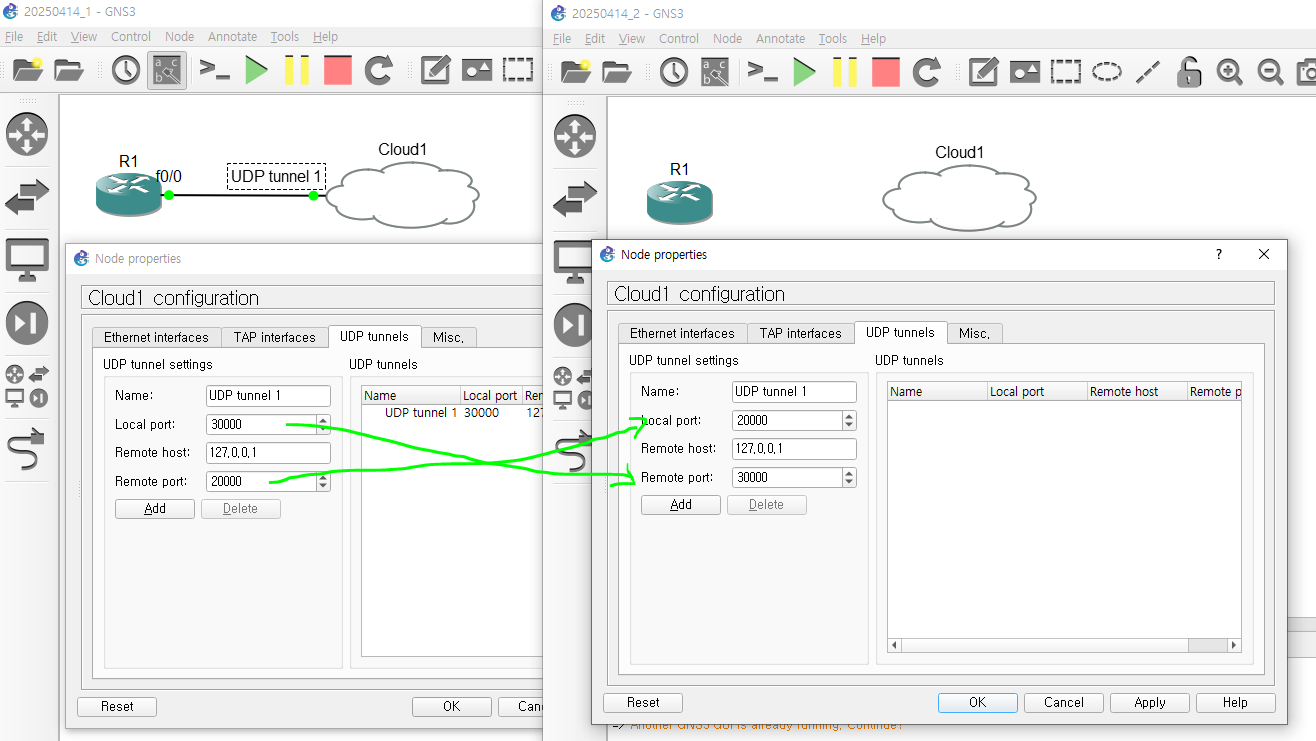
다른 프로젝트(외부)와 연결할 때에는 local host는 상대의 remote host, 나의 remote host는 상대의 local host로 입력한다.
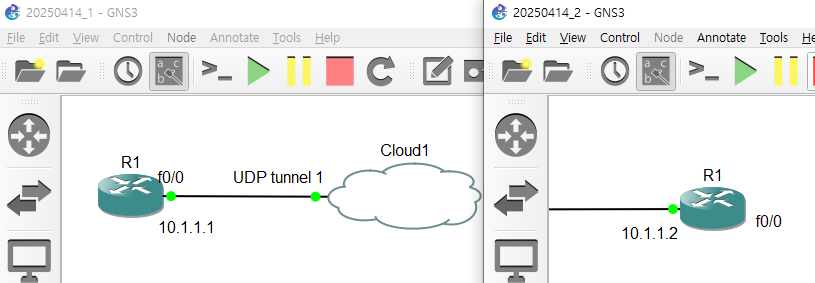
외부 프로젝트 라우터의 ip를 10.1.1.2를 입력하여 같은 네트워크에 있는것으로 설정
현재 cloud를 연결했기 때문에 같은 클라우드를 공유하고 있는 상태라고 할 수 있음
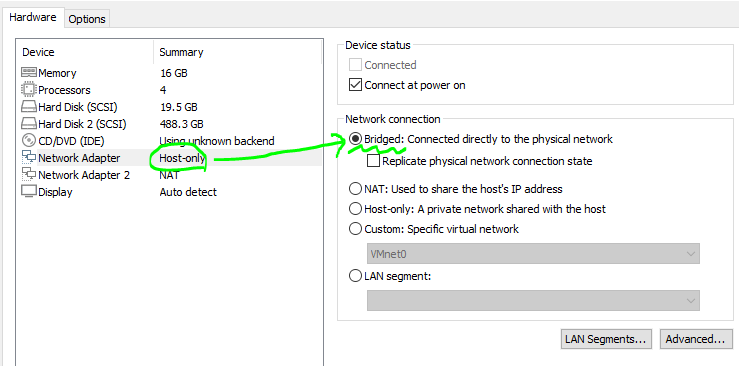
외부와 연결하기 위해 vmware에서 gns3의 인터넷 설정을 host-only에서 bridge로 설정
현재 실습중인 pc의 ip의 공인 ip로 표시되는것을 알 수 있음
상대방의 ip를 입력하고 상대방의 로컬 포트는 30000이기에 나의 로컬포트는 20000, 리모트 포트는 30000으로 연결
상대방은 10.1.1.2의 ip를 사용하기에 r1에서 g0/0의 ip 입력 후 상대방의 ip인 10.1.1.2로 핑을 보내면 정상적으로 보내지는것을 확인
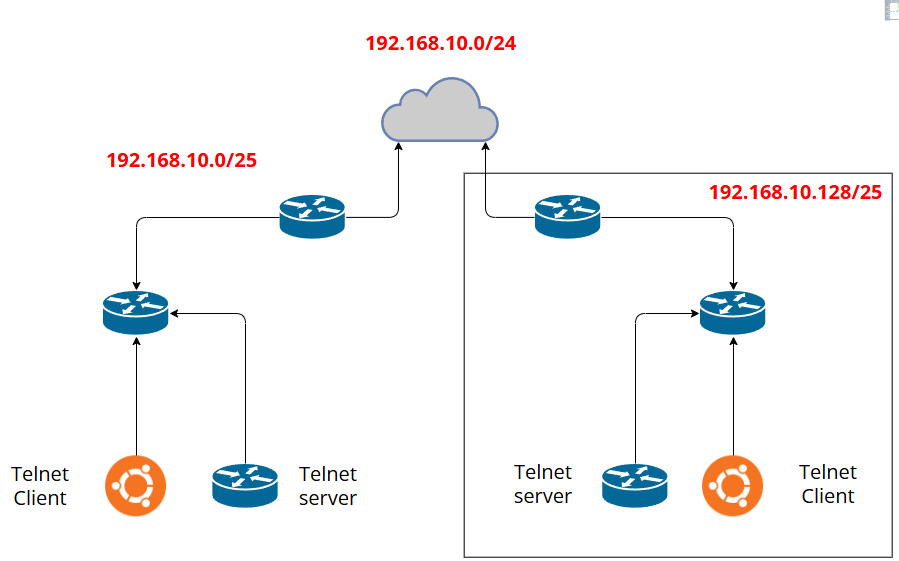
네트워크 다이어그램 제작 사이트
https://online.visual-paradigm.com/ko/diagrams/features/network-diagram-software/
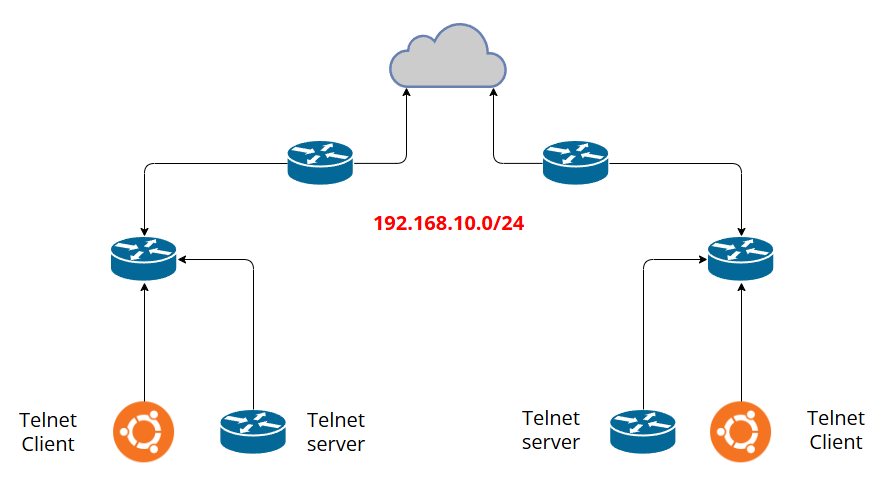
- 클라우드 도구를 사용하여 2명 이상 연결
- 전체 네트워크 192.168.10.0/24
- 서브넷팅을 이용하여 각자 본인의 내부망 구성
- 본인의 내부망에 구성한 telnet Server에 외부에서 접속 가능하게 구성
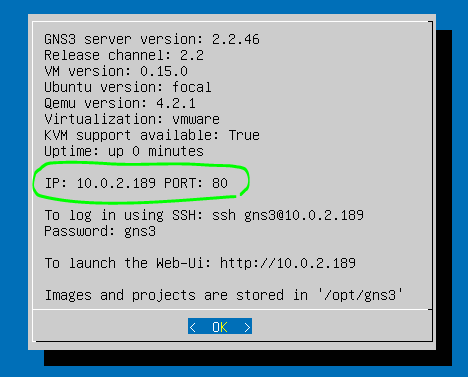
10.0.2.149
6개 네트워크
/x - /24 = a
2^a >= 6
a = 3
/27
8
8-3=5
2^5
2 2 2 2 2
32의 배수
0 ~ 31
32 ~ 63
64 ~ 95
96 ~ 127
128 ~ 159
160 ~ 191
192 ~ 223
224 ~ 255
256
총 4개의 네트워크
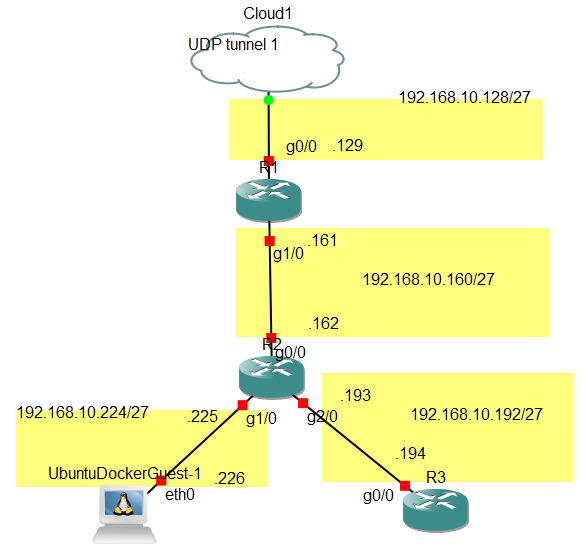
사실 클라우드는 없다고 생각하고 상대방의 R1과 나의 R1은 같은 네트워크를 쓴다..
R1
conf t
int g0/0
ip add 192.168.10.2 255.255.255.224
no sh
int g1/0
ip add 192.168.10.161 255.255.255.224
no sh
end
ip route 0.0.0.0 0.0.0.0 192.168.10.1
ip route 192.168.10.192 255.255.255.224 192.168.10.162
ip route 192.168.10.224 255.255.255.224 192.168.10.162
R2
conf t
int g0/0
ip add 192.168.10.162 255.255.255.224
no sh
int g1/0
ip add 192.168.10.225 255.255.255.224
no sh
int g2/0
ip add 192.168.10.193 255.255.255.224
no sh
ip route 0.0.0.0 0.0.0.0 192.168.10.161
R3
conf t
int g0/0
ip add 192.168.10.194 255.255.255.224
no sh
end
conf t
ip route 0.0.0.0 0.0.0.0 192.168.10.193
username ccnp privilege 15 password cisco
line vty 0 4
login local
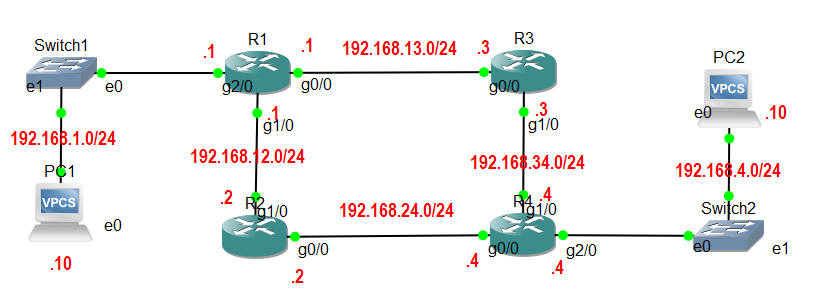
PC1 <-> PC2 ping 연결
PC1
ip 192.168.1.10/24 192.168.1.1
PC2
ip 192.168.4.10/24 192.168.4.4
R1
conf t
int g0/0
ip add 192.168.13.1 255.255.255.0
no sh
endconf t
int g1/0
ip add 192.168.12.1 255.255.255.0
no sh
endconf t
int g2/0
ip add 192.168.1.1 255.255.255.0
no sh
end(루트별 우선순위, 백업루트 설정)
conf t
ip route 192.168.4.0 255.255.255.0 192.168.12.2 10
ip route 192.168.4.0 255.255.255.0 192.168.13.3 20
R2
conf t
int g0/0
ip add 192.168.24.2 255.255.255.0
no sh
endconf t
int g1/0
ip add 192.168.12.2 255.255.255.0
no sh
endconf t
ip route 192.168.1.0 255.255.255.0 192.168.12.1
ip route 192.168.4.0 255.255.255.0 192.168.24.4
R3
conf t
int g0/0
ip add 192.168.13.3 255.255.255.0
no sh
endconf t
int g1/0
ip add 192.168.34.3 255.255.255.0
no sh
endconf t
ip route 192.168.1.0 255.255.255.0 192.168.13.1
ip route 192.168.4.0 255.255.255.0 192.168.34.4
R4
conf t
int g0/0
ip add 192.168.24.4 255.255.255.0
no sh
endconf t
int g1/0
ip add 192.168.34.4 255.255.255.0
no sh
endconf t
int g2/0
ip add 192.168.4.4 255.255.255.0
no sh
end(루트별 우선순위, 백업루트 설정)
conf t
ip route 192.168.1.0 255.255.255.0 192.168.24.2 10
ip route 192.168.1.0 255.255.255.0 192.168.34.3 20

- webterm에서 웹브라우저를 이용하여 인터넷 접속
- 각 PC에서 ping 8.8.8.8 성공
R2
conf t
int g2/0
ip add dhcp
ip nat outside
no sh
endconf t
int g0/0
ip nat inside
int g1/0
ip nat inside
endconf t
ip nat inside source list 1 int g2/0
access-list 1 permit any
R1
conf t
ip route 0.0.0.0 0.0.0.0 192.168.12.2
R4
conf t
ip route 0.0.0.0 0.0.0.0 192.168.24.2