
🐤서론
url: https://soonmac.github.io/vaccine_campaign/sub.html
Github : https://github.com/soonmac/vaccine_campaign
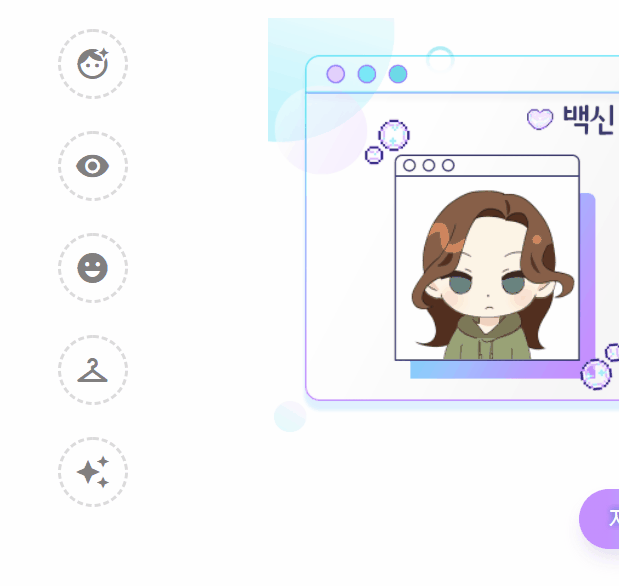
최근 토이 프로젝트에서 구현한 옷입히기 기능입니다.
- 버튼을 클릭하면 버튼 data 속성에 해당하는 팝업창이 나옴
- 팝업창의 버튼을 누르면 팝업창에 뜬 아이템 이미지가 캐릭터에게 적용됩니다.
바로 가보자구용!!!
🐤이미지 소스 준비
가장 중요한 이미지 소스입니다.
캐릭터 베이스, 헤어, 눈, 입, 옷, 악세사리 총 6개의 파트로 나누어 작업했습니다.
이 파츠들은 z-index를 이용해 레이어를 쌓아올리듯이 배치합니다.
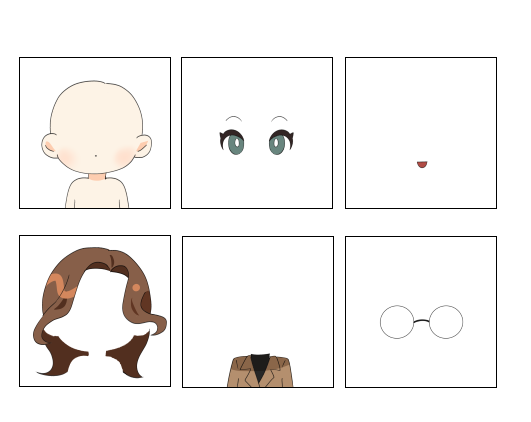
열심히 그린 소스들...
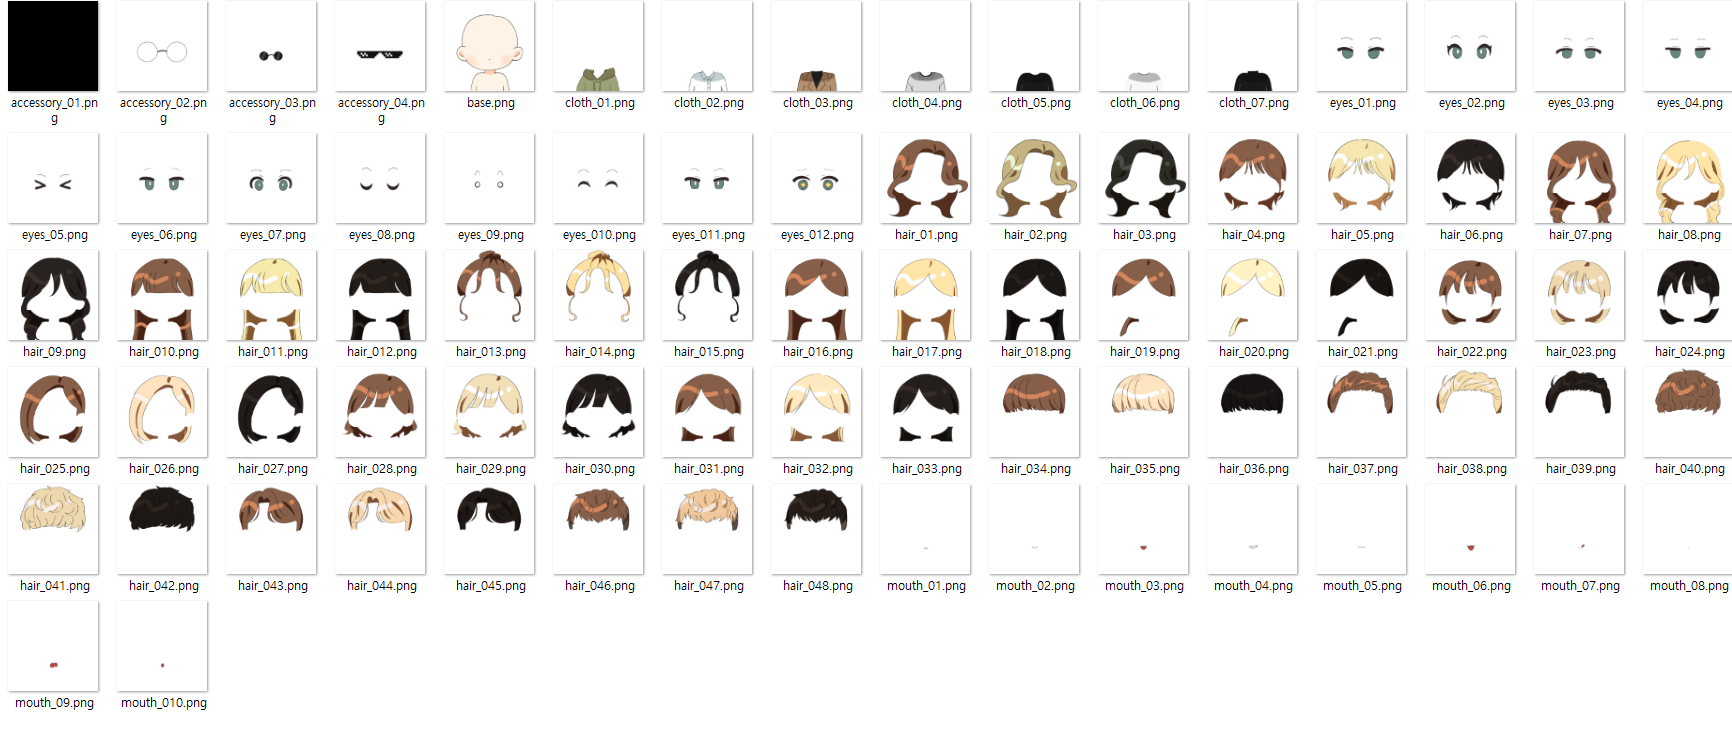
파일 이름의 중요성
파일 이름에 반드시 파츠의 이름과 숫자가 들어가야합니다.
ex) accessory_01.png , hair_01.png
파츠의 이름과 숫자는 자바스크립트에서 이미지의 주소를 바꿀 때 중요하게 쓰입니다.
🐤HTML
캐릭터 영역
<div class="character__area">
    <img data-value = "accessory" class="chara_accessory chara-parts" src="img/character/accessory_01.png" alt="액세서리">
    <img data-value = "cloth" class="chara_cloth chara-parts" src="img/character/cloth_01.png" alt="머리">
    <img data-value = "hair" class="chara_hair chara-parts" src="img/character/hair_01.png" alt="머리">
    <img data-value = "mouth" class="chara_mouth chara-parts" src="img/character/mouth_01.png" alt="입">
    <img data-value = "eyes" class="chara_eye chara-parts" src="img/character/eyes_01.png" alt="눈">
    <img class="chara_base"src="img/character/base.png" alt="베이스">
</div>
버튼들
<ul class="dressup-btns">
    <li class="hair_btn" data-parts="hair">
        <span class="material-icons">
            face_retouching_natural
        </span>

    </li>
    <li class="eye_btn" data-parts="eyes">
        <span class="material-icons">
            visibility
            </span>
    </li>
    <li class="mouth_btn" data-parts="mouth">
        <span class="material-icons">
            emoji_emotions
        </span>
    </li>
    <li class="cloth_btn" data-parts="cloth">
        <span class="material-icons">
            checkroom
        </span>
    </li>
    <li class="accessory_btn" data-parts="accessory">
        <span class="material-icons">
            auto_awesome
        </span>
    </li>

</ul>
data 속성을 이용해 각 버튼마다 파츠의 이름을 적어두었습니다.
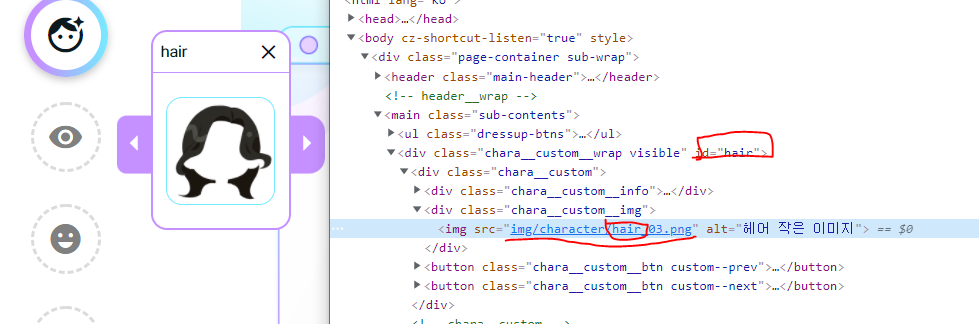
팝업창
<div class="chara__custom__wrap">
    <div class="chara__custom">
        <div class="chara__custom__info">
            <span class="chara__custom__title">
                Hair
            </span>
            <span class="material-icons close-btn">
                close
                </span>
        </div>
        <div class="chara__custom__img">
            <img src="img/character/hair_01.png" alt="헤어 작은 이미지">
        </div>
        <button class="chara__custom__btn custom--prev">
            <span class="material-icons">
                arrow_left
                </span>
        </button>
        <button class="chara__custom__btn custom--next">
            <span class="material-icons">
                arrow_right
                </span>
        </button>
    </div>
    <!-- chara__custom -->
</div>
파츠 종류 추가 혹은 삭제해야하는 상황을 고려하여 팝업창은 하나만 만들었습니다.
자바스크립트를 이용해 버튼의 data 값에 따라 팝업창의 위치와 타이틀, 이미지를 변경할 것입니다.
🐤JavaScript
버튼 클릭 이벤트 : 팝업창이 뜨는 함수
//변수들
const dressupBtns = document.querySelectorAll(".dressup-btns > li")
const charaCustom = document.querySelector(".chara__custom__wrap");
const customTitle = document.querySelector(".chara__custom__title")
const hairBtn = document.querySelector(".hair_btn")
const charaParts = [...document.querySelectorAll(".chara-parts")];
let hairIndex = 1,
    eyesIndex = 1,
    mouthIndex = 1,
    clothIndex = 1,
    accIndex = 1;
let thumb = document.querySelector(".chara__custom__img > img")

//버튼 클릭 이벤트 : 커스텀 창이 뜨는 함수
dressupBtns.forEach(btn => {
    btn.addEventListener("click", (e) => {
        const partsName = e.target.dataset.parts;
        dressupBtns.forEach(btn => {
            if (btn.classList.contains("on")) {
                btn.classList.remove("on")
                charaCustom.classList.remove("visible")
            }
        })
        btn.classList.toggle("on");
        customVisible(partsName)
    })
    // 커스텀 창의 close 버튼을 눌렀을 때 창이 닫히고 li의 on 클래스를 빼는 함수
    document.querySelector(".close-btn").addEventListener("click", () => {
        btn.classList.remove("on");
        charaCustom.classList.remove("visible")
    })
})
왼쪽의 동그란 버튼을 눌렀을 때 팝업창이 등장하는 함수입니다.
천천히 하나하나 봅시다!
클릭한 버튼의 data값을 알아내기
const partsName = e.target.dataset.parts;html에서 각 버튼마다 data 값을 설정해줬죠???
클릭 이벤트가 발생한 버튼의 data-parts값을 저장합니다.
해당하는 버튼에만 on 클래스 추가 & 팝업창 열기
dressupBtns.forEach(btn => {
  //버튼들의 on 클래스를 다 삭제해줍니다.
    if (btn.classList.contains("on")) {
        btn.classList.remove("on")
      //이미 열려있는 팝업창도 닫습니다.
        charaCustom.classList.remove("visible")
    }
})
//해당하는 버튼에만 on~!
        btn.classList.toggle("on");
//팝업 창에 해당 파츠 data값을 전달해서 보여주는 함수
        customVisible(partsName)
팝업 창에 해당 파츠 data값을 전달해서 보여주는 함수
// 팝업 창에 해당 파츠 데이터를 전달해서 보여주는 함수
function customVisible(partsName) {
    charaCustom.id = partsName
    const id = charaCustom.id;
    customTitle.innerHTML = id;
    thumbUrl(id);
    charaCustom.classList.toggle("visible")

}- 클릭한 버튼의 data 값을 저장해놓은 상수 partsName을 받아옵니다!!
- 팝업창의 id 값을 data 값으로 설정합니다. (위치 조정)
참고로 각 파츠 id에 해당하는 CSS(scss)는 이렇습니다.
#hair {
  top: 20%;
  @include tablet {
    top: 10%;
    left: 20%;
  }
}
#eyes {
  top: 30%;
  @include tablet {
    top: 10%;
    left: 30%;
  }
}
#mouth {
  top: 40%;
  @include tablet {
    top: 10%;
    left: 40%;
  }
}
#cloth {
  top: 50%;
  @include tablet {
    top: 10%;
    left: 50%;
  }
}
#accessory {
  top: 60%;
  @include tablet {
    top: 10%;
    left: 60%;
  }
}- 팝업창의 타이틀과 이미지 파일의 파츠 이름 부분을 id 값으로 바꿉니다.
예를 들어 hair 버튼을 클릭했다면 타이틀은 hair로 바뀌고 이미지 파일 이름도 hair_0x.png로 바뀝니다.
파츠 이름을 바꾸는 부분은 따로 function thumbUrl(id) 함수로 만들어놨습니다.
해당하는 값을 찾아 전달해주고 이를 토대로 팝업창을 커스텀(?)해서 보여지게 하는 방식입니다.
function thumbUrl(id) {
    if (id == "hair") {
        thumb.src = `img/character/${id}_0${hairIndex}.png`
    }
    if (id == "eyes") {
        thumb.src = `img/character/${id}_0${eyesIndex}.png`
    }
    if (id == "mouth") {
        thumb.src = `img/character/${id}_0${mouthIndex}.png`
    }
    if (id == "cloth") {
        thumb.src = `img/character/${id}_0${clothIndex}.png`
    }
    if (id == "accessory") {
        thumb.src = `img/character/${id}_0${accIndex}.png`
    }
}
팝업창 버튼 이벤트
//팝업창 창의 다음 버튼 클릭 이벤트
document.querySelector(".custom--next").addEventListener("click", () => {
    const id = charaCustom.id;
    nextPhoto(id);
})
//팝업창 창의 이전버튼 클릭 이벤트
document.querySelector(".custom--prev").addEventListener("click", () => {
    const id = charaCustom.id;
    prevPhoto(id)
})
커스텀 창의 다음 버튼을 눌렀을 때 다음 사진으로 바뀌는 함수(nextPhoto)
function nextPhoto(id) {
    if (id == "hair") {
        hairIndex++;
        hairIndex %= 49;
        if (hairIndex == 0) hairIndex = 1;
        partsImgChange(id, hairIndex);
    }
    if (id == "eyes") {
        eyesIndex++;
        eyesIndex %= 13;
        if (eyesIndex == 0) eyesIndex = 1;
        partsImgChange(id, eyesIndex);
    }
    if (id == "mouth") {
        mouthIndex++;
        mouthIndex %= 11;
        if (mouthIndex == 0) mouthIndex = 1;
        partsImgChange(id, mouthIndex);
    }
    if (id == "cloth") {
        clothIndex++;
        clothIndex %= 8;
        if (clothIndex == 0) clothIndex = 1;
        partsImgChange(id, clothIndex);
    }
    if (id == "accessory") {
        accIndex ++;
        accIndex  %= 5;
        if (accIndex  == 0) accIndex  = 1;
        partsImgChange(id, accIndex);
    }
}

//이미지의 링크를 바꾸는 함수
function partsImgChange(id, index) {
    const partsImg = charaParts.find(element => element.dataset.value == id)
    partsImg.src = `img/character/${id}_0${index}.png`
    thumb.src = `img/character/${id}_0${index}.png`
}
여기서도 팝업창의 id 값을 받아내어 해당하는 파츠를 찾아주고, 파츠의 이름과 index(몇번째 사진인지)를 받아내 캐릭터 영역의 해당하는 파츠를 찾아내(arr.find) 이미지 주소에 반영합니다. (팝업창의 썸네일 이미지도 바꿔줍니다)
🍧Array.prototype.find(): 조건에 만족하는 첫 번째 요소의 값을 반환합니다.
https://developer.mozilla.org/ko/docs/Web/JavaScript/Reference/Global_Objects/Array/find
hair 버튼을 클릭하고 hair 팝업창의 다음 버튼을 눌렀다면 팝업창의 썸네일의 hair 이미지와 캐릭터의 hair 이미지가 동시에 바뀝니다.
팝업창의 이전 버튼을 눌렀을 때 이전 사진으로 바뀌는 함수
//팝업창의 이전 버튼을 눌렀을 때 이전 사진으로 바뀌는 함수
function prevPhoto(id) {
    if (id == "hair") {
        hairIndex--;
        hairIndex %= 49;
        if (hairIndex == 0) hairIndex = 1;
        partsImgChange(id, hairIndex);
    }
    if (id == "eyes") {
        eyesIndex--;
        eyesIndex %= 13;
        if (eyesIndex == 0) eyesIndex = 1;
        partsImgChange(id, eyesIndex);
    }
    if (id == "mouth") {
        mouthIndex--;
        mouthIndex %= 11;
        if (mouthIndex == 0) mouthIndex = 1;
        partsImgChange(id, mouthIndex);
    }
    if (id == "cloth") {
        clothIndex--;
        clothIndex %= 8;
        if (clothIndex == 0) clothIndex = 1;
        partsImgChange(id, clothIndex);
    }
    if (id == "accessory") {
        accIndex --;
        accIndex  %= 5;
        if (accIndex  == 0) accIndex  = 1;
        partsImgChange(id, accIndex);
    }

}
원리는 다음 사진으로 바뀌는 함수와 같습니다.
🐤마치며
이 코드의 큰 단점은 파츠 이미지의 개수를 일일이 업데이트 해야한다는 것인데요
보다시피 mouthIndex %= 11; hairIndex %= 49; 종류마다 파츠의 개수가 달라 하나의 변수로 통일할 수 없다는 점이 아쉽습니다.
img 폴더에 담긴 이미지들의 개수를 알 수 있는 기능을 알았더라면 좀 더 유지보수가 쉬운 코드를 짤 수 있을 것 같습니다.
그리고 서버가 없다보니 이미지의 용량이 너무 걱정되는데 (약간 렉 있음)
버튼을 누를 때마다 비동기적으로 이미지를 불러오는 방식이면 더 좋지 않았을까? 하는 생각이 있습니다.
그렇게 하면 머리, 눈 색깔을 나누어서 작업했을텐데요 하하😅
물론 구체적으로 어떻게 하는지는 모르겠습니다...ㅎ 이참에 리액트를 공부해볼까해요
글 읽어주셔서 감사합니다~

안녕하세요! 포스팅 잘읽었습니다! 혹시 메일 가능하실까요 ?!