말풍선을 만들었으니 이제 채팅화면을 만들어보고 적용해보자.
채팅화면 만들기
먼저 어떤 기능을 구현해야 할지 생각을 해보자.
고려해야할 점
-
myCell과 yourCell 파일을 어떻게 적용할 것인가?
-
키보드가 올라갈 때, 입력칸이 같이 올라가야한다. 대화 내용도 같이 올라가야 하는진 고민해보자
일단 시작할 때는 이 정도 생각을 갖고 시작한다. 어차피 하다가 보면 마음에 안드는 부분, 구현이 안되는 부분이 계속 생기기 때문에 일단 시작을 하는게 가장 좋은 것 같다.
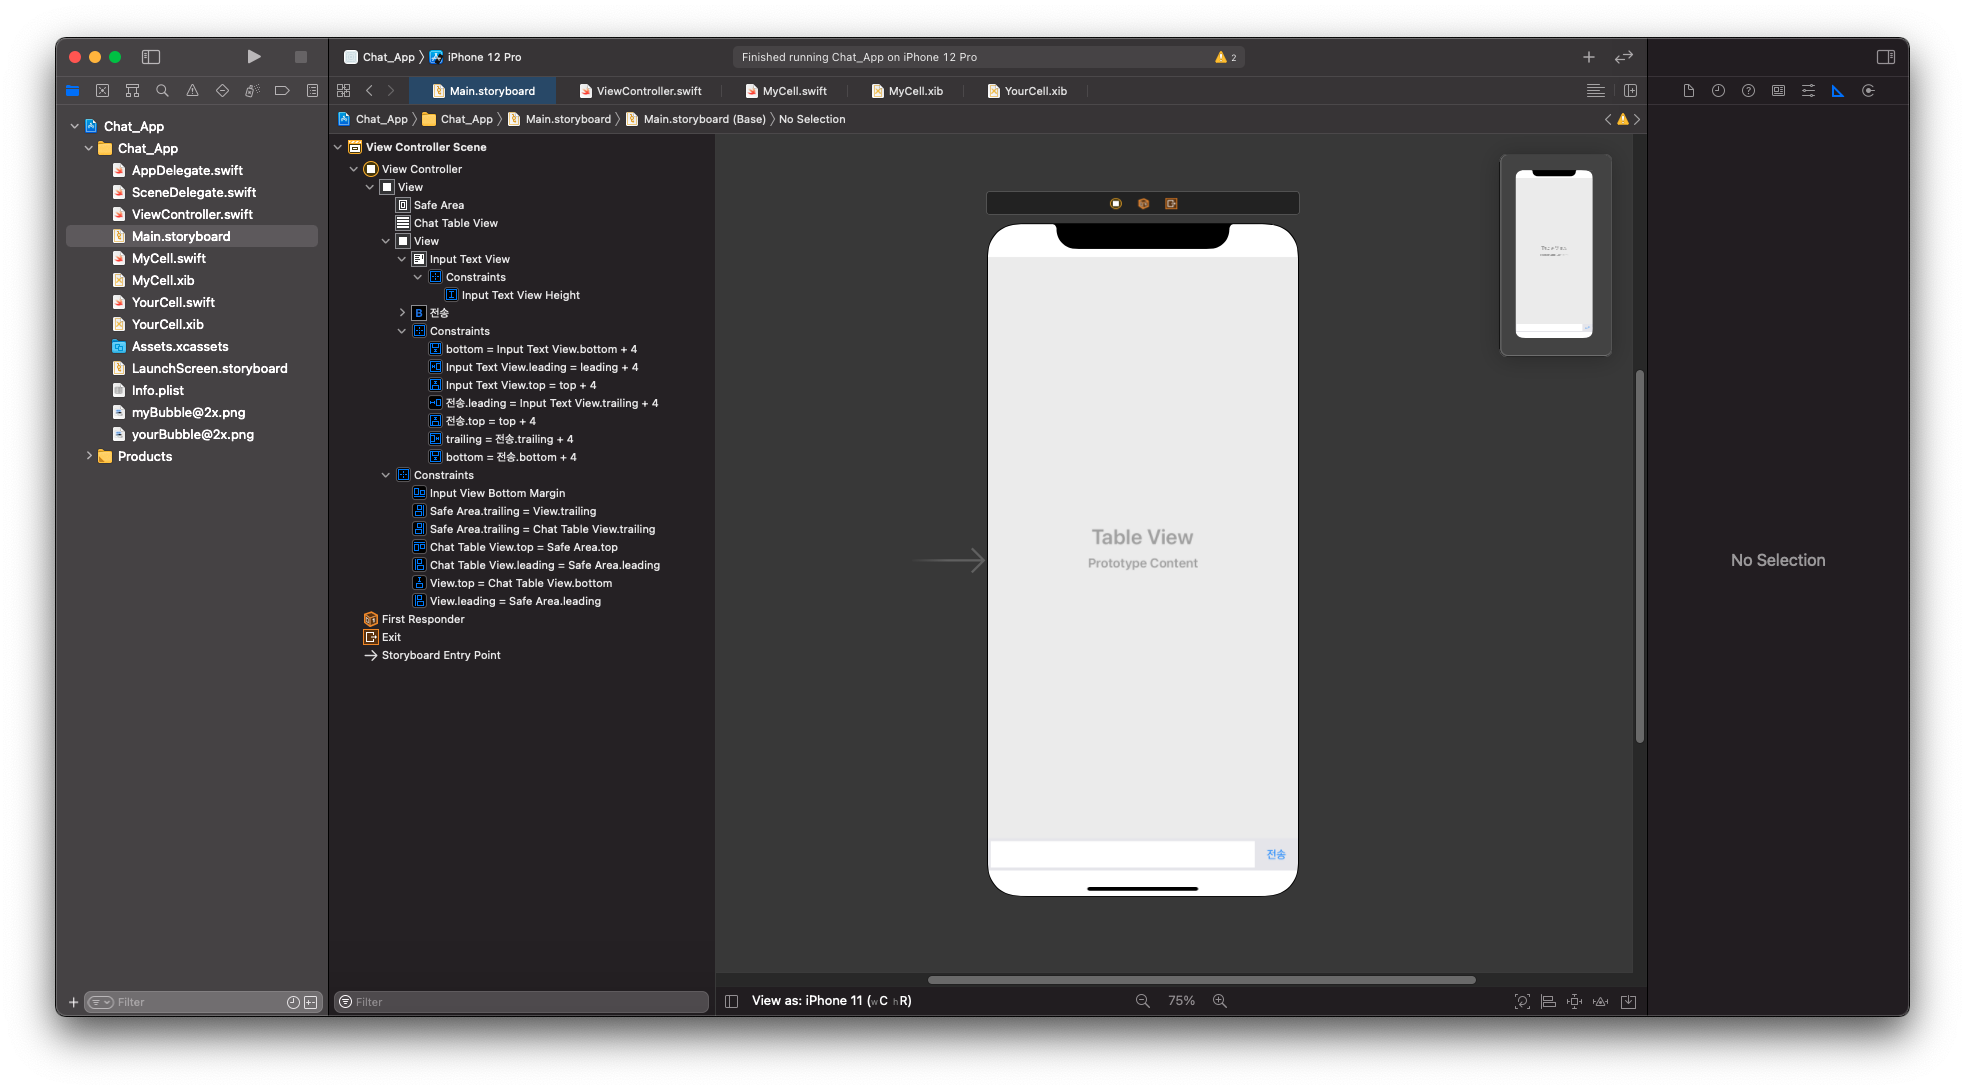
먼저 레이아웃은 이렇다. Table View 가 대화 내용이 들어가는 곳이고, 아래에 사용자의 입력을 받는 칸과 전송칸이 있다. 여기다가 색깔이나 테마를 입히면 카카오톡이 되는 거다!
이제 코드를 만져보자.
Table View 코드 설정하기
TableView Protocol 사용
먼저, 테이블 뷰를 사용하기 위해 가장 먼저 해줘야 할 것은 클래스 선언부에 추가해 주는것.
ViewController.swift 파일 상단부에 있는 클래스 선언부를 보면
class ViewController: UIViewController이렇게 되어 있는데
class ViewController: UIViewController, UITableViewDelegate, UITableViewDataSource, UITextViewDelegate이렇게 바꿔준다. Delegate와 DataSource는 테이블 뷰를 사용하려면 무조건 추가해야 하는 클래스라고 생각하면 되고, UITextViewDelegate는 이따가 텍스트 뷰 설정하면서 추가할 것이다.
그리고 이 클래스를 선언하게 되면 오류가 나는데 테이블 뷰를 상속받게 되면 무조건 사용해야 하는 함수가 2가지가 있다.
func tableView(_ tableView: UITableView, numberOfRowsInSection section: Int) -> Int

func tableView(_ tableView: UITableView, cellForRowAt indexPath: IndexPath) -> UITableViewCell
이 두가지 인데 이건 선언만 해두고 나중에 사용하자.
오브젝트 초기화
테이블 뷰 오브젝트를 코드에 끌어다 쓰게 되면 반드시 해야하는 초기화 작업이 있다.
    @IBOutlet weak var chatTableView: UITableView!{
        didSet{ // 오브젝트 생성했을 때

            // 이것을 하지 않으면 작동 x.
            // 코드로 하거나 스토리보드에서 하면 된다.
            chatTableView.delegate = self
            chatTableView.dataSource = self

            chatTableView.separatorStyle = .none
            // 테이블 뷰 구분선 없애는 것
        }
    }
이거는 공식 같은 것이라고 하니 필수라고 생각은 해두고 이해가 안된다면 따로 찾아보면 될 것 같다. 나는 이전에 보안 키보드 만들 때 한번 다룬 적이 있다.
외부에서 만든 셀 등록
myCell과 yourCell을 이 코드에 등록해놔야 사용할 수가 있다. 등록하는 작업은 register를 이용하면 된다.
 override func viewDidLoad() {
        super.viewDidLoad()
        // Do any additional setup after loading the view.

        // 사용하려는 셀을 등록해야 사용할 수 있다.
        chatTableView.register(UINib(nibName: "MyCell", bundle:nil), forCellReuseIdentifier:"myCell")
        // nibName : xib 파일 이름.     forCellReuseIdentifier: Cell의 identifier. xib파일안에서 설정가능
        chatTableView.register(UINib(nibName: "YourCell", bundle:nil), forCellReuseIdentifier: "yourCell")
 }
nibName 은 xib 파일 이름, 그리고 forCellReuseIdentifier 는 셀 만들때 우리가 지정해 놓은 셀의 identifier 이다. 헷갈리지 않도록 유의한다.
그리고 이제 아까 선언한 두 개의 함수를 사용하면
 func tableView(_ tableView: UITableView, numberOfRowsInSection section: Int) -> Int {
        return chatDatas.count
    } // 테이블 뷰 row 개수 반환하는 건데 우리는 쓸 일이 없다. 리턴값만 제대로 넣어주자.


    // 여기서는 네트워크를 통해 데이터를 구성하는 게 아니고, 그냥 하나의 Array에 모든 데이터를 저장하는 걸로 하자.
    var chatDatas = [String]()

    // 원래는 상대방이 썼을 때 상대방의 셀, 내가 썼을 때 내 셀이 나와야 하는데 이거는 그냥 번갈아가면서 나오게 하는 거임.
    func tableView(_ tableView: UITableView, cellForRowAt indexPath: IndexPath) -> UITableViewCell {

        if indexPath.row % 2 == 0{

            let myCell = tableView.dequeueReusableCell(withIdentifier: "myCell", for: indexPath) as! MyCell
            // MyCell 형식으로 사용하기 위해 형변환이 필요하다.
            myCell.myTextView.text = chatDatas[indexPath.row]   // 버튼 누르면 chatDatas 에 텍스트를 넣을 것이기 때문에 거기서 꺼내오면 되는거다.
            myCell.selectionStyle = .none
            return myCell

        }
        else{

            let yourCell = tableView.dequeueReusableCell(withIdentifier: "yourCell", for: indexPath) as! YourCell
            // 이것도 마찬가지.
            yourCell.yourTextView.text = chatDatas[indexPath.row]
            yourCell.selectionStyle = .none
            return yourCell

        }
    }
이렇게 하면 셀 관련 설정은 어느정도 됐고, 아직 구현이 안된 건 키보드 따라서 안 올라가는 것, 전송 버튼이랑, 텍스트 뷰 높이 제한 시키는 것.
키보드 따라서 올라가는 건 옵저버를 사용하면 된다고 한다. 이게 뭔지는 따로 공부를 좀 해봐야 할 듯하다.
여기는 func viewDidLoad() 구간이다.
    // 키보드 관련 옵저버 설정을 해야 함.
        // 키보드 올라올 때.
        NotificationCenter.default.addObserver(self, selector: #selector(keyBoardup), name: UIResponder.keyboardWillShowNotification, object: nil)

        // 키보드 내려올 때.
        NotificationCenter.default.addObserver(self, selector: #selector(keyBoardDown), name: UIResponder.keyboardDidHideNotification, object: nil)
    }

    @objc func keyBoardup(noti: Notification){
        let notiInfo = noti.userInfo!
        let keyboardFrame = notiInfo[UIResponder.keyboardFrameEndUserInfoKey] as! CGRect

        // 홈 버튼 없는 아이폰들은 다 빼줘야함.
        let height = keyboardFrame.size.height - self.view.safeAreaInsets.bottom


        let animationDuration = notiInfo[ UIResponder.keyboardAnimationDurationUserInfoKey] as! TimeInterval

        // 키보드 올라오는 애니메이션이랑 동일하게 텍스트뷰 올라가게 만들기.
        UIView.animate(withDuration: animationDuration) {
            self.inputViewBottomMargin.constant = height
            self.view.layoutIfNeeded()
        }

    }

    @objc func keyBoardDown(noti: Notification){

        let notiInfo = noti.userInfo!
        let animationDuration = notiInfo[ UIResponder.keyboardAnimationDurationUserInfoKey] as! TimeInterval

        UIView.animate(withDuration: animationDuration) {
            self.inputViewBottomMargin.constant = 0
            self.view.layoutIfNeeded()
        }
    }
이게 코드하나씩 따로 따로 설명하기가 생각보다 어렵다는 생각이 든다. 설명은 이쯤에서 마치고, 따로 구현하면서 함수를 하나하나씩 공부를 하는 게 더 나을거 같다는 생각이 든다.
최종 코드
import UIKit

class ViewController: UIViewController, UITableViewDelegate, UITableViewDataSource, UITextViewDelegate {

    @IBOutlet weak var inputTextViewHeight: NSLayoutConstraint!

    @IBOutlet weak var chatTableView: UITableView!{
        didSet{ // 오브젝트 생성했을 때

            // 이것을 하지 않으면 작동 x. 코드로 하거나 스토리보드에서 하면 된다.
            chatTableView.delegate = self
            chatTableView.dataSource = self

            chatTableView.separatorStyle = .none    // 테이블 뷰 구분선 없애는 것
        }
    }

    // 여기서는 네트워크를 통해 데이터를 구성하는 게 아니고, 그냥 하나의 Array에 모든 데이터를 저장하는 걸로 하자.
    var chatDatas = [String]()

    @IBOutlet weak var inputTextView: UITextView!{
        didSet{
            inputTextView.delegate = self
        }
    }

    @IBOutlet weak var inputViewBottomMargin: NSLayoutConstraint!

    override func viewDidLoad() {
        super.viewDidLoad()
        // Do any additional setup after loading the view.

        // 사용하려는 셀을 등록해야 사용할 수 있다.
        chatTableView.register(UINib(nibName: "MyCell", bundle:nil), forCellReuseIdentifier:"myCell")
        // nibName : xib 파일 이름.     forCellReuseIdentifier: Cell의 identifier. xib파일안에서 설정가능
        chatTableView.register(UINib(nibName: "YourCell", bundle:nil), forCellReuseIdentifier: "yourCell")

        // 키보드 관련 옵저버 설정을 해야 함.
        // 키보드 올라올 때.
        NotificationCenter.default.addObserver(self, selector: #selector(keyBoardup), name: UIResponder.keyboardWillShowNotification, object: nil)

        // 키보드 내려올 때.
        NotificationCenter.default.addObserver(self, selector: #selector(keyBoardDown), name: UIResponder.keyboardDidHideNotification, object: nil)
    }

    @objc func keyBoardup(noti: Notification){
        let notiInfo = noti.userInfo!
        let keyboardFrame = notiInfo[UIResponder.keyboardFrameEndUserInfoKey] as! CGRect

        // 홈 버튼 없는 아이폰들은 다 빼줘야함.
        let height = keyboardFrame.size.height - self.view.safeAreaInsets.bottom


        let animationDuration = notiInfo[ UIResponder.keyboardAnimationDurationUserInfoKey] as! TimeInterval

        // 키보드 올라오는 애니메이션이랑 동일하게 텍스트뷰 올라가게 만들기.
        UIView.animate(withDuration: animationDuration) {
            self.inputViewBottomMargin.constant = height
            self.view.layoutIfNeeded()
        }

    }

    @objc func keyBoardDown(noti: Notification){

        let notiInfo = noti.userInfo!
        let animationDuration = notiInfo[ UIResponder.keyboardAnimationDurationUserInfoKey] as! TimeInterval

        UIView.animate(withDuration: animationDuration) {
            self.inputViewBottomMargin.constant = 0
            self.view.layoutIfNeeded()
        }
    }

    @IBAction func sendButton(_ sender: Any) {
        // 텍스트뷰에 있는 값이 chatDatas array에 들어가야지.
        if inputTextView.text != ""{
            chatDatas.append(inputTextView.text)
            inputTextView.text = ""
        }

        let lastindexPath = IndexPath(row: chatDatas.count - 1, section: 0)

        // 방법 1 : chatTableView.reloadData() 리로드는 조금 부자연스럽다.
        // 방법 2 :
        chatTableView.insertRows(at: [lastindexPath], with: UITableView.RowAnimation.automatic)

        inputTextViewHeight.constant = 35

        // TableView에는 원하는 곳으로 이동하는 함수가 있다. 고로 전송할때마다 최신 대화로 이동.
        chatTableView.scrollToRow(at: lastindexPath, at: UITableView.ScrollPosition.bottom, animated: true)
    }

    // 테이블 뷰를 사용하게 되면 무조건 구현해야하는 함수 2개.
    func tableView(_ tableView: UITableView, numberOfRowsInSection section: Int) -> Int {
        return chatDatas.count
    }


    // 원래는 상대방이 썼을 때 상대방의 셀, 내가 썼을 때 내 셀이 나와야 하는데 이거는 그냥 번갈아가면서 나오게 하는 거임.
    func tableView(_ tableView: UITableView, cellForRowAt indexPath: IndexPath) -> UITableViewCell {

        if indexPath.row % 2 == 0{

            let myCell = tableView.dequeueReusableCell(withIdentifier: "myCell", for: indexPath) as! MyCell // MyCell 형식으로 사용하기 위해 형변환이 필요하다.
            myCell.myTextView.text = chatDatas[indexPath.row]   // 버튼 누르면 chatDatas 에 텍스트를 넣을 것이기 때문에 거기서 꺼내오면 되는거다.
            myCell.selectionStyle = .none
            return myCell

        }
        else{

            let yourCell = tableView.dequeueReusableCell(withIdentifier: "yourCell", for: indexPath) as! YourCell // 이것도 마찬가지.
            yourCell.yourTextView.text = chatDatas[indexPath.row]
            yourCell.selectionStyle = .none
            return yourCell

        }
    }

    func textViewDidChange(_ textView: UITextView) {
        if textView.contentSize.height <= 35{
            inputTextViewHeight.constant = 35
        }
        else if textView.contentSize.height >= 102{
            inputTextViewHeight.constant = 102
        }
        else{
            inputTextViewHeight.constant = textView.contentSize.height
        }


    }
}
어렵다 어려웡....다음주까지 인스타그램 클론코딩 할 수 있을까...ㅎ