들어가기에 앞서
나는 유튜브 보는 걸 좋아한다.
생방송보다는 누군가가 클립으로 만들어 놓은 영상을 보는 걸 좋아한다.
클립들을 보다 보면 나도 한 번 클립을 만들어보고 싶다는 생각이 든다.
1~2분짜리 정도면 나도 만들 수 있을 것 같기도 하고..
다만 고작 2분짜리 영상을 만들기 위해, 내가 직접 3~6시간 생방송을 모두 봐야한다는 것이 쉽지 않아 포기하고 있었다.
그렇게 누워서 유튜브나 보는 생활을 즐기다가..
문득 이런 생각이 들었다.
'그냥 생방송 영상 중 가장 많이 웃은 부분 추출하면 그게 클립인 거 아닌가?'

[우왁굳의 게임방송]
https://www.youtube.com/channel/UCBkyj16n2snkRg1BAzpovXQ
여기 우왁굳이라는 방송인이 있다.
왁굳 형의 방송을 보면 형 특유의 웃음 소리를 들을 수 있다.

테헹 ㅋㅋㅋㅋ | 트위치 클립 일일 하이라이트 | 클립라이트
이른바 '테헹' 이다.
왁굳형이 방송 중 테헹하며 웃은 장면은 대부분 클립으로 뽑힌다.
와! 그럼 2~3시간짜리 생방송 영상에서 '테헹'하고 가장 길게 웃는 장면을 클립으로 만들면 되겠다!
'우왁굳 베스트 테헹 분석기'를 만들어 보자!
... 그런데 '테헹' 웃음소리를 어떻게 구별해 내지?
웃음소리 인식 모델
laughter-detection
뭔가 머신러닝과 관련된 걸 써야할 것 같은데,
문제는 내가 머신러닝 쪽은 거의 해본 게 없다는 것이다.
그나마 tensorflow로 개와 고양이 분류 모델 만들기?
이런 것만 살짝 해봤는데 tensorflow나 pytorch는 어떻게 다루고, 심지어 음성 데이터는 어떻게 다루나...
[jrgillick / laughter-detection]
https://github.com/jrgillick/laughter-detection
다행히도 구글과 깃허브에는 없는게 없었다.
이미 누군가가 음성파일(.wav)에서 웃음소리를 추출해내는 모델을 만들어 두었다.
더 좋은 것은 나처럼 '테헹' 소리만 분석할 생각을 하지 않고 포괄적인 사람들의 웃는 소리를 학습시켰다는 것이다.
좋다. 이걸 이용하면 '우왁굳 베스트 테헹 분석기'를 넘어 '동영상 내 가장 웃긴 클립 분석기'를 만들 수 있을 것이다.
테스트 해보자
가상환경 구축
Dependencies
Python - tested with version 3.6.1.
Librosa - tested with version 0.8.1.
Pytorch - tested with version 1.3.1.
A somewhat more comprehensive list can be found in requirements.txt.
python3.6에서 구축했다고 한다.
conda create -n laughter-detection python==3.7
activate laughter-detection
laughter-detection를 테스트하기 위한 conda 가상환경을 만들었다.
package 설치
Installation
git clone https://github.com/jrgillick/laughter-detection.git
cd laughter-detection
pip install -r requirements.txt
그 후 github에서 설명하신대로 설치를 진행했는데..
librosa==0.9.2
torch==1.3.1
tgt==1.4.4
pyloudnorm==0.1.0
praatio==3.8.0
tensorboardX==1.9
여기서 librosa 버전을 0.8.1으로 설치하면 나중에 오류가 발생했다.
S = librosa.feature.melspectrogram(y, sr, hop_length=hop_length).Tutils/audio_utils.py의 228번 줄에서 melspectrogram이 버전이 바뀌면서 뭔가 바뀌었다고 한다.
librosa 버전을 0.9 이상으로 변경하면 해결된다.
segment_laughter.py 테스트
Usage
- To run interactively on Google Colab, use this link.
- To run laughter detection from the command line, use the segment_laughter.py script.
- For example: python segment_laughter.py --input_audio_file=tst_wave.wav --output_dir=./tst_wave --save_to_textgrid=False --save_to_audio_files=True --min_length=0.2 --threshold=0.5
python segment_laughter.py --input_audio_file=tst_wave.wav --output_dir=./tst_wave --save_to_textgrid=False --save_to_audio_files=True --min_length=0.2 --threshold=0.5예시대로 코드를 바로 실행하면 어김없이 오류가 뜨는데
File "./utils\torch_utils.py", line 109, in load_checkpoint
checkpoint = torch.load(checkpoint)
RuntimeError: Attempting to deserialize object on a CUDA device but torch.cuda.is_available() is False. If you are running on a CPU-only machine, please use torch.load with map_location=torch.device('cpu') to map your storages to the CPU.
설명하자면 torch.load(checkpoint) 이 부분을 실행할 때
자동으로 CUDA(gpu 사용) 환경으로 실행이 되는데
내 노트북에 CUDA 환경이 구축되지 않아 오류가 발생한다는 것이다.
[CUDA - 위키백과]
https://ko.wikipedia.org/wiki/CUDA
위키에서 내 그래픽카드에 맞는 CUDA 버전을 확인하고 설치를 진행해야 했는데,
여기에 내 노트북 그래픽카드인 'MX150'이 없어 cpu로 진행해야 했다.
(나중에 추가로 찾아보니 MX150도 CUDA 11.2까지 지원한다고 한다.)
	if torch.cuda.is_available():
		checkpoint = torch.load(checkpoint)
	else:
		checkpoint = torch.load(checkpoint, map_location=torch.device('cpu'))
RuntimeError에서 설명한대로 map_location=torch.device('cpu')을 추가해주니 오류가 사라졌다.
그렇게 cpu 모드로 30초짜리 음성파일 테스트를 시작했다.
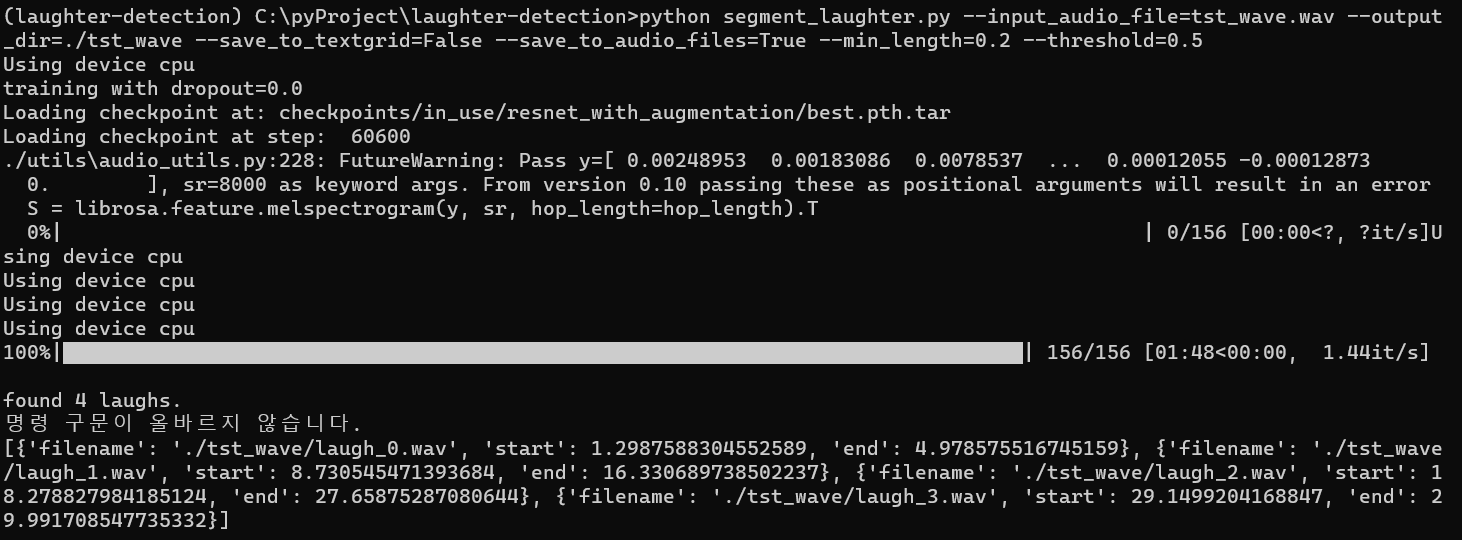
음성파일은 4개가 생성됐고, 4개 파일 모두 웃음소리가 잘 추출되었다.
다만 문제는... 30초짜리에서 추출하는데 1분 48초가 걸린다는 것이다...
아니.. 30초 영상이 2분 걸리면
2~3시간 넘는 동영상은 몇 시간 걸리는 거야?
아.. 어쩌지..?
Colab을 써보자
[Google Colab - laughter-detection.ipynb]
https://colab.research.google.com/github/jrgillick/laughter-detection/blob/master/laughter-detection-interactive.ipynb
Jon Gillick 선생님께서 나같은 사람들을 위해 colab도 준비해 두셨다.
고마워요 센세!
#@title Install laughter-detection
!git clone https://github.com/jrgillick/laughter-detection.git
%cd laughter-detection/
!pip install librosa==0.9.2
!pip install tgt
!pip install pyloudnorm
!pip install praatio==3.8.0
!pip install tensorboardX==1.9

from google.colab import files
'Install Software' 파트에서 pip 설치를 진행하는데
테스트 할 때 발견한 것처럼 librosa 버전을 0.9 이상으로 설치해야 오류가 발생하지 않는다.
colab에 작성된 것들을 하나 하나 실행해주면서
이번에도 30초 영상을 업로드 해주면

와우! 마지막에 웃음 소리를 추출하는 작업이 3초만에 종료됐다.
확실히 이번 프로젝트는 코글로 작성해야겠다.
colab 구독 관련
참고로 colab의 경우 기본적으로 월 10$의 구독 요금제가 있지만, 무료로도 사용이 가능하다.

아 당연히 무료로 써먹어야지. 만원도 작은 돈이 아닌데 ㅎㅎ

.. 1시간 써보다가 바로 pro 구독했다...
[Google Colab FAQ]
https://research.google.com/colaboratory/faq.html
무료로 쓰는 사람들은 gpu 사용시, 우선순위가 밀려 중간에 갑자기 연결이 끊기기도 한다.
문제는 한 번 끊겼을 때 언제 다시 gpu 사용이 가능한지 알 수가 없다는 것이었다.
10분을 기다려도 gpu 연결이 계속 안되는 것을 보고 화병나서 바로 pro를 결제해버렸다.
역시 구글. 장사하는 법을 안다.
Best-LaughClip-Detection
구성
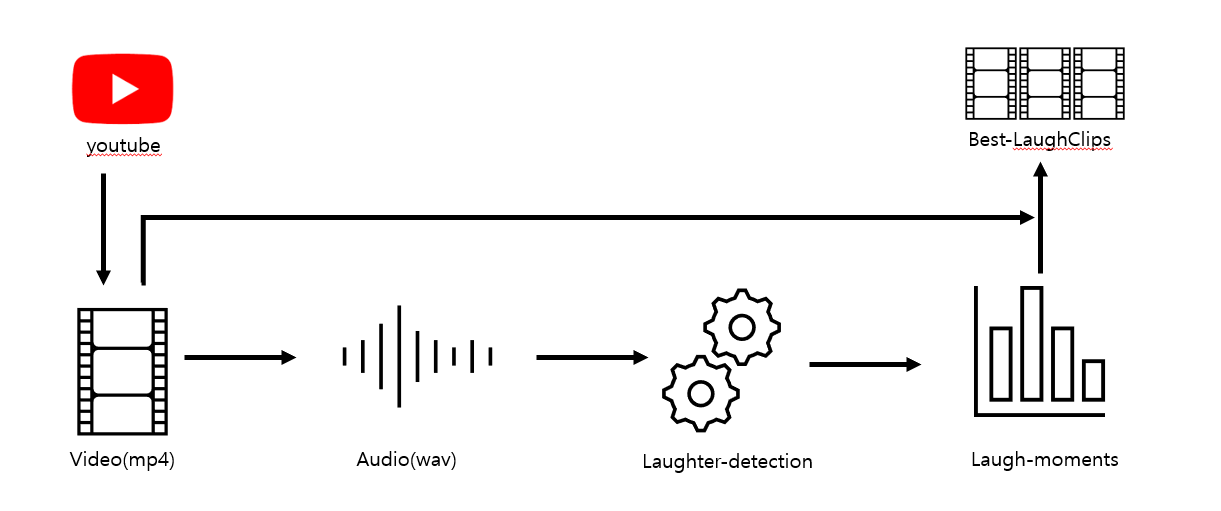
구성은 이런 느낌이다.
youtube에서 동영상을 다운로드하고,
다운로드한 영상(mp4)을 오디오(wav)로 변환한다.
이후 laughter-detection를 사용하여 많이 웃는 구간(Laugh-moments)을 구하고, 이를 클립(Best-LaughClips)으로 만드는 것이다.
Colab 작성
구글드라이브 연동
#@title Load a video file from GoogleDrive

from google.colab import drive
drive.mount('/content/drive')
코랩을 사용할 때는 구글드라이브랑 연동하는 게 편했다.
데스크탑에도 구글드라이브를 설치하면, 코랩을 통해 생성된 데이터를 데스크탑에서도 금방 확인이 가능하다.
pytube를 사용한 youtube 다운로드
#@title Install pytube
!pip install pytube
#@title Download youtube video
from pytube import YouTube
import uuid
#@markdown youtube 동영상의 videoid를 입력할 것
video_id = "VTDLTzLeegE" #@param {type:"string"}
video_url = "https://www.youtube.com/watch?v=" + video_id
#@markdown folder를 작성할 때 반드시 끝에 /를 작성할 것
video_folder = "/content/drive/MyDrive/Colab_sample_data/" #@param {type:"string"}
audio_folder = "/content/drive/MyDrive/Colab_sample_data/" #@param {type:"string"}
video_name = video_id
video_path = video_folder+video_name+".mp4"
audio_path = audio_folder+video_name+".wav"
#@markdown "https://www.google.com/device" 에서 코드 입력해야 함
yt = YouTube(video_url, use_oauth=True, allow_oauth_cache=True)
yt.title = video_name
clip = yt.streams.get_highest_resolution() # 고화질 설정
clip.download(video_folder)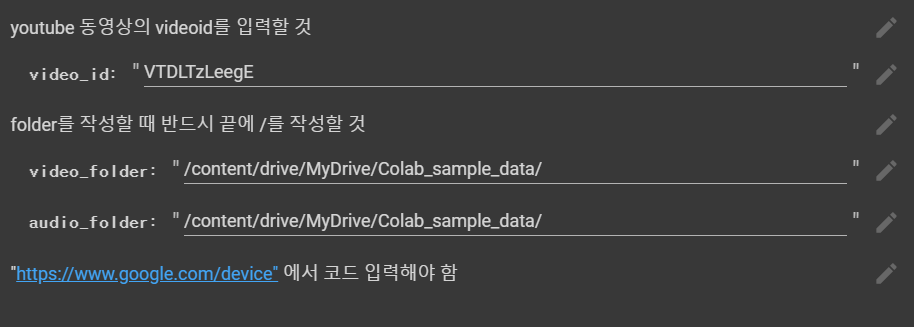
colab은 #@param을 사용하여 값을 입력할 수 있다.
youtube 동영상 id를 입력받으면, 동영상을 drive에 다운로드하는 방식이다.

참고로 pytube를 사용해 동영상을 다운로드 할 때, 위와 같이 코드를 입력해 주어야 한다.
mp4 -> wav 파일 생성
#@title Install ffmpeg
!sudo apt install ffmpeg
#@title Format change video to wav
import os
os.system(f"ffmpeg -i \"{video_path}\" -ac 2 -f wav \"{audio_path}\"")[ffmpeg 대표홈페이지]
https://ffmpeg.org/
mp4를 wav로 변환하기 위해 ffmpeg를 사용했다.
혹시 몰라 설치 명령문을 입력했는데, colab에 기본적으로 ffmpeg가 설치되었다.
참고로 동영상을 다룰 때 다른 것 보다 ffmpeg의 속도가 상당히 빠르다.
laughter-detection 설치
#@title Install laughter-detection
!git clone https://github.com/jrgillick/laughter-detection.git
%cd laughter-detection/
!pip install librosa==0.9.2
!pip install tgt
!pip install pyloudnorm
!pip install praatio==3.8.0
!pip install tensorboardX==1.9

from google.colab import files
git clone과 pip install을 사용한다.
#@title Setup and Load Model

import os, sys, pickle, time, librosa, argparse, torch, numpy as np, pandas as pd, scipy
from tqdm import tqdm
import tgt
sys.path.append('./utils/')
import laugh_segmenter
import models, configs
import dataset_utils, audio_utils, data_loaders, torch_utils
from tqdm import tqdm
from torch import optim, nn
from functools import partial
from distutils.util import strtobool

sample_rate = 8000

model_path = 'checkpoints/in_use/resnet_with_augmentation'
config = configs.CONFIG_MAP['resnet_with_augmentation']

device = torch.device('cuda' if torch.cuda.is_available() else 'cpu')
print(f"Using device {device}")

##### Load the Model

model = config['model'](dropout_rate=0.0, linear_layer_size=config['linear_layer_size'], filter_sizes=config['filter_sizes'])
feature_fn = config['feature_fn']
model.set_device(device)

if os.path.exists(model_path):
    torch_utils.load_checkpoint(model_path+'/best.pth.tar', model)
    model.eval()
else:
    raise Exception(f"Model checkpoint not found at {model_path}")
처음에 테스트한 것과 동일하다.
laughter-detection 실행
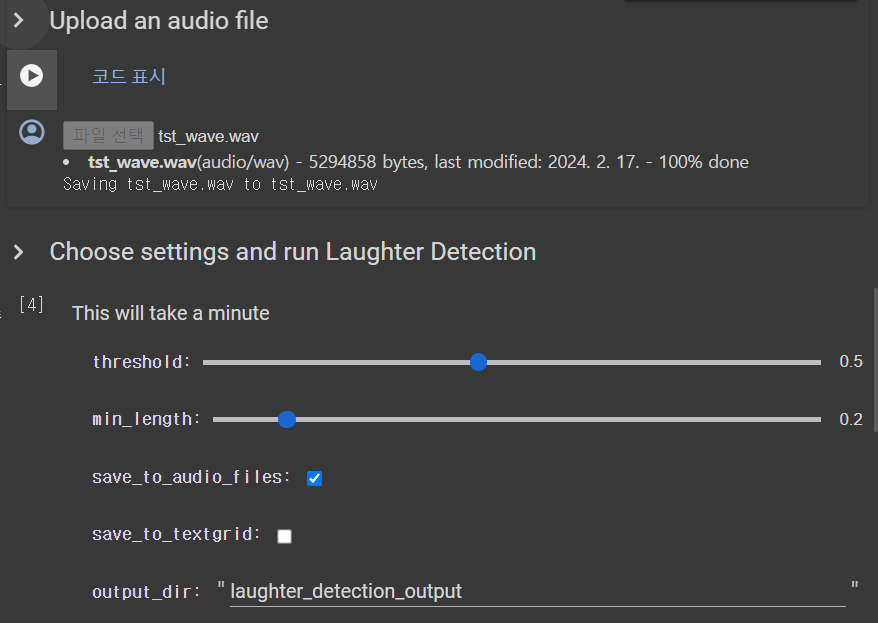
#@title Choose settings and run Laughter Detection

#@markdown This will take a minute
output_dir = 'laughter_detection_output' #@param {type:"string"}
threshold = 0.5 #@param {type:"slider", min:0.1, max:1.0, step:0.1}
min_length = 0.2 #@param {type:"slider", min:0.1, max:1.0, step:0.1}
save_to_audio_files = True #@param {type:"boolean"}


##### Load the audio file and features

inference_dataset = data_loaders.SwitchBoardLaughterInferenceDataset(
    audio_path=audio_path, feature_fn=feature_fn, sr=sample_rate)

collate_fn=partial(audio_utils.pad_sequences_with_labels,
                        expand_channel_dim=config['expand_channel_dim'])

inference_generator = torch.utils.data.DataLoader(
    inference_dataset, num_workers=4, batch_size=8, shuffle=False, collate_fn=collate_fn)


##### Make Predictions

probs = []
for model_inputs, _ in tqdm(inference_generator):
    x = torch.from_numpy(model_inputs).float().to(device)
    preds = model(x).cpu().detach().numpy().squeeze()
    if len(preds.shape)==0:
        preds = [float(preds)]
    else:
        preds = list(preds)
    probs += preds
probs = np.array(probs)

file_length = audio_utils.get_audio_length(audio_path)

fps = len(probs)/float(file_length)

probs = laugh_segmenter.lowpass(probs)
instances = laugh_segmenter.get_laughter_instances(probs, threshold=threshold, min_length=float(min_length), fps=fps)

print(); print("found %d laughs." % (len (instances)))

if len(instances) > 0:
    full_res_y, full_res_sr = librosa.load(audio_path,sr=44100)
    wav_paths = []
    maxv = np.iinfo(np.int16).max

    if save_to_audio_files:
        if output_dir is None:
            raise Exception("Need to specify an output directory to save audio files")
        else:
            os.system(f"mkdir -p {output_dir}")
            for index, instance in enumerate(instances):
                laughs = laugh_segmenter.cut_laughter_segments([instance],full_res_y,full_res_sr)
                wav_path = output_dir + "/laugh_" + str(index) + ".wav"
                scipy.io.wavfile.write(wav_path, full_res_sr, (laughs * maxv).astype(np.int16))
                wav_paths.append(wav_path)
            print(laugh_segmenter.format_outputs(instances, wav_paths))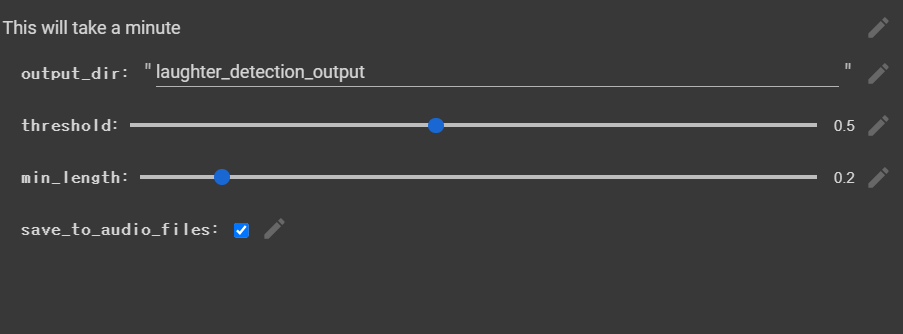
처음에 테스트한 것에서 불필요한 부분을 삭제했다.
/content/laughter-detection/./utils/audio_utils.py:228: FutureWarning: Pass y=[ 0. 0. 0. ... -0.00034499 -0.00046821
0. ], sr=8000 as keyword args. From version 0.10 passing these as positional arguments will result in an error
S = librosa.feature.melspectrogram(y, sr, hop_length=hop_length).T
100%|██████████| 31656/31656 [06:51<00:00, 76.89it/s]found 96 laughs.
1시간 40분 오디오를 처리하는데 대략 7분 걸린 것을 볼 수 있다.
웃긴 구간 정리
#@title Laugh Video Setting
import math
audio_total_length = math.floor(librosa.get_duration(y=full_res_y, sr=full_res_sr))
audio_laugh_check = [False] * (audio_total_length+1)

for item in laugh_segmenter.format_outputs(instances, wav_paths):
  strsec = math.floor(item["start"])
  endsec = math.floor(item["end"])
  for sec in range(strsec, endsec+1):
    audio_laugh_check[sec] = True

laugh_length = 120 #@param {type:"number"}

laughCnt = 0
left, right = 0, laugh_length
for index in range(left, right):
  if(audio_laugh_check[index]): laughCnt+=1

x_values = [0]
y_values = [laughCnt]
while(right < audio_total_length):
  if(audio_laugh_check[left]): laughCnt -= 1
  if(audio_laugh_check[right+1]): laughCnt += 1
  left, right = left+1, right+1
  x_values.append(left)
  y_values.append(laughCnt)
audio_laugh_check = [False] * (audio_total_length+1)핵심은 1초 단위로 동영상 구간을 모두 따지는 것이다.
laughter-detection을 실행하고 나면
[{start : 10.12, end : 12.35}, ...]
와 같이 웃음이 포함된 구역을 알 수 있는데
이걸 이용해서 audio_laugh_check[start ~ end] 구간을 모두 true로 설정하면
동영상이 sec초일 때, audio_laugh_check[sec]를 통해 해당 시간이 웃긴 구간인지 알 수 있는 것이다.
laughCnt = 0
left, right = 0, laugh_length
for index in range(left, right):
  if(audio_laugh_check[index]): laughCnt+=1

x_values = [0]
y_values = [laughCnt]
while(right < audio_total_length):
  if(audio_laugh_check[left]): laughCnt -= 1
  if(audio_laugh_check[right+1]): laughCnt += 1
  left, right = left+1, right+1
  x_values.append(left)
  y_values.append(laughCnt)
laugh_length으로 웃음을 측정할 영상 길이를 입력하면
모든 audio_laugh_check[left ~ right] 구역의 laughCnt를 비교할 수 있다.
구간 그래프로 표시
#@title Laugh Moment Graph
import matplotlib.pyplot as plt
plt.plot(x_values, y_values)
plt.show()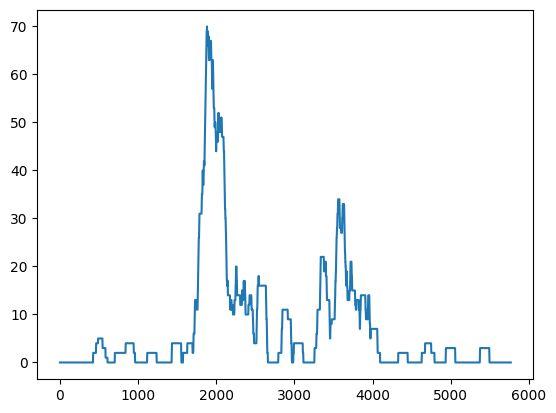
구역을 그래프로 표시하면 위와 같은 사진이 나온다.

이걸 youtube 재생바에서 볼 수 있는 '가장 많이 다시 본 장면' 그래프와 비교하면 어느정도 유사한 것을 볼 수 있다.
위에서 말하지 않았나. 왁굳형이 테헹하고 웃으면 클립이 된다고
Best Laugh Clips 추출하기
#@title get Best Laugh Clips
clip_num = 3 #@param {type:"number"}
laugh_before = 30 #@param {type:"number"}
laugh_after = 30 #@param {type:"number"}
clip_total_length = laugh_before + laugh_length + laugh_after

copy_x = x_values.copy()
copy_y = y_values.copy()

for num in range(0, clip_num):
  index = copy_y.index(max(copy_y))
  str_time = max(0, index-laugh_before)
  end_time = min(index+laugh_length+laugh_after, audio_total_length)
  left = max(0, index-clip_total_length)
  right = min(index+clip_total_length, audio_total_length)
  copy_x = copy_x[0:left] + copy_x[right:audio_total_length]
  copy_y = copy_y[0:left] + copy_y[right:audio_total_length]

  clip_path = video_folder + video_name + "_clip" + str(num) + ".mp4"
  print(f"ffmpeg -i {video_path} -ss {str_time} -to {end_time} -c:v copy -c:a copy {clip_path}")
  os.system(f"ffmpeg -i {video_path} -ss {str_time} -to {end_time} -c:v copy -c:a copy {clip_path}")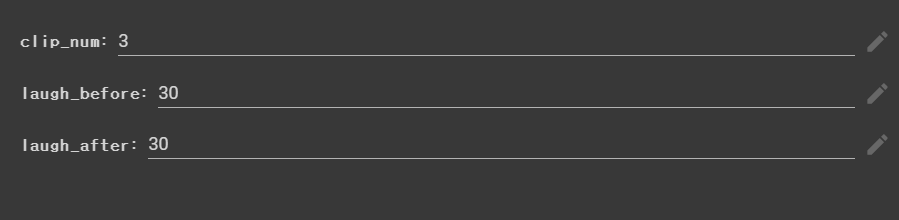
clip_num은 클립으로 추출할 영상의 개수를 의미한다.
laugh_before, laugh_after는 laugh_length의 앞 뒤에 붙일 시간을 의미한다.
이게 audio_laugh_check[index ~ index + laugh_length] 구역을 그대로 추출하자니
(웃기전 상황 -> 상황발생 -> [웃음] -> 마무리)
이런 식으로 구성이 되야 볼만하지
(웃음 -> 웃음 -> 웃음)
으로 진행되면 클립이 재미 없을 것이란 생각이 들었다.
그래서 [웃음]의 이전과 이후에 여백을 주기 위해 laugh_before과 laugh_after를 추가했다.
os.system(f"ffmpeg -i {video_path} -ss {str_time} -to {end_time} -c:v copy -c:a copy {clip_path}")마지막에 동영상을 추출할 때도 ffmpeg를 사용했다.
처음에는 pymovie를 사용하려고 했는데, 30분이 넘어도 동영상을 1개도 추출을 못하고 있었다.
이걸 ffmpeg로 바꾸니, 놀랍게도 1초도 안걸린다!
ffmpeg가 동영상 다룰 때는 압도적인 것 같다.
결과
첫 번째로 추출된 동영상을 보면 유튜브에서 '가장많이 본 다시 본 장면'과 거의 일치하는 것을 볼 수 있었다.
이 정도면 실제로도 사용할 수 있지 않을까 싶을 정도로 만족스럽다.
마무리하며
[Best-LaughClip-Detection]
https://github.com/WickedFoxes/Best-LaughClip-Detection
[Colab / Best-LaughClip-Detection]
https://colab.research.google.com/github/WickedFoxes/Best-LaughClip-Detection/blob/master/Best-LaughClip-Detection.ipynb
여태까지 한 프로젝트 중 가장 재미있었다.
역시 사람은 자기 취미에 맞는 일을 할 때가 가장 즐겁다는 게 맞는 것 같다.
TFilter - 개인정보 검출 프로그램을 만들어 보자 프로젝트는 산업체에서 일할 때 느낌이 들어서 하기 귀찮았다면, 이번 프로젝트는 그냥 취미활동을 하는 것 같아 즐거웠다.
일단 내 취미(유튜브 보기)랑 연관이 있었고, 단계를 거치면서 내가 원하는 결과물이 조금씩 나오는게 기분 좋았다.
라이브러리 호완성 문제와 코랩 무료사용 연결 끊김 등 뭔가 오류가 계속 발생했을 때는 조금 힘들었는데,
마지막에 내가 원하는대로 결과물이 나와주니 고통스러웠던게 싹 날아가는 느낌이었다.
완성된 결과물은 정말 마음에 든다. 왁굳형뿐만 아니라 다른 영상들에서도 하이라이트 영상을 잘 뽑아낸다. 4시간 넘는 영상도 약 30~40분 정도면 하이라이트 영상 3개를 뽑아낸다.
나중에 youtube-api도 사용한다면 생방송이 완료될 때마다, 자동으로 클립을 업로드 하는 모델도 만들 수 있을 것이다.
코랩은 한 달 구독을 해버렸으니, 돈이 아까워서라도 머신러닝 공부를 좀 집중해야겠다. 아니면 이미지 생성, TTS 음성 생성 등 뭔가 장난감처럼 가지고 놀거리를 찾아야 할 것 같다.