캐러셀 만들기(1)-무한캐러셀
⬆️(인덱스를 사용해서 무한슬라이드 만들기)
간단하게 css를 사용해서 무한 슬라이드를 구현해보자.
구현 결과

기능
-
이미지가 자동으로 슬라이드된다.
-
동그란 버튼을 클릭해서 원하는 순서의 이미지로 바로 이동할 수 있다.
구현
CH1 . 이미지,버튼 생성하기
- 우선 배너를 제작할 div를 만들어준다.
<div className={styles.top_banner}></div>- 이미지 리스트들을 만들어준다.
<div className={styles.banner}>
	<ul className={styles.slides}>
        <li className={styles.slide}>
           <img src={House} alt="house" />
        </li>
        <li className={styles.slide}>
           <img src={House1} alt="house" />
        </li>
        <li className={styles.slide}>
           <img src={House2} alt="house" />
        </li>
        <li className={styles.slide}>
           <img src={House3} alt="house" />
        </li>
    </ul>
</div>- 슬라이드가 이동할때 보이는 페이지 이동버튼(동그란 버튼)을 이미지 개수와 똑같이 생성해준다.
<div className={styles.top_banner}>
  <div className={styles.banner}>
      <input ref={inputRef1} type="radio" name="radio-btn" id="radio1" />
      <input ref={inputRef2} type="radio" name="radio-btn" id="radio2" />
      <input ref={inputRef3} type="radio" name="radio-btn" id="radio3" />
      <input ref={inputRef4} type="radio" name="radio-btn" id="radio4" />

      ...(이미지 리스트)...

      <div className={styles.navigation}>
         <div className={styles.nav_btn1}></div>
         <div className={styles.nav_btn2}></div>
         <div className={styles.nav_btn3}></div>
         <div className={styles.nav_btn4}></div>
      </div>
   </div>
   <div className={styles.labels}>
       <label htmlFor="radio1"></label>
       <label htmlFor="radio2"></label>
       <label htmlFor="radio3"></label>
       <label htmlFor="radio4"></label>
   </div>
</div>
갑자기 길어진 코드..ㅎㅎ;
이 부분은 슬라이드를 수동으로 이동시키기 위해 만들어진 요소들이다.
이어지는 슬라이드 수동조작 파트에서 자세히 알아보자.
css 코드
이미지와 버튼 CSS 코드를 살펴보자.
.top_banner {
  height: 40rem;
  width: 25%;
  overflow: hidden;
  position: relative;
}
.slides {
width: calc(100% * 4);
display: flex;
transition: 2s;
}
.slide {
width: calc(100% / 4);
height: 40rem;
display: flex;
align-items: center;
justify-content: center;
}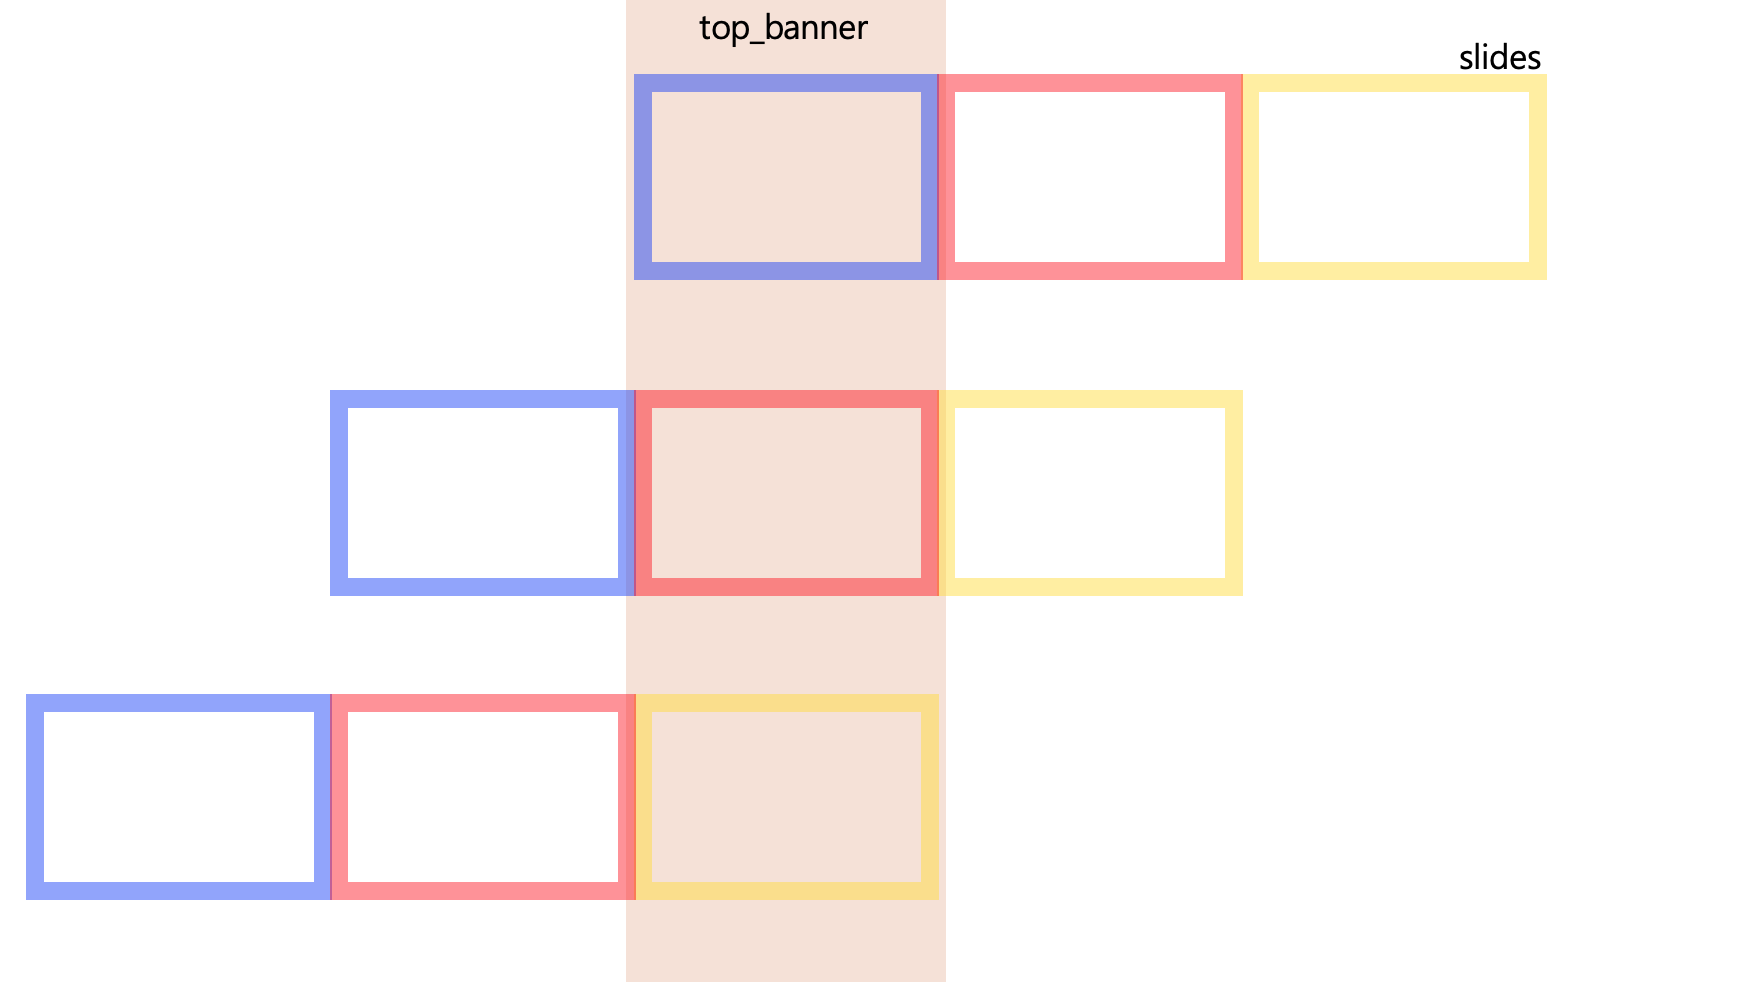
slides에는 이미지가 가로로 나열되어져 있다. slides를 움직이면서 이미지를 한 개씩 보여줄 것이다. (위 이미지 참고)
slides의 너비는 부모 너비의 4배이다.(이미지가 4개니까)
top_banner 에는 한 개의 이미지만 보여줘야 하기 때문에 overflow를 hidden으로 준다.
/**********input 태그**********/
.top_banner input {
  display: none;
}

/**********label 태그**********/
.labels {
  position: absolute;
  bottom: 20px;
  left: 0;
  right: 0;
  text-align: center;
  z-index: 10;
}
.labels label {
  display: inline-block;
  width: 10px;
  height: 10px;
  border-radius: 10px;
  cursor: pointer;
}
.labels label:not(:last-child) {
  margin-right: 0.2rem;
}

/**********div 태그**********/
.navigation {
  position: absolute;
  bottom: 20px;
  left: 0;
  right: 0;
  text-align: center;
  z-index: auto;
}

.navigation div {
  background-color: white;
  display: inline-block;
  width: 10px;
  height: 10px;
  border-radius: 10px;
}

.navigation div:not(:last-child) {
  margin-right: 0.2rem;
}
이동버튼 CSS이다. input태그는 안보이게 설정해주었고, label과 div태그의 position을 absolute로 주고, 두 태그들이 같은 위치에 배치될 수 있게 했다.
CH2 . 슬라이드 수동 조작
직전 코드를 보면 input,div,label 태그가 각각 4개씩 존재하는 것을 볼 수 있다.
각 태그는 다음과 같이 사용된다.
- input(radio타입) : 몇 번째 버튼이 선택되었는지 알 수 있다.
- div : 선택된 버튼의 색상을 변경시켜준다.
- label : input 태그와 연결
3개의 태그를 사용한 이유
간단하게 말하면, input태그의 스타일 때문이다.
기존 input radio 태그의 스타일 말고 원하는 버튼 스타일을 div태그를 통해 자유롭게 만들고, label을 사용해서 원하는 위치에서 input태그를 조작하고자 했다.
(input태그만을 사용해서 해보려고 시도했지만 무슨 이유에서인지 조작이 잘 되지 않았다ㅠㅠ 어떤 이유에서 그런건지는 더 찾아봐야할 것 같다..)
동작구조
- label과 div들을 같은 위치에 겹쳐놓는다.
- label을 선택하면 해당 input태그가 선택된다.
- css 가상클래스(:checked)를 사용해서 해당 input태그 선택시 이미지가 이동할 수 있도록 한다.
=> 이때, div태그의 색상을 변경해서 해당 이미지가 선택됐음을 표시한다.
css 코드
.banner input[type="radio"]:nth-child(1):checked ~ .slides {
  margin-left: 0;
}
.banner input[type="radio"]:nth-child(2):checked ~ .slides {
  margin-left: -100%;
}
.banner input[type="radio"]:nth-child(3):checked ~ .slides {
  margin-left: -200%;
}
.banner input[type="radio"]:nth-child(4):checked ~ .slides {
  margin-left: -300%;
}
input버튼이 checked되었을때 slides가 이동하는 것을 알 수 있다.
.banner input[type="radio"]:nth-child(1):checked ~ .navigation .nav_btn1,
.banner input[type="radio"]:nth-child(2):checked ~ .navigation .nav_btn2,
.banner input[type="radio"]:nth-child(3):checked ~ .navigation .nav_btn3,
.banner input[type="radio"]:nth-child(4):checked ~ .navigation .nav_btn4 {
  background-color: mainColor;
}
input버튼이 checked 되었을때 div의 컬러가 바뀌는 것을 알 수 있다.
CH3 . 슬라이드 자동 조작
가만히 있어도 자동으로 슬라이드 되도록 만들어보자.
위 코드를 보면 input 태그에 모두 ref가 지정되어 있다.
  const inputRef1 = useRef<HTMLInputElement>(null);
  const inputRef2 = useRef<HTMLInputElement>(null);
  const inputRef3 = useRef<HTMLInputElement>(null);
  const inputRef4 = useRef<HTMLInputElement>(null);
  const refArr = [inputRef1, inputRef2, inputRef3, inputRef4];
input태그의 ref를 각각 만들어서 지정해주었고, 자동슬라이드를 위해 ref배열을 하나 생성해주었다.
useEffect(() => {
    inputRef1.current!.checked = true;
    let idx = 0;
    setInterval(function () {
      refArr[idx].current!.checked = true;
      idx++;
      if (idx > refArr.length - 1) {
        idx = 0;
      }
    }, 10000);
  }, []);
useEffect Hook을 이용해서 캐러셀 컴포넌트가 렌더링 된 후에 setInterval 함수를 사용해서 지정된 초마다 ref 배열을 하나씩 돌면서 input radio를 checked 상태로 바꾼다.
간단하게 css를 사용해서 움직이는 슬라이드를 만들어 보았다.