오전문제
첫 번째 문제
람다식
- 결과가 다음과 같이 나오도록 람다식을 작성하시오.
Box
Robot
Lambda
package com.test.memo;

import java.util.ArrayList;
import java.util.Collections;
import java.util.List;

public class Practice {
    public static void main(String[] args) {
        List<String> list = new ArrayList<>();
        list.add("Robot");
        list.add("Lambda");
        list.add("Box");

        Collections.sort(list, (s1, s2) -> s1.length() - s2.length());
        for (String s : list) {
            System.out.println(s);
        }
    }
}
//Box
//Robot
//Lambda- 람다식을 작성하여, 다음과 같이 출력하도록 하시오.
Lambda exp one.
package com.test.memo;

interface Printable {
    void print(String s);
}

public class Practice {
    public static void main(String[] args) {
        Printable p = s -> System.out.println(s);

        p.print("Lambda exp one.");
    }
}
//Lambda exp one.- 람다식을 작성하여, 다음과 같이 출력하도록 하시오.
7
1
12
package com.test.memo;

interface Calculate {
    void cal(int a, int b);
}

public class Practice {
    public static void main(String[] args) {
        Calculate c;
        c = (a, b) -> System.out.println(a + b);
        c.cal(4, 3);

        c = (a, b) -> System.out.println(a - b);
        c.cal(4, 3);

        c = (a, b) -> System.out.println(a * b);
        c.cal(4, 3);
    }
}
//7
//1
//12- 다음과 같은 출력결과가 나오도록 람다식을 완성하시오.
7
package com.test.memo;

interface Calculate {
    int cal(int a, int b);
}

public class Practice {
    public static void main(String[] args) {
        Calculate c;
        c = (a, b) -> (a + b);
        System.out.println(c.cal(4, 3));
    }
}
//7- 다음과 같은 출력결과가 나오도록 람다식을 완성하시오.
13
package com.test.memo;

interface HowLong {
    int len(String s); // 값을 반환하는 메소드
}

public class Practice {
    public static void main(String[] args) {
        HowLong h = s -> s.length();
        System.out.println(h.len("I am so happy"));
    }
}
//13- 0 부터 49사이의 난수를 발생시키는 람다식을 작성하시오.
함수형 인터페이스란 정의되어 있는 추상메서드가 단 하나 존재하는 것을 의미한다.
package com.test.memo;

interface Ran {
    int random();
}

public class Practice {
    public static void main(String[] args) {
        Ran r = () -> (int) (Math.random() * 50);
        System.out.println(r.random());
    }
}
//27- 출력결과를 참고하여 함수형 인터페이스를 작성하시오.
7
7.7700000000000005
package com.test.memo;

interface Calculate<T> {
    T cal(T a, T b);
}

public class Practice {
    public static void main(String[] args) {
        Calculate<Integer> ci = (a, b) -> a + b;
        System.out.println(ci.cal(4, 3));

        Calculate<Double> cd = (a, b) -> a + b;
        System.out.println(cd.cal(4.32, 3.45));
    }
}
//7
//7.7700000000000005
7 -1
문제 1. calAndShow 메소드의 호출문을 람다식을 기반으로 작성해보자.
package com.test.memo;

interface Calculate<T> {
    T cal(T a, T b);
}

public class Practice {
    static <T> void calAndShow(Calculate<T> op, T n1, T n2) {
        T r = op.cal(n1, n2);
        System.out.println(r);
    }

    public static void main(String[] args) {
        calAndShow((a, b) -> a + b, 3, 4);
        calAndShow((a, b) -> a + b, 2.5, 7.1);
        calAndShow((a, b) -> a - b, 4, 2);
        calAndShow((a, b) -> a - b, 4.9, 3.2);
    }
}
//7
//9.6
//2
//1.7000000000000002
문제 2. SLenComparator.java를 람다식 기반으로 수정해보자. 수정 결과에서는 클래스
SLenComp의 정의가 지워져야 한다.
package com.test.memo;

import java.util.ArrayList;
import java.util.Collections;
import java.util.List;

//class SLenComp implements Comparator<String> {
//    @Override
//    public int compare(String s1, String s2) {
//        return s1.length() - s2.length();
//    }
//}
public class Practice {

    public static void main(String[] args) {
        List<String> list = new ArrayList<>();
        list.add("Robot");
        list.add("Lambda");
        list.add("Box");

        Collections.sort(list, (s1, s2) -> s1.length() - s2.length());
        // Collections.sort메서드는 Comparator객체를 인수 취급해 람다로 바로 로직을 제공할 수 있다.

        for (String s : list)
            System.out.println(s);
    }
}
//Box
//Robot
//Lambda
8 - 1. 다음 출력결과를 참고하여 람다식과 sum 메소드를 완성하시오.
짝수 합: 12
홀수 합: 33
package com.test.memo;

import java.util.Arrays;
import java.util.List;
import java.util.function.Predicate;

public class Practice {
    static int sum(Predicate<Integer> p, List<Integer> lst) {
        int sum = 0;
        for (int a : lst) {
            if (p.test(a)) {
                sum += a;
            }
        }
        return sum;
    }

    public static void main(String[] args) {
        List<Integer> list = Arrays.asList(1, 5, 7, 9, 11, 12);

        System.out.println("짝수 합 : " + sum(a -> (a % 2) == 0, list));
        System.out.println("홀수 합 : " + sum(a -> (a % 2) != 0, list));
    }
}
//짝수 합 : 12
//홀수 합 : 33
8 - 2. 아래의 코드에서 주석으로 표시된 내용의 출력을 보이도록 show 메소드의 몸체를 채워 보자.
package com.test.memo;

import java.util.Arrays;
import java.util.List;
import java.util.function.Predicate;

public class Practice {
    static <T> void show(Predicate<T> p, List<T> lst) {// Predicate는 boolean반환
        for (T a : lst) {
            if (p.test(a)) {
                System.out.println(a);
            }
        }
    }

    public static void main(String[] args) {
        List<Integer> lst1 = Arrays.asList(1, 3, 8, 10, 11);
        show(n -> n % 2 != 0, lst1);

        List<Double> lst2 = Arrays.asList(-1.2, 3.5, -2.4, 9.5);
        show(n -> n > 0, lst2);
    }
}
//1
//3
//11
//3.5
//9.5- IntPredicate로 구현해보자. 보충설명하자면 sum 메소드의 원형을 다음 형태로 해라.(8-1이용)
package com.test.memo;

import java.util.Arrays;
import java.util.List;
import java.util.function.IntPredicate;

public class Practice {
    static int sum(IntPredicate p, List<Integer> lst) {
        int sum = 0;
        for (int a : lst) {
            if (p.test(a)) {
                sum += a;
            }
        }
        return sum;
    }

    public static void main(String[] args) {
        List<Integer> list = Arrays.asList(1, 5, 7, 9, 11, 12);

        System.out.println("짝수 합 : " + sum(a -> (a % 2) == 0, list));
        System.out.println("홀수 합 : " + sum(a -> (a % 2) != 0, list));
    }
}
9 - 1. 아래 코드가 정상적으로 동작하도록 '완성되지 않은 문장'을 완성해보자. 어떠한 내용을 담아야 할지는 주석의 내용을 참조하여 판단하자.
[BiPredicate<T, U>]
package com.test.memo;

import java.util.function.BiPredicate;

public class Practice {
    public static void main(String[] args) {
        BiPredicate<String, Integer> conv = (s, i) -> s.length() > i;

        if (conv.test("Robot", 3))
            System.out.println("문자열 길이 3 초과");
        else
            System.out.println("문자열 길이 3 이하");

        // test 호출 결과 문자열 "Box"의 길이가 5를 넘으면 true 반환
        if (conv.test("Box", 5))
            System.out.println("문자열 길이 5 초과");
        else
            System.out.println("문자열 길이 5 이하");
    }
}
//문자열 길이 3 초과
//문자열 길이 5 이하- 다음 출력결과를 참고하여 다음 소스코드의 람다식을 완성하시오.
람다식의 내용은 0부터 49사이의 난수를 발생시켜서 리턴시킨다.
[25, 42, 43, 23, 18][49, 44, 32, 5, 2, 0, 44, 36, 20, 41]
package com.test.memo;

import java.util.ArrayList;
import java.util.List;
import java.util.function.Supplier;

public class Practice {
    public static List<Integer> makeIntList(Supplier<Integer> s, int n) {
        List<Integer> list = new ArrayList<>();
        for (int i = 0; i < n; i++)
            list.add(s.get());
        return list;
    }

    public static void main(String[] args) {
        Supplier<Integer> spr = () -> (int) (Math.random() * 50);

        List<Integer> list = makeIntList(spr, 5);
        System.out.println(list);

        list = makeIntList(spr, 10);
        System.out.println(list);
    }
}
//[0, 2, 8, 4, 34]
//[9, 12, 4, 41, 3, 8, 14, 23, 7, 16]- 10번의 makeIntList의 메소드 원형을 다음과 같이 바꿔서 구현하자.
public static List makeIntList(IntSupplier is, int n) {}
package com.test.memo;

import java.util.ArrayList;
import java.util.List;
import java.util.function.IntSupplier;

public class Practice {
    public static List<Integer> makeIntList(IntSupplier is, int n) {
        List<Integer> list = new ArrayList<>();
        for (int i = 0; i < n; i++)
            list.add(is.getAsInt());
        return list;
    }

    public static void main(String[] args) {
        IntSupplier spr = () -> (int) (Math.random() * 50);

        List<Integer> list = makeIntList(spr, 5);
        System.out.println(list);

        list = makeIntList(spr, 10);
        System.out.println(list);
    }
}
//[0, 2, 8, 4, 34]
//[9, 12, 4, 41, 3, 8, 14, 23, 7, 16]- 다음 출력결과를 보고 다음 람다식을 완성하시오.
Pineapple
Strawberry
package com.test.memo;

import java.util.function.Consumer;

public class Practice {

    public static void main(String[] args) {
        Consumer<String> c = s -> System.out.println(s);

        c.accept("Pineapple");
        c.accept("Strawberry");
    }
}
//Pineapple
//Strawberry-
출력결과가 다음과 같이 나오도록 람다식을 작성하시오.
-
Toy
-
Book
-
Candy
package com.test.memo;

import java.util.function.ObjIntConsumer;

public class Practice {

    public static void main(String[] args) {
        ObjIntConsumer<String> c = (s, i) -> System.out.println(i + ". " + s);
        int n = 1;
        c.accept("Toy", n++);
        c.accept("Book", n++);
        c.accept("Candy", n);
    }
}
//1. Toy
//2. Book
//3. Candy
13 - 1. int형, double형 데이터를 저장하는 기능의 람다식을 각각 작성하고, 이를 확인하기 위한 예제를 작성해보자.
( BiConsumer<T, U> void accept(T t, U u) )
package com.test.memo;

import java.util.function.BiConsumer;

class Box<T> {
    private T ob;

    public void set(T o) {
        ob = o;
    }

    public T get() {
        return ob;
    }
}

public class Practice {

    public static void main(String[] args) {
        BiConsumer<Box<Integer>, Integer> bi = (b, i) -> b.set(i);
        BiConsumer<Box<Double>, Double> bd = (b, i) -> b.set(i);

        Box<Integer> bi2 = new Box<>();
        Box<Double> bd2 = new Box<>();

        bi.accept(bi2, 10);
        bd.accept(bd2, 10.55);

        System.out.println(bi2.get());
        System.out.println(bd2.get());
    }
}
//10
//10.55- 다음 출력결과를 보고 람다식을 완성하시오.
5
6
package com.test.memo;

import java.util.function.Function;

public class Practice {

    public static void main(String[] args) {
        Function<String, Integer> f = s -> s.length();

        System.out.println(f.apply("Robot"));
        System.out.println(f.apply("System"));
    }
}
//5
//6- 다음 출력결과를 보고 람다식을 완성하시오.
DoubleUnaryOperator double applyAsDouble(double
1cm = 0.393701inch
1inch = 2.54cm
package com.test.memo;

import java.util.function.DoubleUnaryOperator;

public class Practice {

    public static void main(String[] args) {
        DoubleUnaryOperator cti = i -> i * 0.393701;
        DoubleUnaryOperator itc = i -> i * 2.54;

        System.out.println("1cm = " + cti.applyAsDouble(1.0) + "inch");
        System.out.println("1inch = " + itc.applyAsDouble(1.0) + "cm");
    }
}
//1cm = 0.393701inch
//1inch = 2.54cm- 다음 소스 코드에서 ls1과 ls2의 0 미만의 값을 삭제하도록 람다식을 완성하자.
package com.test.memo;

import java.util.ArrayList;
import java.util.Arrays;
import java.util.List;

public class Practice {

    public static void main(String[] args) {
        List<Integer> ls1 = Arrays.asList(1, -2, 3, -4, 5);
        ls1 = new ArrayList<>(ls1);
        List<Double> ls2 = Arrays.asList(-1.1, 2.2, 3.3, -4.4, 5.5);
        ls2 = new ArrayList<>(ls2);

        // 람다식
        ls1.removeIf(p -> p < 0);
        ls2.removeIf(p -> p < 0);

        System.out.println(ls1);
        System.out.println(ls2);
    }
}
//[1, 3, 5]
//[2.2, 3.3, 5.5]
두 번째 문제
- Arrays로 1,3,5,7,9를 List로 만들고 람다를 이용하여 역순으로 만든다음 출력하자.
Consumer void accept(T t) 이용
메소드 참조 - Optional 클래스
-
Optional\클래스를 사용해 NullPointerException을 방지할 수 있도록 도와준다.
- NPE를 피하려면 if 문을 사용해 null인지 아닌지 검사해야하는데, 변수가 많은 경우 코드가 복잡해지고 번거롭기 때문에 Optional클래스를 만든것
-
Optional은 멤버 value에 인스턴스를 저장하는 일종의 래퍼(Wrapper)클래스로, 값이 null이더라도 바로 NPE가 발생하지 않으며 각종 메솓르르 제공해준다.
예제 1 - 장점 살리지 못한 예제
import java.util.Optional;

class StringOptional1 {
    public static void main(String[] args) {
        Optional<String> os1 = Optional.of(new String("Toy1"));//null을 허용하지 않음
        Optional<String> os2 = Optional.ofNullable(new String("Toy2"));
                                  //Optional.ofNullable() : null을 허용

        if(os1.isPresent()) //isPresent() : 내용물이 있으면 true, 없으면 false
            System.out.println(os1.get());//담겨져 있는 객체 반환 > Toy1

        if(os2.isPresent())//true반환
            System.out.println(os2.get());//Toy2 반환
    }
}

//Toy1
//Toy2- 위 코드는 if문을 활용해 Optinal클래스를 활용한것이기 때문에 Optinal클래스의 장점을 살렸다고 볼 수는 없다.
예제 1-2 : 장점 살린 예제
import java.util.Optional;

class StringOptional2 {
    public static void main(String[] args) {
        Optional<String> os1 = Optional.of(new String("Toy1"));
        Optional<String> os2 = Optional.ofNullable(new String("Toy2"));

        // 람다식 버전
        os1.ifPresent(s -> System.out.println(s)); //ifPresent() : 존재한다면 람다 실행
        //os1의 내용물이 s에 자동으로 들어가서 Toy1이 출력된다.

        // 메소드 참조 버전
        os2.ifPresent(System.out::println); //Toy2 출력 > 만약 os2가 null이라면 실행하지 않음
    }
}

//Toy1
//Toy2-
호출하고 있는 메소드 ifPresent 의 매개변수 형은 Consumer이다.
public void ifPresent(Consumer<? super T> consumer)
예제 2 : map()
map 메소드의 매개변수 형은 다음과 같이 Function이다.
public <U> Optional<U> map(Function<? super T, ? extends U> mapper)
Function<T, U> U apply(T t)> 매개변수 T t 를 받으면 U를 반환
import java.util.Optional;

class OptionalMap {
    public static void main(String[] args) {
        Optional<String> os1 = Optional.of("Optional String");
        Optional<String> os2 = os1.map(s -> s.toUpperCase());
        //os1이 저장하고있는 객체가  s에 들어가 대문자로 변환
        //os1.map() 하면 Optinal객체로 감싸서 반환한다.

        System.out.println(os2.get()); //Optinal객체가 저장하고 있는 값을반환 > String

        //메소드 체이닝 - 공백을 언더바로 변환하고, 소문자로 변환
        Optional<String> os3 = os1.map(s -> s.replace(' ', '_')).map(s -> s.toLowerCase());
        System.out.println(os3.get());
    }
}

//OPTIONAL STRING
//optional_string-
map()은 Optional 객체로 감싸서 반환한다. -
get()은 Optional이 저장하고있는 객체의 자료형으로 반환한다. 만약 int로 os1에 저장했다면 get()의 반환형은 Integer가 된다.
예제 3 : empty() / orElse()
import java.util.Optional;

class OptionalOrElse {
    public static void main(String[] args) {
        Optional<String> os1 = Optional.empty(); //empty() : 내용물이 비어있는(null) Optional객체를 생
        Optional<String> os2 = Optional.of("So Basic"); //of() : So Basic이 들어있는 Optinal 객체 생성

        String s1 = os1.map(s -> s.toString()).orElse("Empty");
            //.orEls() : Optinal객체에 내용물이 있으면 반환,
            //없으면 인자 안에있는 String을 반환(String인 자료형에 저장하고있으니)

        String s2 = os2.map(s -> s.toString())
                       .orElse("Empty");

        System.out.println(s1);
        System.out.println(s2);
    }
}

//Empty
//So Basic-
orElse(): 저장되는 변수의 자료형에 따라 반환되는 자료형이 다르다. > 위 코드에서는 String으로 반환get()과 유사하지만, get()은 순수한 값을 반환하고, orElse()는 값이 없을 때 반환할 값을 지정할 수 있다는 점에서 다르다.
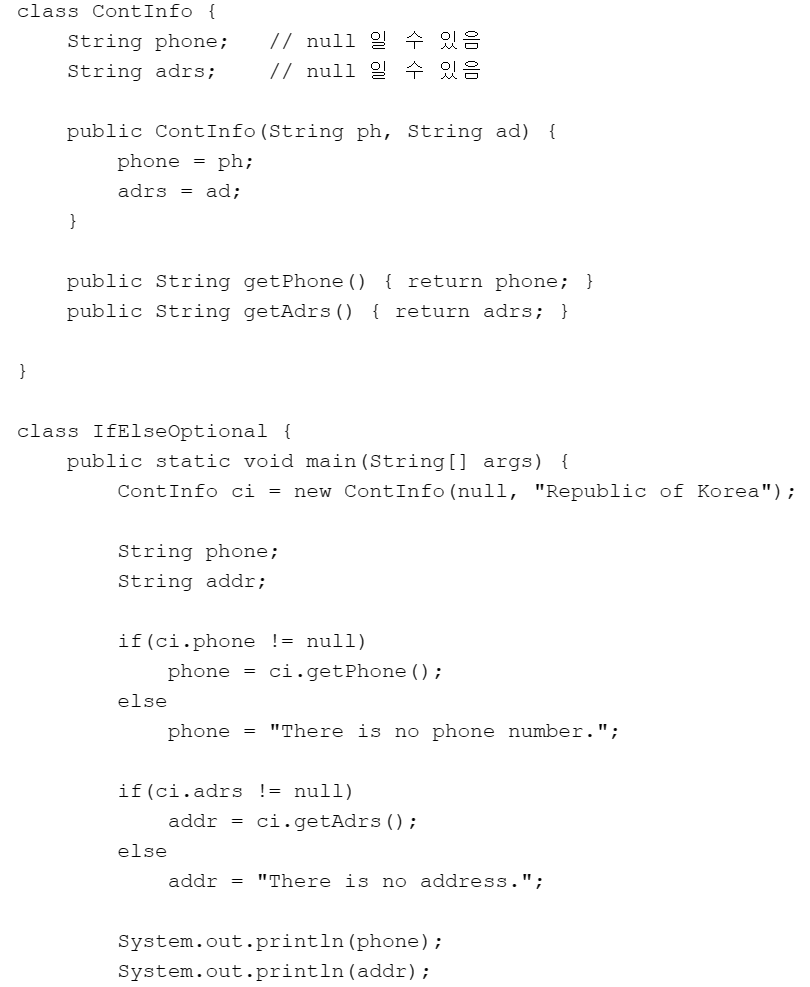
import java.util.Optional;

class ContInfo {
    String phone;   // null 일 수 있음
    String adrs;    // null 일 수 있음

    public ContInfo(String ph, String ad) {
        phone = ph;
        adrs = ad;
    }
    public String getPhone() { return phone; }
    public String getAdrs() { return adrs; }
}

class MapElseOptional {
    public static void main(String[] args) {

        Optional<ContInfo> ci = Optional.of(
                                   new ContInfo(null, "Republic of Korea")
                                );

        String phone = ci.map(c -> c.getPhone())//c에 ContInfo 객체가 저장 > null
                         .orElse("There is no phone number.");//null이니까 문자열 반

        String addr = ci.map(c -> c.getAdrs())
                        .orElse("There is no address.");

        System.out.println(phone);
        System.out.println(addr);
    }
}

//There is no phone number.
//Republic of Korea
import java.util.Optional;
class Friend {
String name;
Company cmp; // null 일 수 있음
public Friend(String n, Company c) {
name = n;
cmp = c;
}
public String getName() { return name; }
public Company getCmp() { return cmp; }
}
class Company {
String cName;
ContInfo cInfo; // null 일 수 있음
public Company(String cn, ContInfo ci) {
cName = cn;
cInfo = ci;
}
public String getCName() { return cName; }
public ContInfo getCInfo() { return cInfo; }
}
class ContInfo {
String phone; // null 일 수 있음
String adrs; // null 일 수 있음
public ContInfo(String ph, String ad) {
phone = ph;
adrs = ad;
}
public String getPhone() { return phone; }
public String getAdrs() { return adrs; }
}
class NullPointerCaseStudy2 {
public static void showCompAddr(Optional<Friend> f) {
String addr = f.map(Friend::getCmp)//메소드 참조 > getCmp의 Optinal객체 반환
.map(Company::getCInfo)
.map(ContInfo::getAdrs)
.orElse("There's no address information.");//내용문을 반환
System.out.println(addr);
}
public static void main(String[] args) {
ContInfo ci = new ContInfo("321-444-577", "Republic of Korea");
Company cp = new Company("YaHo Co., Ltd.", ci);
Friend frn = new Friend("LEE SU", cp);
// 친구 정보에서 회사 주소를 출력
showCompAddr(Optional.of(frn));
}
}
//Republic of Korea예제 4 : flatMap()
import java.util.Optional;

class OptionalFlatMap {
    public static void main(String[] args) {
        Optional<String> os1 = Optional.of("Optional String");

        Optional<String> os2 = os1.map(s -> s.toUpperCase());
        //map() : 람다식을 수행하고 Optional객체를 반환
        System.out.println(os2.get());

        Optional<String> os3 = os1.flatMap(s -> Optional.of(s.toLowerCase()));
                //flatMap() : 람다식을 실행하고 그냥 내용물을 반환(Optional 객체가 아님)
        System.out.println(os3.get());
    }
}

//OPTIONAL STRING
//optional string-
flatMap() 메서드는 각 요소에 대해 매핑 함수를 적용하고, 그 결과로 생성된 여러 개의 스트림을 하나의 스트림으로 평면화한다.(Optional클래스를 벗겨내는 (해제하는) 용도로도 사용할 수 있다.
Optional클래스를 해제해서 그 안에 내용물에 바로 접근 가능
예제 4-1
import java.util.Optional;

class ContInfo {
    Optional<String> phone;   // null 일 수 있음
    Optional<String> adrs;    // null 일 수 있음

    public ContInfo(Optional<String> ph, Optional<String> ad) {
        phone = ph;
        adrs = ad;
    }
    public Optional<String> getPhone() { return phone; }
    public Optional<String> getAdrs() { return adrs; }
}

class FlatMapElseOptional {
    public static void main(String[] args) {
        Optional<ContInfo> ci = Optional.of(
            new ContInfo(Optional.ofNullable(null), Optional.of("Republic of Korea"))
        ); //null을 가지고 있는 Optional객체 생성, 문자열을 가지고 있는 Optional객체 생성

        String phone = ci.flatMap(c -> c.getPhone())
//flatMap() : Optional객체의 내용 자체 반환(Optional 객체로 감싸지 않는다. > 현재 내용이 Optioanl객체
                         .orElse("There is no phone number.");

        String addr = ci.flatMap(c -> c.getAdrs())
                        .orElse("There is no address.");//내용물 반환

        System.out.println(phone);
        System.out.println(addr);
    }
}

//There is no phone number.
//Republic of Korea- of()는 null체크를 하지 않기 때문에 null이 들어가면 NullOfExcetpion이 발생해서 ofNullable()을 사용하는 것이다.
import java.util.Optional;

class Friend {
    String name;
    Optional<Company> cmp;    // null 일 수 있음

    public Friend(String n, Optional<Company> c) {
        name = n;
        cmp = c;
    }
    public String getName() { return name; }
    public Optional<Company> getCmp() { return cmp; }
}

class Company {
    String cName;
    Optional<ContInfo> cInfo;    // null 일 수 있음

    public Company(String cn, Optional<ContInfo> ci) {
        cName = cn;
        cInfo = ci;
    }
    public String getCName() { return cName; }
    public Optional<ContInfo> getCInfo() { return cInfo; }

}

class ContInfo {
    Optional<String> phone;   // null 일 수 있음
    Optional<String> adrs;    // null 일 수 있음

    public ContInfo(Optional<String> ph, Optional<String> ad) {
        phone = ph;
        adrs = ad;
    }
    public Optional<String> getPhone() { return phone; }
    public Optional<String> getAdrs() { return adrs; }

}

class NullPointerCaseStudy3 {
    public static void showCompAddr(Optional<Friend> f) {

        String addr = f.flatMap(Friend::getCmp)
                .flatMap(Company::getCInfo)
                .flatMap(ContInfo::getAdrs)
                .orElse("There's no address information.");

        System.out.println(addr);
    }

    public static void main(String[] args) {
        Optional<ContInfo> ci = Optional.of(
                    new ContInfo(Optional.ofNullable(null), Optional.of("Republic of Korea"))
        );
        Optional<Company> cp = Optional.of(new Company("YaHo Co., Ltd.", ci));
        Optional<Friend> frn = Optional.of(new Friend("LEE SU", cp));

        // 친구 정보에서 회사 주소를 출력
        showCompAddr(frn);
    }
}

//Republic of Korea
예제 5 : OptionalInt
- OptionalXXX클래스들은 Optional클래스보다 그 기능이 제한적이다.
- Optional에서 T를 Integer로 구체화
- 제네릭을 주지 않는다.
import java.util.OptionalInt;

class OptionalIntBase {
    public static void main(String[] args) {
        OptionalInt oi1 = OptionalInt.of(3);
        OptionalInt oi2 = OptionalInt.empty();

        System.out.print("[Step 1.] : ");
        oi1.ifPresent(i -> System.out.print(i + "\t"));
        oi2.ifPresent(i -> System.out.print(i));//null이니까 실행 안됌 > ifPresent()
        System.out.println();

        System.out.print("[Step 2.] : ");
        System.out.print(oi1.orElse(100) + "\t");
        System.out.print(oi2.orElse(100) + "\t");
        System.out.println();
    }
}

//[Step 1.] : 3
//[Step 2.] : 3    100
정리 문제
- Optional 클래스를 이용해 "Toy1"과 "Toy2"를 각각 저장하고 그것을 람다식과 메소드 참조로 각각 출력해 보자.
   package com.test.memo;


import java.util.Optional;

public class Practice {

    public static void main(String[] args) {
        Optional<String> s1 = Optional.of(new String("Toy1"));
        Optional<String> s2 = Optional.of(new String("Toy2"));

        if (s1.isPresent())
            System.out.println(s1.get());
        if (s2.isPresent())
            System.out.println(s2.get());

    }

}
//Toy1
//Toy2- Optional 인스턴스를 "OPTIONAL STRING"을 저장하는 인스턴스로 만든다. 그리고 그것을 반환받아 출력한다. "Optional String"을 감싸고 있는 Optional 인스턴스를 공백을 '_' 로 바꾸고, "optional string" 소문자로 바꾼다. 그리고 그것을 반환받아 출력한다.
package com.test.memo;

import java.util.Optional;

public class Practice {

    public static void main(String[] args) {
        Optional<String> s1 = Optional.of("Optional String");
        Optional<String> s2 = s1.map(s -> s.replace(" ", "_")).map(s -> s.toUpperCase());

        System.out.println(s2.get());

        Optional<String> s3 = s2.map(s -> s.toLowerCase());
        System.out.println(s3.get());
    }
}
//OPTIONAL_STRING
//optional_string- 저장하고 있는 내용물이 없는, 빈 Optional 인스턴스를 생성한다. "So Basic"이라는 문자열을 감싼 Optional 인스턴스를 생성한다. > s1값이 비었다면 EMpty반환, s2도 마찬가지
package com.test.memo;

import java.util.Optional;

public class Practice {

    public static void main(String[] args) {
        Optional<String> s1 = Optional.empty();
        Optional<String> s2 = Optional.of("So Basic");

        String str1 = s1.map(s -> s.toString()).orElse("Empty");
        String str2 = s2.map(s -> s.toString()).orElse("Empty");

        System.out.println(str1);
        System.out.println(str2);
    }
}
//Empty
//So Basic- 다음을 Optional 클래스 기반으로 개선해보자.
package com.test.memo;

import java.util.Optional;

class ContInfo {
    Optional<String> phone; // null 일 수 있음
    Optional<String> adrs; // null 일 수 있음

    public ContInfo(Optional<String> ph, Optional<String> ad) {
        phone = ph;
        adrs = ad;
    }

    public Optional<String> getPhone() {
        return phone;
    }

    public Optional<String> getAdrs() {
        return adrs;
    }

}

public class Practice {

    public static void main(String[] args) {
        Optional<ContInfo> ci = Optional.of(new ContInfo(Optional.ofNullable(null), Optional.of("Republic Korea")));
        // ContInfo ci = new ContInfo(null, "Republic of Korea");

        String phone = ci.flatMap(ContInfo::getPhone).orElse("There is no number");
        String addr = ci.flatMap(c -> c.getAdrs()).orElse("There is no address");

        System.out.println(phone);
        System.out.println(addr);
    }
}
//There is no number
//Republic Korea- Optional객체를 flatMap()을 사용해 해제해서, 그 안에 있는 다른 클래스의 인스턴스에 바로 접근할 수 있는것이다.
- 다음 예제를 Optional을 이용하여 개선해 보자. (너무길어서 첨부 불가)
package com.test.memo;

import java.util.Optional;

class Friend {
    String name;
    Optional<Company> cmp; // null 일 수 있음

    public Friend(String n, Optional<Company> c) {
        name = n;
        cmp = c;
    }

    public String getName() {
        return name;
    }

    public Optional<Company> getCmp() {
        return cmp;
    }
}

class Company {
    String cName;
    Optional<ContInfo> cInfo; // null 일 수 있음

    public Company(String cn, Optional<ContInfo> ci) {
        cName = cn;
        cInfo = ci;
    }

    public String getCName() {
        return cName;
    }

    public Optional<ContInfo> getCInfo() {
        return cInfo;
    }

}

class ContInfo {
    Optional<String> phone; // null 일 수 있음
    Optional<String> adrs; // null 일 수 있음

    public ContInfo(Optional<String> ph, Optional<String> ad) {
        phone = ph;
        adrs = ad;
    }

    public Optional<String> getPhone() {
        return phone;
    }

    public Optional<String> getAdrs() {
        return adrs;
    }

}

public class Practice {
    public static void showCompAddr(Optional<Friend> f) {
        String addr = f.flatMap(Friend::getCmp).flatMap(Company::getCInfo).flatMap(ContInfo::getAdrs)
                .orElse("There's no address information");
        System.out.println(addr);
//        if (f != null) {
//            Company com = f.getCmp();
//
//            if (com != null) {
//                ContInfo info = com.getCInfo();
//
//                if (info != null)
//                    addr = info.getAdrs();
//            }
//        }
//        if (addr != null)
//            System.out.println(addr);
//        else
//            System.out.println("There's no address information.");
    }

    public static void main(String[] args) {
        Optional<ContInfo> op = Optional.of(new ContInfo(Optional.of("321-444-577"), Optional.of("Republic of Korea")));
        Optional<Company> cp = Optional.of(new Company("YaHo Co., Ltd.", op));
        Optional<Friend> fi = Optional.of(new Friend("LEE SU", cp));

//         ContInfo ci = new ContInfo("321-444-577", "Republic of Korea");
//        Company cp = new Company("YaHo Co., Ltd.", ci);
//        Friend frn = new Friend("LEE SU", cp);

        // 친구 정보에서 회사 주소를 출력
        showCompAddr(fi);
    }
}// Republic of Korea- "Optional String"을 감싸고 있는 Optional 인스턴스를 생성한다.
위의 인스턴스를 map을 이용하여, "Optional String"을 소문자로 바꾼 후, Optional 인스턴스를 생성한다.
그리고 그 값을 반환하여 출력하자.
"Optional String"을 감싸고 있는 Optional 인스턴스를 flatMap을 이용하여, "Optional String"을 소문자로 바꾼 후, Optional 인스턴스를 생성한다.
그리고 그 값을 반환하여 출력한다.
package com.test.memo;

import java.util.Optional;

public class Practice {

    public static void main(String[] args) {
        Optional<String> op = Optional.of("Optional String");
        Optional<String> upper = op.map(s -> s.toLowerCase());

        System.out.println(upper.get());
    }
}
//optional string
스트림
배열과 컬렉션 인스턴스에 함수 여러 개를 조합해서 원하는 결과를 필터링하고 가공된 결과를 얻을 수 있다. >> 배열과 컬렉션을 함수형으로 처리할 수 있다.
-
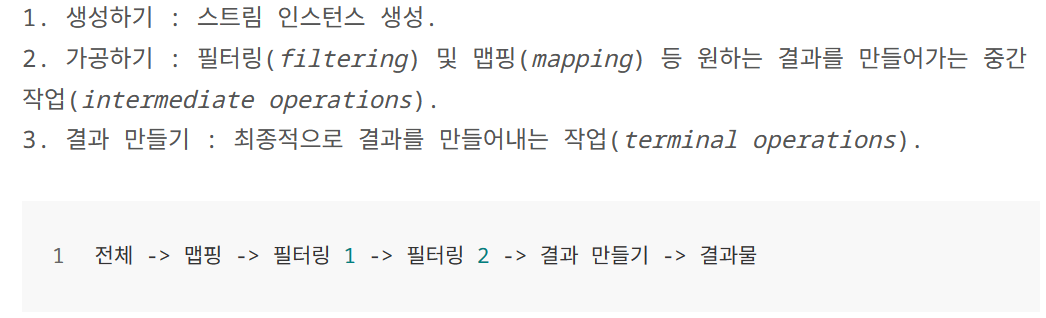
스트림 : 데이터의 흐름을 생성할 수 있으며, 이러한 데이터의 흐름을 스트림 이라 한다.
종류
-
중간 연산(Intermediate Operation) : 마지막이 아닌 위치에서 진행이 되어야 하는 연산( 중간에 연결하는 파이프)
-
최종 연산(Terminal Operation) : 마지막에 진행이 되어야 하는 연산 (마지막에 연결하는 파이프 )
-
-
IntStream stm1 = Arrays.stream(ar);: ar에 저장된 데이터를 대상으로 스트림 생성, 그리고 그 스트림을 stm1이 참조중간 연산과 최종 연산을 진행하기 좋은 구조로 배치된 복사본이라 생각하면 된다.
예제 1 - sum()
import java.util.Arrays;
import java.util.stream.IntStream;

class MyFirstStream {
    public static void main(String[] args) {
        int[] ar = {1, 2, 3, 4, 5};

        // 스트림 생성
        IntStream stm1 = Arrays.stream(ar);        // 배열 ar로부터 스트림 생성

        // 중간 파이프 구성 == 중간 연산
        IntStream stm2 = stm1.filter(n -> n%2 == 1);    // 중간 연산 진행 > 새로운 스트림 생성

        // 최종 파이프 구성 == 최종 연산
        int sum = stm2.sum();//sum() : 스트림에 있는 모든 요소를 더함

        System.out.println(sum);
    }
}

/*
9
*/-
IntStream stm2 = stm1.filter(n->n%2==1);> stm1이 참조하는 스트림을 대상으로 filter 연산 진행filter 연산을 통과하면서 걸러진 스트림을 stm2가 참조하게 된다.
-
filter();: Predicate함수형 인터페이스를 매개변수로 받아, 각 요소에 참과 거짓여부를 판단한다.- true면 새로운 스트림에포함되고, false면 제외된다.
-
sum();: 스트림의 데이터를 모두 더하고 그 결과를 반환하는 연산을 하는 메서드
예제 1-2 : 메소드 체이닝
import java.util.Arrays;

class MyFirstStream2 {
    public static void main(String[] args) {
        int[] ar = {1, 2, 3, 4, 5};

        int sum = Arrays.stream(ar)//스트림을 생성하고
                        .filter(n -> n%2 == 1)//filter 통과시키고,
                        .sum(); //sum을 통과시켜서 결과를 반환

        System.out.println(sum);
    }
}

//9-
트림의 연산은 효율과 성능을 고려하여 '지연(Lazy) 처리' 방식으로 동작한다.
-
메소드 호출시 filter에서 sum으로 이어지지만, 정작 sum이 호출될 때까지 filter의 호출 결과는 스트림에 반영되지 않는다.
최종 연산이 생략되면 그전에 아무리 많은 중간 연산을 진행했다 하더라도 아무런 결과를 보이지 않는다.
예제 2 : String 스트림
import java.util.Arrays;
import java.util.stream.Stream;

class StringStream {
    public static void main(String[] args) {
        String[] names = {"YOON", "LEE", "PARK"};

        // 스트림 생성
        Stream<String> stm = Arrays.stream(names);

        // 최종 연산 진행
        stm.forEach(s -> System.out.println(s));
    }
}

//YOON
//LEE
//PARK
배열에 저장된 데이터를 대상으로 스트림을 생성할 때 호출하는 대표 메소드 > 최종연산
-
public static <T> stream <T> stream(T[] array)// Arrays 클래스에 정의-
Iterable 인터페이스에 forEach 디폴트 메소드가 정의되어 있다.
default void forEach(Consumer<? super T> action) { //void accept()가 추상 메서드로 존재하있다. for(T t: this) action.accept(t); } -
이 두 메소드는 이름과 매개변수 선언이같지만 존재하는 위치가 다르다.
-
forEach의 매개변수 형이 Consumer이니 다음 추상 메소드의 구현에 해당하는 람다식을 인자로 전달해야 한다. 그러면 forEach는 내부적으로 스트림의 데이터를 하나씩 인자로 전달하면서 accept 메소드를 호출한다.
-
forEach는 '최종 연산'으로, 중간연산없이 바로 최종연산 진행
예제 2-2
import java.util.Arrays;

class StringStream2 {
    public static void main(String[] args) {
        String[] names = {"YOON", "LEE", "PARK"};

        Arrays.stream(names)
            .forEach(s -> System.out.println(s));
    }
}

//YOON
//LEE
//PARK
예제 3 : Arrays클래스의 XXXStream 메소드
import java.util.Arrays;

class DoubleStream {
    public static void main(String[] args) {
        double[] ds = {1.1, 2.2, 3.3, 4.4, 5.5};

        Arrays.stream(ds)
           .forEach(d -> System.out.print(d + "\t"));
        System.out.println();

        Arrays.stream(ds, 1, 4)
           .forEach(d -> System.out.print(d + "\t"));
        System.out.println();
    }
}

//1.1    2.2    3.3    4.4    5.5
//2.2 3.3 4.4 -
Arrays 클래스에 저장되어 있는 메소드
-
public static IntStream stream(int[] array) -
public static IntStream stream(int[] array, int startInclusive, int endExclusive) -
public static DoubleStream stream(double[] array) -
public static DoubleStream stream(double[] array, int startInclusive, int endExclusive) -
public static LongStream stream(long[] array) -
public static LongStream stream(long[] array, int startInclusive, int endExclusive)
-
위 두 메소드는 int형 배열을 대상으로 스트림을 생성한다.
예제 4 : 컬렉션 인스턴스를 대상으로 stream메소드 호출해 생성
import java.util.List;
import java.util.Arrays;

class ListStream {
    public static void main(String[] args) {

        List<String> list = Arrays.asList("Toy", "Robot", "Box");

        list.stream()
          .forEach(s -> System.out.print(s + "\t"));

        System.out.println();
    }
}

//Toy    Robot    Box
default Stream<E> stream()
예제 5 : 필터링
import java.util.List;
import java.util.Arrays;

class FilterStream {
    public static void main(String[] args) {
        int[] ar = {1, 2, 3, 4, 5};
        Arrays.stream(ar)
            .filter(n -> n%2 == 1) //filter() : 필터링 메소드
            .forEach(n -> System.out.print(n + "\t"));
        System.out.println();

        List<String> sl = Arrays.asList("Toy", "Robot", "Box");
        sl.stream()
            .filter(s -> s.length() == 3)
            .forEach(s -> System.out.print(s + "\t"));
        System.out.println();
    }
}

//1    3    5
//Toy    Box
필터링(Filtering)과 맵핑(Mapping) 스트림이 배열을 대상으로 생성되었건 컬렉션 인스턴스를 대상으로 생성되었건, 이에 상관없이 동일한 방법으로 '중간 연산'과 '최종 연산'을 진행할 수 있다.
-
filter(): 스트림을 구성하는 데이터 중 일부를 조건에 따라 걸러내는 행위를 의미-
Stream<T> filter(Predicate<? super T> predicate) -
매개변수 형이 Predicate이므로,
boolean test(T t)인 추상메소드의 구현에 해당하는 람다식을 인자로 전달해야 한다.
-
예제 6 : 매핑
import java.util.List;
import java.util.Arrays;

class MapToInt {
    public static void main(String[] args) {
        List<String> ls = Arrays.asList("Box", "Robot", "Simple");

        ls.stream()
          .map(s -> s.length()) //맵
          .forEach(n -> System.out.print(n + "\t"));

        System.out.println();
    }
}

//3    5    6
맵핑도 필터링과 마찬가지로 중간 연산이다.
-
위 코드에서는 문자열 스트림을 숫자 스트림으로 매핑하였고, 이떄 사용된 맵핑의 기준은 문자열의 길이다. > 이렇게 맵핑을 진행하면 스트림의 데이터 형이 달라진다.
-
<R> Stream<R> map(Function<? super T, ? extends R> mapper)> 하나의 매개변수를 받아 반환- 매개변수 형이 Function이다. 따라서
R apply (T t)의 구현에 해당하는 람다식을 인자로 전달해야 한다.- 위 코드에서는
Integer apply(String t)로 쓰이고 있다 > 문자열을 받아 문자열의 길이를 반환하니 Integer로 반환
- 위 코드에서는
- 매개변수 형이 Function이다. 따라서
예제 7: 기본 자료형의 값을 반환하는 매핑
import java.util.List;
import java.util.Arrays;

class MapToInt2 {
    public static void main(String[] args) {
        List<String> ls = Arrays.asList("Box", "Robot", "Simple");

        ls.stream()
          .mapToInt(s -> s.length())
          .forEach(n -> System.out.print(n + "\t"));

        System.out.println();
    }
}

//3    5    6
map의 인자로 다음 메소드에 대한 람다식을 전달하기 때문에 정수의 반환 과정에서 오토 박싱이 진행된다.
apply(T t)
-
맵핑 관련 메소드
-
`IntStream mapToInt(ToIntFunction<? super T> mapper)
->IntStream mapToInt(ToIntFunction mapper)`
-
`LongStream mapToLong(ToLongFunction<? super T>mapper)
-> LongStream mapToLong(ToLongFunctionmapper)`
-
`DoubleStream mapToDouble(ToDoubleFunction<? super T> mapper)
-> DoubleStream mapToDouble(ToDoubleFunction mapper)`
-
예제 6 과 달리 map을 대신하여 mapToInt를 호출해 오토박싱이 진행되지 않는다.
예제 7-2
import java.util.List;
import java.util.ArrayList;

class ToyPriceInfo {            // 장난감 모델 별 가격 정보
    private String model;        // 모델 명
    private int price;            // 가격

    public ToyPriceInfo(String m, int p) {
        model = m;
        price = p;
    }

    public int getPrice() {
        return price;
    }
}

class ToyStream {
    public static void main(String[] args) {
        List<ToyPriceInfo> ls = new ArrayList<>();
        ls.add(new ToyPriceInfo("GUN_LR_45", 200));
        ls.add(new ToyPriceInfo("TEDDY_BEAR_S_014", 350));
        ls.add(new ToyPriceInfo("CAR_TRANSFORM_VER_7719", 550));

        int sum = ls.stream()
                       .filter(p -> p.getPrice() < 500)//500보다 작은게 스트림에 들어가도록 걸러
                       .mapToInt(t -> t.getPrice())
                       .sum();

        System.out.println("sum = " + sum);
    }
}

// sum = 550
예제 8 : reduce()
import java.util.List;
import java.util.Arrays;
import java.util.function.BinaryOperator;

class ReduceStream {
    public static void main(String[] args) {
        List<String> ls = Arrays.asList("Box", "Simple", "Complex", "Robot");

        BinaryOperator<String> lc = //배열 0, 1을 비교하고, 1, 2를 비교해서 더 긴 문자열 반환
            (s1, s2) -> {
               if(s1.length() > s2.length())
                   return s1;
               else
                   return s2;
            };

        String str = ls.stream()
                      .reduce("", lc); //비어있으면 빈문자열 반환

        System.out.println(str);
    }
}//Complex-BinaryOperator<T> T apply(T t1, T t2) > apply에 대한 람다식을 인자로 전달
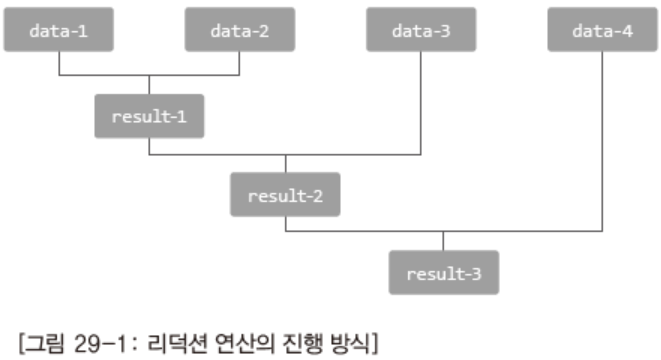
- 리덕션(Reduction)
.reduce("Empty Stream", lc);> 비어있든, 비어있지 않든 Empty Stream을 반환할 것이다.- 그 이유는 스트림의 첫 번째 데이터로 간주하고 리덕션을 진행한다. 때문에 "Empty Stream"이
가장 긴 문자열이 되어 reduce 메소드의 반환 값이 될 수 있다.
- 그 이유는 스트림의 첫 번째 데이터로 간주하고 리덕션을 진행한다. 때문에 "Empty Stream"이
예제 9 : 병렬스트림(parallel Streams)
import java.util.List;
import java.util.Arrays;
import java.util.function.BinaryOperator;

class ReduceParallelStream {
    public static void main(String[] args) {
        List<String> ls = Arrays.asList("Box", "Simple", "Complex", "Robot");

        BinaryOperator<String> lc =
            (s1, s2) -> {
               if(s1.length() > s2.length())
                   return s1;
               else
                   return s2;
            };

        String str = ls.parallelStream()
                      .reduce("", lc);

        System.out.println(str);
    }
}

//Complex-
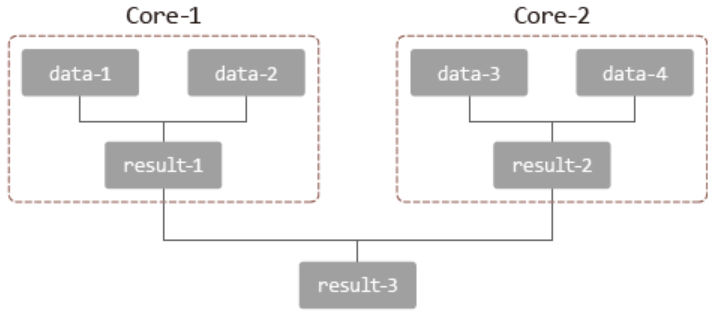
병렬처리의 핵심은 하나의 코어를 활용해 연산을 진행하는데, 연산의 횟수를 줄이지 않고, 연산의 단계를 줄이는데에 있다.
-
"빈 문자열" vs. "Box"
"빈 문자열" vs. "Simple"
"빈 문자열" vs. "Complex"
"빈 문자열" vs. "Robot" >> 총 4개의 코어 투입 -
"Box" vs. "Simple"
"Complex" vs. "Robot" >> 총 2개의 코어 투입 -
"Simple" vs. "Complex" >> 총 1개의 코어 투입
-
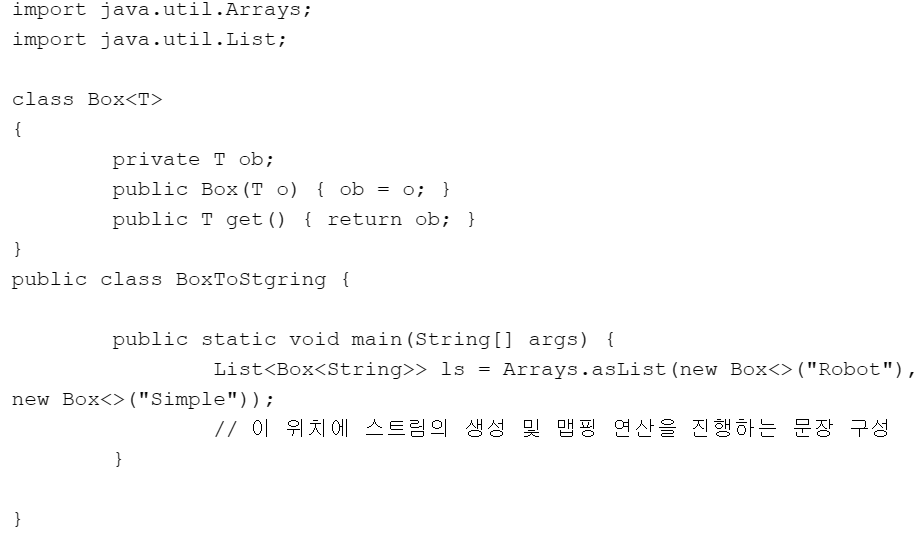
map문제
- 이를 대상으로 스트림을 생성하고, 이 스트림을 기반으로 문자열 스트림을 생성하는 맵핑 연산을 진행해보자. 그리고 그 결과를 forEach 연산을 통해 출력해보자.
package com.test.memo;

import java.util.Arrays;
import java.util.List;

class Box<T> {
    private T ob;

    public Box(T o) {
        ob = o;
    }

    public T get() {
        return ob;
    }
}

public class Practice {

    public static void main(String[] args) {
        List<Box<String>> ls = Arrays.asList(new Box<>("Robot"), new Box<>("Simple"));
        ls.stream().map(s -> s.get()).forEach(n -> System.out.print(n + "\t"));
    }
}
//Robot Simple - 위 문제1에서 Box을 String으로 맵핑하였다. 이번에는 Box을 Integer로
맵핑하도록 문제1의 답안을 수정해보자. 이때 Integer는 상자에 담긴 문자열의 길이이다.
package com.test.memo;

import java.util.Arrays;
import java.util.List;

class Box<T> {
    private T ob;

    public Box(T o) {
        ob = o;
    }

    public T get() {
        return ob;
    }
}

public class Practice {

    public static void main(String[] args) {
        List<Box<String>> ls = Arrays.asList(new Box<>("Robot"), new Box<>("Simple"));

        ls.stream().map(s -> s.get().length()).forEach(n -> System.out.print(n + "\t"));
    }
}
//5    6
매개변수형이 Function이므로 매개변수를 받아 반환할 수 있는것이다.
Stream map(Function<? super T, ? extends R> mapper)이므로 자료형이 다른형태가 가능
- ToyStream.java의 ToyPriceInfo 클래스에 다음 메소드를 추가하자 / 다음의 내용대로 필터링, 맵핑을 하고 마지막에 결과로 남은 스트림의 내용을 forEach 연산을 통해 전부 출력하자.
public String getModel() { return model; }
package com.test.memo;

import java.util.ArrayList;
import java.util.List;

class ToyPriceInfo {
    private String model;
    private int price;

    public ToyPriceInfo(String m, int p) {
        model = m;
        price = p;
    }

    public int getPrice() {
        return price;
    }

    public String getModel() {
        return model;
    }
}

public class Practice {
    public static void main(String[] args) {
        List<ToyPriceInfo> ls = new ArrayList<>();
        ls.add(new ToyPriceInfo("GUN_LR_45", 200));
        ls.add(new ToyPriceInfo("TEDDY_BEAR_S_014", 350));
        ls.add(new ToyPriceInfo("CAR_TRANSFORM_VER_7719", 550));

        ls.stream().filter(p -> p.getModel().length() > 10).map(t -> t.getModel()).forEach(s -> System.out.println(s));

    }
}
//TEDDY_BEAR_S_014
//CAR_TRANSFORM_VER_7719 - filter() : 걸러내기 / map() : 가공
syso부분도 고칠 생각을 안해서 반환되는 자료형이 안맞다고 계속 빨간줄나서 시간이 걸렸다..
스트림 정리 문제
- 스트림을 이용하여 다음 배열의 홀수의 총합을 구하여 출력하자.
package com.test.memo;

import java.util.Arrays;

public class Practice {
    public static void main(String[] args) {
        int[] ar = { 1, 2, 3, 4, 5 };

        int hol = Arrays.stream(ar).filter(n -> n % 2 != 0).sum();
        int jjak = Arrays.stream(ar).filter(n -> n % 2 == 0).sum();

        System.out.println("홀수 합: " + hol);
        System.out.println("짝수 합: " + jjak);
    }
}
//홀수 합: 9
//짝수 합: 6- 다음 배열을 가지고 스트림을 생성하고, 각 요소를 출력하자.
package com.test.memo;

import java.util.Arrays;

public class Practice {
    public static void main(String[] args) {
        String[] names = { "YOON", "LEE", "PARK" };

        Arrays.stream(names).forEach(s -> System.out.println(s));
    }
}
//YOON
//LEE
//PARK- 다음 배열의 스트림을 생성하고 전체 내용을 출력하고, 1번째부터 4번쨰 요소를 출력하자
package com.test.memo;

import java.util.Arrays;

public class Practice {
    public static void main(String[] args) {
        double[] ds = { 1.1, 2.2, 3.3, 4.4, 5.5 };

        Arrays.stream(ds, 1, 4).forEach(System.out::println);
    }
}
//2.2
//3.3
//4.4- "Toy", "Robot", "Box"로 스트림을 생성하고 각 요소를 출력해 보자.
package com.test.memo;

import java.util.Arrays;

public class Practice {
    public static void main(String[] args) {
        String[] Toy = { "Toy", "Robot", "Box" };

        Arrays.stream(Toy).forEach(System.out::println);
    }
}
//Toy
//Robot
//Box- 스트림을 이용해서 홀수만 출력하고, 배열의 길이가 3인 문자열만 출력하자
package com.test.memo;

import java.util.Arrays;

public class Practice {
    public static void main(String[] args) {
        String[] Toy = { "Toy", "Robot", "Box" };
        int[] ar = { 1, 2, 3, 4, 5 };

        Arrays.stream(ar).filter(n -> n % 2 != 0).forEach(n -> System.out.print(n + " "));
        System.out.println();
        Arrays.stream(Toy).filter(s -> s.length() == 3).forEach(n -> System.out.print(n + " "));
    }
}
//1 3 5
//Toy Box - 다음 문자열을 "Box", "Robot", "Simple" 스트림을 이용하여 각각의
문자열의 길이를 출력하자.
package com.test.memo;

import java.util.Arrays;

public class Practice {
    public static void main(String[] args) {
        String[] Toy = { "Box", "Robot", "Simple" };

        Arrays.stream(Toy).map(s -> s.length()).forEach(n -> System.out.print(n + " "));
    }
}
//3 5 6 - , 이 스트림을 기반으로 문자열 스트림을 생성하는 맵핑 연산을 진행해보자. 그리고
그 결과를 forEach 연산을 통해 출력해보자.
package com.test.memo;

import java.util.Arrays;
import java.util.List;

class Box<T> {
    private T ob;

    public Box(T o) {
        ob = o;
    }

    public T get() {
        return ob;
    }
}

public class Practice {
    public static void main(String[] args) {
        List<Box<String>> ls = Arrays.asList(new Box<>("Robot"), new Box<>("Simple"));

        ls.stream().map(s -> s.get()).forEach(System.out::println);
    }
}
//Robot
//Simple- Box을 Integer로 맵핑하도록 문제7의 답안으로 수정해보자.Integer는 상자에 담긴 문자열의 길이이다.
package com.test.memo;

import java.util.Arrays;
import java.util.List;

class Box<T> {
    private T ob;

    public Box(T o) {
        ob = o;
    }

    public T get() {
        return ob;
    }
}

public class Practice {
    public static void main(String[] args) {
        List<Box<String>> ls = Arrays.asList(new Box<>("Robot"), new Box<>("Simple"));

        ls.stream().map(s -> s.get().length()).forEach(System.out::println);
    }
}
//5
//6- 8번 문제를 mapToInt로 풀어보자.
package com.test.memo;

import java.util.Arrays;
import java.util.List;

class Box<T> {
    private T ob;

    public Box(T o) {
        ob = o;
    }

    public T get() {
        return ob;
    }
}

public class Practice {
    public static void main(String[] args) {
        List<Box<String>> ls = Arrays.asList(new Box<>("Robot"), new Box<>("Simple"));

        ls.stream().mapToInt(s -> s.get().length()).forEach(System.out::println);
    }
}
//5
//6- 스트림을 이용하여 정가 500원 미만의 장난감 가격의 총합을 구해보자.
package com.test.memo;

import java.util.ArrayList;
import java.util.List;

class ToyPriceInfo { // 장난감 모델 별 가격 정보
    private String model; // 모델 명
    private int price; // 가격

    public ToyPriceInfo(String m, int p) {
        model = m;
        price = p;
    }

    public int getPrice() {
        return price;
    }
}

public class Practice {
    public static void main(String[] args) {
          List<ToyPriceInfo> ls = new ArrayList<>();
            ls.add(new ToyPriceInfo("GUN_LR_45", 200));
            ls.add(new ToyPriceInfo("TEDDY_BEAR_S_014", 350));
            ls.add(new ToyPriceInfo("CAR_TRANSFORM_VER_7719", 550));

        int sum = ls.stream().filter(n -> n.getPrice() < 500).mapToInt(n -> n.getPrice()).sum();
        System.out.println(sum);
    }
}
//550- , 맵핑을 하고 마지막에 결과로 남은 스트림의 내용을 forEach 연산을 통해 전부 출력하자.
필터링 조건 model이 참조하는 문자열의 길이가 10을 넘으면 해당 인스턴스 통과
package com.test.memo;

import java.util.ArrayList;
import java.util.List;

class ToyPriceInfo { // 장난감 모델 별 가격 정보
    private String model; // 모델 명
    private int price; // 가격

    public ToyPriceInfo(String m, int p) {
        model = m;
        price = p;
    }

    public int getPrice() {
        return price;
    }

    public String getModel() {
        return model;
    }
}

public class Practice {
    public static void main(String[] args) {
        List<ToyPriceInfo> ls = new ArrayList<>();
        ls.add(new ToyPriceInfo("GUN_LR_45", 200));
        ls.add(new ToyPriceInfo("TEDDY_BEAR_S_014", 350));
        ls.add(new ToyPriceInfo("CAR_TRANSFORM_VER_7719", 550));

        ls.stream().filter(n -> n.getModel().length() > 10).map(n -> n.getModel()).forEach(System.out::println);
    }
}
//TEDDY_BEAR_S_014
//CAR_TRANSFORM_VER_7719