게임을 개발하면서 NPC(None Player Character)의 AI를 만드는 방법은 종류가 다양하다. 인기 있는 방식은 그 중 유한 상태 머신(Finite State), 퍼지 로직(Fuzzy Logic), 행동 트리(Behavior Tree)이다. 일부 게임은 한 가지 기술만 사용하는 반면 다른 게임은 보다 역동적인 느낌을 위해 혼합된다.
행동 트리는 복잡성을 확장할 수 있는 모듈식 AI를 작성하는 좋은 방법이다. 트리는 다양한 노드로 구성되어 있고, 이를 합치면 AI를 구동하는 동작을 정의한다. 노드를 다양한 색상의 여러 레고 블럭이라고 생각하고 트리를 최종 완성물이라고 생각하면 된다. 여러 노드를 재사용하여 다른 트리를 만들 수도 있다.
노드는
Task나Leaf라고 부르기도 하는데 의미는 똑같다.
행동 트리에는 두 가지 중요한 원칙이 있다.
- Behaviors should be broken down to the smallest meaningful reusable component.
- Each behavior should be decoupled – that is to not depend directly on another behavior.
즉, 행동은 의미있는 재사용 가능한 구성 요소로 분류되어야 하고, 각 행동은 분리되어야 한다는 점이다. ( 다른 행동에 직접 의존하지 않아야 한다. )
사실 행동 트리는 유니티 에셋에서 쉽게 다운받아 사용할 수 있다.

근데 10만원이 넘는 가격도 부담이기도 하고, 무엇보다 이러한 행동 트리가 내부적으로 어떻게 구현되어있는지를 이해해야 사용하는 부분에 있어서도 잘 사용할 수 있을 것 같아서 직접 구현을 해보기로 했다.
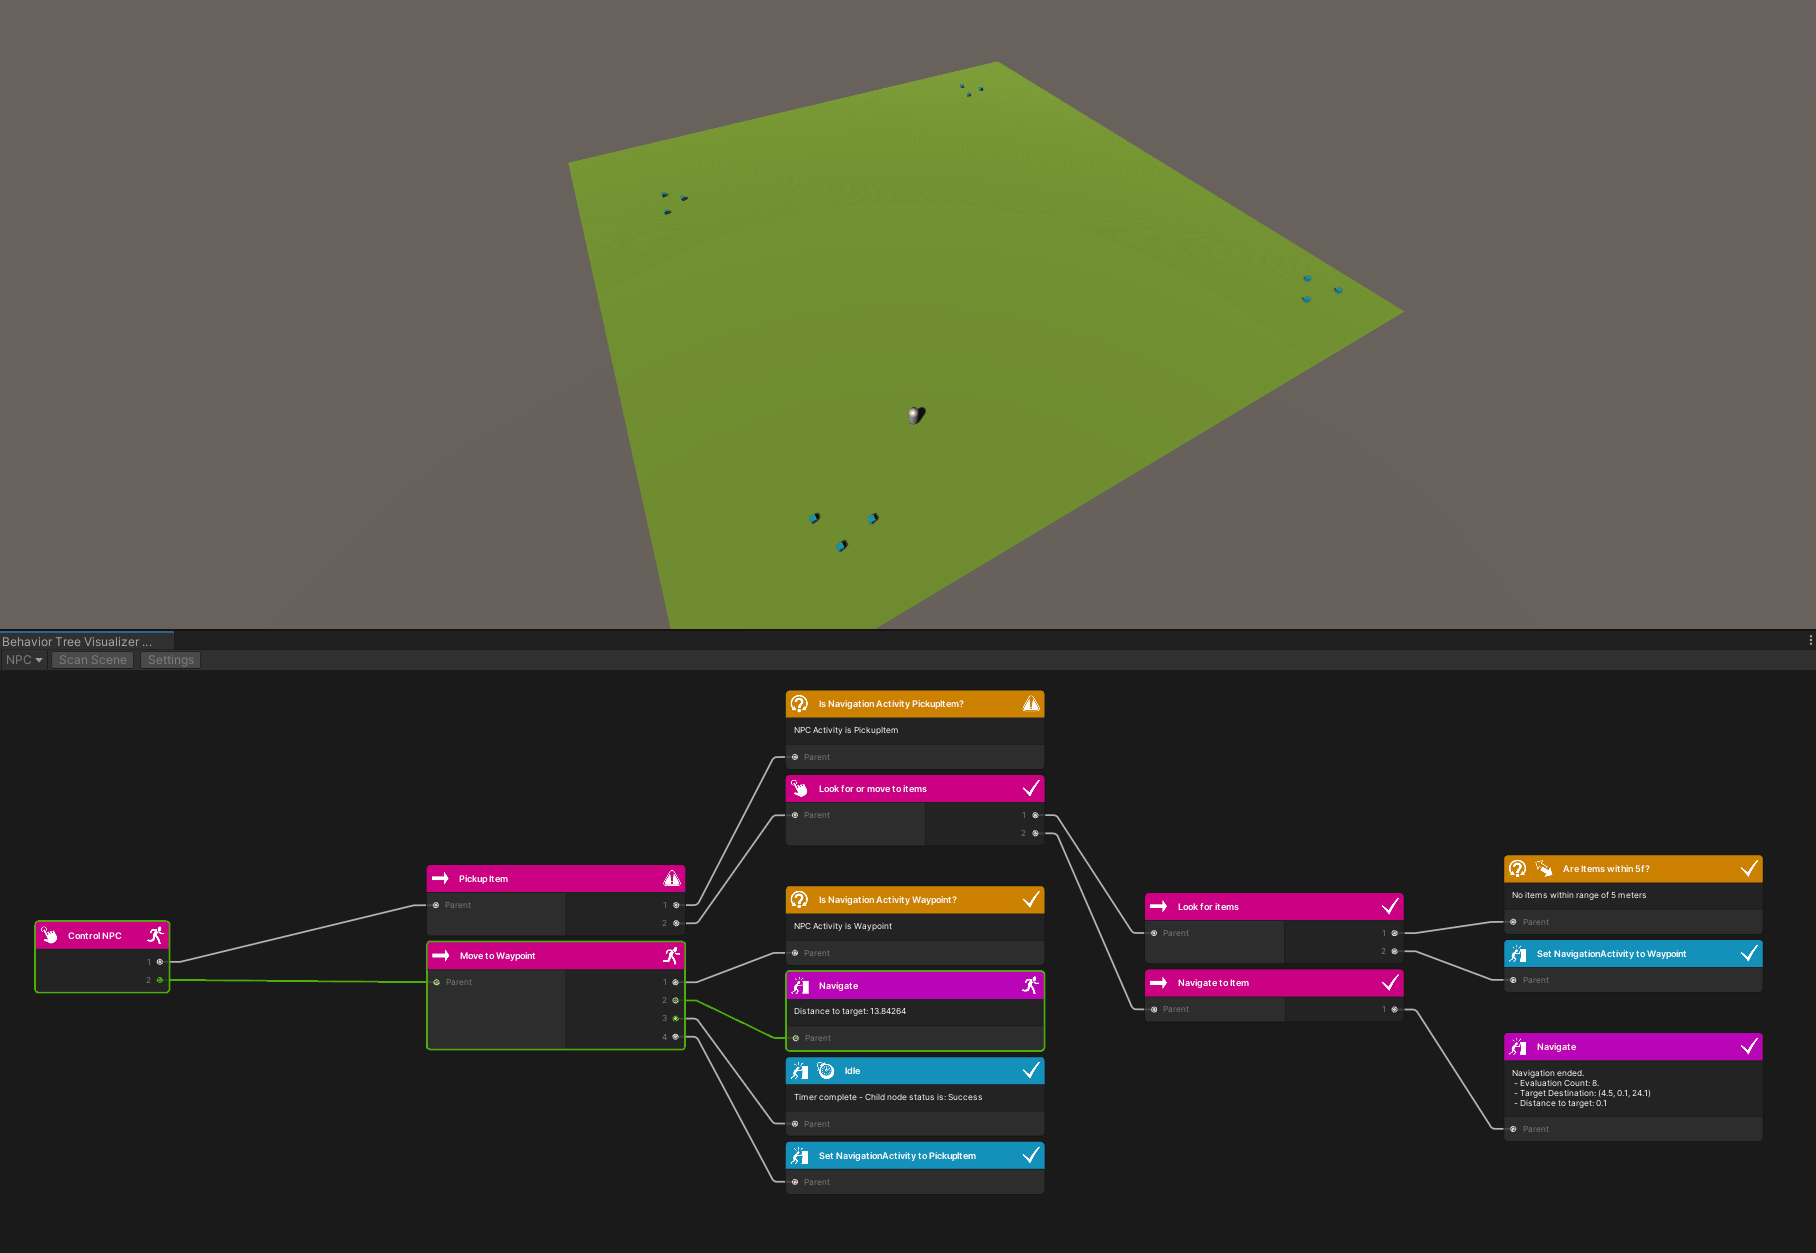
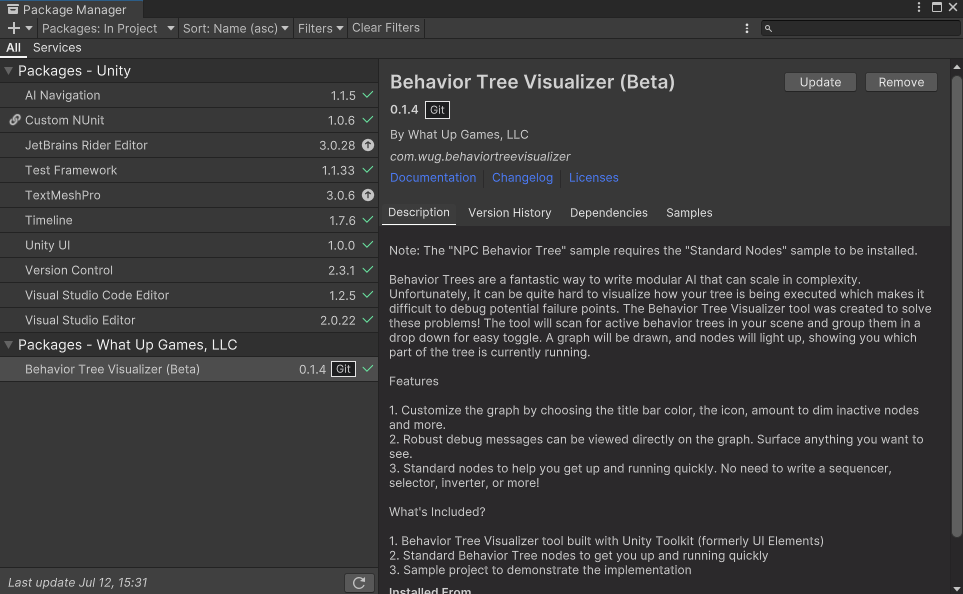
일단 Unity 자체적으로 Tree를 그리는 방식을 시각화할 수 있는 방법 자체는 없다. 그래서 오픈 소스로 공개되어있는 행동 트리 시각화 도구(Behavior Tree Visualizer)를 사용할 것이다.
https://github.com/Yecats/UnityBehaviorTreeVisualizer.git?path=/com.wug.behaviortreevisualizer 이 git URL로 패키지를 임포트 해줄 수 있다.
Behavior Tree
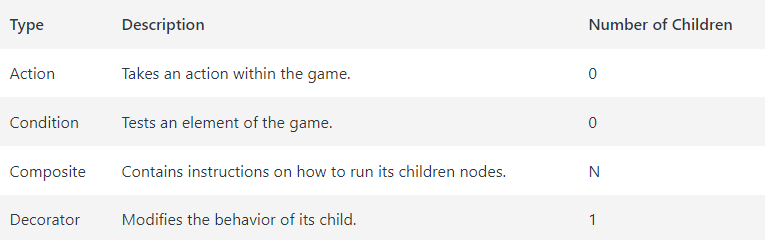
행동 트리의 핵심은 바로 노드이다. 네 가지 종류의 노드가 있다.
이러한 노드가 실행될 때마다 다음 세가지 상태 중 하나를 반환할 수 있다.
- Success: 노드의 동작이 완료되고 의도한 대로 실행됨
- Failure: 노드의 동작이 완료되었고 의도한 대로 실행되지 않음
- Running: 노드의 동작이 여전히 실행 중
예를 들어 잠긴 문을 통과해야 하는 AI가 있다. 그러기 전에 문 열쇠를 확인하는 조건(condition)이 필요하다. 열쇠가 있다면 문을 열고 잠금을 해제하기 위한 조치(action)를 취해야 한다. 이 모든 것은 composite의 지침에 맞게, 시퀀스로 구동된다.
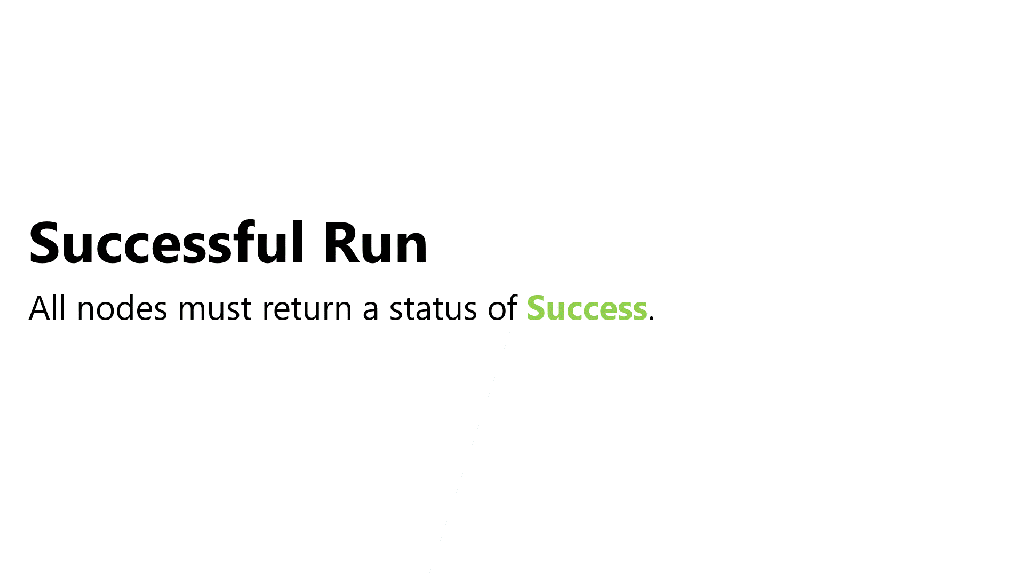
Standard Composite는 나중에 자세히 살펴볼 것이다. 시퀀스는 우리가 자주 사용하게 될 Composite인데, 목표는 모든 자식을 성공적으로 실행하는 것이다. 자식이 실패를 반환하면 자식이 몇 개든 실행이 중지되고 Failure가 반환된다. 모든 자식이 성공적으로 실행되면 Success 상태 코드를 반환한다.
Sequence Composite를 사용하면 "키를 가지고 있는가?" 조건이 실패할 경우 나머지 자식 노드가 실행되지 않는다. 만약 조건이 만족하면 잠금 해제 및 문 개방을 실행한다.
AI가 열쇠를 갖기를 바라는 대신, 열쇠가 없으면 문을 두들기기를 원한다, "키를 가지고 있는가?" 검사는 시퀀스를 계속하기 위해 성공을 반환해야 하므로, 데코레이터(decorator)로 결과를 반전(Invert)시키는 것이 좋다.
Inverter Decorator는 매우 편리한 도구이며 단순히 결과를 뒤집는다. 성공을 반환하는 노드는 이제 실패를 반환하고, 실패를 반환하는 노드는 이제 성공을 반환한다. 이 외에도 다른 데코레이터도 다룰 예정이다.
- Inverter가 자식 노드 "키를 가지고 있는가?"를 실행
- 조건이 성공을 반환하면 결과를 실패로 뒤집고, 시퀀스 실행이 중지되고 자식 중 하나가 실패했기 때문에 Failure를 반환한다.
- 조건이 실패를 반환하면 결과를 성공으로 뒤집고, 시퀀스가 계속되어 Bash Door를 실행한다.
Create the base node
노드는 로직을 실행하고 재설정하는 두 가지 작업을 수행할 수 있어야한다. 모든 단일 노드에 대해 발생하는 일련의 기본 작업이 있으며, 이는 Run 및 Reset에서 발생해야한다. 따라서 OnRun 및 OnReset은 각 파생 노드에 의해 재정의 되며 사용자 지정 논리를 포함해야한다.
Node.cs
using WUG.BehaviorTreeVisualizer;

public abstract class Node : NodeBase {
    // Keeps track of the number of times the node has been evaluated in a single 'run'.
    public int EvalutionCount;

    // Runs the login for the node
    public virtual NodeStatus Run() {
        //Runs the 'custom' logic
        NodeStatus nodeStatus = OnRun();

        // Increments the tracker for how many times the node has been evaluted this 'run'
        EvalutionCount++;

        // If the nodeStatus is not Running, then it is Success of Failure and can be Reset
        if (nodeStatus != NodeStatus.Running) {
            Reset();
        }

        // Return the StatusResult.
        return nodeStatus;
    }

    public void Reset() {
        EvalutionCount = 0;
        OnReset();
    }

    protected abstract NodeStatus OnRun();
    protected abstract void OnReset();
 }
NodeBase는 행동 트리 시각화 도구에 포함되어 있다. 반환 상태 코드(Success, Failure)에 사용할 열거형에 대한 엑세스를 제공한다. 이 외에도NodeStatus라는 유용한 속성도 있다.
이제 기본 클래스는 다 만들었다. Composite를 만들어보자.
Create General Composites
Composite은 분기(자식 노드)를 실행하는 방법에 대한 지침이다. 당연히 여러 자식 노드를 가질 수 있다. 주로 사용하게 될 몇 가지 표준 Composite이 있다. 그 중 가장 대표적인 시퀀스(Sequnce) 와 셀렉터(Selector)라는 두 가지 타입을 만들어보자.
Composite.cs
using System.Linq;

public abstract class Composite : Node
{
    protected int CurrentChildIndex = 0;

    // constructor
    protected Composite(string displayName, params Node[] childNodes) {
        Name = displayName;

        ChildNodes.AddRange(childNodes.ToList());
    }
}
이렇게 하면 이 Composite를 상속받은 모든 컴포짓이 displayName, childNodes 배열이라는 두 개 이상의 매개 변수를 사용한다.
CurrenCHildIndex는 노드가 현재 사용중인 자식 노드를 추적하는데 용이하고 이미 실행된 자식을 실행하지 않도록 할 수 있다.
Sequence
시퀀스 컴포짓의 목표는 모든 자식 노드, 자손을 실행하는 것이다. 자손 중 하나라도 실행에 실패하면 전체 시퀀스는 NodeStatus.Failure를 반환해야 한다.
시퀀스는 Composite을 상속받아서 사용하는데, Composite은 노드를 상속받기 때문에 Node에 추상 멤버 Node.OnRun과 OnReset을 구현해야 다.
using WUG.BehaviorTreeVisualizer;

public class Sequence : Composite
{
    public Sequence(string displayName, params Node[] childNodes) : base(displayName, childNodes) { }

    protected override NodeStatus OnRun()
    {
        // Check the status of the last child
        NodeStatus childNodeStatus = (ChildNodes[CurrentChildIndex] as Node).Run();

        // Evaluate the current child node. If it's failed - sequence should fail.
        switch (childNodeStatus) {
            // Child failed - return failure
            case NodeStatus.Failure :
                return childNodeStatus;
            // It Suceeded - move to the next child
            case NodeStatus.Success :
                CurrentChildIndex++;
                break;
        }

        // All Children have run successfully - return success
        if (CurrentChildIndex >= ChildNodes.Count) {
            return NodeStatus.Success;
        }

        // The child was a success but we still have more to do - so call this method again
        return childNodeStatus == NodeStatus.Success ? OnRun() : NodeStatus.Running;
    }
OnRun()은 호출될 때마다 자식의 상태를 평가한다. 자식 노드가 반환할 수 있는 세 가지 NodeStatus는 아래와 같다.
NodeStatus.Success: 자식 노드가 성공했으므로 시퀀스가 반복되고 다음 자식으로 이동NodeStatus.Failure: 자식 노드가 실패했으므로 시퀀스도 실패하여 NodeStatus.Failure를 반환NodeStatus.Running: 자식 노드가 실행 중이므로 시퀀스가 계속 실행
모든 자손이 성공하면 NodeStatus.Success를 반환한다. OnReset()은 아래와 같이 작성해준다.
    protected override void OnReset()
    {
        CurrentChildIndex = 0;

        for (int i = 0; i < ChildNodes.Count; i++) {
            (ChildNodes[i] as Node).Reset();
        }
    }
}
OnRest()은 각 자식 노드를 반복해서 Reset() 해준다. 또한 CurrentChildIndex에 대한 인덱스를 0으로 다시 설정하여 다음 실행에 맞게 올바르게 설정되도록 한다.
Selector
셀렉터의 목표는 자식 중 하나만 성공적으로 실행하는 것이다. 자식 중 하나가 NodeStatus.Success를 반환할 때까지 각 자식을 순서대로 실행한다. 모든 자식이 NodeStatus.Failure를 반환하면 NodeStatus.Failure를 반환한다.
Selector.cs
using WUG.BehaviorTreeVisualizer;

public class Selector : Composite
{
    public Selector(string displayName, params Node[] childNodes) : base(displayName, childNodes) { }

    protected override NodeStatus OnRun()
    {
        // We'va reached the end of the ChildNodes and no one was successful
        if (CurrentChildIndex >= ChildNodes.Count) {
            return NodeStatus.Failure;
        }

        // Call the current child
        NodeStatus nodeStatus = (ChildNodes[CurrentChildIndex] as Node).Run();

        // Check the child's status - failure means try a new child, Success means done.
        switch (nodeStatus) {
            case NodeStatus.Failure :
                CurrentChildIndex++;
                break;
            case NodeStatus.Success :
                return NodeStatus.Success;
        }

        // If this point as been hit - then the current chidl is still running
        return NodeStatus.Running;
    }

    protected override void OnReset()
    {
        CurrentChildIndex = 0;

        for (int i = 0; i < ChildNodes.Count; i++)
        {
            (ChildNodes[i] as Node).Reset();
        }
    }
}
OnRun()은 호출될 때마다 자식의 상태를 평가한다. 자식 노드가 반환할 수 있는 세 가지 NodeStatus는 아래와 같다.
NodeStatus.Success: 자식 노드가 성공했으므로 셀렉터가 완료되고NodeStatus.Success를 반환NodeStatus.Failure: 자식 노드가 실패했으므로 셀렉터가 반복되어 다음 자식으로 넘어감NodeStatus.Running: 자식 노드가 실행 중이므로 셀렉터가 계속 실행
모든 자식이 실패하면, 셀렉터는 NodeStatus.Failure를 반환한다.
시퀀스와 셀렉터는 일반적이고 유용한 컴포짓이지만, 이 외에도 Parallel, RandomSelector, RandomSequnce와 같은 컴포짓이 있다.
Create general decorators
데코레이터는 클래스 인스턴스의 동작을 변경하는 방법이다. 컴포짓과 달리 데코레이터는 자식이 하나만 있다. 그 자식은 액션 노드, 조건 노드, 컴포짓 자체가 될 수도 있다.
데코레이터 패턴은 객체 지향 프로그래밍의 디자인 패턴 중 하나이다.
컴포짓과 마찬가지로 유용한 데코레이터가 만지만 그 중에서 인버터와 타이머를 다뤄보자.
Decorator.cs
public abstract class Decorator : Node {
    public Decorator(string displayName, Node node) {
        Name = displayName;
        ChildNodes.Add(node);
    }
}
Composite.cs와 주요 차이점은 배열이 아닌 하나의 자식만 받아들인다는 것!
Inverter
인버터의 개념은 간단하다. 트리 위로 전달하기 전에 자식 노드의 결과를 뒤집으면 된다.
- NodeStatus.Success는 NodeStatus.Failure가 된다.
- NodeStatus.Failure는 NodeStatus.Success가 된다.

Inverter는 자식이 반환되면 특별한 작업을 수행하지 않는다, 이는 자식이 여전히 논리를 처리하고 있음을 의미하기 때문이다.
Inverter.cs
using WUG.BehaviorTreeVisualizer;

public class Inverter : Decorator
{
    public Inverter(string displayName, Node childNode) : base(displayName, childNode) { }

    protected override void OnReset() { }

    protected override NodeStatus OnRun() {
        // Confirm that a valid child node was passed in the constructor
        if (ChildNodes.Count == 0 || ChildNodes[0] == null) {
            return NodeStatus.Failure;
        }

        // Reun the child node
        NodeStatus originalStatus = (ChildNodes[0] as Node).Run();

        // Check the status of the child node and invert if it is
        // Failure or Success
        switch (originalStatus) {
            case NodeStatus.Failure :
                return NodeStatus.Success;
            case NodeStatus.Success :
                return NodeStatus.Failure;
        }

        // Otherwise, it's still running or returning an Unknown code
        return originalStatus;
    }
}
OnRun() 메서드는 유요한 자식 노드가 있는지를 먼저 확ㅇ니하고 자식 노드의 반환 값을 반대로하여 반환시킨다. 반환되지 않으면 원본을 반환해준다.
Timer
타이머의 목표는 타이머가 만료될 때까지 자식 노드를 계속 실행하는 것이다. 아래 예시에서 AI는 2초를 기다려야만 문 자물쇠를 따서 열 수 있다.
Timer
using UnityEngine;
using WUG.BehaviorTreeVisualizer;

public class Timer : Decorator {
    private float m_StartTime;
    private bool m_UseFixedTime;
    private float m_TimeToWait;

    public Timer(float timeToWait, Node childeNode, bool useFixedTime = false) : base($"Timer for {timeToWait}", childeNode) {
        m_UseFixedTime = useFixedTime;
        m_TimeToWait = timeToWait;
    }

    protected override void OnReset() { }
    protected override NodeStatus OnRun() {
        // Confirm that a valid child node was passed in the constructor
        if (ChildNodes.Count == 0 || ChildNodes[0] == null) {
            return NodeStatus.Failure;
        }

        // Run the child node and calculate the elapsed
        NodeStatus originalStatus = (ChildNodes[0] as Node).Run();

        // If this is the first eval, then the start time needs to be set up
        if (EvalutionCount == 0) {
            StatusReason = $"Starting timer for {m_TimeToWait}. Child Node status is : {originalStatus}";
            m_StartTime = m_UseFixedTime ? Time.fixedTime : Time.time;
        }

        //Calculate how much time has passed
        float elapsedTime = Time.fixedTime - m_StartTime;

        // If more time has passed than we wanted, it's time to stop
        if (elapsedTime > m_TimeToWait) {
            StatusReason = $"Time complete - Child node status is : {originalStatus}";
            return NodeStatus.Success;
        }

        // Otherwise, keep running
        StatusReason = $"Time is {elapsedTime} out of {m_TimeToWait}. Child node status is : {originalStatus}";
        return NodeStatus.Running;

    }
}
OnRun()은 노드가 처음 실행될 때 타이머를 설정하고, 이후 실행할 때마다 타이머가 만료되었는지를 확인한다.
이 외에도 아래와 같은 유용한 데코레이터들이 있다.
UntilFail: 자식이 실패 상태를 반환할 때까지 실행Repeater: 자식 노드를 종료하기 전에 지정된 횟수만큼 실행Delay: 타이머를 실행한 후 자식 노드를 한 번 실행
이제 어느 정도 기반은 잡았다고 할 수 있다. 다음에는 지금 구현한 내용을 기반으로 데모 프로젝트를 한 번 구현해보자.