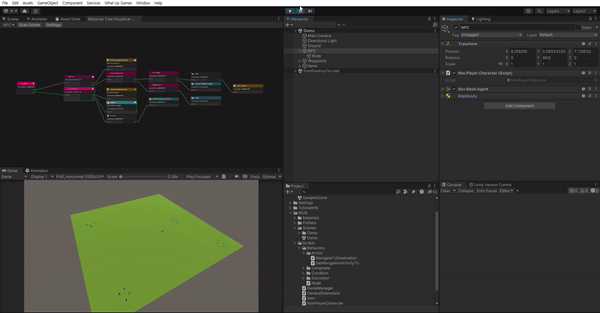
간단한 데모 씬을 열어보자.
이 데모 씬에는 3가지 오브젝트가 있다.
- NPC : 행동 트리가 적용될 캐릭터
- Waypoint : 장면 전체에 흩어져 있는 5개의 빈 오브젝트
- Item : 박스 콜라이더를 트리거로 사용하고 아이템 스크립트를 컴포넌트로 가지는 21개의 프리팹, 웨이포인트 주변에 그룹화
4가지 스크립트가 포함되어 있다.
-
GameManager.cs : 여러참조를 제공 및 GetClosestItem, PickItem, GetNextWayPoint 메서드 제공
-
Item.cs : OnTriggerEnter를 통한 GameManager.PickUpItem을 통해 아이템을 픽업
-
GeneralExtensions.cs : 웨이 포인트 목록(List)를 무작위로 Shuffle() 해주는 정적 메서드가 포함
-
NonPlayerCharacter.cs : NavMeshAgent 및 NavigationActivity 추적을 위한 Wapoint, PickUpItem 에 대한 참조
Behavior Tree
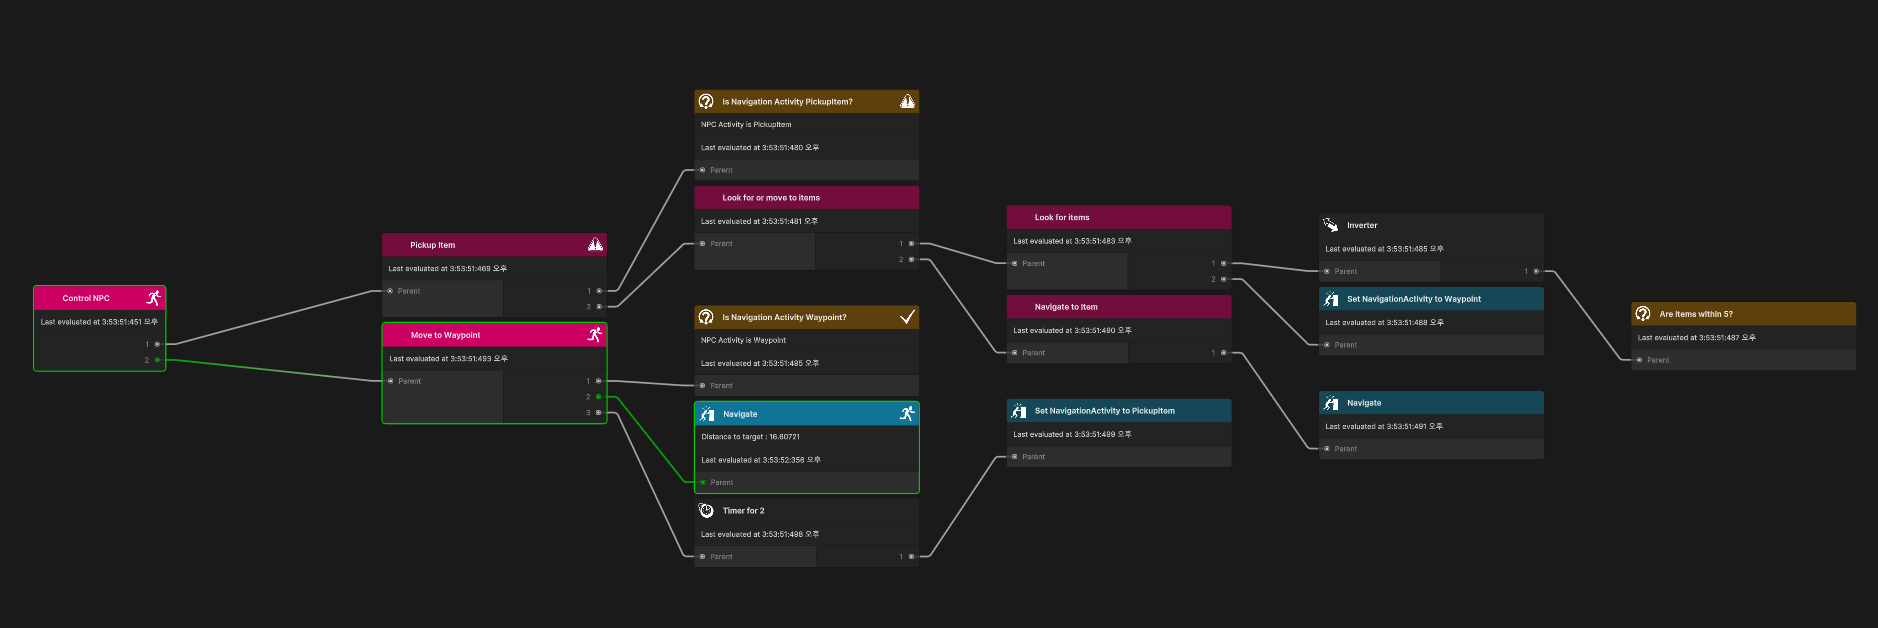
작성할 행동 트리는 복잡해 보일 수 있지만 실제로 그림으로 나타내면 아래와 같다.

첫 번째 노드를 셀렉터로 사용하면 하나의 시퀀스만 실행할 수 있다. 각 분기가 수행하는 작업은 아래와 같다.
왼쪽 분기
왼쪽 분기는 Navigation Acitivity가 PickUp Item일 떄 실행하는 시퀀스로, 웨이 포인트에서 5f 거리 안에있는 모드 아이템을 픽업하는 로직을 담당한다. 만약 아이템이 없는 경우 Navigation Activity를 Waypoint로 설정한다. 이러면 다음 조건 검사에서 왼쪽 분기가 Failure를 반환하고 오른쪽 분기가 실행된다.
오른쪽 분기
오른쪽 분기는 웨이 포인트로 이동하기 위한 로직을 처리한다. AI가 웨이 포인트에 도착하면 데코레이터를 사용하여 2초 동안 일시 중지한 후 Navigation Activity를 웨이포인트에서 PickUpItem으로 변경한다. 이렇게 하면 다음 분기 때 다시 왼쪽 분기가 실행된다.
Create custom conditions
조건은 분기로 들어가게 하는 문지기 역할을 한다고 할 수 있다. 조건은 일반적으로 게임마다 모두 다르기 때문에 필요한 조건에 따른 Condition 노드를 만들어줘야 한다.
먼저 다른 노드와 마찬가지로 상속할 Condition 클래스를 만들어준다.
Condition.cs
public abstract class Condition : Node
{
    public Condition(string name) {
        Name = name;
    }
}
이 클래스를 사용하면 행동 트리 시각화 도구가 모든 조건을 특정 방식으로 스타일링 할 수 있다. 또한 사용자 지정 이름을 쉽게 설정할 수 있도록 각 조건을 설정할 수 있다.
이제 IsNavigationActivityTypeOf Condition 노드를 만들어보자. Navigation Activity 속성을 보고 원하는 값인지만 확인해주도록 하면 된다.
IsNavigationActivityTypeOf.cs
using WUG.BehaviorTreeDemo;
using WUG.BehaviorTreeVisualizer;

public class IsNavigationActivityTypeOf : Condition {
    private NavigationActivity m_ActivityToCheckFor;

    public IsNavigationActivityTypeOf(NavigationActivity activity) : base($"Is Navigation Activity {activity}?") {
        m_ActivityToCheckFor = activity;
    }

    protected override void OnReset() { }

    protected override NodeStatus OnRun()
    {
        if (GameManager.Instance == null || GameManager.Instance.NPC == null) {
            StatusReason = "GameManager and/or NPC is null";
            return NodeStatus.Failure;
        }

        StatusReason = $"NPC Activity is {m_ActivityToCheckFor}";

        return GameManager.Instance.NPC.MyActivity == m_ActivityToCheckFor ? NodeStatus.Success : NodeStatus.Failure;
    }
}
OnRun()은 먼저 필요한 스크립트에 대한 참조를 확인하고 통과하면 NPC에 대해 확인한다.
AreItemsNearBy
아이템이 주변이 특정 거리 이내에 있는지 확인하는 조건 노드도 작성해보자.
using UnityEngine;
using WUG.BehaviorTreeDemo;
using WUG.BehaviorTreeVisualizer;

public class AreItemsNearBy : Condition {
    private float m_DistanceToCheck;

    public AreItemsNearBy (float maxDistance) : base($"Are Items within {maxDistance}?")
    {
        m_DistanceToCheck = maxDistance;
    }

    protected override void OnReset() { }

    protected override NodeStatus OnRun()
    {
        // Check for references
        if (GameManager.Instance == null || GameManager.Instance.NPC == null) {
            StatusReason = "GameManager and/or NPC is null";
            return NodeStatus.Failure;
        }

        // Get the closest item
        GameObject item = GameManager.Instance.GetClosestItem();

        // Cehck to see if something is close by
        if (item == null)
        {
            StatusReason = "No items near by";
            return NodeStatus.Failure;
        }
        else if (Vector3.Distance(item.transform.position, GameManager.Instance.NPC.transform.position) > m_DistanceToCheck)
        {
            StatusReason = $"No items within range of {m_DistanceToCheck} meters.";
            return NodeStatus.Failure;
        }

        return NodeStatus.Success;
    }
}
OnRun은 IsNavigationAcitivityTypeOf와 동일하게 참조 검사를 하고 통과하면 GetCloseItem을 호출하여 가장 가까운 Item을 가져온 다음 NPC와의 거리를 비교하여 NodeStatus를 반환한다.
Create custom actions
액션은 행통 트리의 핵심이다. 일반적으로 백그라운드에서 수행하는 기능이 변경되고 AI의 시각적 변화를 주도한다. 지금 진행하는 프로젝트에는 두 가지 액션이 필요하다. 하나는 씬 뒤에서 기능을 변경하는 것이고, 다른 하나는 AI를 새로운 위치로 이동하는 것이다. 지금까지 만든 다른 노드 유형과 달리, 액션은 Node에서 직접 상속되므로 추가 베이스 클래스를 만들 필요가 없다.
Set NavigationActivity
위에서 조건 노드에서도 사용한 Navigation Activity를 설정해주는 액션 노드를 작성해보자.
SetNavigationActivityTo.cs
using WUG.BehaviorTreeDemo;
using WUG.BehaviorTreeVisualizer;

public class SetNavigationActivityTo : Node
{
    private NavigationActivity m_NewActicity;

    public SetNavigationActivityTo (NavigationActivity newActicity)
    {
        m_NewActicity = newActicity;
        Name = $"Set NavigationActivity to {m_NewActicity}";
    }

    protected override void OnReset() { }

    protected override NodeStatus OnRun()
    {
        if (GameManager.Instance == null || GameManager.Instance.NPC == null) {
            StatusReason = "GameManager and/or NPC is null";
            return NodeStatus.Failure;
        }

        GameManager.Instance.NPC.MyActivity = m_NewActicity;

        return NodeStatus.Success;
    }
}
Navigate To Destination
이제 NPC를 목적지로 이동하는 액션 노드를 작성해보자. NavMeshAgent를 통해 AI의 새 목적지로 이동을 설정하고 모니터링한다.
NavigateToDestination.cs
using System;
using UnityEngine;
using UnityEngine.AI;
using WUG.BehaviorTreeDemo;
using WUG.BehaviorTreeVisualizer;

public class NavigateToDestination : Node {
    private Vector3 m_TargetDestination;

    public NavigateToDestination()
    {
        Name = "Navigate";
    }

    protected override void OnReset(){ }

    protected override NodeStatus OnRun()
    {
        // Check for references
        if (GameManager.Instance == null || GameManager.Instance.NPC == null) {
            StatusReason = "GameManager and/or NPC is null";
            return NodeStatus.Failure;
        }

        // Perform logic that should only run once
        if (EvaluationCount == 0)
        {
            // Get destination from GameManager
            GameObject destinationGO = GameManager.Instance.NPC.MyActivity == NavigationActivity.PickupItem ? GameManager.Instance.GetClosestItem() : GameManager.Instance.GetNextWayPoint();

            // Confirm that the destination is valid - If not, fail
            if (destinationGO == null)
            {
                StatusReason = $"Unable to find game object for {GameManager.Instance.NPC.MyActivity}";
                return NodeStatus.Failure;
            }

            // Get a valid location on the NavMesh that's near the target destination
            NavMesh.SamplePosition(destinationGO.transform.position, out NavMeshHit hit, 1f, 1);

            // set the location for checks later
            m_TargetDestination = hit.position;

            // Set the destination on the NavMesh. This tells the AI to start moving to the new location.
            GameManager.Instance.NPC.MyNavMesh.SetDestination(m_TargetDestination);
            StatusReason = $"Starting to navigate to {destinationGO.transform.position}";

            // Return running, as we want to continue to have this node evaluate
            return NodeStatus.Running;
        }

        // Calculate how far the AI is from the destination
        float distanceToTarget = Vector3.Distance(m_TargetDestination, GameManager.Instance.NPC.transform.position);

        // If the AI is within .25f then navigation will bec onsidered a success
        if (distanceToTarget < .25f) {
            StatusReason = $"Navigation ended. " +
                $"\n - Evalutaion Count : {EvaluationCount}. " +
                $"\n - Target Destination : {m_TargetDestination}" +
                $"\n - Distance to target : {Math.Round(distanceToTarget, 1)}";

            return NodeStatus.Success;
        }

        // Otherwise, the AI is still on the move
        StatusReason = $"Distance to target : {distanceToTarget}";
        return NodeStatus.Running;
    }
}
간단히 설명하자면, 노드가 처음 실행될 때, NPC의 현재 NavigationActivity에 따라 대상 목적지를 묻는다. 가장 가까운 아이템 위치 또는 다음 웨이포인트 위치를 반환한다. 반환된 위치는 NavMeshAgent가 사용하여 경로를 탐색하는데 사용한다. 이렇게 하면 경로를 찾을 수 없는 포지션이 NavMesh에 전달되는 것을 방지할 수 있다. 마지막으로 노드는 NodeStatus.Running을 반환한다.
그 다음 노드는 NPC와 목적지 사이의 거리를 계산한다. 거리가 0.25f 이상이면 노드는 여전히 실행중이라 NodeStatus.Running을 반환하고, 그렇지 않으면 탐색이 완료된 것으로 간주해 NodeStatus.Success를 반환한다.
Building and running the Tree
이제 트리 구현에 필요한 사전 작업은 끝났다. 이제 트리를 구현해보자. 행동 트리 시각화 도구는 Runtime Tree를 읽기 위해 IBehavior Tree를 사용한다.
NonPlayerCharacter.cs
public class NonPlayerCharacter : MonoBehaviour, IBehaviorTreeprivate void GenerateBehaviorTree() {
BehaviorTree =
new Selector("Control NPC",
new Sequence("Pickup Item",
new IsNavigationActivityTypeOf(NavigationActivity.PickupItem),
new Selector("Look for or move to items",
new Sequence("Look for items",
new Inverter("Inverter",
new AreItemsNearBy(5f)),
new SetNavigationActivityTo(NavigationActivity.Waypoint)),
new Sequence("Navigate to Item",
new NavigateToDestination()))),
new Sequence("Move to Waypoint",
new IsNavigationActivityTypeOf(NavigationActivity.Waypoint),
new NavigateToDestination(),
new Timer(2f,
new SetNavigationActivityTo(NavigationActivity.PickupItem))));
}읽기가 지저분하고 보시다시피 행동 트리가 커질수록 구현이 더 어려워진다. 위 코드는 아래와 동일한 구조를 가진다.
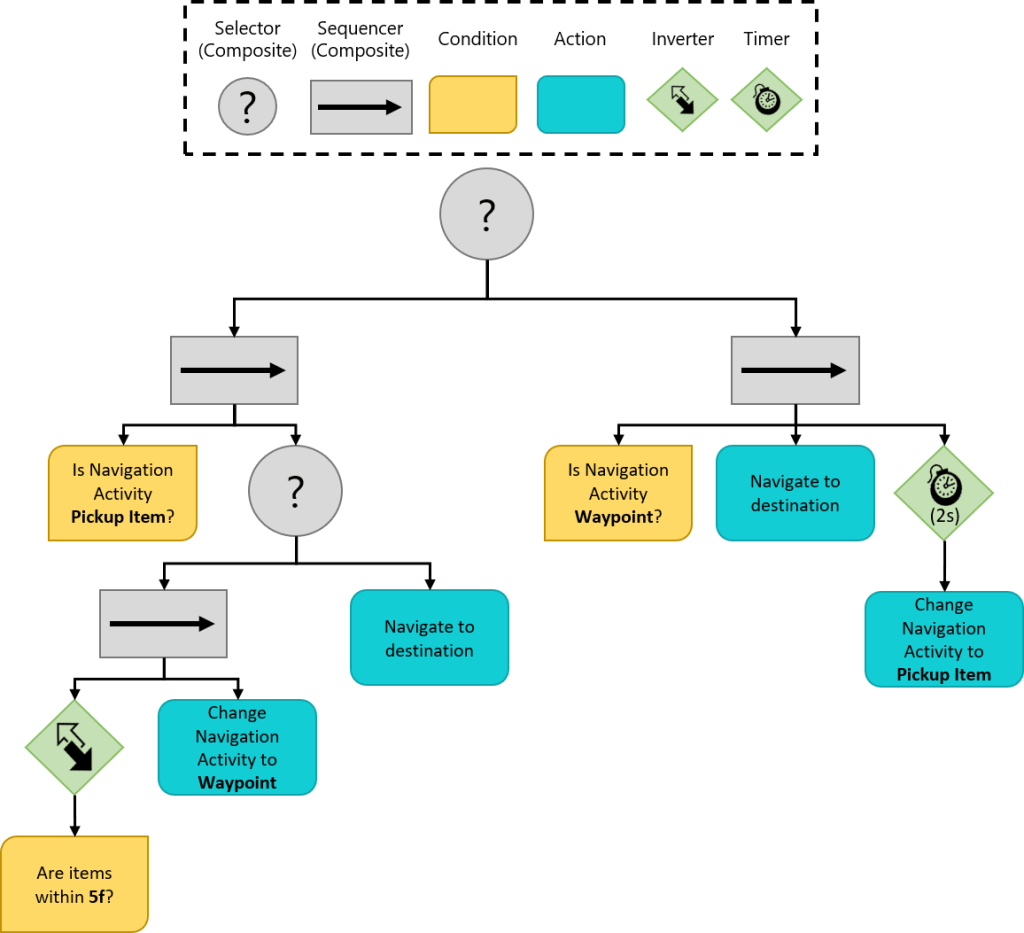
들여쓰기를 활용하면 행동 트리의 현재 level(깊이)를 추적하는데 도움이 된다. 행동 트리 시각화 도구는 런타임 시 중첩 실수를 찾도록 도와준다.
이제 코루틴 로직을 추가하자.
private Coroutine m_BehaviorTreeRoutine;
private YieldInstruction m_WaitTime = new WaitForSeconds(.1f);

private IEnumerator RunBehaviorTree()
{
    while (enabled)
    {
        if (BehaviorTree == null) {
            $"{this.GetType().Name} is missing Behavior Tree. Did you set the BehaviorTree property?".BTDebugLog();
            continue;
        }

        (BehaviorTree as Node).Run();

        yield return m_WaitTime;
    }
}

private void OnDestroy() {
    if (m_BehaviorTreeRoutine != null)
    {
        StopCoroutine(m_BehaviorTreeRoutine);
    }
}
이제 Start에서 트리를 만들고 코루틴을 시작하자.
private void Start()
{
    MyNavMesh = GetComponent<NavMeshAgent>();
    MyActivity = NavigationActivity.Waypoint;

    GenerateBehaviorTree();

    if (m_BehaviorTreeRoutine == null && BehaviorTree != null)
    {
        m_BehaviorTreeRoutine = StartCoroutine(RunBehaviorTree());
    }
}
Setup Behavior Tree Visualizer
행동 트리 시각화 도구(Behavior Tree Visualizer, BTV)는 씬에서 활성화 된 행동 트리를 스캔하도록 설계되어 있고, 모든 트리를 드롭다운용 토글로 그룹화 해준다. 가장 먼저 Node Status 또는 StatusReason이 변경되었을 때 BVT에 알리도록 노드 스크립트를 업데이트 해주자.
Node.cs
private string m_LastStatusReason { get; set; } = "";
// Runs the login for the node
public virtual NodeStatus Run() {
//Runs the 'custom' logic
NodeStatus nodeStatus = OnRun();
if (LastNodeStatus != nodeStatus || !m_LastStatusReason.Equals(StatusReason))
{
LastNodeStatus = nodeStatus;
m_LastStatusReason = StatusReason;
OnNodeStatusChanged(this);
}
// Increments the tracker for how many times the node has been evaluted this 'run'
EvaluationCount++;
// If the nodeStatus is not Running, then it is Success of Failure and can be Reset
if (nodeStatus != NodeStatus.Running) {
Reset();
}
// Return the StatusResult.
return nodeStatus;
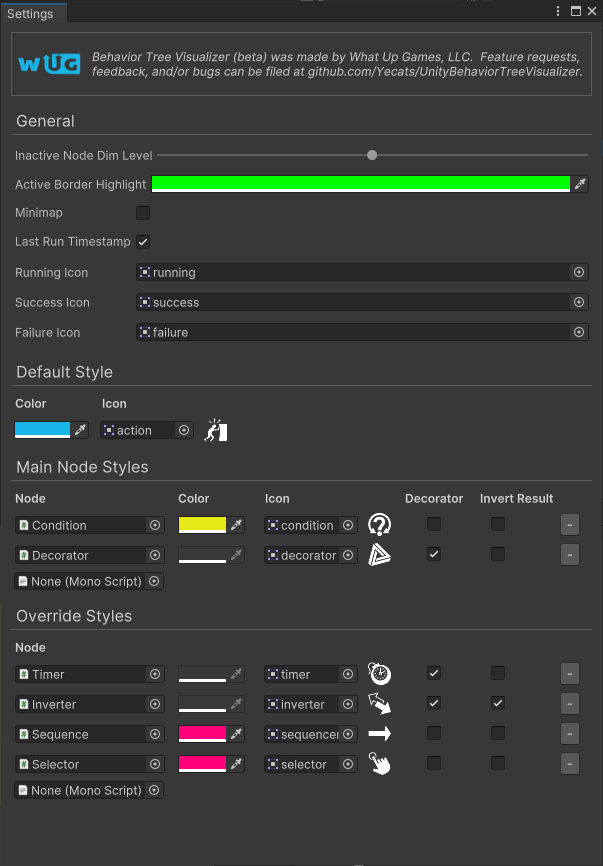
}이제 노드의 스타일을 설정해주자. 강조 표시 테두리, 제목 표시줄 색 및 아이콘이 포함된다.
What Up Games > Behavior Tree Visualizer > Settings
여기에 지금까지 작성해 준 각 노드들을 추가해주고 아이콘과 색상 스타일을 지정해준다. 최종적으로는 아래와 같이 설정했다.
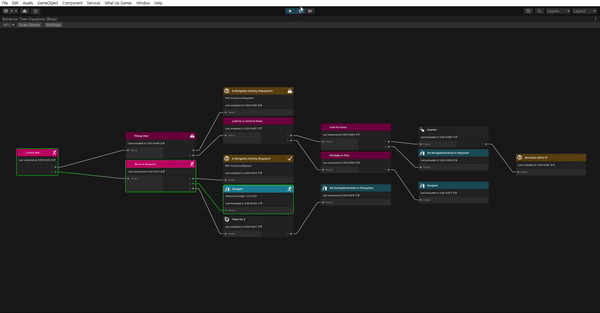
See it in action
이제 다 끝났다. 잘 작동하나 확인해보자.
- What Up Games > Behavior Tree Visualizer를 열어준다.
- Play 해준다.
- BVT에서 Scan Scene을 클릭한다.
- Select Behavior Tree 드롭 다운을 클릭하고 NPC를 선택한다.
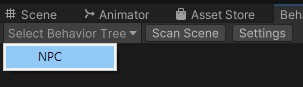
Play를 해야 만 Scan Scene이 가능하다.
NPC의 인스펙터 창에 버튼을 추가하여 BVT를 실행할 수 있다. 자세한 내용은 gitHub 문서를 참고하자