educative - kotlin - 12
Fluency in Kotlin
Need for operator overloading
연산자 오버로딩(operator overloading)이란?
연산자 오버로딩(operator overloading)은 객체 지향 컴퓨터 프로그래밍에서 다형성의 특정 경우로 다른 연산자들이 함수 인자를 통해서 구현을 할 때를 말한다. 연산자 오버로딩은 일반적으로 언어, 프로그래머, 또는 두 가지 모두에 의해 정의된다. 연산자 오버로딩은 사용자 정의 타입과 비슷한 수준을 허락하기 때문에 언어에 내장된 형식으로 구문을 지원한다. 그것은 쉽게 함수 호출을 사용하여 모방할 수 있다; 예를 들어, 정수 a, b, c를 생각하면 아래와 같은 식으로 작성이 가능하다.
예시)
a + b * c -> add (a, multiply (b,c))
자바는 연산자 오버로딩을 제공하지 않지만, 코틀린은 연산자 오버로딩을 지원한다.
bigInteger1.multiply(bigInteger2)

bigInteger1 * bigInteger2
코틀린 연산자 오버로딩의 장점은 위 처럼 숫자 타입의 데이터 뿐만이 아닌 사용자가 직접 정의한 데이터타입의 연산도 가능하다는 점이다. 예를 들면 today + 2이다.
How is it done?
연산자 오버로딩 함수를 정의하기 위해서는 operator 키워드를 사용한다. 예시로 2개의 Pair 클래스에서 각각의 요소를 더해주는 + 연산자를 오버로딩 해준다, 그리고 실행시켜 보자
operator fun Pair<Int, Int>.plus(other: Pair<Int, Int>) =
  Pair(first + other.first, second + other.second)

val firstPair = Pair(0,0)
val secondPair = Pair(1,1)
println(firstPair + secondPair) // (1,1)
복소수 연산을 활용한 다른 예제를 보자
import kotlin.math.abs
data class Complex(val real: Int, val imaginary: Int) {
operator fun times(other: Complex) =
Complex(real * other.real - imaginary * other.imaginary,
real * other.imaginary + imaginary * other.real)
private fun sign() = if (imaginary < 0) "-" else "+"
override fun toString() = "$real ${sign()} ${abs(imaginary)}i"
}
println(Complex(4, 2) * Complex(-3, 4)) //-20 + 10i
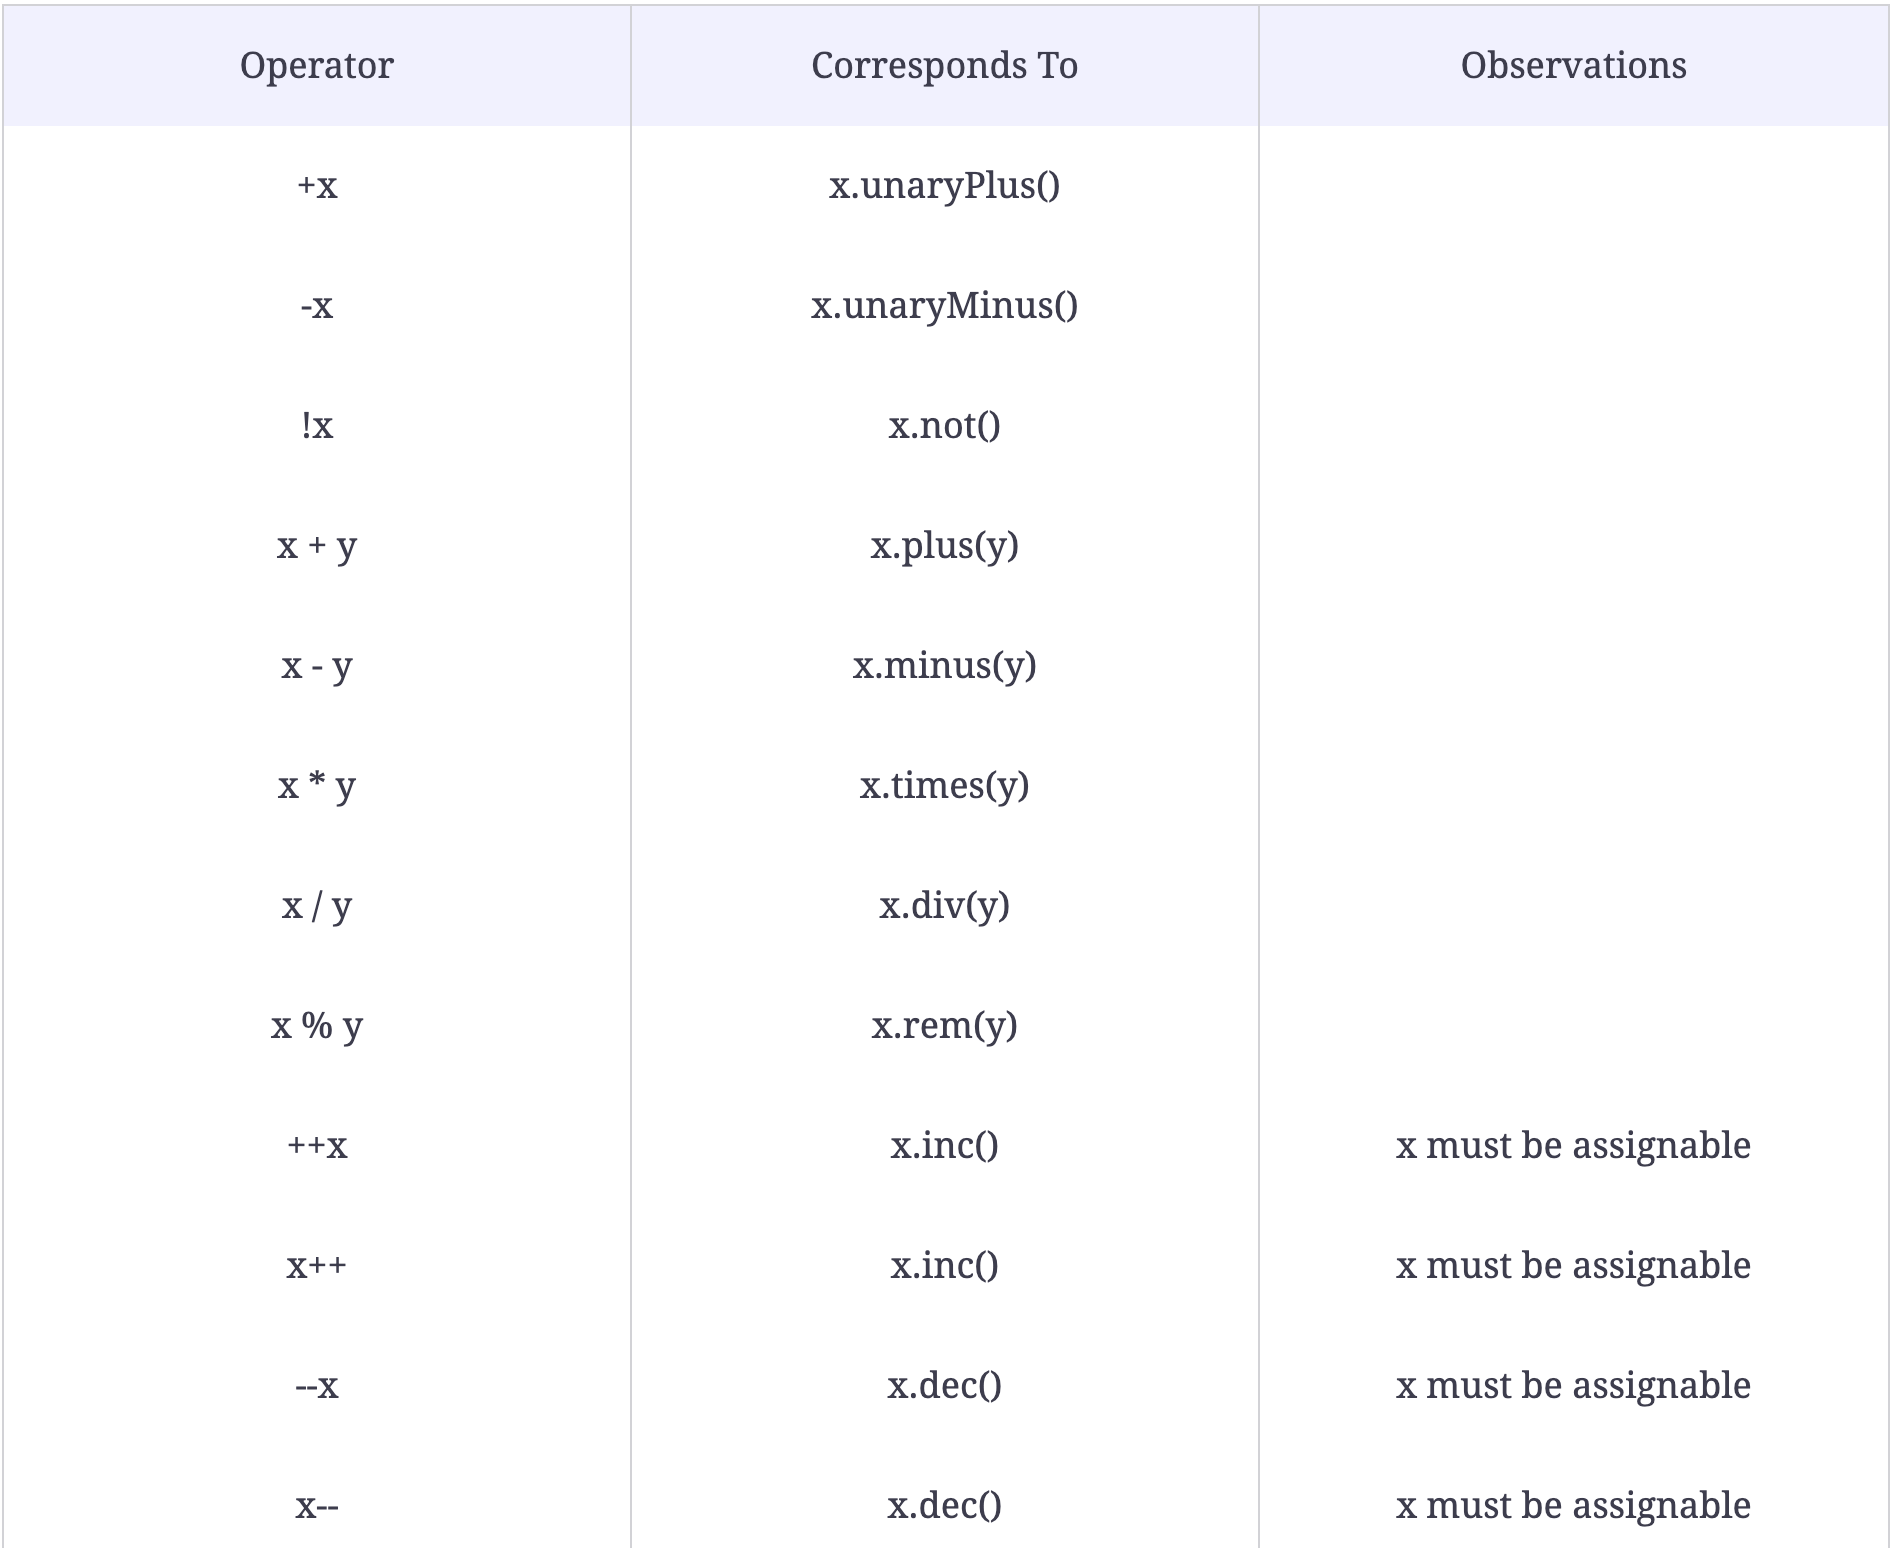
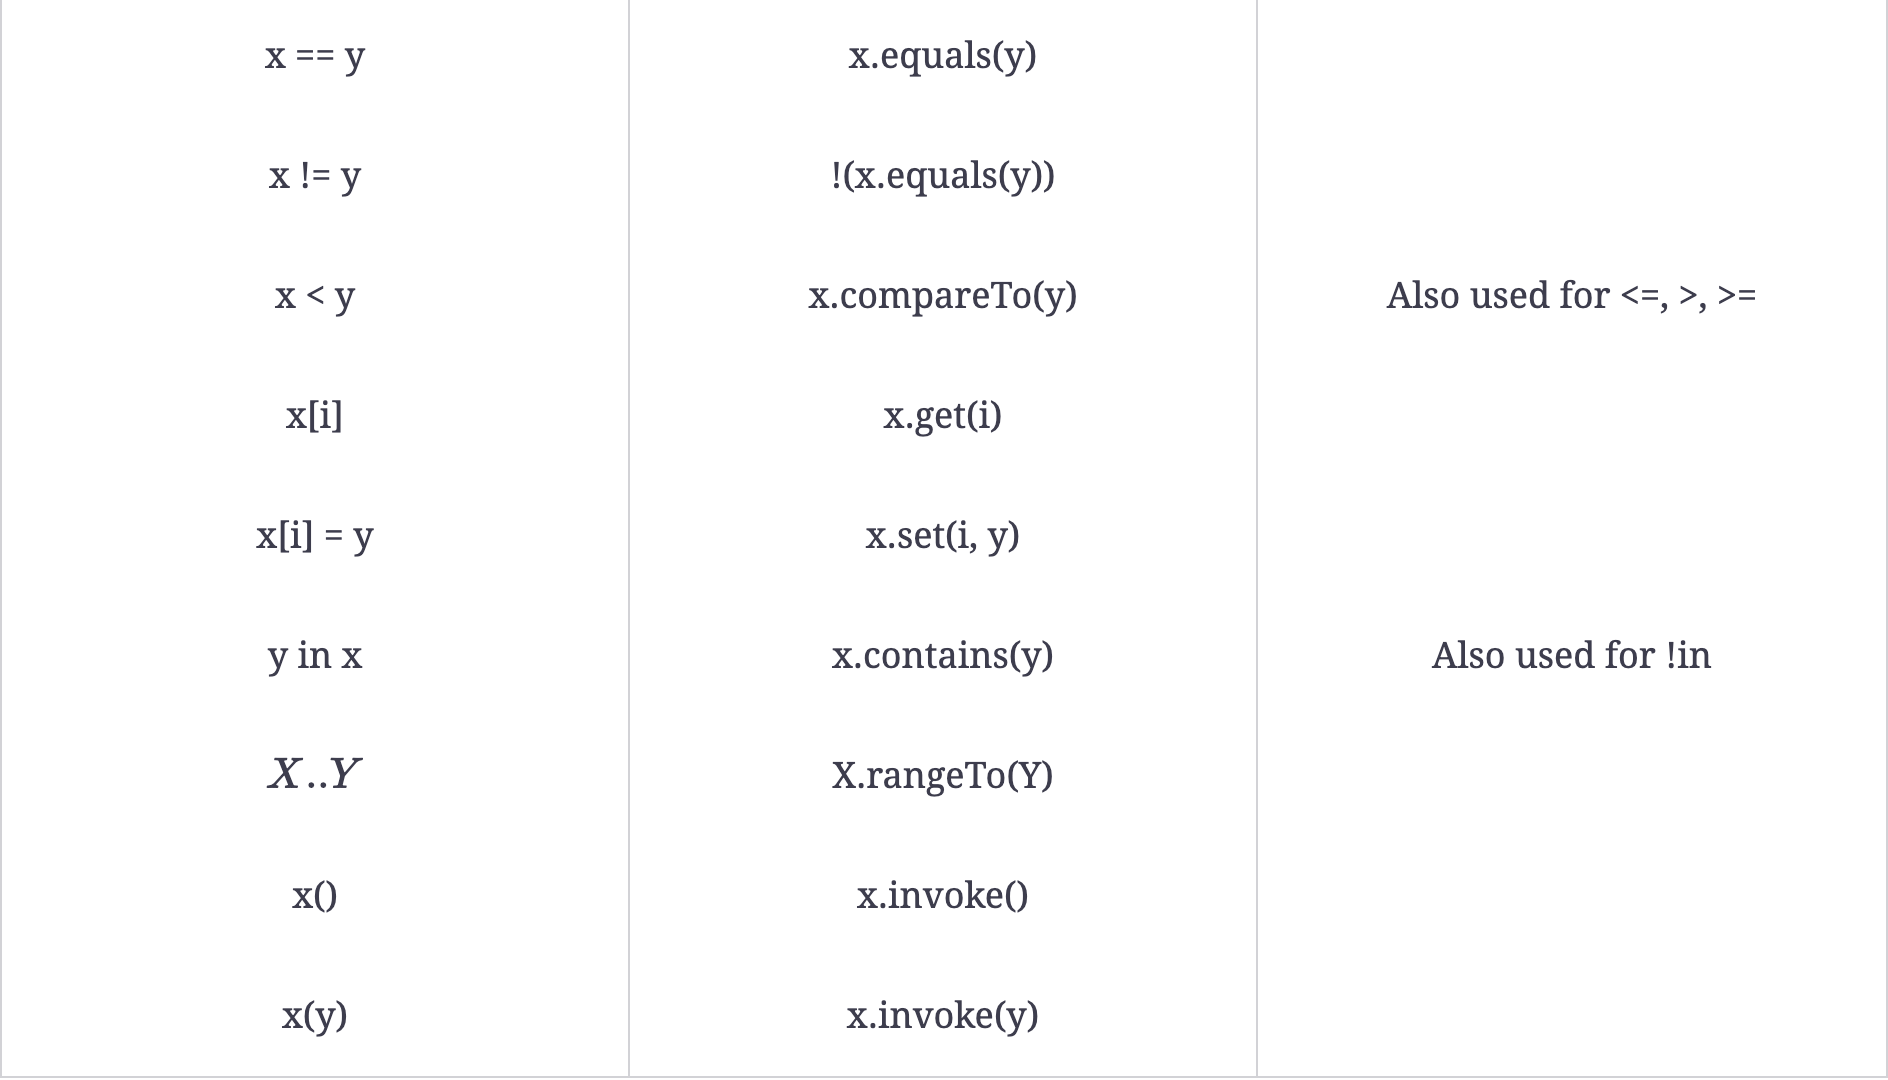
println(Complex(1, 2) * Complex(-3, 4)) //-11 - 2i연산자와 해당 메소드를 정리한 테이블이다.
Rules to follow
단항 연산자 오버로딩을 통해 예시를 들어보자. +는 inc(), -는 dec() 메소드를 사용한다.
class Counter(val value: Int) {
  operator fun inc() = Counter(value + 1)

  operator fun dec() = Counter(value - 1)

  override fun toString() = "$value"
}

var counter = Counter(2)
println(counter)    //2
println(++counter)  //3
println(counter)    //3
println(counter++)  //3
println(counter)    //4
여기서 inc() 메소드를 사용하면 새로운 값을 할당한 객체 반환하게 된다. 전위 연산자(++counter)를 사용하게 되면 할당전에 연산을 하게 되므로 연산을 적용시킨 후 객체를 반환한다. 후위 연산자(counter++)를 사용하게 되면 이전 값을을 반환 후 연산을 수행한다. 4번째 println()문의 결과가 3인 이유다.
연산자 오버로딩은 분명 좋은 기능이지만 남용할 경우 예상치 못한 side effect를 초래한다. 따라서 관련 코드를 작성할때는 코드를 읽는 제 3자에게 최대한 간결하고 정확하게, 오버로딩의 문맥에 맞게 변수 naming에 신경을 많이 써야 한다.
Injecting Using Extension Functions and Properties
2개의 데이터 클래스(원, 좌표)가 있다고 가정해보자
data class Point(val x: Int, val y: Int)
data class Circle(val cx: Int, val cy: Int, val radius: Int)
원안에 위치하고 있는 좌표를 구해야 한다고 가정해보자. 각각의 클래스 안에 메소드를 정의해도 되지만 클래스 바깥쪽에서 contains()라는 메소드를 정의해보자.
fun Circle.contains(point: Point) =
  (point.x - cx) * (point.x - cx) + (point.y - cy) * (point.y - cy) <
    radius * radius
Circle 클래스의 외부임에도 불구하고, Circle 클래스의 내부 메소드인것 처럼 멤버변수(cx, cy)에 접근할 수 있다 (신기하네)
인스턴스를 생성해 실행시켜 보자.
val circle = Circle(100, 100, 25)
val point1 = Point(110, 110)
val point2 = Point(10, 100)

println(circle.contains(point1)) //true
println(circle.contains(point2)) //false
Circle 클래스 내부에서 생성된 메소드가 아님에도 불구하고 위처럼 해당 인스턴스에서 바로 contains() 메소드를 호출 할 수 있다.
패키지 내부에 확장 함수가 존재하면 코틀린 컴파일러는 해당 확장함수의 객체를 함수 첫번째 인자로 전달한다. 위에서는 circle 인스턴스를 contains()의 첫번째 인자로 전달한 셈이 된다.
여기서 확장 함수의 제약사항은
- 확장 함수와 클래스 내부 인스턴스 메소드의 이름이 동일하면 인스턴스 메소드가 우선이다
- 확장 메소드는 클래스에서 visible한 멤버에만 접근할 수 있다.
Injecting operators using extension function
확장 함수를 연산자 오버로딩에서도 사용할 수 있다. in 연산자는 contains() 메소드에 대응한다는 점을 참고해서 예시를 보자
operator fun Circle.contains(point: Point) =
  (point.x - cx) * (point.x - cx) + (point.y - cy) * (point.y - cy) <
    radius * radius

println(circle.contains(point1)) //true
println(point1 in circle) //true
println(point2 in circle) //false
Injecting properties using extension properties
확장 property도 구현이 가능하다. 물론 확장함수는 backing field를 사용할 수 없지만 property를 통해 클래스 멤버에 접근이 가능하다. 아래 예시에서는 getter를 사용한다.
val Circle.area: Double
  get() = kotlin.math.PI * radius * radius

val circle = Circle(100, 100, 25)
println("Area is ${circle.area}") //1963.49....
Injecting into third-party classes
third-party 클래스에서도 확장함수 적용이 가능하다. 회문(palindrome) 여부에 따라 true, false를 반환하는 예시를 보자.
fun String.isPalindrome(): Boolean {
  return reversed() == this
}

fun String.shout() = toUpperCase()

val str = "dad"
println(str.isPalindrome()) //true
println(str.shout()) //DAD
위 예시에서도 볼 수 있듯이 확장함수는 여러곳에서 유연하게 적용이 가능하지만 아래처럼 이미 구현되어 있는, 자주 사용하고 있고 잘 알려진 내장 메소드를 확장 함수를 통해서 수정하는 것은 금기이다. 딱 봐도 이상하다
fun String.toLowerCase() = toUpperCase() //BAD CODE

val str = "Please Don't"
println(str.toLowerCase()) //PLEASE DON'T
확장 함수를 정의해 다음 에러를 해결해보자
for (word in "hell".."help") { print("$word, ") } //ERROR
//for-loop range must have an 'iterator()' method
ClosedRange<T> 클래스에 iterator가 없어서 생기는 문제이다. 확장 함수와 연산자 오버로딩을 통해 문제를 해결할 수 있다.
-
익명 객체로 iterator를 생성한다..
-
ClosedRange<T>의 프로퍼티(start, endInclusive)를 사용해 iterator의 범위를 지정해줄 수 있다. -
>=를compareTo()를 통해 오버로딩 해준다. -
가변 문자열은
StringBuilder클래스에 담아준다. -
kotlin.Char의 + 연산은 알바펫 순서상 다음 문자를 반환한다.
operator fun ClosedRange<String>.iterator() =
  object: Iterator<String> {
    private val next = StringBuilder(start)
    private val last = endInclusive

    override fun hasNext() =
      last >= next.toString() && last.length >= next.length

    override fun next(): String {
      val result = next.toString()

      val lastCharacter = next.last()

      if (lastCharacter < Char.MAX_VALUE) {
        next.setCharAt(next.length - 1, lastCharacter + 1)
      } else {
        next.append(Char.MIN_VALUE)
      }

      return result
    }
  }

for (word in "hell".."help") { print("$word, ") }
// hell, helm, heln, helo, help,
Injecting static methods
static 메소드에 확장함수를 적용해본 예시이다.
fun String.Companion.toURL(link: String) = java.net.URL(link)

val url: java.net.URL = String.toURL("https://pragprog.com")
Injecting from within a class
여태까지는 클래스 내부가 아닌 top-level에서 확장함수를 사용해봤지만 클래스 내부에서도 확장함수를 사용할 수 있다.
class Point(x: Int, y: Int) {
  private val pair = Pair(x, y)

  private val firstsign = if (pair.first < 0) "" else "+"
  private val secondsign = if (pair.second < 0) "" else "+"

  override fun toString() = pair.point2String()

  fun Pair<Int, Int>.point2String() =
    "(${firstsign}${first}, ${this@Point.secondsign}${this.second})"
}

println(Point(1, -3)) //(+1, -3)
println(Point(-3, 4)) //(-3, +4)

fun Pair<Int, Int>.point2String() =
  "(${firstsign}${first}, ${this@Point.secondsign}${this.second})"
앞서 작성했던 Point 클래스와는 다르게 x,y 좌표를 pair라는 멤버 변수에 저장했다. firstsing, secondsign이라는 private 프로퍼티도 추가했다.
point2String() 이라는 확장 함수를 오버라이딩한 toString()을 내부에서 호출하는 구조다. 확장 함수가 클래스 내부에서 생성되어 2개의 receiver(this, this@Point)가 있다. 각각 extension receiver, dispatch receiver라고 한다.

Extending Functions
코틀린에서 함수는 객체로 취급된다. andThen() 메소드를 사용해 확장함수를 구현한 예제를 보자.
fun <T, R, U> ((T) -> R).andThen(next: (R) -> U): (T) -> U =
{ input: T -> next(this(input)) }andThen()함수는 매개변수화 타입인 T를 가지고 R 타입을 리턴한다. andThen() 함수로 넘어가는 인자는 R 타입을 인자로 받는 함수여야 한다. 그리고 이 함수는 U라는 매개변수 타입을 반환한다.
다른 예제
fun increment(number: Int): Double = number + 1.toDouble()
fun double(number: Double) = number * 2

val incrementAndDouble = ::increment.andThen(::double)

println(incrementAndDouble(5)) //12.0
The infix notation
infix notation(중위 표기법)이란 두 개의 피연산자 사이에 연산자가 존재하는 표현 방식이다
ex) X+Y, X-Y
중괄호와 dot notation은 평상시 코드를 칠때도 많이 사용하지만 없을때 코드가 더 깔끔해지는 경우도 있다
if(obj.instanceOf(String)) {} // 노 깔끔

if(obj instanceof String) {} // 깔끔
더 깔끔해진 밑에 코드는 중위 표기법을 사용한 예시가 된다.
피연산자(obj, String) 연산자(instanceof)
비슷한 예시
println(circle.contains(point1)) //true
println(point1 in circle) //true
infix 키워드를 사용하면 아래와 같이 연산자를 오버로딩하는 것 처럼 사용하면 중위 표기법을 오버라이딩 할 수 있다.
operator infix fun Circle.contains(point: Point) =
  (point.x - cx) * (point.x - cx) + (point.y - cy) * (point.y - cy) <
    radius * radius

println(circle contains point1) //true
Behavior of the four methods
also(), apply(), let(), run()
코틀린에서는 이렇게 생긴 확장함수들이 있다. 4개의 함수 모두 람다 표현식을 인자로 받고 그에 따른 결과를 반환한다.
println(String.format("%-10s%-10s%-10s%-10s%-10s",
"Method", "Argument", "Receiver", "Return", "Result"))
println("===============================================")

val result1 = str.let { arg ->
    print(String.format(format, "let", arg, this, result))
    result
}
println(String.format("%-10s", result1))

val result2 = str.also { arg ->
    print(String.format(format, "also", arg, this, result))
    result
}
println(String.format("%-10s", result2))

val result3 = str.run {
    print(String.format(format, "run", "N/A", this, result))
    result
}
println(String.format("%-10s", result3))

val result4 = str.apply {
    print(String.format(format, "apply", "N/A", this, result))
    result
}
println(String.format("%-10s", result4))
실행결과
Method    Argument  Receiver  Return    Result
===============================================
let       context   lexical   RESULT    RESULT
also      context   lexical   RESULT    context
run       N/A       context   RESULT    RESULT
apply     N/A       context   RESULT    context
let() 함수는 자신이 호출된 context를 람다 표현식으로 전달한다. 람다의 this, 즉 receiver의 scope는 lexical 하다.
also() 함수도 자신이 호출된 context를 람다 표현식으로 전달한다. receiver의 scope또한 lexical하지만 람다식의 결과를 무시하고 객체의 context를 결과로 반환한다. 이는 also()의 리턴 타입이 Unit이기 때문이다.
run() 함수는 인자를 넘겨주지 않고 receiver의 context가 리턴된다.
apply()는 run()과 동일하나 context가 리턴된다는 차이점이 있다.
요약하자면,
- 위 4개의 메소드는 인자로 넘어가는 람다를 실행한다.
- let()과 run()은 람다의 결과를 caller에 반환한다.
- also()와 apply()는 람다의 결과를 무시하고 객체의 context를 반환한다
- run()과 apply()는 호출한 context에서 람다를 실행한다.
From a verbose and noisy code
Mailer 라는 클래스를 정의해 실습해보자
class Mailer {
    val details = StringBuilder()
    fun from(addr: String) = details.append("from $addr...\n")
    fun to(addr: String) = details.append("to $addr...\n")
    fun subject(line: String) = details.append("subject $line...\n")
    fun body(message: String) = details.append("body $message...\n")
    fun send() = "...sending...\n$details"
}
각 메소드를 실행시켜보자
val mailer = Mailer()
mailer.from("builder@agiledeveloper.com")
mailer.to("venkats@agiledeveloper.com")
mailer.subject("Your code sucks")
mailer.body("...details...")
val result = mailer.send()
println(result)
실행결과
...sending...
from builder@agiledeveloper.com...
to venkats@agiledeveloper.com...
subject Your code sucks...
body ...details......
Removing repetitive references with apply()
apply()를 사용해 더 간결하게 작성할 수 있다. 호출하는 부분의 람다를 실행하고 context 객체를 caller에게 반환한다. 아래처럼 메소드 chaining이 가능하다. 2개의 방식으로 작성할 수 있다.
val mailer =
    Mailer()
        .apply { from("builder@agiledeveloper.com") }
        .apply { to("venkats@agiledeveloper.com") }
        .apply { subject("Your code sucks") }
        .apply { body("details") }

val result = mailer.send()

val mailer = Mailer().apply {
    from("builder@agiledeveloper.com")
    to("venkats@agiledeveloper.com")
    subject("Your code sucks")
    body("details")
}

val result = mailer.send()
println(result)
Getting results using run()
run()은 apply()와는 다르게 람다의 결과를 반환한다. target object의 context로써 람다식을 실행한다. 람다 내부에서 마지막 표현식의 결과를 가지고 싶을때 사용해준다.
val result = Mailer().run {
    from("builder@agiledeveloper.com")
    to("venkats@agiledeveloper.com")
    subject("Your code sucks")
    body("details")
    send()
}

println(result)
Passing an object as argument using let
인스턴스를 다른 메소드에 인자로 전달할때 사용한다.
fun createMailer() = Mailer()

fun prepareAndSend(mailer: Mailer) = mailer.run {
    from("builder@agiledeveloper.com")
    to("venkats@agiledeveloper.com")
    subject("Your code suks")
    body("details")
    send()
  }
Chaining void functions using also
Unit 객체를 return 해주는 void 메소드를 체이닝하는 경우 사용해준다.
fun prepareMailer(mailer: Mailer):Unit {
  mailer.run {
    from("builder@agiledeveloper.com")
    to("venkats@agiledeveloper.com")
    subject("Your code suks")
    body("details")
  }
}

fun sendMail(mailer: Mailer): Unit {
  mailer.send()
  println("Mail sent")
}
Implicit Receivers
var length = 100

val printIt: (Int) -> Unit = { n: Int ->
  println("n is $n, length is $length")
}

printIt(6) //n is 6, length is 100
위 예시에서 printIt는 정수형을 인자로 받는 람다식이고 Unit을 리턴하는 void 메소드이다. 람다 내부에서는 length 프로퍼티를 출력한다. 여기서 length는 lexcial scoping 원칙에 따라 람다 외부에 있는 var length = 100를 가르킨다.
다른 예시를 보자
var length = 100

val printIt: String.(Int) -> Unit = { n: Int ->
  println("n is $n, length is $length")
}

printIt("Hello", 6) // n is 6, length is 5
"Hello".printIt(6) //멤버 함수인것처럼 실행 가능
// // n is 6, length is 5
여기서 위와 바뀐 점은 var printIt: String.(Int)이다. 이는 컨텍스트 내부에서 람다를 실행시키는 것을 의미한다. 따라서 위처럼 컨텍스트 내부의 length 프로퍼티가 적용된다.
Multiple scopes with receivers
fun top(func: String.() -> Unit) = "hello".func()

fun nested(func: Int.() -> Unit) = (-2).func()

top {
  println("In outer lambda $this and $length")

  nested {
    println("in inner lambda $this and ${toDouble()}")
    println("from inner through receiver of outer: ${length}")
    println("from inner to outer receiver ${this@top}")
  }
}
실행결과
In outer lambda hello and 5
in inner lambda -2 and -2.0
from inner through receiver of outer: 5
from inner to outer receiver hello