기능 개발에 앞서 -
폴더 구조
DOMAIN
ㄴ service.py --> 비즈니스 로직이 작성되는 스크립트
ㄴ controller.py --> 엔드포인트들이 작성되는 스크립트
ㄴ utils.py --> 비즈니스 로직에서 사용되는 함수들이 작성되는 스크립트
ㄴ schema.py --> 입출력 형태를 검증하는 class들이 작성되는 스크립트
위의 형태로 각 도메인들을 채워나갈 것이다.
FastAPI 간단 설명
from fastapi import FastAPI
from pydantic import BaseModel

class ItemsReturn(BaseModel):
	start: int
    limit: int

class AddItem(BaseModel):
	name: str
    price: int

# FastAPI 앱 설정
app = FastAPI()

# app에 'get' 메소드로 http://{host}:{port}/hello에 접근하겠다.
@app.get("/hello")
async def print_hello():
    return {"message": "Hello, World!"}

# app에 'get' 메소드로 http://{host}:{port}/{id}에 접근하겠다.
@app.get("/{id}")
async def print_id(id: int):
	return {"id": id}

# app에 'post' 메소드로 http://{host}:{port}/items에 접근하겠다.
# 반환되는 상태 코드를 201로 하겠다.
@app.post("/items",status_code=201)
# 받아오는 Body 형태를 AddItem에 맞추겠다.
async def add_item(item: AddItem):
	return {"name": item.name, "price": item.price}

# app에 'get' 메소드로
# http://{host}:{port}/items/?start={start}&limit={limit}에 접근하겠다.
# 반환 형태를 ItemsReturn에 맞추겠다.
# 반환되는 상태 코드를 200으로 하겠다.
@app.get("/items/", response_model=ItemsReturn, status_code=200)
async def print_item(start: int, limit: int):
	return {"start": start, "limit": limit}
이를 main.py로 저장하고
콘솔창에서 아래 구문을 실행시켜보자.
uvicorn main:app --host 0.0.0.0정상적으로 작성했다면, FastAPI 서버가 실행되었을 것이다.
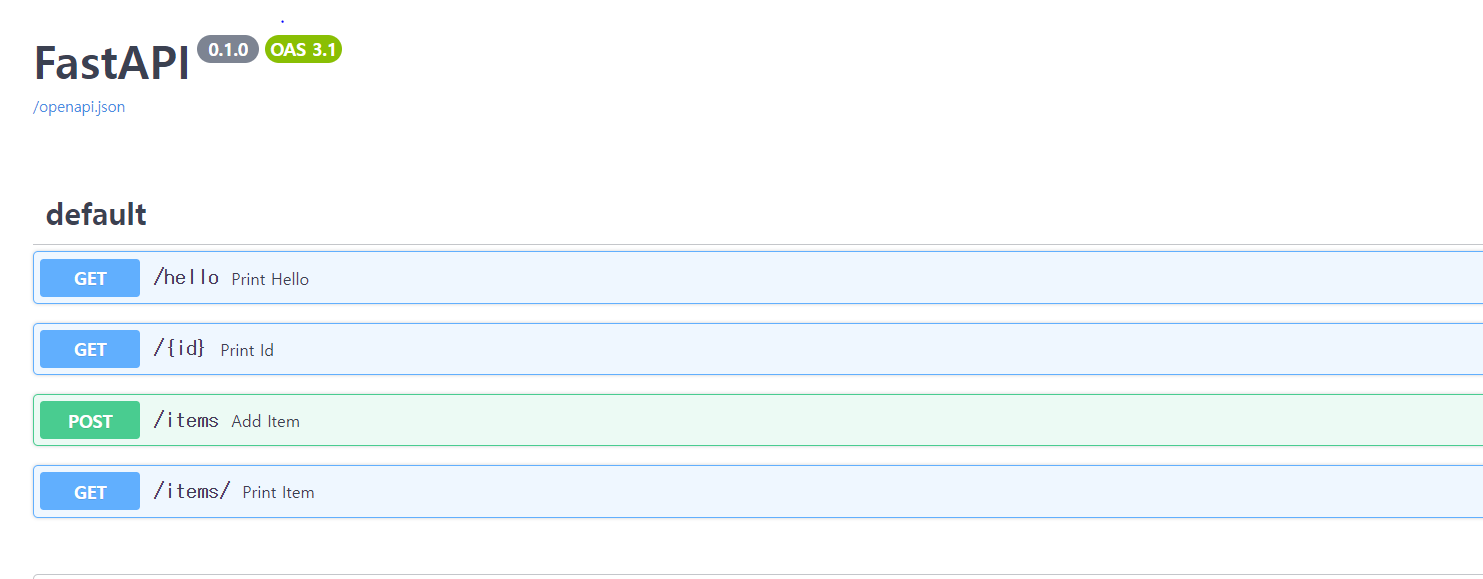
http://localhost:8000/docs 로 들어가면 자동으로 Swagger UI가 생성되어있는 것을 볼 수 있다.
우리 프로젝트에서는?
API
ㄴ __init__.py
ㄴ v1
	ㄴ __init__.py
이 __init__.py에다가 APIRouter로 router를 만들어 main에서 선언한 app에 추가하는 방식으로 엔드포인트를 선언하여 유지보수를 더 쉽게 할 수 있다.
api/__init__.py
from fastapi import APIRouter

from . import v1

router = APIRouter()
router.include_router(v1.router, prefix="/v1")v1/__init__.py
from fastapi import APIRouter

from .user import controller as user

router = APIRouter()

router.include_router(user.router, prefix="/users", tags=["User"])
prefix --> router에 포함되어 있는 엔드포인트 앞에 붙여줄 전치사
tags --> Swagger에서 tag 아래로 정렬해준다
회원가입 및 로그인
왜 회원가입이..?
경상도 사투리를 번역해서 보여주는 웹사이트에 회원가입 및 로그인 기능이 반드시! 필요하냐라고 물어보면 자신있게 예쓰라고 대답하긴 힘들지만, 추가하고자 하는 기능 중에 하나(
아직 구현하지 않았다)가 사용자의 피드백을 통해서 추가 학습까지 가능한 파이프라인을 구축하는 것이기 때문에 익명으로 받아오는 정보를 사용하기보다는 회원가입으로 추적 가능한 데이터를 사용하는게 더 나을 것 같아서 구현해보았다.
Database Table 생성
APP/
ㄴ models.py --> 작업할 공간
models.py
# 이전 상태에서 추가로 import 해줘야 할 라이브러리들.
from sqlalchemy import String, Boolean
from sqlalchemy.orm import relationship

class User(BaseMin, Base):
    __tablename__ = "user"

    email = Column(String(30), nullable=False, unique=True)
    password = Column(String(255), nullable=False)
    is_provider = Column(Boolean, default=True)
    items = relationship("TsItem", back_populates="owner")
    guestbooks = relationship("GuestBook", back_populates="book_owner")

    def as_dict(self):
        return {column.name: getattr(self, column.name) for column in self.__table__.columns}
User 테이블은 BaseMin도 상속받았기 때문에, id, created_at, updated_at은 자동으로 생성된다.
nullable=False --> 반드시 존재해야 하는 값
unique=True --> 테이블에서 하나만 존재해 하는 값
default=True --> 별도로 지정해주지 않았을 때 기본으로 저장되는 값
- email: 로그인 및 회원가입 시 식별하기 위한 이메일
- password: 해쉬화되어 DB에 저장된다
- is_provider: 위에서 언급한 파이프라인 구축을 위한 피드백 제공 여부
- items: 후에 작성할 TsItem에 대해서 일대다 관계를 형성한다.
- guestbooks: 후에 작성할 guestbooks에 대해서 일대다 관계를 형성한다.
- as_dict -> models.User 객체를 딕셔너리 형태로 반환하는 함수
기능
APP/
ㄴ API/
  ㄴ USER/ --> 작업할 공간
	ㄴ service.py
    ㄴ controller.py
    ㄴ utils.py
    ㄴ schema.py
controller.py
from fastapi import APIRouter, status, Depends
from sqlalchemy.orm.session import Session

from app.database import get_db
from .schema import UserAdd, UserAddReturn, DuplicatedEmail
from .service import userAdd, userLogin, emailDuplicated

router = APIRouter()

# 회원가입
@router.post("/register", response_model=UserAddReturn, status_code=status.HTTP_201_CREATED)
async def add_user(data: UserAdd, db: Session = Depends(get_db)):
    return await userAdd(data, db)

# 로그인
@router.post("/login")
async def issue_token(data: UserAdd, db: Session = Depends(get_db)):
    return await userLogin(data, db)

# 이메일 중복 여부 확인
@router.get("/duplicated", status_code=status.HTTP_200_OK)
async def is_duplicated(data: DuplicatedEmail = Depends(), db: Session = Depends(get_db)):
    return await emailDuplicated(data, db)
Depends()
엔드포인트에서 매개변수로 Depends로 함수를 전달해주면,
FastAPI가 자동으로 함수를 실행시켜 엔드포인트에 전달해준다.
database.py의 get_db를 살펴보도록 하자.
def get_db():
    db = SessionLocal()
    try:
        yield db
    finally:
        db.close()
database.py의 윗줄에서 생성한 SessionLocal의 인스턴스를 생성해서 넘겨준다. 우리는 이 세션을 통해서 MySQL과 통신할 것이다!
1. 회원가입
### 회원가입 ###
@router.post("/register", response_model=UserAddReturn, status_code=status.HTTP_201_CREATED)
async def add_user(data: UserAdd, db: Session = Depends(get_db):
return await userAdd(data, db)- UserAdd 형태에 맞게 Body를 받는다.
- userAdd 함수에서 반환된 값을 UserAddReturn 형태에 맞추어 반환한다.
- 문제없이 작동했다면 반환할 때 201 상태 코드를 반환한다.
2. 로그인
@router.post("/login")
async def issue_token(data: UserAdd, db: Session = Depends(get_db)):
return await userLogin(data, db)- UserAdd 형태에 맞게 Body를 받는다.
- userLogin에서 반환된 값을 반환한다.
- 문제없이 작동했다면 반환할 때 200 상태 코드를 반환한다.
3. 닉네임 중복 확인
@router.get("/duplicated", status_code=status.HTTP_200_OK)
async def is_duplicated(data: DuplicatedEmail = Depends(), db: Session = Depends(get_db)):
return await emailDuplicated(data, db)- DuplicatedEmail 형태에 맞게 Query 파라미터를 받는다.
( Pydantic Class를 Depends로 받으면 Query 파라미터로 받을 수 있다.) - emailDuplicated에서 반환된 값을 반환한다.
- 문제없이 작동했다면 반환할 때 200 상태 코드를 반환한다.
service.py
pip install bcryptimport bcrypt
from fastapi.responses import JSONResponse
from .utils import (
add_user,
find_user_by_email,
create_access_token,
is_password_correct,
is_duplicated,
)
async def userAdd(data, db):
    salt_value = bcrypt.gensalt()
    pw = bcrypt.hashpw(data.password.encode(), salt_value)

    row = await add_user(data.email, pw, db)

    return row.as_dict()
async def userLogin(data, db):
    user = await find_user_by_email(data.email, db)
    if await is_password_correct(data.password, user.password):
        token, user_id = await create_access_token(user)
        return JSONResponse(content={"user_id": user_id}, headers={"access_token": token})
async def emailDuplicated(data, db):
    return {"duplicated": await is_duplicated(data.email, db)}
1. 회원가입
async def userAdd(data, db):
salt_value = bcrypt.gensalt()
pw = bcrypt.hashpw(data.password.encode(), salt_value)
row = await add_user(data.email, pw, db)
return row.as_dict()- bcrypt 라이브러리를 활용해 솔트값을 생성한다.
- body에 담겨온 password를 솔트값으로 해쉬화한다.
- add_user 함수로 email, 해쉬화된 비밀번호를 DB에 저장한다.
- 반환된 models.User 객체를 딕셔너리로 바꾸어 반환한다.
2. 로그인
async def userLogin(data, db):
user = await find_user_by_email(data.email, db)
if await is_password_correct(data.password, user.password):
token, user_id = await create_access_token(user)
return JSONResponse(content={"user_id": user_id}, headers={"access_token": token})
find_user_by_email함수에서 body에 담겨온 email로 models.User 객체를 반환한다.is_password_correct함수로 비밀번호가 일치하는지 확인한다.create_access_token함수로 JWT 토큰과 user_id를 반환한다.- 토큰은 Header에 user_id는 콘텐트에 담아 반환한다.
JWT 토큰에 관련된 설명은 https://velog.io/@chuu1019/%EC%95%8C%EA%B3%A0-%EC%93%B0%EC%9E%90-JWTJson-Web-Token 이곳에 잘 되어 있으니 확인해보길 바란다.
3. 닉네임 중복 확인
async def emailDuplicated(data, db):
return {"duplicated": await is_duplicated(data.email, db)}is_duplicated함수에서 body에 담겨온 email로 중복 여부를 판단해 boolean값을 딕셔너리에 담아 반환한다.
utils.py
import bcrypt

from datetime import datetime, timedelta
from fastapi import HTTPException, status
from jose import jwt

from app.config import settings
from app.models import User
from .schema import UserPayload


async def add_user(email, pw, db):
    try:
        row = User(**{"email": email, "password": pw})
        db.add(row)
        db.commit()

        return row
    except Exception as e:
        raise HTTPException(
            status_code=status.HTTP_422_UNPROCESSABLE_ENTITY,
            detail=f"{e} occured while registering",
        )


async def find_user_by_email(email, db):
    row = db.query(User).filter_by(email=email).first()
    if row:
        return row
    else:
        raise HTTPException(
            status_code=status.HTTP_403_FORBIDDEN,
            detail="No Email Found",
        )


async def is_password_correct(data, user):
    if bcrypt.checkpw(data.encode(), user.encode()):
        return True
    else:
        raise HTTPException(
            status_code=status.HTTP_403_FORBIDDEN,
            detail="Incorrect Password",
        )


async def create_access_token(user):
    user_schema = user.as_dict()
    expire = datetime.utcnow() + timedelta(days=1)
    user_info = UserPayload(**user_schema, exp=expire)

    return (
        jwt.encode(user_info.dict(), settings.SECRET_KEY, algorithm=settings.ALGORITHM),
        user_schema["id"],
    )


async def is_duplicated(email, db):
    if db.query(User).filter_by(email=email).first():
        return True
    else:
        return False
1. DB에 유저 추가
async def add_user(email, pw, db):
    try:
        row = User(**{"email": email, "password": pw})
        db.add(row)
        db.commit()

        return row
    except Exception as e:
        raise HTTPException(
            status_code=status.HTTP_422_UNPROCESSABLE_ENTITY,
            detail=f"{e} occured while registering",
)- email과 해쉬화된 비밀번호로 models.User 객체를 생성한다.
- DB의 User 테이블에 추가한다.
- Commit
async def find_user_by_email(email, db):
    row = db.query(User).filter_by(email=email).first()
    if row:
        return row
    else:
        raise HTTPException(
            status_code=status.HTTP_403_FORBIDDEN,
            detail="No Email Found",
)- email로 User 테이블에서 models.User 객체를 검색한다.
- 존재한다면 (row is not None) 객체 반환
- 존재하지 않다면 403 상태 코드를 즉시 반환한다.
2. 비밀번호 확인
async def is_password_correct(data, user):
    if bcrypt.checkpw(data.encode(), user.encode()):
        return True
    else:
        raise HTTPException(
            status_code=status.HTTP_403_FORBIDDEN,
            detail="Incorrect Password",
)- Body의 비밀번호와 models.User 객체의 비밀번호가 일치하는지 확인한다.
- 일치한다면 True 반환
- 일치하지 않다면 403 상태 코드를 즉시 반환한다.
3. JWT 토큰 생성
async def create_access_token(user):
    user_schema = user.as_dict()
    expire = datetime.utcnow() + timedelta(days=1)
    user_info = UserPayload(**user_schema, exp=expire)

    return (
        jwt.encode(user_info.dict(), settings.SECRET_KEY, algorithm=settings.ALGORITHM),
        user_schema["id"],
)- models.User 객체를 딕셔너리화 한다.
- 토큰의 만료기간을 정의한다.
- 위 두 개를 합쳐 토큰화 할 정보를 생성한다.
- .env 파일에 정의된 SECRET_KEY와 ALGORITHM으로 토큰을 생성한 뒤 user_id와 함께 반환한다.
지난번 .env 파일에는 SECRET_KEY와 ALGORITHM이 정의되어 있지 않으므로 추가해줘야 할 것이다.
4. 닉네임 중복 확인
async def is_duplicated(email, db):
    if db.query(User).filter_by(email=email).first():
        return True
    else:
return False- Query 파라미터로 받아온 email을 가진 models.User 객체가 존재한다면 True 반환
- 그렇지 않다면 False 반환
schema.py
from datetime import datetime
from pydantic import BaseModel


class DuplicatedEmail(BaseModel):
    email: str


class UserAdd(DuplicatedEmail):
    password: str


class UserAddReturn(DuplicatedEmail):
    id: int


class UserPayload(UserAddReturn):
    exp: datetime

위의 내용들을 잘 따라왔다면 사진처럼 Swagger에서 확인이 될 것이다.
필자는 리팩토링을 거치고 난 뒤의 모습이라 UserV2 태그의 v2로 보이지만, 게시글들을 잘 따라왔다면 User 태그의 /v1 prefix로 보일 것이다.
테스트 코드는 API들을 작성한 뒤 마지막에 한 번에 쭉쭉 업로드하겠다.
