프로젝트 제작 배경
금융 시장에서 투자자들은 뉴스와 같은 텍스트 데이터를 기반으로 의사 결정을 내린다. 텍스트 데이터를 활용하여 시장 심리를 분석하고 긍정 또는 부정의 감정으로 분류하여 투자 전략을 수립하는 역할을 할 수 있다.
데이터 수집: 캐글
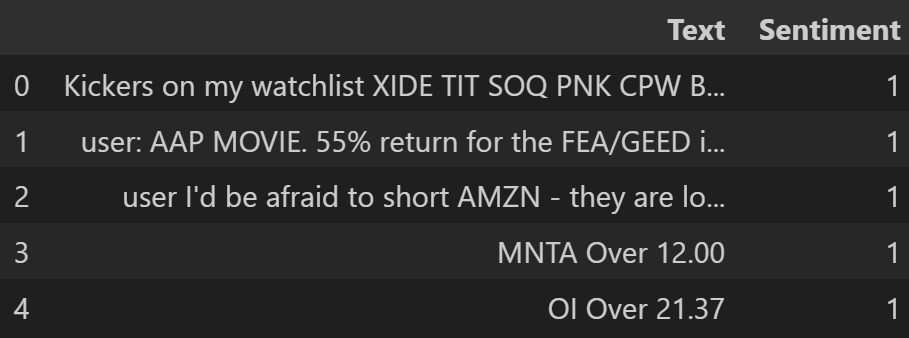
데이터셋 구성
Text: 분류할 텍스트
Sengiment: 감정 1:긍정(상승), -1:부정(하락)
필요 라이프러리 로드
import tensorflow as tf
from tensorflow.keras.preprocessing.text import Tokenizer
from tensorflow.keras.preprocessing.sequence import pad_sequences
from tensorflow.keras.models import Sequential
from tensorflow.keras.layers import Embedding, LSTM, Dense, Dropout, Bidirectional, GRU, BatchNormalization
from sklearn.model_selection import train_test_split
from sklearn.preprocessing import LabelEncoder
import pandas as pd
import re
from nltk.corpus import stopwords
from nltk.tokenize import word_tokenize
import nltk
import random
import numpy as np
from tensorflow.keras.regularizers import l2
from tensorflow.keras.callbacks import EarlyStopping
from tensorflow.keras.optimizers import Adam
import matplotlib.pyplot as plt
시드 설정
def set_seed(seed=114):
    random.seed(seed)
    np.random.seed(seed)
    tf.random.set_seed(seed)

set_seed(114)
nltk 라이브러리의 필요 패키지 다운로드
nltk.download('stopwords')
nltk.download('punkt')
nltk.download('punkt_tab')
불용어 리스트 설정(영어)
stop_words = set(stopwords.words('english'))텍스트 전처리
텍스트 전처리 함수
def preprocess_text(text):
    # 소문자로 변환
    text = text.lower()
    # 특수 문자 제거
    text = re.sub(r'[^a-zA-Z\s]', '', text)
    # 불용어 제거
    words = word_tokenize(text)
    words = [word for word in words if word not in stop_words]
    # 하나의 문자열로 결합
    return ' '.join(words)
데이터 로드, 텍스트 전처리 함수 적용
data = pd.read_csv('stock_data.csv')

texts = data.Text.astype(str).apply(preprocess_text).values
sentiments = data.Sentiment.values
레이블 인코딩
label_encoder = LabelEncoder() # LabelEncoder 객체 생성
labels = label_encoder.fit_transform(sentiments) # 데이터의 sentiment를 정수형 레이블로 변환 -1, 1 -> 0, 1
데이터셋 분리
X_train, X_temp, y_train, y_temp = train_test_split(texts, labels, test_size=0.4, random_state=24)
X_val, X_test, y_val, y_test = train_test_split(X_temp, y_temp, test_size=0.5, random_state=24)
텍스트 데이터 -> 시퀀스로 변환
tokenizer = Tokenizer() # Tokenizer 객체 생성
tokenizer.fit_on_texts(X_train) # 학습 데이터의 텍스트를 기준으로 Tokenizer 단어 사전 생성
텍스트 -> 정수 시퀀스로 변환
X_train_seq = tokenizer.texts_to_sequences(X_train) # 학습 데이터
X_val_seq = tokenizer.texts_to_sequences(X_val) # 검증 데이터
X_test_seq = tokenizer.texts_to_sequences(X_test) # 테스트 데이터
학습을 위해 시퀀스 길이를 동일하게 패딩
max_length = max(len(seq) for seq in X_train_seq) # 학습 데이터의 최대 시퀀스
X_train_padded = pad_sequences(X_train_seq, maxlen=max_length, padding='post')
X_val_padded = pad_sequences(X_val_seq, maxlen=max_length, padding='post')
X_test_padded = pad_sequences(X_test_seq, maxlen=max_length, padding='post')
모델 설계
model = Sequential([
    Embedding(input_dim=len(tokenizer.word_index) + 1, output_dim=128, input_length=max_length), # 임베딩 층
    Bidirectional(LSTM(16, return_sequences=False)), # 양방향 LSTM 층
    BatchNormalization(), # 배치 정규화
    Dropout(0.3), # 드롭아웃으로 과적합 방지
    Dense(16, activation='relu', kernel_regularizer=l2(0.01)), # L2 정규화가 적용된 fully connected layer
    BatchNormalization(), # 배치 정규화
    Dropout(0.3), # 드롭아웃 추가
    Dense(1, activation='sigmoid') # 출력층(이진 분류를 위한 sigmoid 활성화 함수 사용)
])
옵티마이저 설정
optimizer = Adam(learning_rate=0.0005) # Adam 최적화 알고리즘 사용(학습률: 0.0005)모델 구조
print(model.summary())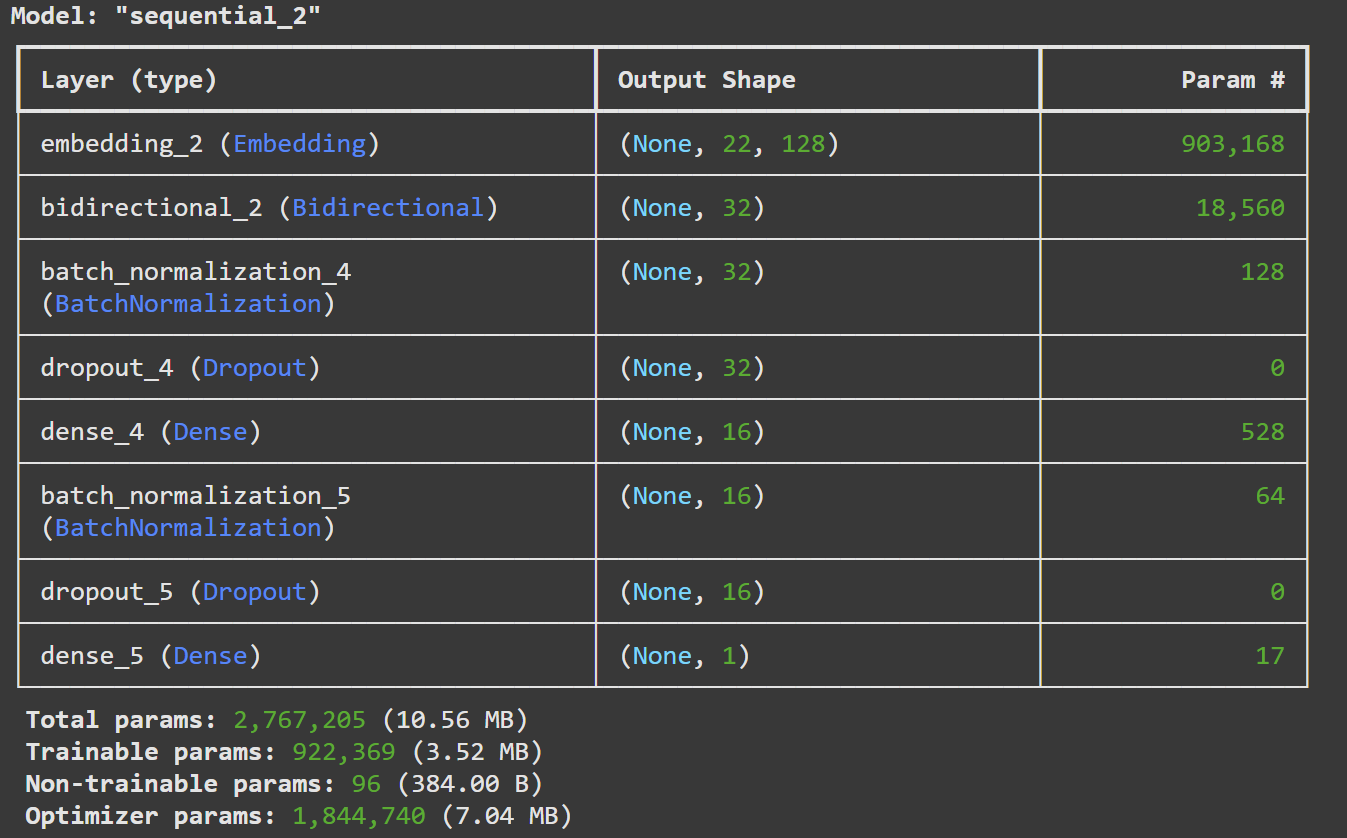
모델 컴파일
손실함수: binary crossentropy loss, 평가지표: accuracy
model.compile(optimizer=optimizer, loss='binary_crossentropy', metrics=['accuracy'])조기 종료 설정
검증 손실이 3번 연속으로 감소하지 않으면 학습 중단, 최적의 가중치를 복원한다
early_stopping = EarlyStopping(monitor='val_loss', patience=3, restore_best_weights=True)모델 학습
# 모델 학습
history = model.fit(
    # 학습 데이터
    X_train_padded, y_train,
    # 검증 데이터
    validation_data=(X_val_padded, y_val),
    # 최대 20번의 에포크 동안 학습
    epochs=20,
    # 배치 크기 32
    batch_size=32,
    # 조기 종룍 콜백
    callbacks=[early_stopping]
)
모델 평가
loss, accuracy = model.evaluate(X_test_padded, y_test)
print(f"테스트 데이터 정확도: {accuracy:.1f}")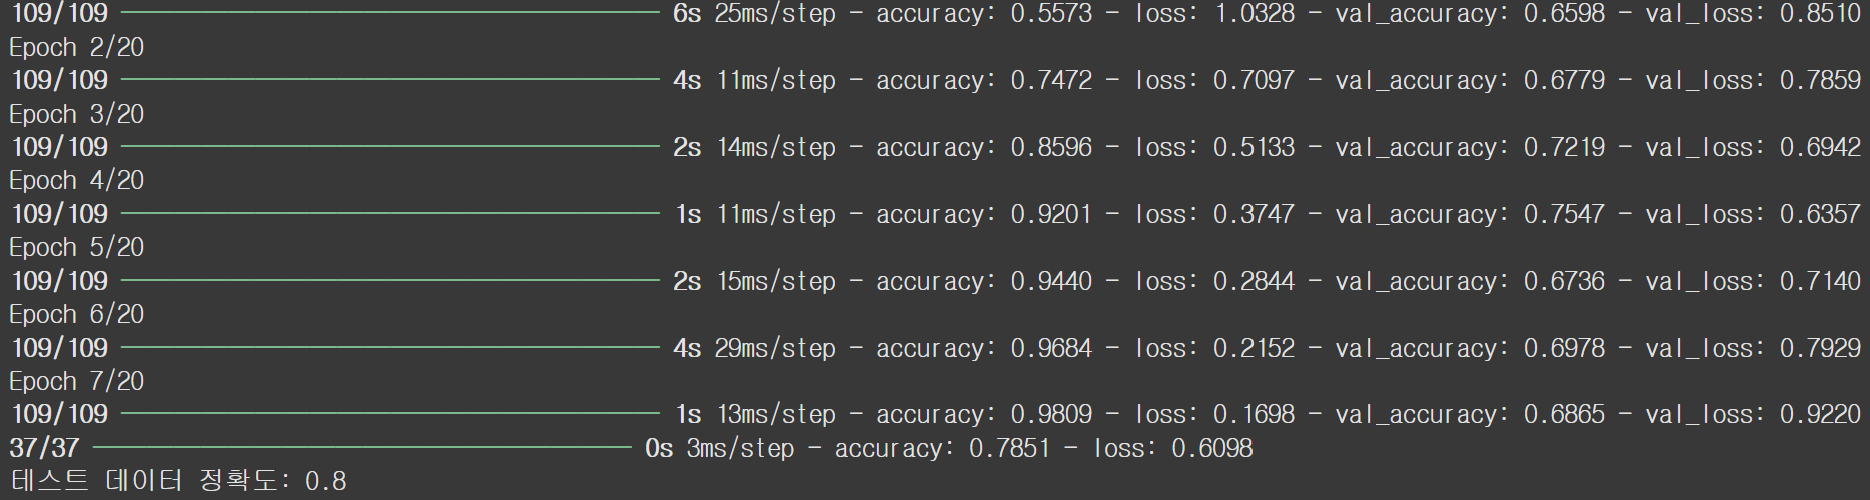
모델 학습 중 loss, accuracy의 변화
# 훈련과 검증 데이터의 loss 시각화
plt.figure(figsize=(12, 6))

# Loss 그래프
plt.subplot(1, 2, 1)
plt.plot(history.history['loss'], label='Training Loss')
plt.plot(history.history['val_loss'], label='Validation Loss')
plt.xlabel('Epochs')
plt.ylabel('Loss')
plt.title('Training and Validation Loss')
plt.legend()

# Accuracy 그래프
plt.subplot(1, 2, 2)
plt.plot(history.history['accuracy'], label='Training Accuracy')
plt.plot(history.history['val_accuracy'], label='Validation Accuracy')
plt.xlabel('Epochs')
plt.ylabel('Accuracy')
plt.title('Training and Validation Accuracy')
plt.legend()
plt.tight_layout()
plt.show()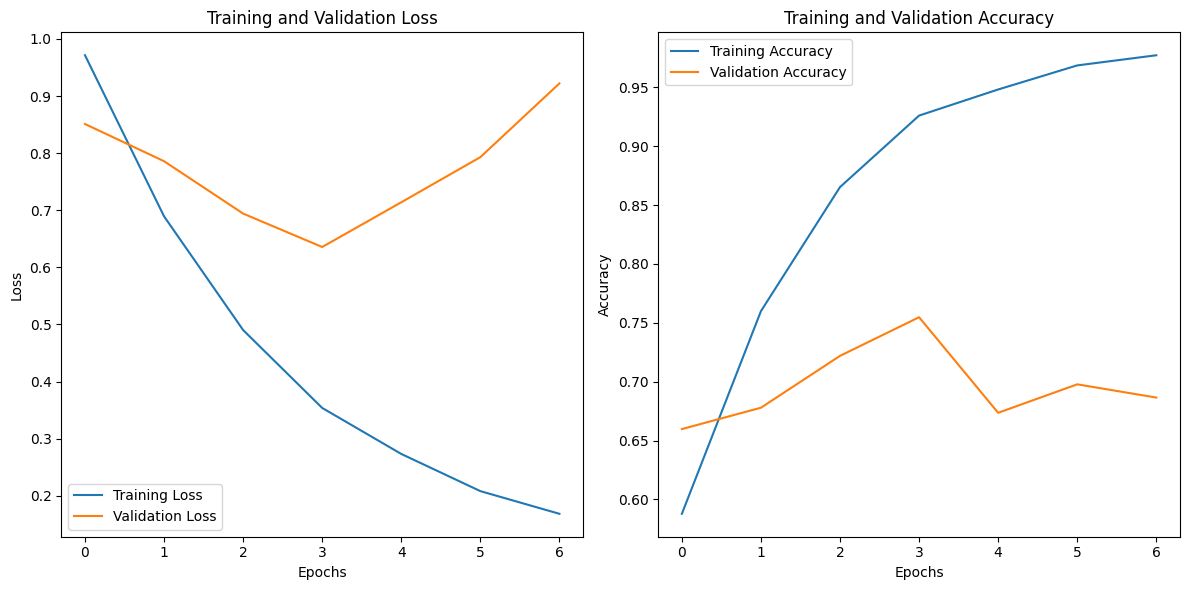
예측
새로운 텍스트를 예측하기 위한 함수
def predict_sentiment(text, tokenizer, model, label_encoder, max_length):
    # 입력 텍스트를 전처리
    processed_text = preprocess_text(text)
    # 전처리된 텍스트 -> 정수 시퀀스로 변환
    sequence = tokenizer.texts_to_sequences([processed_text])
    # max_length로 패딩
    padded_sequence = pad_sequences(sequence, maxlen=max_length, padding='post')
    # 모델로 예측
    prediction = model.predict(padded_sequence)
    # 예측 확률을 0.5를 기준으로 레이블 변환
    sentiment_label = (prediction > 0.5).astype(int).item()
    # 레이블이 1일 경우 긍정(상승), 0일 경우 부정(하락)으로 출력
    if sentiment_label == 1:
        sentiment = "긍정(상승)"
    else:
        sentiment = "부정(하락)"
    return sentiment
예측
# 예제 입력 텍스트
new_text = "Too early to short into this move. Stock Market needs a few days to settle down "

# 감정 예측
predicted_sentiment = predict_sentiment(new_text, tokenizer, model, label_encoder, max_length)
print(new_text)
print(f"감정 예측: {predicted_sentiment}")
예측
# 예제 입력 텍스트
new_text = "AMZN holding up well - next buy point when clears this upper trend line on heavy volume"

# 감정 예측
predicted_sentiment = predict_sentiment(new_text, tokenizer, model, label_encoder, max_length)
print(new_text)
print(f"감정 예측: {predicted_sentiment}")
한계점
- 사용된 데이터셋이 특정 도메인(주식 관련 텍스트)에 제한 되어 있어 일반화 성능이 떨어질 가능성이 있습니다.
- 과적합을 방지하기 위해 여러 기법들(규제, 드롭아웃, 배치정규화, 조기종료, 하이퍼파라미터 튜닝등)을 사용해 봤지만, 어느 정도의 과적합을 막을 수 없었습니다. 이런 원인을 데이터의 부족으로 결론을 내렸습니다 (총 데이터 5712개). 따라서 더 많은 데이터를 기반으로 정확한 성능을 확인할 수 있을 것 같습니다. 테스트셋의 성능은 0.8로 준수한 성능을 보였습니다. 더 많은 데이터셋이 있다면더 높은 성능을 보여줄 수 있을 것입니다.
