프로그래머스에서 진행중인 자율주행 데브코스 - Planning & Control : ROS 기초부터 정리를 시작한다.
강의에서는 Ubuntu 18.04 - ROS Melodic로 진행하였으나
필자는 WSL - Ubuntu 20.04 - ROS Noetic 환경에서 강의를 정리하고 다시 코드를 실행하려 한다.
1. 실습 패키지 작성
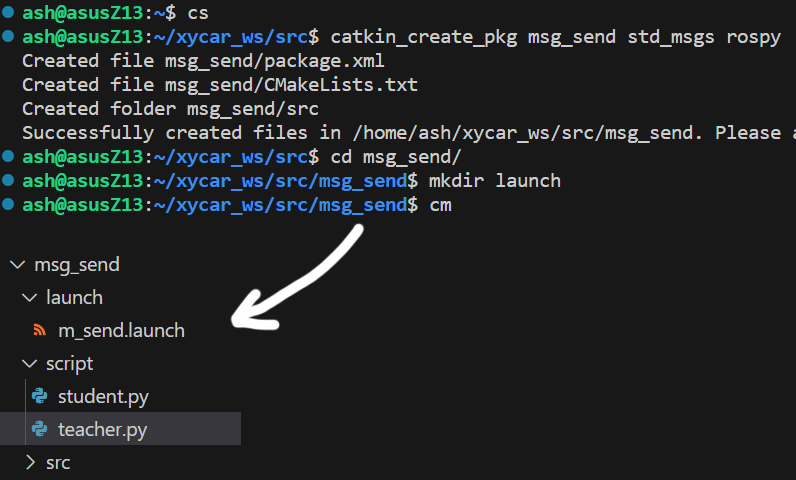
위 사진처럼 적당한 명령어 모음($ cs, $ cm, $ catkin_create_pkg ~)와 vscode IDE의 파일 및 폴더 생성 메뉴를 활용하여 'msg_send'라는 패키지가 std_msgs, rospy 의존성을 갖게 생성한다.
해당 패키지는 py코드를 담기 위한 폴더인 'script', py코드를 한번에 실행하기 위한 'launch'폴더를 포함한다.
2. 코드 작성 및 실행
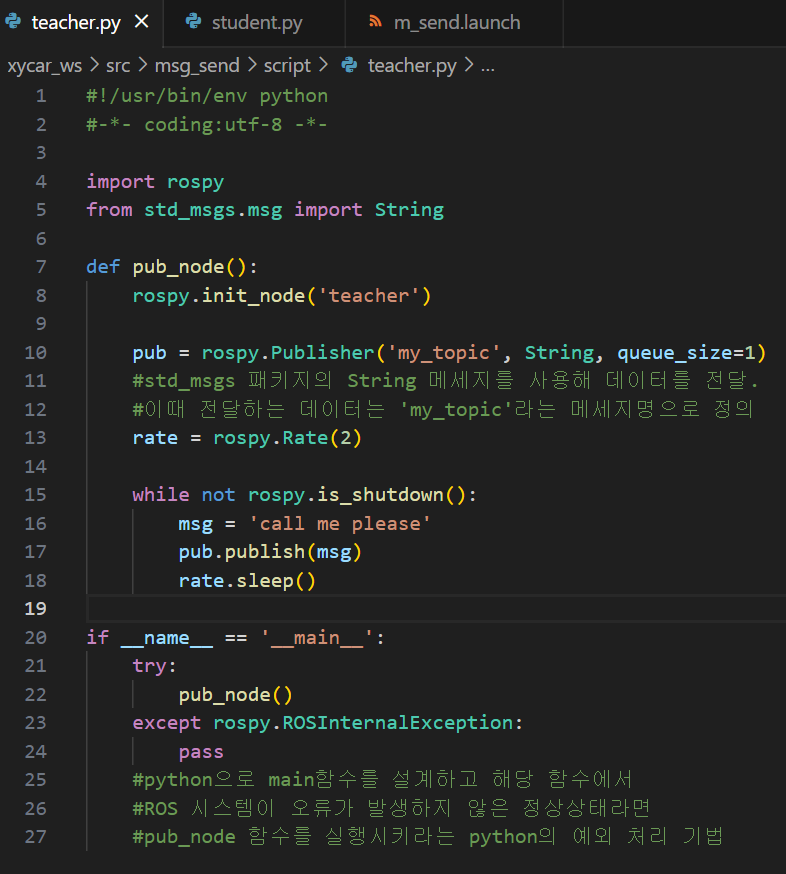
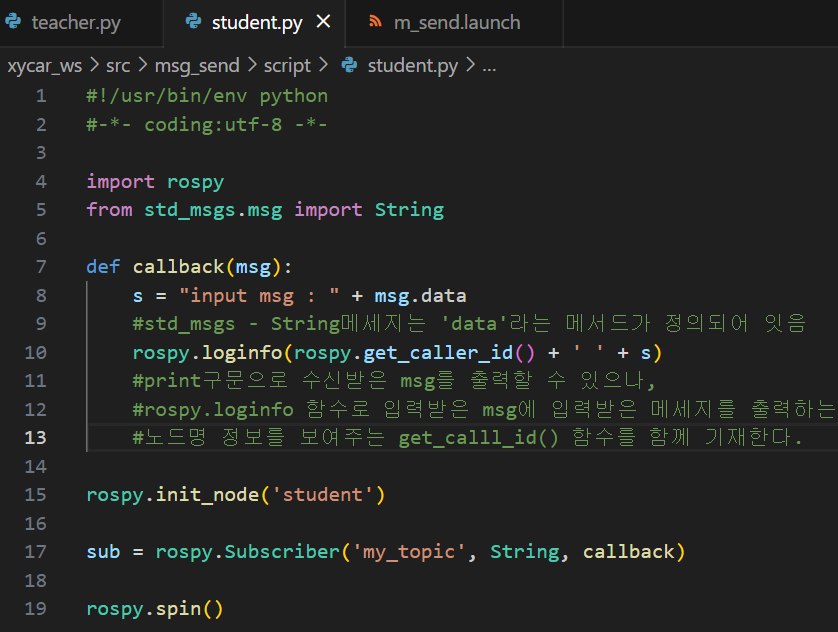
위 'msg_send' 패키지에서 작성한 teacher.py, student.py, m_send.launch 코드는 각각 아래와 같으며, 주석을 같이 첨부한다.
teacher.py
student.py
m_send.launch
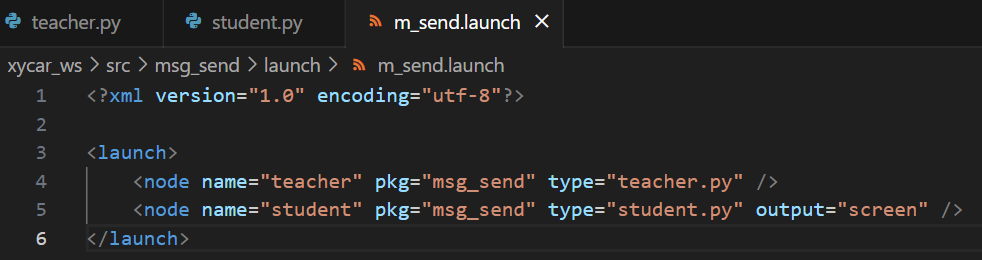
teacher.py#!/usr/bin/env python #-*- coding:utf-8 -*- import rospy from std_msgs.msg import String def pub_node(): rospy.init_node('teacher') pub = rospy.Publisher('my_topic', String, queue_size=1) rate = rospy.Rate(2) while not rospy.is_shutdown(): msg = 'call me please' pub.publish(msg) rate.sleep() if __name__ == '__main__': try: pub_node() except rospy.ROSInternalException: pass
student.py#!/usr/bin/env python #-*- coding:utf-8 -*- import rospy from std_msgs.msg import String def callback(msg): s = "input msg : " + msg.data rospy.loginfo(rospy.get_caller_id() + ' ' + s) rospy.init_node('student') sub = rospy.Subscriber('my_topic', String, callback) rospy.spin()
m_send.launch<?xml version="1.0" encoding="utf-8"?> <launch> <node name="teacher" pkg="msg_send" type="teacher.py" /> <node name="student" pkg="msg_send" type="student.py" output="screen" /> </launch>
작성한 코드에서 teacher.py 와 student.py는 std_msgs 패키지에 포함된 ROS 표준 메세지 String을 사용하며, 이 메세지의 규격은 아래와 같다.
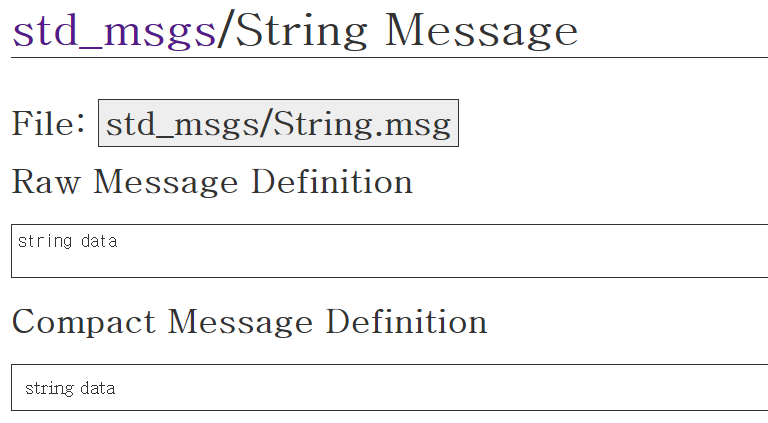
위 메세지를 살펴보면 String 데이터 타입으로 선언된 변수 data를 통해 메세지가 전송됨을 알 수 있으며,
student.py는 s = "input msg : " + msg.data 구문을 통하여 입력받은 메세지 내 data변수값을 s라는 변수로 입력하여 사용함을 알 수 있다.
작성한 teacher.py 와 student.py는 실행권한을 열어주는
$ chmod +x student.py teacher.py
명령을 통해 사전에 권한을 확장해 주고 아래 명령 실행을 통해 m_send 패키지 내 모든 노드를 실행할 수 있다
$ roslaunch msg_send m_send.launch
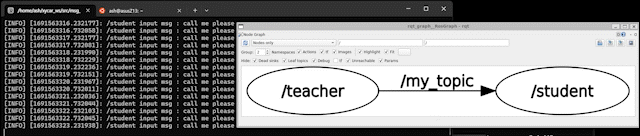
$ rqt_graph-> roslaunch후 실행되는 모든 노드 및 메세지에 대한 시각화
강의에서 이 이후에 수행하는 1:N, N:1, N:N 통신의 경우
단순하게 *.launch파일에서 node태그를 여러개 사용하는 경우기에 포스트에서는 생략한다.
3. 커스텀 메세지 작성 및 빌드
커스텀 메세지의 경우 ROS상에서 다양한 msg규격이 정의되어 있기에 궂이 별도의 메세지를 작성해서 사용할 필요는 거의 없긴 하나
강의 진도에 맞춰 간단히 작성한다.
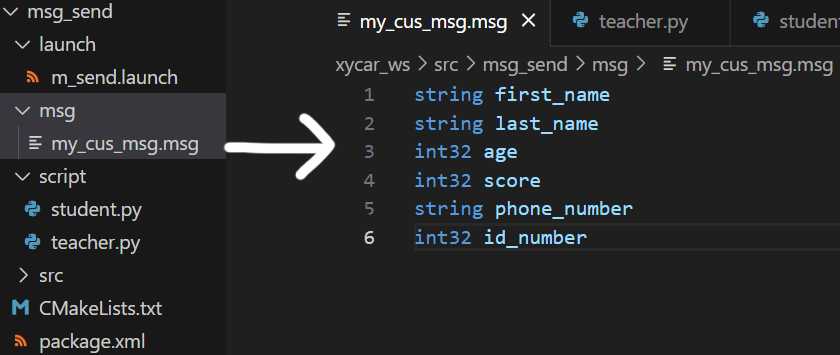
우선 커스텀 메세지인 my_cus_msg.msg라는 파일을 'msg_send'패키지 내 'msg'라는 폴더 내에 생성해준다.
다음으로 'msg_send'의 package.xml파일과 CMakeList.txt파일의 일부 코드를 수정한다.
package.xml 파일 수정
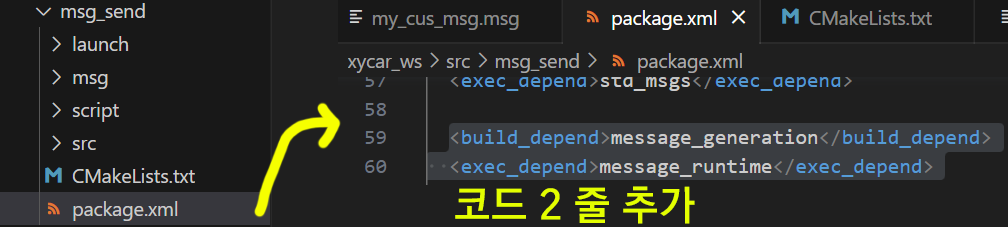
package.xml<build_depend>message_generation</build_depend> <exec_depend>message_runtime</exec_depend>
CMakeList.txt 파일 수정
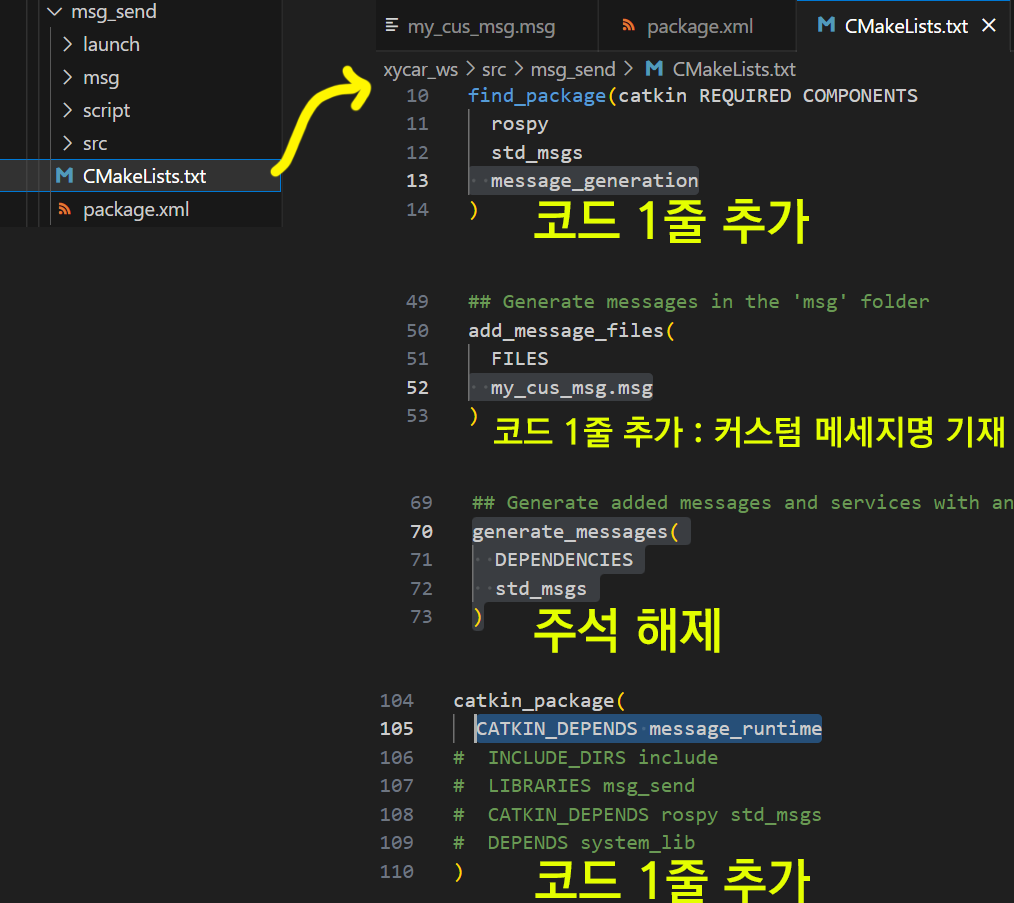
위 두 파일 코드 추가 및 수정 & 코멘트 제거(주석 해제)등을 수행한 뒤에는 아래 명령어를 통해 패키지 catkin_make 과정과 설계한 custom msg가 재대로 등록되었는지 확인한다.
$ cm
$ rosmsg show my_cus_msg
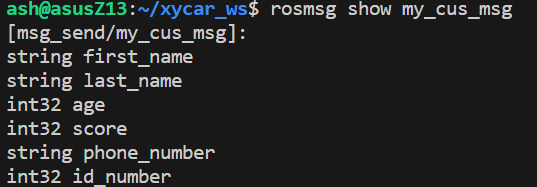
코드 작성 및 수정이 재대로 되었다면 위 사진처럼 설계한 msg가 재대로 등록되어 디스플레이됨을 확인할 수 있다.
4. 커스텀 메세지 실습
위 작성한 커스텀 메세지 my_cus_msg.msg을 사용하는 노드
my_cusmsg_sender.py, my_cusmsg_receiver.py 파일을 'msg_send' 패키지 내 'script'폴더에서 생성하며,
위 두 코드를 동시에 실행하기 위한 my_cusmsg_exam.launch런치 파일을 'launch'폴더에 생성한다.
폴더 구성 및 my_cusmsg_exam.launch
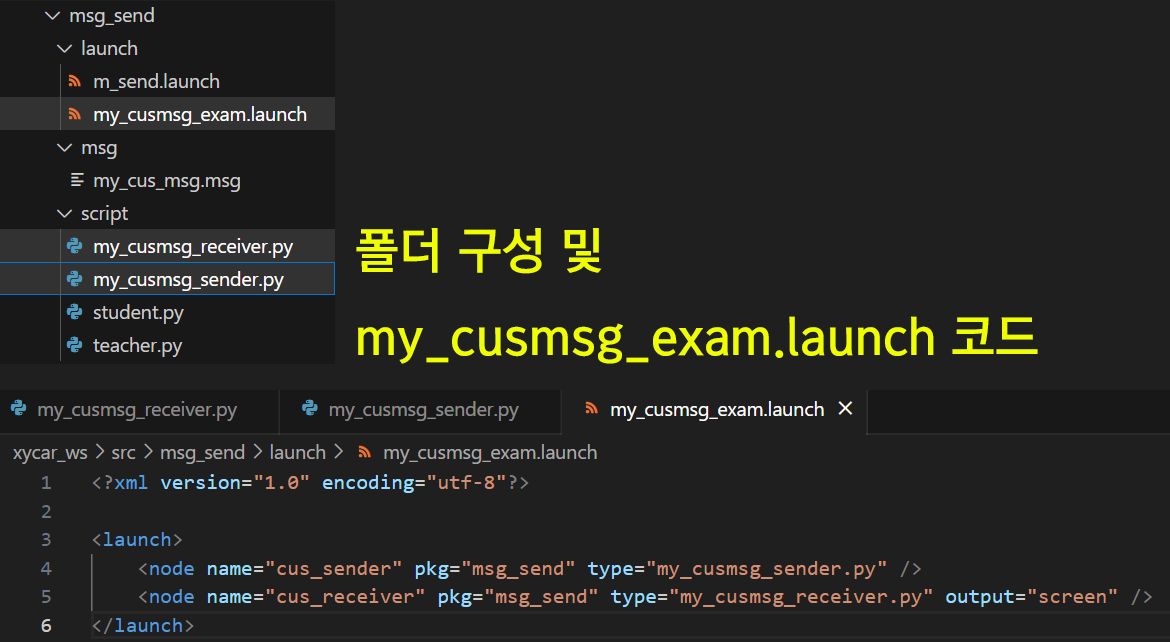
<?xml version="1.0" encoding="utf-8"?>

<launch>
    <node name="cus_sender" pkg="msg_send" type="my_cusmsg_sender.py" />
    <node name="cus_receiver" pkg="msg_send" type="my_cusmsg_receiver.py" output="screen" />
</launch>
my_cusmsg_sender.py
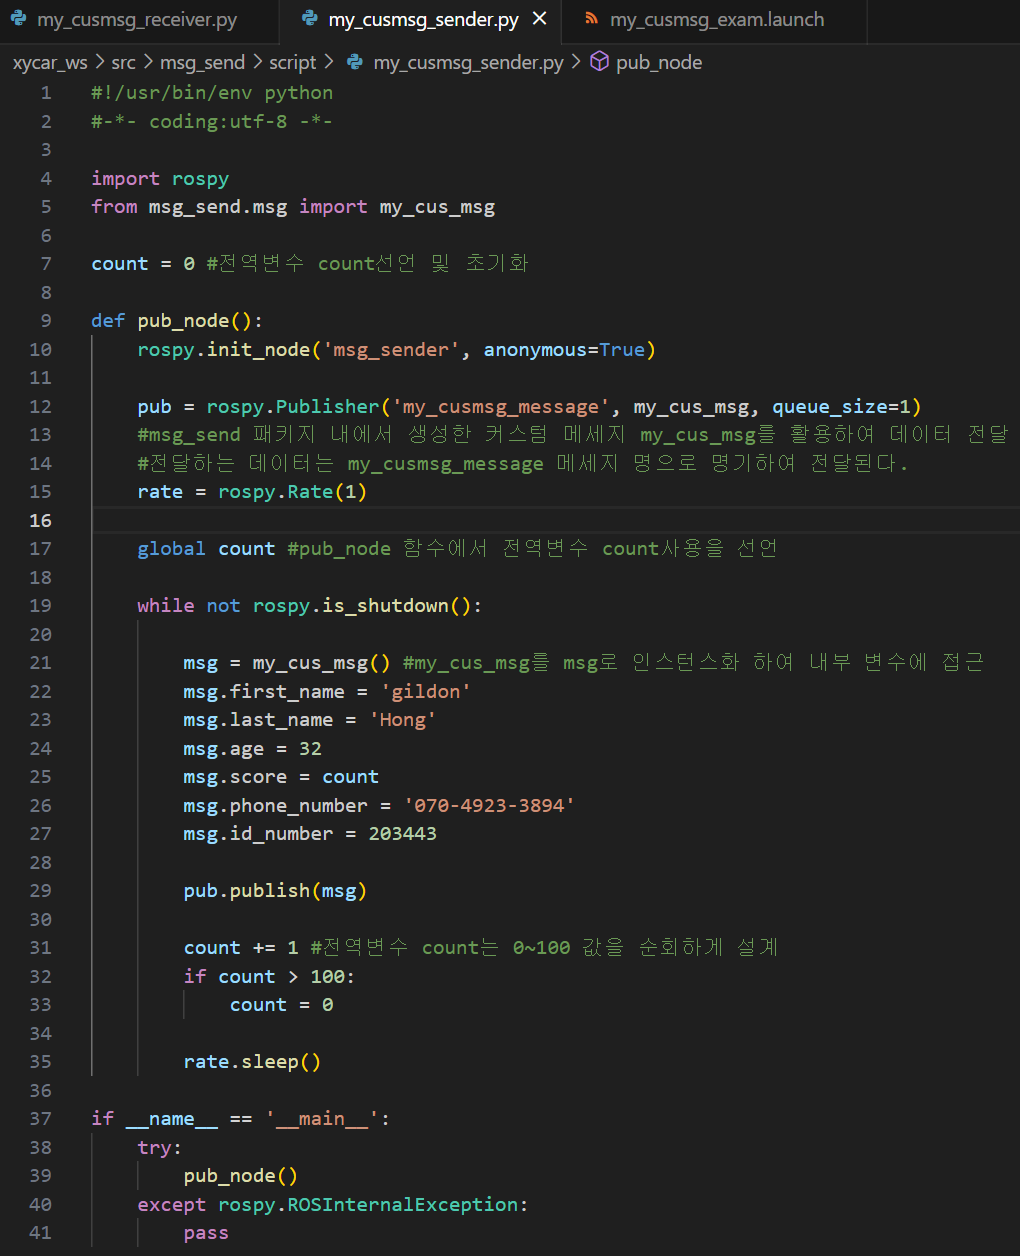
#!/usr/bin/env python
#-*- coding:utf-8 -*-

import rospy
from msg_send.msg import my_cus_msg

count = 0

def pub_node():
    rospy.init_node('msg_sender', anonymous=True)

    pub = rospy.Publisher('my_cusmsg_message', my_cus_msg, queue_size=1)
    rate = rospy.Rate(1)

    global count

    while not rospy.is_shutdown():

        msg = my_cus_msg()
        msg.first_name = 'gildon'
        msg.last_name = 'Hong'
        msg.age = 32
        msg.score = count
        msg.phone_number = '070-4923-3894'
        msg.id_number = 203443

        pub.publish(msg)

        count += 1
        if count > 100:
            count = 0

        rate.sleep()

if __name__ == '__main__':
    try:
        pub_node()
    except rospy.ROSInternalException:
        pass
my_cusmsg_receiver.py

#!/usr/bin/env python
#-*- coding:utf-8 -*-

import rospy
from msg_send.msg import my_cus_msg

def callback(msg):
    rev_msg_1 = msg.last_name + ' ' +msg.first_name
    rev_msg_2 = 'age : %d, score : %d' % (msg.age, msg.score)
    rev_msg_3 = 'phone : %s, id : %s' % (msg.phone_number, msg.id_number)

    rospy.loginfo(rospy.get_caller_id() + ' ' + rev_msg_1)
    rospy.loginfo(rev_msg_2)
    rospy.loginfo(rev_msg_3)

rospy.init_node('msg_receiver')
sub = rospy.Subscriber('my_cusmsg_message', my_cus_msg, callback)
rospy.spin()
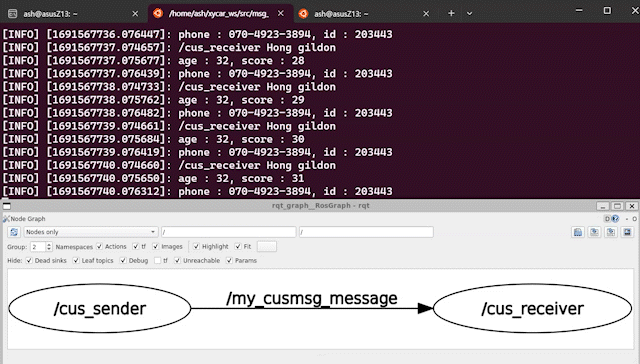
위 3개의 코드 작성 후 실행 화면은 아래와 같다.
그 다음 데브코스 강의에서 소개가 진행되는
노드와 노드 통신간 발생하는 timestamp 문제는
이 포스트에서는 다루지 않겠다.
노드간 통신에서 발생하는 여러가지 문제점은
솔직히 ROS2 환경에서 실습하는게 더 가치가 있다...

큰 도움이 되었습니다, 감사합니다.