
참고 사이트
QCheckBox와 QButtonGroup
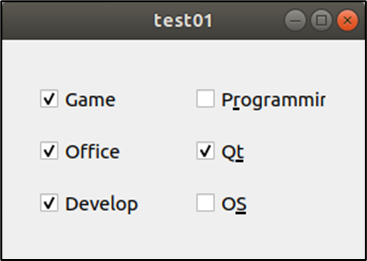
✅ 2개의 체크박스 그룹 중 1개는 다중 선택 가능, 나머지 1개는 오직 하나만 선택 가능하도록 구현
[main.cpp]

#include "widget.h"
#include <QApplication>

int main(int argc, char *argv[])
{
    QApplication a(argc, argv);
    Widget w;
    w.show();

    return a.exec();
}[widget.h]
#ifndef WIDGET_H
#define WIDGET_H
#include <QWidget>
#include <QButtonGroup>
#include <QCheckBox>
class Widget : public QWidget
{
Q_OBJECT
public:
Widget(QWidget *parent = 0);
~Widget();
private:
QButtonGroup *chk_group[2];
QCheckBox *exclusive[2], QCheckBox *non_exclusive[2];
};
#endif // WIDGET_H
- setGeometry : 위치 설정
setGeometry(가로, 세로, 넓이, 높이)
- QCheckBox : 여러 항목을 선택할 수 있는 GUI 인터페이스를 제공
QCheckBox(체크박스 항목, 부모 클래스)
- QButtonGroup : 체크박스를 그룹으로 분리
QButtonGroup(부모 클래스)
- addButton : 체크박스를 그룹에 포함시킴
- setExclusive : (원래 체크박스의 성질은 다중 선택 가능하지만) 단일 항목만 선택 가능하도록 체크 박스의 성질을 변경
- connect
(Signal이 발생하는 곳 , 발생Signal , Slot이 발생하는 곳, 발생Slot)
[widget.cpp]

#include "widget.h"

Widget::Widget(QWidget *parent) : QWidget(parent)
{
    QString str1[3] = {"Game", "Office", "Develop"};
    QString str2[3] = {"P&rogramming", "Q&t", "O&S"};

    int xpos = 30;  // 가로 길이
    int ypos = 30;  // 세로 길이

    chk_group[0] = new QButtonGroup(this);
    chk_group[1] = new QButtonGroup(this);

    for(int i = 0; i < 3; i++) {
        exclusive[i] = new QCheckBox(str1[i], this);
        exclusive[i]->setGeometry(xpos, ypos, 100, 30);
        chk_group[0]->addButton(exclusive[i]);

        non_exclusive[i] = new QCheckBox(str2[i], this);
        non_exclusive[i]->setGeometry(xpos + 120, ypos, 100, 30);
        chk_group[1]->addButton(non_exclusive[i]);

        // exclusive[i]를 클릭하면, 해당 클래스가 가지고 있는 시그널인 chkChanged()을 발생시킴
        connect(exclusive[i], SIGNAL(clicked()), this, SLOT(chkChanged()));
        ypos += 40;  // 한 줄 출력하고, 세로 길이 40 띄우기
    }
    chk_group[0]->setExclusive(false);  // 다중 선택 가능
    chk_group[1]->setExclusive(true);   // 다중 선택 불가능
}

Widget::~Widget()
{

}
결과 이미지

👩💻 기록 및 복습을 위함