GridLayout 배치 규칙
GridLayout은 행과 열로 구성된 테이블 화면을 만드는 레이아웃 클래스다.
LinearLayout처럼 orientation처럼 속성으로 가로나 세로 방향으로 뷰를 나열하는데, LinearLayout과 다르게 줄바꿈을 자동으로 해준다.
- orientation: 방향 설정
- rowCount: 세로로 나열할 뷰 개수
- columnCount: 가로로 나열할 뷰 개수
예시
<GridLayout xmlns:android="http://schemas.android.com/apk/res/android"
    android:layout_width="match_parent"
    android:layout_height="match_parent"
    android:rowCount="3"
    android:orientation="vertical">

    <Button android:text="A" />

    <Button android:text="B" />

    <Button android:text="C" />

    <Button android:text="D" />

    <Button android:text="E" />
</GridLayout>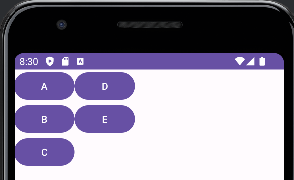
행의 개수를 3개로 설정하고, 세로로 배치하였다.
필요시 horizontal, columnCount로 설정할 수도 있다.
GridLayout 속성
특정 뷰의 위치 조정하기
GridLayout으로 뷰를 배치하면 추가한 순서대로 배치된다.
layout_row, layout_column 속성을 이용하면 특정 뷰의 위치를 조정할 수 있다.
- layout_row: 뷰가 위치하는 세로 방향 인덱스
- layout_column: 뷰가 위치하는 가로 방향 인덱스
<GridLayout xmlns:android="http://schemas.android.com/apk/res/android"
    android:layout_width="match_parent"
    android:layout_height="match_parent"
    android:orientation="horizontal"
    android:columnCount="3">

    <Button android:text="A" />

    <Button android:text="B" />

    <Button
        android:layout_row="1"
        android:layout_column="1"
        android:text="C" />

    <Button android:text="D" />

    <Button android:text="E" />
</GridLayout>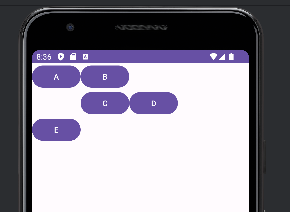
android:layout_row="1": 이는 버튼 C를 두 번째 행(인덱스로는 1)에 위치시킨다.android:layout_column="1": 이는 버튼 C를 두 번째 열(인덱스로는 1)에 위치시킨다.
헷갈림 주의) C를 해당 열의 1번째 인덱스(즉, 0번째가 아닌 1번째), 해당 열의 1번째 인덱스(즉, 0번째가 아닌 1번째)에 위치하는 것이 아니라, 그냥 1번째 행과 열에 위치시키는 것이다.
특정 뷰의 크기 확장하기
<GridLayout xmlns:android="http://schemas.android.com/apk/res/android"
    android:layout_width="match_parent"
    android:layout_height="match_parent"
    android:columnCount="3"
    android:orientation="horizontal">

    <Button android:text="A" />

    <Button android:text="HELLOWORLD HELLOWORLD" />

    <Button android:text="C" />

    <Button android:text="D" />

    <Button
        android:layout_gravity="fill_horizontal"
        android:text="E" />

    <Button android:text="F" />
</GridLayout>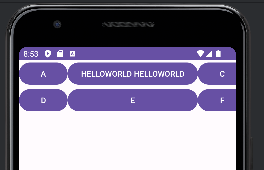
- B에다가 텍스트를 "HELLOWORLD HELLOWORLD"를 넣어서 B의 가로크기가 엄청 커졌다.
- B의 가로크기를 E에다가도 적용하려면
android:layout_gravity="fill_horizontal"를 적용하면 된다.
열이나 행 병합하기
어떤 뷰가 테이블에서 여러 칸을 차지하게 설정할 수도 있다.
- layout_columnSpan: 가로로 열 병합
- layout_rowSpan: 세로로 행 병합
<GridLayout xmlns:android="http://schemas.android.com/apk/res/android"
    android:layout_width="match_parent"
    android:layout_height="match_parent"
    android:columnCount="3"
    android:orientation="horizontal">

    <Button
        android:layout_rowSpan="2"
        android:layout_columnSpan="2"
        android:layout_gravity="fill"
        android:text="A" />

    <Button android:text="B" />

    <Button android:text="C" />

    <Button android:text="D" />

    <Button android:text="E" />

    <Button android:text="F" />
</GridLayout>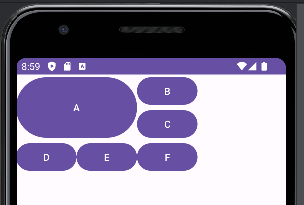
A 버튼에 layout_columnSpan과 layout_rowSpan을 모두 2로 설정했다.
그러면 가로로 2칸, 세로로 2칸을 병합하므로 A 버튼을 4칸을 차지한다.
cf. TableLayout
TableLayout도 마찬가지로 뷰를 테이블 구조로 나타내는 레이아웃이다.
하지만 tableLayout은 불편해서 자주 사용하지는 않는다.
정리
GridLayout 배치 규칙
GridLayout은 행과 열로 구성된 레이아웃이다.orientation으로 방향을 설정한다.rowCount로 세로 행 개수를 설정한다.columnCount로 가로 열 개수를 설정한다.
특정 뷰의 위치 조정하기
layout_row로 뷰의 세로 위치를 설정한다.layout_column로 뷰의 가로 위치를 설정한다.
특정 뷰의 크기 확장하기
layout_gravity속성으로 뷰의 크기를 확장할 수 있다.
열이나 행 병합하기
layout_columnSpan으로 열을 병합한다.layout_rowSpan으로 행을 병합한다.

화려한 외면이 아닌 단단한 내면