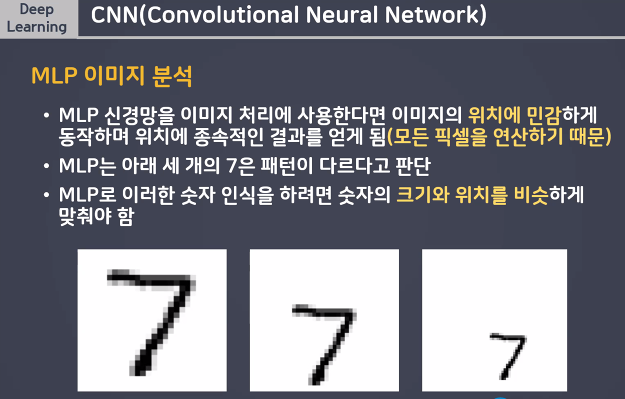
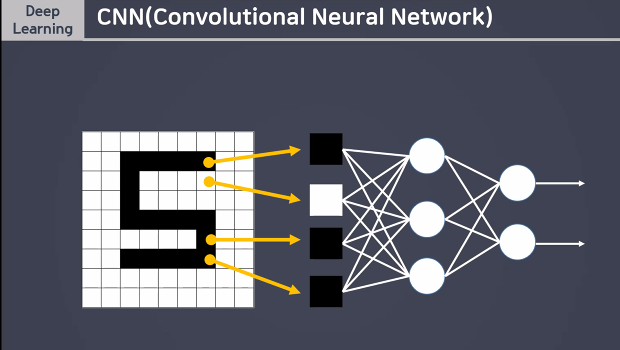
MLP 이미지분석
- 여러개의층(퍼셉트론 다발)으로 구성된 딥러닝 몽델
- 선형모델 여러개가 연결되어있는 구조
- 머신러닝과 비교
- 딥러닝은 모델을 직접 구현한다
- 여러번 학습해서 최적의 결과를 출력한다
좋은 결과 이라면 멈춰 early stopping
- 단점:
- 손글씨, 보스턴집값 이미지를 잘 예측하지 못함 > 다른 모델 사용
- 모델을 직접 구현한다 > 나중에되면 불러와서 사용

Library 불러오기
import numpy as np
import pandas as pd
import matplotlib.pyplot as plt
from tensorflow.keras import Sequential
from tensorflow.keras.layers import Dense, InputLayer, Flatten
from tensorflow.keras.optimizers import SGD, Adam
from tensorflow.keras.datasets import mnist
from tensorflow.keras.callbacks import ModelCheckpoint, EarlyStopping
import PIL.Image as pimg
from tensorflow.keras.models import load_model
데이터 불러오기
(x_train, y_train),(x_test, y_test) = mnist.load_data()
print(x_train.shape, y_train.shape)
print(x_test.shape, y_test.shape)
데이터 전처리
find best model
best_model = '/content/drive/MyDrive/Colab Notebooks/Deep Learning/data/best_model/bm_{epoch:02d}_{val_accuracy:0.2f}.hdf5'
bm = ModelCheckpoint(filepath=best_model,
                     verbose = 1,

                     save_best_only = True,

                     monitor = 'val_accuracy')
es = EarlyStopping(monitor = 'val_accuracy', #학습을 중단할 기준겂 설정
verbose = 1 ,# 로그출력
patience = 10) # 모델성능개선을 기다리는 최대 횟수신경망 설계
# 1. 모델링 설계 (model 1, model 2, model 3)
# 중간층 (총 5개위 층, units = 64,128,256,128,64)
model3 = Sequential()
model3.add (InputLayer(input_shape=(28,28)))
model3.add(Flatten())
model3.add(Dense(units = 64, activation ='relu'))
model3.add(Dense(units = 128, activation ='relu'))
model3.add(Dense(units = 256, activation ='relu'))
model3.add(Dense(units = 128, activation ='relu'))
model3.add(Dense(units = 64, activation ='relu'))
model3.add(Dense(units  =10, activation = 'softmax'))
# 2. 학습방법 및 평가방법 설정
model3.compile(loss = 'sparse_categorical_crossentropy',
              optimizer = 'Adam', metrics = ['accuracy'])
# 3. 학습 (h1, h2, h3)
h3 = model3.fit(x_train,y_train, validation_split=0.2, epochs = 1000,batch_size = 128, callbacks = [bm,es])
# 4 . 평가
model3.evaluate(x_test, y_test)
Test
# 직접작성한 손글씨 > 이미지 데이터
# 파이쎤에서 이미지응 처리하는
import PIL.Image as pimg
# 이미자 불러오기
img = pimg.open('/content/drive/MyDrive/Colab Notebooks/Deep Learning/data/손글씨/9.png')
plt.imshow(img,cmap = 'gray')
# 전처리
# 이미지 컬러이미지 > 흑백이미지로 변경
img = img.convert('L')
# 이미지데이터를 2배열로 변환
img = np.array(img)
img.shape# 완본 이미자에 했던 전처리를 그대로 해주어야한다
# 2차원 -> 1 차원 (flatten)
testimg = img.reshape(1,28,28,1)
testimg.astype('float32')/255
testimg.shapefrom tensorflow.keras.models import load_model
best_model = load_model('/content/drive/MyDrive/Colab Notebooks/Deep Learning/data/best_model/bm_34_0.97.hdf5')best_model.predict(testimg)# 예측 결과
best_model.predict(testimg).argmax()
열심히 공부합시다! The best is yet to come! 💜
잘 읽었습니다
https://ai-ethics.tistory.com/3