과제
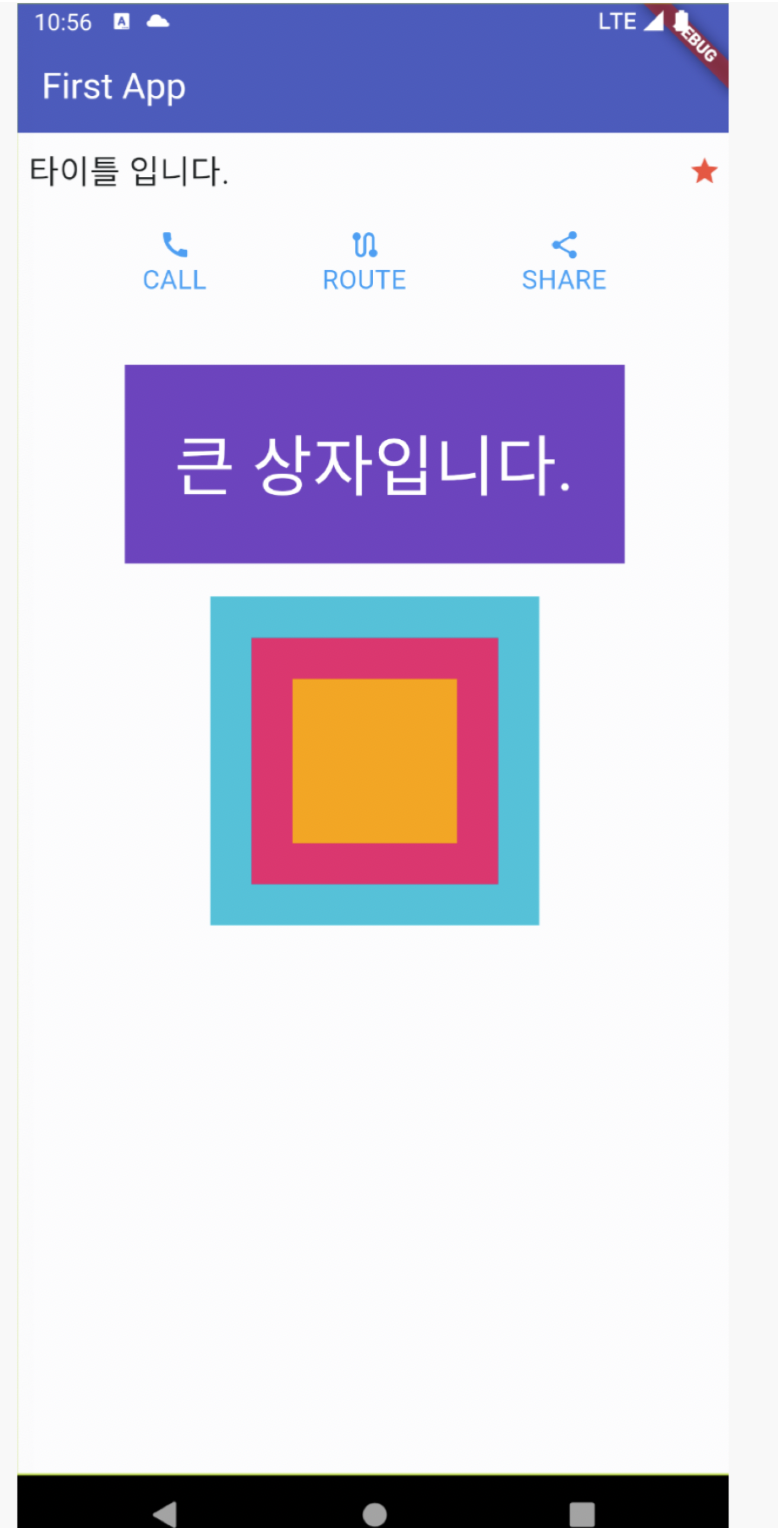
- 만들 예시 화면
내가 작성한 코드
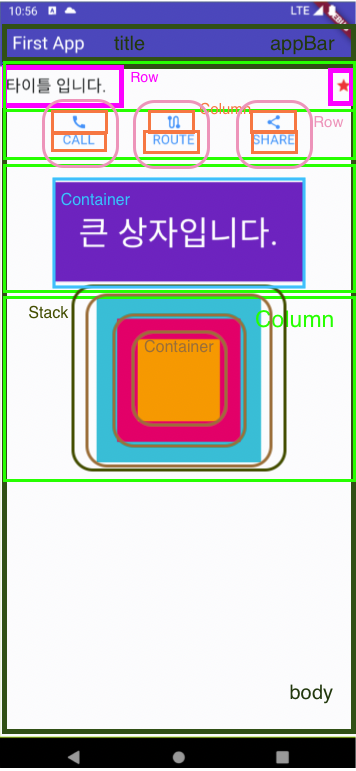
계획
- 예시화면에 네모 그리기
- 바깥 네모부터 하나하나 위젯으로
코드
import 'package:flutter/material.dart';
void main() {
runApp(const MyApp());
}
class MyApp extends StatelessWidget {
const MyApp({super.key});
Widget build(BuildContext context) {
return MaterialApp(
home: Scaffold(
appBar: AppBar(
title: Text('First App'),
backgroundColor: Colors.indigo,
),
body: Column(
children: [
Padding(
padding: const EdgeInsets.fromLTRB(10, 10, 10, 20),
child: Row(
mainAxisAlignment: MainAxisAlignment.spaceBetween,
children: [Text('타이틀 입니다.',
style: TextStyle(fontSize: 20,
fontWeight: FontWeight.bold,
color: Colors.black)),
Icon(Icons.star, color: Colors.red,)],
),
),
Row(
mainAxisAlignment: MainAxisAlignment.spaceEvenly,
children: [Column(
children: [
Icon(Icons.call,color: Colors.blue,size: 30),
Text('Call',style: TextStyle(color:Colors.blue,fontSize: 20 ))
],
),
Column(
children: [
Icon(Icons.route,color: Colors.blue,size: 30),
Text('Route',style: TextStyle(color:Colors.blue,fontSize: 20 ))
],
),
Column(
children: [
Icon(Icons.share,color: Colors.blue,size: 30),
Text('Share',style: TextStyle(color:Colors.blue,fontSize: 20 )),
],
)],
),
Padding(
padding: const EdgeInsets.all(20.0),
child: Container(
padding: EdgeInsets.all(20),
color: Colors.deepPurple,
child:
Text('큰 상자입니다.',
style: TextStyle(color: Colors.white,
fontSize: 30,
fontWeight: FontWeight.w600)),
),
),
Stack(
alignment: Alignment.center,
children: [
Container(
width: 250,
height: 250,
color: Colors.cyan,
),
Container(
width: 200,
height: 200,
color: Colors.pink,
),
Container(
width: 150,
height: 150,
color: Colors.amber,
),
],)],
),
bottomNavigationBar: BottomAppBar(child:
Container(
color: Colors.indigo,
height: 60,
)),
),
);
}
}만든 화면
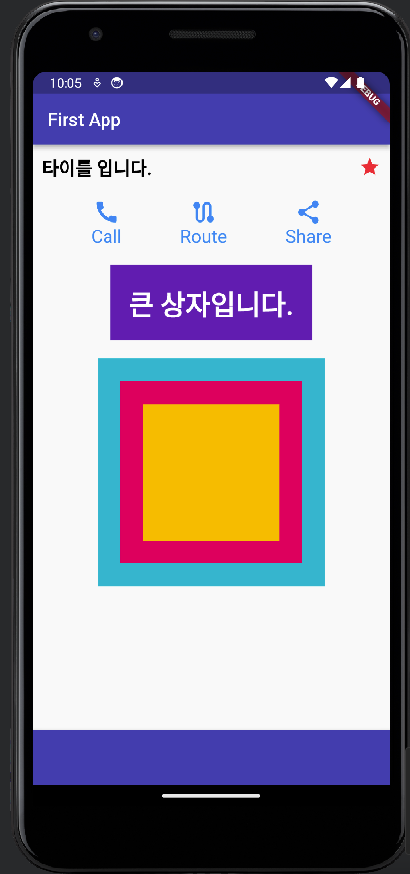
선생님이 쓰신 코드
- 전체 코드가 아닌 '큰 상자입니다' 박스 이전까지 만드신 코드
import 'package:flutter/material.dart';
void main() {
runApp(const MyApp());
}
class MyApp extends StatelessWidget {
const MyApp({super.key});
Widget build(BuildContext context) {
return MaterialApp(
title: 'Flutter Demo',
theme: ThemeData(
colorScheme: ColorScheme.fromSeed(seedColor: Colors.indigo),
useMaterial3: true,
),
home: const MyPage());
}
}
class MyPage extends StatelessWidget {
const MyPage({super.key});
Widget build(BuildContext context) {
return Scaffold(
appBar: AppBar(
title: const Text(
"First App",
style: TextStyle(
color: Colors.white,
),
),
backgroundColor: Colors.indigo,
),
body: const Padding(
padding: EdgeInsets.all(20),
child: Column(
children: [
Row(
mainAxisAlignment: MainAxisAlignment.spaceBetween,
mainAxisSize: MainAxisSize.max,
children: [
Text(
"타이틀 입니다.",
style: TextStyle(
color: Colors.black,
fontSize: 20,
fontWeight: FontWeight.bold,
),
),
Icon(
Icons.star,
color: Colors.red,
),
],
),
SizedBox(
height: 30,
),
Row(
mainAxisAlignment: MainAxisAlignment.spaceEvenly,
children: [
IconText(iconText: "전화1", icon: Icons.call,),
IconText(iconText: "라우트1", icon: Icons.route,),
IconText(iconText: "공유1", icon: Icons.share,),
],
),
],
),
),
);
}
}
class IconText extends StatelessWidget {
final String iconText;
final IconData? icon;
const IconText({
required this.iconText,
this.icon,
super.key
});
Widget build(BuildContext context) {
return Column(
children: [
Icon(
icon ?? Icons.add,
color: Colors.blue,
size: 40,
),
Text(
iconText,
style: const TextStyle(
color: Colors.blue,
fontSize: 30
),
),
],
);
}
}
💡 겹치는 코드는 재사용 가능한 위젯으로 만들기!!!
함께 일하는 프론트엔드 개발자 이성은입니다🐥
글 잘 봤습니다.